-
Vue和综合案例
1、Vue 高级使用
1.1、自定义组件
-
学完了 Element 组件后,我们会发现组件其实就是自定义的标签。例如<el-button>就是对<button>的封装
-
本质上,组件是带有一个名字且可复用的 Vue 实例,我们完全可以自己定义
-
定义格式
Vue.component(组件名称, { props:组件的属性, data: 组件的数据函数, template: 组件解析的标签模板 })- 1
- 2
- 3
- 4
- 5
-
代码实现
<!DOCTYPE html> <html lang="en"> <head> <meta charset="UTF-8"> <meta name="viewport" content="width=device-width, initial-scale=1.0"> <title>自定义组件</title> <script src="vue/vue.js"></script> </head> <body> <div id="div"> <my-button></my-button> </div> </body> <script> Vue.component("my-button",{ // 属性 props:["style"], // 数据函数 data: function(){ return{ msg:"我的按钮" } }, //解析标签模板 template:"<button style='color:red'>{{msg}}</button>" }); new Vue({ el:"#div" }); </script> </html>- 1
- 2
- 3
- 4
- 5
- 6
- 7
- 8
- 9
- 10
- 11
- 12
- 13
- 14
- 15
- 16
- 17
- 18
- 19
- 20
- 21
- 22
- 23
- 24
- 25
- 26
- 27
- 28
- 29
- 30
- 31
- 32
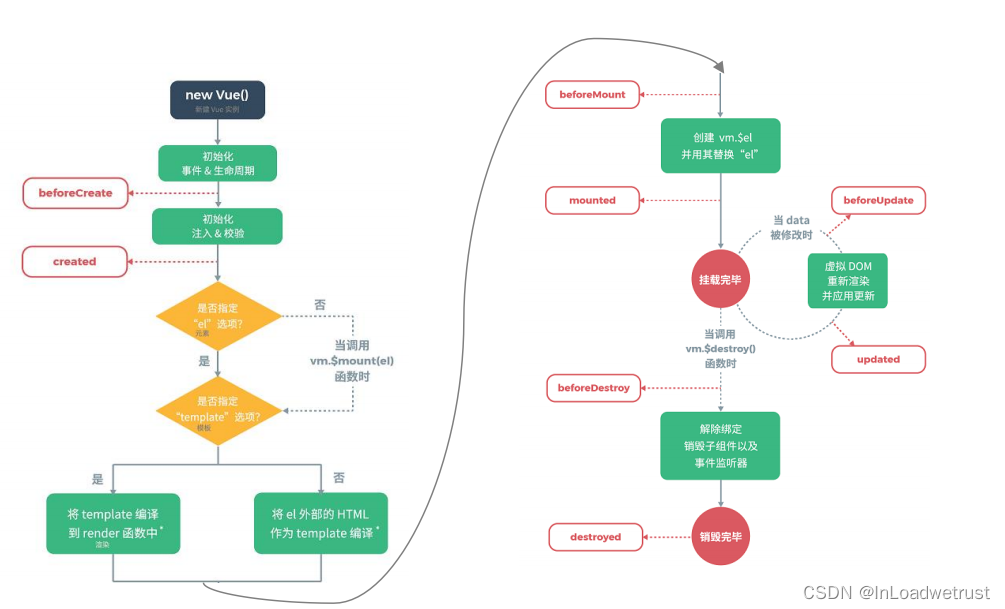
1.2、Vue的生命周期
-
生命周期

-
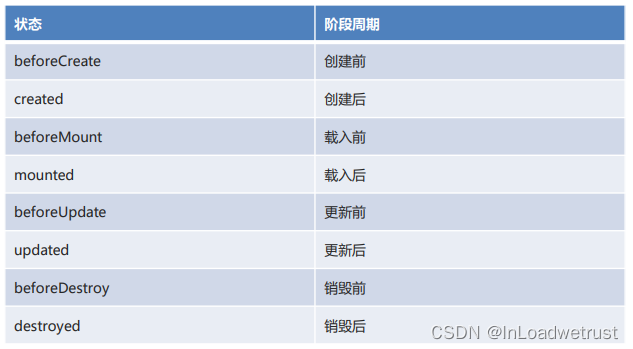
生命周期的八个阶段

-
代码实现
<!DOCTYPE html> <html lang="en"> <head> <meta charset="UTF-8"> <meta name="viewport" content="width=device-width, initial-scale=1.0"> <title>生命周期</title> <script src="vue/vue.js"></script> </head> <body> <div id="app"> {{message}} </div> </body> <script> let vm = new Vue({ el: '#app', data: { message: 'Vue的生命周期' }, beforeCreate: function() { console.group('------beforeCreate创建前状态------'); console.log("%c%s", "color:red", "el : " + this.$el); //undefined console.log("%c%s", "color:red", "data : " + this.$data); //undefined console.log("%c%s", "color:red", "message: " + this.message);//undefined }, created: function() { console.group('------created创建完毕状态------'); console.log("%c%s", "color:red", "el : " + this.$el); //undefined console.log("%c%s", "color:red", "data : " + this.$data); //已被初始化 console.log("%c%s", "color:red", "message: " + this.message); //已被初始化 }, beforeMount: function() { console.group('------beforeMount挂载前状态------'); console.log("%c%s", "color:red", "el : " + (this.$el)); //已被初始化 console.log(this.$el); console.log("%c%s", "color:red", "data : " + this.$data); //已被初始化 console.log("%c%s", "color:red", "message: " + this.message); //已被初始化 }, mounted: function() { console.group('------mounted 挂载结束状态------'); console.log("%c%s", "color:red", "el : " + this.$el); //已被初始化 console.log(this.$el); console.log("%c%s", "color:red", "data : " + this.$data); //已被初始化 console.log("%c%s", "color:red", "message: " + this.message); //已被初始化 }, beforeUpdate: function() { console.group('beforeUpdate 更新前状态===============》'); let dom = document.getElementById("app").innerHTML; console.log(dom); console.log("%c%s", "color:red", "el : " + this.$el); console.log(this.$el); console.log("%c%s", "color:red", "data : " + this.$data); console.log("%c%s", "color:red", "message: " + this.message); }, updated: function() { console.group('updated 更新完成状态===============》'); let dom = document.getElementById("app").innerHTML; console.log(dom); console.log("%c%s", "color:red", "el : " + this.$el); console.log(this.$el); console.log("%c%s", "color:red", "data : " + this.$data); console.log("%c%s", "color:red", "message: " + this.message); }, beforeDestroy: function() { console.group('beforeDestroy 销毁前状态===============》'); console.log("%c%s", "color:red", "el : " + this.$el); console.log(this.$el); console.log("%c%s", "color:red", "data : " + this.$data); console.log("%c%s", "color:red", "message: " + this.message); }, destroyed: function() { console.group('destroyed 销毁完成状态===============》'); console.log("%c%s", "color:red", "el : " + this.$el); console.log(this.$el); console.log("%c%s", "color:red", "data : " + this.$data); console.log("%c%s", "color:red", "message: " + this.message); } }); // 销毁Vue对象 //vm.$destroy(); //vm.message = "hehe"; // 销毁后 Vue 实例会解绑所有内容 // 设置data中message数据值 vm.message = "good..."; </script> </html>- 1
- 2
- 3
- 4
- 5
- 6
- 7
- 8
- 9
- 10
- 11
- 12
- 13
- 14
- 15
- 16
- 17
- 18
- 19
- 20
- 21
- 22
- 23
- 24
- 25
- 26
- 27
- 28
- 29
- 30
- 31
- 32
- 33
- 34
- 35
- 36
- 37
- 38
- 39
- 40
- 41
- 42
- 43
- 44
- 45
- 46
- 47
- 48
- 49
- 50
- 51
- 52
- 53
- 54
- 55
- 56
- 57
- 58
- 59
- 60
- 61
- 62
- 63
- 64
- 65
- 66
- 67
- 68
- 69
- 70
- 71
- 72
- 73
- 74
- 75
- 76
- 77
- 78
- 79
- 80
- 81
- 82
- 83
- 84
- 85
- 86
- 87
- 88
1.3、Vue异步操作***
-
在Vue中发送异步请求,本质上还是AJAX。我们可以使用axios这个插件来简化操作!
-
使用步骤
1.引入axios核心js文件。
2.调用axios对象的方法来发起异步请求。
3.调用axios对象的方法来处理响应的数据。 -
axios常用方法

-
代码实现
- html代码
<!DOCTYPE html> <html lang="en"> <head> <meta charset="UTF-8"> <title>异步操作</title> <script src="js/vue.js"></script> <script src="js/axios-0.18.0.js"></script> </head> <body> <div id="div"> {{name}} <button @click="send()">发起请求</button> </div> </body> <script> new Vue({ el:"#div", data:{ name:"张三" }, methods:{ send(){ // GET方式请求 // axios.get("testServlet?name=" + this.name) // .then(resp => { // alert(resp.data); // }) // .catch(error => { // alert(error); // }) // POST方式请求 axios.post("testServlet","name="+this.name) .then(resp => { alert(resp.data); }) .catch(error => { alert(error); }) } } }); </script> </html>- 1
- 2
- 3
- 4
- 5
- 6
- 7
- 8
- 9
- 10
- 11
- 12
- 13
- 14
- 15
- 16
- 17
- 18
- 19
- 20
- 21
- 22
- 23
- 24
- 25
- 26
- 27
- 28
- 29
- 30
- 31
- 32
- 33
- 34
- 35
- 36
- 37
- 38
- 39
- 40
- 41
- 42
- 43
- 44
- java代码
package com.itheima; import javax.servlet.ServletException; import javax.servlet.annotation.WebServlet; import javax.servlet.http.HttpServlet; import javax.servlet.http.HttpServletRequest; import javax.servlet.http.HttpServletResponse; import java.io.IOException; @WebServlet("/testServlet") public class TestServlet extends HttpServlet { @Override protected void doGet(HttpServletRequest req, HttpServletResponse resp) throws ServletException, IOException { //设置请求和响应的编码 req.setCharacterEncoding("UTF-8"); resp.setContentType("text/html;charset=UTF-8"); //获取请求参数 String name = req.getParameter("name"); System.out.println(name); //响应客户端 resp.getWriter().write("请求成功"); } @Override protected void doPost(HttpServletRequest req, HttpServletResponse resp) throws ServletException, IOException { this.doGet(req,resp); } }- 1
- 2
- 3
- 4
- 5
- 6
- 7
- 8
- 9
- 10
- 11
- 12
- 13
- 14
- 15
- 16
- 17
- 18
- 19
- 20
- 21
- 22
- 23
- 24
- 25
- 26
- 27
- 28
- 29
1.4、小结
-
自定义组件:本质上,组件是带有一个名字且可复用的 Vue 实例,我们可以自己来定义。
Vue.component(组件名称, { props:组件的属性, data: 组件的数据函数, template: 组件解析的标签模板 })- 1
- 2
- 3
- 4
- 5
-
生命周期:核心八个阶段
beforeCreate:创建前
created:创建后
beforeMount:载入前
mounted:载入后
beforeUpdate:更新前
updated:更新后
beforeDestroy:销毁前
destroyed:销毁后 -
异步操作:通过 axios 插件来实现。

2、综合案例 学生管理系统***
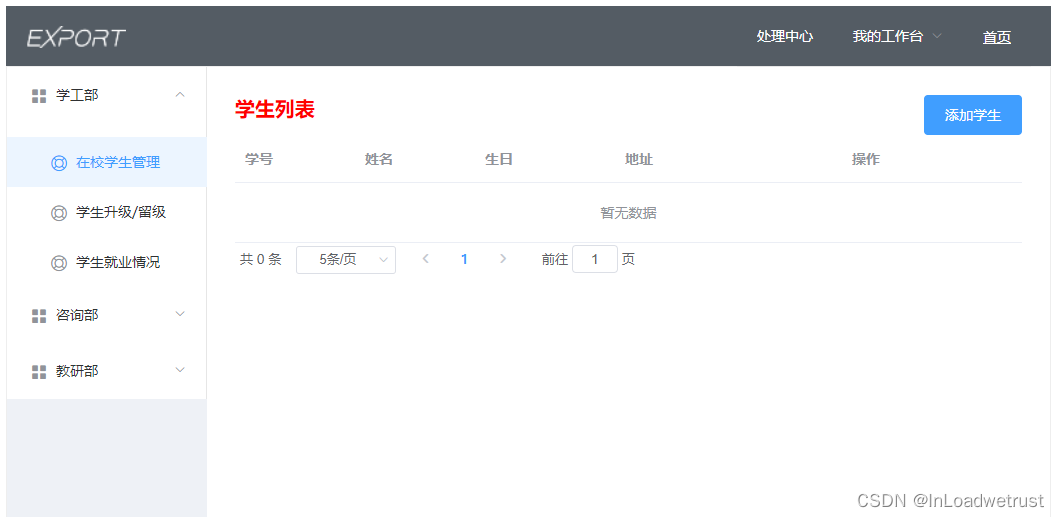
2.1、效果环境的介绍


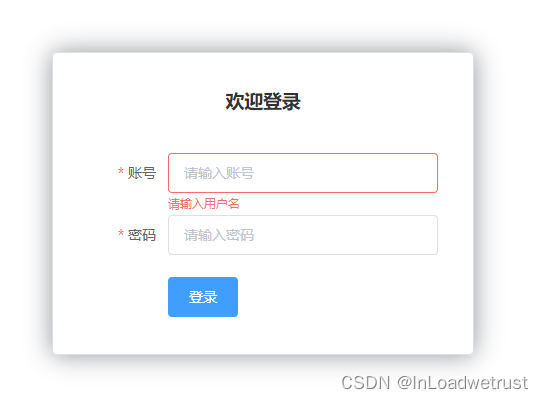
2.2、登录功能的实现
-
环境搭建
- 从当天的资料中解压《学生管理系统原始项目》,并导入。
-
代码实现
-
html代码
onSubmit(formName) { // 为表单绑定验证功能 this.$refs[formName].validate((valid) => { if (valid) { //请求服务器完成登录功能 axios.post("userServlet","username=" + this.form.username + "&password=" + this.form.password) .then(resp => { if(resp.data == true) { //登录成功,跳转到首页 location.href = "index.html"; }else { //登录失败,跳转到登录页面 alert("登录失败,请检查用户名和密码"); location.href = "login.html"; } }) } else { return false; } }); }- 1
- 2
- 3
- 4
- 5
- 6
- 7
- 8
- 9
- 10
- 11
- 12
- 13
- 14
- 15
- 16
- 17
- 18
- 19
- 20
- 21
-
java代码
- UserServlet.java
package com.itheima.controller; import com.itheima.bean.User; import com.itheima.service.UserService; import com.itheima.service.impl.UserServiceImpl; import javax.servlet.ServletException; import javax.servlet.annotation.WebServlet; import javax.servlet.http.HttpServlet; import javax.servlet.http.HttpServletRequest; import javax.servlet.http.HttpServletResponse; import java.io.IOException; import java.util.List; @WebServlet("/userServlet") public class UserServlet extends HttpServlet { private UserService service = new UserServiceImpl(); @Override protected void doGet(HttpServletRequest req, HttpServletResponse resp) throws ServletException, IOException { //设置请求和响应编码 req.setCharacterEncoding("UTF-8"); resp.setContentType("text/html;charset=UTF-8"); //1.获取请求参数 String username = req.getParameter("username"); String password = req.getParameter("password"); //2.封装User对象 User user = new User(username,password); //3.调用业务层的登录方法 List<User> list = service.login(user); //4.判断是否查询出结果 if(list.size() != 0) { //将用户名存入会话域当中 req.getSession().setAttribute("username",username); //响应给客户端true resp.getWriter().write("true"); }else { //响应给客户端false resp.getWriter().write("false"); } } @Override protected void doPost(HttpServletRequest req, HttpServletResponse resp) throws ServletException, IOException { doGet(req,resp); } }- 1
- 2
- 3
- 4
- 5
- 6
- 7
- 8
- 9
- 10
- 11
- 12
- 13
- 14
- 15
- 16
- 17
- 18
- 19
- 20
- 21
- 22
- 23
- 24
- 25
- 26
- 27
- 28
- 29
- 30
- 31
- 32
- 33
- 34
- 35
- 36
- 37
- 38
- 39
- 40
- 41
- 42
- 43
- 44
- 45
- 46
- 47
- 48
- 49
- 50
- UserService.java
package com.itheima.service; import com.itheima.bean.User; import java.util.List; /* 业务层约束接口 */ public interface UserService { /* 登录方法 */ public abstract List<User> login(User user); }- 1
- 2
- 3
- 4
- 5
- 6
- 7
- 8
- 9
- 10
- 11
- 12
- 13
- 14
- UserServiceImpl.java
package com.itheima.service.impl; import com.itheima.bean.User; import com.itheima.mapper.UserMapper; import com.itheima.service.UserService; import org.apache.ibatis.io.Resources; import org.apache.ibatis.session.SqlSession; import org.apache.ibatis.session.SqlSessionFactory; import org.apache.ibatis.session.SqlSessionFactoryBuilder; import java.io.IOException; import java.io.InputStream; import java.util.List; public class UserServiceImpl implements UserService { @Override public List<User> login(User user) { InputStream is = null; SqlSession sqlSession = null; List<User> list = null; try{ //1.加载核心配置文件 is = Resources.getResourceAsStream("MyBatisConfig.xml"); //2.获取SqlSession工厂对象 SqlSessionFactory sqlSessionFactory = new SqlSessionFactoryBuilder().build(is); //3.通过SqlSession工厂对象获取SqlSession对象 sqlSession = sqlSessionFactory.openSession(true); //4.获取UserMapper接口的实现类对象 UserMapper mapper = sqlSession.getMapper(UserMapper.class); //5.调用实现类对象的登录方法 list = mapper.login(user); }catch (Exception e) { e.printStackTrace(); } finally { //6.释放资源 if(sqlSession != null) { sqlSession.close(); } if(is != null) { try { is.close(); } catch (IOException e) { e.printStackTrace(); } } } //7.返回结果到控制层 return list; } }- 1
- 2
- 3
- 4
- 5
- 6
- 7
- 8
- 9
- 10
- 11
- 12
- 13
- 14
- 15
- 16
- 17
- 18
- 19
- 20
- 21
- 22
- 23
- 24
- 25
- 26
- 27
- 28
- 29
- 30
- 31
- 32
- 33
- 34
- 35
- 36
- 37
- 38
- 39
- 40
- 41
- 42
- 43
- 44
- 45
- 46
- 47
- 48
- 49
- 50
- 51
- 52
- 53
- 54
- 55
- UserMapper.java
package com.itheima.mapper; import com.itheima.bean.User; import org.apache.ibatis.annotations.Select; import java.util.List; public interface UserMapper { /* 登录方法 */ @Select("SELECT * FROM user WHERE username=#{username} AND password=#{password}") public abstract List<User> login(User user); }- 1
- 2
- 3
- 4
- 5
- 6
- 7
- 8
- 9
- 10
- 11
- 12
- 13
- 14
-
2.3、分页查询功能的实现
-
代码实现
-
html代码
<script> new Vue({ el:"#div", data:{ dialogTableVisible4add: false, //添加窗口显示状态 dialogTableVisible4edit: false, //编辑窗口显示状态 formData:{},//添加表单的数据 editFormData: {},//编辑表单的数据 tableData:[],//表格数据 pagination: { currentPage: 1, //当前页 pageSize: 5, //每页显示条数 total: 0 //总条数 }, rules: { number: [ {required: true, message: '请输入学号', trigger: 'blur'}, {min: 2, max: 10, message: '长度在 2 到 10 个字符', trigger: 'blur'} ], name: [ {required: true, message: '请输入姓名', trigger: 'blur'}, {min: 2, max: 10, message: '长度在 2 到 10 个字符', trigger: 'blur'} ], birthday: [ {required: true, message: '请选择日期', trigger: 'change'} ], address: [ {required: true, message: '请输入地址', trigger: 'blur'}, {min: 2, max: 200, message: '长度在 2 到 200 个字符', trigger: 'blur'} ], } }, methods:{ //分页查询功能 selectByPage(){ axios.post("studentServlet","method=selectByPage¤tPage=" + this.pagination.currentPage + "&pageSize=" + this.pagination.pageSize) .then(resp => { //将查询出的数据赋值tableData this.tableData = resp.data.list; //设置分页参数 //当前页 this.pagination.currentPage = resp.data.pageNum; //总条数 this.pagination.total = resp.data.total; }) }, //改变每页条数时执行的函数 handleSizeChange(pageSize) { //修改分页查询的参数 this.pagination.pageSize = pageSize; //重新执行查询 this.selectByPage(); }, //改变页码时执行的函数 handleCurrentChange(pageNum) { //修改分页查询的参数 this.pagination.currentPage = pageNum; //重新执行查询 this.selectByPage(); }, showAddStu() { //弹出窗口 this.dialogTableVisible4add = true; }, resetForm(addForm) { //双向绑定,输入的数据都赋值给了formData, 清空formData数据 this.formData = {}; //清除表单的校验数据 this.$refs[addForm].resetFields(); }, showEditStu(row) { //1. 弹出窗口 this.dialogTableVisible4edit = true; //2. 显示表单数据 this.editFormData = { number:row.number, name:row.name, birthday:row.birthday, address:row.address, } } }, mounted(){ //调用分页查询功能 this.selectByPage(); } }); </script>- 1
- 2
- 3
- 4
- 5
- 6
- 7
- 8
- 9
- 10
- 11
- 12
- 13
- 14
- 15
- 16
- 17
- 18
- 19
- 20
- 21
- 22
- 23
- 24
- 25
- 26
- 27
- 28
- 29
- 30
- 31
- 32
- 33
- 34
- 35
- 36
- 37
- 38
- 39
- 40
- 41
- 42
- 43
- 44
- 45
- 46
- 47
- 48
- 49
- 50
- 51
- 52
- 53
- 54
- 55
- 56
- 57
- 58
- 59
- 60
- 61
- 62
- 63
- 64
- 65
- 66
- 67
- 68
- 69
- 70
- 71
- 72
- 73
- 74
- 75
- 76
- 77
- 78
- 79
- 80
- 81
- 82
- 83
- 84
- 85
- 86
- 87
- 88
- 89
-
java代码
- 1、创建StudentServlet.java
package com.itheima.controller; import com.fasterxml.jackson.databind.ObjectMapper; import com.github.pagehelper.Page; import com.github.pagehelper.PageInfo; import com.itheima.bean.Student; import com.itheima.service.StudentService; import com.itheima.service.impl.StudentServiceImpl; import org.apache.commons.beanutils.BeanUtils; import org.apache.commons.beanutils.ConvertUtils; import org.apache.commons.beanutils.Converter; import javax.servlet.ServletException; import javax.servlet.annotation.WebServlet; import javax.servlet.http.HttpServlet; import javax.servlet.http.HttpServletRequest; import javax.servlet.http.HttpServletResponse; import java.io.IOException; import java.text.ParseException; import java.text.SimpleDateFormat; import java.util.Date; import java.util.Map; @WebServlet("/studentServlet") public class StudentServlet extends HttpServlet { private StudentService service = new StudentServiceImpl(); @Override protected void doGet(HttpServletRequest req, HttpServletResponse resp) throws ServletException, IOException { //设置请求和响应编码 req.setCharacterEncoding("UTF-8"); resp.setContentType("text/html;charset=UTF-8"); //1.获取方法名 String method = req.getParameter("method"); if(method.equals("selectByPage")) { //分页查询功能 selectByPage(req,resp); } } /* 分页查询功能 */ private void selectByPage(HttpServletRequest req, HttpServletResponse resp) { //获取请求参数 String currentPage = req.getParameter("currentPage"); String pageSize = req.getParameter("pageSize"); //调用业务层的查询方法 Page page = service.selectByPage(Integer.parseInt(currentPage), Integer.parseInt(pageSize)); //封装PageInfo PageInfo info = new PageInfo(page); //将info转成json,响应给客户端 try { String json = new ObjectMapper().writeValueAsString(info); resp.getWriter().write(json); } catch (Exception e) { e.printStackTrace(); } } @Override protected void doPost(HttpServletRequest req, HttpServletResponse resp) throws ServletException, IOException { doGet(req,resp); } }- 1
- 2
- 3
- 4
- 5
- 6
- 7
- 8
- 9
- 10
- 11
- 12
- 13
- 14
- 15
- 16
- 17
- 18
- 19
- 20
- 21
- 22
- 23
- 24
- 25
- 26
- 27
- 28
- 29
- 30
- 31
- 32
- 33
- 34
- 35
- 36
- 37
- 38
- 39
- 40
- 41
- 42
- 43
- 44
- 45
- 46
- 47
- 48
- 49
- 50
- 51
- 52
- 53
- 54
- 55
- 56
- 57
- 58
- 59
- 60
- 61
- 62
- 63
- 64
- 65
- 66
- 67
- 68
- 2、创建StudentService.java
package com.itheima.service; import com.github.pagehelper.Page; import com.itheima.bean.Student; /* 学生业务层接口 */ public interface StudentService { /* 分页查询方法 */ public abstract Page selectByPage(Integer currentPage, Integer pageSize); }- 1
- 2
- 3
- 4
- 5
- 6
- 7
- 8
- 9
- 10
- 11
- 12
- 13
- 14
- 3、创建StudentServiceImpl.java
package com.itheima.service.impl; import com.github.pagehelper.Page; import com.github.pagehelper.PageHelper; import com.itheima.bean.Student; import com.itheima.mapper.StudentMapper; import com.itheima.service.StudentService; import org.apache.ibatis.io.Resources; import org.apache.ibatis.session.SqlSession; import org.apache.ibatis.session.SqlSessionFactory; import org.apache.ibatis.session.SqlSessionFactoryBuilder; import java.io.IOException; import java.io.InputStream; /* 学生业务层实现类 */ public class StudentServiceImpl implements StudentService { /* 分页查询功能 */ @Override public Page selectByPage(Integer currentPage, Integer pageSize) { InputStream is = null; SqlSession sqlSession = null; Page page = null; try{ //1.加载核心配置文件 is = Resources.getResourceAsStream("MyBatisConfig.xml"); //2.获取SqlSession工厂对象 SqlSessionFactory sqlSessionFactory = new SqlSessionFactoryBuilder().build(is); //3.通过SqlSession工厂对象获取SqlSession对象 sqlSession = sqlSessionFactory.openSession(true); //4.获取StudentMapper接口实现类对象 StudentMapper mapper = sqlSession.getMapper(StudentMapper.class); //5.设置分页参数 page = PageHelper.startPage(currentPage,pageSize); //6.调用实现类对象查询全部方法 mapper.selectAll(); } catch (Exception e) { e.printStackTrace(); } finally { //7.释放资源 if(sqlSession != null) { sqlSession.close(); } if(is != null) { try { is.close(); } catch (IOException e) { e.printStackTrace(); } } } //8.返回结果到控制层 return page; } }- 1
- 2
- 3
- 4
- 5
- 6
- 7
- 8
- 9
- 10
- 11
- 12
- 13
- 14
- 15
- 16
- 17
- 18
- 19
- 20
- 21
- 22
- 23
- 24
- 25
- 26
- 27
- 28
- 29
- 30
- 31
- 32
- 33
- 34
- 35
- 36
- 37
- 38
- 39
- 40
- 41
- 42
- 43
- 44
- 45
- 46
- 47
- 48
- 49
- 50
- 51
- 52
- 53
- 54
- 55
- 56
- 57
- 58
- 59
- 60
- 61
- 4、创建StudentMapper.java
package com.itheima.mapper; import com.itheima.bean.Student; import org.apache.ibatis.annotations.Delete; import org.apache.ibatis.annotations.Insert; import org.apache.ibatis.annotations.Select; import org.apache.ibatis.annotations.Update; import java.util.List; /* 学生持久层接口 */ public interface StudentMapper { /* 查询全部方法 */ @Select("SELECT * FROM student") public abstract List<Student> selectAll(); }- 1
- 2
- 3
- 4
- 5
- 6
- 7
- 8
- 9
- 10
- 11
- 12
- 13
- 14
- 15
- 16
- 17
- 18
- 19
- 20
- 21
-
2.4、添加功能的实现
-
代码实现
-
html代码
在stuList.html中增加“添加功能”代码
//添加学生功能 addStu(){ let param = "method=addStu&number=" + this.formData.number + "&name=" + this.formData.name + "&birthday=" + this.formData.birthday + "&address=" + this.formData.address + "¤tPage=" + this.pagination.currentPage + "&pageSize=" + this.pagination.pageSize; axios.post("studentServlet",param) .then(resp => { //将查询出的数据赋值tableData this.tableData = resp.data.list; //设置分页参数 //当前页 this.pagination.currentPage = resp.data.pageNum; //总条数 this.pagination.total = resp.data.total; }) //关闭添加窗口 this.dialogTableVisible4add = false; }- 1
- 2
- 3
- 4
- 5
- 6
- 7
- 8
- 9
- 10
- 11
- 12
- 13
- 14
- 15
- 16
- 17
- 18
-
java代码
- 1、在StudentServlet.java中增加“添加功能”代码-addStu
/* *1、直接复制会报错 *2、需要将此行代码需要添加到“doGet”方法中 *3、增加“addStu”方法名的判断 */ else if(method.equals("addStu")) { //添加数据功能 addStu(req,resp); } ================================================================================== /* 添加数据功能 */ private void addStu(HttpServletRequest req, HttpServletResponse resp) { //获取请求参数 Map<String, String[]> map = req.getParameterMap(); String currentPage = req.getParameter("currentPage"); String pageSize = req.getParameter("pageSize"); //封装Student对象 Student stu = new Student(); //注册日期转换器方法 dateConvert(); try { BeanUtils.populate(stu,map); } catch (Exception e) { e.printStackTrace(); } //调用业务层的添加方法 service.addStu(stu); //重定向到分页查询功能 try { resp.sendRedirect(req.getContextPath() + "/studentServlet?method=selectByPage¤tPage=" + currentPage + "&pageSize=" + pageSize); } catch (IOException e) { e.printStackTrace(); } } /* 日期转换 */ private void dateConvert() { ConvertUtils.register(new Converter() { public Object convert(Class type, Object value) { SimpleDateFormat simpleDateFormat = new SimpleDateFormat("yyyy-MM-dd"); try { return simpleDateFormat.parse(value.toString()); } catch (ParseException e) { e.printStackTrace(); } return null; } }, Date.class); }- 1
- 2
- 3
- 4
- 5
- 6
- 7
- 8
- 9
- 10
- 11
- 12
- 13
- 14
- 15
- 16
- 17
- 18
- 19
- 20
- 21
- 22
- 23
- 24
- 25
- 26
- 27
- 28
- 29
- 30
- 31
- 32
- 33
- 34
- 35
- 36
- 37
- 38
- 39
- 40
- 41
- 42
- 43
- 44
- 45
- 46
- 47
- 48
- 49
- 50
- 51
- 52
- 53
- 54
- 55
- 56
- 57
- 58
- 59
- 2、在StudentService.java中增加“添加功能”-addStu
/* 添加数据方法 */ public abstract void addStu(Student stu);- 1
- 2
- 3
- 4
- 3、StudentServiceImpl.java中增加“添加功能”-addStu
/* 添加数据方法 */ @Override public void addStu(Student stu) { InputStream is = null; SqlSession sqlSession = null; try{ //1.加载核心配置文件 is = Resources.getResourceAsStream("MyBatisConfig.xml"); //2.获取SqlSession工厂对象 SqlSessionFactory sqlSessionFactory = new SqlSessionFactoryBuilder().build(is); //3.通过SqlSession工厂对象获取SqlSession对象 sqlSession = sqlSessionFactory.openSession(true); //4.获取StudentMapper接口实现类对象 StudentMapper mapper = sqlSession.getMapper(StudentMapper.class); //5.调用实现类对象添加方法 mapper.addStu(stu); } catch (Exception e) { e.printStackTrace(); } finally { //6.释放资源 if(sqlSession != null) { sqlSession.close(); } if(is != null) { try { is.close(); } catch (IOException e) { e.printStackTrace(); } } } }- 1
- 2
- 3
- 4
- 5
- 6
- 7
- 8
- 9
- 10
- 11
- 12
- 13
- 14
- 15
- 16
- 17
- 18
- 19
- 20
- 21
- 22
- 23
- 24
- 25
- 26
- 27
- 28
- 29
- 30
- 31
- 32
- 33
- 34
- 4、StudentMapper.java中增加“添加功能”-addStu
/* 添加数据方法 */ @Insert("INSERT INTO student VALUES (#{number},#{name},#{birthday},#{address})") public abstract void addStu(Student stu);- 1
- 2
- 3
- 4
- 5
-
2.5、修改功能的实现
-
代码实现
-
html代码
在stuList.html中增加“修改功能”代码
//修改数据功能 updateStu() { let param = "method=updateStu&number=" + this.editFormData.number + "&name=" + this.editFormData.name + "&birthday=" + this.editFormData.birthday + "&address=" + this.editFormData.address + "¤tPage=" + this.pagination.currentPage + "&pageSize=" + this.pagination.pageSize; axios.post("studentServlet",param) .then(resp => { //将查询出的数据赋值tableData this.tableData = resp.data.list; //设置分页参数 //当前页 this.pagination.currentPage = resp.data.pageNum; //总条数 this.pagination.total = resp.data.total; }) //关闭编辑窗口 this.dialogTableVisible4edit = false; }- 1
- 2
- 3
- 4
- 5
- 6
- 7
- 8
- 9
- 10
- 11
- 12
- 13
- 14
- 15
- 16
- 17
- 18
-
java代码
- 1、在StudentServlet.java中增加“修改功能”-updateStu
/* 修改数据功能 */ private void updateStu(HttpServletRequest req, HttpServletResponse resp) { //获取请求参数 Map<String, String[]> map = req.getParameterMap(); String currentPage = req.getParameter("currentPage"); String pageSize = req.getParameter("pageSize"); //封装Student对象 Student stu = new Student(); //注册日期转换器方法 dateConvert(); try { BeanUtils.populate(stu,map); } catch (Exception e) { e.printStackTrace(); } //调用业务层的修改方法 service.updateStu(stu); //重定向到分页查询功能 try { resp.sendRedirect(req.getContextPath() + "/studentServlet?method=selectByPage¤tPage=" + currentPage + "&pageSize=" + pageSize); } catch (IOException e) { e.printStackTrace(); } }- 1
- 2
- 3
- 4
- 5
- 6
- 7
- 8
- 9
- 10
- 11
- 12
- 13
- 14
- 15
- 16
- 17
- 18
- 19
- 20
- 21
- 22
- 23
- 24
- 25
- 26
- 27
- 28
- 29
- 30
- 31
- 2、在StudentService.java中增加“修改功能”-updateStu
/* 修改数据方法 */ public abstract void updateStu(Student stu);- 1
- 2
- 3
- 4
- 3、StudentServiceImpl.java中增加“修改功能”-updateStu
/* *1、直接复制会报错 *2、需要将此行代码需要添加到“doGet”方法中 *3、增加“updateStu”方法名的判断 */ else if(method.equals("updateStu")) { //添加数据功能 updateStu(req,resp); } ================================================================================== /* 修改数据方法 */ @Override public void updateStu(Student stu) { InputStream is = null; SqlSession sqlSession = null; try{ //1.加载核心配置文件 is = Resources.getResourceAsStream("MyBatisConfig.xml"); //2.获取SqlSession工厂对象 SqlSessionFactory sqlSessionFactory = new SqlSessionFactoryBuilder().build(is); //3.通过SqlSession工厂对象获取SqlSession对象 sqlSession = sqlSessionFactory.openSession(true); //4.获取StudentMapper接口实现类对象 StudentMapper mapper = sqlSession.getMapper(StudentMapper.class); //5.调用实现类对象修改方法 mapper.updateStu(stu); } catch (Exception e) { e.printStackTrace(); } finally { //6.释放资源 if(sqlSession != null) { sqlSession.close(); } if(is != null) { try { is.close(); } catch (IOException e) { e.printStackTrace(); } } } }- 1
- 2
- 3
- 4
- 5
- 6
- 7
- 8
- 9
- 10
- 11
- 12
- 13
- 14
- 15
- 16
- 17
- 18
- 19
- 20
- 21
- 22
- 23
- 24
- 25
- 26
- 27
- 28
- 29
- 30
- 31
- 32
- 33
- 34
- 35
- 36
- 37
- 38
- 39
- 40
- 41
- 42
- 43
- 44
- 45
- 4、StudentMapper.java中增加“修改功能”-updateStu
/* 修改数据方法 */ @Update("UPDATE student SET number=#{number},name=#{name},birthday=#{birthday},address=#{address} WHERE number=#{number}") public abstract void updateStu(Student stu);- 1
- 2
- 3
- 4
- 5
-
2.6、删除功能的实现
-
代码实现
-
html代码
在stuList.html中增加“删除功能”代码
//删除数据功能 deleteStu(row) { if(confirm("确定要删除" + row.number + "数据?")) { let param = "method=deleteStu&number=" + row.number + "¤tPage=" + this.pagination.currentPage + "&pageSize=" + this.pagination.pageSize; axios.post("studentServlet",param) .then(resp => { //将查询出的数据赋值tableData this.tableData = resp.data.list; //设置分页参数 //当前页 this.pagination.currentPage = resp.data.pageNum; //总条数 this.pagination.total = resp.data.total; }) } }- 1
- 2
- 3
- 4
- 5
- 6
- 7
- 8
- 9
- 10
- 11
- 12
- 13
- 14
- 15
- 16
- 17
-
java代码
- 1、在StudentServlet.java中增加“删除功能”-
/* *1、直接复制会报错 *2、需要将此行代码需要添加到“doGet”方法中 *3、增加“deleteStu”方法名的判断 */ else if(method.equals("deleteStu")) { //添加数据功能 deleteStu(req,resp); } ================================================================================== /* 删除数据功能 */ private void deleteStu(HttpServletRequest req, HttpServletResponse resp) { //获取请求参数 String number = req.getParameter("number"); String currentPage = req.getParameter("currentPage"); String pageSize = req.getParameter("pageSize"); //调用业务层的删除方法 service.deleteStu(number); //重定向到分页查询功能 try { resp.sendRedirect(req.getContextPath() + "/studentServlet?method=selectByPage¤tPage=" + currentPage + "&pageSize=" + pageSize); } catch (IOException e) { e.printStackTrace(); } }- 1
- 2
- 3
- 4
- 5
- 6
- 7
- 8
- 9
- 10
- 11
- 12
- 13
- 14
- 15
- 16
- 17
- 18
- 19
- 20
- 21
- 22
- 23
- 24
- 25
- 26
- 27
- 28
- 29
- 30
- 31
- 2、在StudentService.java中增加“删除功能”-
/* 删除数据方法 */ public abstract void deleteStu(String number);- 1
- 2
- 3
- 4
- 3、StudentServiceImpl.java中增加“删除功能”-
/* 删除数据方法 */ @Override public void deleteStu(String number) { InputStream is = null; SqlSession sqlSession = null; try{ //1.加载核心配置文件 is = Resources.getResourceAsStream("MyBatisConfig.xml"); //2.获取SqlSession工厂对象 SqlSessionFactory sqlSessionFactory = new SqlSessionFactoryBuilder().build(is); //3.通过SqlSession工厂对象获取SqlSession对象 sqlSession = sqlSessionFactory.openSession(true); //4.获取StudentMapper接口实现类对象 StudentMapper mapper = sqlSession.getMapper(StudentMapper.class); //5.调用实现类对象删除方法 mapper.deleteStu(number); } catch (Exception e) { e.printStackTrace(); } finally { //6.释放资源 if(sqlSession != null) { sqlSession.close(); } if(is != null) { try { is.close(); } catch (IOException e) { e.printStackTrace(); } } } }- 1
- 2
- 3
- 4
- 5
- 6
- 7
- 8
- 9
- 10
- 11
- 12
- 13
- 14
- 15
- 16
- 17
- 18
- 19
- 20
- 21
- 22
- 23
- 24
- 25
- 26
- 27
- 28
- 29
- 30
- 31
- 32
- 33
- 34
- 4、StudentMapper.java中增加“删除功能”-
/* 删除数据方法 */ @Delete("DELETE FROM student WHERE number=#{number}") public abstract void deleteStu(String number);- 1
- 2
- 3
- 4
- 5
- 6
-
-
-
相关阅读:
【Portswigger 学院】CORS
找实习之从0开始的后端学习日记【9.20】
dva详解 State、View、Action、connect、dispatch、Reducer
java中的BigDecimal使用
js 中的 map集合使用。
试剂盒和示踪剂—艾美捷FLIVO探针活体凋亡检测分析
起重机笔记
Node+Vue实现高校公寓管理系统设计与开发
Class常量池与运行时常量池
Operator开发之operator-sdk入门
- 原文地址:https://blog.csdn.net/InLoadwetrust/article/details/125604331
