-
事务、定时任务、多线程
事务、定时任务、多线程
1: 定时任务:
代码结构布局:

运行结果:


代码如下:
pom.xml:
4.0.0 org.example Aop_0914_SecondStage 1.0-SNAPSHOT war Aop_0914_SecondStage Maven Webapp http://www.example.com 8 8 4.0.1 2.2 1.2 5.3.14 1.4 3.4.6 1.3.3 8.0.11 1.2.78 junit junit 4.12 javax.servlet javax.servlet-api ${servlet.version} provided javax.servlet.jsp jsp-api ${jsp.version} provided jstl jstl ${jstl.version} org.springframework spring-webmvc ${spring.version} org.springframework spring-jdbc ${spring.version} commons-dbcp commons-dbcp ${commons-dbcp.version} org.mybatis mybatis ${mybatis.version} org.mybatis mybatis-spring ${mybatis-spring.version} com.github.pagehelper pagehelper 5.1.0 com.github.abel533 mapper 3.0.1 mysql mysql-connector-java ${mysql-connector-java.version} com.alibaba fastjson ${fastjson.version} org.projectlombok lombok 1.18.24 com.fasterxml.jackson.core jackson-databind 2.11.2 com.sun.mail javax.mail 1.5.6 org.slf4j slf4j-api 1.7.30 com.github.xuwei-k html2image 0.1.0 org.aspectj aspectjweaver 1.9.8 com.fasterxml.jackson.core jackson-databind 2.13.2.2 org.logback-extensions logback-ext-spring 0.1.4 javax.validation validation-api 2.0.1.Final org.hibernate hibernate-validator 6.1.0.Final org.apache.poi poi 3.17 org.apache.poi poi-ooxml 3.17 org.apache.poi poi-ooxml-schemas 3.17 com.sun.mail jakarta.mail 1.6.7 org.springframework spring-context-support 5.3.1 org.quartz-scheduler quartz 2.2.1 - 1
- 2
- 3
- 4
- 5
- 6
- 7
- 8
- 9
- 10
- 11
- 12
- 13
- 14
- 15
- 16
- 17
- 18
- 19
- 20
- 21
- 22
- 23
- 24
- 25
- 26
- 27
- 28
- 29
- 30
- 31
- 32
- 33
- 34
- 35
- 36
- 37
- 38
- 39
- 40
- 41
- 42
- 43
- 44
- 45
- 46
- 47
- 48
- 49
- 50
- 51
- 52
- 53
- 54
- 55
- 56
- 57
- 58
- 59
- 60
- 61
- 62
- 63
- 64
- 65
- 66
- 67
- 68
- 69
- 70
- 71
- 72
- 73
- 74
- 75
- 76
- 77
- 78
- 79
- 80
- 81
- 82
- 83
- 84
- 85
- 86
- 87
- 88
- 89
- 90
- 91
- 92
- 93
- 94
- 95
- 96
- 97
- 98
- 99
- 100
- 101
- 102
- 103
- 104
- 105
- 106
- 107
- 108
- 109
- 110
- 111
- 112
- 113
- 114
- 115
- 116
- 117
- 118
- 119
- 120
- 121
- 122
- 123
- 124
- 125
- 126
- 127
- 128
- 129
- 130
- 131
- 132
- 133
- 134
- 135
- 136
- 137
- 138
- 139
- 140
- 141
- 142
- 143
- 144
- 145
- 146
- 147
- 148
- 149
- 150
- 151
- 152
- 153
- 154
- 155
- 156
- 157
- 158
- 159
- 160
- 161
- 162
- 163
- 164
- 165
- 166
- 167
- 168
- 169
- 170
- 171
- 172
- 173
- 174
- 175
- 176
- 177
- 178
- 179
- 180
- 181
- 182
- 183
- 184
- 185
- 186
- 187
- 188
- 189
- 190
- 191
- 192
- 193
- 194
- 195
- 196
- 197
- 198
- 199
- 200
- 201
- 202
- 203
- 204
- 205
- 206
spring-task.xml:
- 1
- 2
- 3
- 4
- 5
- 6
- 7
- 8
- 9
- 10
- 11
- 12
- 13
- 14
- 15
- 16
- 17
- 18
- 19
MyTaskJob:
package com.util; import org.springframework.scheduling.annotation.Scheduled; import org.springframework.stereotype.Component; import java.time.LocalDateTime; @Component("myTaskJob") public class MyTaskJob { //定义定时任务方法 public void task(){ System.out.println("这是一个定时任务,发短信,发邮件,数据库备份:"+ LocalDateTime.now()); } //定义定时任务方法 @Scheduled(cron = "*/5 * * * * *") public void task2(){ System.out.println("这是一个定时任务mytask2,发短信,发邮件,数据库备份:"+ LocalDateTime.now()); } }- 1
- 2
- 3
- 4
- 5
- 6
- 7
- 8
- 9
- 10
- 11
- 12
- 13
- 14
- 15
- 16
- 17
- 18
- 19
- 20
- 21
MyTest6 :
package com.test3; import com.util.MyTaskJob; import org.springframework.context.ApplicationContext; import org.springframework.context.support.ClassPathXmlApplicationContext; public class MyTest6 { public static void main(String[] args) { //定时任务测试 ApplicationContext ac = new ClassPathXmlApplicationContext("spring-task.xml"); //MyTaskJob myTaskJob = ac.getBean(MyTaskJob.class); } }- 1
- 2
- 3
- 4
- 5
- 6
- 7
- 8
- 9
- 10
- 11
- 12
- 13
- 14
- 15
- 16
2: 多线程 三种方式:
①代码结构布局:
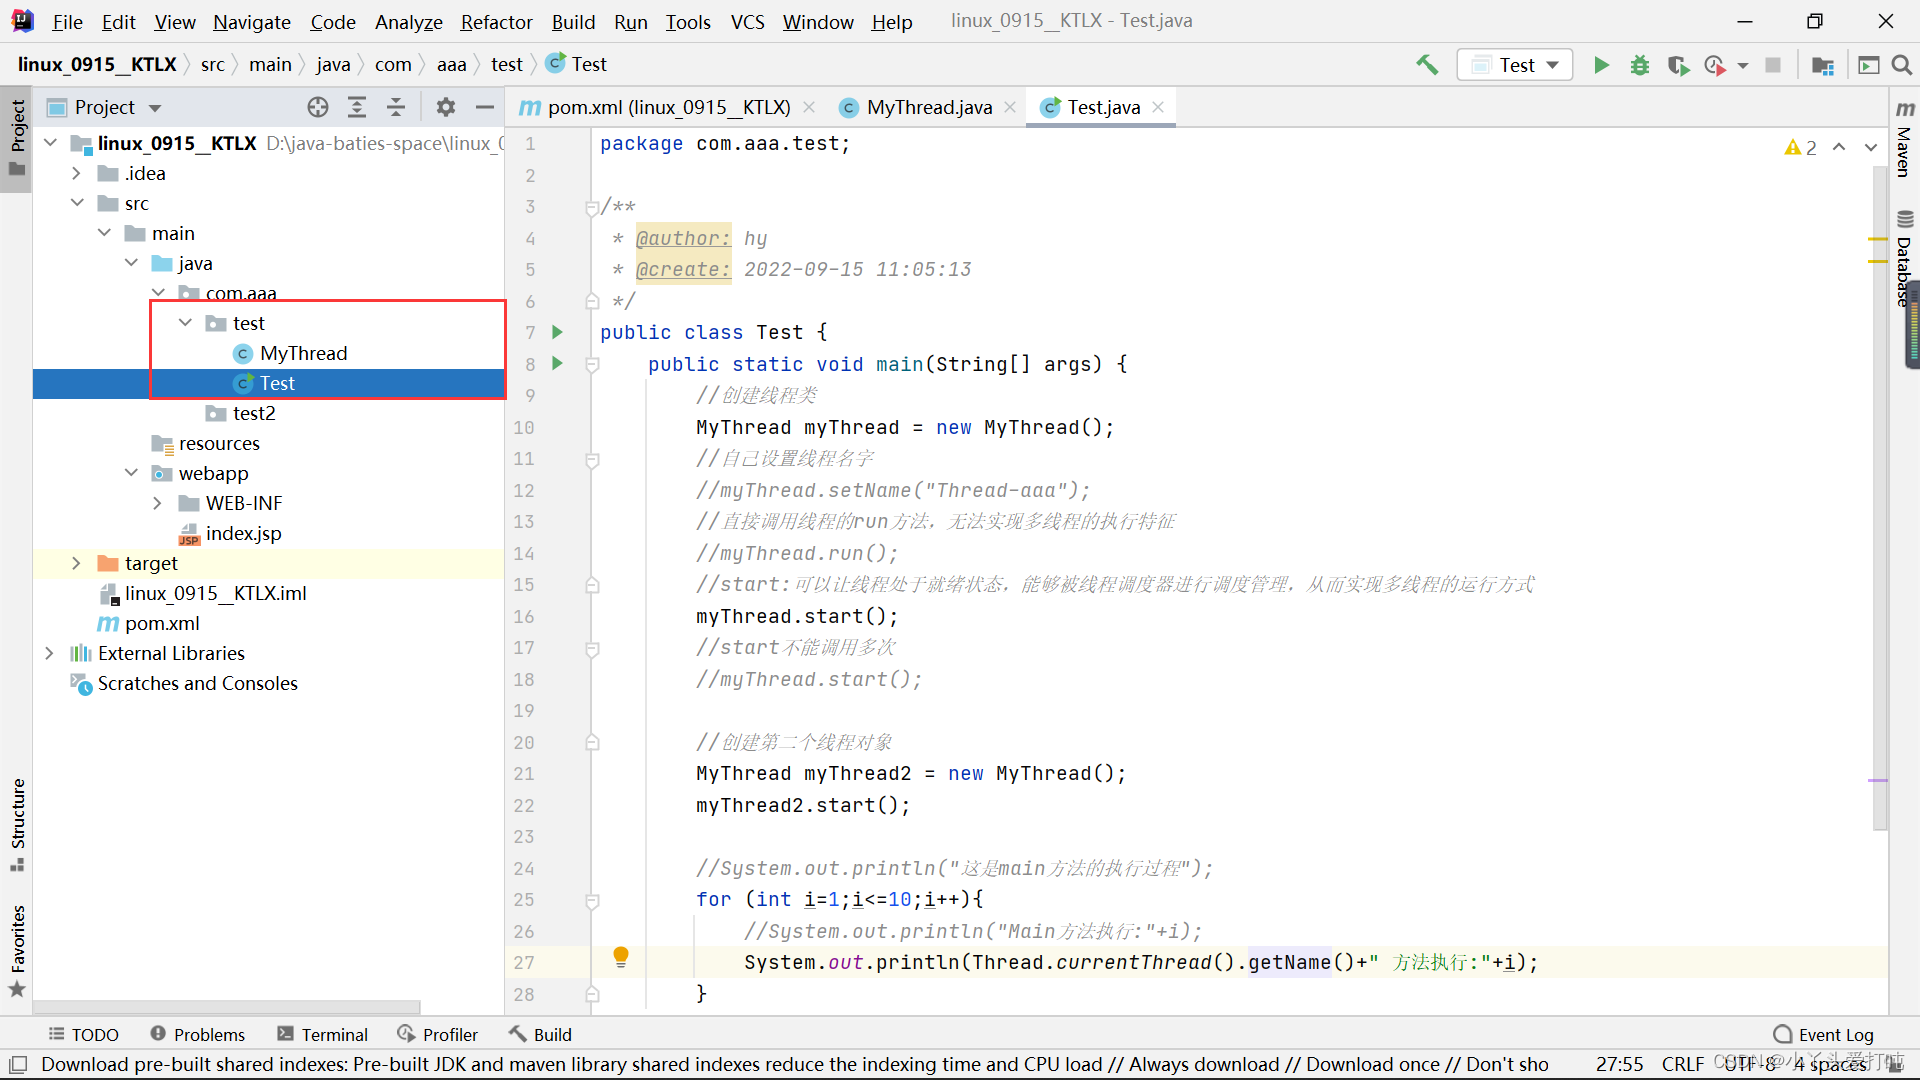
运行结果:

代码如下:
MyThread :
package com.aaa.test; /** * 实现多线程编程的第一种方式:继承Thread类 * @author: hy * @create: 2022-09-15 11:02:24 */ public class MyThread extends Thread{ /** * 多线程的任务处理方法 */ @Override public void run() { //System.out.println("MyThread 执行了任务方法run"); for (int i=1;i<=10;i++){ //System.out.println("MyThread 执行了任务:"+i); //Thread.currentThread().getName():通过线程类获取当前线程对象,获取线程名字 // 如果线程名字自己没有设置,则用序号表示线程 System.out.println(Thread.currentThread().getName()+" 执行了任务:"+i); } } }- 1
- 2
- 3
- 4
- 5
- 6
- 7
- 8
- 9
- 10
- 11
- 12
- 13
- 14
- 15
- 16
- 17
- 18
- 19
- 20
- 21
- 22
- 23
- 24
Test:
package com.aaa.test; /** * @author: hy * @create: 2022-09-15 11:05:13 */ public class Test { public static void main(String[] args) { //创建线程类 MyThread myThread = new MyThread(); //自己设置线程名字 //myThread.setName("Thread-aaa"); //直接调用线程的run方法,无法实现多线程的执行特征 //myThread.run(); //start:可以让线程处于就绪状态,能够被线程调度器进行调度管理,从而实现多线程的运行方式 myThread.start(); //start不能调用多次 //myThread.start(); //创建第二个线程对象 MyThread myThread2 = new MyThread(); myThread2.start(); //System.out.println("这是main方法的执行过程"); for (int i=1;i<=10;i++){ //System.out.println("Main方法执行:"+i); System.out.println(Thread.currentThread().getName()+" 方法执行:"+i); } } }- 1
- 2
- 3
- 4
- 5
- 6
- 7
- 8
- 9
- 10
- 11
- 12
- 13
- 14
- 15
- 16
- 17
- 18
- 19
- 20
- 21
- 22
- 23
- 24
- 25
- 26
- 27
- 28
- 29
- 30
- 31
②代码结构布局:

运行结果:

代码如下:
MyRunnable :
package com.aaa.test2; /** * 实现多线程编程的第二种方式:定义类实现Runnable接口,用于定义线程要【执行的任务】 * @author: hy * @create: 2022-09-15 11:37:28 */ public class MyRunnable implements Runnable{ @Override public void run() { for (int i=1;i<=10;i++){ System.out.println(Thread.currentThread().getName()+"执行:"+i); } } }- 1
- 2
- 3
- 4
- 5
- 6
- 7
- 8
- 9
- 10
- 11
- 12
- 13
- 14
- 15
- 16
Test :
package com.aaa.test2; /** * @author: hy * @create: 2022-09-15 11:39:53 */ public class Test { public static void main(String[] args) { //创建多线程要执行的任务实体 MyRunnable myRunnable =new MyRunnable(); //创建多线程对象,来执行目标任务 Thread t1 = new Thread(myRunnable); t1.start(); Thread t2 = new Thread(myRunnable); t2.start(); for (int i=1;i<=10;i++){ System.out.println(Thread.currentThread().getName()+"执行"+i); } } }- 1
- 2
- 3
- 4
- 5
- 6
- 7
- 8
- 9
- 10
- 11
- 12
- 13
- 14
- 15
- 16
- 17
- 18
- 19
- 20
- 21
- 22
- 23
- 24
- 25
③代码结构布局:
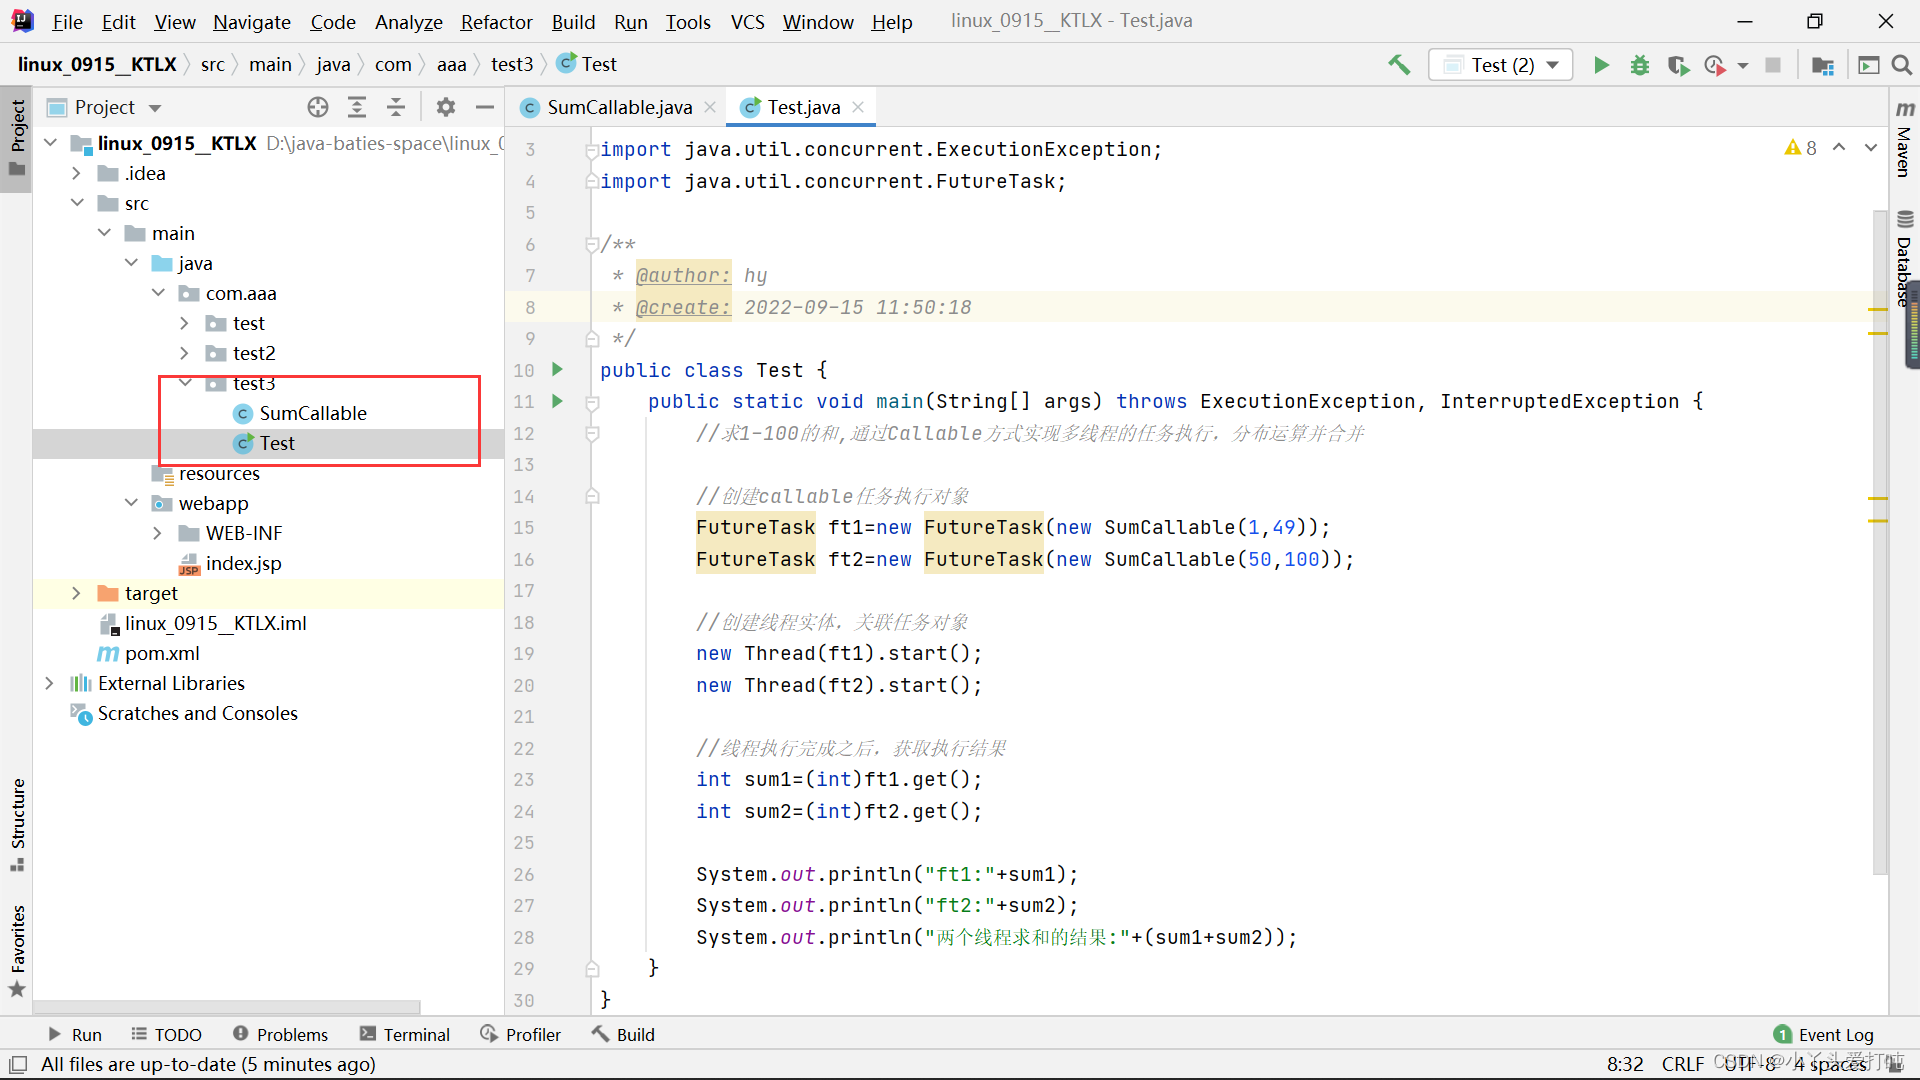
运行结果:

代码如下:
SumCallable :
package com.aaa.test3; //JUC import java.util.concurrent.Callable; /** * 实现多线程编程方式三:实现Callable定义线程任务。可以实现分布式计算 * @author: hy * @create: 2022-09-15 11:47:06 */ public class SumCallable implements Callable { int start; int end; public SumCallable(int start,int end){ this.start=start; this.end=end; } @Override public Object call() throws Exception { int sum =0; for (int i=start;i<=end;i++){ sum+=i; System.out.println(Thread.currentThread().getName()+"执行"+i); } return sum; } }- 1
- 2
- 3
- 4
- 5
- 6
- 7
- 8
- 9
- 10
- 11
- 12
- 13
- 14
- 15
- 16
- 17
- 18
- 19
- 20
- 21
- 22
- 23
- 24
- 25
- 26
- 27
- 28
- 29
Test:
package com.aaa.test3; import java.util.concurrent.ExecutionException; import java.util.concurrent.FutureTask; /** * @author: hy * @create: 2022-09-15 11:50:18 */ public class Test { public static void main(String[] args) throws ExecutionException, InterruptedException { //求1-100的和,通过Callable方式实现多线程的任务执行,分布运算并合并 //创建callable任务执行对象 FutureTask ft1=new FutureTask(new SumCallable(1,49)); FutureTask ft2=new FutureTask(new SumCallable(50,100)); //创建线程实体,关联任务对象 new Thread(ft1).start(); new Thread(ft2).start(); //线程执行完成之后,获取执行结果 int sum1=(int)ft1.get(); int sum2=(int)ft2.get(); System.out.println("ft1:"+sum1); System.out.println("ft2:"+sum2); System.out.println("两个线程求和的结果:"+(sum1+sum2)); } }- 1
- 2
- 3
- 4
- 5
- 6
- 7
- 8
- 9
- 10
- 11
- 12
- 13
- 14
- 15
- 16
- 17
- 18
- 19
- 20
- 21
- 22
- 23
- 24
- 25
- 26
- 27
- 28
- 29
- 30
- 31
异常:
①错误: 找不到或无法加载主类 com.aaa.test3.Test

解决:
删除target目录文件夹,然后运行代码。

线程池实现多线程???—代码:
MyRunnable :
package com.aaa.test4; /** * 定义线程任务 */ public class MyRunnable implements Runnable{ @Override public void run() { System.out.println(Thread.currentThread().getName()+" 执行任务"); } }- 1
- 2
- 3
- 4
- 5
- 6
- 7
- 8
- 9
- 10
- 11
Test :
package com.aaa.test4; import java.util.concurrent.ExecutorService; import java.util.concurrent.Executors; public class Test { public static void main(String[] args) { //创建线程任务对象 MyRunnable runnable = new MyRunnable(); //创建具有固定线程数的线程池 ExecutorService executorService = Executors.newFixedThreadPool(3); //通过线程池执行线程任务:自动会使用线程池中的某个线程来执行任务 executorService.execute(runnable); executorService.execute(runnable); executorService.execute(runnable); executorService.execute(runnable); executorService.execute(runnable); executorService.execute(runnable); executorService.execute(runnable); executorService.execute(runnable); executorService.execute(runnable); //关闭线程池 executorService.shutdown(); } }- 1
- 2
- 3
- 4
- 5
- 6
- 7
- 8
- 9
- 10
- 11
- 12
- 13
- 14
- 15
- 16
- 17
- 18
- 19
- 20
- 21
- 22
- 23
- 24
- 25
- 26
- 27
运行结果:

卖票线程—代码:
代码如下:
SalesTicketThread :
package com.aaa.test5; /** * 卖票线程 */ public class SalesTicketThread extends Thread{ //售票员 private String saler; //票数20 private int ticket =20; //构造方法 public SalesTicketThread(String saler){ this.saler=saler; } /** * 实现卖票任务 */ @Override public void run() { //票数大于0,就继续卖票 while (ticket>0){ System.out.println(this.saler+"卖票一张,还剩:"+(--this.ticket)+"张"); } } }- 1
- 2
- 3
- 4
- 5
- 6
- 7
- 8
- 9
- 10
- 11
- 12
- 13
- 14
- 15
- 16
- 17
- 18
- 19
- 20
- 21
- 22
- 23
- 24
- 25
- 26
- 27
- 28
Test :
package com.aaa.test5; public class Test { public static void main(String[] args) { new SalesTicketThread("张三").start(); new SalesTicketThread("李四").start(); new SalesTicketThread("王五").start(); } }- 1
- 2
- 3
- 4
- 5
- 6
- 7
- 8
- 9
- 10
运行结果:


②代码结构布局:
运行结果:
代码如下:
SaleTiketRunnable :
package com.aaa.test6; /** * 定义卖票任务类 */ public class SaleTiketRunnable implements Runnable{ //定义任务 private int ticket=20; @Override public void run() { while (this.ticket>0){ System.out.println(Thread.currentThread().getName()+"卖票一张,还剩"+(--this.ticket)+"张"); } } }- 1
- 2
- 3
- 4
- 5
- 6
- 7
- 8
- 9
- 10
- 11
- 12
- 13
- 14
- 15
- 16
- 17
Test :
package com.aaa.test6; public class Test { public static void main(String[] args) { //创建任务对象 SaleTiketRunnable saleTiketRunnable = new SaleTiketRunnable(); //创建线程对象执行任务 new Thread(salesTicketRunnable,"孙悟空").start(); new Thread(salesTicketRunnable,"猪八戒").start(); new Thread(salesTicketRunnable,"沙僧").start(); } }- 1
- 2
- 3
- 4
- 5
- 6
- 7
- 8
- 9
- 10
- 11
- 12
- 13
运行结果:

定义/使用匿名内部类实现线程方法—代码:
IA :
package com.aaa.test7; public interface IA { void test(); }- 1
- 2
- 3
- 4
- 5
Test :
package com.aaa.test7; public class Test { public static void main(String[] args) { //IA ia = new TestACls(); //ia.test(); //定义匿名内部类实现接口 IA ia = new IA() { @Override public void test() { System.out.println("这是匿名内部类实现接口方法"); } }; ia.test(); } }- 1
- 2
- 3
- 4
- 5
- 6
- 7
- 8
- 9
- 10
- 11
- 12
- 13
- 14
- 15
- 16
- 17
- 18
- 19
TestACls :
package com.aaa.test7; public class TestACls implements IA{ @Override public void test() { System.out.println("执行了test方法"); } }- 1
- 2
- 3
- 4
- 5
- 6
- 7
- 8
- 9
TestThread :
package com.aaa.test7; public class TestThread { public static void main(String[] args) { //使用匿名内部类实现线程方法 Thread t1=new Thread("t1"){ @Override public void run() { System.out.println(Thread.currentThread().getName()+"执行任务...."); } }; Thread t2=new Thread("t2"){ @Override public void run() { System.out.println(Thread.currentThread().getName()+"执行任务...."); } }; Thread t3=new Thread("t3"){ @Override public void run() { System.out.println(Thread.currentThread().getName()+"执行任务...."); } }; //设置线程优先级:1-10。不设置优先级时,优先级就是5 t1.setPriority(Thread.MAX_PRIORITY); t2.setPriority(3); t3.setPriority(Thread.MIN_PRIORITY); t1.start(); t2.start(); t3.start(); } }- 1
- 2
- 3
- 4
- 5
- 6
- 7
- 8
- 9
- 10
- 11
- 12
- 13
- 14
- 15
- 16
- 17
- 18
- 19
- 20
- 21
- 22
- 23
- 24
- 25
- 26
- 27
- 28
- 29
- 30
- 31
- 32
- 33
- 34
- 35
- 36
- 37
运行结果:


线程礼让—代码:
Test :
package com.aaa.test8; public class Test { public static void main(String[] args) { //线程礼让 Thread t1=new Thread("t1"){ @Override public void run() { for (int i=1;i<=10;i++){ System.out.println(Thread.currentThread().getName()+"执行了:"+i); if(i==5){ //线程礼让:当前线程退出执行状态,重新参与时间片的争夺 Thread.yield(); } } } }; Thread t2=new Thread("t2"){ @Override public void run() { for (int i=1;i<=10;i++){ System.out.println(Thread.currentThread().getName()+"执行了:"+i); if(i==5){ //线程礼让:当前线程退出执行状态,重新参与时间片的争夺 Thread.yield(); } } } }; Thread t3=new Thread("t3"){ @Override public void run() { for (int i=1;i<=10;i++){ System.out.println(Thread.currentThread().getName()+"执行了:"+i); if(i==5){ //线程礼让:当前线程退出执行状态,重新参与时间片的争夺 Thread.yield(); } } } }; t1.start(); t2.start(); t3.start(); } }- 1
- 2
- 3
- 4
- 5
- 6
- 7
- 8
- 9
- 10
- 11
- 12
- 13
- 14
- 15
- 16
- 17
- 18
- 19
- 20
- 21
- 22
- 23
- 24
- 25
- 26
- 27
- 28
- 29
- 30
- 31
- 32
- 33
- 34
- 35
- 36
- 37
- 38
- 39
- 40
- 41
- 42
- 43
- 44
- 45
- 46
- 47
- 48
- 49
- 50
运行结果:

创建Ping工具类,用于测试当前机器到目标主机的连通性—代码:
PingIPRunnable :
package com.aaa.test9; import java.io.IOException; /** * 创建ping ip人物类 */ public class PingIPRunnable implements Runnable{ private long start; private String ip; public PingIPRunnable(long start, String ip){ this.start=start; this.ip=ip; } @Override public void run() { try { PingUtil.ping(ip); long end = System.currentTimeMillis(); System.out.println(Thread.currentThread().getName()+"花费时间:"+(end-start)/1000); } catch (IOException e) { e.printStackTrace(); } } }- 1
- 2
- 3
- 4
- 5
- 6
- 7
- 8
- 9
- 10
- 11
- 12
- 13
- 14
- 15
- 16
- 17
- 18
- 19
- 20
- 21
- 22
- 23
- 24
- 25
- 26
- 27
- 28
- 29
- 30
PingUtil :
package com.aaa.test9; import java.io.*; /** * 创建Ping工具类,用于测试当前机器到目标主机的连通性 */ public class PingUtil { /** * ping目标主机,判断是否通畅 * @param ip */ public static void ping(String ip) throws IOException { //获取程序运行时工具类 Runtime runtime = Runtime.getRuntime(); //执行ping命令,返回ping的执行程序对象 Process exec = runtime.exec("ping " + ip); //执行ping操作,获取ping操作返回的输入流 InputStream inputStream = exec.getInputStream(); //构建缓冲输入流,对于ping的结果字符串内容 //字节字符转换流 InputStreamReader isr = new InputStreamReader(inputStream,"GBK"); //构建缓冲字符流 BufferedReader br =new BufferedReader(isr); String str=null; boolean isPingSuc=false; while((str=br.readLine())!=null){ //System.out.println(str); //如果返回结果包含TTL关键字,则认为ping通了 if(str.contains("TTL")){ isPingSuc=true; break; } } if(isPingSuc){ System.out.println("ping "+ip+" 能够ping通"); }else{ System.out.println("ping "+ip+" 不能ping通"); } br.close(); isr.close(); inputStream.close(); } }- 1
- 2
- 3
- 4
- 5
- 6
- 7
- 8
- 9
- 10
- 11
- 12
- 13
- 14
- 15
- 16
- 17
- 18
- 19
- 20
- 21
- 22
- 23
- 24
- 25
- 26
- 27
- 28
- 29
- 30
- 31
- 32
- 33
- 34
- 35
- 36
- 37
- 38
- 39
- 40
- 41
- 42
- 43
- 44
- 45
- 46
- 47
Test :
package com.aaa.test9; import java.io.IOException; public class Test { public static void main(String[] args) throws IOException { //记录开始时间 long start = System.currentTimeMillis(); //ping 100-120之间的ip for (int i=100;i<=120;i++){ PingUtil.ping("192.168.0."+i); } //记录结束时间 long end = System.currentTimeMillis(); System.out.println((end-start)/1000+"s"); } }- 1
- 2
- 3
- 4
- 5
- 6
- 7
- 8
- 9
- 10
- 11
- 12
- 13
- 14
- 15
- 16
- 17
- 18
- 19
Test2 :
package com.aaa.test9; public class Test2 { public static void main(String[] args) { long start = System.currentTimeMillis(); //多线程方式,ping ip for (int i=100;i<=120;i++){ new Thread(new PingIPRunnable(start,"192.168.0."+i)).start(); } //long end = System.currentTimeMillis(); //System.out.println("main:"+(end-start)/1000); //扩展:使用线程池的方式,实现ping ip的效果 } }- 1
- 2
- 3
- 4
- 5
- 6
- 7
- 8
- 9
- 10
- 11
- 12
- 13
- 14
- 15
- 16
- 17
- 18
运行结果:


同步代码块,对目标代码块加锁;定义同步方法,实现静态方法加锁—代码:
MyRunnable :
package com.aaa.test10; public class MyRunnable implements Runnable{ @Override public void run() { for (int i=1;i<=10;i++){ show(i); //synchronized:同步代码块,对目标代码块加锁 // synchronized (this) { // System.out.println(Thread.currentThread().getName()+ " "+i + " -AAAA-"); // System.out.println(Thread.currentThread().getName()+ " "+i + "-BBBB-"); // System.out.println(Thread.currentThread().getName()+ " "+i + "-CCCC-"); // } } } //synchronized:定义同步方法,实现静态方法加锁 public static synchronized void show(int i){ System.out.println(Thread.currentThread().getName()+ " "+i + " -AAAA-"); System.out.println(Thread.currentThread().getName()+ " "+i + "-BBBB-"); System.out.println(Thread.currentThread().getName()+ " "+i + "-CCCC-"); } //synchronized:定义同步方法,实现实例方法加锁 // public synchronized void show(int i){ // System.out.println(Thread.currentThread().getName()+ " "+i + " -AAAA-"); // System.out.println(Thread.currentThread().getName()+ " "+i + "-BBBB-"); // System.out.println(Thread.currentThread().getName()+ " "+i + "-CCCC-"); // } }- 1
- 2
- 3
- 4
- 5
- 6
- 7
- 8
- 9
- 10
- 11
- 12
- 13
- 14
- 15
- 16
- 17
- 18
- 19
- 20
- 21
- 22
- 23
- 24
- 25
- 26
- 27
- 28
- 29
- 30
- 31
Test :
package com.aaa.test10; public class Test { public static void main(String[] args) { MyRunnable myRunnable = new MyRunnable(); //创建3个线程执行任务 new Thread(myRunnable).start(); new Thread(myRunnable).start(); new Thread(myRunnable).start(); } }- 1
- 2
- 3
- 4
- 5
- 6
- 7
- 8
- 9
- 10
- 11
- 12
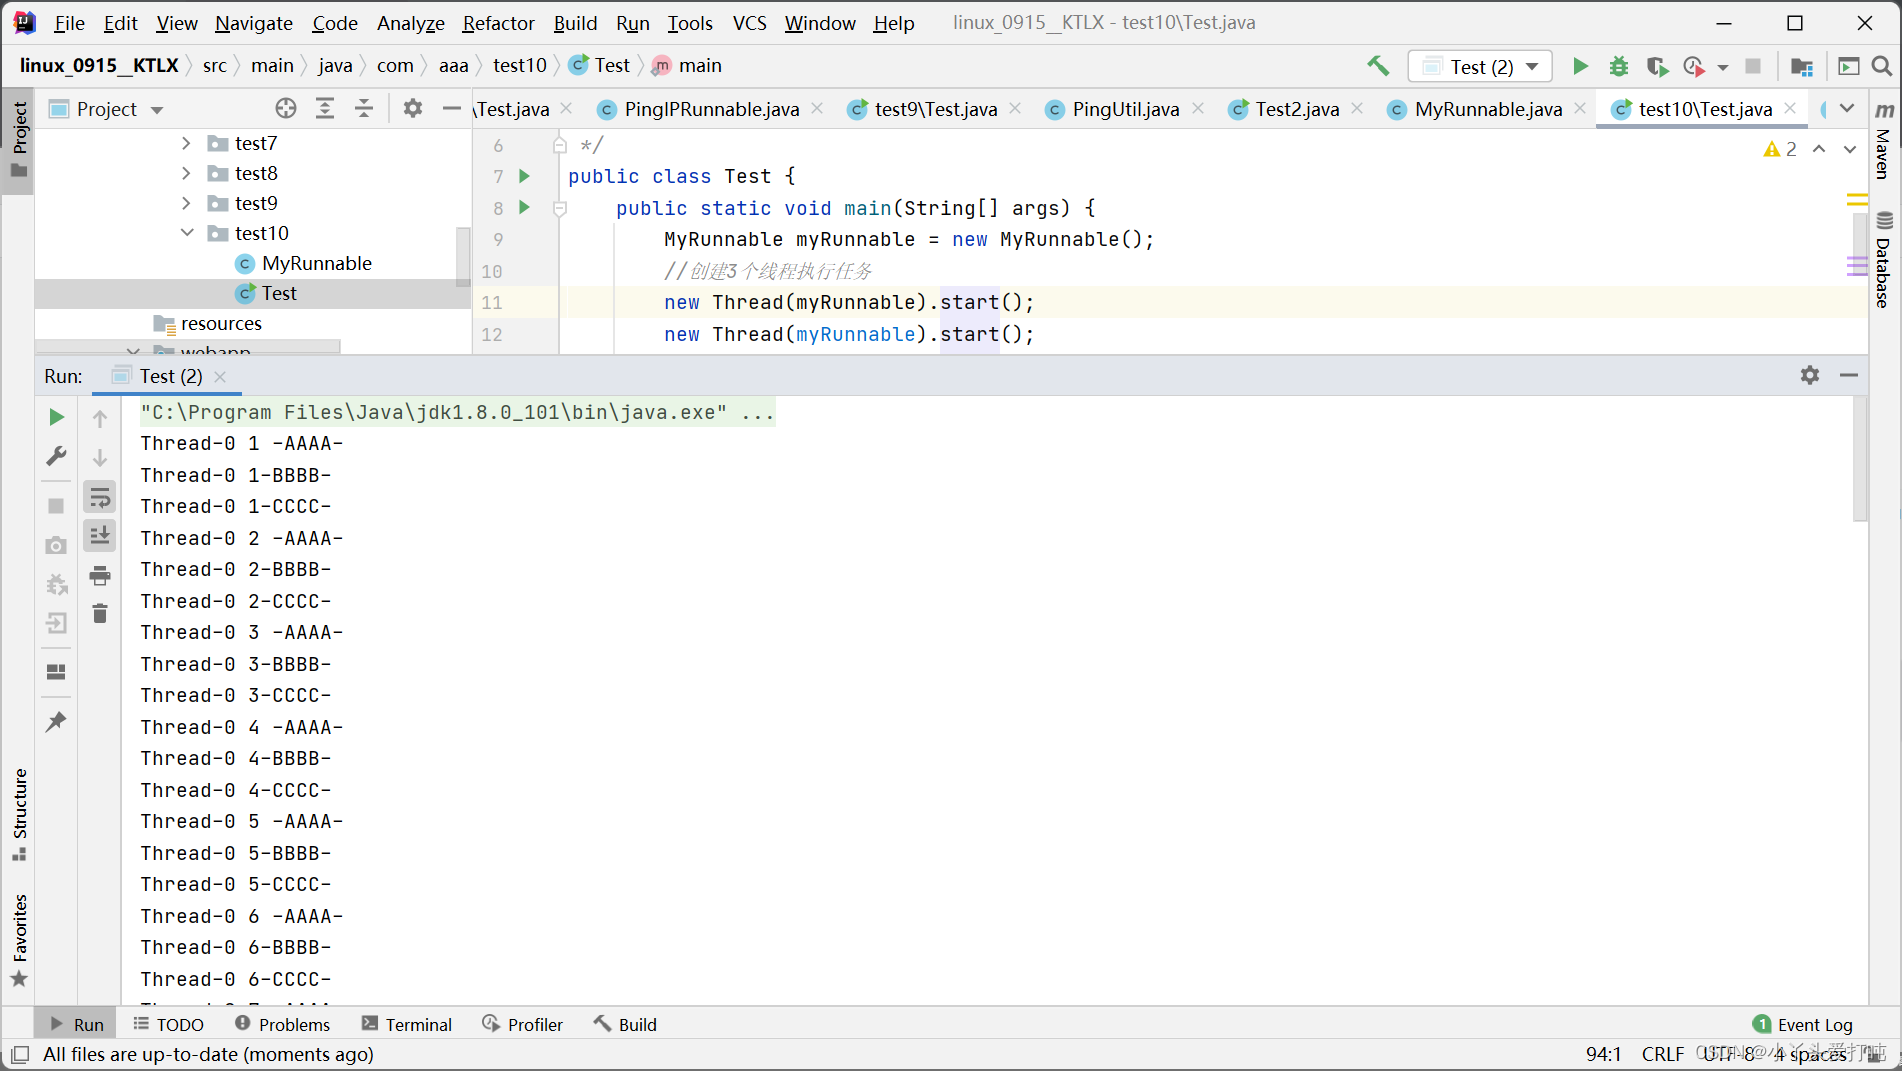
运行结果:
-
相关阅读:
Java项目:jsp+servlet高校社团管理系统
Apache解析漏洞复现
RIP协议;OSPF协议;BGP协议
java基础 异常
(一)正则表达式——基础概念
SpringBoot 2.X 快速掌握
java毕业设计旅游网站设计mybatis+源码+调试部署+系统+数据库+lw
Minio入门系列 MinIO Client使用详解
WebPack自动吐出脚本
crp Week1周报
- 原文地址:https://blog.csdn.net/Liu_wen_wen/article/details/126882442

- 最新文章
-
沪漂五周年了:我越来越迷茫了
Agentic Skill Routing 实战:别再把所有 Skill 塞进 AI Agent 上下文
MySQL-Seconds_behind_master的精度误差
[MAF预定义ChatClient中间件-03]CachingChatClient——利用缓存省钱省时间
AI的至暗历史:从万众期待到被政府撤资,AI的两次死亡徘徊
Agent OS :五种驯服不确定性的范式
PortSwigger SQL注入LAB11
数据库即时编译JIT
[Begin]AI Learn Data Day 0
深度学习进阶(二十七)现代 LLM 的核心架构设计其二:SwiGLU