-
自制操作系统日志——第二十五天
自制操作系统日志——第二十五天
今天的主要任务就是增加命令行窗口,当然除此之外我们还会给我们的系统再润色一下,以便其看起来更像一个真正的操作系统!!
一、蜂鸣器发声
今天,我们就来新编写一个功能吧。我们来做一个蜂鸣器的发声。这里,我们暂时先不调用声卡,因为声卡的调用有一定的难度,对于我们新手而言还是先做一个简单的来练练手吧!!一般的电脑上都会有蜂鸣器的,所以我们今天就用蜂鸣器来进行发声。
与定时器一样,蜂鸣器也是利用PIT进行控制的,下面让我们来具体看看设定信息吧:
音高操作:- AL = 0xb6; OUT(0x43, AL)
- AL = 设定值的低八位; OUT(0x42,AL)
- AL = 设定值的高八位; OUT(0x42,AL)
- 设定值为0时,默认为65536
- 发声的音高为时钟除以设定值。即设定值为1000时,相当于发出1.19318KHZ;设定2712时越440HZ
蜂鸣器的ON/OFF:
- 使用I/O端口0x61控制;
- ON : IN(AL,0x61) ; AL |= 0x033; AL &=0x0f; OUT(0x61,AL)
- OFF : IN(AL,0x61); AL &=0xd; OUT(0x61,AL)
在回忆一下下,这里的PIT时钟与cpu无关,不是cpu时钟,其频率恒定为1.19318MHZ!!!
编写API:
- EDX = 20
- EAX = 声音频率(单位是mhz)
于是乎,按照上面的程序,我们开始进行如下增改:
console:else if (edx == 20){//蜂鸣器发声 if(eax == 0){ i = io_in8(0x61); io_out8(0x61, i & 0x0d);//关闭蜂鸣器 }else{ i = 1193180000 / eax; io_out8(0x43, 0xb6); io_out8(0x42, i & 0xff);//先写入低八位 io_out8(0x42, i >> 8);//写入高八位 i = io_in8(0x61); io_out8(0x61, (i | 0x03) & 0x0f);//启动蜂鸣器 } }- 1
- 2
- 3
- 4
- 5
- 6
- 7
- 8
- 9
- 10
- 11
- 12
- 13
- 14
a_nask:
_api_beep: ; void api_beep(int tone) MOV EDX,20 MOV EAX,[ESP+4] INT 0x40 RET- 1
- 2
- 3
- 4
- 5
- 6
程序:利用定时器进行设定,每0.01秒降低一次发出的声音频率:
void api_end(void); int api_getkey(int mode); int api_alloctimer(void); void api_inittimer(int timer, int data); void api_settimer(int timer, int time); void api_beep(int tone); void HariMain(void) { int i, timer; timer = api_alloctimer(); api_inittimer(timer, 128); for (i = 20000000; i >= 20000; i -= i / 100){ //20KHz~20HZ,人类能听到的范围 //i以1%速度递减 api_beep(i); api_settimer(timer, 1); if(api_getkey(1) != 128){ break; } } api_beep(0); api_end(); }- 1
- 2
- 3
- 4
- 5
- 6
- 7
- 8
- 9
- 10
- 11
- 12
- 13
- 14
- 15
- 16
- 17
- 18
- 19
- 20
- 21
- 22
- 23
- 24
然后,运行!这里建议不要使用自带的qemu了,利用VMware,不然很可能听不到声音喔:
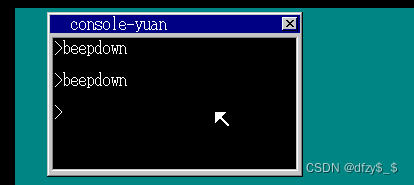
具体效果自己试试看吧,嘿嘿嘿。👀
二、增加更多颜色
截至目前为止,由于之前我们使用的是VGA模式,因此设定的颜色也比较少,仅仅只有16种而言。但是,我们现在已经更新了分辨率,利用了VBE模式。那么我们就再多增加一些颜色吧,不过在此之前,我先把之前设定颜色贴出来,给大家看看:
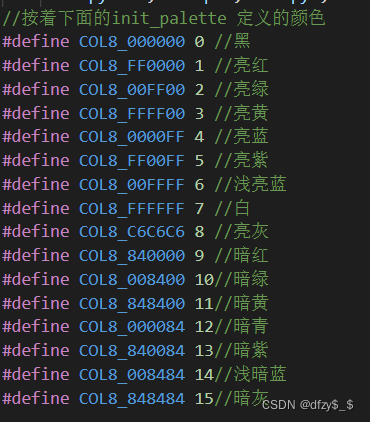
那么接下来我们开始,增加第二个调色版,编号从16开始:
graphic.c:void init_palette(void) { 略 set_palette(0, 15, table_rgb); //进行设置 unsigned char table2[216 * 3]; int r, g ,b; for(b = 0; b < 6; b++){ for(g = 0; g < 6; g++){ for(r = 0; r < 6; r++){ table2[(r + g * 6 + b * 36) * 3 + 0] = r * 51; table2[(r + g * 6 + b * 36) * 3 + 1] = g * 51; table2[(r + g * 6 + b * 36) * 3 + 2] = b * 51; } } } set_palette(16, 231, table2); return; }- 1
- 2
- 3
- 4
- 5
- 6
- 7
- 8
- 9
- 10
- 11
- 12
- 13
- 14
- 15
- 16
- 17
- 18
- 我们设定以光的三原色红、绿、蓝三种颜色,各赋予6个色阶(也就是6种不同的亮度)。那么,我们就可以一共有6x6x6=216种颜色了;
- 当我们需要指定RGB[51,102,153],时候,按照定义,我们可以直接指定16 + 1 + 26 +336 = 137 。 对应代码时,r、g、b这三个变量对应到三原色里是要多乘以51的,比如r=1,则在rgb里就是1*51 = 51了!!!
- 当然,我们这种划分是会有8个与我们第一个调色版定义的相重复的。
下面,我们写入一个程序用来表示rg两种颜色所有色号的混合,在一行或则一列中每22个像素(排除第一个和最后一个像素点)就换一个色号。 以x轴来表示r,以以y轴表示g的颜色:
int api_openwin(char *buf, int xsiz, int ysiz, int col_inv, char *title); void api_initmalloc(void); char *api_malloc(int size); void api_refreshwin(int win, int x0, int y0, int x1, int y1); void api_linewin(int win, int x0, int y0, int x1, int y1, int col); int api_getkey(int mode); void api_end(void); void HariMain(void) { char *buf; int win, x, y, r, g, b; api_initmalloc(); buf = api_malloc(144 * 164); win = api_openwin(buf, 144, 164, -1, "color"); for (y = 0; y < 128; y++) { for (x = 0; x < 128; x++) { r = x * 2; g = y * 2; b = 0; buf[(x + 8) + (y + 28) * 144] = 16 + (r / 43) + (g / 43) * 6 + (b / 43) * 36; } } api_refreshwin(win, 8, 28, 136, 156); api_getkey(1); /*等待按下任意键*/ api_end(); }- 1
- 2
- 3
- 4
- 5
- 6
- 7
- 8
- 9
- 10
- 11
- 12
- 13
- 14
- 15
- 16
- 17
- 18
- 19
- 20
- 21
- 22
- 23
- 24
- 25
- 26
- 27
- 28
运行结果如图所示:
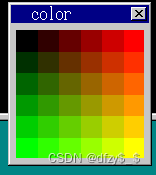
应该可以很明显的看出每行每列六个不同的颜色吧!!
那么,如果我们不使用全色彩模式的话,那还有没有其他方法可以进一步的增加色彩颜色呢?
其实是有的,我们可以利用两则颜色交替排列,已达到看上去像是两种颜色混合在一起的效果,如下图所示:

于是乎,在经过如此排序后,我们就可以利用两种色号之间多产生3种颜色,那么我们的6个色戒就可以进行扩展到 6 + 5*3 = 21种了;
int api_openwin(char *buf, int xsiz, int ysiz, int col_inv, char *title); void api_initmalloc(void); char *api_malloc(int size); void api_refreshwin(int win, int x0, int y0, int x1, int y1); void api_linewin(int win, int x0, int y0, int x1, int y1, int col); int api_getkey(int mode); void api_end(void); unsigned char rgb2pal(int r, int g, int b, int x, int y); void HariMain(void) { char *buf; int win, x, y; api_initmalloc(); buf = api_malloc(144 * 164); win = api_openwin(buf, 144, 164, -1, "color2"); for (y = 0; y < 128; y++) { for (x = 0; x < 128; x++) { buf[(x + 8) + (y + 28) * 144] = rgb2pal(x * 2, y * 2, 0, x, y); } } api_refreshwin(win, 8, 28, 136, 156); api_getkey(1); /* 等待按下任意键 */ api_end(); } unsigned char rgb2pal(int r, int g, int b, int x, int y) { static int table[4] = { 3, 1, 0, 2 }; int i; x &= 1; /* 偶数还是奇数 */ y &= 1; i = table[x + y * 2]; /* 生成中间色的常量*/ r = (r * 21) / 256; /* r= 0~21; 这里是除开第一个和最后一个像素点外,每隔6个像素点就换一个色号 */ g = (g * 21) / 256; b = (b * 21) / 256; r = (r + i) / 4; /* r = 0~5; 这里的为了服务那21中色号的,就利用我们所说的原理,用初始的6个色号进行排列,以此显示出21中不同的色号 */ g = (g + i) / 4; b = (b + i) / 4; return 16 + r + g * 6 + b * 36; }- 1
- 2
- 3
- 4
- 5
- 6
- 7
- 8
- 9
- 10
- 11
- 12
- 13
- 14
- 15
- 16
- 17
- 18
- 19
- 20
- 21
- 22
- 23
- 24
- 25
- 26
- 27
- 28
- 29
- 30
- 31
- 32
- 33
- 34
- 35
- 36
- 37
- 38
- 39
- 40
- 41
- 42
这里,我们简单的计算一下:
x 拓展的色阶号 对应的像素点值 7 1 0 8 1 1 9 1 0 10 1 1 11 1 0 12 1 1 后面的可以自行计算一下蛤!能看出来,其实刚刚好是符合每两个纯色的色号间会拓展出3个不同的颜色的!!
然后。让我们运行一下看看:

3、增加命令行窗口
再正式增加之前,先让我们调整一下窗口的初始位置吧!
console:else if (edx == 5){ sht = sheet_alloc(shtctl); sht->task = task; sht->flags |= 0x10;//启动应用程序自动关闭窗口的功能 sheet_setbuf(sht, (char *) ebx + ds_base, esi, edi, eax);//设置x、y轴和透明色 make_window8((char *)ebx + ds_base, esi, edi, (char *) ecx + ds_base, 0); sheet_slide(sht, (shtctl->xsize - esi) / 2, (shtctl->ysize - edi) / 2); sheet_updown(sht, shtctl->top);//将窗口高度指定在当前鼠标的这层,然后鼠标再上移一层 reg[7] = (int) sht;//方便后续向应用程序的返回值动手脚 }- 1
- 2
- 3
- 4
- 5
- 6
- 7
- 8
- 9
- 10
这时候,就会弹出在中间了!
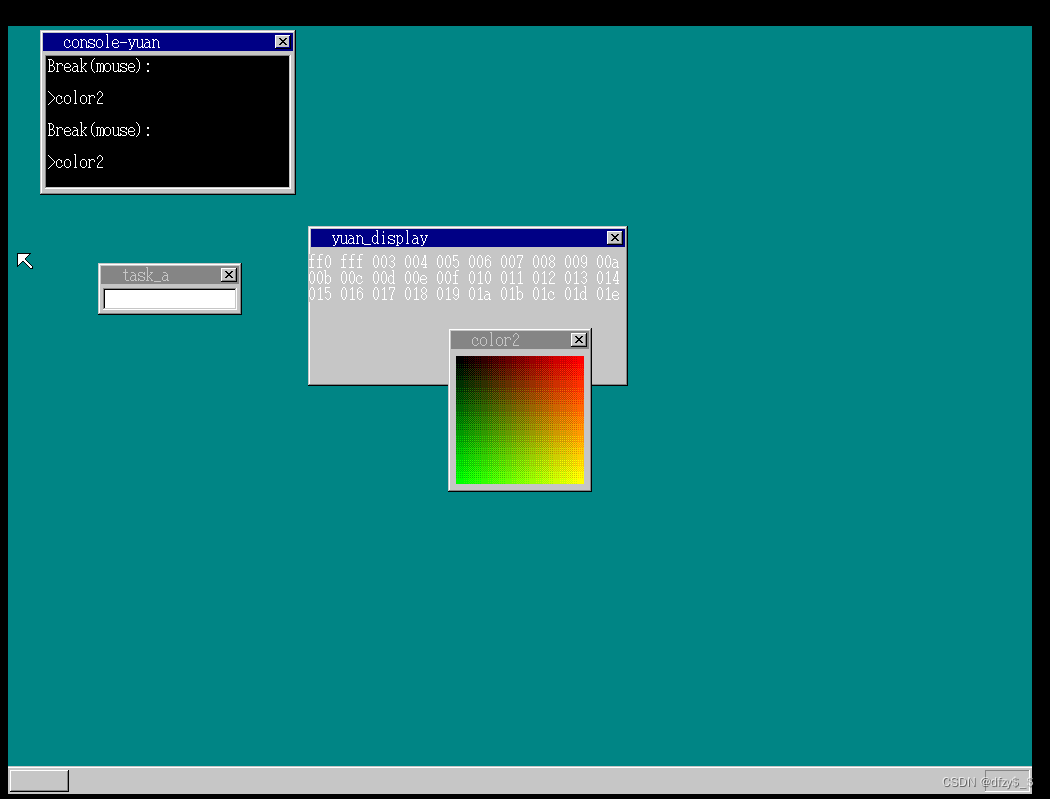
那好,接下来我们正式开始增加命令行的窗口:
为了后续的方便起见,我们这里直接用task_cons[n]这种进行替代:从简单的开始,我们先调用其两个命令行窗口出来:
bootpack.c:略 unsigned char *buf_back, buf_mouse[256], *buf_win, *buf_cons[2], *buf_display;//缓冲区,用于在其中描绘需要的图形 struct SHEET *sht_back, *sht_mouse, *sht_win, *sht_cons[2], *sheet_display;//准备图层区 struct TASK *task_a, *task_cons[2]; 略 /* sht_cons */ for(i = 0; i < 2; i++){ sht_cons[i] = sheet_alloc(shtctl); buf_cons[i] = (unsigned char *) memman_alloc_4k(memman, 256 * 165); sheet_setbuf(sht_cons[i], buf_cons[i], 256, 165, -1); /* 无透明色*/ make_window8(buf_cons[i], 256, 165, "console", 0); make_textbox8(sht_cons[i], 8, 28, 240, 128, COL8_000000); task_cons[i] = task_alloc(); task_cons[i]->tss.esp = memman_alloc_4k(memman, 64 * 1024) + 64 * 1024 - 12; task_cons[i]->tss.eip = (int) &console_task; task_cons[i]->tss.es = 1 * 8; task_cons[i]->tss.cs = 2 * 8; task_cons[i]->tss.ss = 1 * 8; task_cons[i]->tss.ds = 1 * 8; task_cons[i]->tss.fs = 1 * 8; task_cons[i]->tss.gs = 1 * 8; *((int *) (task_cons[i]->tss.esp + 4)) = (int) sht_cons[i]; *((int *) (task_cons[i]->tss.esp + 8)) = memtotal; task_run(task_cons[i], 2, 2); /* level=2, priority=2 */ sht_cons[i]->task = task_cons[i]; sht_cons[i]->flags |= 0x20; /* 有光标 */ } 略 sheet_slide(sht_back, 0, 0); sheet_slide(sht_cons[1], 56, 6); sheet_slide(sht_cons[0], 8, 2); sheet_slide(sht_win, 64, 56); sheet_slide(sheet_display, 300, 200); sheet_slide(sht_mouse, mx, my); sheet_updown(sht_back, 0); sheet_updown(sht_cons[1], 1); sheet_updown(sht_cons[0], 2); sheet_updown(sht_win, 3); sheet_updown(sht_mouse, 4); sheet_updown(sheet_display,2); key_win = sht_win;//用key_win存放当前窗口的地址 略 if(i == 256 + 0x3b && key_shift != 0 && task_cons[0]->tss.ss0 != 0){//shift + F1强制关闭 cons = (struct CONSOLE *) *((int *) 0xfec); cons_putstr0(cons, "\nBreak(key):\n"); io_cli();//不能再改变寄存器的值时候进行切换 task_cons[0]->tss.eax = (int) &(task_cons[0]->tss.esp0); task_cons[0]->tss.eip = (int) asm_end_app; io_sti(); } 略 if(sht->bxsize -21 <= x && x < sht->bxsize - 5 && 5 <= y && y < 19){ //点击X按钮 if((sht->flags & 0x10) != 0){//是由应用程序生成的窗口吗?窗口的flags已经OR 0x10了 cons = (struct CONSOLE *) *((int *) 0xfec); cons_putstr0(cons, " \nBreak(mouse):\n"); io_cli(); task_cons[0]->tss.eax = (int) &(task_cons[0]->tss.esp0); task_cons[0]->tss.eip = (int) asm_end_app; io_sti(); } }- 1
- 2
- 3
- 4
- 5
- 6
- 7
- 8
- 9
- 10
- 11
- 12
- 13
- 14
- 15
- 16
- 17
- 18
- 19
- 20
- 21
- 22
- 23
- 24
- 25
- 26
- 27
- 28
- 29
- 30
- 31
- 32
- 33
- 34
- 35
- 36
- 37
- 38
- 39
- 40
- 41
- 42
- 43
- 44
- 45
- 46
- 47
- 48
- 49
- 50
- 51
- 52
- 53
- 54
- 55
- 56
- 57
- 58
- 59
- 60
- 61
- 62
然后,让我们运行看看:

确实有两个窗口了,且可以运行命令,但是至于程序,则出了点小问题。让我们分析一下看看,当我们在灰色的能能够命令行输入a.hrb时候,是能够显示字符A的,但是在另一个窗口输入后,结果却在灰色的窗口那里显示出来了!!! 仔细一想,造成这种原因的可能是由于,我们在调用api的时候,赋予的地址只有灰色的那个命令行窗口,那让我们看一下源代码中是不是这样子的呢?

嗯,这么一看确实是啊!!那我们可以做出如下设置:
struct TASK { int sel, flags; //sel用于存放GDT编号 int level, priority; //设置优先级 struct FIFO32 fifo; struct TSS32 tss; struct CONSOLE *cons; int ds_base;//数据段地址 };- 1
- 2
- 3
- 4
- 5
- 6
- 7
- 8
- 9
这里,我们将cons保存在task的结构体当中,这样子我们就可以不用将地址赋予到固定的内存里也可以获得对应任务的cons窗口地址了。当然这里同理,我们也需要将本窗口调用的程序的数据段地址也要进行统一的保存,以防止总是读取固定的一个窗口的数据段地址!
那么接下来只需要将之前的0xfec 和 0xfe8等等统统换掉即可:
void console_task(struct SHEET *sheet, unsigned int memtotal) { 略 task->cons = &cons; //将图层的值,存入bootinfo预留的地址空间当中,以便后续调用时可以从堆栈中传递过来! 略 } int cmd_app(struct CONSOLE *cons, int *fat, char *cmdline) { 略 q = (char *) memman_alloc_4k(memman, segsiz); task->ds_base = (int) q; 略 } int *hrb_api(int edi, int esi, int ebp, int esp, int ebx, int edx, int ecx, int eax) { char s[12]; int i; int ds_base = task->ds_base; struct TASK *task = task_now(); struct CONSOLE *cons = task->cons; 略 } int *inthandler0c(int *esp) { struct TASK *task = task_now(); struct CONSOLE *cons = task->cons; 略 } int *inthandler0d(int *esp) { struct TASK *task = task_now(); struct CONSOLE *cons = task->cons; 略 }- 1
- 2
- 3
- 4
- 5
- 6
- 7
- 8
- 9
- 10
- 11
- 12
- 13
- 14
- 15
- 16
- 17
- 18
- 19
- 20
- 21
- 22
- 23
- 24
- 25
- 26
- 27
- 28
- 29
- 30
- 31
- 32
- 33
- 34
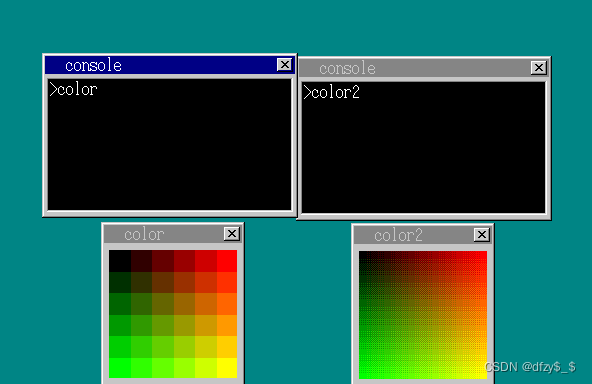
okok,完成!这里啊,我们就可以比较一下之前我所说的色号的拓展前后的对比了,怎么样一个还是很明显的吧???
但是又又有一个小bug了,害。。当我们点击关闭窗口时候,会出现一些闪退之类的。
首先,让我们排查一下:
我们刚刚打开的顺序是color color2,然后我们删除color,结果确实color2被删除了:
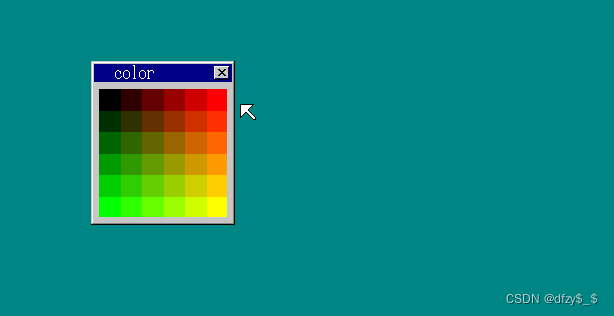
那么,仔细想想看是为啥??让我们看看cmd_app里的内容:

好的,这里由于是因为我们启动的程序啊,都是共用一段内存导致的。也就是说,当我们建立color时候,就会在1003代码段和1004的数据段进行描绘。当描绘完成后,图层显示。然后呢,我们输入color2,此时由于该设置的代码段是一致的,因此color2会把前面的覆盖了,这就当值当前的内存里,已经没有color的数据了,但是由于两个窗口代码相似度极高,因此当我们关闭程序的时候,会误以为我们还在点击color2的,因此就会先把color2的关闭了!!
那么,理解了这里我们就对应的修改吧:
cmd_app:set_segmdesc(gdt + task->sel / 8 + 1000, finfo->size - 1, (int) p, AR_CODE32_ER + 0x60); set_segmdesc(gdt + task->sel / 8 + 2000, segsiz - 1, (int) q, AR_DATA32_RW + 0x60); 略 start_app(0x1b, task->sel + 1000 * 8, esp, 1004 * 8, &(task->tss.esp0));//从程序中返回后,接着执行下面的内容- 1
- 2
- 3
- 4
task->sel 存放了所有任务的GDT编号,其范围在 3~1002之间。因此啊,这里我们就可以利用sel + 1000 = 1003 ~ 2002 之间存放应用程序的代码段;用2003 ~ 3002存放应用程序的数据段!!这样子,由于每一个任务的sel不一样,因此这里我们就可以将其的内存段进行分开了:
…
喔喔,我发现这里如果使用回车来结束的话,倒是没啥问题了。就是,我们还不能使用鼠标点击进行关闭,这是因为我们前面的程序里对于鼠标点击这里,直接写的是task_cons[0] 。 因此,我们还需要更改一下:bootpack.c
if(i == 256 + 0x3b && key_shift != 0 ){//shift + F1强制关闭 task = key_win->task; //获取当前处于的图层 if(task != 0 && task->tss.ss0 != 0) { cons_putstr0(cons, "\nBreak(key):\n"); io_cli();//不能再改变寄存器的值时候进行切换 task->tss.eax = (int) &(task->tss.esp0); task->tss.eip = (int) asm_end_app; io_sti(); } } 略 if(sht->bxsize -21 <= x && x < sht->bxsize - 5 && 5 <= y && y < 19){ //点击X按钮 if((sht->flags & 0x10) != 0){//是由应用程序生成的窗口吗?窗口的flags已经OR 0x10了 task = sht->task; cons_putstr0(task->cons, " \nBreak(mouse):\n"); io_cli(); task->tss.eax = (int) &(task->tss.esp0); task->tss.eip = (int) asm_end_app; io_sti(); } }- 1
- 2
- 3
- 4
- 5
- 6
- 7
- 8
- 9
- 10
- 11
- 12
- 13
- 14
- 15
- 16
- 17
- 18
- 19
- 20
- 21
- 22
- 23
我们将原本的task_cons[0]这个更改为key_win 和 sht->task 。这样子当我们使用强制关闭时,就会关闭当前正在输入的窗口,以及用鼠标时候可以直接关闭我们点击的图层。且还把之前用0xfec读出的cons换成我们存在task里的cons!

okok,删除完毕!!!
进一步的优化
这里我们将task_a这个窗口删除了。具体请参照源代码了,这里就不一一列举。
不过有一点需要说明的就是,我们删除完后task_a窗口后。由于目前正在运行着主函数的任务,且只有当主函数里的任务休眠后才会运行命令窗口的任务。但是,在源程序中,命令窗口的任务的fifo缓冲区,是在console_task开头初始化的,但是我们在主程序的设置里运行了一条语句:

此时,命令行窗口的fifo缓冲区还没有进行初始化,直接用kewin_on传递的话就会导致位置的错误。因此,我们这里需要将初始化的内容放在主函数里:
修改console_task:void console_task(struct SHEET *sheet, unsigned int memtotal) { struct TASK *task = task_now(); struct MEMMAN *memman = (struct MEMMAN *) MEMMAN_ADDR; int i, *fat = (int *) memman_alloc_4k(memman, 4 * 2880); struct CONSOLE cons; char cmdline[30]; cons.sht = sheet; cons.cur_x = 8; cons.cur_y = 28; cons.cur_c = -1; task->cons = &cons; //将图层的值,存入bootinfo预留的地址空间当中,以便后续调用时可以从堆栈中传递过来! cons.timer = timer_alloc(); timer_init(cons.timer, &task->fifo, 1); timer_settime(cons.timer, 50); file_readfat(fat, (unsigned char *) (ADR_DISKIMG + 0x000200)); 略- 1
- 2
- 3
- 4
- 5
- 6
- 7
- 8
- 9
- 10
- 11
- 12
- 13
- 14
- 15
- 16
- 17
- 18
主函数:
void HariMain(void) { //进行声明 struct BOOTINFO *binfo = ( struct BOOTINFO *) ADR_BOOTINFO; struct FIFO32 fifo, keycmd; struct SHTCTL *shtctl;//用于管理的 int fifobuf[128], keycmd_buf[32], *cons_fifo[2]; char s[40]; int mx, my, i; unsigned int memtotal; struct MOUSE_DEC mdec; struct MEMMAN *memman = (struct MEMMAN *) MEMMAN_ADDR;//设定了管理表位于内存的0x003c0000地址,预估今后不会用到 unsigned char *buf_back, buf_mouse[256], *buf_cons[2];//缓冲区,用于在其中描绘需要的图形 struct SHEET *sht_back, *sht_mouse, *sht_cons[2];//准备图层区 struct TASK *task_a, *task_cons[2], *task; 略 /* sht_cons */ for(i = 0; i < 2; i++){ sht_cons[i] = sheet_alloc(shtctl); buf_cons[i] = (unsigned char *) memman_alloc_4k(memman, 256 * 165); sheet_setbuf(sht_cons[i], buf_cons[i], 256, 165, -1); /* 无透明色*/ make_window8(buf_cons[i], 256, 165, "console", 0); make_textbox8(sht_cons[i], 8, 28, 240, 128, COL8_000000); task_cons[i] = task_alloc(); task_cons[i]->tss.esp = memman_alloc_4k(memman, 64 * 1024) + 64 * 1024 - 12; task_cons[i]->tss.eip = (int) &console_task; task_cons[i]->tss.es = 1 * 8; task_cons[i]->tss.cs = 2 * 8; task_cons[i]->tss.ss = 1 * 8; task_cons[i]->tss.ds = 1 * 8; task_cons[i]->tss.fs = 1 * 8; task_cons[i]->tss.gs = 1 * 8; *((int *) (task_cons[i]->tss.esp + 4)) = (int) sht_cons[i]; *((int *) (task_cons[i]->tss.esp + 8)) = memtotal; task_run(task_cons[i], 2, 2); /* level=2, priority=2 */ sht_cons[i]->task = task_cons[i]; sht_cons[i]->flags |= 0x20; /* 有光标 */ cons_fifo[i] = (int *) memman_alloc_4k(memman, 128 * 4); fifo32_init(&task_cons[i]->fifo, 128, cons_fifo[i], task_cons[i]); } 略- 1
- 2
- 3
- 4
- 5
- 6
- 7
- 8
- 9
- 10
- 11
- 12
- 13
- 14
- 15
- 16
- 17
- 18
- 19
- 20
- 21
- 22
- 23
- 24
- 25
- 26
- 27
- 28
- 29
- 30
- 31
- 32
- 33
- 34
- 35
- 36
- 37
- 38
- 39
- 40
- 41
然后,运行看看:
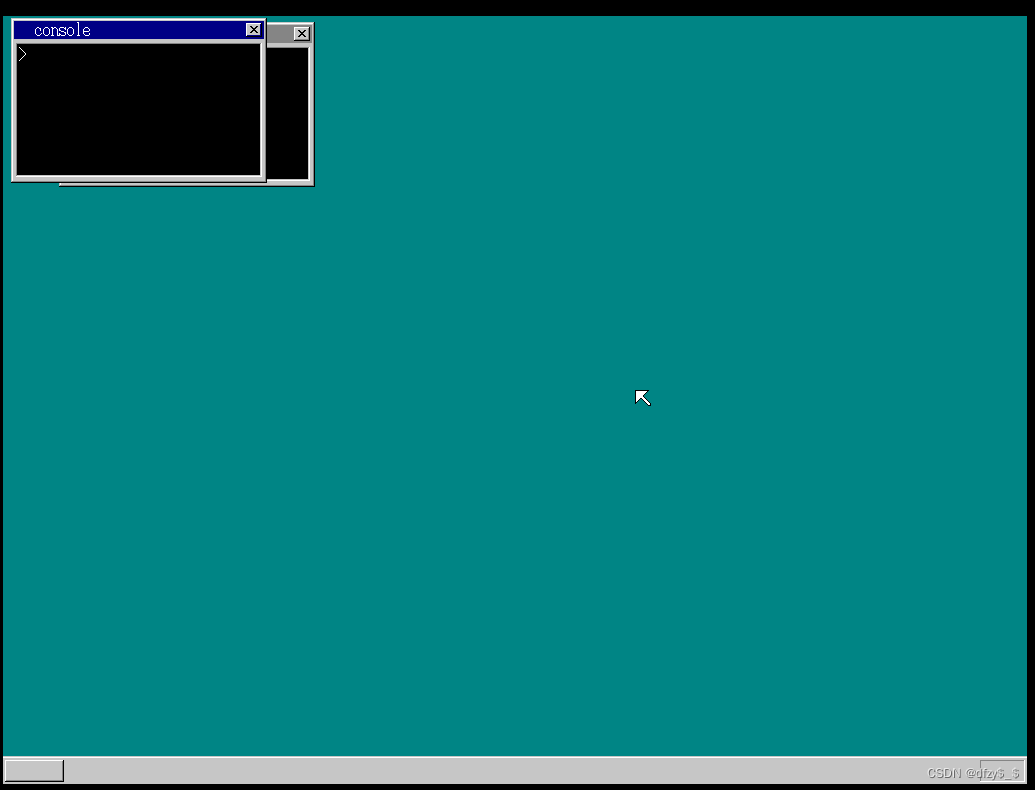
好喔,不见了!!嘿嘿嘿
总结
以上呢,我们已经完成了两个命令行窗口的制作,之后还会急需优化一下,以便能够显示更多的命令行窗口。
-
相关阅读:
oracle创建表空间、用户、权限以及导入dmp文件
python每日一题【剑指 Offer 13. 机器人的运动范围】
麒麟 ZYJ 服务器软件适配 参考示例
金仓数据库KingbaseES客户端编程接口指南-Gokb (5. 程序示例 )
六级高频词汇汇总
YOLOv7 PyQt5 | 手把手教你YOLOv7添加PyQt页面
“华为杯”研究生数学建模竞赛2019年-【华为杯】F题:智能飞行器航迹规划模型(下)(附优秀论文及Pyhton代码实现)
ASEMI快恢复二极管RL257参数,RL257图片,RL257应用
3分钟读懂OKR | 不和绩效挂钩的OKR到底有什么用?
react-typescript-demo
- 原文地址:https://blog.csdn.net/qq_43696276/article/details/126246277