-
迷宫_随机实验_边做边学深度强化学习:PyTorch程序设计实践(1)
迷宫_随机实验_边做边学深度强化学习:PyTorch程序设计实践
0、相关文章
迷宫_Sarsa算法_边做边学深度强化学习:PyTorch程序设计实践(2)
1、导入所使用的包
# 导入所使用的包 import numpy as np import matplotlib.pyplot as plt- 1
- 2
- 3
2、 定义迷宫
fig = plt.figure(figsize=(5, 5)) ax = plt.gca() # 画出红色的墙壁 plt.plot([1, 1], [0, 1], color='red', linewidth=2) plt.plot([1, 2], [2, 2], color='red', linewidth=2) plt.plot([2, 2], [2, 1], color='red', linewidth=2) plt.plot([2, 3], [1, 1], color='red', linewidth=2) # 画出表示状态的文字S0-S8 plt.text(0.5, 2.5, 'S0', size=14, ha='center') plt.text(1.5, 2.5, 'S1', size=14, ha='center') plt.text(2.5, 2.5, 'S2', size=14, ha='center') plt.text(0.5, 1.5, 'S3', size=14, ha='center') plt.text(1.5, 1.5, 'S4', size=14, ha='center') plt.text(2.5, 1.5, 'S5', size=14, ha='center') plt.text(0.5, 0.5, 'S6', size=14, ha='center') plt.text(1.5, 0.5, 'S7', size=14, ha='center') plt.text(2.5, 0.5, 'S8', size=14, ha='center') plt.text(0.5, 2.3, 'START', ha='center') plt.text(2.5, 0.3, 'GOAL', ha='center') # 设定画图的范围 ax.set_xlim(0, 3) ax.set_ylim(0, 3) ax.set_title("Random") plt.tick_params(axis='both', which='both', bottom='off', top='off', labelbottom='off', right='off', left='off', labelleft='off') # 当前位置S0用绿色圆圈画出 line, = ax.plot([0.5], [2.5], marker="o", color='g', markersize=60)- 1
- 2
- 3
- 4
- 5
- 6
- 7
- 8
- 9
- 10
- 11
- 12
- 13
- 14
- 15
- 16
- 17
- 18
- 19
- 20
- 21
- 22
- 23
- 24
- 25
- 26
- 27
- 28
- 29
- 30
- 31
3、定义迷宫动作
# 设定参数θ的初始值theta_0,用于确定初始方案 # 行为状态0~7,列为用↑、→、↓、←表示的移动方向 theta_0 = np.array([[np.nan, 1, 1, np.nan], # s0 [np.nan, 1, np.nan, 1], # s1 [np.nan, np.nan, 1, 1], # s2 [1, 1, 1, np.nan], # s3 [np.nan, np.nan, 1, 1], # s4 [1, np.nan, np.nan, np.nan], # s5 [1, np.nan, np.nan, np.nan], # s6 [1, 1, np.nan, np.nan], # s7、※s8是目标,无策略 ])- 1
- 2
- 3
- 4
- 5
- 6
- 7
- 8
- 9
- 10
- 11
- 12
效果:
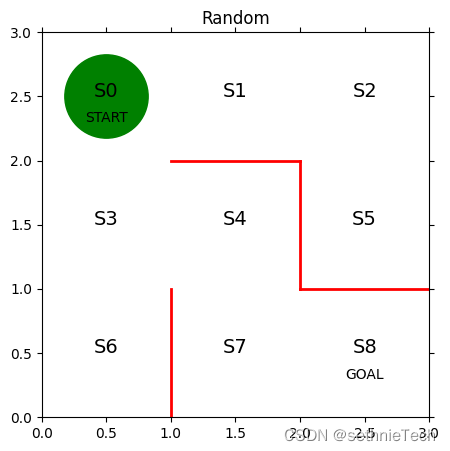
4、策略参数θ转换为行动策略π
def simple_convert_into_pi_from_theta(theta): '''简单计算百分比''' [m, n] = theta.shape # 获取theta矩阵大小 pi = np.zeros((m, n)) for i in range(0, m): pi[i, :] = theta[i, :] / np.nansum(theta[i, :]) # 计算百分比 pi = np.nan_to_num(pi) # 将nan转换为0 return pi- 1
- 2
- 3
- 4
- 5
- 6
- 7
- 8
- 9
- 10
- 11
5、定义随机移动函数
# 1步移动后求得状态s def get_next_s(pi, s): direction = ["up", "right", "down", "left"] # 根据概率pi[s,:]选择direction next_direction = np.random.choice(direction, p=pi[s, :]) # 移动后切换状态 if next_direction == "up": s_next = s - 3 elif next_direction == "right": s_next = s + 1 elif next_direction == "down": s_next = s + 3 elif next_direction == "left": s_next = s - 1 return s_next- 1
- 2
- 3
- 4
- 5
- 6
- 7
- 8
- 9
- 10
- 11
- 12
- 13
- 14
- 15
- 16
- 17
- 18
6、定义使智能体移动到目标的函数
def goal_maze(pi): s = 0 # 开始地点 state_history = [0] # 记录智能体移动轨迹的列表 while (1): # 循环,直至到达目标 next_s = get_next_s(pi, s) state_history.append(next_s) if next_s == 8: # 到达目标地点则终止 for i in range(0,10): state_history.append(next_s) break else: s = next_s return state_history- 1
- 2
- 3
- 4
- 5
- 6
- 7
- 8
- 9
- 10
- 11
- 12
- 13
- 14
- 15
- 16
7、智能体移动到目标
# 求初始策略π pi_0 = simple_convert_into_pi_from_theta(theta_0) state_history = goal_maze(pi_0) print(state_history) print("求解迷宫问题所需要的步数是:" + str(len(state_history) - 1))- 1
- 2
- 3
- 4
- 5
8、运行路径可视化
# 参考URL http://louistiao.me/posts/notebooks/embedding-matplotlib-animations-in-jupyter-notebooks/ from matplotlib import animation from IPython.display import HTML def init(): '''初始化背景图像''' line.set_data([], []) return (line,) def animate(i): '''每一帧的画面内容''' state = state_history[i] # 画出当前的位置 x = (state % 3) + 0.5 # 状态的x坐标为状态数除以3的余数加0.5 y = 2.5 - int(state / 3) # 状态y坐标为2.5减去状态数除以3的商 line.set_data(x, y) return (line,) # 用初始化函数和绘图函数来生成动画 anim = animation.FuncAnimation(fig, animate, init_func=init, frames=len( state_history), interval=200, repeat=False) anim.save('result/maze_Random.gif',writer='pillow') HTML(anim.to_jshtml())- 1
- 2
- 3
- 4
- 5
- 6
- 7
- 8
- 9
- 10
- 11
- 12
- 13
- 14
- 15
- 16
- 17
- 18
- 19
- 20
- 21
- 22
- 23
9、最终结果


10、代码下载
10、参考资料
-
相关阅读:
计算机毕业设计(附源码)python疫情下居家隔离服务系统
sqlserver刷新全部视图
python教程:列表[list]和元组(tuple)
useragent怎么获取
CSAPP 之 CacheLab 详解
15个必须知道的sql优化技巧(荣耀典藏版)
ARM端部署PP-OCR_V3
OceanBase 安全审计之透明加密
UGUI界面性能优化1-UGUI开发界面时常见的优化方法和注意事项
命名实体标注工具
- 原文地址:https://blog.csdn.net/qq_34206137/article/details/126660901

- 最新文章
-
沪漂五周年了:我越来越迷茫了
Agentic Skill Routing 实战:别再把所有 Skill 塞进 AI Agent 上下文
MySQL-Seconds_behind_master的精度误差
[MAF预定义ChatClient中间件-03]CachingChatClient——利用缓存省钱省时间
AI的至暗历史:从万众期待到被政府撤资,AI的两次死亡徘徊
Agent OS :五种驯服不确定性的范式
PortSwigger SQL注入LAB11
数据库即时编译JIT
[Begin]AI Learn Data Day 0
深度学习进阶(二十七)现代 LLM 的核心架构设计其二:SwiGLU