-
大数据架构师——数据湖技术(二)
文章目录
数据湖技术
数据湖技术之Iceberg
Spark 与 Iceberg 整合
1. Spark3.2.1 与 Iceberg0.13.2整合
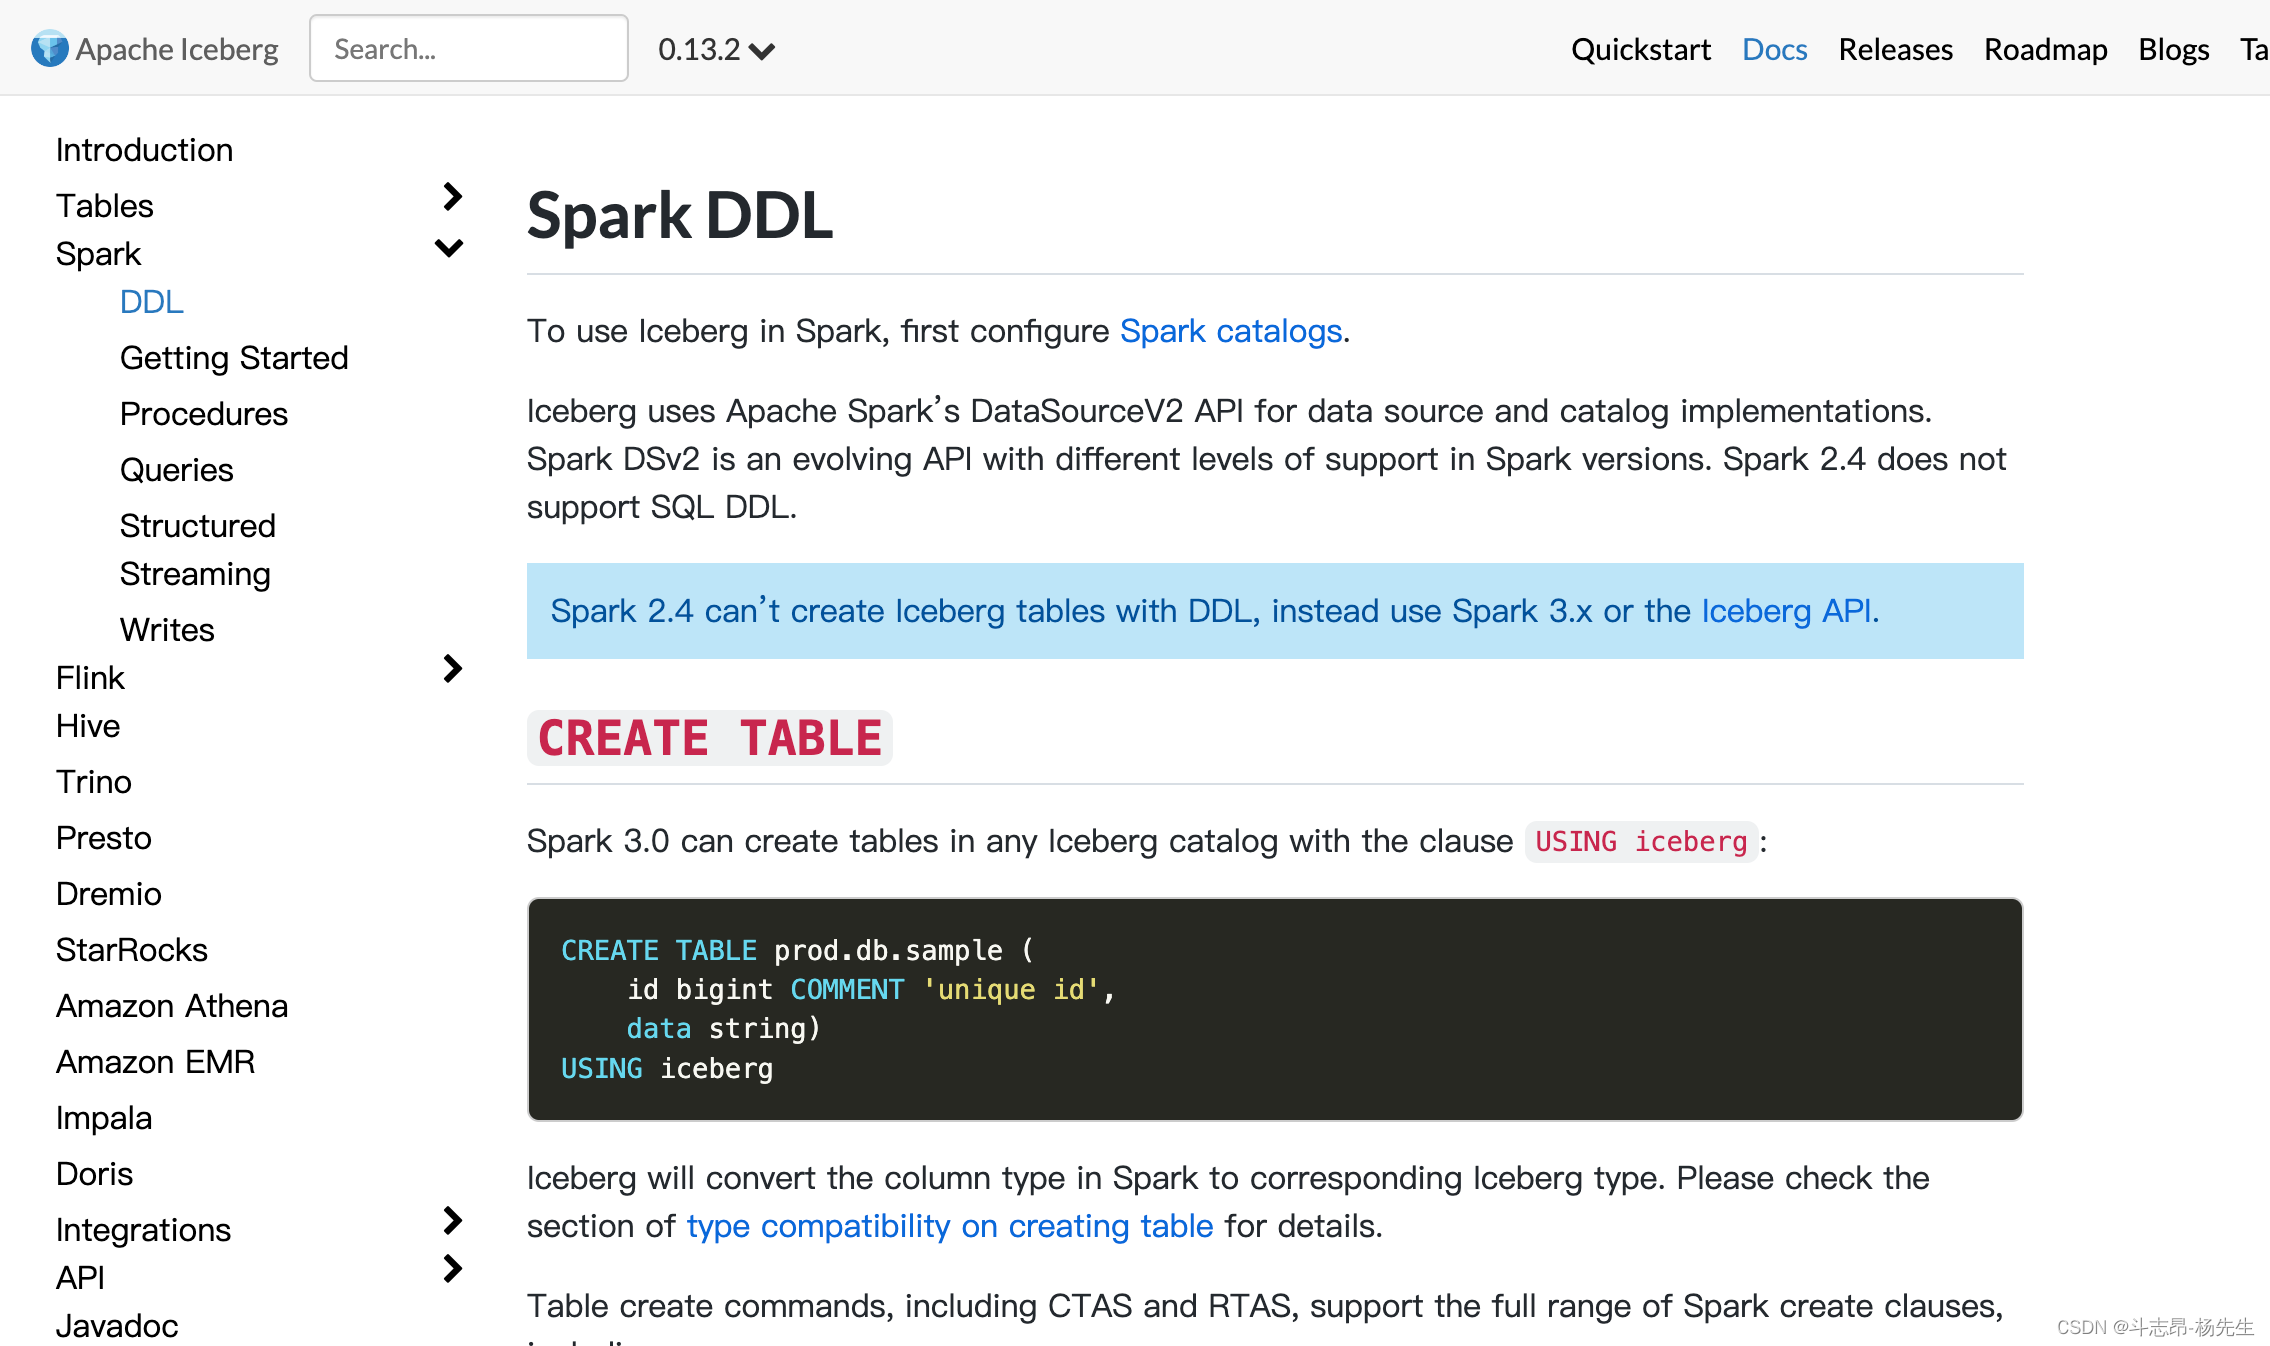
- Spark可以操作Iceberg数据湖,这里使用的Iceberg的版本为0.13.2,此版本与 Spark3.x 版本之上兼容。
添加依赖
- pom.xml添加依赖包:
<properties> <spark.version>3.2.1spark.version> <scala.version>2.13scala.version> <iceberg.version>0.13.2iceberg.version> properties> <dependencies> <dependency> <groupId>org.apache.sparkgroupId> <artifactId>spark-core_${scala.version}artifactId> <version>${spark.version}version> dependency> <dependency> <groupId>org.apache.sparkgroupId> <artifactId>spark-sql_${scala.version}artifactId> <version>${spark.version}version> dependency> <dependency> <groupId>org.apache.sparkgroupId> <artifactId>spark-hive_${scala.version}artifactId> <version>${spark.version}version> dependency> <dependency> <groupId>org.apache.sparkgroupId> <artifactId>spark-streaming_${scala.version}artifactId> <version>${spark.version}version> dependency> <dependency> <groupId>org.apache.sparkgroupId> <artifactId>spark-streaming-kafka-0-10_${scala.version}artifactId> <version>${spark.version}version> dependency> <dependency> <groupId>org.apache.sparkgroupId> <artifactId>spark-sql-kafka-0-10_${scala.version}artifactId> <version>${spark.version}version> dependency> <dependency> <groupId>org.apache.iceberggroupId> <artifactId>iceberg-spark3artifactId> <version>${iceberg.version}version> dependency> <dependency> <groupId>org.apache.iceberggroupId> <artifactId>iceberg-spark3-runtimeartifactId> <version>${iceberg.version}version> dependency> <dependency> <groupId>org.apache.avrogroupId> <artifactId>avroartifactId> <version>1.10.2version> dependency> <dependency> <groupId>org.apache.parquetgroupId> <artifactId>parquet-hadoopartifactId> <version>1.12.0version> dependency> // 其它省略... <dependencies>- 1
- 2
- 3
- 4
- 5
- 6
- 7
- 8
- 9
- 10
- 11
- 12
- 13
- 14
- 15
- 16
- 17
- 18
- 19
- 20
- 21
- 22
- 23
- 24
- 25
- 26
- 27
- 28
- 29
- 30
- 31
- 32
- 33
- 34
- 35
- 36
- 37
- 38
- 39
- 40
- 41
- 42
- 43
- 44
- 45
- 46
- 47
- 48
- 49
- 50
- 51
- 52
- 53
- 54
- 55
- 56
- 57
- 58
- 59
- 60
- 61
- 62
Spark 设置 Catalog 配置
- 以下操作主要是 SparkSQL 操作 Iceberg,同样 Spark 中支持两种 Catalog 的设置:hive和hadoop。
- Hive Catalog 就是 iceberg 表存储使用 Hive 默认的数据路径
- Hadoop Catalog 需要指定 Iceberg 格式表存储路径。
- 在 SparkSQL 代码中通过以下方式来指定使用的 Catalog:
val spark = SparkSession.builder().appName(this.getClass.getSimpleName).master("local[*]") // 指定hive catalog, catalog名称为hive_prod .config("spark.sql.catalog.hive_prod", "org.apache.iceberg.spark.SparkCatalog") .config("spark.sql.catalog.hive_prod.type", "hive") .config("spark.sql.catalog.hive_prod.uri", "thrift://node03:9083") .config("iceberg.engine.hive.enabled", "true") // 指定hadoop catalog,catalog名称为hadoop_prod .config("spark.sql.catalog.hadoop_prod", "org.apache.iceberg.spark.SparkCatalog") .config("spark.sql.catalog.hadoop_prod.type", "hadoop") .config("spark.sql.catalog.hadoop_prod.warehouse", "hdfs://node01:8020/spark_iceberg") .getOrCreate()- 1
- 2
- 3
- 4
- 5
- 6
- 7
- 8
- 9
- 10
- 11
使用 Hive Catalog 管理 Iceberg 表
- 使用 Hive Catalog 管理 Iceberg 表默认数据存储在 Hive 对应的 Warehouse 目录下,在 Hive 中会自动创建对应的 Iceberg 表,SparkSQL 相当于是 Hive 客户端,需要额外设置 iceberg.engine.hive.enabled 属性为 true,否则在 Hive 对应的 Iceberg 格式表中查询不到数据。
// 1. 创建表: hive_prod:指定catalog名称, default:指定Hive中存在的库, test: 创建的iceberg表名 spark.sql( """ | create table if not exists hive_prod.default.test(id int, name string, age int) using iceberg """.stripMargin) // 2. 插入数据 spark.sql( """ | insert into hive_prod.default.test values(1, 'zhangsan', 23),(1, 'lisi', 14),(1, 'wangwu', 35) """.stripMargin) // 3. 查询数据 spark.sql( """ | select * from hive_prod.default.test """.stripMargin).show()- 1
- 2
- 3
- 4
- 5
- 6
- 7
- 8
- 9
- 10
- 11
- 12
- 13
- 14
- 15
- 16
- 17

- hive 中也能查询数据:

// 4. 删除表 spark.sql( """ | drop table hive_prod.default.test """.stripMargin)- 1
- 2
- 3
- 4
- 5
注意:
- 创建表时,表名称为:
${hive catalog名称}.${Hive中库名}.${创建的Iceberg格式表名} - 表创建之后,可以在 Hive 中查询到对应的 test 表,创建的是 Hive 外表,在对应的Hive warehouse 目录下可以看到对应的数据目录。
- 删除表后,数据会被删除,但是表目录还是存在,如果彻底删除数据,需要把对应的表目录删除。
使用 Hadoop Catalog 管理 Iceberg 表
- 使用Hadoop Catalog管理表,需要指定对应Iceberg存储数据的目录。
// 1. 创建表 hadoop_prod: 指定Hadoop catalog名称, default: 指定库名称, test: 创建的iceberg表名 spark.sql( """ | create table if not exists hadoop_prod.default.test(id int,name string,age int) using iceberg """.stripMargin); // 2. 插入数据 spark.sql( """ | insert into hadoop_prod.default.test values(1, 'zhangsan', 23),(2, 'lisi', 14),(3, 'wangwu', 35) """.stripMargin); // 3. 查询数据 spark.sql( """ | select * from hadoop_prod.default.test """.stripMargin).show();- 1
- 2
- 3
- 4
- 5
- 6
- 7
- 8
- 9
- 10
- 11
- 12
- 13
- 14
- 15
- 16
- 17
注意:
- 创建表时,表名称为:
${hadoop catalog名称}.${随意定义库名}.${Iceberg格式表名} - 表创建之后,可以在 hadoop_prod 名称对应的目录下创建表
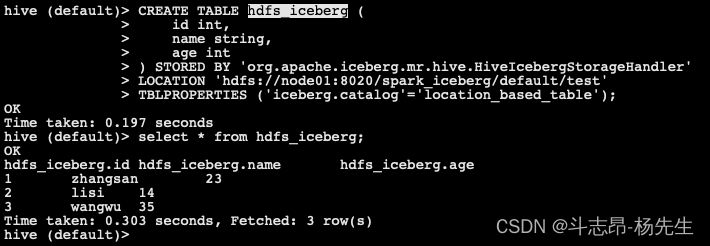
- 创建对应的Hive表映射数据:在 hive 中执行以下建表语句
CREATE TABLE hdfs_iceberg ( id int, name string, age int ) STORED BY 'org.apache.iceberg.mr.hive.HiveIcebergStorageHandler' LOCATION 'hdfs://node01:8020/spark_iceberg/default/test' TBLPROPERTIES ('iceberg.catalog'='location_based_table');- 1
- 2
- 3
- 4
- 5
- 6
- 7
- 在Hive中查询“hdfs_iceberg”表数据如下:
// 5. 删除表:删除iceberg表后,数据被删除,对应的库目录存在。 spark.sql( """ | drop table hadoop_prod.default.test """.stripMargin);- 1
- 2
- 3
- 4
- 5
2. Spark 与 Iceberg 整合DDL操作
- 这里使用 Hadoop Catalog 来演示 Spark 与 Iceberg 的 DDL 操作。
CREATE TABLE 创建表
- Create table 创建Iceberg表,创建表不仅可以创建普通表还可以创建分区表,再向分区表中插入一批数据时,必须对数据中分区列进行排序,否则会出现文件关闭错误,代码如下:
// 1. 创建普通表 spark.sql( """ | create table if not exists hadoop_prod.default.normal_tbl(id int,name string,age int) using iceberg """.stripMargin) // 2. 创建分区表,以 loc 列为分区字段 spark.sql( """ | create table if not exists hadoop_prod.default.partition_tbl(id int,name string,age int,loc string) using iceberg partitioned by (loc) """.stripMargin) // 3. 向分区表中插入数据 spark.sql( """ | insert into table hadoop_prod.default.partition_tbl values (1,"zs",18,"bj"),(3,"ww",20,"sz"),(2,"ls",19,"sh"),(4,"ml",21,"gz") """.stripMargin) // 4. 查询 spark.sql("select * from hadoop_prod.default.partition_tbl").show()- 1
- 2
- 3
- 4
- 5
- 6
- 7
- 8
- 9
- 10
- 11
- 12
- 13
- 14
- 15
- 16
- 17
- 18
- 19
- 20

- 创建Iceberg分区时,还可以通过一些转换表达式对timestamp列来进行转换,创建隐藏分区,常用的转换表达式有如下几种:
- years(ts):按照年分区
// 创建分区表 partition_tbl1,指定分区为year spark.sql( """ | create table if not exists hadoop_prod.default.partition_tbl1(id int ,name string,age int,register_ts timestamp) using iceberg | partitioned by (years(register_ts)) """.stripMargin) // 插入数据 spark.sql( """ | insert into hadoop_prod.default.partition_tbl1 values | (1,'zs',18,cast(1608469830 as timestamp)), | (2,'ls',19,cast(1634559630 as timestamp)), | (3,'ww',20,cast(1603096230 as timestamp)), | (4,'ml',21,cast(1639920630 as timestamp)), | (5,'tq',22,cast(1608279630 as timestamp)), | (6,'gb',23,cast(1576843830 as timestamp)) """.stripMargin) // 查询 spark.sql("select * from hadoop_prod.default.partition_tbl1").show()- 1
- 2
- 3
- 4
- 5
- 6
- 7
- 8
- 9
- 10
- 11
- 12
- 13
- 14
- 15
- 16
- 17
- 18
- 19
- 20
- 21
- 数据结果如下,在 HDFS 中是按照年进行分区了

- months(ts):按照“年-月”月级别分区
// 创建分区表 partition_tbl2,指定分区为months,会按照“年-月”分区 spark.sql( """ | create table if not exists hadoop_prod.default.partition_tbl2(id int ,name string,age int,register_ts timestamp) using iceberg | partitioned by (months(register_ts)) """.stripMargin) // 插入数据 spark.sql( """ | insert into hadoop_prod.default.partition_tbl2 values | (1,'zs',18,cast(1608469830 as timestamp)), | (2,'ls',19,cast(1634559630 as timestamp)), | (3,'ww',20,cast(1603096230 as timestamp)), | (4,'ml',21,cast(1639920630 as timestamp)), | (5,'tq',22,cast(1608279630 as timestamp)), | (6,'gb',23,cast(1576843830 as timestamp)) """.stripMargin) // 查询 spark.sql("select * from hadoop_prod.default.partition_tbl2").show()- 1
- 2
- 3
- 4
- 5
- 6
- 7
- 8
- 9
- 10
- 11
- 12
- 13
- 14
- 15
- 16
- 17
- 18
- 19
- 20
- 21

- days(ts)或者date(ts):按照“年-月-日”天级别分区
// 创建分区表 partition_tbl3,指定分区为days,会按照“年-月-日”分区 spark.sql( """ | create table if not exists hadoop_prod.default.partition_tbl3(id int ,name string,age int,register_ts timestamp) using iceberg | partitioned by (days(register_ts)) """.stripMargin) // 插入数据 spark.sql( """ | insert into hadoop_prod.default.partition_tbl3 values | (1,'zs',18,cast(1608469830 as timestamp)), | (2,'ls',19,cast(1634559630 as timestamp)), | (3,'ww',20,cast(1603096230 as timestamp)), | (4,'ml',21,cast(1639920630 as timestamp)), | (5,'tq',22,cast(1608279630 as timestamp)), | (6,'gb',23,cast(1576843830 as timestamp)) """.stripMargin) // 查询 spark.sql("select * from hadoop_prod.default.partition_tbl3").show()- 1
- 2
- 3
- 4
- 5
- 6
- 7
- 8
- 9
- 10
- 11
- 12
- 13
- 14
- 15
- 16
- 17
- 18
- 19
- 20
- 21

- hours(ts)或者date_hour(ts):按照“年-月-日-时”小时级别分区
// 创建分区表 partition_tbl4,指定分区为hours,会按照“年-月-日-时”分区 spark.sql( """ | create table if not exists hadoop_prod.default.partition_tbl4(id int ,name string,age int,register_ts timestamp) using iceberg | partitioned by (days(register_ts)) """.stripMargin) // 插入数据 spark.sql( """ | insert into hadoop_prod.default.partition_tbl4 values | (1,'zs',18,cast(1608469830 as timestamp)), | (2,'ls',19,cast(1634559630 as timestamp)), | (3,'ww',20,cast(1603096230 as timestamp)), | (4,'ml',21,cast(1639920630 as timestamp)), | (5,'tq',22,cast(1608279630 as timestamp)), | (6,'gb',23,cast(1576843830 as timestamp)) """.stripMargin) // 查询 spark.sql("select * from hadoop_prod.default.partition_tbl4").show()- 1
- 2
- 3
- 4
- 5
- 6
- 7
- 8
- 9
- 10
- 11
- 12
- 13
- 14
- 15
- 16
- 17
- 18
- 19
- 20
- 21

- Iceberg支持的时间分区目前和将来只支持UTC、UTC是国际时,UTC+8就是国际时加八小时,是东八区时间,也就是北京时间,所以我们看到上面分区时间与数据时间不一致。
- 除了以上常用的时间隐藏分区外,Iceberg还支持bucket(N,col)分区,这种分区方式可以按照某列的hash值与N取余决定数据去往的分区。truncate(L,col),这种隐藏分区可以将字符串列截取L长度,相同的数据会被分到相同分区中。
CREATE TAEBL … AS SELECT
- Iceberg支持“create table … as select ”语法,可以从查询语句中创建一张表,并插入对应的数据,操作如下:
// 创建表 spark.sql("create table hadoop_prod.default.my_tb1(id int,name string,age int) using iceberg") // 向表中插入数据 spark.sql("insert into table hadoop_prod.default.my_tb1 values (1,'zs',18),(3,'ww',20),(2,'ls',19),(4,'ml',21)") // 查询数据 spark.sql("select * from hadoop_prod.default.my_tb1").show() // 查询插入 spark.sql("create table hadoop_prod.default.my_tb2 using iceberg as select id,name,age from hadoop_prod.default.my_tb1") // 查询 spark.sql("select * from hadoop_prod.default.my_tb2").show()- 1
- 2
- 3
- 4
- 5
- 6
- 7
- 8
- 9
- 10
REPLACE TABLE … AS SELECT
- Iceberg支持“replace table … as select ”语法,可以从查询语句中重建一张表,并插入对应的数据,操作如下:
// 创建表 spark.sql("create table hadoop_prod.default.my_tb3(id int,name string,age int) using iceberg") // 向表中插入数据 spark.sql("insert into table hadoop_prod.default.my_tb3 values (1,'zs',18),(3,'ww',20),(2,'ls',19),(4,'ml',21)") // 查询数据 spark.sql("select * from hadoop_prod.default.my_tb3").show() // 查询插入 spark.sql("replace table hadoop_prod.default.my_tb2 using iceberg as select * from hadoop_prod.default.my_tb3") // 查询 spark.sql("select * from hadoop_prod.default.my_tb2").show()- 1
- 2
- 3
- 4
- 5
- 6
- 7
- 8
- 9
- 10
DROP TABLE
- 删除iceberg表时直接执行:“drop table xxx”语句即可,删除表时,表数据会被删除,但是库目录存在。
spark.sql("drop table hadoop_prod.default.mytb1")- 1
ALTER TABLE
- Iceberg的alter操作在Spark3.x版本中支持,alter一般包含以下操作:
- 添加列:ALTER TABLE … ADD COLUMN
- 删除列:ALTER TABLE … DROP COLUMN
- 重命名列:ALTER TABLE … RENAME COLUMN
// 创建表 spark.sql("create table hadoop_prod.default.test(id int,name string,age int) using iceberg") // 向表中插入数据 spark.sql("insert into table hadoop_prod.default.test values (1,'zs',18),(2,'ls',19),(3,'ww',20)") // 查询 spark.sql("select * from hadoop_prod.default.test").show() // 添加字段,给 test 表增加列: gender、loc spark.sql("alter table hadoop_prod.default.test add column gender string, loc string") // 删除字段,给 test 表删除列: age spark.sql("alter table hadoop_prod.default.test drop column age") // 再次查询 spark.sql("select * from hadoop_prod.default.test").show() /* 最终表展示的列少了age列,多了gender、loc列 +---+----+------+----+ | id|name|gender| loc| +---+----+------+----+ | 1| zs| null|null| | 2| ls| null|null| | 3| ww| null|null| +---+----+------+----+ */ // 重命名列 spark.sql("alter table hadoop_prod.default.test rename column gender to xxx") // 再次查询 spark.sql("select * from hadoop_prod.default.test").show() /* 最终表展示的列 gender列变成了xxx列 +---+----+----+----+ | id|name| xxx| loc| +---+----+----+----+ | 1| zs|null|null| | 2| ls|null|null| | 3| ww|null|null| +---+----+----+----+ */- 1
- 2
- 3
- 4
- 5
- 6
- 7
- 8
- 9
- 10
- 11
- 12
- 13
- 14
- 15
- 16
- 17
- 18
- 19
- 20
- 21
- 22
- 23
- 24
- 25
- 26
- 27
- 28
- 29
- 30
- 31
- 32
- 33
- 34
- 35
- 36
ALTER TABLE 分区操作
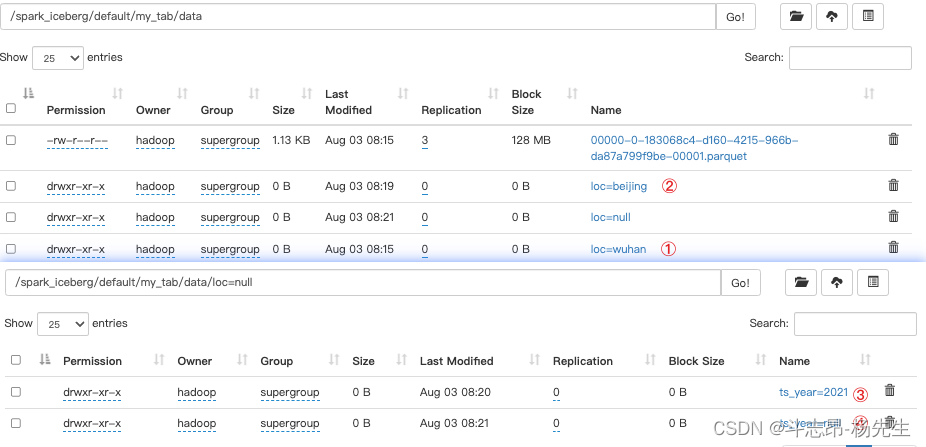
- alter 分区操作包括增加分区和删除分区操作,这种分区操作在Spark3.x之后被支持,spark2.4版本不支持,并且使用时,必须在spark配置中加入spark.sql.extensions属性,其值为:org.apache.iceberg.spark.extensions.IcebergSparkSessionExtensions,在添加分区时还支持分区转换,语法如下:
- 添加分区:ALTER TABLE … ADD PARTITION FIELD
- 删除分区:ALTER TABLE … DROP PARTITION FIELD
-- 创建普通表 create table if not exists hadoop_prod.default.my_tab(id int,name string,loc string,ts timestamp) using iceberg; -- 向表中插入数据 insert into hadoop_prod.default.my_tab values (1,'zs','shenzhen',cast(1608469830 as timestamp)); -- 将表loc列添加为分区列,并插入数据 alter table hadoop_prod.default.my_tab add partition field loc; insert into hadoop_prod.default.my_tab values (2,'li','wuhan',cast(1634559630 as timestamp));- 1
- 2
- 3
- 4
- 5
- 6
- 7
- 8
- 9

- 注意:添加分区字段是元数据操作,不会改变现有的表数据,新数据将使用新分区写入数据,现有数据将继续保留在原有的布局中。
-- 将ts列进行转换作为分区列,插入数据 alter table hadoop_prod.default.my_tab add partition field years(ts); insert into hadoop_prod.default.my_tab values (3,'ww','beijing',cast(1576843830 as timestamp)); -- 删除分区loc,插入数据 alter table hadoop_prod.default.my_tab drop partition field loc; insert into hadoop_prod.default.my_tab values (4,'zl','shanghai',cast(1639920630 as timestamp)); -- 删除分区删除分区years(ts),插入数据 alter table hadoop_prod.default.my_tab drop partition field years(ts); insert into hadoop_prod.default.my_tab values (5,'tq','shanghai',cast(1634559630 as timestamp));- 1
- 2
- 3
- 4
- 5
- 6
- 7
- 8
- 9
- 10
- 11
3. Spark 与 Iceberg 整合查询操作
DataFrame API加载Iceberg中的数据
- Spark操作Iceberg不仅可以使用SQL方式查询Iceberg中的数据,还可以使用DataFrame方式加载Iceberg表中的数据,可以通过spark.table(Iceberg表名)或者spark.read.format(“iceberg”).load(“iceberg data path”)来加载对应Iceberg表中的数据,操作如下:
// 1. SQL 方式读取Iceberg中的数据 spark.sql("select * from hadoop_prod.default.my_tb1").show() // 2. 使用DataFrame方式,建议使用SQL方式 // 方式一 val df1: DataFrame = spark.table("hadoop_prod.default.my_tb1") df1.show() // 方式二 val df2: DataFrame = spark.read.format("iceberg").load("hdfs://node01:8020/spark_iceberg/default/my_tb1") df2.show()- 1
- 2
- 3
- 4
- 5
- 6
- 7
- 8
- 9
查询表快照
- 每次向Iceberg表中commit数据都会生成对应的一个快照,我们可以通过查询
${catalog名称}.${库名}.${Iceberg表}.snapshots来查询对应Iceberg表中拥有的所有快照,操作如下:
// 查看Iceberg表快照信息 spark.sql("select * from hadoop_prod.default.my_tb1.snapshots").show(false)- 1
- 2

查询表历史
- 对Iceberg表查询表历史就是查询Iceberg表快照信息内容,与查询表快照类似,通过
${catalog名称}.${库名}.${Iceberg表}.history进行查询,操作如下:
// 查看Iceberg表历史信息 spark.sql("select * from hadoop_prod.default.my_tb1.history").show(false) /* +-----------------------+-------------------+---------+-------------------+ |made_current_at |snapshot_id |parent_id|is_current_ancestor| +-----------------------+-------------------+---------+-------------------+ |2022-07-30 00:15:07.942|8409100036511820619|null |true | +-----------------------+-------------------+---------+-------------------+ */- 1
- 2
- 3
- 4
- 5
- 6
- 7
- 8
- 9
查询表data files
- 通过
${catalog名称}.${库名}.${Iceberg表}.files来查询Iceberg表对应的data files 信息,操作如下:
// 查看Iceberg表中的data files spark.sql("select * from hadoop_prod.default.my_tb1.files").show(false)- 1
- 2

查询manifests
- 通过
${catalog名称}.${库名}.${Iceberg表}.manifests来查询表对应的manifests信息,具体操作如下:
// 查询Manifests spark.sql("select * from hadoop_prod.default.my_tb1.manifests").show(false)- 1
- 2

查询指定快照数据
- 查询Iceberg表数据还可以指定
snapshot-id来查询指定快照的数据,这种方式可以使用DataFrame Api方式来查询
// 查询指定快照数据 spark.read.option("snapshot-id", 8409100036511820619L).format("iceberg") .load("hdfs://node01:8020/spark_iceberg/default/my_tb1") .show() /* +---+----+---+ | id|name|age| +---+----+---+ | 1| zs| 18| | 3| ww| 20| | 2| ls| 19| | 4| ml| 21| +---+----+---+ */- 1
- 2
- 3
- 4
- 5
- 6
- 7
- 8
- 9
- 10
- 11
- 12
- 13
- 14
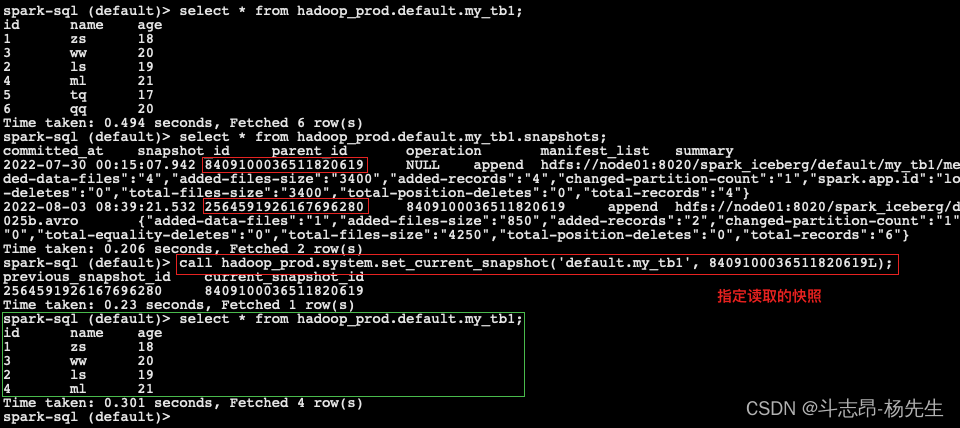
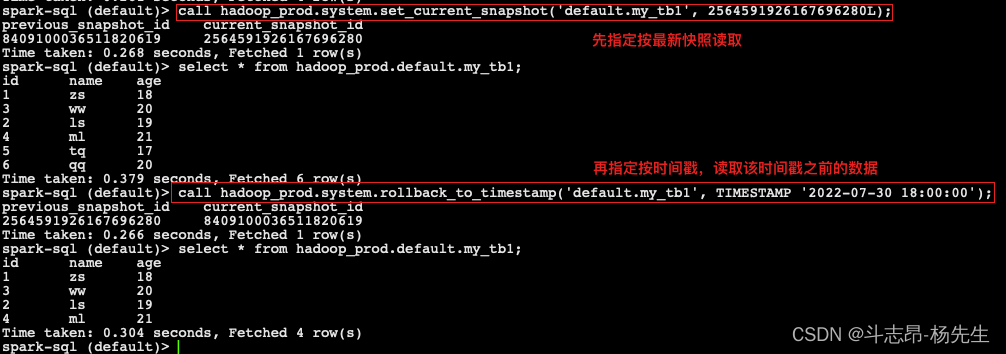
- Spark3.x 版本之后,SQL指定快照语法为:
CALL ${Catalog 名称}.system.set_current_snapshot("${库名.表名}",快照ID)
-- 插入数据 insert into table hadoop_prod.default.my_tb1 values (5,'tq',17),(6,'qq',20); -- 查询表数据 select * from hadoop_prod.default.my_tb1; -- 查询表快照 select * from hadoop_prod.default.my_tb1.snapshots; -- 指定读取快照 call hadoop_prod.system.set_current_snapshot('default.my_tb1', 8409100036511820619L); -- 再次查询表数据 select * from hadoop_prod.default.my_tb1;- 1
- 2
- 3
- 4
- 5
- 6
- 7
- 8
- 9
- 10
根据时间戳查询数据
- Spark读取Iceberg表可以指定as-of-timestamp参数,通过指定一个毫秒时间参数查询Iceberg表中数据,iceberg会根据元数据找出timestamp-ms <= as-of-timestamp 对应的 snapshot-id,也只能通过DataFrame Api把数据查询出来,Spark3.x版本之后支持SQL指定时间戳查询数据。具体操作如下:
// call hadoop_prod.system.set_current_snapshot('default.my_tb1', 2564591926167696280L); // 根据时间戳查询数据 spark.read.option("as-of-timestamp", "1659466148000") .format("iceberg") .load("hdfs://node01:8020/spark_iceberg/default/my_tb1") .show() /* +---+----+---+ | id|name|age| +---+----+---+ | 1| zs| 18| | 3| ww| 20| | 2| ls| 19| | 4| ml| 21| +---+----+---+ */- 1
- 2
- 3
- 4
- 5
- 6
- 7
- 8
- 9
- 10
- 11
- 12
- 13
- 14
- 15
- 16
- Spark3.x 版本之后,SQL根据时间戳查询最近快照语法为:
CALL ${Catalog 名称}.system.rollback_to_timestamp("${库名.表名}", TIMESTAMP '日期数据'),操作如下:
-- 指定读取快照 call hadoop_prod.system.rollback_to_timestamp('default.my_tb1', TIMESTAMP '2022-07-30 18:00:00'); -- 查询表数据 select * from hadoop_prod.default.my_tb1;- 1
- 2
- 3
- 4
回滚快照
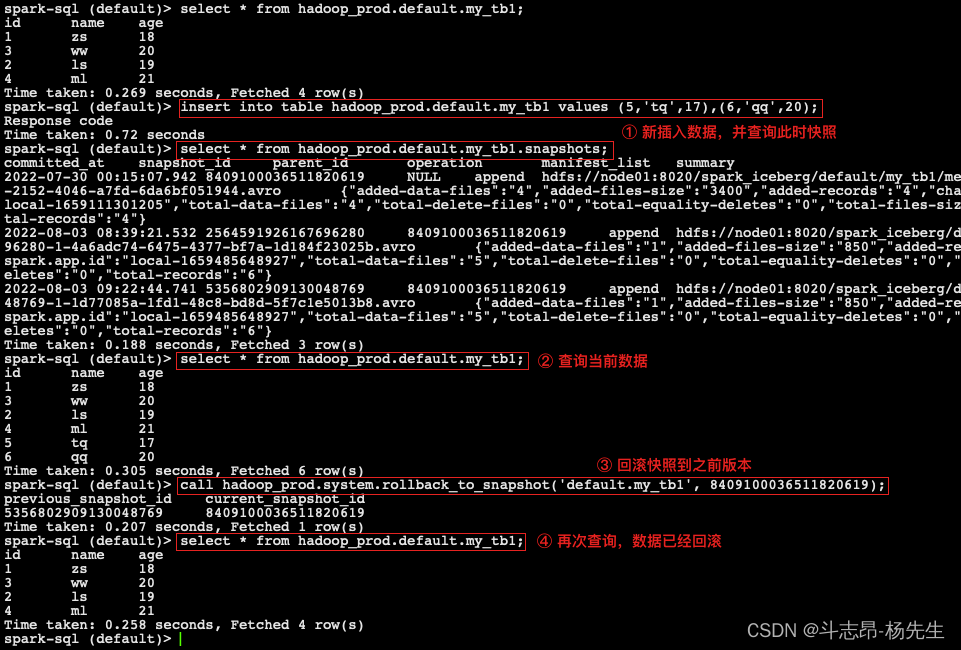
- 在Iceberg中可以回滚快照,可以借助于Java 代码实现,Spark DataFrame Api 不能回滚快照,在Spark3.x版本之后,支持SQL回滚快照。回滚快照之后,Iceberg对应的表中会生成新的Snapshot-id,重新查询,回滚生效,具体操作如下:
// 回滚快照 spark.sql("select * from hadoop_prod.default.my_tb1").show() // 回滚前 val conf = new Configuration() val catalog = new HadoopCatalog(conf, "hdfs://node01:8020/spark_iceberg") val table = catalog.loadTable(TableIdentifier.of("default", "my_tb1")) table.manageSnapshots().rollbackTo(8409100036511820619L).commit() spark.sql("select * from hadoop_prod.default.my_tb1").show() // 回滚后- 1
- 2
- 3
- 4
- 5
- 6
- 7
- 回滚快照之后,在对应的Iceberg表中会生成新的Snapshot-id,再次查询后,会看到数据是回滚快照之后的数据。
- Spark3.x 版本之后,SQL回滚快照语法为:
CALL ${Catalog 名称}.system.rollback_to_snapshot("${库名.表名}", 快照ID)
-- 回滚快照 call hadoop_prod.system.rollback_to_snapshot('default.my_tb1', 8409100036511820619);- 1
- 2
合并iceberg表的数据文件
- 针对Iceberg表每次commit都会生成一个parquet数据文件,有可能一张Iceberg表对应的数据文件非常多,那么我们通过Java Api 方式对Iceberg表可以进行数据文件合并,数据文件合并之后,会生成新的Snapshot且原有数据并不会被删除,如果要删除对应的数据文件需要通过 Expire Snapshot 来实现,具体操作如下:
/** ***************** 1. 创建iceberg表表my_test *******************/ spark.sql("create table if not exists hadoop_prod.default.my_test(id int,name string,age int) using iceberg") /** ***************** 2. 向表my_test中插入一批数据 *******************/ val df: DataFrame = spark.read.textFile(this.getClass.getClassLoader.getResource("nameinfo.txt").getPath) .map(line => { val arr: Array[String] = line.split(",") (arr(0).toInt, arr(1), arr(2).toInt) }).toDF("id", "name", "age") df.writeTo("hadoop_prod.default.my_test").append()- 1
- 2
- 3
- 4
- 5
- 6
- 7
- 8
- 9
- 10
- 以上代码执行两次,插入数据后我们可以看到Iceberg表元数据目录如下:
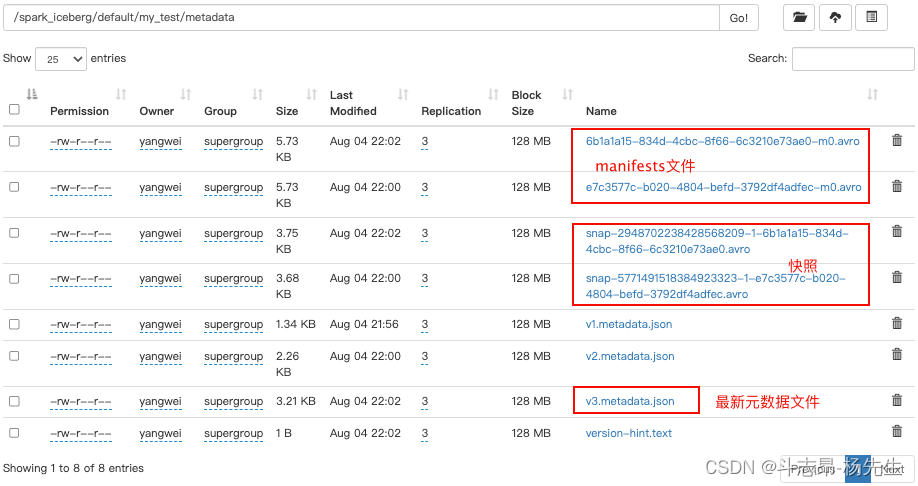
- Iceberg合并小文件时并不会删除被合并的文件,Compact是将小文件合并成大文件并创建新的Snapshot,如果要删除文件需要通过Expire Snapshots来实现。
/******************* 3. 合并小文件数据 *******************/ val catalog = new HadoopCatalog(new Configuration(), "hdfs://node01:8020/spark_iceberg") val table: Table = catalog.loadTable(TableIdentifier.of("default", "my_test")) SparkActions.get().rewriteDataFiles(table) .filter(Expressions.greaterThanOrEqual("id", 1)) .option("target-file-size-bytes", "10240") // 10KB .execute()- 1
- 2
- 3
- 4
- 5
- 6
- 7
删除历史快照
- 通过 Java Api 删除历史快照,可以指定时间戳,当前时间戳之前的所有快照都会被删除(如果指定时间比最后一个快照时间还大,会保留最新快照数据),可以通过查看最新元数据 json 文件来查找要指定的时间。例如,表my_test 最新的json元数据文件信息如下:

- 这里删除时间为“1659658697197”之前的所有快照信息,在删除快照时,数据data目录中过期的数据parquet文件也会被删除(例如:快照回滚后不再需要的文件),代码操作如下:
/******************* 4. 删除历史快照 *******************/ table.expireSnapshots().expireOlderThan(1659658697197L).commit()- 1
- 2
- 注意:删除对应快照数据时,Iceberg表对应的Parquet格式数据也会被删除,到底哪些parquet文件数据被删除决定于最后的“snap-xx.avro”中对应的manifest list数据对应的parquet数据。
- 随着不断删除snapshot,在Iceberg表中不再有manifest文件对应的parquet文件也会被删除。
- 在Spark3.x版本之后,我们还可以使用SQL方式来删除快照方式,SQL删除快照语法为:
CALL ${Catalog 名称}.system.expire_snapshots("${库名.表名}", TIMESTAMP '年-月-日 时-分-秒.000', N) - 每次Commit生成对应的Snapshot之外,还会有一份元数据文件“Vx-metadata.json”文件产生,我们可以在创建Iceberg表时执行对应的属性决定Iceberg表保留几个元数据文件:
CREATE TABLE ${Catalog名称}.${库名}.${表名} ( id bigint, name string ) using iceberg PARTITIONED BY (loc string) TBLPROPERTIES ( -- 每次表提交后是否删除旧的元数据文件 'write.metadata.delete-after-commit.enabled'= true, -- 要保留旧的元数据文件数量 'write.metadata.previous-version-max' = 3 )- 1
- 2
- 3
- 4
- 5
- 6
- 7
- 8
- 9
- 10
- 11
4. Spark 与 Iceberg 整合写操作
INSERT INTO
insert into是向Iceberg表中插入数据,有两种语法形式:
INSERT INTO tbl VALUES (1,"zs",18),(2,"ls",19) INSERT INTO tbl SELECT ...- 1
- 2
- 3
MERGE INTO
- Iceberg
merge into语法可以对表数据进行行级更新或删除,在 Spark3.x 版本之后支持,其原理是重写包含需要删除和更新行数据所在的 data files。merge into可以使用一个查询结果数据来更新目标表的数据,其语法通过类似 join 关联方式,根据指定的匹配条件对匹配的行数据进行相应操作。语法如下:
MERGE INTO tbl t USING (SELECT ...) s ON t.id = s.id -- 删除 WHEN MATCHED AND ... THEN DELETE -- 更新 WHEN MATCHED AND ... THEN UPDATE SET ... -- 多条件更新 WHEN MATCHED AND ... AND ... THEN UPDATE SET ... -- 匹配不上,向目标表插入数据 WHEN NOT MATCHED ADN ... THEN INSERT (col1,col2...) VALUES(s.col1,s.col2 ...)- 1
- 2
- 3
- 4
- 5
- 6
- 7
- 8
- 9
- 10
- 11
- 举个🌰:
-- 创建表a,并插入数据 create table hadoop_prod.default.t_a(id int, name string, age int) using iceberg; insert into hadoop_prod.default.t_a values(1, 'zs', 13), (2, 'ls', 24), (3, 'ww', 35); -- 创建表b,并插入数据 create table hadoop_prod.default.t_b(id int, name string, age int, tp string) using iceberg; insert into hadoop_prod.default.t_b values(1, 'zs', 23, 'del'),(2, 'ls', 14, 'upd'), (4, 'ww', 25, 'add');- 1
- 2
- 3
- 4
- 5
- 6
- 7
- 使用MERGE INTO 语法向目标表更新、删除、新增数据,将
t_b与t_a表匹配 id:- 若
t_b中 tp 字段是del,则t_a表中对应 id 数据删除; - 若
t_b中 tp 字段是upd,则t_a表中对应 id 数据其他字段进行更新; - 若
t_a与t_b匹配不上,那么将t_b表中数据插入到t_a中。
- 若
merge into hadoop_prod.default.t_a t1 using (select id, name, age, tp from hadoop_prod.default.t_b) t2 on t1.id = t2.id when matched and t2.tp = 'del' then delete when matched and t2.tp = 'upd' then update set t1.name = t2.name, t1.age = t2.age when not matched then insert (id, name, age) values (t2.id, t2.name, t2.age);- 1
- 2
- 3
- 4

注意:更新数据时,在查询的数据中只能有一条匹配的数据更新到目标表,否则将报错。
INSERT OVERWRITE
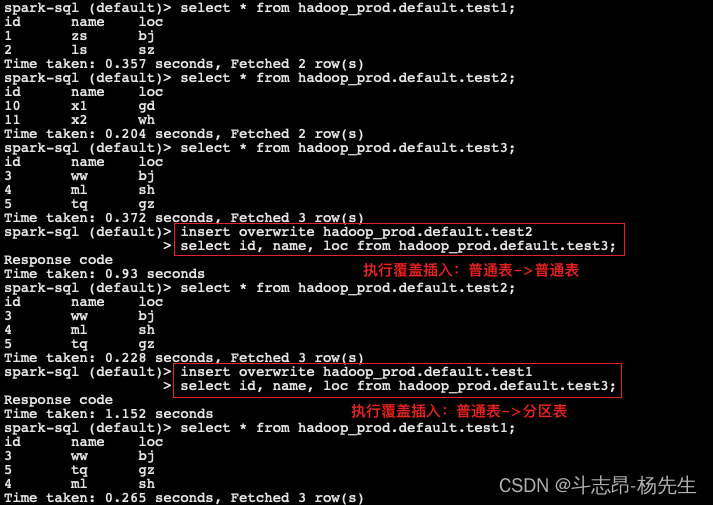
insert overwrite可以覆盖Iceberg表中的数据,这种操作会将表中全部数据替换掉,建议如果有部分数据替换操作可以使用merge into操作。- 对于Iceberg分区表使用
insert overwrite操作时,有两种情况:- 动态覆盖:动态覆盖会全量将原有数据覆盖,并将新插入的数据根据Iceberg表分区规则自动分区,类似Hive中的动态分区。
- 静态覆盖:静态覆盖在向Iceberg中插入数据时,需要手动指定分区,如果当前Iceberg表存在这个分区,那么只有这个分区的数据会被覆盖,其他分区数据不受影响,如果Iceberg表不存在这个分区,那么相当于给Iceberg表增加了个一个分区。
-- 创建 test1 分区表,并插入数据 create table hadoop_prod.default.test1 (id int, name string, loc string) using iceberg partitioned by (loc); insert into hadoop_prod.default.test1 values(1, 'zs', 'bj'), (2, 'ls', 'sz'); -- 创建 test2 普通表,并插入数据 create table hadoop_prod.default.test2 (id int, name string, loc string) using iceberg; insert into hadoop_prod.default.test2 values(10, 'x1', 'gd'), (11, 'x2', 'wh'); -- 创建 test3 普通表,并插入数据 create table hadoop_prod.default.test3 (id int, name string, loc string) using iceberg; insert into hadoop_prod.default.test3 values(3, 'ww', 'bj'), (4, 'ml', 'sh'), (5, 'tq', 'gz');- 1
- 2
- 3
- 4
- 5
- 6
- 7
- 8
- 9
- 10
- 11
- 使用 insert overwrite 读取 test3 表中的数据覆盖到 test2 表中
insert overwrite hadoop_prod.default.test2 select id, name, loc from hadoop_prod.default.test3;- 1
- 2
- 使用 insert overwrite 读取 test3 表数据,动态分区方式覆盖到表 test1
insert overwrite hadoop_prod.default.test1 select id, name, loc from hadoop_prod.default.test3;- 1
- 2
- 静态分区方式,将 iceberg 表 test3 的数据覆盖到 Iceberg 表 test1 中
-- 删除表test1,重新创建表test1 分区表,并插入数据 drop table hadoop_prod.default.test1; create table hadoop_prod.default.test1 (id int, name string, loc string) using iceberg partitioned by (loc); insert into hadoop_prod.default.test1 values(1, 'zs', 'bj'), (2, 'ls', 'sz'); -- 静态分区下,就不要在查询 “loc" 列了,否则重复 insert overwrite hadoop_prod.default.test1 partition (loc = 'js') select id, name from hadoop_prod.default.test3;- 1
- 2
- 3
- 4
- 5
- 6
- 7
- 8
- 9
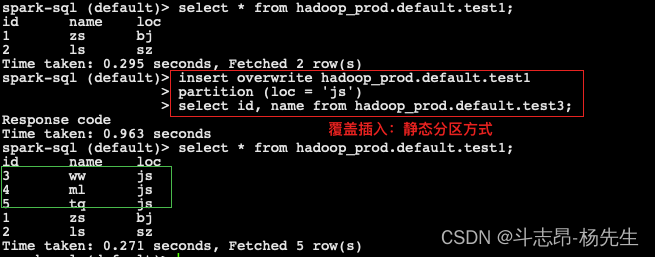
注意:使用insert overwrite 读取test3表数据 静态分区方式覆盖到表 test1,表中其他分区数据不受影响,只会覆盖指定的静态分区数据。
DELETE FROM
- Spark 3.x 版本之后支持
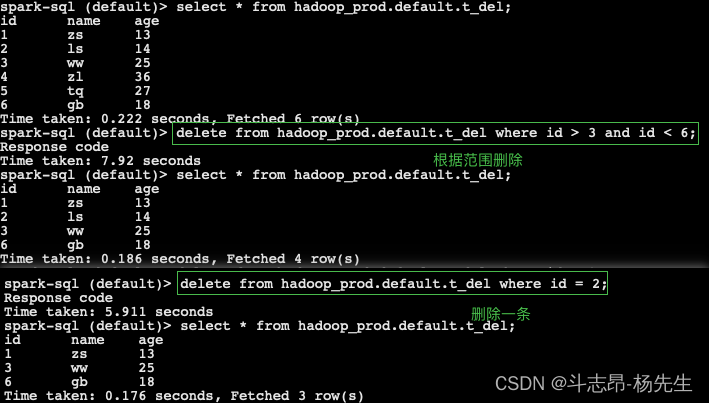
Delete from可以根据指定的 where 条件来删除表中数据。如果 where 条件匹配 Iceberg 表一个分区的数据,Iceberg 仅会修改元数据,如果where条件匹配的表的单个行,则 Iceberg 会重写受影响行所在的数据文件。
-- 创建表 t_del,并插入数据 create table hadoop_prod.default.t_del (id int, name string, age int) using iceberg; insert into hadoop_prod.default.t_del values (1, 'zs', 13), (2, 'ls', 14), (3, 'ww', 25), (4, 'zl', 36), (5, 'tq', 27), (6, 'gb', 18); -- 根据条件范围删除表 t_del 中的数据 delete from hadoop_prod.default.t_del where id > 3 and id < 6; -- 根据条件删除表 t_del 中的一条数据 delete from hadoop_prod.default.t_del where id = 2;- 1
- 2
- 3
- 4
- 5
- 6
- 7
- 8
- 9
UPDATE
- Spark3.x+ 版本支持了 update 更新数据操作,可以根据匹配的条件进行数据更新操作。
-- 创建表 t_upd,并插入数据 create table hadoop_prod.default.t_upd (id int, name string, age int) using iceberg; insert into hadoop_prod.default.t_upd values (1, 'zs', 13), (2, 'ls', 14), (3, 'ww', 25), (4, 'zl', 36), (5, 'tq', 27), (6, 'gb', 18); -- 根据条件范围update表 t_upd 中的数据 update hadoop_prod.default.t_upd set name = 'xxx', age = 30 where id > 3;- 1
- 2
- 3
- 4
- 5
- 6

DataFrame API 写入 Iceberg 表
- Spark 向 Iceberg 中写数据时不仅可以使用 SQL 方式,也可以使用 DataFrame Api 方式操作 Iceberg,建议使用 SQL 方式操作。
- DataFrame 创建 Iceberg 表分为创建普通表和分区表,创建分区表时需要指定分区列,分区列可以是多个列。创建表的语法如下:
df.write(tbl).create() -- 相当于 CREATE TABLE AS SELECT ... df.write(tbl).replace() -- 相当于 REPLACE TABLE AS SELECT ... df.write(tbl).append() -- 相当于 INSERT INTO ... df.write(tbl).overwritePartitions() -- 相当于动态 INSERT OVERWRITE ...- 1
- 2
- 3
- 4
- 举个🌰:
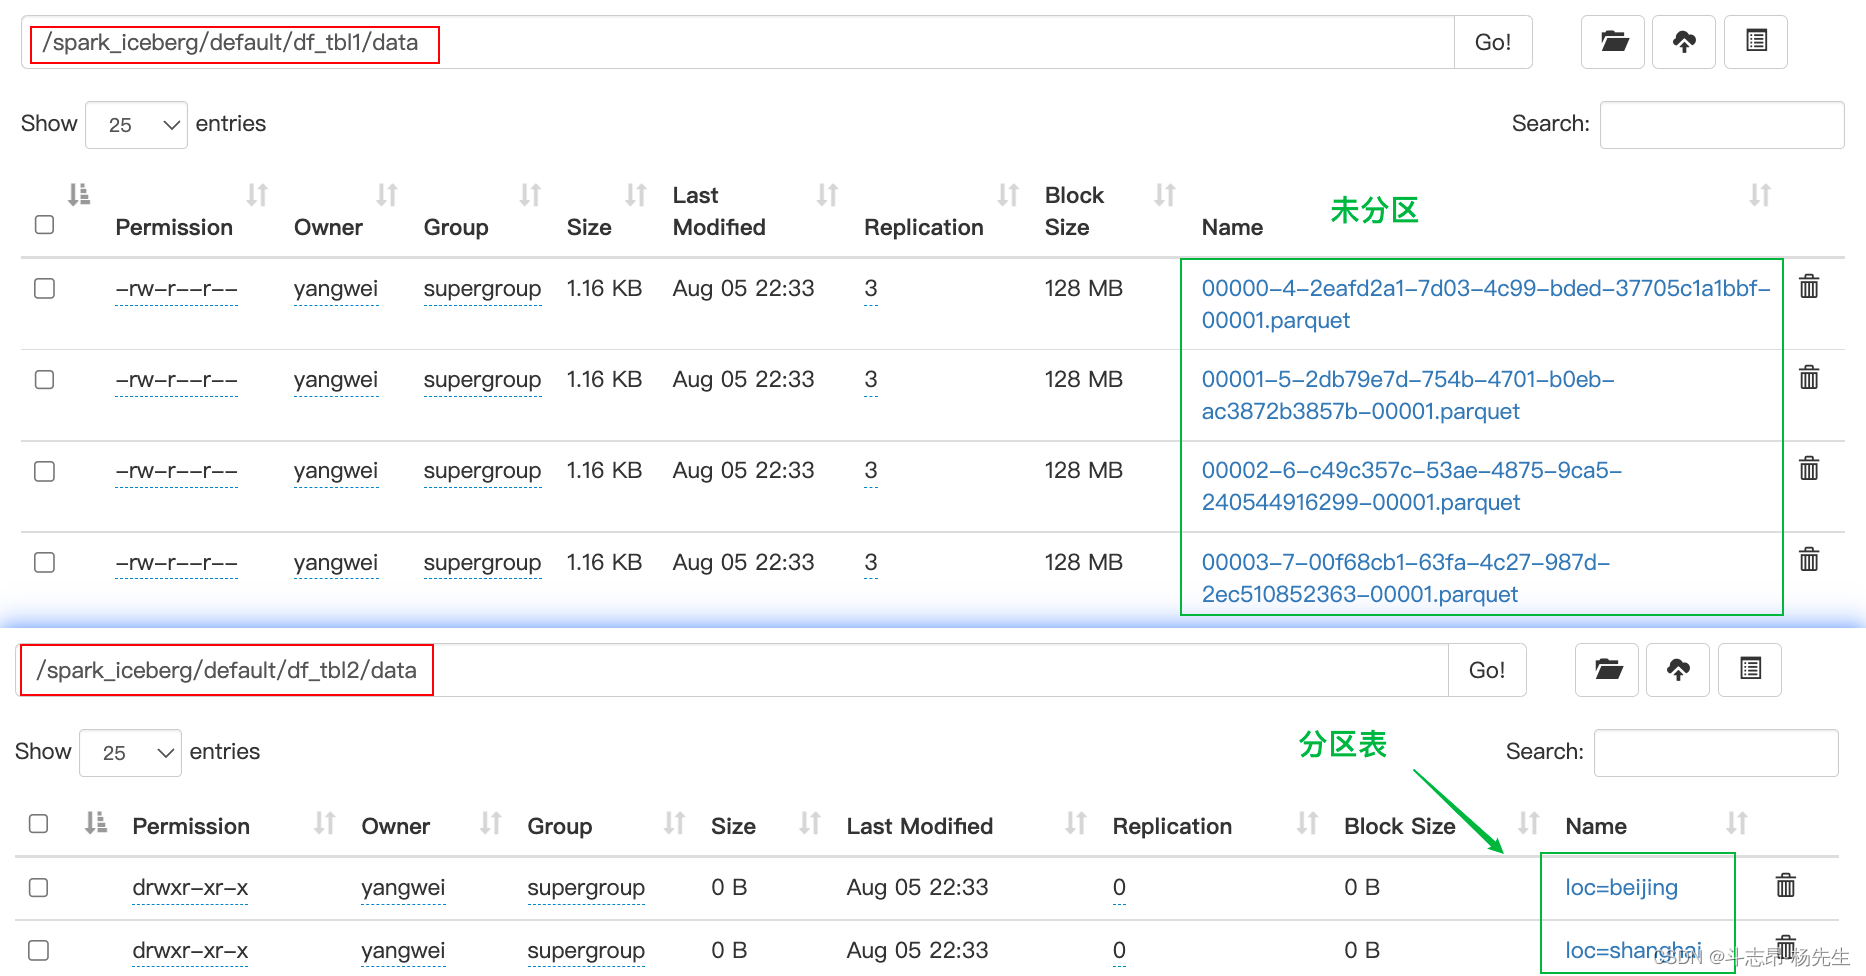
// 1.准备数据,使用DataFrame Api 写入Iceberg表及分区表 val nameJsonList = List[String]( "{\"id\":1,\"name\":\"zs\",\"age\":18,\"loc\":\"beijing\"}", "{\"id\":2,\"name\":\"ls\",\"age\":19,\"loc\":\"shanghai\"}", "{\"id\":3,\"name\":\"ww\",\"age\":20,\"loc\":\"beijing\"}", "{\"id\":4,\"name\":\"ml\",\"age\":21,\"loc\":\"shanghai\"}") import spark.implicits._ val df: DataFrame = spark.read.json(nameJsonList.toDS) // 2. 创建普通表df_tbl1,并将数据写入到Iceberg表,其中DF中的列就是Iceberg表中的列 df.writeTo("hadoop_prod.default.df_tbl1").create() // 3. 查询表 hadoop_prod.default.df_tbl1 中的数据,并查看数据存储结构 spark.read.table("hadoop_prod.default.df_tbl1").show() /* +---+---+--------+----+ |age| id| loc|name| +---+---+--------+----+ | 18| 1| beijing| zs| | 19| 2|shanghai| ls| | 20| 3| beijing| ww| | 21| 4|shanghai| ml| +---+---+--------+----+ */ // 4. 创建分区表 df_tbl2, 并将数据写入到Iceberg表,其中DF中的列就是Iceberg表中的列 df.sortWithinPartitions($"loc") //写入分区表,必须按照分区列进行排序 .writeTo("hadoop_prod.default.df_tbl2") .partitionedBy($"loc") //这里可以指定多个列为联合分区 .create() // 5.查询分区表 hadoop_prod.default.df_tbl2 中的数据,并查看数据存储结构 spark.read.table("hadoop_prod.default.df_tbl2").show() /* +---+---+--------+----+ |age| id| loc|name| +---+---+--------+----+ | 18| 1| beijing| zs| | 19| 2|shanghai| ls| | 20| 3| beijing| ww| | 21| 4|shanghai| ml| +---+---+--------+----+ */- 1
- 2
- 3
- 4
- 5
- 6
- 7
- 8
- 9
- 10
- 11
- 12
- 13
- 14
- 15
- 16
- 17
- 18
- 19
- 20
- 21
- 22
- 23
- 24
- 25
- 26
- 27
- 28
- 29
- 30
- 31
- 32
- 33
- 34
- 35
- 36
- 37
- 38
- 39
- 40
- 41
- 42
- 43
- 44
-
相关阅读:
你们的优雅停机真的优雅吗?
AUTOSAR协议栈 - 功能简介
二叉树刷题(四)
【SpringMVC】参数传递与用户请求和响应
单体微服务K8S笔记
MySql 表 转为C#实体类 ,sql语句
使用阿里云OSS实现视频上传功能
深度学习(一)—— Transformer
XXL-JOB任务分片
8.2 Windows驱动开发:内核解锁与强删文件
- 原文地址:https://blog.csdn.net/yangwei234/article/details/119376824
