-
Mybatis-Plus【吐血详解 一篇掌握】

mybatis-plus
- 本文笔记都是观看狂神老师视频手敲的,敲完的时候发现一件挺奔溃的事,视频地址:https://www.bilibili.com/video/BV17E411N7KN视频地址
- 这个老师讲课真的很好,学java后端的都可以去看一下,从基础到架构很详细,推荐给大家https://space.bilibili.com/95256449/狂神说
- 最近做项目听到老师讲到使用mybatis-plus,刚好狂神更新了mybatis-plus视频,简直天助我也,学完不要太震惊,真的牛逼,从此CURD告别写sql。
- 本人也还是小白一名,下面文章大部分是手敲和官网复制,没有运行过,可能会有一些错误,字母符号什么的,如果要复制注意一下。
- 看这篇文章需要掌握点mysql,mybatis,springboot,狂神老师那都有对应的视频,可以去看看,我也要去看看sql的基础知识了,上学期的SQL差点挂了,看完我会把笔记再发到博客,关注我哦!!!
地址:https://mp.baomidou.com/
简介
MyBatis-Plus(简称 MP)是一个 MyBatis 的增强工具,在 MyBatis 的基础上只做增强不做改变,为简化开发、提高效率而生。
愿景
我们的愿景是成为 MyBatis 最好的搭档,就像 魂斗罗 中的 1P、2P,基友搭配,效率翻倍。

特性
- 无侵入:只做增强不做改变,引入它不会对现有工程产生影响,如丝般顺滑
- 损耗小:启动即会自动注入基本 CURD,性能基本无损耗,直接面向对象操作
- 强大的 CRUD 操作:内置通用 Mapper、通用 Service,仅仅通过少量配置即可实现单表大部分 CRUD 操作,更有强大的条件构造器,满足各类使用需求
- 支持 Lambda 形式调用:通过 Lambda 表达式,方便的编写各类查询条件,无需再担心字段写错
- 支持主键自动生成:支持多达 4 种主键策略(内含分布式唯一 ID 生成器 - Sequence),可自由配置,完美解决主键问题
- 支持 ActiveRecord 模式:支持 ActiveRecord 形式调用,实体类只需继承 Model 类即可进行强大的 CRUD 操作
- 支持自定义全局通用操作:支持全局通用方法注入( Write once, use anywhere )
- 内置代码生成器:采用代码或者 Maven 插件可快速生成 Mapper 、 Model 、 Service 、 Controller 层代码,支持模板引擎,更有超多自定义配置等您来使用
- 内置分页插件:基于 MyBatis 物理分页,开发者无需关心具体操作,配置好插件之后,写分页等同于普通 List 查询
- 分页插件支持多种数据库:支持 MySQL、MariaDB、Oracle、DB2、H2、HSQL、SQLite、Postgre、SQLServer 等多种数据库
- 内置性能分析插件:可输出 Sql 语句以及其执行时间,建议开发测试时启用该功能,能快速揪出慢查询
- 内置全局拦截插件:提供全表 delete 、 update 操作智能分析阻断,也可自定义拦截规则,预防误操作
支持数据库
- mysql 、 mariadb 、 oracle 、 db2 、 h2 、 hsql 、 sqlite 、 postgresql 、 sqlserver
- 达梦数据库 、 虚谷数据库 、 人大金仓数据库
快速指南
我们将通过一个简单的 Demo 来阐述 MyBatis-Plus 的强大功能,在此之前,我们假设您已经:
- 拥有 Java 开发环境以及相应 IDE
- 熟悉 Spring Boot
- 熟悉 Maven
使用第三方组件:
1、导入对应的依赖
2、研究依赖如何配置
3、代码如何编写
4、提高扩展技术的能力
步骤
1、创建数据库
mybatis_plus现有一张
User表,其表结构如下:id name age email 1 Jone 18 test1@baomidou.com 2 Jack 20 test2@baomidou.com 3 Tom 28 test3@baomidou.com 4 Sandy 21 test4@baomidou.com 5 Billie 24 test5@baomidou.com 其对应的数据库 Schema 脚本如下:
DROP TABLE IF EXISTS user; CREATE TABLE user ( id BIGINT(20) NOT NULL COMMENT '主键ID', name VARCHAR(30) NULL DEFAULT NULL COMMENT '姓名', age INT(11) NULL DEFAULT NULL COMMENT '年龄', email VARCHAR(50) NULL DEFAULT NULL COMMENT '邮箱', PRIMARY KEY (id) ); -- 真实开发中,version(乐观锁),deleted(逻辑删除)、gmt_create、gem_mo- 1
- 2
- 3
- 4
- 5
- 6
- 7
- 8
- 9
- 10
其对应的数据库 Data 脚本如下:
DELETE FROM user; INSERT INTO user (id, name, age, email) VALUES (1, 'Jone', 18, 'test1@baomidou.com'), (2, 'Jack', 20, 'test2@baomidou.com'), (3, 'Tom', 28, 'test3@baomidou.com'), (4, 'Sandy', 21, 'test4@baomidou.com'), (5, 'Billie', 24, 'test5@baomidou.com');- 1
- 2
- 3
- 4
- 5
- 6
- 7
2、导入相应的依赖
<dependency> <groupId>mysqlgroupId> <artifactId>mysql-connector-javaartifactId> <scope>runtimescope> dependency> <dependency> <groupId>com.baomidougroupId> <artifactId>mybatis-plus-boot-starterartifactId> <version>3.3.1.tmpversion> dependency> <dependency> <groupId>org.projectlombokgroupId> <artifactId>lombokartifactId> <version>1.18.10version> <scope>providedscope> dependency>- 1
- 2
- 3
- 4
- 5
- 6
- 7
- 8
- 9
- 10
- 11
- 12
- 13
- 14
- 15
- 16
- 17
- 18
说明:我们使用mybatis-plus可以节省我们大量的代码,尽量不要同时导入mybatis和mybatis-plus! 版本的差异!
3、连接数据库
# mysql 5 驱动不同 com.mysql.jsbc.Driver- 1
mysql 8 驱动不同 com.mysql.cj.jsbc.Driver、需要增加时区的配置
spring.datasource.username=root spring.datasource.password=123 spring.datasource.url=jdbc:mysql://localhost:3306/mybatis_plus?useSSL=false&useUnicode=true&characterEncoding=utf-8&serverTimezone=GMT%2B8 spring.datasource.driver-class-name=com.mysql.cj.jdbc.Driver- 1
- 2
- 3
- 4
4、编写代码
pojo–>dao–>(连接mybatis,配置mapper.xml文件)–>service-controller (传统方式 )
使用mybatis-plus之后
* pojo * dao接口(不用写mapper.xml文件) * 使用- 1
- 2
- 3
编写实体类
User.java(此处使用了 Lombok 简化代码)@Data public class User { private Long id; private String name; private Integer age; private String email; }- 1
- 2
- 3
- 4
- 5
- 6
- 7
编写Mapper类
UserMapper.java//在对应的Mapper上继承基本的类baseMapper public interface UserMapper extends BaseMapper<User> { //所有的CRUD已经编写完成 //不需要像以前的配置一些xml }- 1
- 2
- 3
- 4
- 5
在 Spring Boot 启动类中添加
@MapperScan注解,扫描 Mapper 文件夹:@SpringBootApplication @MapperScan("com.baomidou.mybatisplus.mapper")//扫描mapper文件夹 public class Application { public static void main(String[] args) { SpringApplication.run(QuickStartApplication.class, args); } }- 1
- 2
- 3
- 4
- 5
- 6
- 7
添加测试类,进行功能测试:
@RunWith(SpringRunner.class) @SpringBootTest public class SampleTest { @Autowired private UserMapper userMapper; @Test public void testSelect() { System.out.println(("----- selectAll method test ------")); //参数是一个Wrapper,条件结构器,这里先不用 填null //查询所有的用户 List<User> userList = userMapper.selectList(null); Assert.assertEquals(5, userList.size()); userList.forEach(System.out::println); } }- 1
- 2
- 3
- 4
- 5
- 6
- 7
- 8
- 9
- 10
- 11
- 12
- 13
- 14
- 15
UserMapper 中的
selectList()方法的参数为 MP 内置的条件封装器Wrapper,所以不填写就是无任何条件控制台输出:
User(id=1, name=Jone, age=18, email=test1@baomidou.com) User(id=2, name=Jack, age=20, email=test2@baomidou.com) User(id=3, name=Tom, age=28, email=test3@baomidou.com) User(id=4, name=Sandy, age=21, email=test4@baomidou.com) User(id=5, name=Billie, age=24, email=test5@baomidou.com)- 1
- 2
- 3
- 4
- 5
完整的代码示例请移步:Spring Boot 快速启动示例 [Spring MVC 快速启动示例]
5、小结
通过以上几个简单的步骤,我们就实现了 User 表的 CRUD 功能,甚至连 XML 文件都不用编写!
从以上步骤中,我们可以看到集成
MyBatis-Plus非常的简单,只需要引入 starter 工程,并配置 mapper 扫描路径即可。但 MyBatis-Plus 的强大远不止这些功能,想要详细了解 MyBatis-Plus 的强大功能?那就继续往下看吧!
配置日志
我们所用的sql现在是不可见的,我们希望知道他是怎么执行的,所以我们必须要查看日志!
#配置日志 mybatis-plus.configuration.log-impl=org.apache.ibatis.logging.stdout.StdOutImpl- 1
- 2

常用注解
@TableName("表名")当表名与实体类名不一致时,可以在实体类上加入@TableName()声明
@TableId声明属性为表中的主键(若属性名称不为默认id)@TableFieId("字段")当实体类属性与表字段不一致时,可以用来声明@TableName("表名") public class User{ @TableId private Long userId; @TableFieId("name") private String realName }- 1
- 2
- 3
- 4
- 5
- 6
- 7
CRUD扩展
Insert 插入
// 插入一条记录 int insert(T entity);- 1
- 2
参数说明
类型 参数名 描述 T entity 实体对象 举例测试
@Test public void testInsert() { System.out.println(("----- selectAll method test ------")); User user = new User(); user.setName=("shuishui"); user.setAge(3); user.setEmail("12434141@qq.com"); userMapper.insert(user); }- 1
- 2
- 3
- 4
- 5
- 6
- 7
- 8
- 9
- 10
数据库插入的id为全局默认的id(ID_WORKER)
主键生成策略
分布式系统唯一id生成
雪花算法
SnowFlake 算法,是 Twitter 开源的分布式 id 生成算法。其核心思想就是:使用一个 64 bit 的 long 型的数字作为全局唯一 id。在分布式系统中的应用十分广泛,且ID 引入了时间戳,基本上保持自增的。
这 64 个 bit 中,其中 1 个 bit 是不用的,然后用其中的 41 bit 作为毫秒数,用 10 bit 作为工作机器 id,12 bit 作为序列号。
https://blog.csdn.net/lq18050010830/article/details/89845790主键自增
我们需要配置主键自增
1、实体类字段上 @TableId(type =IdType.AUTO)

2、数据库字段一定要是自增的
其他的码源详解
public enum IdType { AUTO(0), //数据可id自增 NONE(1), //未设置主键 INPUT(2), //手动输入 ID_WORKER(3), //默认的全局唯一id UUID(4), //全局唯一id uuid ID_WORKER_STR(5); // ID_WORKEK 字符串表示法 private int key; private IdType(int key) { this.key = key; } public int getKey() { return this.key; } }- 1
- 2
- 3
- 4
- 5
- 6
- 7
- 8
- 9
- 10
- 11
- 12
- 13
- 14
- 15
更新操作
// 根据 whereEntity 条件,更新记录 int update(@Param(Constants.ENTITY) T entity, @Param(Constants.WRAPPER) Wrapper<T> updateWrapper); // 根据 ID 修改 int updateById(@Param(Constants.ENTITY) T entity);- 1
- 2
- 3
- 4
#参数说明
类型 参数名 描述 T entity 实体对象 (set 条件值,可为 null) Wrapper updateWrapper 实体对象封装操作类(可以为 null,里面的 entity 用于生成 where 语句) 举例测试
@Test public void testUpdate() { //sql自动动态配置 User user = new User(); user.setName=("shui"); user.setId(3L); user.setAge("18"); //注意:updateById的参数是一个对象 userMapper.updateById(user); }- 1
- 2
- 3
- 4
- 5
- 6
- 7
- 8
- 9
- 10
自动填充
创建时间、修改时间!这些个操作一遍都是自动化完成,我们不希望手动更新!
阿里巴巴开发手册:所有的数据库表:gmt_create\gmt_modified几乎所有的表都要配置上!而且需要自动化
方式一:数据库级别
在表中新增字段 create_time 、update_time(默认CURRENT_TIMESIAMP)
方式二:代码级别
实体类上的属性需要增加注解==@TableField==
//创建时间 @TableField(fill = FieldFill.INSERT) private Date createTime; //更新时间 @TableField(fill = FieldFill.INSERT_UPDATE) private Date updateTime;- 1
- 2
- 3
- 4
- 5
- 6
- 7
编写处理器来处理这个注释即可!
@Slf4j @Component public class MyMetaObjectHandler implements MetaObjectHandler { //插入时候的填充策略 @Override @Componcent //一定不要忘记吧处理器加到IOC容器中 public void insertFill(MetaObject metaObject) { log.info("start insert fill ...."); //日志 //设置字段的值(String fieldName字段名,Object fieldVal要传递的值,MetaObject metaObject) this.setFieldVaLByName("createTime",new Date(),metaObject); this.setFieldVaLByName("createTime",new Date(),metaObject); //this.strictInsertFill(metaObject, "createTime", LocalDateTime.class, LocalDateTime.now()); // 起始版本 3.3.0(推荐使用) // this.fillStrategy(metaObject, "createTime", LocalDateTime.now()); // 也可以使用(3.3.0 该方法有bug请升级到之后的版本如`3.3.1.8-SNAPSHOT`) /* 上面选其一使用,下面的已过时(注意 strictInsertFill 有多个方法,详细查看源码) */ //this.setFieldValByName("operator", "Jerry", metaObject); //this.setInsertFieldValByName("operator", "Jerry", metaObject); } //更新时间的填充策略 @Override public void updateFill(MetaObject metaObject) { log.info("start update fill ...."); this.setFieldVaLByName("createTime",new Date(),metaObject); //this.strictUpdateFill(metaObject, "updateTime", LocalDateTime.class, LocalDateTime.now()); // 起始版本 3.3.0(推荐使用) // this.fillStrategy(metaObject, "updateTime", LocalDateTime.now()); // 也可以使用(3.3.0 该方法有bug请升级到之后的版本如`3.3.1.8-SNAPSHOT`) /* 上面选其一使用,下面的已过时(注意 strictUpdateFill 有多个方法,详细查看源码) */ //this.setFieldValByName("operator", "Tom", metaObject); //this.setUpdateFieldValByName("operator", "Tom", metaObject); } }- 1
- 2
- 3
- 4
- 5
- 6
- 7
- 8
- 9
- 10
- 11
- 12
- 13
- 14
- 15
- 16
- 17
- 18
- 19
- 20
- 21
- 22
- 23
- 24
- 25
- 26
- 27
- 28
- 29
吐槽:这么麻烦,难道用数据库不香吗?
乐观锁
面试中经常会问到乐观锁,悲观锁
乐观锁:顾名思义十分乐观,它总是被认为不会出现问题,无论干什么都不去上锁!如果出现了问题,再次更新测试
悲观锁:顾名思义十分悲观,它总是出现问题,无论干什么都会上锁!再去操作!
乐观锁实现方式
- 取出记录是,获取当前version
- 更新事,带上这个version
- 执行更新事,set version=newVersion where version =oldVersion
- 如果version不对,就更新失败
乐观锁: 1、先查询,获得版本号 version=1 --A update user set name ="shuishui" ,version =version+1 where id =2 and version=1- 1
- 2
- 3
- 4
–B 如果线程抢先完成,这个时候version=2,会导致A修改失败
update user set name =“shuishui” ,version =version+1
where id =2 and version=1测试乐观锁
1、表中创建乐观锁字段version 默认值为1

2、同步实体类
@Version //乐观锁Version注解 private Integer version;- 1
- 2
3、注册组件 (config包下)
springboot:
@EnableTransactionManagement @MapperScan("com.baomidou.cloud.service.*.mapper*") @Configuration//配置类 public class MyBatisPlusConfig{ //注册乐观锁插件 @Bean public OptimisticLockerInterceptor optimisticLockerInterceptor() { return new OptimisticLockerInterceptor(); } }- 1
- 2
- 3
- 4
- 5
- 6
- 7
- 8
- 9
- 10
spring xml:
<bean class="com.baomidou.mybatisplus.extension.plugins.OptimisticLockerInterceptor"/>- 1
特别说明:
- 支持的数据类型只有:int,Integer,long,Long,Date,Timestamp,LocalDateTime
- 整数类型下
newVersion = oldVersion + 1 newVersion会回写到entity中- 仅支持
updateById(id)与update(entity, wrapper)方法 - 在
update(entity, wrapper)方法下,wrapper不能复用!!!
测试一下:

查询操作
// 根据 ID 查询 T selectById(Serializable id); // 根据 entity 条件,查询一条记录 T selectOne(@Param(Constants.WRAPPER) Wrapper<T> queryWrapper); // 查询(根据ID 批量查询) List<T> selectBatchIds(@Param(Constants.COLLECTION) Collection<? extends Serializable> idList); // 根据 entity 条件,查询全部记录 List<T> selectList(@Param(Constants.WRAPPER) Wrapper<T> queryWrapper); // 查询(根据 columnMap 条件) List<T> selectByMap(@Param(Constants.COLUMN_MAP) Map<String, Object> columnMap); // 根据 Wrapper 条件,查询全部记录 List<Map<String, Object>> selectMaps(@Param(Constants.WRAPPER) Wrapper<T> queryWrapper); // 根据 Wrapper 条件,查询全部记录。注意: 只返回第一个字段的值 List<Object> selectObjs(@Param(Constants.WRAPPER) Wrapper<T> queryWrapper); // 根据 entity 条件,查询全部记录(并翻页) IPage<T> selectPage(IPage<T> page, @Param(Constants.WRAPPER) Wrapper<T> queryWrapper); // 根据 Wrapper 条件,查询全部记录(并翻页) IPage<Map<String, Object>> selectMapsPage(IPage<T> page, @Param(Constants.WRAPPER) Wrapper<T> queryWrapper); // 根据 Wrapper 条件,查询总记录数 Integer selectCount(@Param(Constants.WRAPPER) Wrapper<T> queryWrapper);- 1
- 2
- 3
- 4
- 5
- 6
- 7
- 8
- 9
- 10
- 11
- 12
- 13
- 14
- 15
- 16
- 17
- 18
- 19
- 20
#参数说明
类型 参数名 描述 Serializable id 主键ID Wrapper queryWrapper 实体对象封装操作类(可以为 null) Collection idList 主键ID列表(不能为 null 以及 empty) Map columnMap 表字段 map 对象 IPage page 分页查询条件(可以为 RowBounds.DEFAULT) 实例测试
@Test public void testSelectById(){ User user =userMapper.selectById(1); System.out.println(user) } //测试批量查询 @Test public void testSelectByBatchId(){ List<User> user =userMapper.selectBatchIds(Arrays.asList(1,2,3)); users.forEach(System.out::println) } //条件查询 public void testSelectByBatchIds(){ HashMap<String,Object> map=new HashMap<>(); //自定义查询 map.put("name","shuishui"); map.put("age",3); List<User> user = userMapper.selectByMap(map); users.forEach(System.out::println); }- 1
- 2
- 3
- 4
- 5
- 6
- 7
- 8
- 9
- 10
- 11
- 12
- 13
- 14
- 15
- 16
- 17
- 18
- 19
- 20
查询指定字段
// QueryWrapperqueryWrapper = new QueryWrapper<>(); // queryWrapper.select(CasesFeedback.class,info -> !info.getColumn().equals("create_time")&& // !info.getColumn().equals("update_time") && // !info.getColumn().equals("deleted")&& // !info.getColumn().equals("id"));- 1
- 2
- 3
- 4
- 5
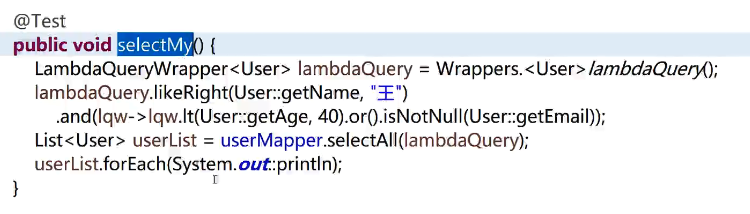
自定义sql
方式一:
在Mapper文件中定义一个方法
@Select("select * from user ${ew.customSqlSegment}") List<User> selectAll(@Param(Constants.WRAPPER)Wrapper<User> wrapper);- 1
- 2
方式二:将sql写入xml中
在application中加入扫描mapper文件路径
mybatis-plus: mapper-locations: com/mp/mapper/*- 1
- 2
在*Mapper.xml中写sql
<mapper namespace="com.mp.dao.UserMapper"> <select id="selectAll" resultType="com.mp.entity.User"> select * from user ${ew.customSqlSegment} select> mapper>- 1
- 2
- 3
- 4
- 5
测试

分页查询
分页在网站使用的十分多
1、原始的limit进行分页
2、pageHelper 第三方插件
3、Mybatis-Plus中也内置了分页插件!
如何使用
1、配置拦截器组件即可
//Spring boot方式 @EnableTransactionManagement @Configuration @MapperScan("com.baomidou.cloud.service.*.mapper*") public class MybatisPlusConfig { @Bean public PaginationInterceptor paginationInterceptor() { PaginationInterceptor paginationInterceptor = new PaginationInterceptor(); // 设置请求的页面大于最大页后操作, true调回到首页,false 继续请求 默认false // paginationInterceptor.setOverflow(false); // 设置最大单页限制数量,默认 500 条,-1 不受限制 // paginationInterceptor.setLimit(500); // 开启 count 的 join 优化,只针对部分 left join paginationInterceptor.setCountSqlParser(new JsqlParserCountOptimize(true)); return paginationInterceptor; } }- 1
- 2
- 3
- 4
- 5
- 6
- 7
- 8
- 9
- 10
- 11
- 12
- 13
- 14
- 15
- 16
- 17
2、写测试
//测试分页查询 @Test pulic void testPage(){ // 参数一:当前页 // 参数二:页面大小 // 使用了分页插件之后,所有的分页操作也变得简单了 Page<User> page =new Page<>(2,5); userMapper.selectPage(page,null); page.getRecords().forEach(System.out::println); //获取总数 page.getTotal(); }- 1
- 2
- 3
- 4
- 5
- 6
- 7
- 8
- 9
- 10
- 11
- 12
删除
// 根据 entity 条件,删除记录 int delete(@Param(Constants.WRAPPER) Wrapper<T> wrapper); // 删除(根据ID 批量删除) int deleteBatchIds(@Param(Constants.COLLECTION) Collection<? extends Serializable> idList); // 根据 ID 删除 int deleteById(Serializable id); // 根据 columnMap 条件,删除记录 int deleteByMap(@Param(Constants.COLUMN_MAP) Map<String, Object> columnMap);- 1
- 2
- 3
- 4
- 5
- 6
- 7
- 8
#参数说明
类型 参数名 描述 Wrapper wrapper 实体对象封装操作类(可以为 null) Collection idList 主键ID列表(不能为 null 以及 empty) Serializable id 主键ID Map columnMap 表字段 map 对象 测试删除:
@Test public void testDeleteById(){ userMapper.deleteById(1); } //批量删除 @Test public void testDeleteBatchId(){ userMapper.deleteBatchIds(Arrays.asList(1,2)); } //条件删除 @Test public void testDeleteMap(){ HashMap<String,Object> map = new HashMap<>(); map.put("name","shuishui"); userMapper.deleteByMap(Map); }- 1
- 2
- 3
- 4
- 5
- 6
- 7
- 8
- 9
- 10
- 11
- 12
- 13
- 14
- 15
- 16
在工作中会遇到逻辑删除
逻辑删除
物理删除 :从数据库中直接移出
逻辑删除:在数据库中没有被移出,而是通过一个变量来让他失效!deleted=0 ==>deleted =1(失效)
SpringBoot 配置方式:
-
application.yml 加入配置(如果你的默认值和mp默认的一样,该配置可无):
mybatis-plus: global-config: db-config: logic-delete-field: flag #全局逻辑删除字段值 3.3.0开始支持,详情看下面。 logic-delete-value: 1 # 逻辑已删除值(默认为 1) logic-not-delete-value: 0 # 逻辑未删除值(默认为 0)- 1
- 2
- 3
- 4
- 5
- 6
注册 Bean(3.1.1开始不再需要这一步):
import com.baomidou.mybatisplus.core.injector.ISqlInjector; import com.baomidou.mybatisplus.extension.injector.LogicSqlInjector; import org.springframework.context.annotation.Bean; import org.springframework.context.annotation.Configuration; @Configuration public class MyBatisPlusConfiguration { @Bean public ISqlInjector sqlInjector() { return new LogicSqlInjector(); } }- 1
- 2
- 3
- 4
- 5
- 6
- 7
- 8
- 9
- 10
- 11
实体类字段上加上
@TableLogic注解@TableLogic private Integer deleted;- 1
- 2
效果: 使用mp自带方法删除和查找都会附带逻辑删除功能 (自己写的xml不会)
example 删除时 update user set deleted=1 where id =1 and deleted=0 查找时 select * from user where deleted=0- 1
- 2
- 3
全局逻辑删除: 3.3.0开始支持
如果公司代码比较规范,比如统一了全局都是flag为逻辑删除字段。
使用此配置则不需要在实体类上添加 @TableLogic。
但如果实体类上有 @TableLogic 则以实体上的为准,忽略全局。 即先查找注解再查找全局,都没有则此表没有逻辑删除。
mybatis-plus: global-config: db-config: logic-delete-field: flag #全局逻辑删除字段值- 1
- 2
- 3
- 4
附件说明
- 逻辑删除是为了方便数据恢复和保护数据本身价值等等的一种方案,但实际就是删除。
- 如果你需要再查出来就不应使用逻辑删除,而是以一个状态去表示。
如: 员工离职,账号被锁定等都应该是一个状态字段,此种场景不应使用逻辑删除。
- 若确需查找删除数据,如老板需要查看历史所有数据的统计汇总信息,请单独手写sql。
以上的CRUD操作都必须要掌握
通用service
配置:
1、创建一个service接口:
public interface UserService extends IService<User>{ }- 1
- 2
2、创建实现类
public class UserServiceImpl extend ServiceImol<UserMapper,User> implements UserService{ }- 1
- 2
3、测试方法
@RunWith(SpringRunner.class) @SpringBootTest public class ServiceTest{ @Autowired private UserService userService; //取一个值 @Test public void getOne(){ User one = userService.getOne(Wrapper.<User>lambdaQuery().gt(User::getAge,25),false); } //批量插入 @Test public void batch(){ User user1= new User(); user1.steName("shui"); user1.setAge("28"); User user2= new User(); user1.steName("shui2"); user1.setAge("29"); List<User> userList =Arrays.asList(user1,user2); userService.saveBatch(userList); } @Test public void chain(){ //查询 userService.lambdaQuery().ge(User::getAge,25).like(User::getName,"雨").list(); } }- 1
- 2
- 3
- 4
- 5
- 6
- 7
- 8
- 9
- 10
- 11
- 12
- 13
- 14
- 15
- 16
- 17
- 18
- 19
- 20
- 21
- 22
- 23
- 24
- 25
- 26
- 27
- 28
性能更新插件
我们在平时的开发中,会遇到一些慢sql。测试!druid…
作用:性能分析拦截器,用于输出每条SQL语句及执行时间
MP也提供性能分析插件,如果超过这和时间就会停止运行
1、导入插件
//Spring boot方式 @EnableTransactionManagement @Configuration @MapperScan("com.baomidou.cloud.service.*.mapper*") public class MybatisPlusConfig { /** * SQL执行效率插件 */ @Bean @Profile({"dev","test"})// 设置 dev test 环境开启 public PerformanceInterceptor performanceInterceptor() { PerformanceInterceptor performanceInterceptor = new PerformanceInterceptor(); performanceInterceptor.setMaxTime(100);// ms 设置sql执行的最大时间,如果超过就停止 performanceInterceptor.setFormat(true); return new PerformanceInterceptor(); } }- 1
- 2
- 3
- 4
- 5
- 6
- 7
- 8
- 9
- 10
- 11
- 12
- 13
- 14
- 15
- 16
- 17
记得在SpringBoot配置环境为dev或者test环境!
2、测试使用
@Test void contextLoads(){ //参数是一个Wrapper,条件结构器,这里先不用,填null //查询全部用户 List<User> users =userMapper.selectList(null); user.forEach(System.out::println); }- 1
- 2
- 3
- 4
- 5
- 6
- 7

注意!参数说明:
- 参数:maxTime SQL 执行最大时长,超过自动停止运行,有助于发现问题。
- 参数:format SQL SQL是否格式化,默认false。
- 该插件只用于开发环境,不建议生产环境使用。
条件构造器(Wrapper)
十分重要:Wrapper
我们写一些复杂的sql可以用它来完成
现做几个实例看看:
@Test void contextLoads(){ // 查询name不为null的用户,并且邮箱不为null的永不,年龄大于等于20的用户 QueryWrapper<User> wrapper =new QueryWrapper<>(); wrapper.isNotNull("name"); wrapper.isNotNull("email"); wrapper.ge("age",12); userMapper.selectList(wrapper).forEach(System.out::println); } @Test void test2(){ // 查询name为shuishui的用户 QueryWrapper<User> wrapper =new QueryWrapper<>(); wrapper.eq("name","shuishui"); User user=userMapper.selectList(wrapper) System.out.println(user); } @Test void test3(){ // 查询年龄在20~30岁之间的用户 QueryWrapper<User> wrapper =new QueryWrapper<>(); wrapper.between("age",20,30); Integer count =userMapper.selectCount(wrapper);//查询结果数 System.out.println(count); } //模糊查询 @Test void test4(){ QueryWrapper<User> wrapper =new QueryWrapper<>(); wrapper.notLike("name",“s”);//相当于NOT LIKE '%s%' wrapper.likeRight("email",“s”);//相当于LIKE 's%' List<Map<String,Object>>maps =userMapper.selectMaps(wrapper);//查询结果数 maps.forEach(System.out::println); } @Test void test5(){ QueryWrapper<User> wrapper =new QueryWrapper<>(); //子查询 wrapper.insql("id","select id from user where id<3"); List<Object> objects =userMapper.selectobjs(wrapper); objects.forEach(System.out::println); } @Test void test6(){ QueryWrapper<User> wrapper =new QueryWrapper<>(); //通过id进行排序 wrapper.orderByAsc("id"); List<User> users =userMapper.selectList(wrapper); objects.forEach(System.out::println); } //姓王年龄大于等于25,按年龄降序,年龄相同按id升序排列 void test7(){ QueryWrapper<User> wrapper =new QueryWrapper<>(); wrapper.likeRoght("name","王").or().ge("age",25).ordeiByDesc("age").orderByAsc("id"); List<User> users =userMapper.selectList(wrapper); objects.forEach(System.out::println); } //创建日期为2019年2月14日并且直属上级为姓王 void test8(){ QueryWrapper<User> wrapper =new QueryWrapper<>(); wrapper.apply("date_fromat(create_time,'%Y-%m-%d')='2019-02-14'").inSql("manager_id","select id from user where name like '王%'"); List<User> users =userMapper.selectList(wrapper); objects.forEach(System.out::println); } //姓王并且(年龄小于40或者邮箱不为空) void test9(){ QueryWrapper<User> wrapper =new QueryWrapper<>(); //lt小于,gt大于 wrapper.likeRoght("name","王").and(wq->wa.lt("age",40).or().isNotNull("email")) List<User> users =userMapper.selectList(wrapper); objects.forEach(System.out::println); } //不列出所有字段 @Test void test10(){ QueryWrapper<User> wrapper =new QueryWrapper<>(); wrapper.select("id","name").like("name","雨").lt("age",40); //不显示时间和id //wrapper.select(User.class,info->!info.getColumn().equals("create_time")&&!info.getColumn().equals("manager_id")).like("name","雨").lt("age",40); List<User> users =userMapper.selectList(wrapper); objects.forEach(System.out::println); }- 1
- 2
- 3
- 4
- 5
- 6
- 7
- 8
- 9
- 10
- 11
- 12
- 13
- 14
- 15
- 16
- 17
- 18
- 19
- 20
- 21
- 22
- 23
- 24
- 25
- 26
- 27
- 28
- 29
- 30
- 31
- 32
- 33
- 34
- 35
- 36
- 37
- 38
- 39
- 40
- 41
- 42
- 43
- 44
- 45
- 46
- 47
- 48
- 49
- 50
- 51
- 52
- 53
- 54
- 55
- 56
- 57
- 58
- 59
- 60
- 61
- 62
- 63
- 64
- 65
- 66
- 67
- 68
- 69
- 70
- 71
- 72
- 73
- 74
- 75
- 76
- 77
- 78
- 79
- 80
- 81
- 82
更多的方法都在官方文档里
condition的用法

alleq的用法
allEq(Map<R, V> params) allEq(Map<R, V> params, boolean null2IsNull) allEq(boolean condition, Map<R, V> params, boolean null2IsNull)- 1
- 2
- 3
个别参数说明:
params:key为数据库字段名,value为字段值
null2IsNull: 为true则在map的value为null时调用 isNull 方法,为false时则忽略value为null的- 例1:
allEq({id:1,name:"老王",age:null})—>id = 1 and name = '老王' and age is null - 例2:
allEq({id:1,name:"老王",age:null}, false)—>id = 1 and name = '老王'
allEq(BiPredicate<R, V> filter, Map<R, V> params) allEq(BiPredicate<R, V> filter, Map<R, V> params, boolean null2IsNull) allEq(boolean condition, BiPredicate<R, V> filter, Map<R, V> params, boolean null2IsNull)- 1
- 2
- 3
个别参数说明:
filter: 过滤函数,是否允许字段传入比对条件中
params与null2IsNull: 同上- 例1:
allEq((k,v) -> k.indexOf("a") >= 0, {id:1,name:"老王",age:null})—>name = '老王' and age is null - 例2:
allEq((k,v) -> k.indexOf("a") >= 0, {id:1,name:"老王",age:null}, false)—>name = '老王'
实例测试
@Test void selecrAlleq(){ QueryWrapper<User> wrapper =new QueryWrapper<>(); Map<String,Object> params=new HashMap<String,Object>(); params.put("name","水"); params.put("age",25); wrapper.allEq(params); List<User> users =userMapper.selectList(wrapper); users.forEach(System.out::println); }- 1
- 2
- 3
- 4
- 5
- 6
- 7
- 8
- 9
- 10
Lambda 条件构造器
作用:防误写!
@Test public void selectLambda(){ // LambdaQueryWrapperlambda =new QueryWrapper // LambdaQueryWrapper().lambda(); lambda =new LambdaQueryWrapper LambdaQueryWrapper<User> lambda =new Wrapper.<User>lambdaQuery(); lambda.like(User::getName,"雨").lt(User::getAge,40); //写错会直接爆红 List<user> userList =userMapper.selectList(lambdaQuery); userList.forEach(System.out::println); }(); - 1
- 2
- 3
- 4
- 5
- 6
- 7
- 8
- 9
AR模式
通过实体类对象直接实现CRUD
实体类操作:
@Data @EqualsAndHashCode(callSuper = false) public class User extends Model<User> { private static final long serialVersionUID = 1L; @ApiModelProperty(value = "用户id") private String userId; }- 1
- 2
- 3
- 4
- 5
- 6
- 7
dao层Mapper接口操作:
public interface UserMapper extends BaseMapper<RentDetail> { }- 1
- 2
实例测试:
// 测试插入 @Test public void insert(){ User user =new User(); user.setName("水"); user.setAge(29); ... user.insert(); //不用再调用mapper接口,直接实现 } // 测试查询 @Test public void select(){ User user =new User(); user.selectById(1); } @Test public void select2(){ User user =new User(); user.setId(1); user.selectById(); } //测试更新 @Test public void update(){ User user =new User(); user.setId(1); user.setName("火") user.updateById(); } //测试删除 @Test public void delete(){ User user =new User(); user.setId(1); user.deleteById(); }- 1
- 2
- 3
- 4
- 5
- 6
- 7
- 8
- 9
- 10
- 11
- 12
- 13
- 14
- 15
- 16
- 17
- 18
- 19
- 20
- 21
- 22
- 23
- 24
- 25
- 26
- 27
- 28
- 29
- 30
- 31
- 32
- 33
- 34
- 35
- 36
代码自动生成器
dao、pojo、conrtroller、service自动生成
package com.kuang; import com.baomidou.mybatisplus.annotation.DbType; import com.baomidou.mybatisplus.annotation.FieldFill; import com.baomidou.mybatisplus.annotation.IdType; import com.baomidou.mybatisplus.annotation.TableField; import com.baomidou.mybatisplus.generator.AutoGenerator; import com.baomidou.mybatisplus.generator.config.DataSourceConfig; import com.baomidou.mybatisplus.generator.config.GlobalConfig; import com.baomidou.mybatisplus.generator.config.PackageConfig; import com.baomidou.mybatisplus.generator.config.StrategyConfig; import com.baomidou.mybatisplus.generator.config.po.TableFill; import com.baomidou.mybatisplus.generator.config.rules.DateType; import com.baomidou.mybatisplus.generator.config.rules.NamingStrategy; import java.util.ArrayList; // 代码自动生成器 public class KuangCode { public static void main(String[] args) { // 需要构建一个 代码自动生成器 对象 AutoGenerator mpg = new AutoGenerator(); // 配置策略 // 1、全局配置 GlobalConfig gc = new GlobalConfig(); String projectPath = System.getProperty("user.dir"); gc.setOutputDir(projectPath+"/src/main/java"); gc.setAuthor("狂神说"); gc.setOpen(false); gc.setFileOverride(false);// 是否覆盖 gc.setServiceName("%sService");// 去Service的I前缀 gc.setIdType(IdType.ID_WORKER); gc.setDateType(DateType.ONLY_DATE); gc.setSwagger2(true); mpg.setGlobalConfig(gc); //2、设置数据源 DataSourceConfig dsc = new DataSourceConfig(); dsc.setUrl("jdbc:mysql://localhost:3306/kuang_community? useSSL=false&useUnicode=true&characterEncoding=utf-8&serverTimezone=GMT%2B8"); dsc.setDriverName("com.mysql.cj.jdbc.Driver"); dsc.setUsername("root"); dsc.setPassword("123456"); dsc.setDbType(DbType.MYSQL); mpg.setDataSource(dsc); //3、包的配置 PackageConfig pc = new PackageConfig(); pc.setModuleName("blog"); pc.setParent("com.kuang"); pc.setEntity("entity"); pc.setMapper("mapper"); pc.setService("service"); pc.setController("controller"); mpg.setPackageInfo(pc); //4、策略配置 StrategyConfig strategy = new StrategyConfig(); strategy.setInclude("blog_tags","course","links","sys_settings","user_record"," user_say"); // 设置要映射的表名 strategy.setNaming(NamingStrategy.underline_to_camel); strategy.setColumnNaming(NamingStrategy.underline_to_camel); strategy.setEntityLombokModel(true);// 自动lombok; strategy.setLogicDeleteFieldName("deleted"); // 自动填充配置 TableFill gmtCreate = new TableFill("gmt_create", FieldFill.INSERT); TableFill gmtModified = new TableFill("gmt_modified", FieldFill.INSERT_UPDATE); ArrayList<TableFill> tableFills = new ArrayList<>(); tableFills.add(gmtCreate); tableFills.add(gmtModified); strategy.setTableFillList(tableFills); // 乐观锁 strategy.setVersionFieldName("version"); strategy.setRestControllerStyle(true); strategy.setControllerMappingHyphenStyle(true); // localhost:8080/hello_id_2 mpg.setStrategy(strategy); mpg.execute(); //执行 } }- 1
- 2
- 3
- 4
- 5
- 6
- 7
- 8
- 9
- 10
- 11
- 12
- 13
- 14
- 15
- 16
- 17
- 18
- 19
- 20
- 21
- 22
- 23
- 24
- 25
- 26
- 27
- 28
- 29
- 30
- 31
- 32
- 33
- 34
- 35
- 36
- 37
- 38
- 39
- 40
- 41
- 42
- 43
- 44
- 45
- 46
- 47
- 48
- 49
- 50
- 51
- 52
- 53
- 54
- 55
- 56
- 57
- 58
- 59
- 60
- 61
- 62
- 63
- 64
- 65
- 66
- 67
- 68
- 69
- 70
- 71
- 72

-
相关阅读:
Vue2.js使用 Axios
优化模型验证关键代码20:时间依赖成功访问概率的车辆路径问题
lamp环境搭建(kali,docker,ubuntu)
Unity DOTS技术(五)Archetype,Chunk,NativeArray
Linux 中的 chroot 命令及示例
王道数据结构C语言循环链表基本操作实现
基于C++实现二叉排序树数据结构
SpringBoot 3.0最低版本要求的JDK 17,这几个新特性不能不知道
Unity 热更--AssetBundle学习笔记 1.0【AB包资源加载工具类的实现】
多线程详细介绍
- 原文地址:https://blog.csdn.net/m0_51411338/article/details/126031798

- 最新文章
-
沪漂五周年了:我越来越迷茫了
Agentic Skill Routing 实战:别再把所有 Skill 塞进 AI Agent 上下文
MySQL-Seconds_behind_master的精度误差
[MAF预定义ChatClient中间件-03]CachingChatClient——利用缓存省钱省时间
AI的至暗历史:从万众期待到被政府撤资,AI的两次死亡徘徊
Agent OS :五种驯服不确定性的范式
PortSwigger SQL注入LAB11
数据库即时编译JIT
[Begin]AI Learn Data Day 0
深度学习进阶(二十七)现代 LLM 的核心架构设计其二:SwiGLU