-
【微信小程序】项目实战—抽签应用
- 完成学习前面章节的微信小程序开发必备的基础知识,从本章开始就可以进入完整的应用开发了。很多大型的应用主要通过App来实现,微信小程序的定义则主要是工具类的应用,宗旨是做到即用即走。抽签应用完全符合这一特性,所以本章将实现一个抽签类型的小程序。
本章主要涉及的知识点有:
- UI组件的使用
- 表单的使用
- 本地存储
1.项目起步
本节开始设计抽签项目所需要包含的功能。在平时遇到难以决定的事情时,可以使用小程序进行抽签。该抽签应用包括以下功能。
- 增加抽签项及其内容项
- 删除抽签项及其内容项
- 抽签
- 本地存储
- 输入校验
- 用户交互提示
接下来新建一个项目draw作为本章的项目。导入UI框架iView,并在根目录新建文件夹images。项目中所需要用到的图片可以直接从示例代码中获取。目录如图所示。

将
app.js清空,删除index和logs页面,新建home、mine、edit-item、draw-view页面,最后在app.json、app.wxss中输入以下代码:// app.json ·.. "tabBar":{ "selectedColor":"#2C8BEF""list": [ { "selectedIconPath":"images/home2.png","iconPath":"images/home.png","pagePath":"pages/home/home","text":"首页"},{ "selectedIconPath":"images/mine2.png","iconPath":"images/mine.png","pagePath":"pages/mine/mine","text":"我的" }] }, ·.. // app.wxss page { background-color: #EFEFEF;- 1
- 2
- 3
- 4
- 5
- 6
- 7
- 8
- 9
- 10
- 11
- 12
- 13
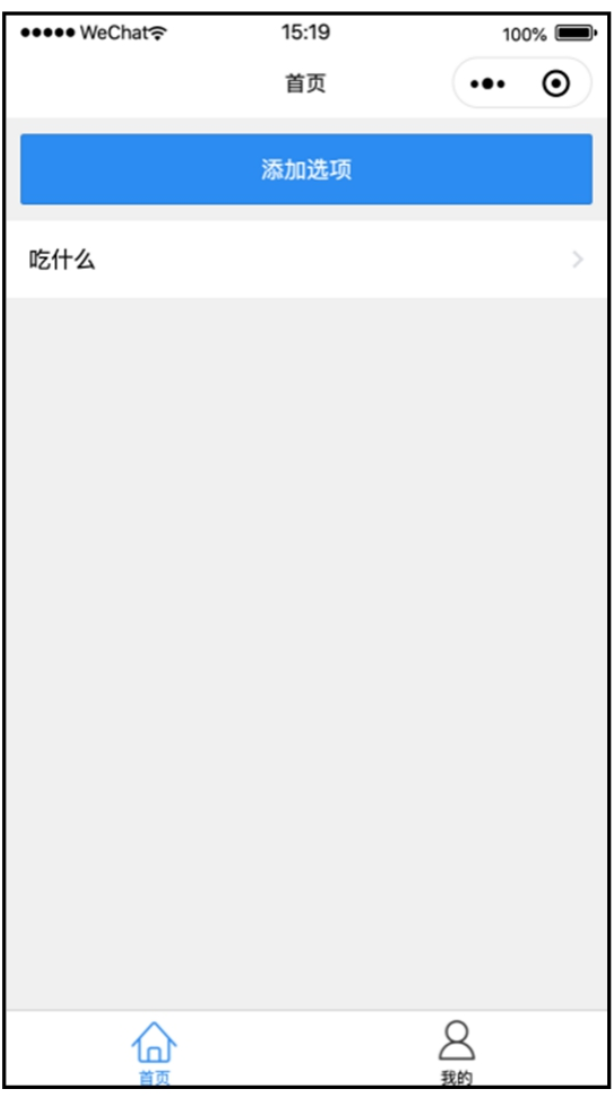
运行效果如图所示。

【代码解析】一个带底部导航栏的首页已经完成。导航栏的内容主要是通过tabBar参数来实现的。
注意:应把app.json中的v2删除,否则UI框架可能会运行出错。
2.项目开发
准备工作完成后,正式进入编码阶段。
2.1首页开发
打开home页面,输入以下代码:
// home.json "navigationBarTitleText":"首页""usingComponents": { "i-button":"/dist/button/index", "i-cell-group":"/dist/cell-group/i ndex","i-cell":"/dist/cell/index", "i-modal":"/dist/modal/index" } // home.wxml <i-button type="primary" bind:click="addItem">添加选项</i-button> <i-cell-group><i-cell wx:for="{{listData}}" wx:for-item="item" wx:key="item" data-item="{{item}}" title="{{item}}" bindtap="draw" bindlongpress="delete" is-link></i-cell></i-cell-group> <i-modal title="删除确认" visible="{{ visible }}" actions="{{ actions }}" bind:click="realDelete"> <view>删除后无法恢复哦</view></i-modal> // home.js // pages/home/home.js Page({ data:{ listData:[], currentItem:'' actions: [{ name:'取消'}, name:'删除', color:'#ed3f14', loading:false} ], visible:false}, onShow: function () { this.setData({ listData:wx.getStorageSync('homeList')})}, //加选项 addItem() { wx.navigateTo({ url:'../edit-item/edit-item', }, //进入抽签页 draw(e){ wx.navigateTo({ url:'../draw-view/draw-view?item='+ e.currentTarget.dataset.item }, //删除子选项弹窗 delete(e){ console.log(e) this.setData({ visible: true, currentItem: e.currentTarget.dataset.item}); // 删除子选项 realDelete({detail}){ if (detail.index=== 1) { var newArray=[]; for (const item of this.data.listData){ if (item!=this.data.currentItem){ newArray.push(item); } } this.setData({ listData: newArray 1 wx.setStorageSync('homeList',this.data.listData) wx.removeStoraqeSync(this.data.currentItem) wx.showToast({ title:'删除成功', 1) this.setData({ visible: false !({ })- 1
- 2
- 3
- 4
- 5
- 6
- 7
- 8
- 9
- 10
- 11
- 12
- 13
- 14
- 15
- 16
- 17
- 18
- 19
- 20
- 21
- 22
- 23
- 24
- 25
- 26
- 27
- 28
- 29
- 30
- 31
- 32
- 33
- 34
- 35
- 36
- 37
- 38
- 39
- 40
- 41
- 42
- 43
- 44
- 45
- 46
- 47
- 48
- 49
- 50
- 51
- 52
- 53
- 54
- 55
- 56
- 57
- 58
- 59
- 60
- 61
- 62
- 63
- 64
- 65
- 66
- 67
- 68
- 69
【代码解析】首先在home.json中导入需要用到的UI组件。在页面结构上,顶部是一个添加选项按钮,并通过wxfor来显示选项,最后的i-modal是弹窗组件,通过visible控制。在页面跳转方面,edit-item是添加选项页,draw-view是抽签页。删除功能通过覆盖homeList的选项来实现,删除成功后,要循环删除子选项。
2.2新增页面开发
由于还没有开发添加选项页,因此放效果图之前需要先开发一个添加选项页面。在edit-item页面中输入以下代码:
// edit-item.json{ "navigationBarTitleText":"选项","usingComponents":{ "i-panel":"/dist/panel/index","i-input":"/dist/input/index","i-button":"/dist/button/index" / // edit-item.wxml <i-panel title="{{title}}"> <i-input value="{{itemName}!" placeholder="请输入选项" bind:change="changeItem"/></i-panel> <i-button bind:click="submit" type="primary">提交</i-button> // edit-item.js // pages/edit-item/edit-item.js Page({ data:{ title:'添加选项', saveKey:'homeList', itemName:'' }, onLoad:function (options){ if (options.item){ this.setData({ title:'添加"'+options.item+'"的子选项', saveKey:options.item})} }, changeItem(e){ this.setData({ itemName: e.detail.detail.value}) }, // 提交 submit() { if (this.data.itemName.length===0) { wx.showToast({ title:'内容过短', icon:'none'}) } else if (this.data.itemName.length >10){ wx.showToast({ title:'内容过长', icon:'none'}) }else { var items; var key= this.data.saveKey; if (wx.getStorageSync(key)) { items=wx.getstorageSync(key); for (const key of items) { if (key== this.data.itemName){ wx.showToast({ title:'已存在', icon:'none'}) returni } }else { items = []; items.push(this.data.itemName); wx.setStorageSync(key,items); wx.showToast({ title:'保存成功',}) setTimeout(() => { wx.navigateBack()},1000) }})- 1
- 2
- 3
- 4
- 5
- 6
- 7
- 8
- 9
- 10
- 11
- 12
- 13
- 14
- 15
- 16
- 17
- 18
- 19
- 20
- 21
- 22
- 23
- 24
- 25
- 26
- 27
- 28
- 29
- 30
- 31
- 32
- 33
- 34
- 35
- 36
- 37
- 38
- 39
- 40
- 41
- 42
- 43
- 44
- 45
- 46
- 47
- 48
添加选项页的运行效果如图一所示。
【代码解析】新增选项页面之后需要与新增子选项复用,所以我们编写代码的时候要兼顾两者。同样先在JSON文件中导入用到的UI组件。表单上只有一个input需要输入,提交的时候判断是否为空、是否过长即可。如果是首页选项,就保存在homeList中,子选项则以首页选项的名字为key保存。添加完成后,首页如下下图所示。
【添加选项页】

【首页效果】
2.3 抽签页面开发
现在首页已经有了选项,并且可以通过新增页来增加。此时可以开发抽签页,列出子选项,用于抽签。打开draw-view页面,输入以下代码:
// draw-view.json "navigationBarTitleText":"抽签","usingComponents":{ "i-button":"/dist/button/index" "i-cell-group":"/dist/cell-group/index","i-cell":"/dist/cell/index","i-modal":"/dist/modal/index" // draw-view.wxml <i-button type="primary" bind:click="addItem">添加子选项</i-button><i-button type="success" bind:click="draw">抽签</i-button> <i-cell-group><i-cell wx:for="{{listData}}" wx:for-item="item" wx:key="item" data-item="{{item}}" title="{{item}}" bindlongpress="delete"></i-cell></i-cell-group> <i-modal title="删除确认"visible="{{ visible }}" actions="{{ actions }}" bind:click="realDelete"> <view>删除后无法恢复哦</view></i-modal> // draw-view.js //pages/draw-view/draw-view.js Page({ data:{ listData:[], lastItem:'' currentItem:'', actions:[{ name:'取消'}, name:'删除', color:'#ed3f14', loading:false} ], visible:false}, onLoad:function(options){ this.setData({ lastItem: options.item wx.setNavigationBarTitle({ title: options.item,})}, onShow:function() { this.setData({ listData:wx.getStorageSync(this.data.lastItem)})}, //添加子选项 addItem() { wx.navigateTo({ url:'../edit-item/edit-item?item='+ this.data.lastitem })}, // 抽签 draw(){ if (this.data.listData.length == 0) { wx.showToast({ title:'没有数据', icon:'none'}) } else { const randomNumber=this.getRandomNumber(0, this.data.listData.length); wx.showToast({ title:this.data.listData[randomNumber]}) }, // 获取随机数 getRandomNumber(begin,end){ return Math.floor(Math.random() * (end-begin))+ beging}, // 删除子选项弹窗 delete(e){ this.setData({ visible: true, currentItem: e.currentTarget.dataset.item }); }, // 删除子选项 realDelete({detail}) { if (detail.index=== 1) { var newArray=[]; for (const item of this.data.listData){ if (item!= this.data.currentItem){ newArray.push(item); )} this.setData({ listData: newArray}) wx.setStorageSync(this.data.lastItem,this.data.listData); wx.showToast({ title:'删除成功',})} this.setData({ visible:false});} })- 1
- 2
- 3
- 4
- 5
- 6
- 7
- 8
- 9
- 10
- 11
- 12
- 13
- 14
- 15
- 16
- 17
- 18
- 19
- 20
- 21
- 22
- 23
- 24
- 25
- 26
- 27
- 28
- 29
- 30
- 31
- 32
- 33
- 34
- 35
- 36
- 37
- 38
- 39
- 40
- 41
- 42
- 43
- 44
- 45
- 46
- 47
- 48
- 49
- 50
- 51
- 52
- 53
- 54
- 55
- 56
- 57
- 58
- 59
- 60
- 61
- 62
- 63
- 64
- 65
- 66
- 67
- 68
- 69
- 70
- 71
- 72
- 73
- 74
- 75
添加子选项后,点击“抽签”按钮,运行效果如图所示。
【代码解析】进入页面后,会根据上一个页面传入的选项名来获取存储的子选项数据。点击“抽签”按钮,会通过随机数从现有子选项中抽取一个进行弹窗显示。添加、删除子选项功能与首页的基本相同。

2.4 我的页面开发
通过前面3个页面的开发,主要的抽签流程已经走通了。为了完善这个应用,补充“我的”页面,增加清空、微信登录功能。打开mine页面,输入以下代码:
// mine.json{ "navigationBarTitleText":"我的", "usingComponents":{ "i-card":"/dist/card/index" "i-button":"/dist/button/index" "i-cell-group":"/dist/cell-group/index""i-cell":"/dist/cell/index","i-modal":"/dist/modal/index" // mine.wxml <view class="view-margin"> <i-card title="{{userInfo.nickName}}" extra="{{userInfo.country}}" thumb="{{userInfo.avatarUrl}}"> <!-- <view slot="content">用户名:张三</view> --></i-card> </view> <view class="view-margin"><i-cell-group><i-cell title="清空数据" bindtap="clearData" is-link></i-cell><i-cell title="意见反馈" bindtap="callBack" is-link></i-cell></i-cell-group></view> <i-button wx:if="{{userInfo.nickName=='未登录'}}" type="primary" open-type="getUserInfo" bind:getuserinfo="login">登录</i-button> <i-button wx:if="{{userInfo.nickName!='未登录'}}" type="error" bind:click="logout">退出登录</i-button> <i-modal title="清空确认" visible="{{ visible }}" bind:ok="delete" bind:cancel="cancel"> <view>清空后无法恢复哦</view></i-modal> // mine.wxss.view-margin{ margin-top:16px;} // mine.js Page({ data:{ userInfo:{ nickName:'未登录', country:'-', avatarUrl:'https://i.loli.net/2017/08/21/599a521472424.jpg visible:false onLoad(options){ if (wx.getStorageSync('userInfo')){ this.setData({ userInfo: wx.getStorageSync('userInfo') }) }, clearData(){ this.setData({ visible:true }, delete() { const array=wx.getstorageSync('homeList') for (const item of array) { wx.removeStorageSync(item)} wx.removeStorageSync('homeList') this.setData({ visible:false cancel() { this.setData({ visible:false})}, login(e){ if (e.detail.userInfo){ this.setData({ userInfo: e.detail.userInfo}) wx.setStorageSync('userInfo',e.detail.userInfo)} else { wx.showToast({ title:'登录失败', icon:'none'}) } }, logout() { wx.removeStorageSync('userInfo'y this.setData({ userInfo:{ nickName:'未登录', country: '-', avatarUrl:"https://i.loli.net/2017/08/21/599a521472424.ipq } })}})- 1
- 2
- 3
- 4
- 5
- 6
- 7
- 8
- 9
- 10
- 11
- 12
- 13
- 14
- 15
- 16
- 17
- 18
- 19
- 20
- 21
- 22
- 23
- 24
- 25
- 26
- 27
- 28
- 29
- 30
- 31
- 32
- 33
- 34
- 35
- 36
- 37
- 38
- 39
- 40
- 41
- 42
- 43
- 44
- 45
- 46
- 47
- 48
- 49
- 50
- 51
- 52
- 53
- 54
- 55
- 56
- 57
- 58
- 59
- 60
- 61
- 62
- 63
- 64
- 65
- 66
- 67
- 68
- 69
- 70
- 71
- 72
- 73
- 74
- 75
- 76
- 77
- 78
- 79
- 80
在“我的”页面点击“登录”按钮,会弹出权限申请框,点击允许授予权限后即可登录,运行效果如图所示。

【代码解析】清空数据通过循环homeList里的数据把所有数据移除掉。登录功能在用户,点击允许按钮后,从e.detail.userInfo取出用户的头像、昵称等信息进行展示,并通过wxif控制“显示登录”或“退出登录”按钮。如果需要测试,可以点击微信开发工具中的“清缓存→清除登录状态”,如图所示。

3.小结
本章综合运用前面学到的知识创建了一个易用的工具类应用。虽然该程序的基本功能已经齐全,但是仍有较大的改进空间。建议读者自行添加编辑选项、改变排序等功能来作为练习。为了将各种知识分类展示,本章的内容仅使用了本地存储,没有设计网络请求。下一章我们将做一个带网络请求的完整应用。
-
相关阅读:
WSL 配置 Linux
k8s基于kubectl命令管理资源并分配
linux make和makefile
GFS分布式文件系统
Postman自动化接口测试
【JS基础】在js中如何简单的使用正则表达式
ideal一键部署SpringBoot项目jar包到服务器
01-React入门
排书 ← IDA*
超级详细的微信小程序登录基于SpringBoot
- 原文地址:https://blog.csdn.net/weixin_58024114/article/details/126017631

- 最新文章
-
沪漂五周年了:我越来越迷茫了
Agentic Skill Routing 实战:别再把所有 Skill 塞进 AI Agent 上下文
MySQL-Seconds_behind_master的精度误差
[MAF预定义ChatClient中间件-03]CachingChatClient——利用缓存省钱省时间
AI的至暗历史:从万众期待到被政府撤资,AI的两次死亡徘徊
Agent OS :五种驯服不确定性的范式
PortSwigger SQL注入LAB11
数据库即时编译JIT
[Begin]AI Learn Data Day 0
深度学习进阶(二十七)现代 LLM 的核心架构设计其二:SwiGLU