-
三、MyBatis(3)
一、动态SQL
1.1 什么是动态SQL
- 动态SQL就是根据不同的条件生成不同的SQL语句
- 利用动态SQL这一特性可以彻底摆脱这种痛苦。
如果你之前用过 JSTL 或任何基于类 XML 语言的文本处理器,你对动态 SQL 元素可能会感觉似曾相识。在 MyBatis 之前的版本中,需要花时间了解大量的元素。借助功能强大的基于 OGNL 的表达式,MyBatis 3 替换了之前的大部分元素,大大精简了元素种类,现在要学习的元素种类比原来的一半还要少。
if choose (when, otherwise) trim (where, set) foreach- 1
- 2
- 3
- 4
1.2 搭建环境
(1)sql:
CREATE TABLE `blog`( `id` VARCHAR(50) NOT NULL COMMENT '博客id', `title` VARCHAR(100) NOT NULL COMMENT '博客标题', `author` VARCHAR(30) NOT NULL COMMENT '博客作者', `create_time` DATETIME NOT NULL COMMENT '创建时间', `views` INT(30) NOT NULL COMMENT '浏览量' )ENGINE=INNODB DEFAULT CHARSET=utf8- 1
- 2
- 3
- 4
- 5
- 6
- 7
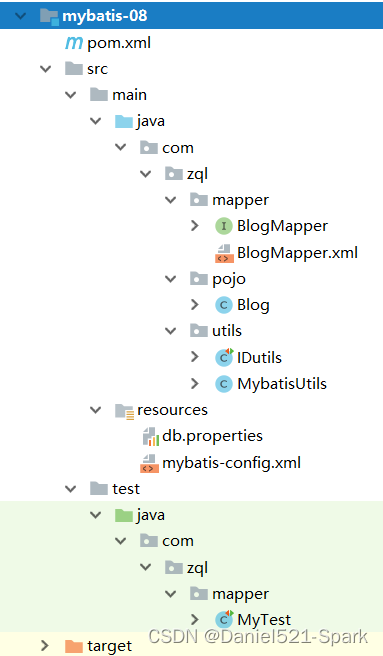
(2)创建一个基础工程

- 导包
- 编写配置文件
- 编写实体类
- 编写实体类对应Mapper接口和Mapper.xml文件
1.导包
<dependencies> <dependency> <groupId>org.projectlombokgroupId> <artifactId>lombokartifactId> <version>1.18.24version> dependency> dependencies> <build> <resources> <resource> <directory>src/main/javadirectory> <includes> <include>**/*.xmlinclude> <include>**/*.propertiesinclude> includes> resource> <resource> <directory>src/main/resourcesdirectory> <includes> <include>**/*.xmlinclude> <include>**/*.propertiesinclude> includes> resource> resources> build>- 1
- 2
- 3
- 4
- 5
- 6
- 7
- 8
- 9
- 10
- 11
- 12
- 13
- 14
- 15
- 16
- 17
- 18
- 19
- 20
- 21
- 22
- 23
- 24
- 25
- 26
- 27
- 28
- 29
- 编写配置文件
db.properties
driver=com.mysql.jdbc.Driver url=jdbc:mysql://localhost:3306/mybatis?\ useSSL=true&useUnicode=true&characterEncoding=UTF-8&serverTimezone=UTC username=root password=root- 1
- 2
- 3
- 4
- 5
mybatis-config.xml
(1)开启驼峰命名自动映射知识点
设置名 描述 有效值 默认值 mapUnderscoreToCamelCase 是否开启驼峰命名自动映射,即从经典数据库列名 A_COLUMN 映射到经典 Java 属性名 aColumn。 true false False 
(2) mybatis-config.xmlDOCTYPE configuration PUBLIC "-//mybatis.org//DTD Config 3.0//EN" "http://mybatis.org/dtd/mybatis-3-config.dtd"> <configuration> <properties resource="db.properties"/> <settings> <setting name="logImpl" value="STDOUT_LOGGING"/> <setting name="mapUnderscoreToCamelCase" value="true">setting> settings> <typeAliases> <package name="com.zql.pojo">package> typeAliases> <environments default="development"> <environment id="development"> <transactionManager type="JDBC"/> <dataSource type="POOLED"> <property name="driver" value="${driver}"/> <property name="url" value="${url}"/> <property name="username" value="${username}"/> <property name="password" value="${password}"/> dataSource> environment> environments> <mappers> <mapper class="com.zql.mapper.BlogMapper">mapper> mappers> configuration>- 1
- 2
- 3
- 4
- 5
- 6
- 7
- 8
- 9
- 10
- 11
- 12
- 13
- 14
- 15
- 16
- 17
- 18
- 19
- 20
- 21
- 22
- 23
- 24
- 25
- 26
- 27
- 28
- 29
- 30
- 31
- 32
- 导入工具类
MybatisUtils.java
package com.zql.utils; import org.apache.ibatis.io.Resources; import org.apache.ibatis.session.SqlSession; import org.apache.ibatis.session.SqlSessionFactory; import org.apache.ibatis.session.SqlSessionFactoryBuilder; import java.io.InputStream; public class MybatisUtils { private static SqlSessionFactory sqlSessionFactory; static { try { String resource = "mybatis-config.xml"; InputStream inputStream = Resources.getResourceAsStream(resource); //1.Resources获取加载全局配置文件 sqlSessionFactory = new SqlSessionFactoryBuilder().build(inputStream); } catch (Exception e) { e.printStackTrace(); } } public static SqlSession getSqlSession(){ return sqlSessionFactory.openSession(true);//true自动提交事务 } }- 1
- 2
- 3
- 4
- 5
- 6
- 7
- 8
- 9
- 10
- 11
- 12
- 13
- 14
- 15
- 16
- 17
- 18
- 19
- 20
- 21
- 22
- 23
- 24
- 25
- 26
- 27
- 28
- 29
IDutils.java
package com.zql.utils; import org.junit.Test; import java.util.UUID; /** * @Author:Daniel * @Version 1.0 */ public class IDutils { public static String getId(){ return UUID.randomUUID().toString().replaceAll("-",""); } @Test public void test(){ System.out.println(IDutils.getId()); } }- 1
- 2
- 3
- 4
- 5
- 6
- 7
- 8
- 9
- 10
- 11
- 12
- 13
- 14
- 15
- 16
- 17
- 18
- 19
- 20
- 21
- 22
- 23
- 24
- 25
- 编写实体类
Blog.java
package com.zql.pojo; import lombok.Data; import java.io.Serializable; import java.util.Date; /** * @Author:Daniel * @Version 1.0 */ @Data public class Blog implements Serializable { private String id; private String title; private String author; private Date createTime; private int views; }- 1
- 2
- 3
- 4
- 5
- 6
- 7
- 8
- 9
- 10
- 11
- 12
- 13
- 14
- 15
- 16
- 17
- 18
- 19
- 20
- 21
- 编写实体类对应Mapper接口和Mapper.xml文件
BlogMapper.java
package com.zql.mapper; import com.zql.pojo.Blog; /** * @Author:Daniel * @Version 1.0 */ public interface BlogMapper { int addBlog(Blog blog); }- 1
- 2
- 3
- 4
- 5
- 6
- 7
- 8
- 9
- 10
- 11
- 12
- 13
BlogMapper.xml
DOCTYPE mapper PUBLIC "-//mybatis.org//DTD mapper 3.0//EN" "http://mybatis.org/dtd/mybatis-3-mapper.dtd"> <mapper namespace="com.zql.mapper.BlogMapper"> <insert id="addBlog" parameterType="blog"> insert into blog (id, title, author, create_time, views) values (#{id}, #{title}, #{author}, #{createTime}, #{views}) insert> mapper>- 1
- 2
- 3
- 4
- 5
- 6
- 7
- 8
- 9
- 10
- 11
MyTest.java
package com.zql.mapper; import com.zql.pojo.Blog; import com.zql.utils.IDutils; import com.zql.utils.MybatisUtils; import org.apache.ibatis.session.SqlSession; import org.junit.Test; import java.util.Date; /** * @Author:Daniel * @Version 1.0 */ public class MyTest { @Test public void test(){ SqlSession sqlSession = MybatisUtils.getSqlSession(); BlogMapper mapper = sqlSession.getMapper(BlogMapper.class); Blog blog = new Blog(); blog.setId(IDutils.getId()); blog.setTitle("Mybatis"); blog.setAuthor("Daniel"); blog.setCreateTime(new Date()); blog.setViews(9999); mapper.addBlog(blog); blog.setId(IDutils.getId()); blog.setTitle("Java"); mapper.addBlog(blog); blog.setId(IDutils.getId()); blog.setTitle("Spring"); mapper.addBlog(blog); blog.setId(IDutils.getId()); blog.setTitle("微服务"); mapper.addBlog(blog); sqlSession.close(); } }- 1
- 2
- 3
- 4
- 5
- 6
- 7
- 8
- 9
- 10
- 11
- 12
- 13
- 14
- 15
- 16
- 17
- 18
- 19
- 20
- 21
- 22
- 23
- 24
- 25
- 26
- 27
- 28
- 29
- 30
- 31
- 32
- 33
- 34
- 35
- 36
- 37
- 38
- 39
- 40
- 41
- 42
- 43
- 44
- 45
- 46
- 47
- 48

1.3 if
(1)接口 BlogMapper.java
//使用if 查询博客 List<Blog> queryBlogIf(Map map);- 1
- 2
(2)BlogMapper.xml
<select id="queryBlogIf" parameterType="map" resultType="blog"> select * from blog where 1=1 <if test="title != null"> and title=#{title} if> <if test="author != null"> and author=#{author} if> select>- 1
- 2
- 3
- 4
- 5
- 6
- 7
- 8
- 9
- 10
(3)MyTest.java
@Test public void queryBlog(){ SqlSession sqlSession = MybatisUtils.getSqlSession(); BlogMapper mapper = sqlSession.getMapper(BlogMapper.class); HashMap<Object, Object> map = new HashMap<>(); map.put("title","Spring"); //map.put("author","Daniel"); List<Blog> blogs = mapper.queryBlogIf(map); for (Blog blog : blogs) { System.out.println(blog); } sqlSession.close(); }- 1
- 2
- 3
- 4
- 5
- 6
- 7
- 8
- 9
- 10
- 11
- 12
- 13
- 14
- 15
- 16
- 17
- 18
- 19
- 20
- 21

1.4 choose、when、otherwise
有时候,我们不想使用所有的条件,而只是想从多个条件中选择一个使用。针对这种情况,MyBatis 提供了 choose 元素,它有点像 Java 中的 switch 语句。
(1)接口 BlogMapper.java
//choose、when、otherwise List<Blog> queryBlogChoose(Map map);- 1
- 2
(2)BlogMapper.xml
<select id="queryBlogChoose" parameterType="map" resultType="blog"> select * from blog <where> <choose> <when test="title != null"> title=#{title} when> <when test="author != null"> and author=#{author} when> <otherwise> and views=#{views} otherwise> choose> where> select>- 1
- 2
- 3
- 4
- 5
- 6
- 7
- 8
- 9
- 10
- 11
- 12
- 13
- 14
- 15
- 16
(3)MyTest.java
@Test public void queryBlogChoose(){ SqlSession sqlSession = MybatisUtils.getSqlSession(); BlogMapper mapper = sqlSession.getMapper(BlogMapper.class); HashMap<Object, Object> map = new HashMap<>(); map.put("title","Java"); map.put("author","Daniell"); map.put("views",9999); List<Blog> blogs = mapper.queryBlogChoose(map); for (Blog blog : blogs) { System.out.println(blog); } sqlSession.close(); }- 1
- 2
- 3
- 4
- 5
- 6
- 7
- 8
- 9
- 10
- 11
- 12
- 13
- 14
- 15
- 16
- 17
- 18
- 19
- 20
- 21

1.5 trim、where、set
1.5.1 where
(1)接口 BlogMapper.java
//where if 查询博客 List<Blog> queryBlogWhereIf(Map map);- 1
- 2
(2)BlogMapper.xml
<select id="queryBlogWhereIf" parameterType="map" resultType="blog"> select * from blog <where> <if test="title != null"> title=#{title} if> <if test="author != null"> and author=#{author} if> where> select>- 1
- 2
- 3
- 4
- 5
- 6
- 7
- 8
- 9
- 10
- 11
- 12
(3)MyTest.java
@Test public void queryBlogWhereIf(){ SqlSession sqlSession = MybatisUtils.getSqlSession(); BlogMapper mapper = sqlSession.getMapper(BlogMapper.class); HashMap<Object, Object> map = new HashMap<>(); map.put("title","Mybatis"); map.put("author","Daniel"); List<Blog> blogs = mapper.queryBlogWhereIf(map); for (Blog blog : blogs) { System.out.println(blog); } sqlSession.close(); }- 1
- 2
- 3
- 4
- 5
- 6
- 7
- 8
- 9
- 10
- 11
- 12
- 13
- 14
- 15
- 16
- 17
- 18
- 19
- 20

1.5.2 set
(1) BlogMapper.java
//set int updateBlogSet(Map map);- 1
- 2
(2)BlogMapper.xml
<update id="updateBlogSet" parameterType="map"> update blog <set> <if test="title != null"> title =#{title}, if> <if test="author != null"> author =#{author} if> set> where id=#{id} update>- 1
- 2
- 3
- 4
- 5
- 6
- 7
- 8
- 9
- 10
- 11
- 12
(3)MyTest.java
@Test public void updateBlogSet(){ SqlSession sqlSession = MybatisUtils.getSqlSession(); BlogMapper mapper = sqlSession.getMapper(BlogMapper.class); HashMap<Object, Object> map = new HashMap<>(); map.put("title","Spring22"); map.put("id","f5dc243d171c42319a57bcd44ff66cb1"); int i = mapper.updateBlogSet(map); if(i > 0){ System.out.println("更新成功"); } sqlSession.close(); }- 1
- 2
- 3
- 4
- 5
- 6
- 7
- 8
- 9
- 10
- 11
- 12
- 13
- 14
- 15
- 16
- 17
- 18
- 19

- 所谓的动态SQL,本质还是SQL语句,只是我们可以在SQL层面,去执行一个逻辑代码
if where,set,choose,when- 1
- 2
1.6 sql片段
有的时候,我们可能会将一些功能的部分抽取出来,方便复用!
(1)BlogMapper.java
//where if 查询博客 SQL片段 List<Blog> queryBlogWhereIf(Map map);- 1
- 2
(2)BlogMapper.xml
(2.1) 使用SQL标签抽取公共的部分
<sql id="id-title-author"> <if test="title != null"> title=#{title} </if> <if test="author != null"> and author=#{author} </if> </sql>- 1
- 2
- 3
- 4
- 5
- 6
- 7
- 8
- 9
(2.2) 在需要使用的地方使用include标签引用即可
<select id="queryBlogWhereIf" parameterType="map" resultType="blog"> select * from blog <where> <include refid="id-title-author">include> where> select>- 1
- 2
- 3
- 4
- 5
- 6
(3)MyTest.java
@Test public void queryBlogWhereIf(){ SqlSession sqlSession = MybatisUtils.getSqlSession(); BlogMapper mapper = sqlSession.getMapper(BlogMapper.class); HashMap<Object, Object> map = new HashMap<>(); map.put("title","Mybatis"); map.put("author","Daniel"); List<Blog> blogs = mapper.queryBlogWhereIf(map); for (Blog blog : blogs) { System.out.println(blog); } sqlSession.close(); }- 1
- 2
- 3
- 4
- 5
- 6
- 7
- 8
- 9
- 10
- 11
- 12
- 13
- 14
- 15
- 16
- 17
- 18
- 19
- 20

注意事项:
- 最好基于单表来定义SQL片段!
- 不要存在where标签
1.7 foreach

(1)BlogMapper.java
//foreach List<Blog> queryBlogForeach(Map map);- 1
- 2
(2)BlogMapper.xml
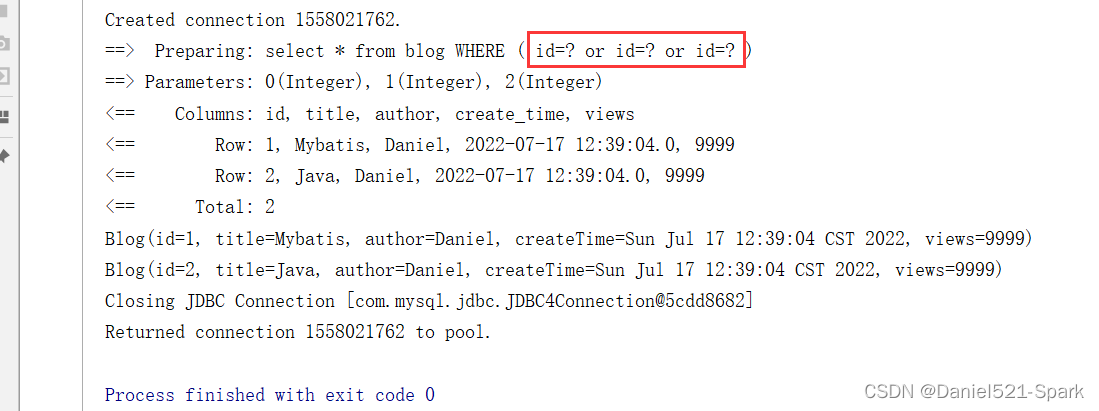
<!--select * from blog where 1=1 and (id=1 or id=2 or id=3)--> <select id="queryBlogForeach" parameterType="map" resultType="blog"> select * from blog <where> <foreach collection="ids" index="id" open="and (" close=")" separator="or"> id=#{id} </foreach> </where> </select>- 1
- 2
- 3
- 4
- 5
- 6
- 7
- 8
- 9
(3)MyTest.java
@Test public void queryBlogForeach(){ SqlSession sqlSession = MybatisUtils.getSqlSession(); BlogMapper mapper = sqlSession.getMapper(BlogMapper.class); HashMap<Object, Object> map = new HashMap<>(); ArrayList<Integer> ids = new ArrayList<Integer>(); ids.add(1); ids.add(2); ids.add(3); map.put("ids",ids); List<Blog> blogs = mapper.queryBlogForeach(map); for (Blog blog : blogs) { System.out.println(blog); } sqlSession.close(); }- 1
- 2
- 3
- 4
- 5
- 6
- 7
- 8
- 9
- 10
- 11
- 12
- 13
- 14
- 15
- 16
- 17
- 18
- 19
- 20
- 21
- 22
- 23
- 24
- 25
- 26

- 动态SQL就是在拼接SQL语句,我们只要保证SQL的正确性,按照SQL的格式,去排列组合就可以了
建议:
现在Mysql中写出完整的SQL,再对应的去修改成为我们的动态SQL实现通用即可!
二、缓存
2.1 缓存简介
- 查询:连接数据库,耗资源
- 一次查询的结果,给他暂存在一个可以直接取到的地方!——>内存:缓存
- 我们再次查询相同数据的时候,直接走缓存,就不用走数据库了
2.1.1 什么是缓存[Cache]?
- 存在内存中的临时数据。
- 将用户经常查询的数据放在缓存(内存)中,用户去查询数据就不用从磁盘上(关系型数据库文件)查询,从缓存中查询,从而提高查询效率,解决了高并发系统的性能问题。
2.1.2 为什么使用缓存?
减少和数据库的交互次数,减少系统开销,提高系统效率。
2.1.3 什么样的数据能使用缓存?
经常查询并且不经常改变的数据。【可以使用缓存】
2.2 缓存分类
- MyBatis包含了一个非常强大的查询缓存特性,它可以非常方便地定制和配置缓存。缓存可以极大的提升查询效率。
- MyBatis系统中默认定义了两级缓存:一级缓存和二级缓存
– 默认情况下,只有一级缓存开启。(SqlSession级别的缓存,也称为本地缓存)
– 二级缓存需要手动开启和配置,他是基于namespace级别的缓存。
– 为了提高扩展性,MyBatis定义了缓存接口Cache。我们可以通过实现Cache接口来自定义二级缓存
2.2.1 一级缓存
- 一级缓存也叫本地缓存:
– 与数据库同一次会话期间查询到的数据会放在本地缓存中。
– 以后如果需要获取相同的数据,直接从缓存中拿,没必要再去查询数据库;
2.2.1.1 测试查看
(1)创建子工程
(2)引入依赖
pom.xml<dependencies> <dependency> <groupId>org.projectlombokgroupId> <artifactId>lombokartifactId> <version>1.18.24version> dependency> dependencies> <build> <resources> <resource> <directory>src/main/javadirectory> <includes> <include>**/*.xmlinclude> <include>**/*.propertiesinclude> includes> resource> <resource> <directory>src/main/resourcesdirectory> <includes> <include>**/*.xmlinclude> <include>**/*.propertiesinclude> includes> resource> resources> build>- 1
- 2
- 3
- 4
- 5
- 6
- 7
- 8
- 9
- 10
- 11
- 12
- 13
- 14
- 15
- 16
- 17
- 18
- 19
- 20
- 21
- 22
- 23
- 24
- 25
- 26
- 27
- 28
- 29
(3)导入resources文件(db.propertis,mybatis-config.xml)
db.propertis
driver=com.mysql.jdbc.Driver url=jdbc:mysql://localhost:3306/mybatis?\ useSSL=true&useUnicode=true&characterEncoding=UTF-8&serverTimezone=UTC username=root password=root- 1
- 2
- 3
- 4
- 5
mybatis-config.xml
DOCTYPE configuration PUBLIC "-//mybatis.org//DTD Config 3.0//EN" "http://mybatis.org/dtd/mybatis-3-config.dtd"> <configuration> <properties resource="db.properties"/> <settings> <setting name="logImpl" value="STDOUT_LOGGING"/> settings> <typeAliases> <package name="com.zql.pojo">package> typeAliases> <environments default="development"> <environment id="development"> <transactionManager type="JDBC"/> <dataSource type="POOLED"> <property name="driver" value="${driver}"/> <property name="url" value="${url}"/> <property name="username" value="${username}"/> <property name="password" value="${password}"/> dataSource> environment> environments> <mappers> <mapper class="com.zql.mapper.UserMapper">mapper> mappers> configuration>- 1
- 2
- 3
- 4
- 5
- 6
- 7
- 8
- 9
- 10
- 11
- 12
- 13
- 14
- 15
- 16
- 17
- 18
- 19
- 20
- 21
- 22
- 23
- 24
- 25
- 26
- 27
- 28
- 29
- 30
- 31
- 32
(4)工具类
MybatisUtils.java
package com.zql.utils; import org.apache.ibatis.io.Resources; import org.apache.ibatis.session.SqlSession; import org.apache.ibatis.session.SqlSessionFactory; import org.apache.ibatis.session.SqlSessionFactoryBuilder; import java.io.InputStream; public class MybatisUtils { private static SqlSessionFactory sqlSessionFactory; static { try { String resource = "mybatis-config.xml"; InputStream inputStream = Resources.getResourceAsStream(resource); //1.Resources获取加载全局配置文件 sqlSessionFactory = new SqlSessionFactoryBuilder().build(inputStream); } catch (Exception e) { e.printStackTrace(); } } public static SqlSession getSqlSession(){ return sqlSessionFactory.openSession(true);//true自动提交事务 } }- 1
- 2
- 3
- 4
- 5
- 6
- 7
- 8
- 9
- 10
- 11
- 12
- 13
- 14
- 15
- 16
- 17
- 18
- 19
- 20
- 21
- 22
- 23
- 24
- 25
- 26
- 27
- 28
- 29
(5)实体类
User.java在这里插入代码片- 1
(6) 接口
UserMapper.javapackage com.zql.mapper; import com.zql.pojo.User; import org.apache.ibatis.annotations.Param; /** * @Author:Daniel * @Version 1.0 */ public interface UserMapper { User getUserById(@Param("id") int id); }- 1
- 2
- 3
- 4
- 5
- 6
- 7
- 8
- 9
- 10
- 11
- 12
- 13
- 14
(7)Mapper.xml 文件
UserMapper.xmlDOCTYPE mapper PUBLIC "-//mybatis.org//DTD mapper 3.0//EN" "http://mybatis.org/dtd/mybatis-3-mapper.dtd"> <mapper namespace="com.zql.mapper.UserMapper"> <select id="getUserById" resultType="user"> select * from user where id=#{id} select> mapper>- 1
- 2
- 3
- 4
- 5
- 6
- 7
- 8
- 9
- 10
- 11
(8)MyTest.java
package com.zql.mapper; import com.zql.pojo.User; import com.zql.utils.MybatisUtils; import org.apache.ibatis.session.SqlSession; import org.junit.Test; /** * @Author:Daniel * @Version 1.0 */ public class MyTest { @Test public void getUserById(){ SqlSession sqlSession = MybatisUtils.getSqlSession(); UserMapper mapper = sqlSession.getMapper(UserMapper.class); User userById = mapper.getUserById(1); System.out.println(userById); System.out.println("==================================="); User userById2 = mapper.getUserById(1); System.out.println(userById2); sqlSession.close(); } }- 1
- 2
- 3
- 4
- 5
- 6
- 7
- 8
- 9
- 10
- 11
- 12
- 13
- 14
- 15
- 16
- 17
- 18
- 19
- 20
- 21
- 22
- 23
- 24
- 25
- 26
- 27
- 28
- 29
- 30
- 31
测试步骤:
- 开启日志!
- 测试在一个Session中查询两次相同的记录
- 查看日志输出👇🏾👇🏾

缓存失效的情况:
- 查询不同的东西
- 增删改操作,可能会改变原来的数据,所以必定会刷新缓存!

- 查询不同的Mapper.xml
- 手动清理缓存!

总结:一级缓存默认是开启的,只在第一次SqlSession中有效,也就是拿到连接到关闭连接这个区间段!
一级缓存就是一个Map。2.2.2 二级缓存
2.2.2.1 概述
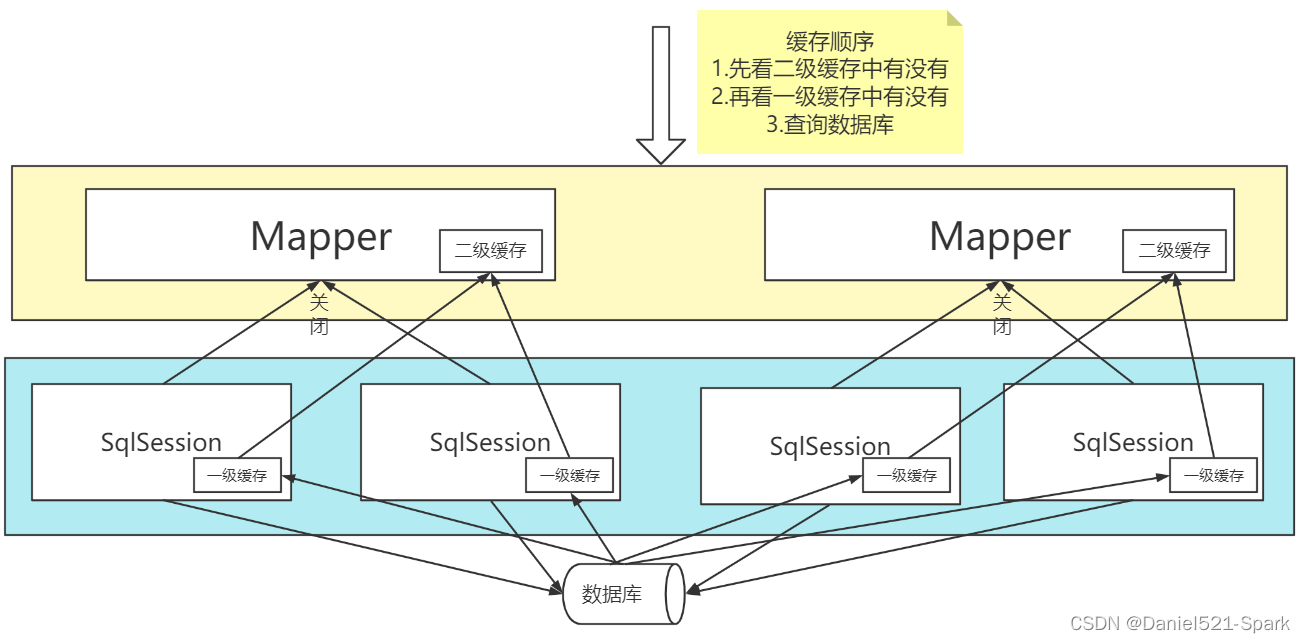
- 二级缓存也叫全局缓存,一级缓存作用域太低了,所以诞生了二级缓存
- 基于namespace级别的缓存,一个名称空间,对应一个二级缓存;
- 工作机制
– 一个会话查询一条数据,这个数据就会被放在当前会话的一级缓存中;
– 如果当前会话关闭了,这个会话对应的一级缓存就没了;但是我们想要的是,会话关闭了,一级缓存中的数据被保存到二级缓存中;
– 新的会话查询信息,就可以从二级缓存中获取内容;
– 不同的mapper查出的数据会放在自己对应的缓存(map)中;
2.2.2.1 应用
- 开启全局缓存
设置名 描述 有效值 默认值 cacheEnabled 全局性地开启或关闭所有映射器配置文件中已配置的任何缓存。 true false true mybatis-config.xml
<settings> <setting name="logImpl" value="STDOUT_LOGGING"/> <setting name="cacheEnabled" value="true">setting> settings>- 1
- 2
- 3
- 4
- 在要使用二级缓存的Mapper中开启
<cache/>- 1
- 2
也可以自定义参数:👇🏾👇🏾
<cache eviction="FIFO" flushInterval="60000" size="512" readOnly="true"/>- 1
- 2
- 3
- 4
- 5
- 6
总结:
- 只要开启了二级缓存,在同一个Mapper下就有效
- 所有的数据都会先放在一级缓存中;
- 只有当会话提交,或者关闭的时候,才会提交到二级缓存中!
2.3 缓存原理

2.4 自定义缓存 - ehcache(拓展)
2.4.1 什么是ehcache?

2.4.2 ehcache的应用
Ehcache是一种广泛使用的开源Java分布式缓存。主要面向通用缓存。
(1)要在程序中使用Ehcache,先要导依赖
<dependency> <groupId>org.mybatis.cachesgroupId> <artifactId>mybatis-ehcacheartifactId> <version>1.1.0version> dependency>- 1
- 2
- 3
- 4
- 5
(2)在mapper中指定使用我们的ehcache实现
<cache type="org.mybatis.caches.ehcache.EhcacheCache"/>- 1
- 2
(3) ehcache.xml
<ehcache xmlns:xsi="http://www.w3.org/2001/XMLSchema-instance" xsi:noNamespaceSchemaLocation="http://ehcache.org/ehcache.xsd" updateCheck="false"> <diskStore path="./tmpdir/Tmp_EhCache"/> <defaultCache eternal="false" maxElementsInMemory="10000" overflowToDisk="false" diskPersistent="false" timeToIdleSeconds="1800" timeToLiveSeconds="259200" memoryStoreEvictionPolicy="LRU"/> <cache name="cloud_user" eternal="false" maxElementsInMemory="5000" overflowToDisk="false" diskPersistent="false" timeToIdleSeconds="1800" timeToLiveSeconds="1800" memoryStoreEvictionPolicy="LRU"/> ehcache>- 1
- 2
- 3
- 4
- 5
- 6
- 7
- 8
- 9
- 10
- 11
- 12
- 13
- 14
- 15
- 16
- 17
- 18
- 19
- 20
- 21
- 22
- 23
- 24
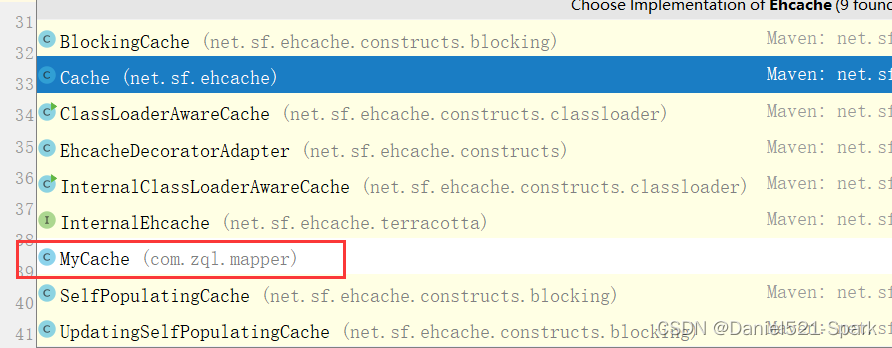
(4) 创建一个
public class MyCache implements Ehcache {}就OK
-
相关阅读:
Linux挂载硬盘
Zulip Server 6.0 发布,开源团队协作工具
替代STM32的GD32,替代KEIL的Eclipse配置---连载4
15、JAVA入门——封装
PowerBI(一) : 如何将powerBI报表嵌入内部web应用程序?
关键词搜索功能升级,启发营销场景多样化
DM8:单库单实例搭建本地数据守护服务
微信小程序能不能有一种公共的分包,能被普通的分包引用其资源?(内有解决方案)
elasticsearch 聚合之 date_histogram 聚合
C++之模板——初阶
- 原文地址:https://blog.csdn.net/weixin_42171159/article/details/125834387
