-
threejs (一) 创建一个场景
引入
npm install three import * as THREE from 'three'; const scene = new THREE.Scene();- 1
- 2
- 3
- 4
或者使用bootCDN复制对应的版本连接
<script src="https://cdn.bootcdn.net/ajax/libs/three.js/0.156.1/three.js"></script>- 1
基础知识
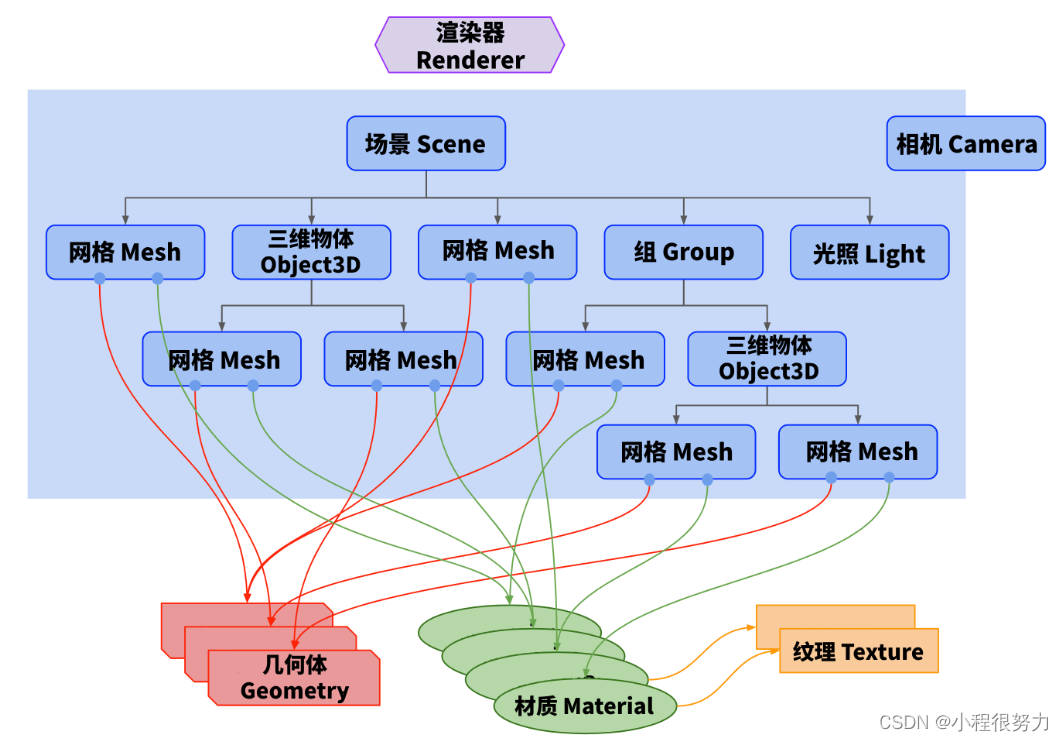
场景、相机、渲染器
- 通过
THREE.Scene创建一个场景:3D世界的容器,所有的对象都要放到这个场景中,包括背景等。 Geometry:几何体,常见的内置几何体有- 基础材质
MeshBasicMaterial:可以理解为皮肤,只会显示几何体的颜色,不会收到光照的影响 - 网格对象
Mesh:网格用来将几何体和材质结合起来形成可视化的3D物体,是three.js中最基础的可视化对象 - 通过
THREE.PerspectiveCamera创建一个相机:可以创建多个相机来回切换 - 通过
THREE.WebGLRenderer创建一个渲染器,方便将物体渲染到场景中:所有的物体, 灯光, 纹理都要经过render才能看到, 也就是说 render 用来呈现结果, render 通过算法把 3D 场景投影成2D画面绘制到画布上

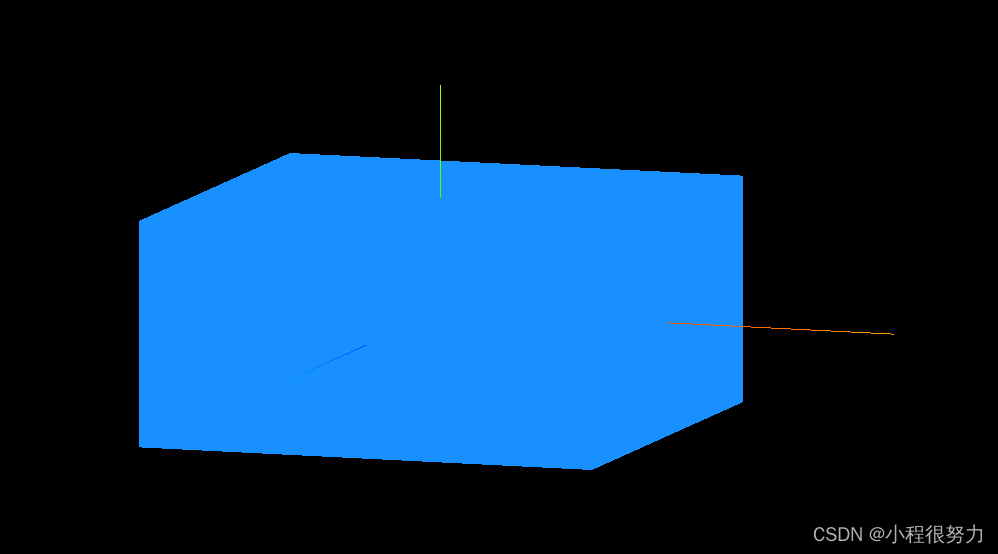
展示一个立方体
const canvas = document.getElementById('c'); const width = window.innerWidth; const height = window.innerHeight; canvas.width = width; canvas.height = height; // 创建3D场景 const scene = new THREE.Scene(); // 创建辅助坐标系 const axesHelper = new THREE.AxesHelper(); scene.add(axesHelper); // 创建立方体 const box = new THREE.BoxGeometry(1, 1, 1); // 创建立方体的材质 const material = new THREE.MeshBasicMaterial({ color: 0x1890ff, }); // 创建物体对象 const mesh = new THREE.Mesh(box, material); scene.add(mesh); // 创建相机对象 const aspect = width / height; const camera = new THREE.OrthographicCamera( -aspect, aspect, aspect, -aspect, 0.01, 100 ); // 透视相机 // 设置相机位置 camera.position.set(1, 1, 3); // 相机默认的坐标是在(0,0,0); // 设置相机方向 camera.lookAt(scene.position); // 将相机朝向场景 // 将相机添加到场景中 scene.add(camera); // 创建渲染器 const renderer = new THREE.WebGLRenderer({ canvas, }); // 设置渲染器大小 renderer.setSize(window.innerWidth, window.innerHeight); // 执行渲染 renderer.render(scene, camera);- 1
- 2
- 3
- 4
- 5
- 6
- 7
- 8
- 9
- 10
- 11
- 12
- 13
- 14
- 15
- 16
- 17
- 18
- 19
- 20
- 21
- 22
- 23
- 24
- 25
- 26
- 27
- 28
- 29
- 30
- 31
- 32
- 33
- 34
- 35
- 36
- 37
- 38
- 39
- 40
- 41
- 42
- 43
- 44
- 45
- 46
- 47
- 48
- 49
- 50

- 改善锯齿
// 创建渲染器 const renderer = new THREE.WebGLRenderer({ canvas, antialias: true, //抗锯齿 }); // 设置渲染器像素比 renderer.setPixelRatio(window.devicePixelRatio || 1);- 1
- 2
- 3
- 4
- 5
- 6
- 7
- 改善立体效果 添加光线
// 添加全局光照 const ambient = new THREE.AmbientLight(0xffffff, 0.5); // 添加方向光 平行光 const directionalLight = new THREE.DirectionalLight(0xffffff, 0.5); scene.add(ambient, directionalLight);- 1
- 2
- 3
- 4
- 5
- 修改立方体颜色
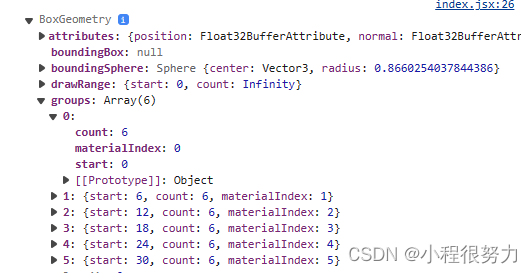
打印立方体,发现每个面有6个顶点,通过透视查看当前的立方体,可以发现每个面是由两个三角形组成,所以一个面是六个点


const faces = [] for (let i = 0; i < box.groups.length; i++) { const material = new THREE.MeshBasicMaterial({ color: Math.random() * 0xffffff, }) faces.push(material) } // 创建立方体的材质 MeshLambertMaterial需要光照 // const material = new THREE.MeshLambertMaterial({ // color: 0x1890ff, // }); // 创建物体对象 const mesh = new THREE.Mesh(box, faces);- 1
- 2
- 3
- 4
- 5
- 6
- 7
- 8
- 9
- 10
- 11
- 12
- 13
- 14
- 运动
- 创建辅助平面
// 创建辅助平面 const gridHelper = new THREE.GridHelper(); scene.add(gridHelper);- 1
- 2
- 3
- 围绕中心点做圆周运动与相机移动
const clock = new THREE.Clock() const tick = () => { const elapsedTime = clock.getElapsedTime(); // mesh.rotation.x += elapsedTime * 0.01; // mesh.rotation.y += elapsedTime * 0.01; // mesh.rotation.z += elapsedTime * 0.01; // 实现以中心点为中心 圆周运动 // mesh.position.x = Math.cos(elapsedTime) // mesh.position.y = Math.sin(elapsedTime) // 以相机为主旋转 // camera.position.x = Math.cos(elapsedTime) // camera.position.y = Math.sin(elapsedTime) orbitControls.update(); renderer.render(scene, camera); window.requestAnimationFrame(tick); }; tick();- 1
- 2
- 3
- 4
- 5
- 6
- 7
- 8
- 9
- 10
- 11
- 12
- 13
- 14
- 15
- 16
- 17
- 性能监控器
// 添加性能监视器 const stats = new Stats(); stats.setMode(0); document.body.appendChild(stats.domElement); ... // 屏幕适配 window.addEventListener('resize', () => { camera.aspect = window.innerWidth / window.innerHeight; camera.updateProjectionMatrix(); renderer.setSize(window.innerWidth, window.innerHeight); });- 1
- 2
- 3
- 4
- 5
- 6
- 7
- 8
- 9
- 10
- 11
试题
实现一个正方体匀速执行5个单位后回到初始继续形式。
方法一不采用原因:requestAnimationFrame每秒执行60次,但是每两帧之间的时间间距是不同的,所以无法在两针之间加固定的数据const tick = () => { const elapsedTime = clock.getElapsedTime(); // 方法一:pass // 需要匀速的运动但因为每个计算机的刷新率及任务量各方面都会影响时间差,导致time每次上下帧相隔都不同 // if (mesh.position.x >= 10 ) { // mesh.position.x = 0; // } else { // mesh.position.x += 1/60; // } // 方法二 // 获取到当前执行了多少的时间,就移动多少 let t = elapsedTime % 5; //得到每秒(%5)每次到了5之后会重新计算,不然不回重新开始 mesh.position.x = t * 1; //每次渲染时移动1格 if (mesh.position.x > 5) { mesh.position.x = 0; } stats.update(); orbitControls.update(); renderer.render(scene, camera); // 1s大约执行60次 window.requestAnimationFrame(tick); }; tick();- 1
- 2
- 3
- 4
- 5
- 6
- 7
- 8
- 9
- 10
- 11
- 12
- 13
- 14
- 15
- 16
- 17
- 18
- 19
- 20
- 21
- 22
- 23
- 24
- 25
-
相关阅读:
当下,产业园区发展面临的十大问题
dpdk legacy memory 模型浅析
vue3.x 组件间传参
HTuple HObject使用记录
设计模式:简单工厂模式(C#、JAVA、JavaScript、C++、Python、Go、PHP):
prompt
无线传感器网络基于MCKP-MMF算法的流量估计matlab仿真
聊聊admin服务的架构模式
服务网关GateWay基础
HTML期末学生大作业——基于html+css+javascript+jquery+bootstrap响应式音乐酒吧网站
- 原文地址:https://blog.csdn.net/cwjxyp/article/details/133951205
