-
【Detectron2】代码库学习-2. 环境搭建和demo
Detectron2
1. 简介
Detectron2是Facebook AI Research(FAIR)推出的基于Pytorch的视觉算法开源框架,主要聚焦于目标检测和分割任务等视觉算法,此外还支持全景分割,关键点检测,旋转框检测等任务。Detectron2继承自Detectron 和mask-rcnn。
Detectron2具有较强的灵活性和可扩展性,支持快速的单GPU训练,多GPU并行训练和多节点分布式训练。2. 环境依赖
- Linux or macOS with Python ≥ 3.7
- PyTorch ≥ 1.8 and torchvision
- OpenCV 可选
3.推荐步骤
python -m pip install 'git+https://github.com/facebookresearch/detectron2.git' # (add --user if you don't have permission) # Or, to install it from a local clone: git clone https://github.com/facebookresearch/detectron2.git python -m pip install -e detectron2 # On macOS, you may need to prepend the above commands with a few environment variables: CC=clang CXX=clang++ ARCHFLAGS="-arch x86_64" python -m pip install ...- 1
- 2
- 3
- 4
- 5
- 6
- 7
4. 环境搭建
前置硬件环境
- Ubuntu 20.04.1 LTS ($lsb_release -a)
- Linux kernel 5.15.0-46-generic ($uname -a)
- CUDA Version 11.7 Driver Version 515.65.01 ($nvidia-smi)
- CUDNN Version 8.4.1
- A40 GPU
- python环境
conda create --name det python==3.10.4- 1
- torch &torchvison
pip3 install torchvision+cu117 -f https://download.pytorch.org/whl/torch_stable.html pip3 install torchvision==0.14.0+cu117 -f https://download.pytorch.org/whl/torch_stable.html- 1
- 2
- openCV
pip install opencv-python==4.5.5.64- 1
- detectron2
git clone https://github.com/facebookresearch/detectron2.git cd detectron2 python setup.py install- 1
- 2
- 3
输出 Finished processing dependencies for detectron2==0.6 则为安装成功5.可选项: 在
.bashrc设置CUDA 环境变量vim ~/.bashrc export PATH=/usr/local/cuda/bin${PATH:+:${PATH}} export LD_LIBRARY_PATH=/usr/local/cuda/lib64${LD_LIBRARY_PATH:+:${LD_LIBRARY_PATH}} export CUDA_HOME=/usr/local/cuda source ~/.bashrc- 1
- 2
- 3
- 4
- 5
5. demo 教程
环境搭建完成后就可以开始学习demo代码了,demo脚本在detectron2目录下,
GETTING_STARTED.md中有详细步骤- 获取测试图像
wget http://images.cocodataset.org/val2017/000000439715.jpg -q -O input.jpg- 1
- 测试输出
python demo.py --input input.jpg --output out.png- 1
将加载默认的模型配置文件:
../configs/quick_schedules/mask_rcnn_R_50_FPN_inference_acc_test.yaml
和checkpoint
detectron2://COCO-InstanceSegmentation/mask_rcnn_R_50_FPN_3x/137849600/model_final_f10217.pkl
6. demo colab源代码
参考代码教程
打不开上面链接的可以直接看以下全文代码:# -*- coding: utf-8 -*- """Detectron2 Tutorial.ipynb Automatically generated by Colaboratory. Original file is located at https://colab.research.google.com/drive/16jcaJoc6bCFAQ96jDe2HwtXj7BMD_-m5 # Detectron2 Beginner's Tutorial Welcome to detectron2! This is the official colab tutorial of detectron2. Here, we will go through some basics usage of detectron2, including the following:
* Run inference on images or videos, with an existing detectron2 model
* Train a detectron2 model on a new dataset
You can make a copy of this tutorial by "File -> Open in playground mode" and make changes there. __DO NOT__ request access to this tutorial.
# Install detectron2
"""
!python -m pip install pyyaml==5.1
import sys, os, distutils.core
# Note: This is a faster way to install detectron2 in Colab, but it does not include all functionalities.
# See https://detectron2.readthedocs.io/tutorials/install.html for full installation instructions
!git clone 'https://github.com/facebookresearch/detectron2'
dist = distutils.core.run_setup("./detectron2/setup.py")
!python -m pip install {' '.join([f"'{x}'" for x in dist.install_requires])}
sys.path.insert(0, os.path.abspath('./detectron2'))
# Properly install detectron2. (Please do not install twice in both ways)
# !python -m pip install 'git+https://github.com/facebookresearch/detectron2.git'
import torch, detectron2
!nvcc --version
TORCH_VERSION = ".".join(torch.__version__.split(".")[:2])
CUDA_VERSION = torch.__version__.split("+")[-1]
print("torch: ", TORCH_VERSION, "; cuda: ", CUDA_VERSION)
print("detectron2:", detectron2.__version__)
# Some basic setup:
# Setup detectron2 logger
import detectron2
from detectron2.utils.logger import setup_logger
setup_logger()
# import some common libraries
import numpy as np
import os, json, cv2, random
from google.colab.patches import cv2_imshow
# import some common detectron2 utilities
from detectron2 import model_zoo
from detectron2.engine import DefaultPredictor
from detectron2.config import get_cfg
from detectron2.utils.visualizer import Visualizer
from detectron2.data import MetadataCatalog, DatasetCatalog
"""# Run a pre-trained detectron2 model
We first download an image from the COCO dataset:
"""
!wget http://images.cocodataset.org/val2017/000000439715.jpg -q -O input.jpg
im = cv2.imread("./input.jpg")
cv2_imshow(im)
"""Then, we create a detectron2 config and a detectron2 `DefaultPredictor` to run inference on this image."""
cfg = get_cfg()
# add project-specific config (e.g., TensorMask) here if you're not running a model in detectron2's core library
cfg.merge_from_file(model_zoo.get_config_file("COCO-InstanceSegmentation/mask_rcnn_R_50_FPN_3x.yaml"))
cfg.MODEL.ROI_HEADS.SCORE_THRESH_TEST = 0.5 # set threshold for this model
# Find a model from detectron2's model zoo. You can use the https://dl.fbaipublicfiles... url as well
cfg.MODEL.WEIGHTS = model_zoo.get_checkpoint_url("COCO-InstanceSegmentation/mask_rcnn_R_50_FPN_3x.yaml")
predictor = DefaultPredictor(cfg)
outputs = predictor(im)
# look at the outputs. See https://detectron2.readthedocs.io/tutorials/models.html#model-output-format for specification
print(outputs["instances"].pred_classes)
print(outputs["instances"].pred_boxes)
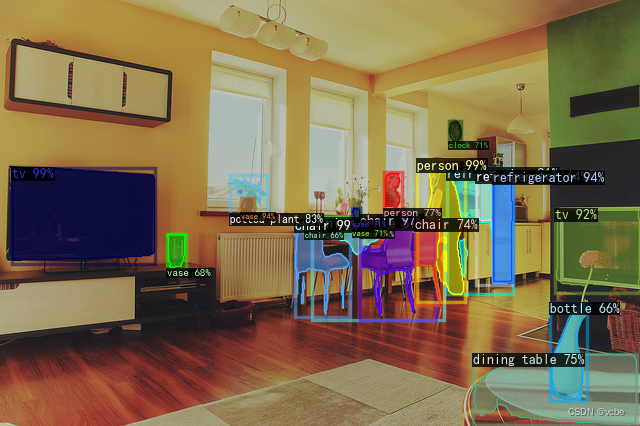
# We can use `Visualizer` to draw the predictions on the image.
v = Visualizer(im[:, :, ::-1], MetadataCatalog.get(cfg.DATASETS.TRAIN[0]), scale=1.2)
out = v.draw_instance_predictions(outputs["instances"].to("cpu"))
cv2_imshow(out.get_image()[:, :, ::-1])
"""# Train on a custom dataset
In this section, we show how to train an existing detectron2 model on a custom dataset in a new format.
We use [the balloon segmentation dataset](https://github.com/matterport/Mask_RCNN/tree/master/samples/balloon)
which only has one class: balloon.
We'll train a balloon segmentation model from an existing model pre-trained on COCO dataset, available in detectron2's model zoo.
Note that COCO dataset does not have the "balloon" category. We'll be able to recognize this new class in a few minutes.
## Prepare the dataset
"""
# download, decompress the data
!wget https://github.com/matterport/Mask_RCNN/releases/download/v2.1/balloon_dataset.zip
!unzip balloon_dataset.zip > /dev/null
"""Register the balloon dataset to detectron2, following the [detectron2 custom dataset tutorial](https://detectron2.readthedocs.io/tutorials/datasets.html).
Here, the dataset is in its custom format, therefore we write a function to parse it and prepare it into detectron2's standard format. User should write such a function when using a dataset in custom format. See the tutorial for more details.
"""
# if your dataset is in COCO format, this cell can be replaced by the following three lines:
# from detectron2.data.datasets import register_coco_instances
# register_coco_instances("my_dataset_train", {}, "json_annotation_train.json", "path/to/image/dir")
# register_coco_instances("my_dataset_val", {}, "json_annotation_val.json", "path/to/image/dir")
from detectron2.structures import BoxMode
def get_balloon_dicts(img_dir):
json_file = os.path.join(img_dir, "via_region_data.json")
with open(json_file) as f:
imgs_anns = json.load(f)
dataset_dicts = []
for idx, v in enumerate(imgs_anns.values()):
record = {}
filename = os.path.join(img_dir, v["filename"])
height, width = cv2.imread(filename).shape[:2]
record["file_name"] = filename
record["image_id"] = idx
record["height"] = height
record["width"] = width
annos = v["regions"]
objs = []
for _, anno in annos.items():
assert not anno["region_attributes"]
anno = anno["shape_attributes"]
px = anno["all_points_x"]
py = anno["all_points_y"]
poly = [(x + 0.5, y + 0.5) for x, y in zip(px, py)]
poly = [p for x in poly for p in x]
obj = {
"bbox": [np.min(px), np.min(py), np.max(px), np.max(py)],
"bbox_mode": BoxMode.XYXY_ABS,
"segmentation": [poly],
"category_id": 0,
}
objs.append(obj)
record["annotations"] = objs
dataset_dicts.append(record)
return dataset_dicts
for d in ["train", "val"]:
DatasetCatalog.register("balloon_" + d, lambda d=d: get_balloon_dicts("balloon/" + d))
MetadataCatalog.get("balloon_" + d).set(thing_classes=["balloon"])
balloon_metadata = MetadataCatalog.get("balloon_train")
"""To verify the dataset is in correct format, let's visualize the annotations of randomly selected samples in the training set:
"""
dataset_dicts = get_balloon_dicts("balloon/train")
for d in random.sample(dataset_dicts, 3):
img = cv2.imread(d["file_name"])
visualizer = Visualizer(img[:, :, ::-1], metadata=balloon_metadata, scale=0.5)
out = visualizer.draw_dataset_dict(d)
cv2_imshow(out.get_image()[:, :, ::-1])
"""## Train!
Now, let's fine-tune a COCO-pretrained R50-FPN Mask R-CNN model on the balloon dataset. It takes ~2 minutes to train 300 iterations on a P100 GPU.
"""
from detectron2.engine import DefaultTrainer
cfg = get_cfg()
cfg.merge_from_file(model_zoo.get_config_file("COCO-InstanceSegmentation/mask_rcnn_R_50_FPN_3x.yaml"))
cfg.DATASETS.TRAIN = ("balloon_train",)
cfg.DATASETS.TEST = ()
cfg.DATALOADER.NUM_WORKERS = 2
cfg.MODEL.WEIGHTS = model_zoo.get_checkpoint_url("COCO-InstanceSegmentation/mask_rcnn_R_50_FPN_3x.yaml") # Let training initialize from model zoo
cfg.SOLVER.IMS_PER_BATCH = 2 # This is the real "batch size" commonly known to deep learning people
cfg.SOLVER.BASE_LR = 0.00025 # pick a good LR
cfg.SOLVER.MAX_ITER = 300 # 300 iterations seems good enough for this toy dataset; you will need to train longer for a practical dataset
cfg.SOLVER.STEPS = [] # do not decay learning rate
cfg.MODEL.ROI_HEADS.BATCH_SIZE_PER_IMAGE = 128 # The "RoIHead batch size". 128 is faster, and good enough for this toy dataset (default: 512)
cfg.MODEL.ROI_HEADS.NUM_CLASSES = 1 # only has one class (ballon). (see https://detectron2.readthedocs.io/tutorials/datasets.html#update-the-config-for-new-datasets)
# NOTE: this config means the number of classes, but a few popular unofficial tutorials incorrect uses num_classes+1 here.
os.makedirs(cfg.OUTPUT_DIR, exist_ok=True)
trainer = DefaultTrainer(cfg)
trainer.resume_or_load(resume=False)
trainer.train()
# Commented out IPython magic to ensure Python compatibility.
# Look at training curves in tensorboard:
# %load_ext tensorboard
# %tensorboard --logdir output
"""## Inference & evaluation using the trained model
Now, let's run inference with the trained model on the balloon validation dataset. First, let's create a predictor using the model we just trained:
"""
# Inference should use the config with parameters that are used in training
# cfg now already contains everything we've set previously. We changed it a little bit for inference:
cfg.MODEL.WEIGHTS = os.path.join(cfg.OUTPUT_DIR, "model_final.pth") # path to the model we just trained
cfg.MODEL.ROI_HEADS.SCORE_THRESH_TEST = 0.7 # set a custom testing threshold
predictor = DefaultPredictor(cfg)
"""Then, we randomly select several samples to visualize the prediction results."""
from detectron2.utils.visualizer import ColorMode
dataset_dicts = get_balloon_dicts("balloon/val")
for d in random.sample(dataset_dicts, 3):
im = cv2.imread(d["file_name"])
outputs = predictor(im) # format is documented at https://detectron2.readthedocs.io/tutorials/models.html#model-output-format
v = Visualizer(im[:, :, ::-1],
metadata=balloon_metadata,
scale=0.5,
instance_mode=ColorMode.IMAGE_BW # remove the colors of unsegmented pixels. This option is only available for segmentation models
)
out = v.draw_instance_predictions(outputs["instances"].to("cpu"))
cv2_imshow(out.get_image()[:, :, ::-1])
"""We can also evaluate its performance using AP metric implemented in COCO API.
This gives an AP of ~70. Not bad!
"""
from detectron2.evaluation import COCOEvaluator, inference_on_dataset
from detectron2.data import build_detection_test_loader
evaluator = COCOEvaluator("balloon_val", output_dir="./output")
val_loader = build_detection_test_loader(cfg, "balloon_val")
print(inference_on_dataset(predictor.model, val_loader, evaluator))
# another equivalent way to evaluate the model is to use `trainer.test`
"""# Other types of builtin models
We showcase simple demos of other types of models below:
"""
# Inference with a keypoint detection model
cfg = get_cfg() # get a fresh new config
cfg.merge_from_file(model_zoo.get_config_file("COCO-Keypoints/keypoint_rcnn_R_50_FPN_3x.yaml"))
cfg.MODEL.ROI_HEADS.SCORE_THRESH_TEST = 0.7 # set threshold for this model
cfg.MODEL.WEIGHTS = model_zoo.get_checkpoint_url("COCO-Keypoints/keypoint_rcnn_R_50_FPN_3x.yaml")
predictor = DefaultPredictor(cfg)
outputs = predictor(im)
v = Visualizer(im[:,:,::-1], MetadataCatalog.get(cfg.DATASETS.TRAIN[0]), scale=1.2)
out = v.draw_instance_predictions(outputs["instances"].to("cpu"))
cv2_imshow(out.get_image()[:, :, ::-1])
# Inference with a panoptic segmentation model
cfg = get_cfg()
cfg.merge_from_file(model_zoo.get_config_file("COCO-PanopticSegmentation/panoptic_fpn_R_101_3x.yaml"))
cfg.MODEL.WEIGHTS = model_zoo.get_checkpoint_url("COCO-PanopticSegmentation/panoptic_fpn_R_101_3x.yaml")
predictor = DefaultPredictor(cfg)
panoptic_seg, segments_info = predictor(im)["panoptic_seg"]
v = Visualizer(im[:, :, ::-1], MetadataCatalog.get(cfg.DATASETS.TRAIN[0]), scale=1.2)
out = v.draw_panoptic_seg_predictions(panoptic_seg.to("cpu"), segments_info)
cv2_imshow(out.get_image()[:, :, ::-1])
"""# Run panoptic segmentation on a video"""
# This is the video we're going to process
from IPython.display import YouTubeVideo, display
video = YouTubeVideo("ll8TgCZ0plk", width=500)
display(video)
# Install dependencies, download the video, and crop 5 seconds for processing
!pip install youtube-dl
!youtube-dl https://www.youtube.com/watch?v=ll8TgCZ0plk -f 22 -o video.mp4
!ffmpeg -i video.mp4 -t 00:00:06 -c:v copy video-clip.mp4
# Commented out IPython magic to ensure Python compatibility.
# Run frame-by-frame inference demo on this video (takes 3-4 minutes) with the "demo.py" tool we provided in the repo.
!git clone https://github.com/facebookresearch/detectron2
# Note: this is currently BROKEN due to missing codec. See https://github.com/facebookresearch/detectron2/issues/2901 for workaround.
# %run detectron2/demo/demo.py --config-file detectron2/configs/COCO-PanopticSegmentation/panoptic_fpn_R_101_3x.yaml --video-input video-clip.mp4 --confidence-threshold 0.6 --output video-output.mkv \
--opts MODEL.WEIGHTS detectron2://COCO-PanopticSegmentation/panoptic_fpn_R_101_3x/139514519/model_final_cafdb1.pkl
# Download the results
from google.colab import files
files.download('video-output.mkv')
Welcome to detectron2! This is the official colab tutorial of detectron2. Here, we will go through some basics usage of detectron2, including the following:
* Run inference on images or videos, with an existing detectron2 model
* Train a detectron2 model on a new dataset
You can make a copy of this tutorial by "File -> Open in playground mode" and make changes there. __DO NOT__ request access to this tutorial.
# Install detectron2
"""
!python -m pip install pyyaml==5.1
import sys, os, distutils.core
# Note: This is a faster way to install detectron2 in Colab, but it does not include all functionalities.
# See https://detectron2.readthedocs.io/tutorials/install.html for full installation instructions
!git clone 'https://github.com/facebookresearch/detectron2'
dist = distutils.core.run_setup("./detectron2/setup.py")
!python -m pip install {' '.join([f"'{x}'" for x in dist.install_requires])}
sys.path.insert(0, os.path.abspath('./detectron2'))
# Properly install detectron2. (Please do not install twice in both ways)
# !python -m pip install 'git+https://github.com/facebookresearch/detectron2.git'
import torch, detectron2
!nvcc --version
TORCH_VERSION = ".".join(torch.__version__.split(".")[:2])
CUDA_VERSION = torch.__version__.split("+")[-1]
print("torch: ", TORCH_VERSION, "; cuda: ", CUDA_VERSION)
print("detectron2:", detectron2.__version__)
# Some basic setup:
# Setup detectron2 logger
import detectron2
from detectron2.utils.logger import setup_logger
setup_logger()
# import some common libraries
import numpy as np
import os, json, cv2, random
from google.colab.patches import cv2_imshow
# import some common detectron2 utilities
from detectron2 import model_zoo
from detectron2.engine import DefaultPredictor
from detectron2.config import get_cfg
from detectron2.utils.visualizer import Visualizer
from detectron2.data import MetadataCatalog, DatasetCatalog
"""# Run a pre-trained detectron2 model
We first download an image from the COCO dataset:
"""
!wget http://images.cocodataset.org/val2017/000000439715.jpg -q -O input.jpg
im = cv2.imread("./input.jpg")
cv2_imshow(im)
"""Then, we create a detectron2 config and a detectron2 `DefaultPredictor` to run inference on this image."""
cfg = get_cfg()
# add project-specific config (e.g., TensorMask) here if you're not running a model in detectron2's core library
cfg.merge_from_file(model_zoo.get_config_file("COCO-InstanceSegmentation/mask_rcnn_R_50_FPN_3x.yaml"))
cfg.MODEL.ROI_HEADS.SCORE_THRESH_TEST = 0.5 # set threshold for this model
# Find a model from detectron2's model zoo. You can use the https://dl.fbaipublicfiles... url as well
cfg.MODEL.WEIGHTS = model_zoo.get_checkpoint_url("COCO-InstanceSegmentation/mask_rcnn_R_50_FPN_3x.yaml")
predictor = DefaultPredictor(cfg)
outputs = predictor(im)
# look at the outputs. See https://detectron2.readthedocs.io/tutorials/models.html#model-output-format for specification
print(outputs["instances"].pred_classes)
print(outputs["instances"].pred_boxes)
# We can use `Visualizer` to draw the predictions on the image.
v = Visualizer(im[:, :, ::-1], MetadataCatalog.get(cfg.DATASETS.TRAIN[0]), scale=1.2)
out = v.draw_instance_predictions(outputs["instances"].to("cpu"))
cv2_imshow(out.get_image()[:, :, ::-1])
"""# Train on a custom dataset
In this section, we show how to train an existing detectron2 model on a custom dataset in a new format.
We use [the balloon segmentation dataset](https://github.com/matterport/Mask_RCNN/tree/master/samples/balloon)
which only has one class: balloon.
We'll train a balloon segmentation model from an existing model pre-trained on COCO dataset, available in detectron2's model zoo.
Note that COCO dataset does not have the "balloon" category. We'll be able to recognize this new class in a few minutes.
## Prepare the dataset
"""
# download, decompress the data
!wget https://github.com/matterport/Mask_RCNN/releases/download/v2.1/balloon_dataset.zip
!unzip balloon_dataset.zip > /dev/null
"""Register the balloon dataset to detectron2, following the [detectron2 custom dataset tutorial](https://detectron2.readthedocs.io/tutorials/datasets.html).
Here, the dataset is in its custom format, therefore we write a function to parse it and prepare it into detectron2's standard format. User should write such a function when using a dataset in custom format. See the tutorial for more details.
"""
# if your dataset is in COCO format, this cell can be replaced by the following three lines:
# from detectron2.data.datasets import register_coco_instances
# register_coco_instances("my_dataset_train", {}, "json_annotation_train.json", "path/to/image/dir")
# register_coco_instances("my_dataset_val", {}, "json_annotation_val.json", "path/to/image/dir")
from detectron2.structures import BoxMode
def get_balloon_dicts(img_dir):
json_file = os.path.join(img_dir, "via_region_data.json")
with open(json_file) as f:
imgs_anns = json.load(f)
dataset_dicts = []
for idx, v in enumerate(imgs_anns.values()):
record = {}
filename = os.path.join(img_dir, v["filename"])
height, width = cv2.imread(filename).shape[:2]
record["file_name"] = filename
record["image_id"] = idx
record["height"] = height
record["width"] = width
annos = v["regions"]
objs = []
for _, anno in annos.items():
assert not anno["region_attributes"]
anno = anno["shape_attributes"]
px = anno["all_points_x"]
py = anno["all_points_y"]
poly = [(x + 0.5, y + 0.5) for x, y in zip(px, py)]
poly = [p for x in poly for p in x]
obj = {
"bbox": [np.min(px), np.min(py), np.max(px), np.max(py)],
"bbox_mode": BoxMode.XYXY_ABS,
"segmentation": [poly],
"category_id": 0,
}
objs.append(obj)
record["annotations"] = objs
dataset_dicts.append(record)
return dataset_dicts
for d in ["train", "val"]:
DatasetCatalog.register("balloon_" + d, lambda d=d: get_balloon_dicts("balloon/" + d))
MetadataCatalog.get("balloon_" + d).set(thing_classes=["balloon"])
balloon_metadata = MetadataCatalog.get("balloon_train")
"""To verify the dataset is in correct format, let's visualize the annotations of randomly selected samples in the training set:
"""
dataset_dicts = get_balloon_dicts("balloon/train")
for d in random.sample(dataset_dicts, 3):
img = cv2.imread(d["file_name"])
visualizer = Visualizer(img[:, :, ::-1], metadata=balloon_metadata, scale=0.5)
out = visualizer.draw_dataset_dict(d)
cv2_imshow(out.get_image()[:, :, ::-1])
"""## Train!
Now, let's fine-tune a COCO-pretrained R50-FPN Mask R-CNN model on the balloon dataset. It takes ~2 minutes to train 300 iterations on a P100 GPU.
"""
from detectron2.engine import DefaultTrainer
cfg = get_cfg()
cfg.merge_from_file(model_zoo.get_config_file("COCO-InstanceSegmentation/mask_rcnn_R_50_FPN_3x.yaml"))
cfg.DATASETS.TRAIN = ("balloon_train",)
cfg.DATASETS.TEST = ()
cfg.DATALOADER.NUM_WORKERS = 2
cfg.MODEL.WEIGHTS = model_zoo.get_checkpoint_url("COCO-InstanceSegmentation/mask_rcnn_R_50_FPN_3x.yaml") # Let training initialize from model zoo
cfg.SOLVER.IMS_PER_BATCH = 2 # This is the real "batch size" commonly known to deep learning people
cfg.SOLVER.BASE_LR = 0.00025 # pick a good LR
cfg.SOLVER.MAX_ITER = 300 # 300 iterations seems good enough for this toy dataset; you will need to train longer for a practical dataset
cfg.SOLVER.STEPS = [] # do not decay learning rate
cfg.MODEL.ROI_HEADS.BATCH_SIZE_PER_IMAGE = 128 # The "RoIHead batch size". 128 is faster, and good enough for this toy dataset (default: 512)
cfg.MODEL.ROI_HEADS.NUM_CLASSES = 1 # only has one class (ballon). (see https://detectron2.readthedocs.io/tutorials/datasets.html#update-the-config-for-new-datasets)
# NOTE: this config means the number of classes, but a few popular unofficial tutorials incorrect uses num_classes+1 here.
os.makedirs(cfg.OUTPUT_DIR, exist_ok=True)
trainer = DefaultTrainer(cfg)
trainer.resume_or_load(resume=False)
trainer.train()
# Commented out IPython magic to ensure Python compatibility.
# Look at training curves in tensorboard:
# %load_ext tensorboard
# %tensorboard --logdir output
"""## Inference & evaluation using the trained model
Now, let's run inference with the trained model on the balloon validation dataset. First, let's create a predictor using the model we just trained:
"""
# Inference should use the config with parameters that are used in training
# cfg now already contains everything we've set previously. We changed it a little bit for inference:
cfg.MODEL.WEIGHTS = os.path.join(cfg.OUTPUT_DIR, "model_final.pth") # path to the model we just trained
cfg.MODEL.ROI_HEADS.SCORE_THRESH_TEST = 0.7 # set a custom testing threshold
predictor = DefaultPredictor(cfg)
"""Then, we randomly select several samples to visualize the prediction results."""
from detectron2.utils.visualizer import ColorMode
dataset_dicts = get_balloon_dicts("balloon/val")
for d in random.sample(dataset_dicts, 3):
im = cv2.imread(d["file_name"])
outputs = predictor(im) # format is documented at https://detectron2.readthedocs.io/tutorials/models.html#model-output-format
v = Visualizer(im[:, :, ::-1],
metadata=balloon_metadata,
scale=0.5,
instance_mode=ColorMode.IMAGE_BW # remove the colors of unsegmented pixels. This option is only available for segmentation models
)
out = v.draw_instance_predictions(outputs["instances"].to("cpu"))
cv2_imshow(out.get_image()[:, :, ::-1])
"""We can also evaluate its performance using AP metric implemented in COCO API.
This gives an AP of ~70. Not bad!
"""
from detectron2.evaluation import COCOEvaluator, inference_on_dataset
from detectron2.data import build_detection_test_loader
evaluator = COCOEvaluator("balloon_val", output_dir="./output")
val_loader = build_detection_test_loader(cfg, "balloon_val")
print(inference_on_dataset(predictor.model, val_loader, evaluator))
# another equivalent way to evaluate the model is to use `trainer.test`
"""# Other types of builtin models
We showcase simple demos of other types of models below:
"""
# Inference with a keypoint detection model
cfg = get_cfg() # get a fresh new config
cfg.merge_from_file(model_zoo.get_config_file("COCO-Keypoints/keypoint_rcnn_R_50_FPN_3x.yaml"))
cfg.MODEL.ROI_HEADS.SCORE_THRESH_TEST = 0.7 # set threshold for this model
cfg.MODEL.WEIGHTS = model_zoo.get_checkpoint_url("COCO-Keypoints/keypoint_rcnn_R_50_FPN_3x.yaml")
predictor = DefaultPredictor(cfg)
outputs = predictor(im)
v = Visualizer(im[:,:,::-1], MetadataCatalog.get(cfg.DATASETS.TRAIN[0]), scale=1.2)
out = v.draw_instance_predictions(outputs["instances"].to("cpu"))
cv2_imshow(out.get_image()[:, :, ::-1])
# Inference with a panoptic segmentation model
cfg = get_cfg()
cfg.merge_from_file(model_zoo.get_config_file("COCO-PanopticSegmentation/panoptic_fpn_R_101_3x.yaml"))
cfg.MODEL.WEIGHTS = model_zoo.get_checkpoint_url("COCO-PanopticSegmentation/panoptic_fpn_R_101_3x.yaml")
predictor = DefaultPredictor(cfg)
panoptic_seg, segments_info = predictor(im)["panoptic_seg"]
v = Visualizer(im[:, :, ::-1], MetadataCatalog.get(cfg.DATASETS.TRAIN[0]), scale=1.2)
out = v.draw_panoptic_seg_predictions(panoptic_seg.to("cpu"), segments_info)
cv2_imshow(out.get_image()[:, :, ::-1])
"""# Run panoptic segmentation on a video"""
# This is the video we're going to process
from IPython.display import YouTubeVideo, display
video = YouTubeVideo("ll8TgCZ0plk", width=500)
display(video)
# Install dependencies, download the video, and crop 5 seconds for processing
!pip install youtube-dl
!youtube-dl https://www.youtube.com/watch?v=ll8TgCZ0plk -f 22 -o video.mp4
!ffmpeg -i video.mp4 -t 00:00:06 -c:v copy video-clip.mp4
# Commented out IPython magic to ensure Python compatibility.
# Run frame-by-frame inference demo on this video (takes 3-4 minutes) with the "demo.py" tool we provided in the repo.
!git clone https://github.com/facebookresearch/detectron2
# Note: this is currently BROKEN due to missing codec. See https://github.com/facebookresearch/detectron2/issues/2901 for workaround.
# %run detectron2/demo/demo.py --config-file detectron2/configs/COCO-PanopticSegmentation/panoptic_fpn_R_101_3x.yaml --video-input video-clip.mp4 --confidence-threshold 0.6 --output video-output.mkv \
--opts MODEL.WEIGHTS detectron2://COCO-PanopticSegmentation/panoptic_fpn_R_101_3x/139514519/model_final_cafdb1.pkl
# Download the results
from google.colab import files
files.download('video-output.mkv')
- 1
- 2
- 3
- 4
- 5
- 6
- 7
- 8
- 9
- 10
- 11
- 12
- 13
- 14
- 15
- 16
- 17
- 18
- 19
- 20
- 21
- 22
- 23
- 24
- 25
- 26
- 27
- 28
- 29
- 30
- 31
- 32
- 33
- 34
- 35
- 36
- 37
- 38
- 39
- 40
- 41
- 42
- 43
- 44
- 45
- 46
- 47
- 48
- 49
- 50
- 51
- 52
- 53
- 54
- 55
- 56
- 57
- 58
- 59
- 60
- 61
- 62
- 63
- 64
- 65
- 66
- 67
- 68
- 69
- 70
- 71
- 72
- 73
- 74
- 75
- 76
- 77
- 78
- 79
- 80
- 81
- 82
- 83
- 84
- 85
- 86
- 87
- 88
- 89
- 90
- 91
- 92
- 93
- 94
- 95
- 96
- 97
- 98
- 99
- 100
- 101
- 102
- 103
- 104
- 105
- 106
- 107
- 108
- 109
- 110
- 111
- 112
- 113
- 114
- 115
- 116
- 117
- 118
- 119
- 120
- 121
- 122
- 123
- 124
- 125
- 126
- 127
- 128
- 129
- 130
- 131
- 132
- 133
- 134
- 135
- 136
- 137
- 138
- 139
- 140
- 141
- 142
- 143
- 144
- 145
- 146
- 147
- 148
- 149
- 150
- 151
- 152
- 153
- 154
- 155
- 156
- 157
- 158
- 159
- 160
- 161
- 162
- 163
- 164
- 165
- 166
- 167
- 168
- 169
- 170
- 171
- 172
- 173
- 174
- 175
- 176
- 177
- 178
- 179
- 180
- 181
- 182
- 183
- 184
- 185
- 186
- 187
- 188
- 189
- 190
- 191
- 192
- 193
- 194
- 195
- 196
- 197
- 198
- 199
- 200
- 201
- 202
- 203
- 204
- 205
- 206
- 207
- 208
- 209
- 210
- 211
- 212
- 213
- 214
- 215
- 216
- 217
- 218
- 219
- 220
- 221
- 222
- 223
- 224
- 225
- 226
- 227
- 228
- 229
- 230
- 231
- 232
- 233
- 234
- 235
- 236
- 237
- 238
- 239
- 240
- 241
- 242
- 243
- 244
- 245
- 246
- 247
- 248
- 249
- 250
- 251
- 252
- 253
- 254
- 255
- 256
- 257
- 258
- 259
- 260
- 261
- 262
- 263
- 264
- 265
- 266
- 267
- 268
- 269
- 270
- 271
- 272
- 273
- 274
- 275
- 276
- 277
- 278
- 279
- 280
- 281
- 282
- 283
- 284
- 285
- 286
- 287
- 288
- 289
-
相关阅读:
【英语:基础进阶_听口实战运用】D6.短篇文章训练
Proxifier联动BurpSuite抓取小程序
剑指 Offer II 041. 滑动窗口的平均值
在 Python 中使用 Selenium 按文本查找元素
iwemeta元宇宙:阿里首任COO:如何打造销售铁军
Vue3核心源码解析 (一) : 源码目录结构
(已导出)【kubernetes系列学习】client-go学习与实践
Letcode动态规划专题-困难
DOM——文件对象模型(事件响应链、阻止冒泡和系统默认事件、事件代理、样式操作css、防抖和节流、预加载和懒加载、async,defer)
尚硅谷MySQL学习笔记
- 原文地址:https://blog.csdn.net/u014515463/article/details/127788489
