-
计算机视觉实战项目2(单目测距+图像处理+路径规划+车牌识别)
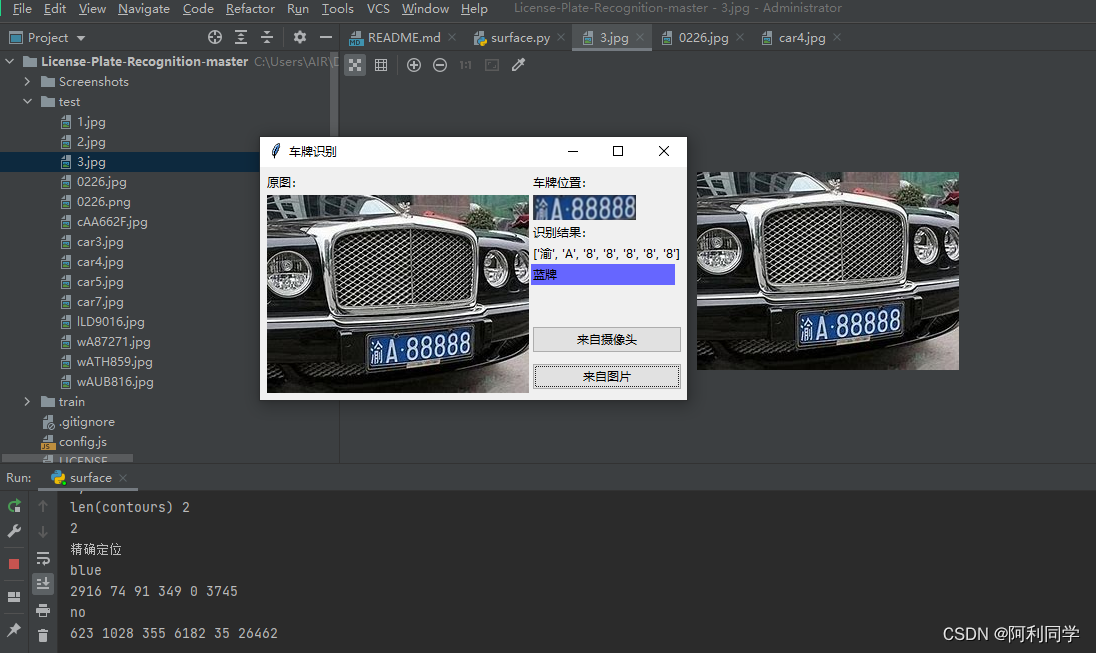
车牌识别
用python3+opencv3做的中国车牌识别,包括算法和客户端界面,只有2个文件,一个是界面代码,一个是算法代码,点击即可出结果,方便易用!
链接:车牌识别
大致的UI界面如下,点击输入图片,右侧即可出现结果!
代码
额外说明:算法代码只有500行,测试中发现,车牌定位算法的参数受图像分辨率、色偏、车距影响。
--->qq 1309399183----------<代码交流 def from_pic(self): self.thread_run = False self.pic_path = askopenfilename(title="选择识别图片", filetypes=[("jpg图片", "*.jpg")]) if self.pic_path: img_bgr = predict.imreadex(self.pic_path) self.imgtk = self.get_imgtk(img_bgr) self.image_ctl.configure(image=self.imgtk) resize_rates = (1, 0.9, 0.8, 0.7, 0.6, 0.5, 0.4) for resize_rate in resize_rates: print("resize_rate:", resize_rate) r, roi, color = self.predictor.predict(img_bgr, resize_rate) if r: break #r, roi, color = self.predictor.predict(img_bgr, 1) self.show_roi(r, roi, color)- 1
- 2
- 3
- 4
- 5
- 6
- 7
- 8
- 9
- 10
- 11
- 12
- 13
- 14
- 15
- 16
- 17
图像去雾去雨+目标检测+单目测距结合
实时感知本车周围物体的距离对高级驾驶辅助系统具有重要意义,当判定物体与本车距离小于安
链接:单目测距
全距离时便采取主动刹车等安全辅助功能,这将进一步提升汽车的安全性能并减少碰撞的发生。上一章本文完成了目标检测任务,接下来需要对检测出来的物体进行距离测量。- 首先描述并分析了相机成像模型,推导了图像的像素坐标系与世界坐标系之间的关系。
- 其次,利用软件标定来获取相机内外参数并改进了测距目标点的选取。
- 最后利用测距模型完成距离的测量并对采集到的图像进行仿真分析和方法验证。

代码
for path, img, im0s, vid_cap in dataset: img = torch.from_numpy(img).to(device) img = img.half() if half else img.float() # uint8 to fp16/32 img /= 255.0 # 0 - 255 to 0.0 - 1.0 if img.ndimension() == 3: img = img.unsqueeze(0) # Warmup if device.type != 'cpu' and (old_img_b != img.shape[0] or old_img_h != img.shape[2] or old_img_w != img.shape[3]): old_img_b = img.shape[0] old_img_h = img.shape[2] old_img_w = img.shape[3] for i in range(3): model(img, augment=opt.augment)[0] # Inference t1 = time_synchronized() with torch.no_grad(): # Calculating gradients would cause a GPU memory leak pred = model(img, augment=opt.augment)[0] t2 = time_synchronized() distance=object_point_world_position(u, v, h, w, out_mat, in_mat):- 1
- 2
- 3
- 4
- 5
- 6
- 7
- 8
- 9
- 10
- 11
- 12
- 13
- 14
- 15
- 16
- 17
- 18
- 19
- 20
- 21
- 22
- 23
路径规划
本节针对越野场景路径规划问题,采用栅格法建立障碍物、威胁物和越野道路模型,模拟真实的越野环境场景。
-
引入方向变化惩罚和局部区域复杂度惩罚来优化A算法,使算法规划出的路径更平滑,算法效率更高效。
-
采用改进 Floyd 算法对路径进行双向平滑,并且进行了防碰撞处理,来确保规划出路径的安全可靠性。
-
仿真结果表明,所改进的 A算法与传统算法相比较,效率提高了 30%,拐点数减少了4
倍,所提算法能够在越野环境多重因素综合影响以及不同车辆性能和任务的要求下快速的规划出安全的路径。

代码
###############创建A-Star类############ class AStar: # 描述AStar算法中的节点数据 class Node: #初始化 def __init__(self, point, startPoint,endPoint, g=0,w=1,p=1): self.point = point # 自己的坐标 self.father = None # 父节点 self.g = g # g值,g值在用到的时候会重新算 # 计算h值,采用曼哈顿距离 #self.h = (abs(endPoint.x - point.x) + abs(endPoint.y - point.y)) * 10 #采用欧几里得距离 #self.h = math.pow((math.pow((endPoint.x - point.x),2) + math.pow((endPoint.y - point.y),2)),0.5)*10 #采用对角距离 pp=(1-p)+0.2*math.exp((math.pow((math.pow((endPoint.x - point.x),2) + math.pow((endPoint.y - point.y),2)),0.5))/(math.pow((math.pow((endPoint.x - startPoint.x),2) + math.pow((endPoint.y - startPoint.y),2)),0.5))) Diagonal_step = min((endPoint.x - point.x),(endPoint.y - point.y)) straight_step = (abs(endPoint.x - point.x) + abs(endPoint.y - point.y)) - 2*Diagonal_step self.h =(straight_step + math.pow(2,0.5)*Diagonal_step)*10*pp #print(pp) #初始化A-start def __init__(self, map2d, startPoint, endPoint, passTag=1.0):#map2d地图信息,startPoint起点, endPoint终点, passTag=1.0为不可行驶区域 # 开启表 self.openList = [] # 关闭表 self.closeList = [] # 寻路地图 self.map2d = map2d # 起点终点 if isinstance(startPoint, Point) and isinstance(endPoint, Point): self.startPoint = startPoint self.endPoint = endPoint else: self.startPoint = Point(*startPoint) self.endPoint = Point(*endPoint) # 不可行走标记 self.passTag = passTag def getMinNode(self): """ 获得openlist中F值最小的节点 :return: Node """ currentNode = self.openList[0] for node in self.openList: if node.g + node.h < currentNode.g + currentNode.h: currentNode = node return currentNode#返回最小代价的点- 1
- 2
- 3
- 4
- 5
- 6
- 7
- 8
- 9
- 10
- 11
- 12
- 13
- 14
- 15
- 16
- 17
- 18
- 19
- 20
- 21
- 22
- 23
- 24
- 25
- 26
- 27
- 28
- 29
- 30
- 31
- 32
- 33
- 34
- 35
- 36
- 37
- 38
- 39
- 40
- 41
- 42
- 43
- 44
- 45
- 46
- 47
- 48
- 49
- 50
- 51
- 52
- 53
- 54
- 55
- 56
- 57
- 58
停车位检测
基于深度学习的鱼眼图像中的停车点检测和分类是为二维物体检测而开发的。我们的工作增强了预测关键点和方框的能力。这在许多场景中很有用,因为对象不能用右上的矩形“紧密”表示。
一个这样的例子,道路上的任何标记,由于透视效果,在现实世界中的对象矩形不会在图像中保持矩形,所以关键点检测显得格外重要。鱼眼图像还呈现了观察到这种现象的另一种场景,由于鱼眼宽广的视角,可以扑捉更多画像链接:停车位检测

代码
#全部代码可加qq1309399183 def train(): #parses command line args args = parse_args() #parses args from file if args.config_file is not None: cfg_from_file(args.config_file) if (args.FIX_MODEL_CHECKPOINT): args.FIX_MODEL_CHECKPOINT = args.FIX_MODEL_CHECKPOINT.replace(" ", "") args.FIX_MODEL_CHECKPOINT = args.FIX_MODEL_CHECKPOINT.replace("=", "") cfg.RESUME_CHECKPOINT = args.FIX_MODEL_CHECKPOINT cfg.CHECK_PREVIOUS = False if (os.path.exists(cfg.RESUME_CHECKPOINT) == False): print('Exiting the process as asked model for resuming is not found') exit() if (args.RESUME_CHECKPOINT): cfg.RESUME_CHECKPOINT = args.RESUME_CHECKPOINT if (args.LOG_DIR): cfg.EXP_DIR = args.LOG_DIR cfg.LOG_DIR = cfg.EXP_DIR if (args.PHASE): cfg.PHASE = [] cfg.PHASE.append(args.PHASE) if (args.EVAL_METHOD): cfg.DATASET.EVAL_METHOD = args.EVAL_METHOD #for backward compatibility if cfg.DATASET.DATASET == 'psd': cfg.DATASET.DATASET = 'tiod' if cfg.DATASET.BGR_OR_RGB == True: #cfg.DATASET.PIXEL_MEANS = (123.68, 116.78, 103.94) #cfg.DATASET.PIXEL_MEANS = (123, 117, 104) cfg.DATASET.PIXEL_MEANS = (128.0, 128.0, 128.0) # simpler mean subtraction to keep data in int8 after mean subtraction print("cfg: ", cfg) for phase in cfg.PHASE: cfg_dir = cfg.LOG_DIR + '/' + phase + '_cfg/' os.makedirs(os.path.dirname(cfg_dir), exist_ok=True) shutil.copy(args.config_file, cfg_dir) # to making every run consistent # TII np.random.seed(100) torch.manual_seed(100) torch.cuda.manual_seed(100) random.seed(100) torch.cuda.manual_seed_all(999) torch.backends.cudnn.enabled = False train_model() if __name__ == '__main__': train()- 1
- 2
- 3
- 4
- 5
- 6
- 7
- 8
- 9
- 10
- 11
- 12
- 13
- 14
- 15
- 16
- 17
- 18
- 19
- 20
- 21
- 22
- 23
- 24
- 25
- 26
- 27
- 28
- 29
- 30
- 31
- 32
- 33
- 34
- 35
- 36
- 37
- 38
- 39
- 40
- 41
- 42
- 43
- 44
- 45
- 46
- 47
- 48
- 49
- 50
- 51
- 52
- 53
- 54
- 55
- 56
- 57
- 58
- 59
- 60
- 61
- 62
图像雾去雨与目标检测
针对不同的天气则采取不同的图像前处理方法来提升图像质量。雾天天气 时,针对当下求解的透射率会导致去雾结果出现光晕、伪影现象,本文采用加权最小二乘法细化透射率透。针对四叉树法得到的大气光值不精确的问题,改进四叉树法来解决上述问题。将上述得到的透射率和大气光值代入大气散射模型完成去雾处理;
在图像处理后加入目标检测,提高了目标检测精度以及目标数量。
下图展现了雾天处理后的结果
图第一列为雾霾图像,第二列为没有加入图像处理的目标检测结果图,第三列为去雾后的目标检测结果图。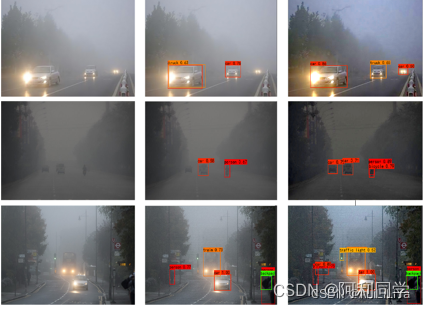
-
相关阅读:
深度学习——day43 ID-YOLO——基于驾驶员固定区域的实时突出目标检测
工作小记 ffmpeg avcodec_receive_frame 缓存问题
Sychronized和ReentrantLock锁 面试题
开启智慧之旅,AI与机器学习驱动的微服务设计模式探索
StringBuffer类 和StringBuilder类
Cat Online Judge 判题系统
Git常用方法
【Java八股文总结】之读写分离&分库分表
04 多表查询
vscode中git的使用,以及与webstorm中git的使用对比
- 原文地址:https://blog.csdn.net/ALiLiLiYa/article/details/132896317