-
LaTeX学习笔记
LaTeX学习笔记
冲鸭!!!
1. 开始的尝试
先开始试一下一个简单的示例叭
\documentclass{article} \begin{document} ``Hello world!'' from \LaTeX. \end{document}- 1
- 2
- 3
- 4

2.文档类与宏包
① 文档类
\documentclass[⟨options⟩]{⟨class-name⟩}- 1
可选参数
⟨options⟩为文档类指定选项,以全局地规定一些排版的参数,如字号、纸张大小、单双面等等。⟨class-name⟩为文档类的名称,如 LATEX 提供的article, report, book指定为文章格式,纸张为 A4 大小,基本字号为 11pt,双面排版:
\documentclass[11pt,twoside,a4paper]{article}- 1
② 宏包
在使用 LATEX 时,时常需要依赖一些扩展来增强或补充 LATEX 的功能,比如排版复杂的表格、插入图片、增加颜色甚至超链接等等。这些扩展称为宏包。
调用宏包类的方法:
\usepackage[⟨options⟩]{⟨package-name⟩}- 1
\usepackage可以一次性调用多个宏包,在⟨package-name⟩中用逗号隔开。\usepackage{tabularx, makecell, multirow}- 1
3.标题与章节
① 标题页格式:
\title{⟨title⟩} \author{⟨author⟩} \date{⟨date⟩} \maketitle- 1
- 2
示例:
\documentclass{article} \begin{document} \title{I love study} % 标题 \author{⟨Anonymous \and qiuqiu \and mapIN} % 作者 \date{\today} % 日期 \maketitle % 生成标题 Blessed is the person who is too busy to worry in the daytime, and too sleepy to worry at night. \end{document}- 1
- 2
- 3
- 4
- 5
- 6
- 7
- 8
- 9

② 摘要和关键词\begin{abstract} Blessed is the person who is too busy to worry in the daytime, and too sleepy to worry at night. Know the enemy and know yourself, and you can fight a hundred battles with no danger of defeat. \noindent{\textbf{Keywords: } Keyword1; Keyword2; Keyword3} % 取消缩进的关键词 \end{abstract}- 1
- 2
- 3
- 4
- 5
- 6
- 7
- 8
- 9

③ 各级标题
LaTex提供了7种等级的章节命令:
等级 命令 -1 \part{part}0 \chapter{chapter}1 \section{section}2 \subsection{subsection}3 \subsubsection{subsubsection}4 \paragraph{paragraph}5 \subparagraph{subparagraph}以下是常用的标题示例:
\section{Introduction} This is the first section. \subsection{Background} This is the first subsection. \subsubsection{Test} This is the first subsubsection. \subsection{Literature Review} This is the second subsection. \section{Notations} This is the second section.- 1
- 2
- 3
- 4
- 5
- 6
- 7
- 8
- 9
- 10
效果如下:

④ 生成目录\tableofcontents- 1

如果想要目录等链接跳转,要使用
\usepackage{hyperref}
为减少可能的冲突,习惯上将hyperref宏包放在其它宏包之后调用。
4.标注
① 交叉引用
在能够被交叉引用的地方,如章节、公式、图表、定理等位置使用
\label命令:
之后可以在别处使用\ref或\pageref命令,分别生成交叉引用的编号和页码:被Vscode折磨了一个晚上,无法实现交叉引用,原来在
setting.json"把".out"注释掉就好

一个示例:
A reference to this subsection \label{myref} looks like: ``see section~\ref{myref} on page~\pageref{myref}.''- 1
- 2
- 3
- 4
- 5
效果如下:

\label命令可用于记录各种类型的交叉引用,使用位置分别为:位置 使用方法 章节标题 在章节标题命令 \section等之后紧接着使用。行间公式 单行公式在 公式内任意位置使用;多行公式在每一行公式的任意位置使用。有序列表 在 enumerate环境的每个\item命令之后、下一个\item命令之前任意位置使用。图表标题 在图表标题命令 \caption之后紧接着使用。定理环境 在定理环境内部任意位置使用。
② 脚注和边注
使用
\footnote命令可以在页面底部生成一个脚注:I am cxb \footnote{a smart person}- 1
效果如下:

使用\marginpar命令可在边栏位置生成边注:You are qiy \marginpar{a smart person}- 1
效果如下:

5.列表
① 有序列表
\begin{enumerate} \item qjy \item czj \item cxb \end{enumerate}- 1
- 2
- 3
- 4
- 5

② 无序列表
\begin{itemize} \item cxb \item[*] czj \item[A] qjy \end{itemize}- 1
- 2
- 3
- 4
- 5

③ 描述性列表\begin{description} \item[Enumerate] Numbered list. \item[Itemize] Non-numbered list. \end{description}- 1
- 2
- 3
- 4

6.对齐
\centering、\raggedright和\raggedleft分别使文本居中、居左、居右一个示例:
\centering Centered text paragraph. \raggedright Left-aligned text paragraph. \raggedleft Right-aligned text paragraph.- 1
- 2
- 3
- 4
- 5
- 6
- 7
- 8

7.插入代码块
以下将基于
matlab插入高亮代码块- 先去官网下载宏包:M-code LaTeX Package
- 将下载的
宏包放入D:\texlive\2022\texmf-dist\tex\latex\mcode中

3. 以管理员身份运行cmd,并输入texhash4.写入以下代码
\documentclass{article} \usepackage[framed,numbered,autolinebreaks,useliterate]{mcode} \usepackage{CTEX} \begin{document} \begin{lstlisting}[caption=A Sample, language=matlab] m = 128; n = 256; % 128x256矩阵,每个元素服从Gauss随机分布 A = randn(m, n); % 精确解 §$\mcommentfont\mu$§ 只有10%元素非零,每一个非零元素也服从高斯分布 % 可保证 §$\mcommentfont\mu$§ 是方程组唯一的非零元素最少的解 u = sprandn(n, 1, 0.1); b = A * u; \end{lstlisting} \end{document}- 1
- 2
- 3
- 4
- 5
- 6
- 7
- 8
- 9
- 10
- 11
- 12
- 13
- 14
- 15
- 16
效果如下:

或者直接将代码放到文件中再展示出来:\lstinputlisting [caption = A Example, language = matlab] { code/main.m }- 1
8.绘制表格
① 导入宏包
\usepackage{booktabs} \usepackage{longtable} \usepackage{caption} %!* 格式宏包- 1
- 2
- 3
② 绘制一个普通表格
\begin{tabular}{|l|c|r|} % 左对齐|居中|又对齐 \hline number & grade & levle \\ \hline 1 & 78 & good \\ 2 & 89 & excellent \\ 3 & 90 & excellent \\ \hline \end{tabular} \\- 1
- 2
- 3
- 4
- 5
- 6
- 7
- 8
- 9

③ 三线表
\begin{tabular}[t]{ccc} %! 三个全部居中 \toprule number & grade & levle \\ \midrule 1 & 78 & good \\ 2 & 89 & excellent \\ 3 & 90 & excellent \\ \bottomrule \end{tabular}- 1
- 2
- 3
- 4
- 5
- 6
- 7
- 8
- 9

④ 将表格放入浮动体\begin{table}[ht] \centering \caption{Symbols and its Description} \begin{tabular}{cl} \toprule Symbols & Description \\ \midrule $ t $ & The time \\ $ W(t) $ & The weight function \\ $ \sigma $ & The environmental factor \\ \bottomrule \end{tabular} \end{table}- 1
- 2
- 3
- 4
- 5
- 6
- 7
- 8
- 9
- 10
- 11
- 12
- 13

⑤ 长表格%! 长表格(跨页表格)使用longtable环境实现 \begin{longtable}{cl} \caption{Symbols and its Description} \\ \toprule Symbols & Description \\ \midrule \endfirsthead %!* 表示以上为表格第一页表头 \multicolumn{2}{l}{Continued to Previous Page} \\ %! 2表示合并了两个单元格 \midrule Symbols & Description \\ \midrule \endhead %!* 表示以上为每一页表格表头 \midrule \multicolumn{2}{l}{Following} \\ %! 2的作用同上 \endfoot %!* 表示以上为每一页表格表尾 \bottomrule \endlastfoot %!* 表示以上为最后一页表尾 $ t $ & The time \\ $ W(t) $ & The weight function \\ $ \sigma $ & The environmental factor \\ $ W(t) $ & The weight function \\ $ \sigma $ & The environmental factor \\ $ W(t) $ & The weight function \\ $ \sigma $ & The environmental factor \\ $ W(t) $ & The weight function \\ \end{longtable}- 1
- 2
- 3
- 4
- 5
- 6
- 7
- 8
- 9
- 10
- 11
- 12
- 13
- 14
- 15
- 16
- 17
- 18
- 19
- 20
- 21
- 22
- 23
- 24
- 25
- 26
- 27

9.插入图片
① 导入包
\usepackage{graphicx} %!* 图片宏包 \usepackage{caption} %!* 格式宏包 \usepackage{xcolor} %!* 色彩宏包 \captionsetup{figurename = Fig., labelfont = {color = blue}, textfont = it} %! 更改标签为Fig.,更改标签颜色为蓝色;更改标题内容为意大利体- 1
- 2
- 3
- 4
- 5
② 插入一张简单的图片
\includegraphics{young.jpg}- 1

③ 使用浮动体环境
\begin{figure}[h] %//! h表示插入到此处 \centering %//! 居中显示 \includegraphics[height = .5in]{young.jpg} \caption[example]{example picture A} %//!居中显示图片标题 \end{figure}- 1
- 2
- 3
- 4
- 5

④ 并列两图,使用同一个标题
\begin{figure}[htbp] \centering \includegraphics[scale = 0.35]{young.jpg} \includegraphics[scale = 0.35]{young.jpg} \caption{pictures side by side} \end{figure}- 1
- 2
- 3
- 4
- 5
- 6

⑤ 并列两图,分别使用不同标题
\begin{figure}[htbp] \centering pictures have a caption %!*居中显示图片标题 \vspace{12pt} %!*标题与图片垂直间距 \begin{minipage}{5.5cm} \centering \includegraphics[scale = 0.6]{young.jpg} \caption{left} \end{minipage} \hspace{10pt} %!* 两张图片中间的间隔(注意这里必须直接连接下一个minipage环境,不能回车否则图片会断开) \begin{minipage}{5.5cm} \centering \includegraphics[scale = 0.6]{young.jpg} \caption{right} \end{minipage} \end{figure}- 1
- 2
- 3
- 4
- 5
- 6
- 7
- 8
- 9
- 10
- 11
- 12
- 13
- 14
- 15
- 16
- 17

多排插入多张图片,只需在并排插入图片的代码中加入换行即可
⑥ 每个图片定义小标题
\begin{figure} \centering \subfigure[figure 1 title.] { \label{fig:a} \includegraphics[scale = 0.35]{2.png} } \subfigure[figure 2 title.] { \label{fig:b} \includegraphics[scale = 0.35]{2.png} } \caption{ general title. } \label{fig} \end{figure}- 1
- 2
- 3
- 4
- 5
- 6
- 7
- 8
- 9
- 10
- 11

⑦ \includegraphics 命令的可选参数
参数 含义 width=⟨width⟩将图片缩放到宽度为 ⟨width⟩height=⟨height⟩将图片缩放到高度为 ⟨height⟩scale=⟨scale⟩将图片相对于原尺寸缩放 ⟨scale⟩倍angle=⟨angle⟩将图片逆时针旋转 ⟨angle⟩度⑧ 浮动体的位置参数
参数 含义 h当前位置(代码所处的上下文) t顶部 b底部 p单独成页 !在决定位置时忽视限制 H强制位置,这个参数需要引入 float包\usepackage{float}
10.数学公式
① 导入包
%//!引入数学宏包 \usepackage{amsmath} \usepackage{amsfonts} \usepackage{amssymb} \usepackage{bm}- 1
- 2
- 3
- 4
- 5
10.1.基础公式
① 行内公式
%//! 直接行间输出公式,用美元符号 $ 包含 $this is a inline formula $ a^2 + b^2 = c^2 $ \\- 1
- 2

② 无编号居中显示公式\[E = mc^2 \]- 1
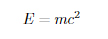
③ 有编号的公式%//! 进入数学公式模式,输出有编号的公式 \begin{equation} a^2 + b^2 = c^2 \\ \end{equation}- 1
- 2
- 3
- 4

%//! 更换公式编号类型 \begin{equation} a + b \tag{$\star$} \end{equation}- 1
- 2
- 3
- 4

④ 多行公式
%//! gather环境的特点是公式每行居中显示 %//! 可以用\notag取消某行的编号 \begin{gather} a^2 + b^2 = c^2 \\ a = 3 \notag \end{gather}- 1
- 2
- 3
- 4
- 5
- 6

%//! align环境特点是可以让公式按等号或其他关系符对齐 %//! 可以在要对齐的符号前用 & 表示对齐 \begin{align} a^2 + b^2 & = c^2 \\ a & = 3 \end{align}- 1
- 2
- 3
- 4
- 5
- 6

%//! multline环境特点是,对于长公式而言, %//! 可以使第一行左对齐,最后一行右对齐,中间居中 \begin{multline} a+b+c \\ +d+e+f \\ +g+h+i \end{multline}- 1
- 2
- 3
- 4
- 5
- 6
- 7

%//! split环境的特点是,它通常用在equation、gather等 %//! 数学环境里,把单个长公式拆成多行 %//! 同时支持align的对其方式,编号由外层环境控制 \begin{equation} \begin{split} \cos2x & = \cos^2 x - \sin^2 x \\ & = 2\cos^2 x - 1 \end{split} \end{equation}- 1
- 2
- 3
- 4
- 5
- 6
- 7
- 8
- 9

%//! 分段公式输入;有时我们需要大括号把公式组合到一起 %//! 这就需要cases、dcases等环境 \begin{equation} D(x) = \begin{cases} 1, & x \in \mathbb{Q}; \\ 0, & x \in \mathbb{R}\setminus\mathbb{Q} \\ \end{cases} \end{equation}- 1
- 2
- 3
- 4
- 5
- 6
- 7
- 8
- 9

10.2.复杂公式
对于复杂的公式和符号来说,其实只需要在LaTeX公式编辑器就可以很方便地实现了。
但是,毕竟是学习嘛,就学习一下咯
① 上下标
上下标是最基础也最常用的符号了。
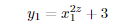
^表示上标,_表示下标。如果上下标的内容多于一个字符,需要用{}将这些内容括成一个整体。上下标可以嵌套,也可以同时使用。y_1=x_1^{2z}+3- 1
② 括号和分隔符
()、[] 和 |表示符号本身,使用\{\}来表示{}。当要显示大号的括号或分隔符时,要用\left和\right命令。f(x,y,z) = 3y^2z \left( 3+\frac{7x+5}{1+y^2} \right)- 1

我们还可以用\big、\bigg等命令生成固定大小的定界符。更常用的形式是类似\left的\bigl、\biggl等,以及类似\right 的\bigr、\biggr等(\bigl和\bigr不必成对出现)。\Bigl((x+1)(x-1)\Bigr)^{2}- 1

\bigl( \Bigl( \biggl( \Biggl( \quad \bigr\} \Bigr\} \biggr\} \Biggr\} \quad \big\| \Big\| \bigg\| \Bigg\| \quad \big\Downarrow \Big\Downarrow \bigg\Downarrow \Bigg\Downarrow- 1
- 2
- 3
- 4
- 5

③ 分数通常使用
\frac {分子} {分母}来生成一个分数,分数可多层嵌套。如果分式较为复杂,亦可使用
分子 \over 分母此时分数仅有一层。
④ 开方使用
\sqrt [根指数,省略时为2] {被开方数}命令输入开方。\sqrt{a} \quad or \quad \sqrt[n]{b}- 1

⑤ 省略号\ldots表示与 文本底线 对齐的省略号,\cdots表示与 文本中线 对齐的省略号。f(x_1,x_2,\underbrace{\ldots}_{\rm ldots} ,x_n) = x_1^2 + x_2^2 + \underbrace{\cdots}_{\rm cdots} + x_n^2- 1

⑥ 向量使用
\vec{向量}来自动产生一个向量。\vec{a} \cdot \vec{b}=0- 1

⑦ 积分使用
\int_积分下限^积分上限 {被积表达式}来输入一个积分。\int_{-\infty}^\infty\frac{1}{\sqrt{2\pi}\sigma}e^{- \frac{(x-\mu)^2}{2\sigma ^2}}\;\mathrm{d}x = 1- 1
- 2

⑧ 极限
使用
\lim_{变量 \to 表达式} 表达式来输入一个极限。\lim_{x \to \infty } = 0- 1

⑨ 累加、累乘运算使用
\sum_{下标表达式}^{上标表达式} {累加表达式}来输入一个累加。与之类似,使用\prod\bigcup\bigcap来分别输入累乘、并集和交集\sum_{i=1}^n \frac{1}{i^2} \quad and \quad \prod_{i=1}^n \frac{1}{i^2} \quad and \quad \bigcup_{i=1}^{2} \bm{R} \quad and \quad \bigcap_{i=1}^{2} \bm{R}- 1

⑩ 数组和矩阵
无括号
\begin{matrix}\end{matrix}\begin{matrix} x_{11} &x_{12} &x_{13} &x_{14} \\ x_{21} &x_{22} &x_{23} &x_{24}\\ x_{31} &x_{32} &x_{33} &x_{34} \end{matrix}- 1
- 2
- 3
- 4
- 5

中括号\begin{bmatrix}\end{bmatrix}\begin{bmatrix} x_{11} &x_{12} &x_{13} &x_{14} \\ x_{21} &x_{22} &x_{23} &x_{24}\\ x_{31} &x_{32} &x_{33} &x_{34} \end{bmatrix}- 1
- 2
- 3
- 4
- 5

圆括号\begin{pmatrix}\end{pmatrix}\begin{pmatrix} x_{11} &x_{12} &x_{13} &x_{14} \\ x_{21} &x_{22} &x_{23} &x_{24} \\ x_{31} &x_{32} &x_{33} &x_{34} \end{pmatrix}- 1
- 2
- 3
- 4
- 5

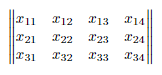
竖线\begin{vmatrix}\end{vmatrix}\begin{vmatrix} x_{11} &x_{12} &x_{13} &x_{14} \\ x_{21} &x_{22} &x_{23} &x_{24} \\ x_{31} &x_{32} &x_{33} &x_{34} \end{vmatrix}- 1
- 2
- 3
- 4
- 5

双竖线
\begin{Vmatrix}\end{Vmatrix}\begin{Vmatrix} x_{11} &x_{12} &x_{13} &x_{14} \\ x_{21} &x_{22} &x_{23} &x_{24} \\ x_{31} &x_{32} &x_{33} &x_{34} \end{Vmatrix}- 1
- 2
- 3
- 4
- 5
10.3 常用符号
① 希腊字母
输入 显示 输入 显示 输入 显示 \alpha α \alpha α \gamma γ \gamma γ \epsilon ϵ \epsilon ϵ \eta η \eta η \lambda λ \lambda λ \rho ρ \rho ρ \phi ϕ \phi ϕ \psi ψ \psi ψ \beta β \beta β \delta δ \delta δ \Delta Δ \Delta Δ \theta θ \theta θ \mu μ \mu μ \xi ξ \xi ξ \pi π \pi π \sigma σ \sigma σ \omega ω \omega ω \Omega Ω \Omega Ω ② 关系运算符
输入 显示 输入 显示 输入 显示 \pm ± \pm ± \times × \times × \div ÷ \div ÷ \geq ≥ \geq ≥ \neq ≠ \neq = \leq ≤ \leq ≤ \cdot ⋅ \cdot ⋅ \approx ≈ \approx ≈ \equiv ≡ \equiv ≡ 11.参考文献
① 手动添加参考文献
\begin{thebibliography}{12} %!* 12表示条目数量 \bibitem{Rowling_1997} Joanne K. Rowling, \emph{Harry Potter and the Philosopher's Stone}. Bloomsbury, London, 1997. \bibitem{Rowling_1997} Joanne K. Rowling, \emph{Harry Potter and the Philosopher's Stone}. Bloomsbury, London, 1997. \end{thebibliography}- 1
- 2
- 3
- 4
- 5
- 6
- 7
- 8
- 9
- 10
- 11
- 12
- 13

② 导入文件方式- 前往文献数据库下载
BibTeX文件
如: dblp: computer science bibliography

如:谷歌学术

- 将下载或复制的内容放入
ref.bib文件中 - 在
documentclass下使用\bibliographystyle{plain} - 在
.tex文档中使用\cite{}表示引用处,\bibliography{ref.bib}表示文献被引用处
\usepackage{hyperref} \bibliographystyle{plain} \begin{document} this paper cite\cite{mitchell1990machine} \bibliography{ref} \end{document}- 1
- 2
- 3
- 4
- 5
- 6
- 7
- 8
- 9
- 10

③ 超链接
\url{https://wikipedia.org} \\ % 加上了超链接 \nolinkurl{https://wikipedia.org} \\ % 没有加上超链接 \href{https://wikipedia.org}{Wiki}=- 1
- 2
- 3

就学到这里啦,继续加油叭 ! ! !
-
相关阅读:
【Qt炫酷动画】3.QPauseAnimation暂停动画类
计算机基础之计算机的发展历史
Redis实战 | 使用Redis 的有序集合(Sorted Set)实现排行榜功能,和Spring Boot集成
JSP plugin动作
前端开发踩坑笔记(2022-08)
Postman工具之接口测试必学的几个关键点,你知道吗?
学习笔记丨Shell
【数据库内核分析系列】:数据库表的创建过程
Express框架操作MongoDB数据库
[读论文]深度孵化 Deep Incubation: Training Large Models by Divide-and-Conquering
- 原文地址:https://blog.csdn.net/weixin_62313535/article/details/127886125

- 最新文章
-
沪漂五周年了:我越来越迷茫了
Agentic Skill Routing 实战:别再把所有 Skill 塞进 AI Agent 上下文
MySQL-Seconds_behind_master的精度误差
[MAF预定义ChatClient中间件-03]CachingChatClient——利用缓存省钱省时间
AI的至暗历史:从万众期待到被政府撤资,AI的两次死亡徘徊
Agent OS :五种驯服不确定性的范式
PortSwigger SQL注入LAB11
数据库即时编译JIT
[Begin]AI Learn Data Day 0
深度学习进阶(二十七)现代 LLM 的核心架构设计其二:SwiGLU