-
Spring(九)- Spring自定义命名空间整合第三方框架原理解析
一、Spring通过命名空间整合第三方框架
1. Dubbo 命名空间
Spring 整合其他组件时就不像MyBatis这么简单了,例如Dubbo框架在与Spring进行整合时,要使用Dubbo提供的命名空间的扩展方式,自定义了一些Dubbo的标签,Dubbo框架再去解析自己的Dubbo标签
<beans xmlns="http://www.springframework.org/schema/beans" xmlns:xsi="http://www.w3.org/2001/XMLSchema-instance" http://dubbo.apache.org/schema/dubbo http://dubbo.apache.org/schema/dubbo/dubbo.xsd"> <dubbo:application name="dubbo1-consumer"/> <dubbo:registry address="zookeeper://localhost:2181"/> <dubbo:annotation package="com.itheima.controller"/> <dubbo:consumer check="false" timeout="1000" retries="0"/> beans>- 1
- 2
- 3
- 4
- 5
- 6
- 7
- 8
- 9
- 10
- 11
- 12
- 13
- 14
- 15
- 16
- 17
- 18
2. Context 命名空间
为了降低我们此处的学习成本,不再引入Dubbo第三方框架了,以Spring的 context 命名空间去进行讲解,该方式也是命名空间扩展方式。
需求:加载外部properties文件jdbc.properties,将键值对存储在Spring容器中
jdbc.driver=com.mysql.jdbc.Driver jdbc.url=jdbc:mysql://localhost:3306/mybatis jdbc.username=root jdbc.password=root- 1
- 2
- 3
- 4
引入context命名空间,再使用context命名空间的标签,使用SpEL表达式在xml或注解中根据key获得value
<beans xmlns="http://www.springframework.org/schema/beans" xmlns:context="http://www.springframework.org/schema/context" xmlns:xsi="http://www.w3.org/2001/XMLSchema-instance" xsi:schemaLocation="http://www.springframework.org/schema/beans http://www.springframework.org/schema/beans/spring-beans.xsd http://www.springframework.org/schema/context http://www.springframework.org/schema/context/spring-context.xsd"> <context:property-placeholder location="classpath:jdbc.properties" /> <bean id="dataSource" class="com.alibaba.druid.pool.DruidDataSource"> <property name="driverClassName" value="${jdbc.driver}">property> <property name="url" value="${jdbc.url}">property> <property name="username" value="${jdbc.username}">property> <property name="password" value="${jdbc.password}">property> bean> <beans>- 1
- 2
- 3
- 4
- 5
- 6
- 7
- 8
- 9
- 10
- 11
- 12
- 13
- 14
- 15
- 16
- 17
- 18
其实,加载的properties文件中的属性最终通过Spring解析后会被存储到了Spring容器的environment中去,不仅自己定义的属性会进行存储,Spring也会把环境相关的一些属性进行存储

二、Spring自定义命名空间原理解析
首先从ClassPathXmlApplicationContext入手,进入spring容器入口refresh()方法
public class ClassPathXmlApplicationContext extends AbstractXmlApplicationContext { @Override public void refresh() throws BeansException, IllegalStateException { synchronized (this.startupShutdownMonitor) { ... // 将beanDefinition定义信息填充到beanDefinitionMap中 ConfigurableListableBeanFactory beanFactory = obtainFreshBeanFactory(); ... } } }- 1
- 2
- 3
- 4
- 5
- 6
- 7
- 8
- 9
- 10
- 11
接着调用AbstractApplicationContext类中的obtainFreshBeanFactory方法
public abstract class AbstractApplicationContext extends DefaultResourceLoader implements ConfigurableApplicationContext { protected ConfigurableListableBeanFactory obtainFreshBeanFactory() { refreshBeanFactory(); return getBeanFactory(); } }- 1
- 2
- 3
- 4
- 5
- 6
接着执行AbstractRefreshableApplicationContext类中的refreshBeanFactory方法
public abstract class AbstractRefreshableApplicationContext extends AbstractApplicationContext { @Override protected final void refreshBeanFactory() throws BeansException { ... loadBeanDefinitions(beanFactory); ... } }- 1
- 2
- 3
- 4
- 5
- 6
- 7
- 8
最终会通过loadBeanDefinitions方法->doLoadBeanDefinitions方法->registerBeanDefinitions方法->doRegisterBeanDefinitions方法->parseBeanDefinitions方法
public class DefaultBeanDefinitionDocumentReader implements BeanDefinitionDocumentReader { protected void parseBeanDefinitions(Element root, BeanDefinitionParserDelegate delegate) { if (delegate.isDefaultNamespace(root)) { NodeList nl = root.getChildNodes(); for (int i = 0; i < nl.getLength(); i++) { Node node = nl.item(i); if (node instanceof Element) { Element ele = (Element) node; if (delegate.isDefaultNamespace(ele)) { // 默认命名空间的标签有import、alias、bean、beans parseDefaultElement(ele, delegate); } else { // 解析自定义命名空间的标签 delegate.parseCustomElement(ele); } } } } else { delegate.parseCustomElement(root); } } }- 1
- 2
- 3
- 4
- 5
- 6
- 7
- 8
- 9
- 10
- 11
- 12
- 13
- 14
- 15
- 16
- 17
- 18
- 19
- 20
- 21
- 22
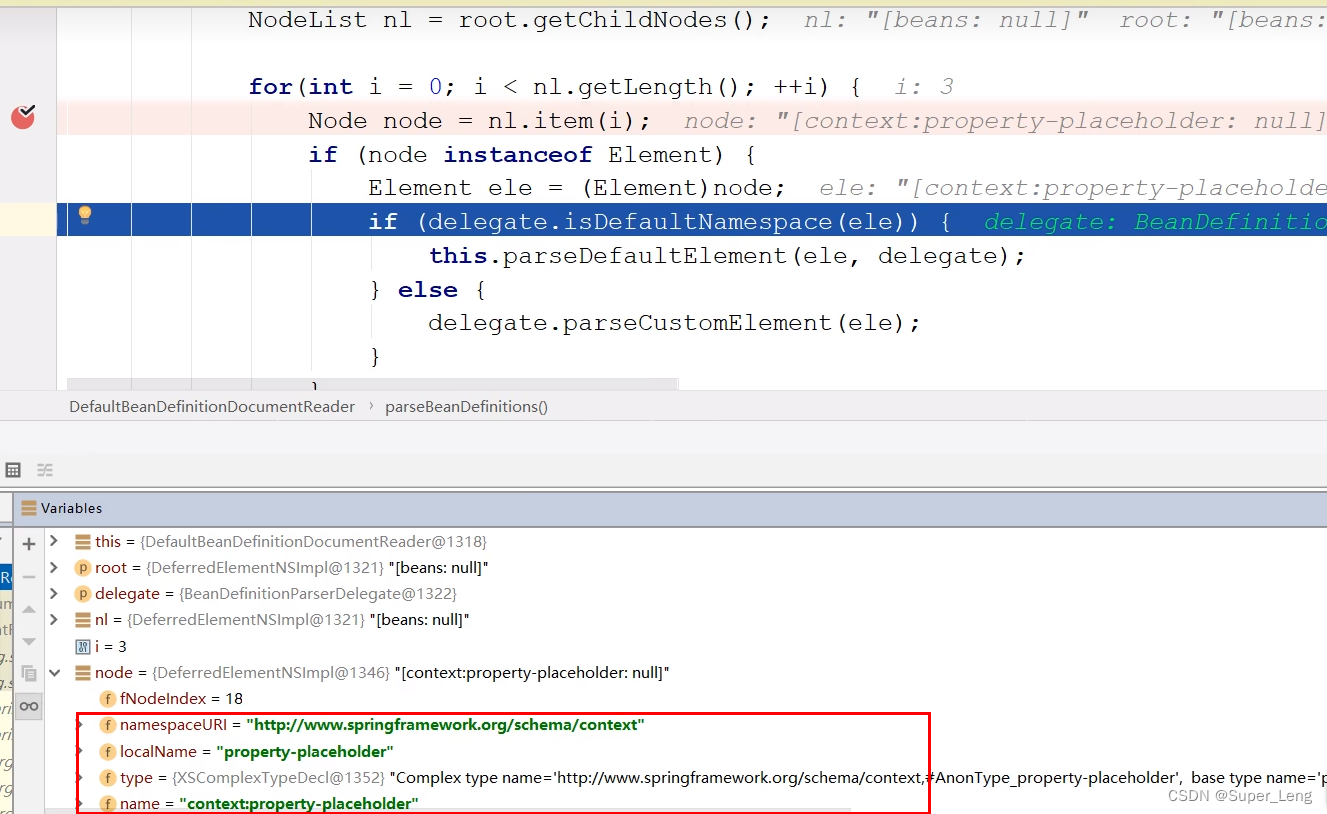
默认命名空间的标签有import、alias、bean、beans

由于context是自定义命名空间的标签,所以会执行delegate.parseCustomElement(ele);方法
public class BeanDefinitionParserDelegate { @Nullable public BeanDefinition parseCustomElement(Element ele, @Nullable BeanDefinition containingBd) { // xmlns:context="http://www.springframework.org/schema/context" // 这里的namespaceUri对应的是xml中的"http://www.springframework.org/schema/context" String namespaceUri = getNamespaceURI(ele); // 根据命名空间uri获取命名空间处理器 NamespaceHandler handler = this.readerContext.getNamespaceHandlerResolver().resolve(namespaceUri); // 执行命名空间处理器的parse方法,解析执行的标签 return handler.parse(ele, new ParserContext(this.readerContext, this, containingBd)); } }- 1
- 2
- 3
- 4
- 5
- 6
- 7
- 8
- 9
- 10
- 11
- 12
根据命名空间uri获取命名空间处理器
public class DefaultNamespaceHandlerResolver implements NamespaceHandlerResolver { // 通过构造方法创建DefaultNamespaceHandlerResolver时,会将"META-INF/spring.handlers"中配置的命名空间处理器加载到handlerMappings中 public DefaultNamespaceHandlerResolver() { this(null, "META-INF/spring.handlers"); } // 在执行resovle方法时,就是从Map- 1
- 2
- 3
- 4
- 5
- 6
- 7
- 8
- 9
- 10
- 11
- 12
- 13
- 14
- 15
- 16
- 17
- 18
- 19
- 20
- 21
- 22
- 23
- 24
- 25
- 26


执行ContextNamespaceHandler的init方法
ContextNamespaceHandler源码如下,间接实现了NamespaceHandler接口,初始化方法init会被自动调用。由于context命名空间下有多个标签,所以每个标签又单独注册了对应的解析器,注册到了其父类NamespaceHandlerSupport的Mappublic class ContextNamespaceHandler extends NamespaceHandlerSupport { @Override public void init() { // 注入解析器,不同的标签有不同的解析器 registerBeanDefinitionParser("property-placeholder", new PropertyPlaceholderBeanDefinitionParser()); registerBeanDefinitionParser("property-override", new PropertyOverrideBeanDefinitionParser()); registerBeanDefinitionParser("annotation-config", new AnnotationConfigBeanDefinitionParser()); registerBeanDefinitionParser("component-scan", new ComponentScanBeanDefinitionParser()); registerBeanDefinitionParser("load-time-weaver", new LoadTimeWeaverBeanDefinitionParser()); registerBeanDefinitionParser("spring-configured", new SpringConfiguredBeanDefinitionParser()); registerBeanDefinitionParser("mbean-export", new MBeanExportBeanDefinitionParser()); registerBeanDefinitionParser("mbean-server", new MBeanServerBeanDefinitionParser()); } }- 1
- 2
- 3
- 4
- 5
- 6
- 7
- 8
- 9
- 10
- 11
- 12
- 13
- 14
- 15
注入解析器后,再去执行命名空间处理器ContextNamespaceHandler的parse方法,该parse方法具体流程是再去调每个自定义标签解析器的parse方法,例如上面"property-placeholder"标签,会执行PropertyPlaceholderBeanDefinitionParser解析器的parse方法,parse方法主要作用就是解析标签的beanDefinition定义信息注册到容器中,Spring再根据对应的beanDefinition定义信息创建对象
public abstract class NamespaceHandlerSupport implements NamespaceHandler { @Override @Nullable public BeanDefinition parse(Element element, ParserContext parserContext) { BeanDefinitionParser parser = findParserForElement(element, parserContext); return (parser != null ? parser.parse(element, parserContext) : null); } }- 1
- 2
- 3
- 4
- 5
- 6
- 7
- 8

通过上述分析,我们清楚的了解了外部命名空间标签的执行流程,如下:
⚫ 将自定义标签的约束:物理约束文件与网络约束名称的约束 以键值对形式存储到一个spring.schemas文件里,该文件存储在类加载路径的 META-INF里,Spring会自动加载到;
⚫ 将自定义命名空间的名称 与 自定义命名空间的处理器映射关系 以键值对形式存在到一个叫spring.handlers文件里,该文件存储在类加载路径的 META-INF里,Spring会自动加载到;
⚫ 准备好NamespaceHandler,如果命名空间只有一个标签,那么直接在parse方法中进行解析即可,一般解析结果就是注册该标签对应的BeanDefinition。如果命名空间里有多个标签,那么可以在init方法中为每个标签都注册一个BeanDefinitionParser,在执行NamespaceHandler的parse方法时再分流给不同的BeanDefinitionParser进行解析(重写doParse方法即可)。

http\://www.springframework.org/schema/context/spring-context.xsd=org/springframework/context/config/spring-context.xsd- 1
约束文件http://www.springframework.org/schema/context/spring-context.xsd对应真实的路径是org/springframework/context/config/spring-context.xsd

三、手写自定义命名空间标签与Spring整合
设想自己是一名架构师,进行某一个框架与Spring的集成开发,效果是通过一个指示标签,向Spring容器中自动注入一个BeanPostProcessor,这样可以在创建bean的生命周期中对自定义框架中的bean进行增强处理
步骤分析:
- 确定命名空间名称、schema虚拟路径、标签名称;
- 编写schema约束文件haohao-annotation.xsd
- 在类加载路径下创建META目录,编写约束映射文件spring.schemas和处理器映射文件spring.handlers
- 编写命名空间处理器 HaohaoNamespaceHandler,在init方法中注册HaohaoBeanDefinitionParser
- 编写标签的解析器 HaohaoBeanDefinitionParser,在parse方法中注册HaohaoBeanPostProcessor
- 编写HaohaoBeanPostProcessor
========== 以上五步是框架开发者写的,以下是框架使用者写的=========== - 在applicationContext.xml配置文件中引入命名空间
- 在applicationContext.xml配置文件中使用自定义的标签
<beans xmlns="http://www.springframework.org/schema/beans" xmlns:xsi="http://www.w3.org/2001/xmlSchema-instance" xmlns:haohao="http://www.itheima.com/haohao" xsi:schemaLocation="http://www.springframework.org/schema/beans http://www.springframework.org/schema/beans/spring-beans.xsd http://www.itheima.com/haohao http://www.itheima.com/haohao/haohao-annotation.xsd"> <haohao:annotation-driven/> beans>- 1
- 2
- 3
- 4
- 5
- 6
- 7
- 8
- 9
编写schema约束文件haohao-annotation.xsd
<xsd:schema xmlns="http://www.itheima.com/haohao" xmlns:xsd="http://www.w3.org/2001/XMLSchema" targetNamespace="http://www.itheima.com/haohao"> <xsd:element name="annotation-driven">xsd:element> xsd:schema>- 1
- 2
- 3
- 4
- 5
- 6
在类加载路径下创建META目录,编写约束映射文件spring.schemas和处理器映射文件spring.handlers

编写命名空间处理器 HaohaoNamespaceHandler,在init方法中注册HaohaoBeanDefinitionParserpublic class HaohaoNamespaceHandler extends NamespaceHandlerSupport { @Override public void init() { this.registerBeanDefinitionParser("annotation-driven", new HaohaoBeanDefinitionParser()); } }- 1
- 2
- 3
- 4
- 5
- 6
编写标签的解析器 HaohaoBeanDefinitionParser,在parse方法中注册HaohaoBeanPostProcessor
public class HaohaoBeanDefinitionParser implements BeanDefinitionParser { public BeanDefinition parse(Element element, ParserContext parserContext) { // 创建HaohaoBeanPostProcessor的BeanDefinition RootBeanDefinition beanDefinition = new RootBeanDefinition(); beanDefinition.setBeanClass(HaohaoBeanPostProcessor.class); // 注册HaohaoBeanPostProcessor parserContext.getRegistry().registerBeanDefinition("haohaoBeanPostProcessor", beanDefinition); return beanDefinition; } }- 1
- 2
- 3
- 4
- 5
- 6
- 7
- 8
- 9
- 10
编写HaohaoBeanPostProcessor
public class HaohaoBeanPostProcessor implements BeanPostProcessor { @Override public Object postProcessBeforeInitialization(Object bean, String beanName) throws BeansException { System.out.println("创建bean时,可以在此进行增强处理..."); return bean; } }- 1
- 2
- 3
- 4
- 5
- 6
- 7
-
相关阅读:
git-使用命令笔记
qml 无法修改listview表头控件文本
线性代数理解笔记
Win10远程连接服务器失败,报错:出现了内部错误
Netty(11)序列化/反序列化、Netty参数
基于SSM+MySQL的高校寝室管理系统
我的第一个springboot starter
EFLAGS寄存器与JCC指令
Codeforces Round #810 (Div. 2) D. Rain (线段树差分)
设计模式--装饰器模式
- 原文地址:https://blog.csdn.net/qq_36602071/article/details/127875047
