-
RabbitMQ系列【5】Spring Boot 整合RabbitMQ
有道无术,术尚可求,有术无道,止于术。
前言
Spring Boot为RabbitMQ也提供了自动配置和启动器。1. 环境搭建
创建一个
Spring Boot基础工程,引入依赖:<dependency> <groupId>org.springframework.bootgroupId> <artifactId>spring-boot-starter-amqpartifactId> dependency>- 1
- 2
- 3
- 4
该依赖中,引入了
spring-rabbit:

2. 基本信息配置
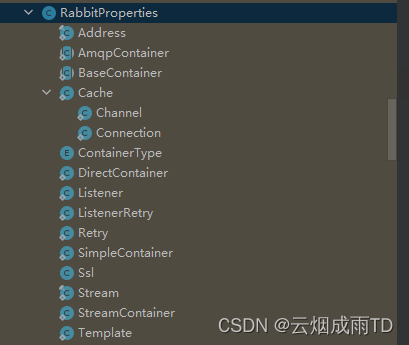
在
RabbitProperties配置类中,可以看到很多相关配置:

最重要当然是配置MQ 的地址、端口、用户名、密码,可以使用两种方式配置:spring: rabbitmq: addresses: amqp://guest:guest@localhost port: 5672 # 或者 spring: rabbitmq: username: guest password: guest host: localhost port: 5672- 1
- 2
- 3
- 4
- 5
- 6
- 7
- 8
- 9
- 10
- 11
虚拟机配置,虚拟机以
/开头,默认为/:spring: rabbitmq: virtual-host: /- 1
- 2
- 3
3. 创建交换机和队列
使用
ExchangeBuilder创建交换机,可以创建四种类型的交换机,如下图:

按照相似的方式创建队列、绑定。@Configuration public class RabbitMqConfig { /** * 使用 ExchangeBuilder 创建交换机 * */ @Bean("bootExchange") public Exchange bootExchange() { return ExchangeBuilder.directExchange("bootExchange").durable(true).build(); } /** * 创建队列 */ @Bean("bootQueue") public Queue bootQueue() { return QueueBuilder.durable("bootQueue").build(); } /** * 创建队列和交换机的绑定关系 */ @Bean("bootBinding") public Binding bootBinding(@Qualifier("bootQueue") Queue bootQueue, @Qualifier("bootExchange") Exchange bootExchange) { return BindingBuilder.bind(bootQueue).to(bootExchange).with("boot.key").and(null); } }- 1
- 2
- 3
- 4
- 5
- 6
- 7
- 8
- 9
- 10
- 11
- 12
- 13
- 14
- 15
- 16
- 17
- 18
- 19
- 20
- 21
- 22
- 23
- 24
- 25
- 26
- 27
- 28
启动项目,进入控制台,可以看到相关信息:

4. 消费者
使用
@RabbitListener注解标记在方法上,并指定队列名,方法入参Message:@Component public class RabbitConsumer { @RabbitListener(queues = {"bootQueue"}) public void rabbitListener(Message message) { System.out.println("收到消息===" + message); } }- 1
- 2
- 3
- 4
- 5
- 6
- 7
- 8
Message对象是Sring集成RabbirMQ提供的消息装载体,主要包含了消息二进制数据body和消息属性MessageProperties:

5. 生产者
创建一个生产者,使用
RabbitTemplate直接将消息发送到指定的交换机,并指定其路由KEY@SpringBootTest public class MqTest { @Autowired private RabbitTemplate rabbitTemplate; @Test public void testRabbitPub() { rabbitTemplate.convertAndSend("bootExchange","boot.key","HELLO SPRING BOOT"); } }- 1
- 2
- 3
- 4
- 5
- 6
- 7
- 8
- 9
- 10
- 11
- 12
测试
启动项目,可以看到打印了连接日志:

发送消息,并成功接收到消息,消息包含了消息本身内容和消息属性:

-
相关阅读:
【机器学习】聚类【Ⅲ】高斯混合模型讲解
克拉默法则
【leetcode】【2022/9/18】827. 最大人工岛
Java单例模式
Python经典练习题,闯关练习题
2022腾讯全球数字生态大会【存储专场】它来了|预约有礼
视频监控系统/视频云存储EasyCVR接入国标GB28181设备无法播放设备录像,是什么原因?
阿里Java架构师面试高频300题:集合+JVM+Redis+并发+算法+框架等
mysql表操作
MySQL之MHA高可用配置及故障切换实例
- 原文地址:https://blog.csdn.net/qq_43437874/article/details/127764021
