-
异步&线程池
1.初始化线程的 4 种方式
- 继承 Thread
- 实现 Runnable 接口
- 实现 Callable 接口 + FutureTask (可以拿到返回结果,可以处理异常)
- 线程池
示例
public class ThreadTest { public static ExecutorService executorService = Executors.newFixedThreadPool(10); public static void main(String[] args) throws ExecutionException, InterruptedException { //1. 继承Thread方式 // System.out.println("main.....start...."); // // Thread01 thread01 = new Thread01(); // thread01.start(); // // System.out.println("main.......end...."); //实现Runable方式 // System.out.println("main---start"); // Runable01 runable01 = new Runable01(); // new Thread(runable01).start(); // System.out.println("main---end"); // System.out.println("main---start"); // FutureTaskfutureTask = new FutureTask<>(new Callable01()); // new Thread(futureTask).start(); // //阻塞等待整个线程执行完,获取返回结果 // Integer integer = futureTask.get(); // System.out.println(integer); // System.out.println("main---end"); //以后的业务代码里,以上三种启动线程的方式都不用,将所有的一步任务交给线程池使用 //线程池 给线程直接提交任务 //当前系统中只有一两个池 ,提交线程池让他们自己去执行 executorService.submit(new Runable01()); } //继承thread public static class Thread01 extends Thread{ @Override public void run() { System.out.println("当前线程:"+Thread.currentThread().getId()); int i=10/2; System.out.println("运算结果"+i); } } //实现runable接口 public static class Runable01 implements Runnable{ @Override public void run() { System.out.println("当前线程:"+Thread.currentThread().getId()); int i=10/2; System.out.println("运算结果"+i); } } //实现 Callable 接口 public static class Callable01 implements Callable<Integer>{ @Override public Integer call() throws Exception { System.out.println("当前线程:"+Thread.currentThread().getId()); int i=10/2; System.out.println("运算结果"+i); return i; } } }- 1
- 2
- 3
- 4
- 5
- 6
- 7
- 8
- 9
- 10
- 11
- 12
- 13
- 14
- 15
- 16
- 17
- 18
- 19
- 20
- 21
- 22
- 23
- 24
- 25
- 26
- 27
- 28
- 29
- 30
- 31
- 32
- 33
- 34
- 35
- 36
- 37
- 38
- 39
- 40
- 41
- 42
- 43
- 44
- 45
- 46
- 47
- 48
- 49
- 50
- 51
- 52
- 53
- 54
- 55
- 56
- 57
- 58
- 59
- 60
- 61
- 62
- 63
- 64
- 65
- 66
- 67
区划:
- 方式 1 和方式 2:主进程无法获取线程的运算结果。不适合当前场景
- 方式 3:主进程可以获取线程的运算结果,但是不利于控制服务器中的线程资源。可以导致 服务器资源耗尽。
- 方式 4:可以控制资源,性能稳定
2. 线程池
2.1 线程池详细解释
/** * 七大参数 * corePoolSize: 核心线程数(一直存在除非设置allowCoreThreadTimeOut):线程池创建好以后就准备就绪的线程的数量,就等待接受异步任务去执行 * maximumPoolSize:最大线程数 控制资源 *keepAliveTime:存活时间 如果当前的线程数量大于核心线程数的数量 ,只有线程的空闲时间大于keepAliveTime 就会释放空闲线程(corePoolSize-maximumPoolSize) *unit:时间单位 *workQueue:阻塞队列 如果任务有很多,就会将目前多的任务放到队列里面,只要有线程空闲,就会去队列里面取出新任务继续执行 * threadFactory 线程工厂 创建线程的工厂 * handler:拒绝策略 如果队列满了,按照我们指定的拒绝策略拒绝执行任务 */ ThreadPoolExecutor threadPoolExecutor = new ThreadPoolExecutor(5, 200, 10, TimeUnit.SECONDS, new LinkedBlockingDeque<>(1000), Executors.defaultThreadFactory(), new ThreadPoolExecutor.AbortPolicy()); }- 1
- 2
- 3
- 4
- 5
- 6
- 7
- 8
- 9
- 10
- 11
- 12
- 13
- 14
- 15
- 16
- 17
- 18
2.2 七大参数
- corePoolSize: 核心线程数(一直存在除非设置allowCoreThreadTimeOut):线程池创建好以后就准备就绪的线程的数量,就等待接受异步任务去执行
- maximumPoolSize:最大线程数 控制资源
- keepAliveTime:存活时间 如果当前的线程数量大于核心线程数的数量 ,只有线程的空闲时间大keepAliveTime 就会释放空闲线程(corePoolSize-maximumPoolSize)
- unit:时间单位
- workQueue:阻塞队列 如果任务有很多,就会将目前多的任务放到队列里面,只要有线程空闲,就会去队列里面取出新任务继续执行
- threadFactory 线程工厂 创建线程的工厂
- handler:拒绝策略 如果队列满了,按照我们指定的拒绝策略拒绝执行任务
2.3运行流程:
- 线程池创建,准备好 core 数量的核心线程,准备接受任务
- 新的任务进来,用 core 准备好的空闲线程执行。
1. core 满了,就将再进来的任务放入阻塞队列中。空闲的 core 就会自己去阻塞队 列获取任务执行
2. 阻塞队列满了,就直接开新线程执行,最大只能开到 max 指定的数量
3. max 都执行好了。Max-core 数量空闲的线程会在 keepAliveTime 指定的时间后自 动销毁。最终保持到core 大小
4. 如果线程数开到了 max 的数量,还有新任务进来,就会使用 reject 指定的拒绝策 略进行处理 - 所有的线程创建都是由指定的 factory 创建的。
面试: 一个线程池 core 7; max 20 ,queue:50,100 并发进来怎么分配的?
先有 7 个能直接得到执行,接下来 50 个进入队列排队,在多开 13 个继续执行。现在 70 个 被安排上了。剩下30 个默认拒绝策略2.4 常见的 4 种线程池
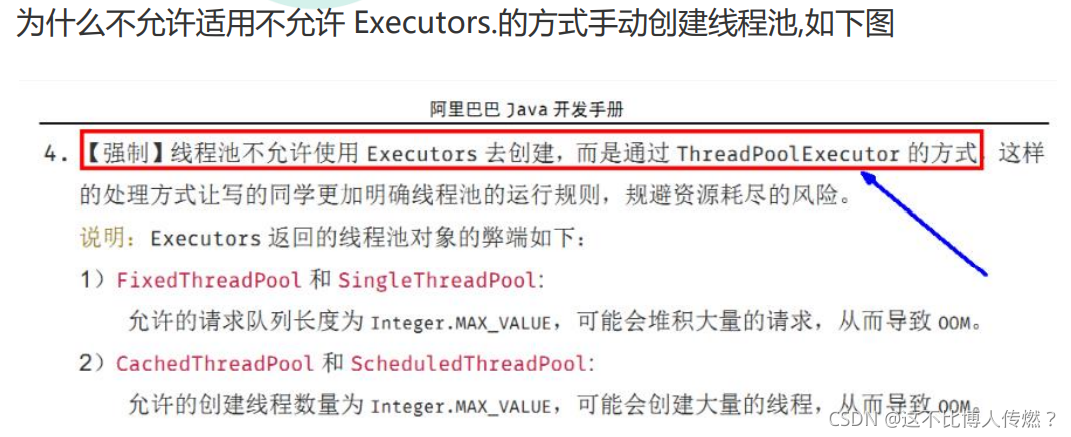
- Executors.newCachedThreadPool :核心数是0,都可回收。
- Executors.newFixedThreadPool :固定大小,max=core 都不可回收
- Executors.newScheduledThreadPool : 创建一个定长线程池,支持定时及周期性任务执行。定时任务的线程池
- Executors.newSingleThreadExecutor:单线程的线程池,后台从队列里获取任务依次执行
- Executors.newFixedThreadPool(int),一池N线程
项目演示:银行为10个顾客办理业务,根据线程池使用方式不同,所开的窗口(线程)不同
public class Demo1 { public static void main(String[] args) { ExecutorService threadPool = Executors.newFixedThreadPool(5); try { for(int i=0;i<10;i++){ threadPool.execute(()->{ System.out.println("当前线程"+Thread.currentThread().getName()); }); } }catch (Exception e){ e.printStackTrace(); }finally { threadPool.shutdown(); } } }- 1
- 2
- 3
- 4
- 5
- 6
- 7
- 8
- 9
- 10
- 11
- 12
- 13
- 14
- 15
- 16
- 17
- 18
- Executors.newSingleThreadExecutor(),一个任务一个任务执行,一池一线程
项目演示:
public class Demo1 { public static void main(String[] args) { // ExecutorService threadPool = Executors.newFixedThreadPool(5); ExecutorService threadPool = Executors.newSingleThreadExecutor(); try { for(int i=0;i<10;i++){ threadPool.execute(()->{ System.out.println("当前线程"+Thread.currentThread().getName()); }); } }catch (Exception e){ e.printStackTrace(); }finally { threadPool.shutdown(); } } }- 1
- 2
- 3
- 4
- 5
- 6
- 7
- 8
- 9
- 10
- 11
- 12
- 13
- 14
- 15
- 16
- 17
- 18
- Executors.newCachedThreadPool(),线程池根据需求创建线程,可扩容,遇强则强而在不需要那么多线程的时候,又会自行关闭
public class Demo1 { public static void main(String[] args) { // ExecutorService threadPool = Executors.newFixedThreadPool(5); // ExecutorService threadPool = Executors.newSingleThreadExecutor(); ExecutorService threadPool = Executors.newCachedThreadPool(); try { for(int i=0;i<20;i++){ threadPool.execute(()->{ System.out.println("当前线程"+Thread.currentThread().getName()); }); } }catch (Exception e){ e.printStackTrace(); }finally { threadPool.shutdown(); } } }- 1
- 2
- 3
- 4
- 5
- 6
- 7
- 8
- 9
- 10
- 11
- 12
- 13
- 14
- 15
- 16
- 17
- 18
- 19
2.5 常见的拒绝策略

2.6、开发中为什么使用线程池
- 降低资源的消耗
通过重复利用已经创建好的线程降低线程的创建和销毁带来的损耗 - 提高响应速度
因为线程池中的线程数没有超过线程池的最大上限时,有的线程处于等待分配任的状态,当任务来时无需创建新的线程就能执行 - 提高线程的可管理性
线程池会根据当前系统特点对池内的线程进行优化处理,减少创建和销毁线程带来的系统开销。无限的创建和销毁线程不仅消耗系统资源,还降低系统的稳定性,使用线程池进行统一分配
2.7 自定义线程池
public class Demo2 { public static void main(String[] args) { ThreadPoolExecutor threadPool= new ThreadPoolExecutor(2, 5, 2L, TimeUnit.SECONDS, new ArrayBlockingQueue<>(3), Executors.defaultThreadFactory(), new ThreadPoolExecutor.AbortPolicy()); try { for (int i = 0; i < 10; i++) { threadPool.execute(() -> { System.out.println(Thread.currentThread().getName()); }); } }catch (Exception e){ e.printStackTrace(); }finally { threadPool.shutdown(); } } }- 1
- 2
- 3
- 4
- 5
- 6
- 7
- 8
- 9
- 10
- 11
- 12
- 13
- 14
- 15
- 16
- 17
- 18
- 19
- 20
- 21
- 22
- 23
3.CompletableFuture 异步编排
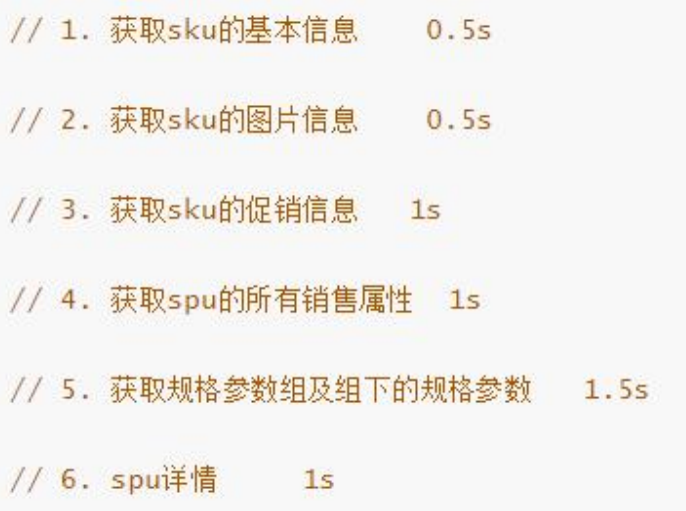
业务场景: 查询商品详情页的逻辑比较复杂,有些数据还需要远程调用,必然需要花费更多的时间

假如商品详情页的每个查询,需要如下标注的时间才能完成 那么,用户需要 5.5s 后才能看到商品详情页的内容。很显然是不能接受的。 如果有多个线程同时完成这 6 步操作,也许只需要 1.5s 即可完成响应,但有一些是异步执行的,比如1必须执行完并返回结果,我们才可以拿1的结果去执行4,此时可以采用异步的方式3.1、创建异步对象
CompletableFuture 提供了四个静态方法来创建一个异步操作。

- runXxxx 都是没有返回结果的,supplyXxx 都是可以获取返回结果的
- 可以传入自定义的线程池,否则就用默认的线程池;
样例:
public static void main(String[] args) throws ExecutionException, InterruptedException { System.out.println("main----start"); CompletableFuture.runAsync(()->{ System.out.println("当前线程:"+Thread.currentThread().getId()); int i=10/2; System.out.println("运算结果"+i); },executorService); System.out.println("main----end"); System.out.println("main----start"); CompletableFuture<Integer> future = CompletableFuture.supplyAsync(() -> { System.out.println("当前线程:" + Thread.currentThread().getId()); int i = 10 / 2; System.out.println("运算结果" + i); return i; }, executorService); Integer integer = future.get(); System.out.println("main----end---"+integer); }- 1
- 2
- 3
- 4
- 5
- 6
- 7
- 8
- 9
- 10
- 11
- 12
- 13
- 14
- 15
- 16
- 17
- 18
- 19
3.2 计算完成时的回调

- whenComplete 可以处理正常和异常的计算结果,exceptionally 处理异常情况。
- whenComplete 和 whenCompleteAsync 的区别:
- whenComplete:是执行当前任务的线程执行继续执行 whenComplete 的任务。
- whenCompleteAsync:是执行把 whenCompleteAsync 这个任务继续提交给线程池 来进行执行。
- 方法不以 Async 结尾,意味着 Action 使用相同的线程执行,而 Async 可能会使用其他线程 执行(如果是使用相同的线程池,也可能会被同一个线程选中执行)
- whenComplete:可以查看异常信息,但无法修改返回的数据,exceptionally:可以感知异常同时返回默认值
3.3、handle 方法完成后的处理

和 complete 一样,可对结果做最后的处理(可处理异常),可改变返回值。System.out.println("main---start"); //方法执行后的处理 CompletableFuture<Integer> handle = CompletableFuture.supplyAsync(() -> { int i = 10 / 4; System.out.println("执行的结果" + i); return i; }, executorService).handle((res,e)->{ if(res != null){ return res*2; } if (e != null){ return 0; } return -1; }); System.out.println("main---end"+handle.get());- 1
- 2
- 3
- 4
- 5
- 6
- 7
- 8
- 9
- 10
- 11
- 12
- 13
- 14
- 15
- 16
3.4、线程串行化方法

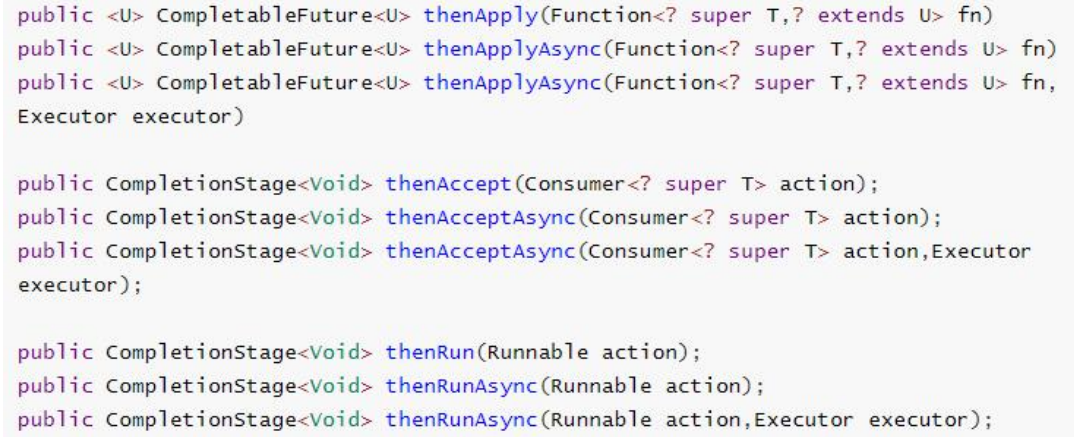
- thenApply 方法:当一个线程依赖另一个线程时,获取上一个任务返回的结果,并返回当前 任务的返回值。
- thenAccept 方法:消费处理结果。接收任务的处理结果,并消费处理,无返回结果。
- thenRun 方法:只要上面的任务执行完成,就开始执行 thenRun,只是处理完任务后,执行 thenRun 的后续操作
- 带有 Async 默认是异步执行的。同之前。
- 以上都要前置任务成功完成。
- Function
- T:上一个任务返回结果的类型
- U:当前任务的返回值类型
//线程串行话 System.out.println("main---start"); //方法执行后的处理 CompletableFuture<Integer> future = CompletableFuture.supplyAsync(() -> { int i = 10 / 4; System.out.println("当前线程"+Thread.currentThread().getId()); System.out.println("执行的结果" + i); return i; }, executorService).thenApplyAsync((res) -> { System.out.println("当前线程"+Thread.currentThread().getId()); System.out.println("上一次返回的结果" + res); return res; }, executorService); Integer integer = future.get(); System.out.println("返回的结果"+integer);- 1
- 2
- 3
- 4
- 5
- 6
- 7
- 8
- 9
- 10
- 11
- 12
- 13
- 14
- 15
3.5 两任务组合 - 都要完成


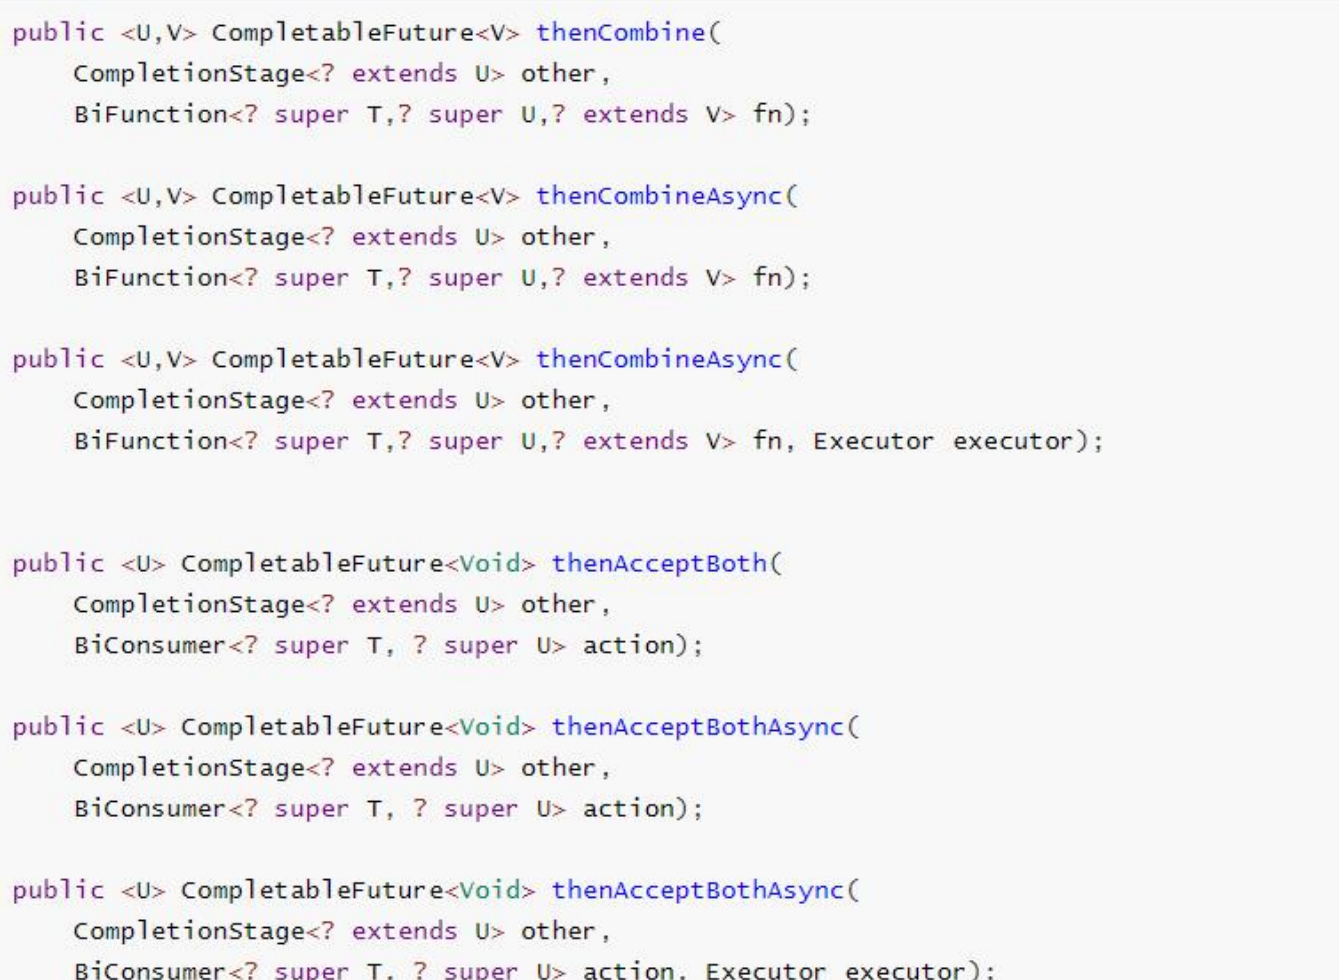
两个任务必须都完成,触发该任务。- thenCombine:组合两个 future,获取两个 future 的返回结果,并返回当前任务的返回值
- thenAcceptBoth:组合两个 future,获取两个 future 任务的返回结果,然后处理任务,没有 返回值。
- runAfterBoth:组合两个 future,不需要获取 future 的结果,只需两个 future 处理完任务后, 处理该任务。
/** * 两个都要完成 */ CompletableFuture<Integer> future = CompletableFuture.supplyAsync(() -> { System.out.println("线程一" + Thread.currentThread().getId()); int i = 10 / 2; System.out.println("线程一结束"); return i; }, executorService); CompletableFuture<Integer> future1 = CompletableFuture.supplyAsync(() -> { System.out.println("任务二开始"); return 10; }, executorService); future.runAfterBothAsync(future1,()->{ System.out.println("执行完毕"); },executorService); System.out.println("main--end"); future.thenAcceptBothAsync(future1,(e1,e2)->{ System.out.println("线程一的结果:"+e1); System.out.println("线程二的结果:"+e2); },executorService); CompletableFuture<Integer> future2 = future.thenCombineAsync(future1, (e1, e2) -> { System.out.println("线程一的结果:" + e1); System.out.println("线程二的结果:" + e2); return e1 + e2; }, executorService); System.out.println("两个线程执行后的结果为"+future2.get());- 1
- 2
- 3
- 4
- 5
- 6
- 7
- 8
- 9
- 10
- 11
- 12
- 13
- 14
- 15
- 16
- 17
- 18
- 19
- 20
- 21
- 22
- 23
- 24
- 25
- 26
- 27
- 28
- 29
3.6 两任务组合 - 一个完成


当两个任务中,任意一个 future 任务完成的时候,执行任务。- applyToEither:两个任务有一个执行完成,获取它的返回值,处理任务并有新的返回值。
- acceptEither:两个任务有一个执行完成,获取它的返回值,处理任务,没有新的返回值。
- runAfterEither:两个任务有一个执行完成,不需要获取 future 的结果,处理任务,也没有返 回值。
/** * 两个任务只要有一个完成 */ CompletableFuture<Integer> future = CompletableFuture.supplyAsync(() -> { System.out.println("线程一" + Thread.currentThread().getId()); int i = 10 / 2; System.out.println("线程一结束"); return i; }, executorService); CompletableFuture<Integer> future1 = CompletableFuture.supplyAsync(() -> { System.out.println("任务二开始"); try { Thread.sleep(10); } catch (InterruptedException e) { e.printStackTrace(); } return 10; }, executorService); future.runAfterEitherAsync(future1,()->{ System.out.println("ok"); },executorService); future.acceptEitherAsync(future1,res->{ System.out.println("返回的结果"+res); },executorService); CompletableFuture<Object> future2 = future.applyToEitherAsync(future1, res -> { System.out.println("返回结果一:" + res); return res; }, executorService); System.out.println("最终结果"+future2.get());- 1
- 2
- 3
- 4
- 5
- 6
- 7
- 8
- 9
- 10
- 11
- 12
- 13
- 14
- 15
- 16
- 17
- 18
- 19
- 20
- 21
- 22
- 23
- 24
- 25
- 26
- 27
- 28
- 29
- 30
- 31
3.7 多任务组合

allOf:等待所有任务完成
anyOf:只要有一个任务完成CompletableFuture<String> future1 = CompletableFuture.supplyAsync(() -> { System.out.println("111"); return "11"; }, executorService); CompletableFuture<String> future2 = CompletableFuture.supplyAsync(() -> { System.out.println("222"); return "22"; }, executorService); CompletableFuture<String> future3 = CompletableFuture.supplyAsync(() -> { System.out.println("333"); try { Thread.sleep(2000); } catch (InterruptedException e) { e.printStackTrace(); } return "3"; }, executorService); CompletableFuture<Void> all = CompletableFuture.allOf(future1, future2, future3); all.get(); System.out.println("main---end");- 1
- 2
- 3
- 4
- 5
- 6
- 7
- 8
- 9
- 10
- 11
- 12
- 13
- 14
- 15
- 16
- 17
- 18
- 19
- 20
-
相关阅读:
BufferedReader和BufferedWriter的实现原理
机器人控制算法简要概述
31.JavaScript数组进阶,一网打尽数组操作函数slice、filter、map、reduce、some、every、find、splice
敏捷开发、V模型开发、瀑布模型
【Mysql专题】视图介绍及其基本操作
虚拟环境搭建、后台项目创建及目录调整、封装logger、封装全局异常、封装Response、后台数据库创建
解决创建maven工程时,产生“找不到插件的错误”
拍摄的vlog视频画质模糊怎么办?视频画质高清修复
C现代方法(第14章)笔记——预处理器
SpringBoot+Vue项目学生选课系统
- 原文地址:https://blog.csdn.net/m0_45432976/article/details/127477837
