-
Kubernetes Namespace
Kubernetes Namespace
Why we need Kubernetes namespace
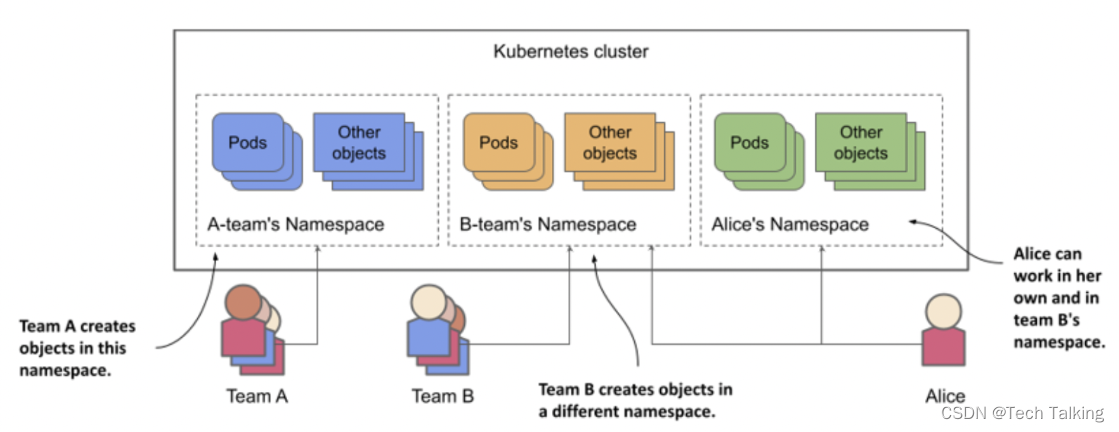
Imagine that your organization is running a single Kubernetes cluster that’s used by multiple engineering teams. Each of these teams deploys the entire application suite to develop and test it. You want each team to only deal with their own instance of the application suite - each team only wants to see the objects they’ve created and not those created by the other teams. This is achieved by creating objects in separate Kubernetes namespaces.
What is kubernetes namespace
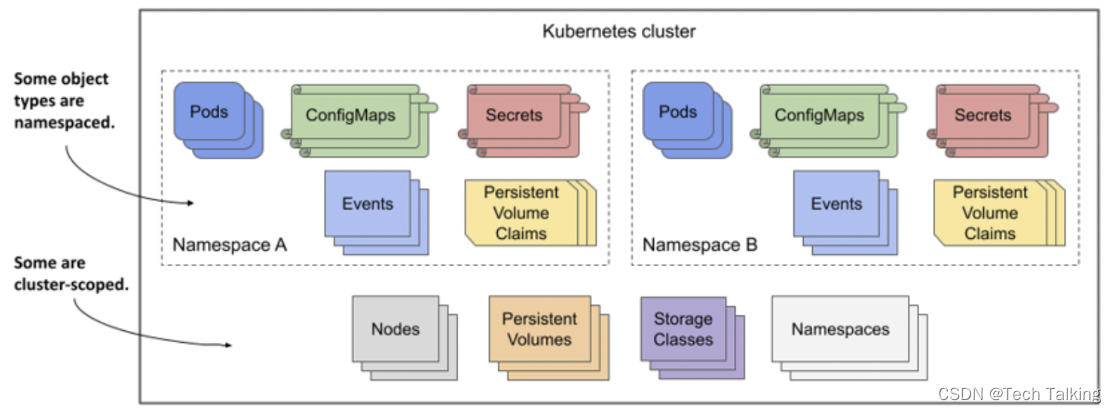
In Kubernetes, namespaces provides a mechanism for isolating groups of resources within a single cluster. Names of resources need to be unique within a namespace, but not across namespaces. Namespace-based scoping is applicable only for namespaced objects (e.g. Deployments, Services, etc) and not for cluster-wide objects (e.g. StorageClass, Nodes, PersistentVolumes, etc).
When to use namespace
Using multiple namespaces allows you to divide complex systems with numerous components into smaller groups that are managed by different teams. They can also be used to separate objects in a multitenant environment (for example, you can create a separate namespace for each client and deploy the entire application suite for that client in that namespace). As explained earlier, you can also have each team (or team member) deploy in its own namespace.
Without namespaces, each user of the cluster would have to prefix their object names with a unique prefix or each user would have to use their own Kubernetes cluster.
NOTE
Most Kubernetes API object types are namespaced, but a few are not. Pods, ConfigMaps, Secrets, PersistentVolumeClaims, and Events are all namespaced. Nodes, PersistentVolumes, StorageClasses, and Namespaces themselves are not. To see if a resource is namespaced or cluster-scoped, check the NAMESPACED column when running kubectl api-resources
Initial namespaces
Kubernetes starts with four initial namespaces:
default
Kubernetes includes this namespace so that you can start using your new cluster without first creating a namespace.
kube-node-lease
This namespace holds Lease objects associated with each node. Node leases allow the kubelet to send heartbeats so that the control plane can detect node failure.
kube-public
This namespace is readable by all clients (including those not authenticated). This namespace is mostly reserved for cluster usage, in case that some resources should be visible and readable publicly throughout the whole cluster. The public aspect of this namespace is only a convention, not a requirement.
kube-system
The namespace for objects created by the Kubernetes system.
How to work with namespace
Viewing namespaces
You can list the current namespaces in a cluster using:
NAME STATUS AGE default Active 1d kube-node-lease Active 1d kube-public Active 1d kube-system Active 1d- 1
- 2
- 3
- 4
- 5
Creating a Namespace in Kubernetes
Before creating a namespace, it’s important to keep in mind the naming conventions for creating a namespace:
- The name can include alphanumeric characters.
- The name can also include hyphens; however, you can’t use them initially.
- The name cannot include special characters.
- Resource names must be unique within a namespace but not between different namespaces.
- Namespaces cannot be nested, and each Kubernetes resource can only be in one namespace.
There are two ways to create our namespace: using a template in YAML format or without. To create a namespace, you need to create a .yaml file like the one below:
root@AlexRampUpVM-01:~# cat file.yaml apiVersion: v1 kind: Namespace metadata: name: test root@AlexRampUpVM-01:~# kubectl apply -f file.yaml namespace/test created- 1
- 2
- 3
- 4
- 5
- 6
- 7
- 8
Or, you can also run the
kubectl create namespacecommand to create a namespace:root@AlexRampUpVM-01:~# kubectl create namespace test namespace/test created root@AlexRampUpVM-01:~# kubectl get namespaces test NAME STATUS AGE test Active 10s- 1
- 2
- 3
- 4
- 5
- 6
Deleting a Namespace in Kubernetes
Same as creating a namespace in kubernetes, there are two ways to delete our namespace. You can leverage the .yaml file like the one below:
root@AlexRampUpVM-01:~# cat file.yaml apiVersion: v1 kind: Namespace metadata: name: test root@AlexRampUpVM-01:~# kubectl delete -f file.yaml namespace "test" deleted- 1
- 2
- 3
- 4
- 5
- 6
- 7
- 8
Or, you can also run the
kubectl delete namespacecommand to delete a namespace:root@AlexRampUpVM-01:~# kubectl delete namespaces test namespace "test" deleted- 1
- 2
Create objects into a specific namespace
To set the namespace for a current request, use the
--namespaceflag.For example:
root@AlexRampUpVM-01:~# kubectl create namespace test namespace/test created root@AlexRampUpVM-01:~# kubectl run testpod --image=nginx -n test pod/testpod created root@AlexRampUpVM-01:~# kubectl get pod -n test NAME READY STATUS RESTARTS AGE testpod 1/1 Running 0 12s root@AlexRampUpVM-01:~# kubectl expose pod/testpod -n test --type=ClusterIP --port 80 service/testpod exposed root@AlexRampUpVM-01:~# kubectl get all -n test NAME READY STATUS RESTARTS AGE pod/testpod 1/1 Running 0 4m53s NAME TYPE CLUSTER-IP EXTERNAL-IP PORT(S) AGE service/testpod ClusterIP 10.0.168.4280/TCP 12s - 1
- 2
- 3
- 4
- 5
- 6
- 7
- 8
- 9
- 10
- 11
- 12
- 13
- 14
- 15
- 16
- 17
- 18
- 19
Limitation of Resources or Objects
When using a shared environment, there’s always a concern with resource issues. Within it, Kubernetes can solve this using “resource quota,” which provides a resource limitation per namespace. This limitation can range from hardware to the number of objects created by type within the namespace.
When Kubernetes checks if it’s possible to create a “pod, service, replication controller” inside the namespace, it checks if there are any resource limitations. If it exists, Kubernetes already notifies the user that creating the desired component is impossible. An example resource policy that you can create is as follows:
- Namespace test has 20 GB of memory and 20 cores
- Namespace production has 40 GB of memory and 20 cores
However, if your environment has 50 GB of memory, Kubernetes will allocate CPU memory to the component that makes the request first, thus having no way to prioritize a given namespace. In addition to making CPU and memory limitations, it’s also possible to perform disk and object limitations.
You can see an example of creating a “resource quota” below.
root@AlexRampUpVM-01:~# cat resourcequota.yaml apiVersion: v1 kind: ResourceQuota metadata: name: limited-resources namespace: test spec: hard: pods: "10" limits.cpu: "10" limits.memory: 20Gi root@AlexRampUpVM-01:~# kubectl apply -f resourcequota.yaml resourcequota/limited-resources created root@AlexRampUpVM-01:~# kubectl get resourcequotas -n test NAME AGE REQUEST LIMIT limited-resources 15s pods: 0/10 limits.cpu: 0/10, limits.memory: 0/20Gi- 1
- 2
- 3
- 4
- 5
- 6
- 7
- 8
- 9
- 10
- 11
- 12
- 13
- 14
- 15
- 16
- 17
- 18
Conclusion
Namespaces in Kubernetes are an excellent way to manage your clusters. This is especially true when you have different teams working on a project.
In addition, the ResourceQuota object combined with namespaces allows you to further optimize the resource usage of your Kubernetes objects, thus increasing performance.
-
相关阅读:
【CVPR 2022】半监督目标检测:Dense Learning based Semi-Supervised Object Detection
大模型系列:提示词管理
CPU性能优化干货总结
238. 银河英雄传说,带权值的并查集
基于安卓android微信小程序的校园维修平台
HTML进阶(5)- 其他元素
洛谷 P1909 [NOIP2016 普及组] 买铅笔
【系统架构设计】架构核心知识: 3.7 大型网站系统架构演化
Linux-sed
【分享】“有赞商城“ 在集简云平台集成应用的常见问题与解决方案
- 原文地址:https://blog.csdn.net/mukouping82/article/details/133902968
