-
FastApi项目搭建
环境
- Python版本:Python3.8.9
- 框架:FastApi
pip install fastapi- 1
- ORM工具:tortoise-orm
pip install tortoise-orm pip install aiomysql- 1
- 2
- 数据库:MySQL
- 迁移工具:aerich
pip install aerich- 1
- 部署工具:uvicorn
pip install uvicorn- 1
- 数据校验:Pydantic, FastApi附带安装。
- 异步任务:celery
项目构建
创建项目所需文件
创建文件夹
fastapi-app,然后创建项目所需文件,创建完成后项目目录格式如下。目前目录创建的都是空白文件,后面再写内容。. ├── main.py ├── middlewares │ ├── __init__.py │ └── auth_middleware.py ├── models │ ├── __init__.py │ └── user.py ├── tasks │ ├── __init__.py │ └── tasks.py └── views ├── __init__.py ├── user.py └── login.py- 1
- 2
- 3
- 4
- 5
- 6
- 7
- 8
- 9
- 10
- 11
- 12
- 13
- 14
- 15
简单启动项目
- 在
main.py文件中创建fastapi实例。from fastapi import FastAPI def create_app(): # 创建一个实例 app = FastAPI() return app- 1
- 2
- 3
- 4
- 5
- 6
- 更新
main.py,添加一个路由。from fastapi import FastAPI def create_app(): # 创建一个实例 app = FastAPI() @app.get('/') def index(): return "Hello World" return app app = create_app()- 1
- 2
- 3
- 4
- 5
- 6
- 7
- 8
- 9
- 10
- 启动项目:
uvicorn main:app --reload。(venv) ➜ uvicorn main:app --reload INFO: Will watch for changes in these directories: ['/Users/wxy/fastapi-app'] INFO: Uvicorn running on http://127.0.0.1:8000 (Press CTRL+C to quit) INFO: Started reloader process [1428] using StatReload INFO: Started server process [1430] INFO: Waiting for application startup. INFO: Application startup complete.- 1
- 2
- 3
- 4
- 5
- 6
- 7
- 访问
http://127.0.0.1:8000。

- 访问
http://127.0.0.1:8000/docs查看文档。

项目拓展
作为实例项目,下面会完成一个用户的创建、登录,虽然只有两个接口,但是其中包括了MySQL的配置和连接、orm工具和迁移工具的使用、中间件的使用等。后面写一个完整的项目其实也就是按照这两个接口修修改改,就不过多赘述了。
更新代码
- 更新
main.py,配置数据库参数,并且连接数据库。import uvicorn from fastapi import FastAPI from tortoise.contrib.fastapi import register_tortoise TORTOISE_ORM_CONFIG = { 'connections': { 'default': { 'engine': 'tortoise.backends.mysql', 'credentials': { 'host': 'localhost', 'port': '3306', 'user': 'root', 'password': '12345678', 'database': 'fastapp', } }, }, 'apps': { 'models': { # 数据表对应文件, `aerich.models`是迁移工具生成的数据表 'models': ['aerich.models', 'models'], 'default_connection': 'default', } } } def create_app(): # 创建一个实例 app = FastAPI() # 连接数据库 register_tortoise( app, add_exception_handlers=True, config=TORTOISE_ORM_CONFIG, # 生成模式, 自动创建数据表, generate_schemas=False, ) @app.get('/') def index(): return "Hello World" return app app = create_app()- 1
- 2
- 3
- 4
- 5
- 6
- 7
- 8
- 9
- 10
- 11
- 12
- 13
- 14
- 15
- 16
- 17
- 18
- 19
- 20
- 21
- 22
- 23
- 24
- 25
- 26
- 27
- 28
- 29
- 30
- 31
- 32
- 33
- 34
- 35
- 36
- 37
- 38
- 39
- 40
- 41
- 42
- 43
- 44
- 45
- 46
- 47
- 48
- 打开
models/user.py新增User的model数据。from tortoise import fields, Model class User(Model): """ 创建user表 """ # pk=True, 设置为主键 id = fields.IntField(pk=True) name = fields.CharField(max_length=64, description="用户名") password = fields.CharField(max_length=128, description="登录密码") create_at = fields.DatetimeField(auto_now_add=True, description="创建时间") modify_at = fields.DatetimeField(auto_now=True, description="更新时间")- 1
- 2
- 3
- 4
- 5
- 6
- 7
- 8
- 9
- 10
- 11
- 12
- 把新创建的User表导入到
models/__init__.py中。from models.user import User- 1
- 打开
viewls/user.py新增创建用户接口的路由。from fastapi import APIRouter # 创建一个路由 router = APIRouter( # 请求路径 prefix="/user", # 标签, 文档上显示 tags=["登录"], )- 1
- 2
- 3
- 4
- 5
- 6
- 7
- 8
- 9
- 更新
viewls/user.py文件,添加请求数据的校验和响应数据格式化。from fastapi import Body from pydantic.main import BaseModel from typing import Optional class UserRequest(BaseModel): """ 创建用户接口数据校验 """ # default=..., 是指name字段为必填项, 不写default参数也是默认为必填, 这里加上只是为了更清晰 name: str = Body(default=..., description="用户名") password: str = Body(description="登录密码") # Optional[str]可选项, default=None可以不填或者是填写None email: Optional[str] = Body(default=None, description="邮箱") class UserResponse(BaseModel): """ 创建用户返回数据格式化 """ name: Optional[str] password: Optional[str] email: Optional[str] class Config: # 设置orm_mode=True, 可以在view层直接返回model实例, 并且关联的外键数据也可以直接查出来 orm_mode = True- 1
- 2
- 3
- 4
- 5
- 6
- 7
- 8
- 9
- 10
- 11
- 12
- 13
- 14
- 15
- 16
- 17
- 18
- 19
- 20
- 21
- 22
- 23
- 更新
viewls/user.py文件,定义创建用户的接口。# response_model=UserResponse, 指定响应数据的格式 # response_model_exclude_none=True, 如果返回的字段=None, 不显示该字段 @router.post('/', response_model=UserResponse, response_model_exclude_none=True) async def create_user(data: UserRequest): user = await User.create( name=data.name, passsword=data.password, email=data.email, ) return user- 1
- 2
- 3
- 4
- 5
- 6
- 7
- 8
- 9
- 10
- 11
- 更新
main.py文件,把上面定义的创建路由添加到项目中,在create_app方法最后添加一行app.include_router(user.router)。import uvicorn from fastapi import FastAPI from tortoise.contrib.fastapi import register_tortoise from views import user TORTOISE_ORM_CONFIG = { 'connections': { 'default': { 'engine': 'tortoise.backends.mysql', 'credentials': { 'host': 'localhost', 'port': '3306', 'user': 'root', 'password': '12345678', 'database': 'fastapp', } }, }, 'apps': { 'models': { # 数据表对应文件, `aerich.models`是迁移工具生成的数据表 'models': ['aerich.models', 'models'], 'default_connection': 'default', } } } def create_app(): # 创建一个实例 app = FastAPI() # 连接数据库 register_tortoise( app, add_exception_handlers=True, config=TORTOISE_ORM_CONFIG, # 生成模式, 自动创建数据表, generate_schemas=False, ) @app.get('/') def index(): return "Hello World" # 添加路由 app.include_router(user.router) return app app = create_app()- 1
- 2
- 3
- 4
- 5
- 6
- 7
- 8
- 9
- 10
- 11
- 12
- 13
- 14
- 15
- 16
- 17
- 18
- 19
- 20
- 21
- 22
- 23
- 24
- 25
- 26
- 27
- 28
- 29
- 30
- 31
- 32
- 33
- 34
- 35
- 36
- 37
- 38
- 39
- 40
- 41
- 42
- 43
- 44
- 45
- 46
- 47
- 48
- 49
- 50
到了这里创建用户的接口就算是完成了,但是现在还无法真正的运行起来,如果现在直接运行会提示
tortoise.exceptions.ConfigurationError: default_connection for the modelcannot be None - 1
这是因为我们创建的User用户表其实还没有在数据库里面创建,需要使用迁移工具更新数据库以后才可以使用。
aerich迁移工具的使用
- 初始化配置文件和迁移位置:
aerich init -t main.TORTOISE_ORM_CONFIG- 1
- 初始化后在
main.py同级目录下会生成一个空的migrations文件夹,和pyproject.toml文件,pyproject.toml内容如下:[tool.aerich] tortoise_orm = "main.TORTOISE_ORM_CONFIG" location = "./migrations" src_folder = "./."- 1
- 2
- 3
- 4
- 初始化数据库。
aerich init-db- 1
- 初始化后会在
migrations文件夹下生成一个models文件夹, 同时生成一份0_{datetime}_init.sql数据库迁移文件, 并且在数据库中添加一个名为aerich的迁移表。-- upgrade -- CREATE TABLE IF NOT EXISTS `aerich` ( `id` INT NOT NULL PRIMARY KEY AUTO_INCREMENT, `version` VARCHAR(255) NOT NULL, `app` VARCHAR(100) NOT NULL, `content` JSON NOT NULL ) CHARACTER SET utf8mb4;- 1
- 2
- 3
- 4
- 5
- 6
- 7
- 更新数据库迁移文件。如果models有更新,会在
migrations/models文件夹中新生成一份1_{datetime}_update.sql的数据库迁移文件。aerich migrate- 1
- 把迁移文件更新到数据库。
aerich upgrade- 1
- (可选) 降级数据库1: 查看历史版本。
aerich history- 1
- (可选) 降级数据库2: 降级到指定版本。
aerich downgrade -v [版本]- 1
- (可选) 降级数据库3: 查看被降级的版本。
aerich heads- 1
- (可选) 迁移文件整合、损坏修复
通过文档创建用户
-
启动项目:
uvicorn main:app --reload。 -
访问文档地址:
http://127.0.0.1:8000/docs。 -
依次点击

-
修改请求值(因为
email字段非必填,所以这里没有填写email参数),然后点击执行按钮。
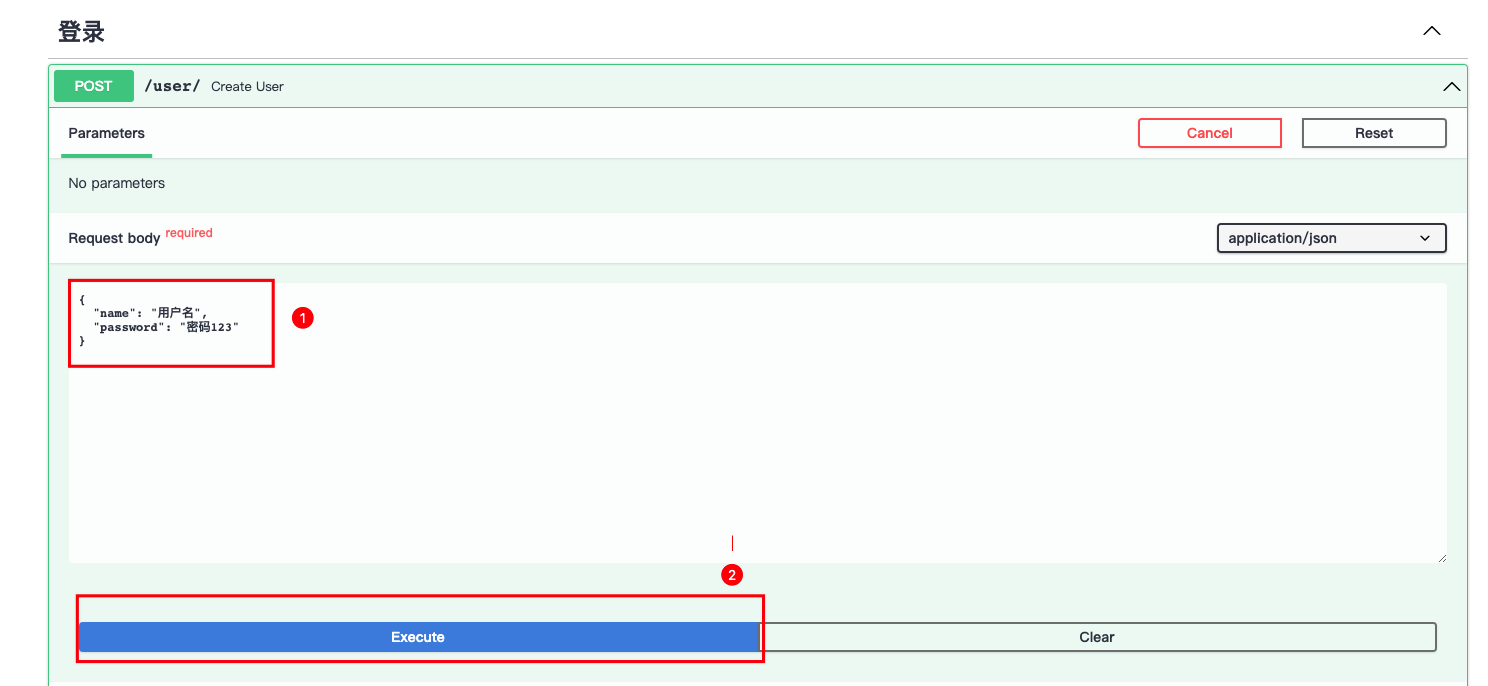
-
然后在下面可以看到响应数据,说明用户已经创建完成。

用户创建的接口完成,下面开始写用户的登录接口
用户登录
- 打开文件
views/login.py,新增一个登录接口。from fastapi import APIRouter, HTTPException, Depends, Body from pydantic import BaseModel from starlette import status from models.user import User router = APIRouter( # 请求路径 prefix="/1/login", # 标签, 文档上显示 tags=["登录"], ) class RequestUserLogin(BaseModel): """ 用户登录请求数据校验 """ phone: str = Body(..., max_length=11, description="登录手机号") password: str = Body(..., description="登录密码") class ResponseUserLogin(BaseModel): """ 用户登录响应数据 """ name: str = None access_token: str = None @router.post("/", response_model=ResponseUserLogin, response_model_exclude_unset=True) async def login(data: RequestUserLogin): """ 登录 :param data: :return: """ user = User.filter(phone=data.phone, password=data.password) if not user: raise HTTPException(status_code=status.HTTP_400_BAD_REQUEST, detail="用户名或密码错误.") # 生成一个token返回给前端, 做登录校验使用 access_token = "0123456789" return {"access_token": access_token, "name": user.name}- 1
- 2
- 3
- 4
- 5
- 6
- 7
- 8
- 9
- 10
- 11
- 12
- 13
- 14
- 15
- 16
- 17
- 18
- 19
- 20
- 21
- 22
- 23
- 24
- 25
- 26
- 27
- 28
- 29
- 30
- 31
- 32
- 33
- 34
- 35
- 36
- 37
- 38
- 39
- 40
- 41
- 42
- 43
- 写个脚本使用
requests调用一下登录接口,测试接口的可用性(可选)。import requests url = "http://127.0.0.1:8000/1/login/" payload = { "name": "用户名", "password": "密码123" } headers = { 'Authorization': '0123456789', 'Content-Type': 'application/json' } response = requests.request("POST", url, headers=headers, json=payload) print(response.json())- 1
- 2
- 3
- 4
- 5
- 6
- 7
- 8
- 9
- 10
- 11
- 12
- 13
- 14
- 15
{ "name": "用户名", "access_token": "0123456789" }- 1
- 2
- 3
- 4
- 原文链接:时光博客
-
相关阅读:
【操作系统】进程间的通信——信号
计算机的存储器(1)
使用矢量坐标对自然语言建模
NPDP产品经理知识(市场调研-文化,团队,领导力)
收藏吃灰,1024推荐2款Python趣味的第三方模块吧
HTTP协议 和 HTTPS协议
【kali】一款黑客们都在使用的操作系统
php语言
质量小议13 -- 侥幸
我的设计模式之旅 ⑦ 观察者模式
- 原文地址:https://blog.csdn.net/weixin_44649870/article/details/125416428
