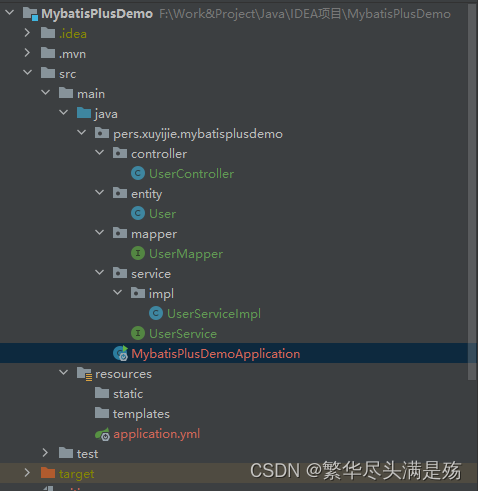
-
Springboot 使用 Mybatis Plus LambdaQueryWrapper 构造器和注解自定义SQL
前言
MyBatis-Plus 是一个 MyBatis (opens new window)的增强工具,在 MyBatis 的基础上只做增强不做改变,MyBatis 可以无损升级为MyBatis-Plus,只需要更换一下pom依赖即可。
1、强大的条件构造器:单表查询不需要写SQL语句
2、支持 Lambda 形式调用:通过 Lambda 表达式,方便的编写各类查询条件,无需再担心字段写错
3、支持主键自动生成:支持多达 4 种主键策略(内含分布式唯一 ID 生成器 - Sequence),可自由配置,完美解决主键问题
4、内置分页插件:基于 MyBatis 物理分页,开发者无需关心具体操作,配置好插件之后,写分页等同于普通 List 查询
5、支持多种数据库:支持 MySQL、MariaDB、Oracle、DB2、H2、HSQL、SQLite、Postgre、SQLServer 、达梦等多种数据库下面我将演示如何引入、配置、使用

一、配置和使用
1、引入依赖
<dependency>
   <groupId>com.baomidougroupId>
   <artifactId>mybatis-plus-boot-starterartifactId>
   <version>3.5.3.1version>
dependency>
2、配置yml
连接池我们选用了springboot内置的 hikari ,这个是当今速度最快的连接池,druid 相较于 hikari 增加了许多监控、拦截器等功能,我们中小型项目用不着那么多功能,还是主要追求速度
下面有一行配置是打印出SQL语句,意思是把MybatisPlus构造器构造的所有CURD的SQL语句都打印到控制台,方便我们调试
server:
  port: 8081
spring:
  datasource:
    driver-class-name: com.mysql.cj.jdbc.Driver
    url: jdbc:mysql://localhost:3306/xuyijie?useSSL=false&useUnicode=true&characterEncoding=UTF-8&serverTimezone=Asia/Shanghai&rewriteBatchedStatements=true
    username: root
    password: 123456
mybatis-plus:
  mapper-locations: classpath:mapper/*.xml
  # 打印出SQL语句
  configuration:
    log-impl: org.apache.ibatis.logging.stdout.StdOutImpl
3、创建实体类
使用 @TableName 指定表名,下面字段上面的注解的解释我在代码注释中有介绍,注意,主键策略设置后,插入数据不需要手动设置主键的值,数据进入数据库后会自动生成
package pers.xuyijie.mybatisplusdemo.entity;

import com.baomidou.mybatisplus.annotation.IdType;
import com.baomidou.mybatisplus.annotation.TableField;
import com.baomidou.mybatisplus.annotation.TableId;
import com.baomidou.mybatisplus.annotation.TableName;
import lombok.Data;

/**
 * @author 徐一杰
 * @date 2022/9/25 21:01
 * @description
 */
@Data
@TableName("user")
public class User {
    /**
     * 此注解代表这是表的主键,主键策略是自增
     * 除了自增策略,还有ASSIGN_ID(雪花)、ASSIGN_UUID(通用唯一标识)
     * 主键策略设置后,插入数据不需要手动设置主键的值,数据进入数据库后会自动生成
     */
    @TableId(type = IdType.AUTO)
    private String id;
    private String name;
    private Integer age;
    /**
     * 用次注解标注的字段不会映射到数据库表,也就是说不会存储和查询该字段
     */
    @TableField(exist = false)
    private String description;
}
4、创建mapper
创建一个 interface 继承 BaseMapper(不要忘记 @Mapper 注解),会得到很多内置方法,如果需要自定义SQL,下面会讲解
package pers.xuyijie.mybatisplusdemo.mapper;

import com.baomidou.mybatisplus.core.mapper.BaseMapper;
import org.apache.ibatis.annotations.Mapper;
import org.apache.ibatis.annotations.Param;
import org.apache.ibatis.annotations.Select;
import pers.xuyijie.mybatisplusdemo.entity.User;

import java.util.List;

/**
 * @author 徐一杰
 * @date 2022/9/25 21:06
 * @description
 */
@Mapper
public interface UserMapper extends BaseMapper<User> {

}
5、创建service
这里的 service 和 serviceImpl 也继承了 IService,这个是非必须的,只是 IService 提供了一些 BaseMapper 没有的增强方法,我等一下会演示
package pers.xuyijie.mybatisplusdemo.service;

import com.baomidou.mybatisplus.extension.service.IService;
import pers.xuyijie.mybatisplusdemo.entity.User;

/**
 * @author 徐一杰
 * @date 2022/9/25 21:12
 * @description
 */
public interface UserService extends IService<User> {
}
package pers.xuyijie.mybatisplusdemo.service.impl; import com.baomidou.mybatisplus.extension.service.impl.ServiceImpl; import org.springframework.stereotype.Service; import pers.xuyijie.mybatisplusdemo.entity.User; import pers.xuyijie.mybatisplusdemo.mapper.UserMapper; import pers.xuyijie.mybatisplusdemo.service.UserService; /** * @author 徐一杰 * @date 2022/9/25 21:13 * @description */ @Service public class UserServiceImpl extends ServiceImpl<UserMapper, User> implements UserService { }
6、创建controller
我在 controller 里面写了一些 BaseMapper 和 IService 的内置方法,大家请看下面的 /saveList,
userService.saveBatch就是一个增强的方法,可以存储多条数据,BaseMapper 则没有存储多条的内置方法主键策略设置后,插入数据不需要手动设置主键的值,数据进入数据库后会自动生成,所以下面的 user 不需要
setIdpackage pers.xuyijie.mybatisplusdemo.controller; import com.baomidou.mybatisplus.core.conditions.query.LambdaQueryWrapper; import org.springframework.beans.factory.annotation.Autowired; import org.springframework.web.bind.annotation.PathVariable; import org.springframework.web.bind.annotation.RequestMapping; import org.springframework.web.bind.annotation.RestController; import pers.xuyijie.mybatisplusdemo.entity.User; import pers.xuyijie.mybatisplusdemo.mapper.UserMapper; import pers.xuyijie.mybatisplusdemo.service.UserService; import java.util.ArrayList; import java.util.List; /** * @author 徐一杰 * @date 2022/9/25 21:07 * @description */ @RestController @RequestMapping("/user") public class UserController { @Autowired private UserMapper userMapper; @Autowired private UserService userService; /** * 查询全部数据 * @return */ @RequestMapping("/findAll") public List<User> findAll(){ return userMapper.selectList(null); } /** * 根据id查询 * @param id * @return */ @RequestMapping("/findById/{id}") public User findById(@PathVariable String id){ return userMapper.selectById(id); } /** * 保存一条数据 * @return */ @RequestMapping("/saveOne") public String saveOne(){ User user = new User(); user.setName("xuyijie"); user.setAge(22); userMapper.insert(user); return "添加一条成功"; } /** * 保存多条数据 * @return */ @RequestMapping("/saveList") public String saveList(){ List<User> userList = new ArrayList<>(); User user1 = new User(); user1.setName("xuyijie1"); user1.setAge(23); userList.add(user1); User user2 = new User(); user2.setName("xuyijie2"); user2.setAge(24); userList.add(user2); userService.saveBatch(userList); return "批量添加成功"; } }
二、LambdaQueryWrapper 构造器
上面的内置方法太过简单,无法满足我们的业务需求,所以我们要使用条件构造器来构造查询SQL
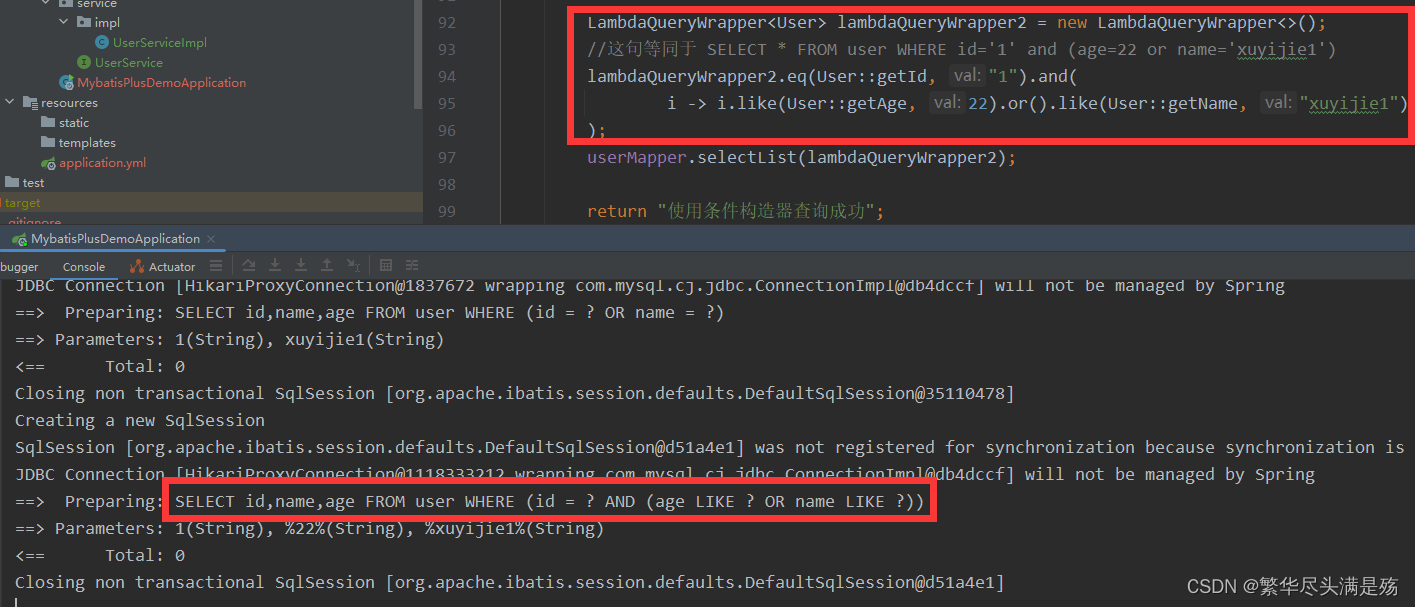
如下代码,看注释,下面就是构造器的全部使用方法了,你们照着模仿就行了,很简单的@RequestMapping("/findByConditions") public String findByConditions(){ LambdaQueryWrapper<User> lambdaQueryWrapper = new LambdaQueryWrapper<>(); //这句等同于 SELECT * FROM user WHERE id='1' and name='xuyijie1' lambdaQueryWrapper.eq(User::getId, "1").eq(User::getName, "xuyijie1"); userMapper.selectList(lambdaQueryWrapper); LambdaQueryWrapper<User> lambdaQueryWrapper1 = new LambdaQueryWrapper<>(); //这句等同于 SELECT * FROM user WHERE id='1' or name='xuyijie1' lambdaQueryWrapper1.eq(User::getId, "1").or().eq(User::getName, "xuyijie1"); userMapper.selectList(lambdaQueryWrapper1); LambdaQueryWrapper<User> lambdaQueryWrapper2 = new LambdaQueryWrapper<>(); //这句等同于 SELECT * FROM user WHERE id='1' and (age like %22% or name like '%xuyijie1%') lambdaQueryWrapper2.eq(User::getId, "1").and( i -> i.like(User::getAge, 22).or().like(User::getName, "xuyijie1") ); userMapper.selectList(lambdaQueryWrapper2); return "使用条件构造器查询成功"; }调用一下,控制台打印出来 构造器构造的SQL


构造器还有
.orderByAsc()、.exists()、.groupBy()等条件,和SQL里面一样,大家可以自己试一下
三、注解方式自定义SQL
Mybatis-Plus 的构造器只支持单表查询,如果遇到了复杂的多表查询,就需要自己写SQL了,下面我演示注解方式,如果想在xml里写SQL和Mybatis一样,这里就不演示了
package pers.xuyijie.mybatisplusdemo.mapper;

import com.baomidou.mybatisplus.core.mapper.BaseMapper;
import org.apache.ibatis.annotations.Mapper;
import org.apache.ibatis.annotations.Param;
import org.apache.ibatis.annotations.Select;
import pers.xuyijie.mybatisplusdemo.entity.User;

import java.util.List;

/**
 * @author 徐一杰
 * @date 2022/9/25 21:06
 * @description
 */
@Mapper
public interface UserMapper extends BaseMapper<User> {

    /**
     * 注解方式自己写SQL语句
     * 如果想在xml里写SQL和Mybatis一样,这里就不演示了
     * @param name
     * @return
     */
    @Select("SELECT * FROM user WHERE name=#{name}")
    List<User> selectAll(@Param("name") String name);

	/**
     * 多表查询
     * @return
     */
    @Select("SELECT * FROM user LEFT JOIN classroom ON user.id=classroom.userId")
    List<User> selectMulti();

}
总结
MybatisPlus 简单的事务回滚请看我的另一篇MyBatisPlus 开启事务并交由 Springboot 管理
-
相关阅读:
基础架构之Redis
【深度学习实验】数据可视化
LeetCode-148. Sort List [C++][Java]
计算机毕设推荐基于微信小程序的自来水收费系统
竞赛 基于深度学习的行人重识别(person reid)
20220918
提升ChatGPT答案质量和准确性的方法Prompt engineering实用的prompt灵感和技巧
Java——正则表达式
D. Yet Another Problem
C++11 - 5 - function包装器
- 原文地址:https://blog.csdn.net/qq_48922459/article/details/127044399