-
微信公众号扫码登录(一)—— 获取微信公众号二维码
引言
这几天在研究微信登录,今天解决了获取微信二维码问题;在这里总结一下
关于微信登录想说的话
第一次接触微信登录,开始就弄混了登录方式;简单来说,微信扫码登录分为两种,一种是微信公众平台,一种是微信开放平台,两者的开发文档也不一样,开始就是一直用的微信公众号的参数却使用的是微信开放平台提供的接口,找了半天问题;
总结一下:
微信公众号(公众平台) 和 微信开放平台 是两码事。
- 微信公众平台是扫码通过微信公众号授权登录的,个人用户可以申请订阅号,但是没有一些接口调用权限,企业用户可以申请服务号,有许多接口权限;但是个人用户可以通过测试号获取一些权限进行学习测试;
- 微信开放平台是微信为了接入更多第三方应用而开放的接口,对于web应用,可以申请web应用,从而获取权限,但是只能是企业用户才能申请;(个人学习很不方便)
两者开发文档是不同的,所以看网上教程一定要看清楚是公众平台还是开放平台,不要跟错教程了;最好就是看官方文档,这样就能避免踩坑;(我开始就是看不下去文档,因为微信是php示例代码,所以一直看网上教程,就被各种各样的教程弄晕了;最后还是乖乖看文档去了)
下面就进入正题
准备环境
首先申请了一个公众号,然后从开发者工具中进入测试号:

然后就是这个界面:

appID和appsecret都是操作所需参数;
接口配置下面介绍;
接口配置
接口配置后面会用到,所以需要先配置一下,其实看官方文档就能看懂,但是示例代码是php,所以这里我来演示一下我的操作;
官方文档:传送门
官方文档意思就是你得有一个域名,代码还得跑在该域名下的服务器上,然后你自己需要再代码中实现一个接口获取微信发来的信息进行处理;
如果你和我一样是个学生,开发都在本地127.0.0.1,或者没有域名,那该怎么办?因为微信不能直接调用本地ip,这就需要用到内网穿透;
简单来说就是微信想要向你填入的url发送请求数据,但是它不能直接向本地127.0.0.1发送,我们可以通过内网穿透获取一个域名,让该域名映射到本地127.0.0.1,然后微信向该域名发送数据,这样就把数据发送到了本地;(个人理解)
内网穿透
我通过ngrok进行的内网穿透,就花2块钱实名了一下,然后有一个免费的隧道可以使用:

然后进行配置,它就会給你分一个域名:

接下来下载ngrok客户端,启动隧道:

点击.bat文件,按要求输入隧道id:

链接成功,这时时就意味着访问本地127.0.0.1和访问生成的域名的效果是一样的;
访问流程就是:
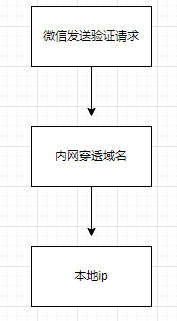
文档:

微信向自己填的url发送请求;
实现接入代码
然后就是代码配置,就是官网文档的第二步,官方检验是一个php代码,下面是java代码:
controller接口:
/**
 *  接入微信接口
 */
@GetMapping("/callback")
@ResponseBody
public String checkSign (HttpServletRequest request) throws Exception {
    log.info("===========>checkSign");
    // 获取微信请求参数
    String signature = request.getParameter ("signature");
    String timestamp = request.getParameter ("timestamp");
    String nonce = request.getParameter ("nonce");
    String echostr = request.getParameter ("echostr");
    log.info("开始校验此次消息是否来自微信服务器,param->signature:{},\ntimestamp:{},\nnonce:{},\nechostr:{}",
            signature, timestamp, nonce, echostr);
    if (CheckWXTokenUtils.checkSignature(signature, timestamp, nonce)) {
        return echostr;
    }
    return "";
}
校验工具类(直接cv)
import lombok.extern.log4j.Log4j2;

import java.security.MessageDigest;
import java.security.NoSuchAlgorithmException;
import java.util.Arrays;

/**
 * 和微信建立链接参数校验
 */
@Log4j2
public class CheckWXTokenUtils {
    private static final String TOKEN = "xxxxxx"; // 自定义的token

    /**
     * 校验微信服务器Token签名
     *
     * @param signature 微信加密签名
     * @param timestamp 时间戳
     * @param nonce     随机数
     * @return boolean
     */
    public static boolean checkSignature(String signature, String timestamp, String nonce) {
        String[] arr = {TOKEN, timestamp, nonce};
        Arrays.sort(arr);
        StringBuilder stringBuilder = new StringBuilder();
        for (String param : arr) {
            stringBuilder.append(param);
        }
        String hexString = SHA1(stringBuilder.toString());
        return signature.equals(hexString);
    }

    private static String SHA1(String str) {
        MessageDigest md;
        try {
            md = MessageDigest.getInstance("SHA-1");
            byte[] digest = md.digest(str.getBytes());
            return toHexString(digest);
        } catch (NoSuchAlgorithmException e) {
            log.info("校验令牌Token出现错误:{}", e.getMessage());
        }
        return "";
    }

    /**
     * 字节数组转化为十六进制
     *
     * @param digest 字节数组
     * @return String
     */
    private static String toHexString(byte[] digest) {
        StringBuilder hexString = new StringBuilder();
        for (byte b : digest) {
            String shaHex = Integer.toHexString(b & 0xff);
            if (shaHex.length() < 2) {
                hexString.append(0);
            }
            hexString.append(shaHex);
        }
        return hexString.toString();
    }
}
几个校验参数官方文档也说了,自己对比着看就行了;
再次放入官方文档地址:接入概述
配置就是:
url是内网穿透域名+自己实现的接口
token也是自己写的;


然后在网页服务中:

点击修改:(还是内网穿透域名)

然后就配置好了;
下面就是正式开始二维码生成了;
生成二维码
先放出文档:
获取ticket
我们先看第一个文档,大致意思就是先发送一个获取二维码ticket的post请求,获取ticket:

整理一下:
url: post
https://api.weixin.qq.com/cgi-bin/qrcode/create?access_token=TOKEN

参数:
param参数:access_token
json参数(两个必要的,其他可以自己看文档加): {"expire_seconds": 604800, "action_name": "QR_SCENE"}

结果:
{"ticket":"gQH47joAAAAAAAAAASxodHRwOi8vd2VpeGluLnFxLmNvbS9xL2taZ2Z3TVRtNzJXV1Brb3ZhYmJJAAIEZ23sUwMEmm
3sUw==","expire_seconds":60,"url":"http://weixin.qq.com/q/kZgfwMTm72WWPkovabbI"}
那么就很简单了,就是调用就接口获取ticket,但是可以发现所需要的参数中的access_token我们并没有,所以调用该接口前需要先获取,同样也有官方文档,上面已经放出来了;
获取access_token

同样整理一下:
url: get
https://api.weixin.qq.com/cgi-bin/token?grant_type=client_credential&appid=APPID&secret=APPSECRET

参数:
grant_type、appid、secret

结果:
{"access_token":"ACCESS_TOKEN","expires_in":7200}
其中grant_type就写client_credential就行了,固定的;
appid和secret就是测试号的:

所以很轻易就可以获取到access_token;
获取到access_token就可以获取ticket,到这里这两步就完成了;
接下来就是获取二维码了:

获取二维码

这就不过多介绍了,就加一个ticket参数即可;
测试流程
下面我使用postman测试一遍流程:
1,首先获取access_token:
https://api.weixin.qq.com/cgi-bin/token?grant_type=client_credential&appid=&secret=

2,然后获取ticket:
https://api.weixin.qq.com/cgi-bin/qrcode/create?access_token=ACCESS_TOKEN

3,最后获取二维码:
https://mp.weixin.qq.com/cgi-bin/showqrcode?ticket=TICKET
直接浏览器访问该链接,即可看到该二维码

整个流程就走通了;
下面就是代码实现该流程;
代码实现
这里思考一个问题,后端内部如何自己发送请求获取响应?
平时都是前端向后端发送请求,后端响应;
因为我们需要先发送请求获取access_token,再获取ticket,最后响应给前端的就是一个二维码url,所以后端需要自己发请求并获取响应结果;
这里可以使用httpclient,具体细节可以查资料,这里不过多介绍;
下面是实现代码:
httpclient依赖:
<dependency>
	<groupId>org.apache.httpcomponentsgroupId>
    <artifactId>httpclientartifactId>
    <version>4.5.13version>
dependency>
httpclient工具类(直接cv):
import org.apache.http.HttpEntity;
import org.apache.http.NameValuePair;
import org.apache.http.client.config.RequestConfig;
import org.apache.http.client.entity.UrlEncodedFormEntity;
import org.apache.http.client.methods.CloseableHttpResponse;
import org.apache.http.client.methods.HttpGet;
import org.apache.http.client.methods.HttpPost;
import org.apache.http.client.methods.HttpRequestBase;
import org.apache.http.client.utils.URIBuilder;
import org.apache.http.client.utils.URLEncodedUtils;
import org.apache.http.conn.ssl.SSLConnectionSocketFactory;
import org.apache.http.entity.StringEntity;
import org.apache.http.impl.client.CloseableHttpClient;
import org.apache.http.impl.client.HttpClientBuilder;
import org.apache.http.impl.client.HttpClients;
import org.apache.http.message.BasicNameValuePair;
import org.apache.http.ssl.SSLContexts;
import org.apache.http.util.EntityUtils;

import javax.net.ssl.SSLContext;
import java.io.File;
import java.io.FileInputStream;
import java.nio.charset.StandardCharsets;
import java.security.KeyStore;
import java.util.ArrayList;
import java.util.List;
import java.util.Map;

/**
 * HttpClient工具类
 */
public class HttpClientUtils {

    private static final CloseableHttpClient httpClient;

    // 采用静态代码块,初始化超时时间配置,再根据配置生成默认httpClient对象
    static {
        RequestConfig config = RequestConfig.custom().setConnectTimeout(30000).setSocketTimeout(15000).build();
        httpClient = HttpClientBuilder.create().setDefaultRequestConfig(config).build();
    }

    /**
     * 发送 HTTP GET请求,不带请求参数和请求头
     * @param url 请求地址
     * @return
     * @throws Exception
     */
    public static String doGet(String url) throws Exception {
        HttpGet httpGet = new HttpGet(url);
        return doHttp(httpGet);
    }

    /**
     * 发送 HTTP GET,请求带参数,不带请求头
     * @param url 请求地址
     * @param params 请求参数
     * @return
     * @throws Exception
     */
    public static String doGet(String url, Map<String, Object> params) throws Exception {
        // 转换请求参数
        List<NameValuePair> pairs = covertParamsToList(params);
        // 装载请求地址和参数
        URIBuilder ub = new URIBuilder();
        ub.setPath(url);
        ub.setParameters(pairs);
        HttpGet httpGet = new HttpGet(ub.build());
        return doHttp(httpGet);
    }

    /**
     * 发送 HTTP GET请求,带请求参数和请求头
     * @param url 请求地址
     * @param headers 请求头
     * @param params 请求参数
     * @return
     * @throws Exception
     */
    public static String doGet(String url, Map<String, Object> headers, Map<String, Object> params) throws Exception {
        // 转换请求参数
        List<NameValuePair> pairs = covertParamsToList(params);
        // 装载请求地址和参数
        URIBuilder ub = new URIBuilder();
        ub.setPath(url);
        ub.setParameters(pairs);

        HttpGet httpGet = new HttpGet(ub.build());
        // 设置请求头
        for (Map.Entry<String, Object> param : headers.entrySet()) {
            httpGet.addHeader(param.getKey(), String.valueOf(param.getValue()));
        }
        return doHttp(httpGet);
    }

    /**
     * 发送 HTTP POST请求,不带请求参数和请求头
     *
     * @param url 请求地址
     * @return
     * @throws Exception
     */
    public static String doPost(String url) throws Exception {
        HttpPost httpPost = new HttpPost(url);
        return doHttp(httpPost);
    }

    /**
     * 发送 HTTP POST请求,带请求参数,不带请求头
     *
     * @param url    请求地址
     * @param params 请求参数
     * @return
     * @throws Exception
     */
    public static String doPost(String url, Map<String, Object> params) throws Exception {
        // 转换请求参数
        List<NameValuePair> pairs = covertParamsToList(params);
        HttpPost httpPost = new HttpPost(url);
        // 设置请求参数
        httpPost.setEntity(new UrlEncodedFormEntity(pairs, StandardCharsets.UTF_8.name()));

        return doHttp(httpPost);
    }

    /**
     * 发送 HTTP POST请求,带请求参数和请求头
     *
     * @param url     地址
     * @param headers 请求头
     * @param params  参数
     * @return
     * @throws Exception
     */
    public static String doPost(String url, Map<String, Object> headers, Map<String, Object> params) throws Exception {
        // 转换请求参数
        List<NameValuePair> pairs = covertParamsToList(params);
        HttpPost httpPost = new HttpPost(url);
        // 设置请求参数
        httpPost.setEntity(new UrlEncodedFormEntity(pairs, StandardCharsets.UTF_8.name()));
        // 设置请求头
        for (Map.Entry<String, Object> param : headers.entrySet()) {
            httpPost.addHeader(param.getKey(), String.valueOf(param.getValue()));
        }
        return doHttp(httpPost);
    }

    /**
     * 发送 HTTP POST请求,请求参数是JSON格式,数据编码是UTF-8
     *
     * @param url 请求地址
     * @param param 请求参数
     * @return
     * @throws Exception
     */
    public static String doPostJson(String url, String param) throws Exception {
        HttpPost httpPost = new HttpPost(url);
        // 设置请求头
        httpPost.addHeader("Content-Type", "application/json; charset=UTF-8");
        // 设置请求参数
        httpPost.setEntity(new StringEntity(param, StandardCharsets.UTF_8.name()));
        return doHttp(httpPost);
    }

    /**
     * 发送 HTTP POST请求,请求参数是XML格式,数据编码是UTF-8
     *
     * @param url 请求地址
     * @param param 请求参数
     * @return
     * @throws Exception
     */
    public static String doPostXml(String url, String param) throws Exception {
        HttpPost httpPost = new HttpPost(url);
        // 设置请求头
        httpPost.addHeader("Content-Type", "application/xml; charset=UTF-8");
        // 设置请求参数
        httpPost.setEntity(new StringEntity(param, StandardCharsets.UTF_8.name()));

        return doHttp(httpPost);
    }

    /**
     * 发送 HTTPS POST请求,使用指定的证书文件及密码,不带请求头信息<
     *
     * @param url 请求地址
     * @param param 请求参数
     * @param path 证书全路径
     * @param password 证书密码
     * @return
     * @throws Exception
     * @throws Exception
     */
    public static String doHttpsPost(String url, String param, String path, String password) throws Exception {
        HttpPost httpPost = new HttpPost(url);
        // 设置请求参数
        httpPost.setEntity(new StringEntity(param, StandardCharsets.UTF_8.name()));

        return doHttps(httpPost, path, password);
    }

    /**
     * 发送 HTTPS POST请求,使用指定的证书文件及密码,请求头为“application/xml;charset=UTF-8”
     *
     * @param url 请求地址
     * @param param 请求参数
     * @param path 证书全路径
     * @param password 证书密码
     * @return
     * @throws Exception
     * @throws Exception
     */
    public static String doHttpsPostXml(String url, String param, String path, String password) throws Exception {
        HttpPost httpPost = new HttpPost(url);
        // 设置请求头
        httpPost.addHeader("Content-Type", "application/xml; charset=UTF-8");
        // 设置请求参数
        httpPost.setEntity(new StringEntity(param, StandardCharsets.UTF_8.name()));
        return doHttps(httpPost, path, password);
    }

    /**
     * 发送 HTTPS 请求,使用指定的证书文件及密码
     *
     * @param request
     * @param path 证书全路径
     * @param password 证书密码
     * @return
     * @throws Exception
     * @throws Exception
     */
    private static String doHttps(HttpRequestBase request, String path, String password) throws Exception {
        // 获取HTTPS SSL证书
        SSLConnectionSocketFactory csf = getHttpsFactory(path, password);
        // 通过连接池获取连接对象
        CloseableHttpClient httpClient = HttpClients.custom().setSSLSocketFactory(csf).build();
        return doRequest(httpClient, request);
    }

    /**
     * 获取HTTPS SSL连接工厂,使用指定的证书文件及密码
     *
     * @param path     证书全路径
     * @param password 证书密码
     * @return
     * @throws Exception
     * @throws Exception
     */
    private static SSLConnectionSocketFactory getHttpsFactory(String path, String password) throws Exception {

        // 初始化证书,指定证书类型为“PKCS12”
        KeyStore keyStore = KeyStore.getInstance("PKCS12");
        // 读取指定路径的证书
        FileInputStream input = new FileInputStream(new File(path));
        try {
            // 装载读取到的证书,并指定证书密码
            keyStore.load(input, password.toCharArray());
        } finally {
            input.close();
        }
        // 获取HTTPS SSL证书连接上下文
        SSLContext sslContext = SSLContexts.custom().loadKeyMaterial(keyStore, password.toCharArray()).build();
        // 获取HTTPS连接工厂,指定TSL版本
        SSLConnectionSocketFactory sslCsf = new SSLConnectionSocketFactory(sslContext, new String[]{"SSLv2Hello", "SSLv3", "TLSv1", "TLSv1.2"}, null, SSLConnectionSocketFactory.getDefaultHostnameVerifier());
        return sslCsf;
    }
    /**
     * 发送 HTTP 请求
     *
     * @param request
     * @return
     * @throws Exception
     */
    private static String doHttp(HttpRequestBase request) throws Exception {
        // 通过连接池获取连接对象
        return doRequest(httpClient, request);
    }

    /**
     * 处理Http/Https请求,并返回请求结果,默认请求编码方式:UTF-8
     * @param httpClient
     * @param request
     * @return
     */
    private static String doRequest(CloseableHttpClient httpClient, HttpRequestBase request) throws Exception {
        String result = null;
        try (CloseableHttpResponse response = httpClient.execute(request)) {
            // 获取请求结果
            int statusCode = response.getStatusLine().getStatusCode();
            if (statusCode != 200) {
                request.abort();
                throw new RuntimeException("HttpClient error status code: " + statusCode);
            }
            // 解析请求结果
            HttpEntity entity = response.getEntity();
            // 转换结果
            result = EntityUtils.toString(entity, StandardCharsets.UTF_8.name());
            // 关闭IO流
            EntityUtils.consume(entity);
        }
        return result;
    }

    /**
     * 转换请求参数,将Map键值对拼接成QueryString字符串
     *
     * @param params
     * @return
     */
    public static String covertMapToQueryStr(Map<String, Object> params) {
        List<NameValuePair> pairs = covertParamsToList(params);
        return URLEncodedUtils.format(pairs, StandardCharsets.UTF_8.name());
    }

    /**
     * 转换请求参数
     *
     * @param params
     * @return
     */
    public static List<NameValuePair> covertParamsToList(Map<String, Object> params) {
        List<NameValuePair> pairs = new ArrayList<>();
        for (Map.Entry<String, Object> param : params.entrySet()) {
            pairs.add(new BasicNameValuePair(param.getKey(), String.valueOf(param.getValue())));
        }
        return pairs;
    }
}
然后controller实现一个接口,前端调用该接口获取二维码url:
// 获取二维码
@GetMapping("/qr/login/param")
@ResponseBody
public BaseResponse<String> getWxQRCodeParam() {
    String QRUrl = null;
    try {
        // 第一步:发送请求获取access_token
        String getAccessTokenUrl = "https://api.weixin.qq.com/cgi-bin/token?grant_type=client_credential" +
                "&appid=" + WXConstant.APP_ID +
                "&secret=" + WXConstant.APP_SECRET;
        String accessTokenRes = HttpClientUtils.doGet(getAccessTokenUrl);
        log.info("accessTokenRes=>" + accessTokenRes);
        String accessToken = (String) JSON.parseObject(accessTokenRes).get("access_token"); // 获取到access_token

        // 第二步:通过access_token和一些参数发送post请求获取二维码Ticket
        String getTicketUrl = "https://api.weixin.qq.com/cgi-bin/qrcode/create?access_token=" + accessToken;
        // 封装参数
        Map<String, Object> ticketInfo = new HashMap<>();
        ticketInfo.put("expire_seconds", 604800); // 二维码超时时间
        ticketInfo.put("action_name", "QR_SCENE");
        String ticketJsonInfo = JSON.toJSON(ticketInfo).toString();
        String ticketRes = HttpClientUtils.doPostJson(getTicketUrl, ticketJsonInfo);
        log.info("ticketRes=>" + ticketRes);
        String ticket = (String) JSON.parseObject(ticketRes).get("ticket");

        // 第三步:通过ticket获取二维码url
        String encodeTicket = URLEncoder.encode(ticket, "utf-8"); // 编码ticket
        String getQRUrl = "https://mp.weixin.qq.com/cgi-bin/showqrcode?ticket=" + encodeTicket;
        QRUrl = getQRUrl; // 二维码url
    } catch (Exception e) {
        e.printStackTrace();
    }
    return ResultUtils.success(QRUrl);
}
注:该接口只注重了功能实现,具体安全性并未考虑;
可以调用该接口测试一下:

那么前端只需要获取到这个url并展示出来就行了:


可以测试一下:

可以看到每次都能获取到不同二维码;
到这里二维码生成就完成了,可以扫码测试一下:

扫码候就是公众号界面了,接下来就是一些授权操作了,下集在讲;
总结
总的来说只要细心看文档还不算是特别难理解的,所以一定要多看文档!
总的来说流程就是那三步:

因为文章是本人理解记录的,可能会有错误,有错误问题欢迎交流!
-
相关阅读:
Day 54 多线程
齐博X1-栏目的终极方法get_sort
Flutter转换png图片为jpg图片
阿里面试分享,4面技术5面HR附加笔试面,庆幸已经拿到offer了~
【Netty 的优化和参数】
Elasticsearch概述
数据结构——【堆】
computed计算方法不被调用的原因;只有在使用时才会被调用
【JavaSE】反射
typescript:命名空间
- 原文地址:https://blog.csdn.net/YXXXYX/article/details/127039184