-
linux下nginx安装与配置说明
Nginx运行原理


一个master配置文件中可以设置多个 worker_processes
可以使用nginx -s reload 热部署,利于nginx做热部署操作
对于每个 worker_processes都是独立的进程,不需要加锁,采用独立的进程,可以互相之间不会影响,一个进程退出后,其他进程依旧工作,不会造成请求中断worker_processes数和服务器cpu数量相等是最合适的
连接数:worker_connection
一个请求占用2~4个连接数并发数:
普通静态访问最大并发数量为:
worker_connection * worker_processes /2如果是HTTP作为反向代理最大并发数量为:
worker_connection * worker_processes /4Nginx安装
https://nginx.org/

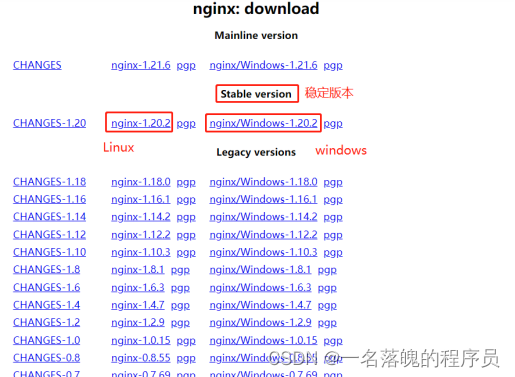
将下载好的压缩包上传linux服务器并解压解压命令
tar -zxvf nginx-1.20.2.tar.gz- 1
安装nginx相关依赖
或者一键安装上面四个依赖
yum -y install gcc zlib zlib-devel pcre-devel openssl openssl-devel- 1
进入nginx解压后的根目录,配置SSL模块
./configure --prefix=/usr/local/nginx --with-http_ssl_module- 1
/usr/local/nginx为启动的路径可自行配置
configure完成之后,会有如下信息,诸如日志文件,配置文件啥的
编译安装make && make install- 1
先检测nginx的配置是否正确进入/usr/local
./nginx -t- 1

Nginx Linux基本操作指令
启动服务:./nginx
退出服务:./nginx -s quit
强制关闭服务:./nginx -s stop
重载服务:./nginx -s reload (重载服务配置文件,类似于重启,但服务不会中止)
验证配置文件:./nginx -t
使用配置文件:./nginx -c “配置文件路径”
使用帮助:./nginx -h可以查看nginx进程
ps -ef | grep nginx- 1

在浏览器地址输入服务器ip回车出现如下页面,则表示安装成功(默认80端口)。yum源安装报错问题解决
如果出现以下错误

解决方案
CentOS 8 yum安装软件时,提示无法从AppStream下载检查网通不通,然后确定DNS解析是否正确。
ping www.baidu.com- 1

有可能是所在网络环境在出口封了相应端口,需用其他方式,比如VPN解决。
我们无法使用CentOS原生yum源就是因为网络问题,你懂的。
为了快,更换国内yum源,推荐阿里云yum或者腾讯yum。网易没落了。
阿里yum源: https://developer.aliyun.com/mirror/centos
腾云yum源: https://mirrors.tencent.com/help/centos.htmlmv /etc/yum.repos.d/CentOS-Base.repo /etc/yum.repos.d/CentOS-Base.repo.backup.3- 1
wget -O /etc/yum.repos.d/CentOS-Base.repo http://mirrors.cloud.tencent.com/repo/centos8_base.repo- 1
清理之前的yum缓存
yum clean all- 1
建立新的缓存
yum makecache- 1

makecache的时候报错了!解决方案:
先看看CentOS的yum.repos.d
查看跟新后的CentOS-Base.repo文件cat /etc/yum.repos.d/CentOS-Base.repo- 1

找到跟新后CentOS-Base.repo中[AppStream]标签内的内容并复制
打开CentOS-AppStream.repo,注释掉原有内容,并插入新内容
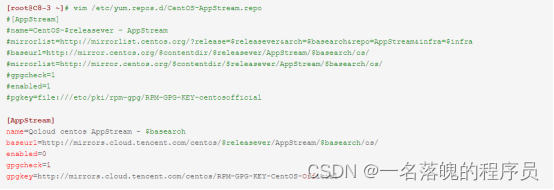
重新运行yum makecache,操作成功Nginx配置文件 nginx.conf
第一部分:全局块

第二部分:支持的最大连接数

第三部分:http全局块

1> 反向代理配置


当然也可配置多个server块进行反向代理操作

重启nginx后生效Location指令说明

2>负载均衡配置
weight=1时默认轮询机制
upstream myserver{
server 47.108.71.54:8080 weight=1;
server 47.108.71.53:8081 weight=1;
}

upstream myserver{
ip_hash
server 47.108.71.54:8080 weight=1;
server 47.108.71.53:8081 weight=1;
}如果配置了ip_hash 客户端的每个请求会根据ip的hash的结果匹配,这样每个访客固定访问一个后端服务器,可以解决session的问题,比如一个用户访问了8080那么这时候将信息存取到了session中,在访问的时候可能会访问8081服务器这时候读取session的时候就不存在会造成数据报错等问题。
upstream myserver{
server 47.108.71.54:8080 weight=1;
server 47.108.71.53:8081 weight=1;
fair;
}如果配置了 fair(第三方) 按后端服务器根据响应时间分配请求,响应时间短的优先分配
3>动静分离配置

修改nginx默认端口进入
usr/local/nginx/conf找到nginx.conf

修改端口后重启nginx即可设置nginx开机自启
在 /usr/lib/systemd/system/ 目录下,创建nginx.service文件,并输入以下内容(并保存退出):
cd /usr/lib/systemd/system/ touch nginx.service- 1
- 2
[Unit] Description=nginx After=network.target [Service] Type=forking PIDFile=/usr/local/nginx/logs/nginx.pid ExecStart=/usr/local/nginx/sbin/nginx ExecReload=/usr/local/nginx/sbin/nginx -s reload ExecStop=/usr/local/nginx/sbin/nginx -s stop PrivateTmp=true [Install] WantedBy=multi-user.target- 1
- 2
- 3
- 4
- 5
- 6
- 7
- 8
- 9
- 10
- 11
- 12
- 13
- 14
设置开机启动
systemctl enable nginx.service 或 systemctl enable nginx- 1
- 2
- 3
nginx其他命令:
systemctl start nginx.service (启动nginx服务) systemctl stop nginx.service (停止nginx服务) systemctl enable nginx.service (设置开机自启动) systemctl disable nginx.service (停止开机自启动) systemctl status nginx.service (查看服务当前状态) systemctl restart nginx.service (重新启动服务) systemctl list-units --type=service (查看所有已启动的服务)- 1
- 2
- 3
- 4
- 5
- 6
- 7
Nginx高可用主备模式
默认下我们只有一台nginx,当nginx宕机后服务就会呈现一个不可用的状态,这时候我们就需要对nginx做集群,当主服务器nginx宕机后备用的nginx服务能自动顶上,这时就有一个东西叫
keepalived,需要在两台服务器上郡安装nginx和keepalivedKeepalived:相当于路由,需要一个虚拟ip,自动检测nginx如果宕机了则将主服务器中的虚拟ip绑定到备用服务器
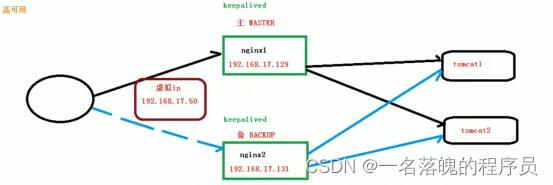
keepalived下载地址:
https://www.keepalived.org/download.html

安装keepalived:
解压:
tar xvf keepalived-2.2.4.tar.gz cd keepalived-2.2.4- 1
- 2
编译:
./configure --prefix=/usr/local/keepalived make && make install- 1
- 2
备份keeplived默认配置文件
cd /usr/local/keepalived/etc/keepalived/ cp keepalived.conf -d ./keepalived.conf_blk mkdir /etc/keepalived cp /usr/local/keepalived/etc/keepalived/keepalived.conf /etc/keepalived/keepalived.conf- 1
- 2
- 3
- 4
复制/sbin/keepalived到/usr/sbin下
cp /usr/local/keepalived/sbin/keepalived /usr/sbin/- 1
复制sysconfig文件到/etc/sysconfig下
cp /usr/local/keepalived/etc/sysconfig/keepalived /etc/sysconfig/- 1
#########################下面请注意#########################
下面这步,亲身经历就是:不做应该也能成功,做了反而可能不成功。大家自行决定是否执行
复制启动脚本到/etc/init.d下
cd /usr/local/keepalived cp /usr/local/keepalived/etc/init.d/keepalived /etc/init.d/ chmod 755 /etc/init.d/keepalived- 1
- 2
- 3
#########################上面请注意#########################
重新加载
systemctl daemon-reload- 1
设置开机自动启动
systemctl enable keepalived.service- 1
取消开机自动启动
systemctl disable keepalived.service- 1
启动
systemctl start keepalived.service- 1
查看状态
systemctl status keepalived.service- 1
停止
systemctl stop keepalived.service- 1
卸载keepalived
service keepalived stop rm -rf /usr/local/keepalived rm -rf /etc/keepalived rm -rf /etc/init.d/keepalived rm -rf /etc/sysconfig/keepalived rm -rf /usr/local/sbin/keepalived rm -rf /usr/sbin/keepalived rm -rf /sbin/keepalived- 1
- 2
- 3
- 4
- 5
- 6
- 7
- 8
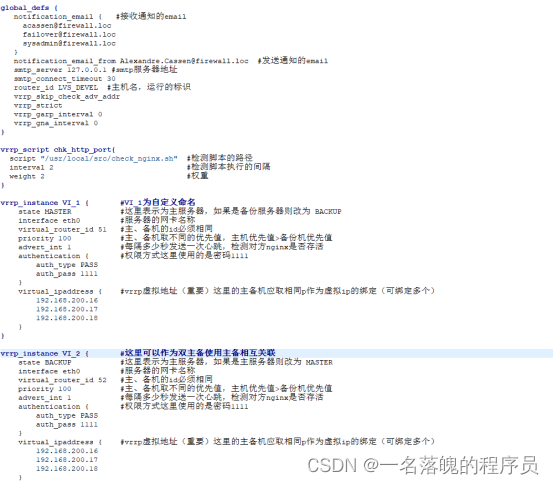
配置好后重启keepalived使用命令 ip a 查看主服务器中存在虚拟ip
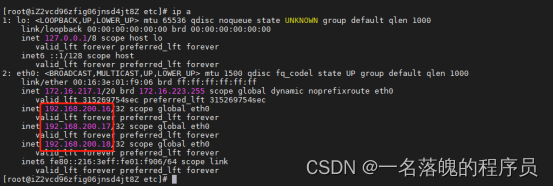
当关掉keepalived后,备份机查询ip a 会发现上面的虚拟会存在备份机中

keepalived.confglobal_defs { notification_email { #接收通知的email acassen@firewall.loc failover@firewall.loc sysadmin@firewall.loc } notification_email_from Alexandre.Cassen@firewall.loc #发送通知的email smtp_server 127.0.0.1 #smtp服务器地址 smtp_connect_timeout 30 router_id LVS_DEVEL #主机名,运行的标识 vrrp_skip_check_adv_addr vrrp_strict vrrp_garp_interval 0 vrrp_gna_interval 0 } vrrp_instance VI_1 { #VI_1为自定义命名 state MASTER #这里表示为主服务器,如果是备份服务器则改为 BACKUP interface eth0 #服务器的网卡名称 virtual_router_id 51 #主、备机的id必须相同 priority 100 #主、备机取不同的优先值,主机优先值>备份机优先值 advert_int 1 #每隔多少秒发送一次心跳,检测对方nginx是否存活 authentication { #权限方式这里使用的是密码1111 auth_type PASS auth_pass 1111 } virtual_ipaddress { #vrrp虚拟地址(重要)这里的主备机应取相同p作为虚拟ip的绑定(可绑定多个) 192.168.200.16 192.168.200.17 192.168.200.18 } } vrrp_instance VI_2 { #这里可以作为双主备使用主备相互关联 state BACKUP #这里表示为主服务器,如果是主服务器则改为 MASTER interface eth0 #服务器的网卡名称 virtual_router_id 52 #主、备机的id必须相同 priority 100 #主、备机取不同的优先值,主机优先值>备份机优先值 advert_int 1 #每隔多少秒发送一次心跳,检测对方nginx是否存活 authentication { #权限方式这里使用的是密码1111 auth_type PASS auth_pass 1111 } virtual_ipaddress { #vrrp虚拟地址(重要)这里的主备机应取相同p作为虚拟ip的绑定(可绑定多个) 192.168.200.16 192.168.200.17 192.168.200.18 } }- 1
- 2
- 3
- 4
- 5
- 6
- 7
- 8
- 9
- 10
- 11
- 12
- 13
- 14
- 15
- 16
- 17
- 18
- 19
- 20
- 21
- 22
- 23
- 24
- 25
- 26
- 27
- 28
- 29
- 30
- 31
- 32
- 33
- 34
- 35
- 36
- 37
- 38
- 39
- 40
- 41
- 42
- 43
- 44
- 45
- 46
- 47
- 48
- 49
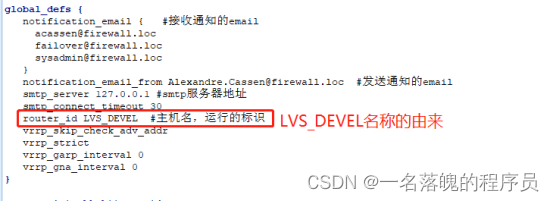


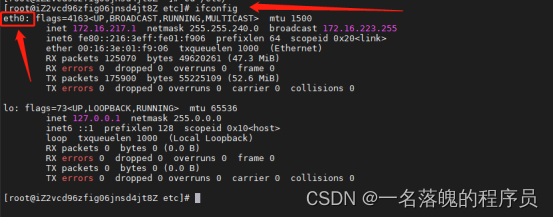
网卡名称(默认):

虚拟ip

这里说明一下虚拟ip,如果是内网的话就设置一个没有被路由使用的ip作为虚拟ip,如果需要虚拟ip能够外网访问并解析到域名这种那么你至少要准备三台外网服务器(拥有三个外网ip),一台作为域名解析和keepalived的vrrp虚拟ip,其他两台可做为nginx集群使用。这样直接访问域名即可达到nginx高可用集群效果。配置Nginx整合vue访问后端接口
nginx.conf
user root; worker_processes 4; #error_log logs/error.log; #error_log logs/error.log notice; #error_log logs/error.log info; pid logs/nginx.pid; events { #线程 worker_connections 1024; } http { include mime.types; default_type application/octet-stream; #该属性默认为off,表示如果header name中包含下划线,则忽略掉 underscores_in_headers on; log_format main '$upstream_http_content_type $http_Authorization' '$http_x_forwarded_for - $remote_user [$time_local] "$request" ' '$status $body_bytes_sent "$http_referer" ' '"$http_user_agent" "$http_x_forwarded_for"'; # access_log logs/access.log main; sendfile on; #tcp_nopush on; #keepalive_timeout 0; keepalive_timeout 65; proxy_headers_hash_max_size 51200; proxy_headers_hash_bucket_size 6400; #gzip on; # 现在访问速率 # limit_req_zone $binary_remote_addr zone=allips:10m rate=50r/s; #HTTP Strict Transport Security (通常简称为HSTS) 是一个安全功能,它告诉浏览器只能通过HTTPS访问当前资源, 禁止HTTP方式 # add_header Strict-Transport-Security "max-age=515360000; includeSubDomains;preload" always; #每个域名/主机名一个配置文 include /usr/local/nginx/conf/vhosts/*.conf; #real_ip_recursive on; #:是否递归解析,当real_ip_recursive配置为off时,Nginx会把real_ip_header指定的请求头中的最后一个IP作为真实客户端IP;当real_ip_recursive配置为on时,Nginx会递归解析real_ip_header指定的请求头,最后一个不匹配set_real_ip_from的IP作为真实客户端IP # real_ip_header X-Forwarded-For; #set_real_ip_from192.168.0.0/16; #:告知Nginx哪些是反向代理IP,即排除后剩下的就是真实客户端IP,支持配置具体IP地址、CIDR地址 }- 1
- 2
- 3
- 4
- 5
- 6
- 7
- 8
- 9
- 10
- 11
- 12
- 13
- 14
- 15
- 16
- 17
- 18
- 19
- 20
- 21
- 22
- 23
- 24
- 25
- 26
- 27
- 28
- 29
- 30
- 31
- 32
- 33
- 34
- 35
- 36
- 37
- 38
- 39
- 40
- 41
- 42
- 43
- 44
- 45
- 46
- 47
- 48
- 49
- 50
- 51
域名.conf
upstream city { ip_hash; server 127.0.0.1:项目端口号; keepalive 64; } server{ listen 80; server_name 域名; rewrite ^(.*) https://$server_name$1 permanent; } server { listen 443 ssl; server_name 域名; ssl_certificate /usr/local/nginx/conf/cert/skyrim.city/xxxxxx.pem; ssl_certificate_key /usr/local/nginx/conf/cert/skyrim.city/xxxxxxx.key; ssl_session_timeout 5m; ssl_protocols TLSv1 TLSv1.1 TLSv1.2 SSLv3; ssl_ciphers ECDHE-RSA-AES256-SHA384:AES256-SHA256:RC4:HIGH:!MD5:!aNULL:!eNULL:!NULL:!DH:!EDH:!AESGCM; ssl_prefer_server_ciphers on; error_log /usr/local/nginx/logs/error.log; access_log /usr/local/nginx/logs/access.log; sendfile on; tcp_nopush on; tcp_nodelay on; keepalive_timeout 120; #allow 10.0.16.55; #deny all; gzip on; gzip_min_length 2k; gzip_buffers 4 16k; gzip_comp_level 9; gzip_types text/plain application/x-javascript text/css application/xml text/javascript application/javascript application/octet-stream application/x-httpd-php image/jpeg image/gif image/png; gzip_vary off; gzip_disable "MSIE [1-6]\."; client_max_body_size 100m; client_body_buffer_size 256k; proxy_connect_timeout 90; proxy_send_timeout 90; proxy_read_timeout 90; proxy_buffer_size 256k; proxy_buffers 4 256k; proxy_busy_buffers_size 256k; proxy_temp_file_write_size 256k; proxy_max_temp_file_size 128m; #前端项目地址 location ^~/ { root /home/lighthouse/city/html/; index index.html index.htm; try_files $uri $uri/ /index.html; } #后端服务 location ^~/scuser-server { add_header Access-Control-Allow-Origin *; add_header Access-Control-Allow-Methods 'GET, POST, OPTIONS'; add_header Access-Control-Allow-Headers 'DNT,X-Mx-ReqToken,Keep-Alive,User-Agent,X-Requested-With,If-Modified-Since,Cache-Control,Content-Type,Authorization'; proxy_pass http://city; proxy_set_header Host $host; proxy_set_header X-Real_IP $remote_addr; proxy_set_header X-Forwarded-For $proxy_add_x_forwarded_for; } #后端服务 location ^~/equipment-server { add_header Access-Control-Allow-Origin *; add_header Access-Control-Allow-Methods 'GET, POST, OPTIONS'; add_header Access-Control-Allow-Headers 'DNT,X-Mx-ReqToken,Keep-Alive,User-Agent,X-Requested-With,If-Modified-Since,Cache-Control,Content-Type,Authorization'; proxy_pass http://city; proxy_set_header Host $host; proxy_set_header X-Real_IP $remote_addr; proxy_set_header X-Forwarded-For $proxy_add_x_forwarded_for; } #后端服务 location ^~/file-server { add_header Access-Control-Allow-Origin *; add_header Access-Control-Allow-Methods 'GET, POST, OPTIONS'; add_header Access-Control-Allow-Headers 'DNT,X-Mx-ReqToken,Keep-Alive,User-Agent,X-Requested-With,If-Modified-Since,Cache-Control,Content-Type,Authorization'; proxy_pass http://city; proxy_set_header Host $host; proxy_set_header X-Real_IP $remote_addr; proxy_set_header X-Forwarded-For $proxy_add_x_forwarded_for; } }- 1
- 2
- 3
- 4
- 5
- 6
- 7
- 8
- 9
- 10
- 11
- 12
- 13
- 14
- 15
- 16
- 17
- 18
- 19
- 20
- 21
- 22
- 23
- 24
- 25
- 26
- 27
- 28
- 29
- 30
- 31
- 32
- 33
- 34
- 35
- 36
- 37
- 38
- 39
- 40
- 41
- 42
- 43
- 44
- 45
- 46
- 47
- 48
- 49
- 50
- 51
- 52
- 53
- 54
- 55
- 56
- 57
- 58
- 59
- 60
- 61
- 62
- 63
- 64
- 65
- 66
- 67
- 68
- 69
- 70
- 71
- 72
- 73
- 74
- 75
- 76
- 77
- 78
- 79
- 80
- 81
- 82
- 83
- 84
- 85
- 86
- 87
- 88
- 89
- 90
- 91
- 92
- 93
- 94
-
相关阅读:
业界唯一!极智嘉依托新技术研发与应用斩获学技术进步奖一等奖
珂朵莉树 学习笔记
Java项目:SSM公司人力资源管理系统
mysql分组排序并取每组的前1条记录
100分钟带你玩转 Spring AOP,轻松吊打面试官
线性回归的正则方法:岭回归和Lasso
太速科技-基于XC7Z100+灵汐KA200的图像处理类脑平台
Java线上故障排查(CPU、磁盘、内存、网络、GC)+JVM性能调优监控工具+JVM常用参数和命令
文本标注工具doccano 中上传dataset无法成功
七步走,让你快速编写一个最简单的Servlet项目
- 原文地址:https://blog.csdn.net/pengxiaozhong/article/details/126768355