-
Flask Web——Jinjia2模板的使用
静态模板的使用
Jinjia2是Flask使用的html渲染模板,Jinjia原意为日本的神社,英文为temple,与模板的英文template相近,故取名jinjia。
首先先演示如何在flask代码中展示静态的html,方法是使用flask库中的render_template()方法,其参数为template(默认为template,也可以通过参数修改)文件夹中的“index.html”,通过这种方式,可以在进入指定UML之后,访问html页面。@app.route('/') def hello_world(): # put application's code here return render_template("index.html")- 1
- 2
- 3

👇index.html的html页面代码:DOCTYPE html> <html lang="en"> <head> <meta charset="UTF-8"> <title>首页title> head> <body> <h1>这是首页h1> body> html>- 1
- 2
- 3
- 4
- 5
- 6
- 7
- 8
- 9
- 10

渲染变量——传递参数
HTML中有些数据需要动态地从数据库中加载,不能直接写死在HTML页面中,在视图函数中可以将数据提取好,再通过Jinjia2传递参数的方式将数据在视图函数中通过render_template()(render的本意即为渲染)传递给HTML。在html中使用双花括号
{{ hobby }}即可使用变量,此处的hobby即为在视图函数中使用render_template传递过来的变量。此外,字典的键值和对象的属性在模板中都可以通过点(.)来传递, 还可以通过["属性名"]的方式传递, 二者的区别在于, 使用.先查看变量是否为字典, 再查看是否为对象, 都不是则返回undefined对象, 而使用方括号则字典和对象的寻找顺序相反.class User: def __init__(self, username, email): self.username = username self.email = email @app.route('/variable') def variable(): hobby = "游戏" person = { "name" : "张三", "age" : 18 } user = User("里斯","xx@qq.com") return render_template("variable.html", hobby=hobby,person=person,user=user)- 1
- 2
- 3
- 4
- 5
- 6
- 7
- 8
- 9
- 10
- 11
- 12
- 13
- 14
👆注意, 如果传递参数时, 名字出错了, 则在html页面不会显示, 推测是因为没有打开debug模式. 👇
DOCTYPE html> <html lang="en"> <head> <meta charset="UTF-8"> <title>变量使用title> head> <body> <h1>我的兴趣爱好是:{{ hobby }}h1> <p>person的姓名是:{{ person.name }}, person的年龄是{{ person.age }}p> <p>user的用户名是:{{ user["username"] }}, user的邮箱是{{ user.email }}p> body> html>- 1
- 2
- 3
- 4
- 5
- 6
- 7
- 8
- 9
- 10
- 11
- 12

此外, 还可以通过对字典使用**运算,使字典变成关键字参数. 其效果与上面的代码等同.@app.route('/variable') def variable(): hobby = "游戏" person = { "name" : "张三", "age" : 18 } user = User("里斯","xx@qq.com") context = { 'hobby' : hobby, 'person': person, 'user' : user } return render_template("variable.html", **context)- 1
- 2
- 3
- 4
- 5
- 6
- 7
- 8
- 9
- 10
- 11
- 12
- 13
- 14
过滤器和测试器
用户自定义的过滤器
差点忘了Markdown是可以开二级标题的…
向html中传递参数时, 可能需要对传递的变量进行处理, 处理过后再显示, 如时间的格式化输出等, 此时可以用到过滤器. Jinjia2内置了许多过滤器, 但过滤器可以由用户进行自定义. 因为过滤器本质上是一个函数.
在定义了一个函数之后, 可以使用app.add_template_filter(datetime_format, "dformat")方法将函数添加为过滤器, 其中datetime_format为函数, 而dformat为过滤器名.def datetime_format(value, format="%Y-%d-%m %H: %M"): return value.strftime(format) app.add_template_filter(datetime_format, "dformat")- 1
- 2
- 3
- 4
除此之外, 还可以通过装饰器的方式定义过滤器.
@app.template_filter("dformat") def datetime_format(value, format="%Y-%d-%m %H: %M"): return value.strftime(format)- 1
- 2
- 3
可以看到, 使用的仍然是带参数的装饰器, 参数列表为过滤器的名称 ( 如果不加参数, 则默认将函数名当作过滤器的名称 ). 两种声明方法是等价的.
Jinjia2内置的过滤器
详情可查看官方文档.
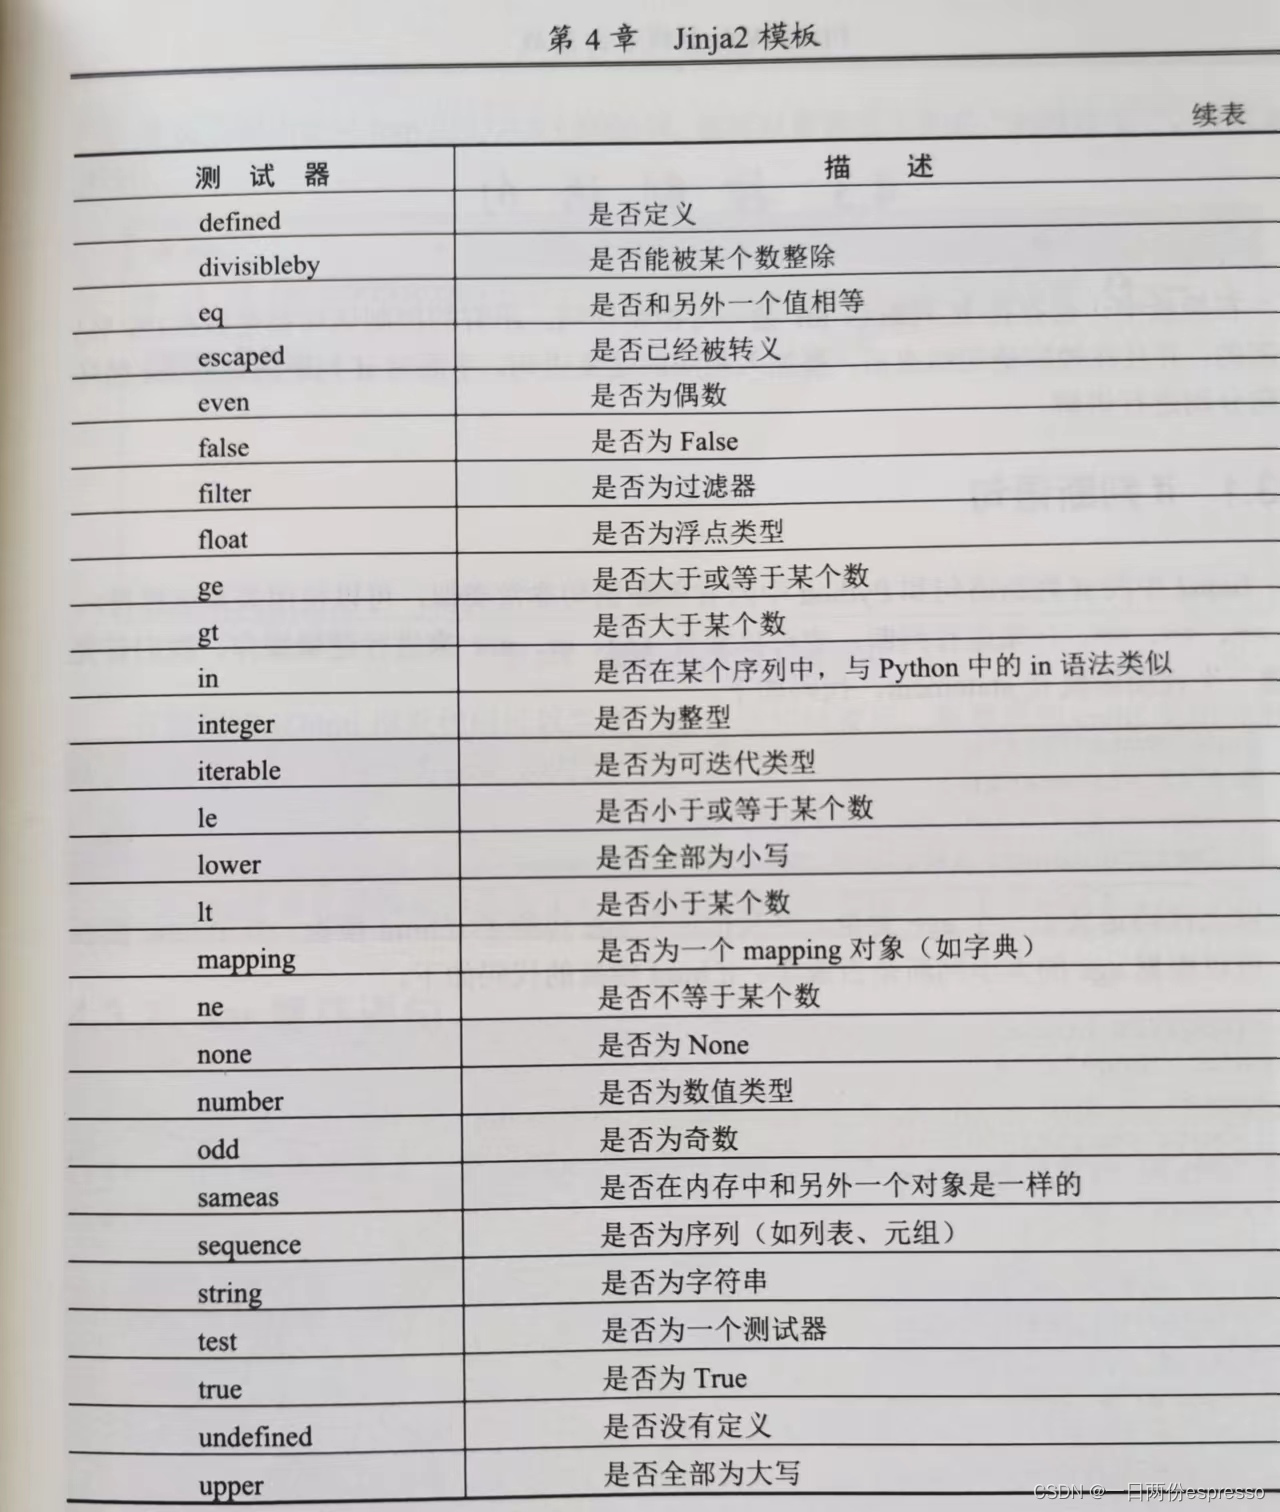
测试器
用来测试某些元素是否满足条件, 如测试一个变量是否为字符串, 测试一个变量能否被调用(类似于
iscallable())等.{% if user is defined %} user定义了:{{ user }} {% else %} user没用定义。 {% endif %}- 1
- 2
- 3
- 4
- 5


控制语句
if判断语句
Jinjia2中的if判断句与python中的if判断句非常相似, 甚至比较运算符和逻辑运算符都完全相同, 并且也使用elif作为else if. 注意, 当if语句块结束时, 需要声明
endif.{% if age > 18 %} <div>您已成年!div> {% elif age < 18 %} <div>您未成年!div> {% else %} <div>您刚成年!div> {% endif %}- 1
- 2
- 3
- 4
- 5
- 6
- 7
👆Jinjia2中代码缩进的目的是更加方便阅读, 实际上任何代码缩进在Jinjia2中都是不必要的.

for循环语句
Jinjia2的for循环语句只是比python多加了一个
endfor声明.@app.route('/for') def for_statement(): books = [{ "name":"三国演义", "author":"罗贯中", "price":100 },{ "name":"水浒传", "author":"施耐庵", "price":101 },{ "name":"西游记", "author":"吴承恩", "price":99 },{ "name":"红楼梦", "author":"曹雪芹", "price":88 }, ] return render_template("for.html",books=books)- 1
- 2
- 3
- 4
- 5
- 6
- 7
- 8
- 9
- 10
- 11
- 12
- 13
- 14
- 15
- 16
- 17
- 18
- 19
- 20
- 21
DOCTYPE html> <html lang="en"> <head> <meta charset="UTF-8"> <title>for循环title> head> <body> <table> <thead> <tr> <th>书名th> <th>作者th> <th>价格th> tr> thead> <tbody> {% for book in books %} <tr> <td>{{ book.name }}td> <td>{{ book.author }}td> <td>{{ book.price }}td> tr> {% else %} <tr> <td colspan="3" style="text-align: center;">无数据td> tr> {% endfor %} tbody> table> body> html>- 1
- 2
- 3
- 4
- 5
- 6
- 7
- 8
- 9
- 10
- 11
- 12
- 13
- 14
- 15
- 16
- 17
- 18
- 19
- 20
- 21
- 22
- 23
- 24
- 25
- 26
- 27
- 28
- 29
- 30
- 31
👆如果被循环的列表books中没有元素, 那么可以定义else语句块, 显示"无数据".


此外, Jinjia2的for循环中还内置了许多有用的变量, 如获取当前循环到了第几次, 可以使用loop.index来查看.{% for book in books %} <tr> <td>{{ loop.index }}td> <td>{{ book.name }}td> <td>{{ book.author }}td> <td>{{ book.price }}td> tr> {% else %} <tr> <td colspan="3" style="text-align: center;">无数据td> tr> {% endfor %}- 1
- 2
- 3
- 4
- 5
- 6
- 7
- 8
- 9
- 10
- 11
- 12
👆添加loop.index


模板结构
宏和import语句
模板中的宏(macro)与python中的函数非常相似, 可以传递参数但是没有返回值. 可以将一些常用的代码片段放到宏中, 然后把一些不固定的值抽取出来当成一个参数.
👇将宏定义在一个单独的文件forms.html中.DOCTYPE html> <html lang="en"> <head> <meta charset="UTF-8"> <title>formstitle> head> <body> {% macro input(name, value='', type='text') %} <input type="{{ type }}" value="{{ value|escape }}" name="{{ name }}"> {% endmacro %} {% macro textarea(name, value='', rows=10, cols=40) %} <textarea name="{{ name }}" rows="{{ rows }}" cols="{{ cols }}">{{ value|escape }}textarea> {% endmacro %} body> html>- 1
- 2
- 3
- 4
- 5
- 6
- 7
- 8
- 9
- 10
- 11
- 12
- 13
- 14
- 15
👆可以看到, 通过macro标签创建了一个名为input的宏, 它接收参数name和type.
👇导入宏, 使用import, 规则和python的import相同(支持import…as…和from…import…as…等语法). 加上with context, 可以导入当前模板中的变量.<!DOCTYPE html> <html lang="en"> <head> <meta charset="UTF-8"> <title>变量使用</title> </head> <body> <h1>我的兴趣爱好是:{{ hobby }}</h1> <p>person的姓名是:{{ person.name }}, person的年龄是{{ person.age }}</p> <p>user的用户名是:{{ user["username"] }}, user的邮箱是{{ user.email }}</p> <p> {% if user is defined %} user定义了:{{ user }} {% else %} user没用定义。 {% endif %} </p> {% import 'forms.html' as forms with context %} <dl> <dt>Username</dt> <dd>{{ forms.input('username') }}</dd> <dt>Password</dt> <dd>{{ forms.input('password', type='password') }}</dd> </dl> <p>{{ forms.textarea('comment') }}</p> </body> </html>- 1
- 2
- 3
- 4
- 5
- 6
- 7
- 8
- 9
- 10
- 11
- 12
- 13
- 14
- 15
- 16
- 17
- 18
- 19
- 20
- 21
- 22
- 23
- 24
- 25
- 26
- 27

模板继承
通过模板继承, 把一些重复性的代码写在父模板当中, 子模板继承父模板后, 再分别实现自己的代码.

模板环境
模板上下文
Jinjia2中的模板上下文即为在整个模板中都可以使用的变量, 可以通过
app.context_processor进行声明. 此外, 还可以通过set方法进行创建. 使用set方法后, 创建的变量在这一句之后都是有效的.{% set name = 'admin' %}- 1
如果不想让这个变量污染全局环境, 还可以用with语句块指定作用域.
{% with %} {% set foo = 42 %} {{ foo }} {% end with %}- 1
- 2
- 3
- 4
也可以直接在with语句块内声明该作用域的变量:
{% with foo = 42 %} {{foo}} {% end with %}- 1
- 2
- 3
👆以上两种方式等价.
此外, Jinjia2中还有内置的全局变量, 如g, request, session和config.
Jinjia2虽然内置了一些全局变量, 但有时候仍然需要传递自定义的变量, 如很多网站的导航条右上角会显示当前登录的用户名, 这需要把username传递到几乎所有的模板, 定义一个全局变量很合适. 仍然是使用装饰器.@app.context_processor def context_user(): user = {"username":"admin", "level":2} return {"user":user}- 1
- 2
- 3
- 4
👆在自定义的上下文处理器函数中, 需要把变量放到字典中才能被函数所使用, 正如上述代码块所定义的.
全局函数
- Jinjia2内置的全局函数有range, lipsum, dict等, 详情请查看Jinjia2的官方文档. 此外, 除了Jinjia2内置的全局函数, Flask也提供两个全局函数, 如之前使用过的
url_for( 用于加载静态文件, 或者用于构建URL )以get_flashed_message( 用于获取闪现消息 ). - 自定义全局函数: 通过装饰器
@app.template_global()
@app.template_global() def greet(name): return "欢迎! %s" % name 使用: <div>{{ greet("詹森") }}</div>- 1
- 2
- 3
- 4
- 5
- 6
闪现消息
使用闪现消息, 需要在视图函数中通过
flash()提交要传递的消息, 然后再在模板中使用get_flashed_messages函数获取视图函数中的消息内容. 由于get_flashed_messages返回一个列表, 因此需要通过下标或者for循环来读取闪现消息.
Noteworthy的是, 闪现消息存储在session中, 使用session之前需要在app.config中设置SECRET_KEY, 幸运的是SECRET_KEY可以设置为任意字符串.app.config['SECRET_KEY'] = "ewgnlew&S;12zd-+" @app.route('/flash') def myflash(): flash("闪现消息1...") flash("闪现消息2...") return render_template("flash.html")- 1
- 2
- 3
- 4
- 5
- 6
DOCTYPE html> <html lang="en"> <head> <meta charset="UTF-8"> <title>flashtitle> head> <body> <ul> {% for message in get_flashed_messages() %} <li>{{ message }}li> {% endfor %} ul> body> html>- 1
- 2
- 3
- 4
- 5
- 6
- 7
- 8
- 9
- 10
- 11
- 12
- 13
- 14

-
相关阅读:
day06-前后端项目上传到gitee、后端多方式登录接口、发送短信功能、发送短信封装、短信验证码接口、短信登录接口
03 基础配置webpack3打包vue文件
C语言-操作符详解(5)
情人节后属于单身狗的浪漫
Vue生命周期函数相关——笔试/面试题
CRMEB开源商城部署在腾讯云
面试官:Java池化技术你了解多少?
Linux是什么,其特点是啥
2021-arxiv-Prefix-Tuning- Optimizing Continuous Prompts for Generation
【案例】用 turtle 绘制一个月饼
- 原文地址:https://blog.csdn.net/fatfairyyy/article/details/126812605
