-
基于Python实现的卷积神经网络分类MNIST数据集
卷积神经网络分类MNIST数据集
目录
人工智能第七次实验报告 1
卷积神经网络分类MNIST数据集 1
一 、问题背景 1
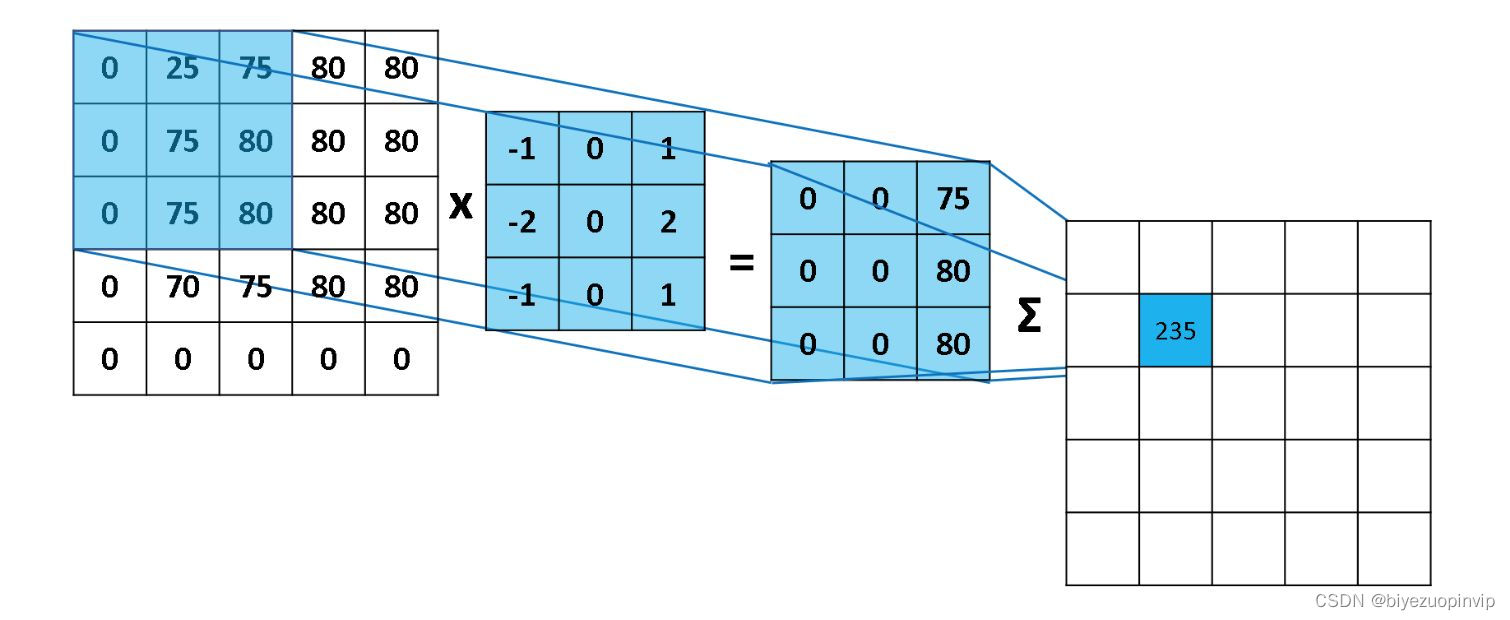
1.1 卷积和卷积核 1
1.2 卷积神经网络简介 2
1.3 卷积神经网络的细节讨论 3
二 、实现说明 3
2.1 构建神经网络模型 3- 为输入输出分配占位符 3
- 构建卷积层和池化层 4
- 构建全连接层 5
- 动态调整网络参数 6
2.2 运行模型 6
三 、程序测试 7
3.1 运行说明 7
3.2 运行输出 7
3.3 对比BP神经网络 8
四 、实验总结 8
1.2卷积神经网络简介
卷积神经网络(CNN,Convolutional Neural Network)是一个多层的神经网络,每层由多个二维平面组成,每个平面由多个独立神经元组成。卷积神经网络中C层和S层,C层为特征提取层,也称为卷 积层,是卷积神经网络的核心,S层位特征映射层,也称为下采样层。
在卷积层,卷积神经网络利用卷积核对图像进行滤波,可以得到显著的边缘特性。在卷积神经网络 中,每一个就卷积层都紧跟着一个下采样层,卷积层负责探测上一层特征的局部连接,下采样层负责把 相似的特征合并起来。下采样层合并相似特征的过程降低了特征图的空间分辨率,达到了数据降维的效 果。
在卷积神经网络中,输入矩阵通过卷积过程形成卷积层,卷积结果在通过下采样过程形成规模减小 的特征映射矩阵。卷积过程用一个可训练的滤波器去卷积一个输入特征矩阵,加上一个偏置后得到卷积 层。下采样过程将邻域内若干的像素通过池化操作变为一个像素,经过加权和增加偏置后,通过一个激 活函数,产生一个缩小的特征映射图。
一般卷积神经网络除了卷积层和下采样层之外,还会在输出段加入全连接层,全连接层的输入就是 每一个深度最终特征提取的结果,全连接神经网络最后再对这些结果进行分类。
1.3卷积神经网络的细节讨论
神经元的空间排列:
与常规神经网络不同,卷积神经网络的各层中的神经元是三维排列的:宽度、高度和深度。宽 度和高度与特征图的宽高一一对应。
而深度本身是卷积神经网络的一个超参数,在数值上等于使用的滤波器的数量,而每个滤波器 是不一样的,在输入数据中寻找的特征。本文转载自http://www.biyezuopin.vip/onews.asp?id=16722从上一张卷积神经网络图上可以看到,卷积神经网络结构 的最后部分将会把全尺寸的图像压缩为包含分类评分的一个向量,向量是在深度方向排列的。
局部连接:
与局部连接相反的是全局连接,对应到一个全连接的神经网络。对于图像数据,因为像素的数 量过多,全连接神经网络需要非常多的的参数,这对于算法效率是难以接受的,故使用局部连接的 思路:每个神经元只对局部进行感知,即层中的神经元将只与前一层中的一小块区域连接,然后再 更高层汇总来得到全局信息。
局部连接的空间大小叫做神经元的感受野,感受野的大小与滤波器的空间尺寸相等。权值共享:
每个神经元参数设为相同,即权值共享,也即在同一深度上,每个神经元用同一个卷积核去卷 积图像。
池化:
计算图像一个区域上的某个特定特征的平均值(或最大值),这种聚合操作就叫做池化 (平均池化/最大池化)。使用池化可以很好的实现数据降维并防止过度拟合。
通常在连续的卷积层之间会周期性地插入一个池化层。它的作用是逐渐降低数据体的空间尺 寸,这样的话就能减少网络中参数的数量。汇聚层使用最大池化操作,对输入数据体的每一个深度 切片独立进行操作,改变它的空间尺寸。最常见的形式是汇聚层使用尺寸2x2的滤波器,以步长为2 来对每个深度切片进行降采样,将其中75%的激活信息都丢掉。
二 、实现说明
2.1构建神经网络模型
所构建的网络模型:卷积层 + 池化层 + 卷积层 + 池化层 + 全连接层 + 全连接层from matplotlib import pyplot as plt import tensorflow as tf import datetime from tensorflow.examples.tutorials.mnist import input_data def weight_variable(shape): # 权重正态分布初始化 initial = tf.truncated_normal(shape, stddev=0.1) # shape表示生成张量的维度,mean是均值,stddev是标准差 return tf.Variable(initial) def bias_variable(shape): # 偏置量初始化 initial = tf.constant(0.1, shape=shape) # value=0.1,shape是生成的维度 return tf.Variable(initial) def conv2d(x, W): # 定义2维的卷积图层 return tf.nn.conv2d(x, W, strides=[1, 1, 1, 1], padding='SAME') # strides:每跨多少步抽取信息,strides[1, x_movement,y_movement, 1], [0]和strides[3]必须为1 # padding:边距处理,“SAME”表示输出图层和输入图层大小保持不变,设置为“VALID”时表示舍弃多余边距(丢失信息) def max_pool(x): return tf.nn.max_pool(x, ksize=[1, 2, 2, 1], strides=[1, 2, 2, 1], padding='SAME') # ksize 池化窗口的大小一般是[1, height, width, 1],所以这两个维度设为了1 # strides 和卷积类似,窗口在每一个维度上滑动的步长,一般也是[1, stride,stride, 1] if __name__ == '__main__': x = tf.placeholder(tf.float32, [None, 784]) y = tf.placeholder(tf.float32, [None, 10]) keep_prob = tf.placeholder(tf.float32) # 创建神经网络第1层,输入层,激活函数为relu W_layer1 = weight_variable([784, 500]) b_layer1 = bias_variable([500]) h1 = tf.add(tf.matmul(x, W_layer1), b_layer1) h1 = tf.nn.relu(h1) # 创建神经网络第2层,隐藏层,激活函数为relu W_layer2 = weight_variable([500, 1000]) b_layer2 = bias_variable([1000]) h2 = tf.add(tf.matmul(h1, W_layer2), b_layer2) h2 = tf.nn.relu(h2) # 创建神经网络第3层,隐藏层,激活函数为relu W_layer3 = weight_variable([1000, 300]) b_layer3 = bias_variable([300]) h3 = tf.add(tf.matmul(h2, W_layer3), b_layer3) h3 = tf.nn.relu(h3) # 创建神经网络第4层,输出层,激活函数为softmax W_layer4 = weight_variable([300, 10]) b_layer4 = bias_variable([10]) predict = tf.add(tf.matmul(h3, W_layer4), b_layer4) y_conv = tf.nn.softmax(tf.matmul(h3, W_layer4) + b_layer4) cross_entropy = tf.reduce_mean(tf.nn.softmax_cross_entropy_with_logits(logits=predict, labels=y)) train_step = tf.train.AdamOptimizer(1e-4).minimize(cross_entropy) correct_prediction = tf.equal(tf.argmax(y_conv, 1), tf.argmax(y, 1)) accuracy = tf.reduce_mean(tf.cast(correct_prediction, 'float')) i_list2 = [] train_error2 = [] test_acc2 = [] with tf.Session() as sess2: sess2.run(tf.global_variables_initializer()) # 初始化变量 starttime = datetime.datetime.now() mnist = input_data.read_data_sets('MNIST_data/', one_hot=True) for i in range(1000): batch = mnist.train.next_batch(100) if i % 50 == 0: cross_entropy_now = sess2.run(cross_entropy, feed_dict={x: batch[0], y: batch[1], keep_prob: 1}) print('step %d, training error %g' % (i, cross_entropy_now)) res = accuracy.eval(session=sess2, feed_dict={x: mnist.test.images, y: mnist.test.labels, keep_prob: 1.0}) print('test accuracy %g' % res) if i != 0: i_list2.append(i) train_error2.append(cross_entropy_now) test_acc2.append(res) sess2.run(train_step, feed_dict={x: batch[0], y: batch[1], keep_prob: 0.8}) endtime = datetime.datetime.now() print('Cost: ' + str(endtime - starttime)) x = tf.placeholder(tf.float32, [None, 784]) # 输入数据 None表示行不定 x_image = tf.reshape(x, [-1, 28, 28, 1]) # 将原图reshape为4维,-1表示数据是黑白的,28*28=784,1表示颜色通道数目 y = tf.placeholder(tf.float32, [None, 10]) W_conv1 = weight_variable([5, 5, 1, 32]) # 按照[5,5,输入通道=1,输出通道=32]生成一组随机变量 b_conv1 = bias_variable([32]) h_conv1 = tf.nn.relu(conv2d(x_image, W_conv1) + b_conv1) # 输出size 28*28*32(因为conv2d()中x和y步长都为1,边距保持不变) h_pool1 = max_pool(h_conv1) # 把h_pool1的厚度由32增加到64,长宽由14*14缩小为7*7 W_conv2 = weight_variable([5, 5, 32, 64]) b_conv2 = bias_variable([64]) h_conv2 = tf.nn.relu(conv2d(h_pool1, W_conv2) + b_conv2) h_pool2 = max_pool(h_conv2) # 第一层全连接 # 把h_pool2由7*7*64,变成1024*1 W_fc1 = weight_variable([7 * 7 * 64, 1024]) b_fc1 = bias_variable([1024]) h_pool2_flat = tf.reshape(h_pool2, [-1, 7 * 7 * 64]) # 把pooling后的结构reshape为一维向量 h_fc1 = tf.nn.relu(tf.matmul(h_pool2_flat, W_fc1) + b_fc1) keep_prob = tf.placeholder(tf.float32) h_fc1_drop = tf.nn.dropout(h_fc1, keep_prob) # 第二层全连接 # 按照keep_prob的概率扔掉一些,为了减少过拟合 W_fc2 = weight_variable([1024, 10]) b_fc2 = bias_variable([10]) predict = tf.add(tf.matmul(h_fc1_drop, W_fc2), b_fc2) y_conv = tf.nn.softmax(tf.matmul(h_fc1_drop, W_fc2) + b_fc2) cross_entropy = tf.reduce_mean(tf.nn.softmax_cross_entropy_with_logits(logits=predict, labels=y)) # 计算误差 train_step = tf.train.AdamOptimizer(1e-4).minimize(cross_entropy) # 通过使用动量(参数的移动平均数)来改善传统梯度下降,促进超参数动态调整 correct_prediction = tf.equal(tf.argmax(y_conv, 1), tf.argmax(y, 1)) # 找出预测正确的标签 accuracy = tf.reduce_mean(tf.cast(correct_prediction, 'float')) # 得出通过正确个数除以总数得出准确率 i_list = [] train_error = [] test_acc = [] with tf.Session() as sess: sess.run(tf.global_variables_initializer()) # 初始化变量 starttime = datetime.datetime.now() mnist = input_data.read_data_sets('MNIST_data/', one_hot=True) for i in range(1000): batch = mnist.train.next_batch(100) if i % 50 == 0: cross_entropy_now = sess.run(cross_entropy, feed_dict={x: batch[0], y: batch[1], keep_prob: 1}) print('step %d, training error %g' % (i, cross_entropy_now)) res = accuracy.eval(session=sess, feed_dict={x: mnist.test.images, y: mnist.test.labels, keep_prob: 1.0}) print('test accuracy %g' % res) if i != 0: i_list.append(i) train_error.append(cross_entropy_now) test_acc.append(res) sess.run(train_step, feed_dict={x: batch[0], y: batch[1], keep_prob: 0.8}) endtime = datetime.datetime.now() print('Cost: ' + str(endtime - starttime)) ax1 = plt.subplot(121) ax1.plot(i_list, test_acc, 'b', label="CNN") ax1.plot(i_list, test_acc2, 'g', label="BP") ax1.set_title("test accuracy") plt.legend() ax2 = plt.subplot(122) ax2.set_title("training error") ax2.plot(i_list, train_error, 'b', label="CNN") ax2.plot(i_list, train_error2, 'g', label="BP") plt.legend() plt.show()- 1
- 2
- 3
- 4
- 5
- 6
- 7
- 8
- 9
- 10
- 11
- 12
- 13
- 14
- 15
- 16
- 17
- 18
- 19
- 20
- 21
- 22
- 23
- 24
- 25
- 26
- 27
- 28
- 29
- 30
- 31
- 32
- 33
- 34
- 35
- 36
- 37
- 38
- 39
- 40
- 41
- 42
- 43
- 44
- 45
- 46
- 47
- 48
- 49
- 50
- 51
- 52
- 53
- 54
- 55
- 56
- 57
- 58
- 59
- 60
- 61
- 62
- 63
- 64
- 65
- 66
- 67
- 68
- 69
- 70
- 71
- 72
- 73
- 74
- 75
- 76
- 77
- 78
- 79
- 80
- 81
- 82
- 83
- 84
- 85
- 86
- 87
- 88
- 89
- 90
- 91
- 92
- 93
- 94
- 95
- 96
- 97
- 98
- 99
- 100
- 101
- 102
- 103
- 104
- 105
- 106
- 107
- 108
- 109
- 110
- 111
- 112
- 113
- 114
- 115
- 116
- 117
- 118
- 119
- 120
- 121
- 122
- 123
- 124
- 125
- 126
- 127
- 128
- 129
- 130
- 131
- 132
- 133
- 134
- 135
- 136
- 137
- 138
- 139
- 140
- 141
- 142
- 143
- 144
- 145
- 146
- 147
- 148
- 149
- 150
- 151
- 152
- 153
- 154
- 155
- 156
- 157
- 158
- 159
- 160
- 161
- 162
- 163
- 164


-
相关阅读:
[附源码]java毕业设计小区物业管理系统论文
java项目运行时信息获取
JavaScript 基础语法
倒计时 2 天!聚焦 Arm 性能提升,助力龙蜥生态落地应用
天翼云推出全栈政务混合云 支持私有化运行
组件的传参
哪种IP更适合你的数据抓取需求?
自研的MySQL Rest Data Service(MRDS)
Java的构造器
C语言 coding style
- 原文地址:https://blog.csdn.net/newlw/article/details/126813687
