-
yolov4模型部署流程
环境配置
以 yolov4 为例,打开 https://github.com/AlexeyAB/darknet 这个教程,将这个项目下载到本地文件。接下来需要下载一下:
• Opencv: OpenCV >= 2.4: https://opencv.org/releases.html
• 安装完成后,添加环境变量:右击此电脑-属性-高级系统设置-环境变
量,找到系统变量中的 path(找到自己的安装目录相对应的文件位置):C:\Program Files\opencv\build\x64\vc15\bin C :\Program Files\opencv\build\x64\vc14\bin- 1
- 2
添加完成后,建议重启下,保证环境变量生效。
- CMake >= 3.12: https://cmake.org/download/
- Visual Studio 2019 https://visualstudio.microsoft.com/zh-hans/thank-you-downloading-visual-studio/?sku=Community
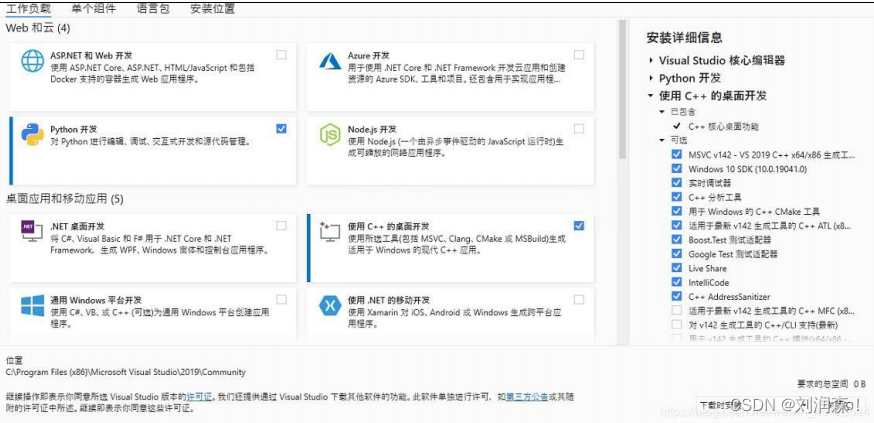
一直下一步,选择如上图,同时选择自己要安装的位置并安装。安装配置完成后,打开 cmake:
1:导入之前下载好的 github 项目
2,3:configure 选择 vs2019,x64
4: 完成后开始编译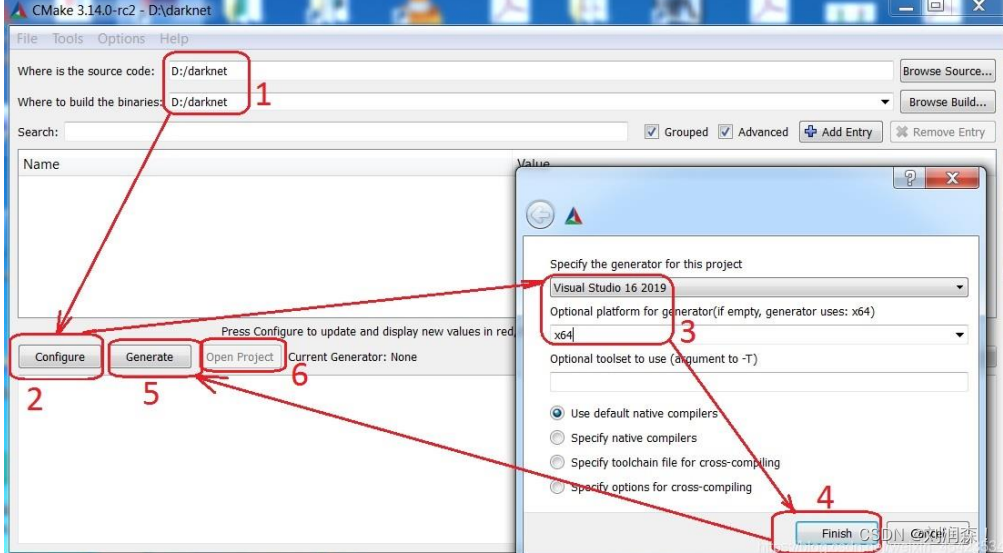
采用 cpu 运行,configure 报错后,选择将 ENABLE_CUDA 取消(后面的方框取消√)。
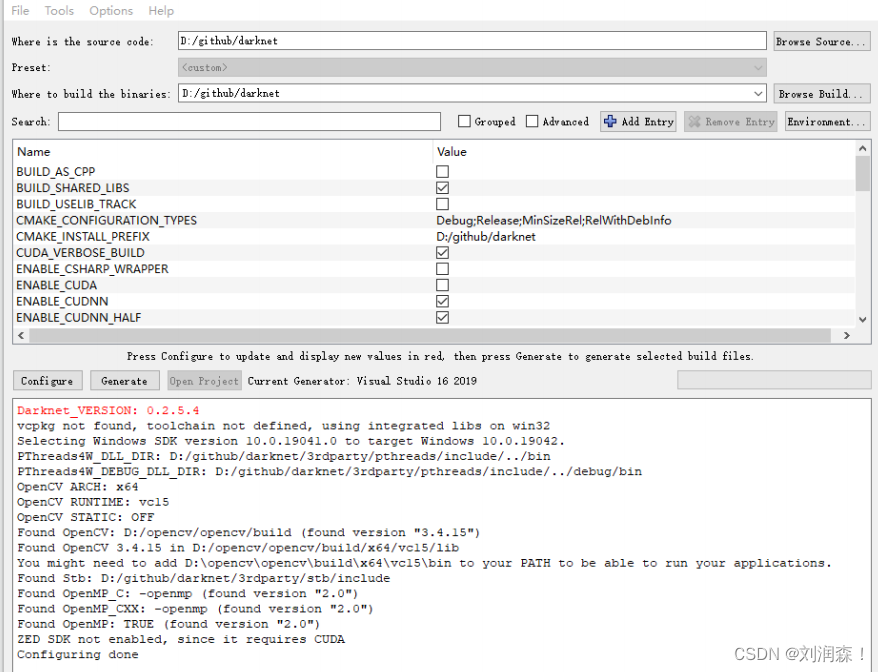
如果报错找不到对应的 opencv 文件,可以手动指定路径。


2.显示 congifure done 后,点击 generate
3. generate done 后,点击 open project 就会自动打开 vs2019
4.选择 release,x64,点击生成解决方案。
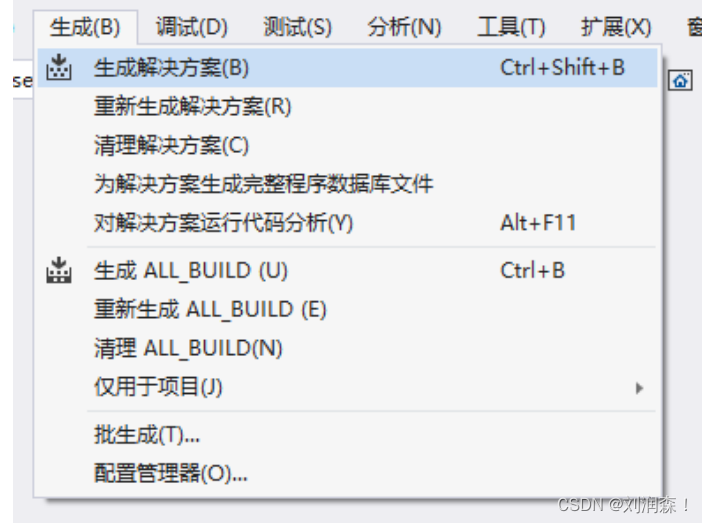
5.生成完成后,在原项目文件中就会出现一个 release 文件夹,里面有 darknet.exe 文件,此时直接运行时失败的下载 YOLOV4 权重文件
链接:https://pan.baidu.com/s/1ZNK7FbqC2TlVKukQFqGYSw
提取码:g0ju链接失效 ,自己下载 yolov4.weights
将权重文件中的 exe 文件复制到 D:\download\darknet-master\build\darknet\x64 目录中。
在命令提示窗口输入
cd /d D:\download\darknet-master\build\darknet\x6- 1
接下来输入
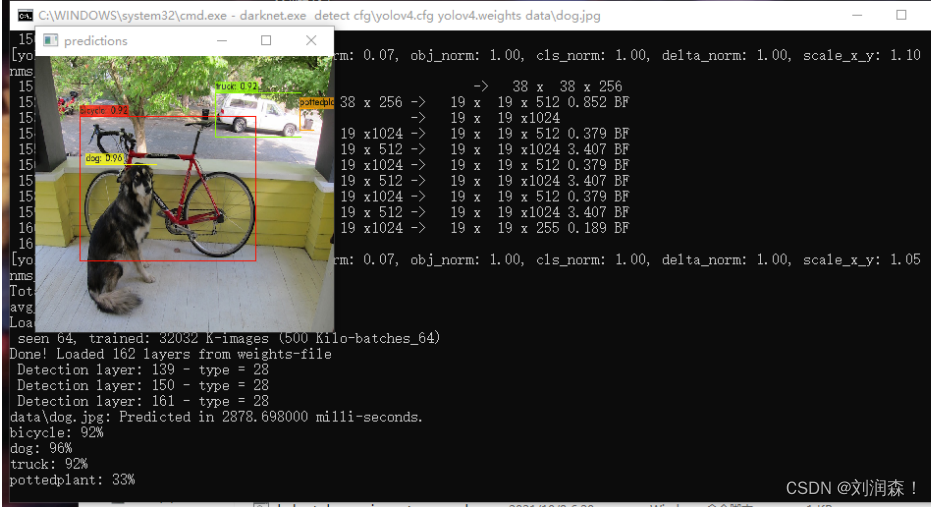
darknet.exe detect cfg\yolov4.cfg yolov4.weights data\dog.jpg- 1

输入完成后进行作者项目中的 dog.jpg 的目标检测。
利用 yolov4 训练新的数据集
1、Yolov4 预训练模型 yolov4.conv.137 下载地址:https://pan.baidu.com/s/1kwAwefd3absOrZSTAGnbhQ,提取码:x3gz,放在在 build/darknet/x64/下目录下。
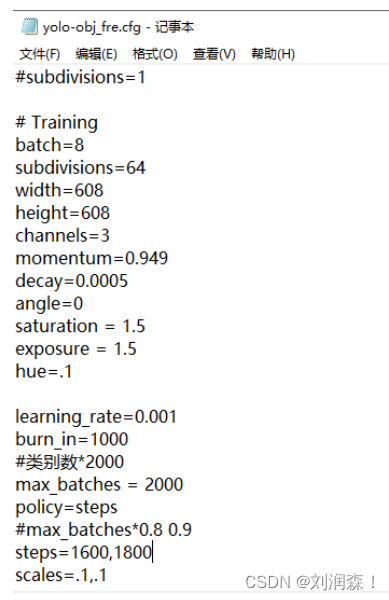
2、创建配置文件:放在 darknet-master/cfg/下,创建 yolo-obj_fre.cfg(复制cfg/yolov4-custom.cfg 文件并重命名即可),但需要在几个地方修改,如下所示:
- batch=8 #依据你电脑的显存大小而定,尽量设大
一点 - subdivisions=64 # 看情况而定
- max_batches=2000 #classes*2000
- steps=1600,1800 #max_batches0.8,max_batches0.9
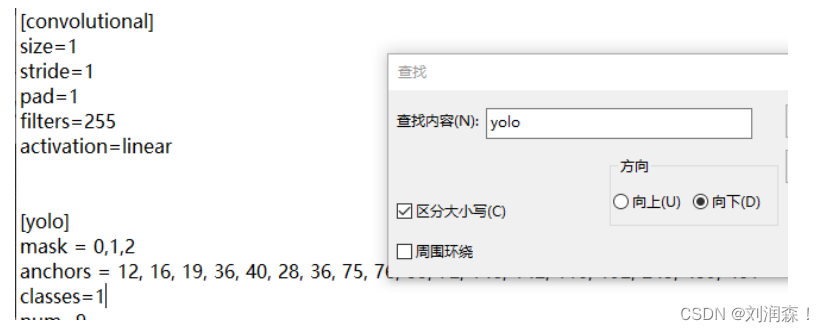
- 修改 3 个[yolo]下 classes=1 #你要训练的类别数
- 修改 2 个[yolo]上面 filters=18 #filters=(classes + 5)x3,注意只修改每个[yolo]上面最后一个 conv 的 filters
创建 fre.names 文件,其中每一行写上一个你要训练的一个类别,如下: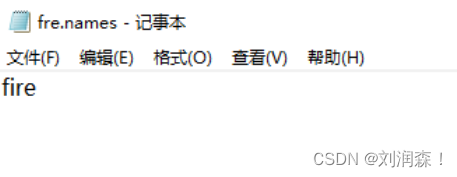
3、在 build\darknet\x64\data\下,创建 fre.data 文件,文件格式为:- classes= 1
- train = build/darknet/x64/data/train.txt # 这个下面说,train.txt
里面存放着训练图片的存放路径 - valid = build/darknet/x64/data/test.txt #
- names = build/darknet/x64/data/fre.names # 创建的 fre.names
- backup = backup/ #权重存在在 backup 文件中
4、再处理自己的数据集(jpg 文件+xml 文件),将 jpg 文件放在./build/darknet/x64/data/obj 中,将 xml 文件放在./build/darknet/x64/data/train_label,接下来需要将 xml 文件转化为 yolov4 需要的 txt 文件,代码如下
import os import xml.etree.ElementTree as ET def xml_to_txt(data_path, anno_path, path, use_difficult_bbox=False): classes = ['am', 'fm', 'gsm', 'qpsk'] image_inds = file_name(data_path + "train_label/") # 遍历 xml 文件 with open(anno_path, 'a') as f: for image_ind in image_inds: img_txt = data_path + 'obj/' + image_ind + '.txt' img_txt_file = open(img_txt, 'w') image_path = os.path.join(data_path, 'obj/', image_ind + '.jpg') label_path = os.path.join(data_path, 'train_label', image_ind + '.xml') root = ET.parse(label_path).getroot() objects_size = root.findall('size') image_width = int(objects_size[0].find('width').text) image_height = int(objects_size[0].find('height').text) objects = root.findall('object') for obj in objects: difficult = obj.find('difficult').text.strip() if (not use_difficult_bbox) and (int(difficult) == 1): continue bbox = obj.find('bndbox') class_ind = str(classes.index(obj.find('name').text.lower().strip())) xmin = int(bbox.find('xmin').text.strip()) xmax = int(bbox.find('xmax').text.strip()) ymin = int(bbox.find('ymin').text.strip()) ymax = int(bbox.find('ymax').text.strip()) x_center = str((xmin + xmax) / (2 * image_width)) y_center = str((ymin + ymax) / (2 * image_height)) width_ = str((xmax - xmin) / (image_width)) height_ = str((ymax - ymin) / (image_height)) class_ind += ' ' + ','.join([x_center + ' ' + y_center + ' ' + width_ + ' ' + height_]) img_txt_file.write(class_ind + "\n") f.write(image_path + "\n") def file_name(file_dir): L = [] for root, dirs, files in os.walk(file_dir): for file in files: if os.path.splitext(file)[1] == '.xml': L.append(file.split(".")[0]) return L if __name__ == '__main__': num1 = xml_to_txt('./build/darknet/x64/data/', './build/darknet/x64/data/train.txt', 'train') print('done')- 1
- 2
- 3
- 4
- 5
- 6
- 7
- 8
- 9
- 10
- 11
- 12
- 13
- 14
- 15
- 16
- 17
- 18
- 19
- 20
- 21
- 22
- 23
- 24
- 25
- 26
- 27
- 28
- 29
- 30
- 31
- 32
- 33
- 34
- 35
- 36
- 37
- 38
- 39
- 40
- 41
- 42
- 43
- 44
- 45
- 46
- 47
- 48
5、运行完上述代码,可以在./build/darknet/x64/data/下生成 train.txt 文件(里面保存训练图片文件的路径)在./build/darknet/x64/data/obj/ 下生成 img.txt(每一张图片对应的 txt 文件,与 jpg 文件放在一起),同时 test.txt 可以直接复制 train.txt,两者可相同。
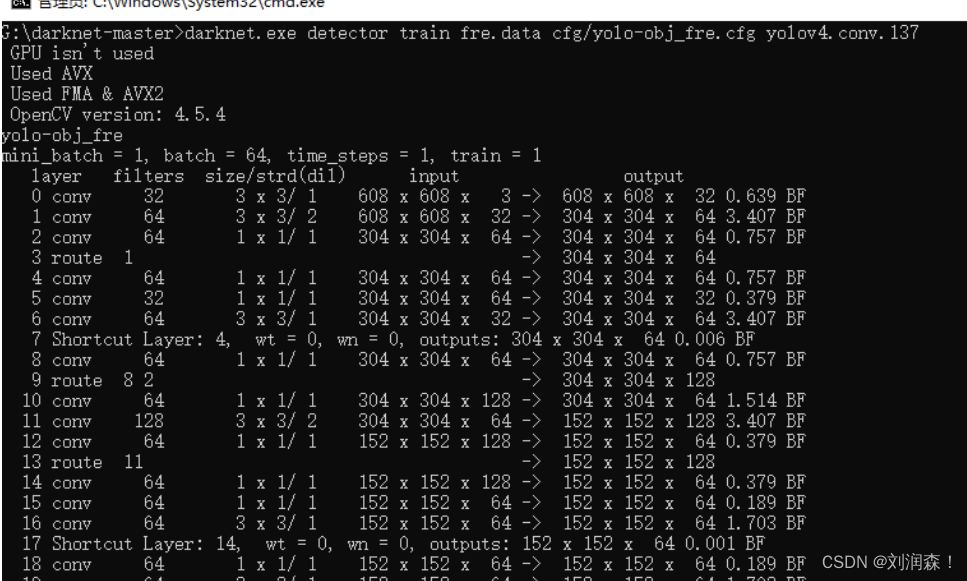
6、接着训练模型,本例子中将上述的文件以及 darknet.exe 全部复制到了根目录 darknet-master 中,进入该目录下,输入 darknet.exe detector train fre.data cfg/yolo-obj_fre.cfg yolov4.conv.137 即可训练模型,最终的权重均保存在 darknet-master/backup 中
模型部署
darknet 模型需要 转为 ONNX
安装onnx

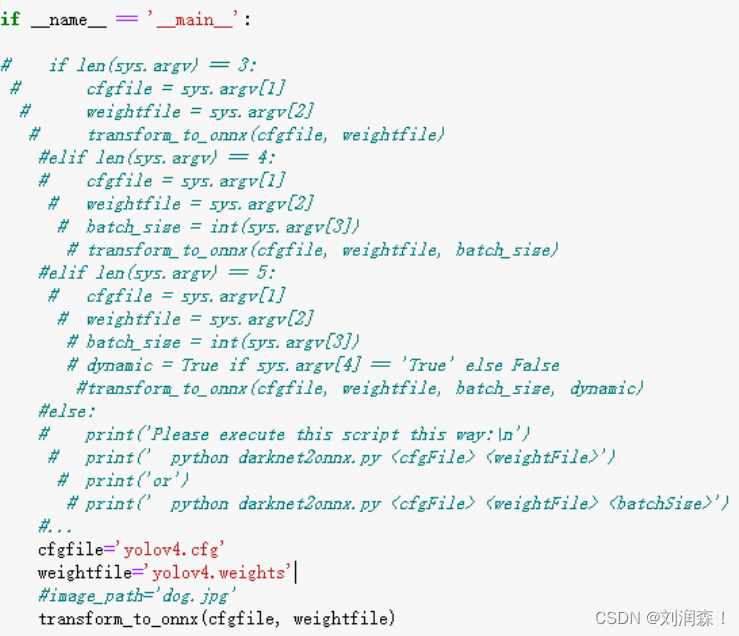
利用 darknet2onnx.py 文件将 darknet 模型转化为 onnx 模型,下载地址为:https://hub.fastgit.org/Tianxiaomo/pytorch-YOLOv4,运行 tool/darknet2onnx.py 文件,注意:cfgfile(darknet 的 cfg 文件路径)、weightfile(darknet 的 weight 文件路径)需要补充,修改如下
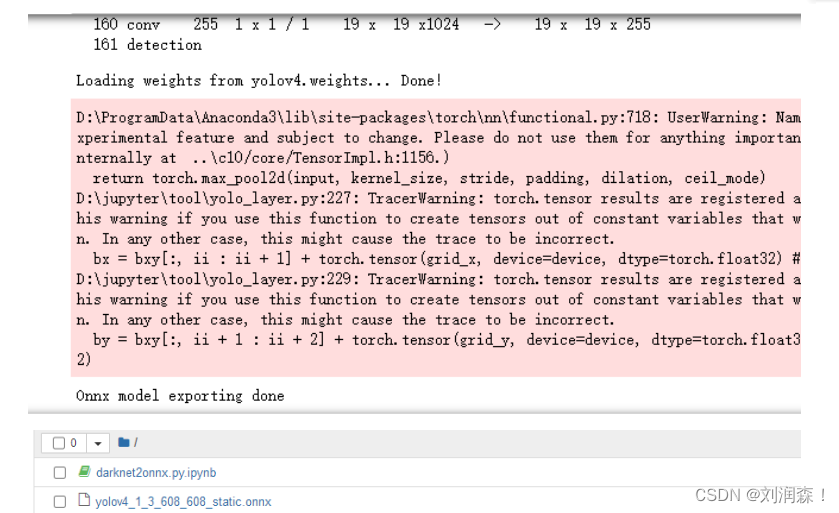
运行该文件以后,可以将 darknet 模型转为 ONNX 模型(本例子是在 jupyter notebook 中运行的),结果如下,转化成功:
flask API
Flask 是一个基于 Python 开发的微型 web 框架,使用 Flask 实现简单的 api,形成特定网页,
这部分主要针对 onnx 模型在 flask 上的部署,即实现在网页上上传图片,然后网页上显示目标识别后的结果。(利用 pycharm)
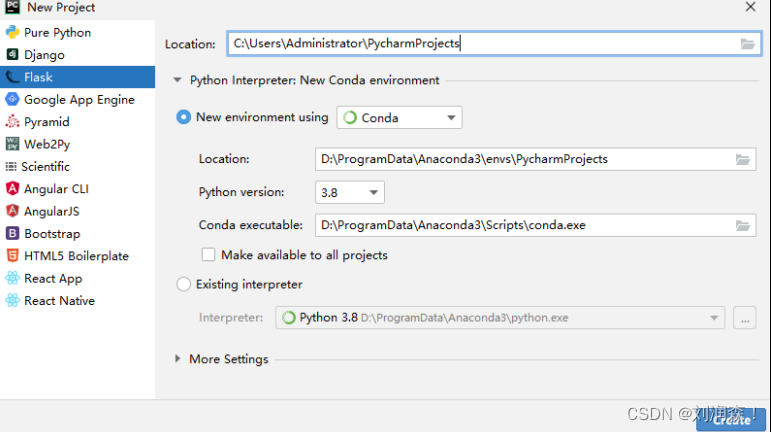
首先在 pycharm 中创建一个新的 flask project,如下:
而后将 https://hub.fastgit.org/Tianxiaomo/pytorch-YOLOv4 中的文件 tool 和data导入,将上述步骤中生成的onnx模型导入,再在static下新建一个目录images用来存放待检测的图片 test.jpg。在 templates 下新建了一个 upload.html 文件,用来定义网页的页面。该 project 的文件总目录如下: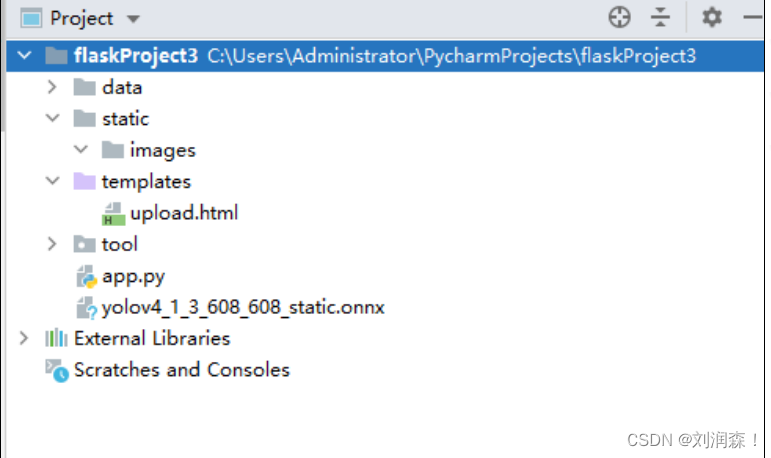
upload.html 代码如下:<!DOCTYPE html> <html lang="en"> <head> <meta charset="UTF-8"> <title>Flask 上传图片</title> </head> <body> <h1>使用 Flask 上传本地图片并显示</h1> <form action="" enctype='multipart/form-data' method='POST'> <input type="file" name="file" style="margin-top:20px;"/> <br> <input type="submit" value=" 上 传 " class="button-new" style="margin-top:15px;"/> </form> </body> </html>- 1
- 2
- 3
- 4
- 5
- 6
- 7
- 8
- 9
- 10
- 11
- 12
- 13
- 14
- 15
- 16
app.py 文件代码如下:
import numpy as np from flask import Flask, render_template, request, redirect, url_for, make_response, jsonify from datetime import timedelta import os import time # 设置允许的文件格式 ALLOWED_EXTENSIONS = set(['png', 'jpg', 'JPG', 'PNG', 'bmp']) import cv2 import onnxruntime from tool.utils import * def allowed_file(filename): return '.' in filename and filename.rsplit('.', 1)[1] in ALLOWED_EXTENSIONS # 改写,只有检测部分 def test(onnx, image_path): # onnx 模型的推理 session = onnxruntime.InferenceSession(onnx) # session = onnx.load(onnx_path) print("The model expects input shape: ", session.get_inputs()[0].shape) image_src = cv2.imread(image_path) # 检测 detect(session, image_src) def detect(session, image_src): # 1*3*高*宽 IN_IMAGE_H = session.get_inputs()[0].shape[2] IN_IMAGE_W = session.get_inputs()[0].shape[3] # Input,数据预处理 resized = cv2.resize(image_src, (IN_IMAGE_W, IN_IMAGE_H), interpolation=cv2.INTER_LINEAR) img_in = cv2.cvtColor(resized, cv2.COLOR_BGR2RGB) img_in = np.transpose(img_in, (2, 0, 1)).astype(np.float32) img_in = np.expand_dims(img_in, axis=0) img_in /= 255.0 print("Shape of the network input: ", img_in.shape) # Compute input_name = session.get_inputs()[0].name outputs = session.run(None, {input_name: img_in}) boxes = post_processing(img_in, 0.4, 0.6, outputs) num_classes = 80 if num_classes == 20: namesfile = 'data/voc.names' elif num_classes == 80: namesfile = 'data/coco.names' else: namesfile = 'data/names' class_names = load_class_names(namesfile) plot_boxes_cv2(image_src, boxes[0], savename='prediction_onnx.jpg', class_names=class_names) # 创建实例 app = Flask(__name__) # 设置静态文件缓存过期时间 app.send_file_max_age_default = timedelta(seconds=1) onnx = "yolov4_1_3_608_608_static.onnx" @app.route('/upload', methods=['POST', 'GET']) # 添加路由,访问的网址 def upload(): # 方法的使用模式 if request.method == 'POST': # 原先 file 的控件名 f = request.files['file'] if not (f and allowed_file(f.filename)): return jsonify({"error": 1001, "msg": "only png\PNG\jpg\JPG\Bmp"}) # 获取表单数据 user_input = request.form.get("name") basepath = os.path.dirname(__file__) # 当前文件所在路径 upload_path = os.path.join(basepath, 'static/images', 'test.jpg') # 以 test 的名称 f.save(upload_path) # 检测 test(onnx, upload_path) image_data = open('prediction_onnx.jpg', "rb").read() response = make_response(image_data) response.headers['Content-Type'] = 'image/png' return response return render_template('upload.html') if __name__ == '__main__': # host 表示共享访问 app.run(host='0.0.0.0', port=8987, debug=True)- 1
- 2
- 3
- 4
- 5
- 6
- 7
- 8
- 9
- 10
- 11
- 12
- 13
- 14
- 15
- 16
- 17
- 18
- 19
- 20
- 21
- 22
- 23
- 24
- 25
- 26
- 27
- 28
- 29
- 30
- 31
- 32
- 33
- 34
- 35
- 36
- 37
- 38
- 39
- 40
- 41
- 42
- 43
- 44
- 45
- 46
- 47
- 48
- 49
- 50
- 51
- 52
- 53
- 54
- 55
- 56
- 57
- 58
- 59
- 60
- 61
- 62
- 63
- 64
- 65
- 66
- 67
- 68
- 69
- 70
- 71
- 72
- 73
- 74
- 75
- 76
- 77
- 78
- 79
- 80
- 81
- 82
- 83
- 84
- 85
- 86
- 87
- 88
其中,上传的图片我们用 test.jpg 文件名保存,检测后得到的图片结果用prediction_onnx.jpg 来保存,run 该项目,会生成一个网址如下:

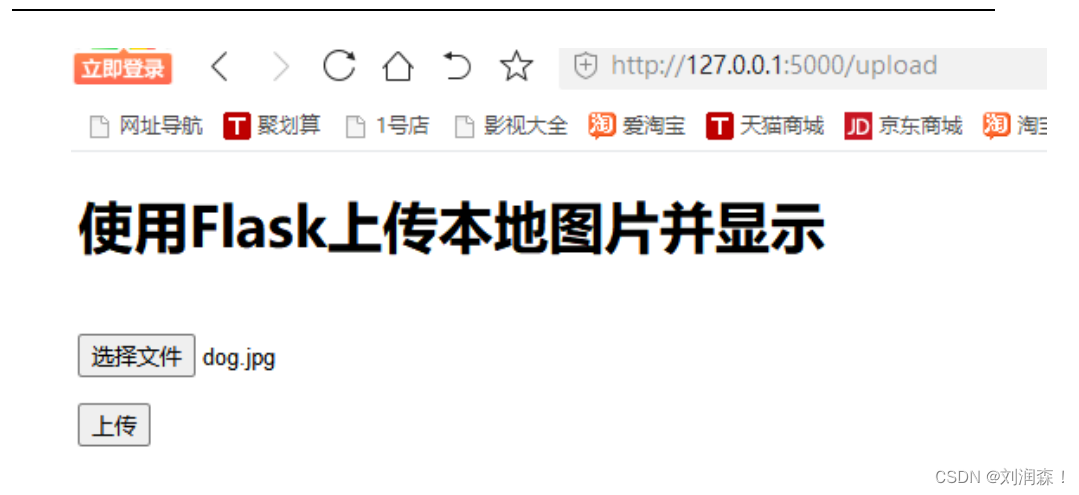

此时该 project 的总文件目录如下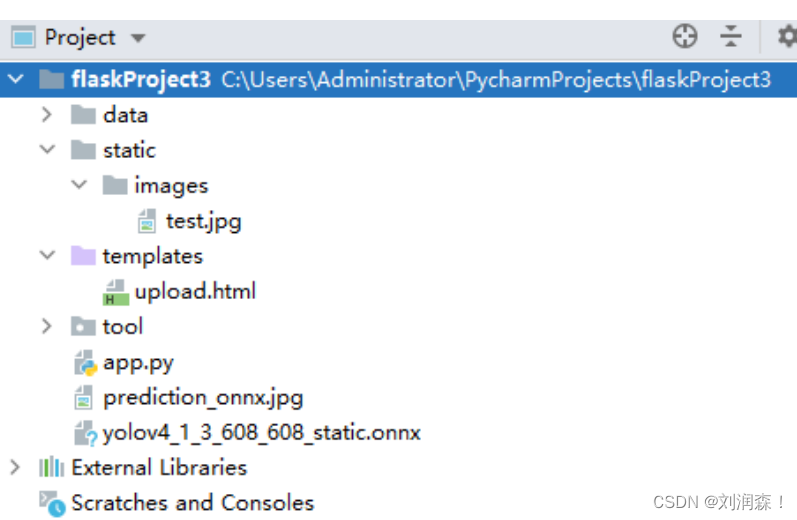
ncnn 在嵌入式平台使用
下载并安装 protobuf-3.4.0
1、下载地址:https://pan.baidu.com/s/1fRV1OpJsUXscUNlC4uvUMA 提取
码:bt4q2、下载后解压
3、打开 VS2019 的 X64 命令行
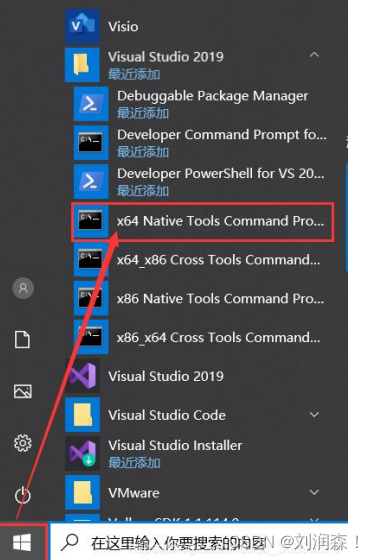
在 VS2019 的 X64 命令行下执行以下命令
cd <protobuf-root-dir> mkdir build-vs2019 cd build-vs2019 cmake -G"NMake Makefiles" -DCMAKE_BUILD_TYPE=Release -DCMAKE_INSTALL_PREFIX=%cd%/install -Dprotobuf_BUILD_TESTS=OFF -Dprotobuf_MSVC_STATIC_RUNTIME=OFF ../cmake nmake nmake install- 1
- 2
- 3
- 4
- 5
- 6
- 7
- 8
注:
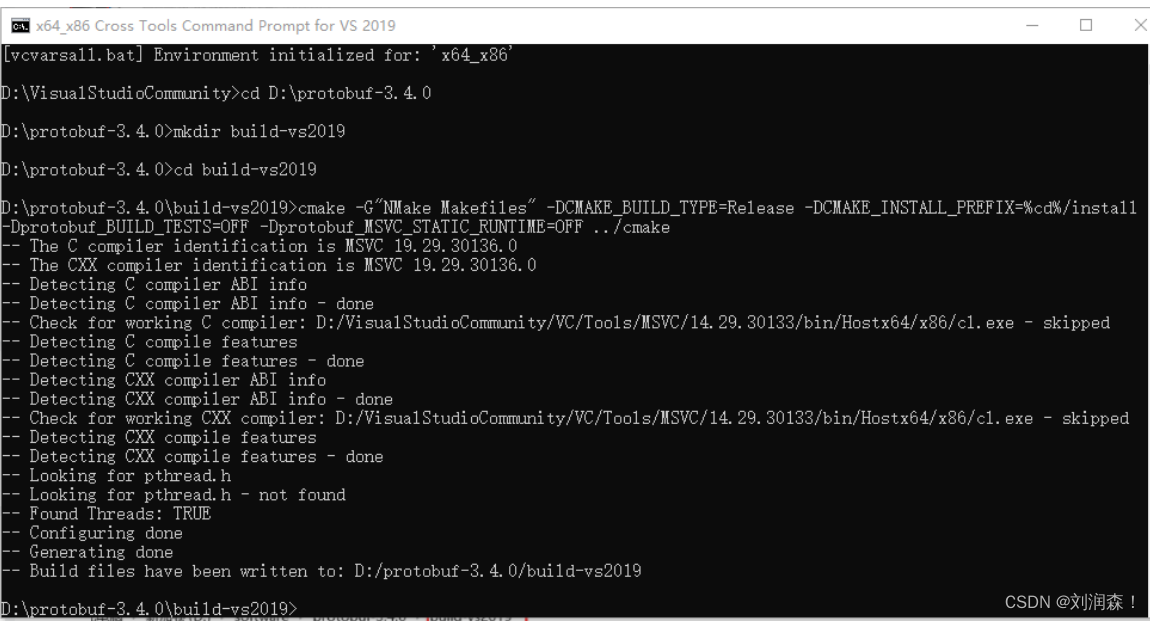
输入 nmake 后,继续输入 nmake install 就完成了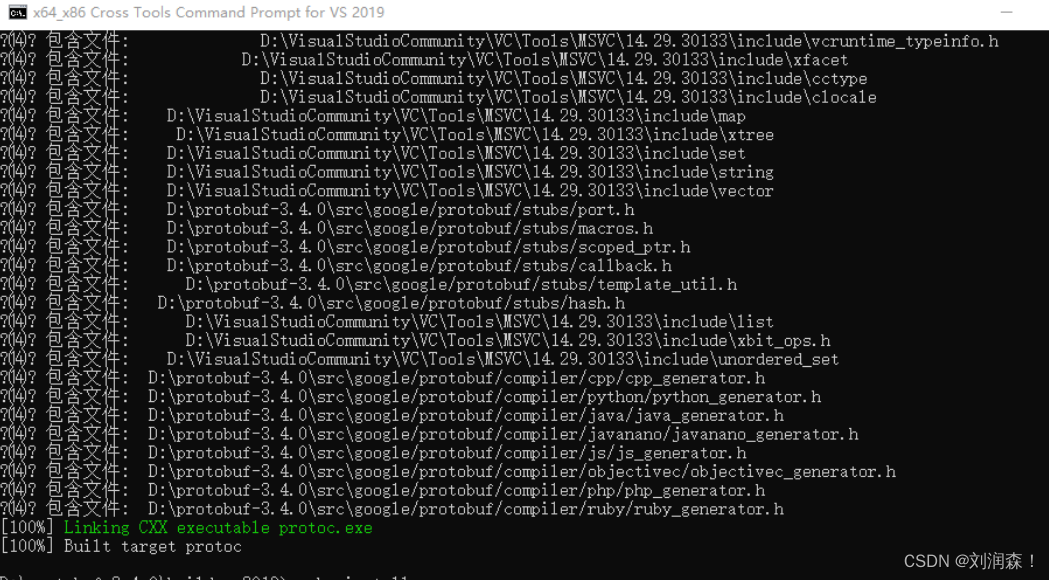
、成功后会产生 build-vs2019 文件夹以及该文件夹下的若干文件夹及文件
-
相关阅读:
DB net 实践
【VulnHub靶场】——BOREDHACKERBLOG: SOCIAL NETWORK
算法的时间复杂度
测试的核心竞争力是什么?
用人话讲解深度学习中CUDA,cudatookit,cudnn和pytorch的关系
历时三个月,史上最详细的Spring注解驱动开发系列教程终于出炉了,给你全新震撼
CentOS 7删除virbr0虚拟网卡
MATLAB算法实战应用案例精讲-【图像处理】目标检测(补充篇)(附实战案例及代码实现)
NLP(4)--BERT
写给Java应用开发看的Elasticsearch调优手册
- 原文地址:https://blog.csdn.net/weixin_44510615/article/details/126786592
