-
SpringBoot

前言
Spring 的优点
Spring 是 Java企业版(Java Enterprise Edition,JEE,也称J2EE)的轻量级代替品。无需开发重量级的Enterprise JavaBean(EJB),Spring 为企业级 Java 开发提供了一种相对简单的方法,通过依赖注入和面向切面编程,用简单的 Java 对象(Plain Old Java Object,POJO)实现了 EJB 的功能。
Spring 的缺点
虽然 Spring 的组件代码是轻量级的,但它的配置却是重量级的。一开始,Spring 用 XML 配置,而且是很多 XML 配置。Spring 2.5 引入了基于注解的组件扫描,这消除了大量针对应用程序自身组件的显式 XML 配置。Spring 3.0 引入了基于Java 的配置,这是一种类型安全的可重构配置方式,可以代替 XML。
所有这些配置都代表了开发时的损耗。因为在思考 Spring 特性配置和解决业务问题之间需要进行思维切换,所以编写配置挤占了编写应用程序逻辑的时间。和所有框架一样,Spring 实用,但与此同时它要求的回报也不少。
除此之外,项目的依赖管理也是一件耗时耗力的事情。在环境搭建时,需要分析要导入哪些库的坐标,而且还需要分析导入与之有依赖关系的其他库的坐标,一旦选错了依赖的版本,随之而来的不兼容问题就会严重阻碍项目的开发进度。
使用 SpringBoot 解决上面的问题
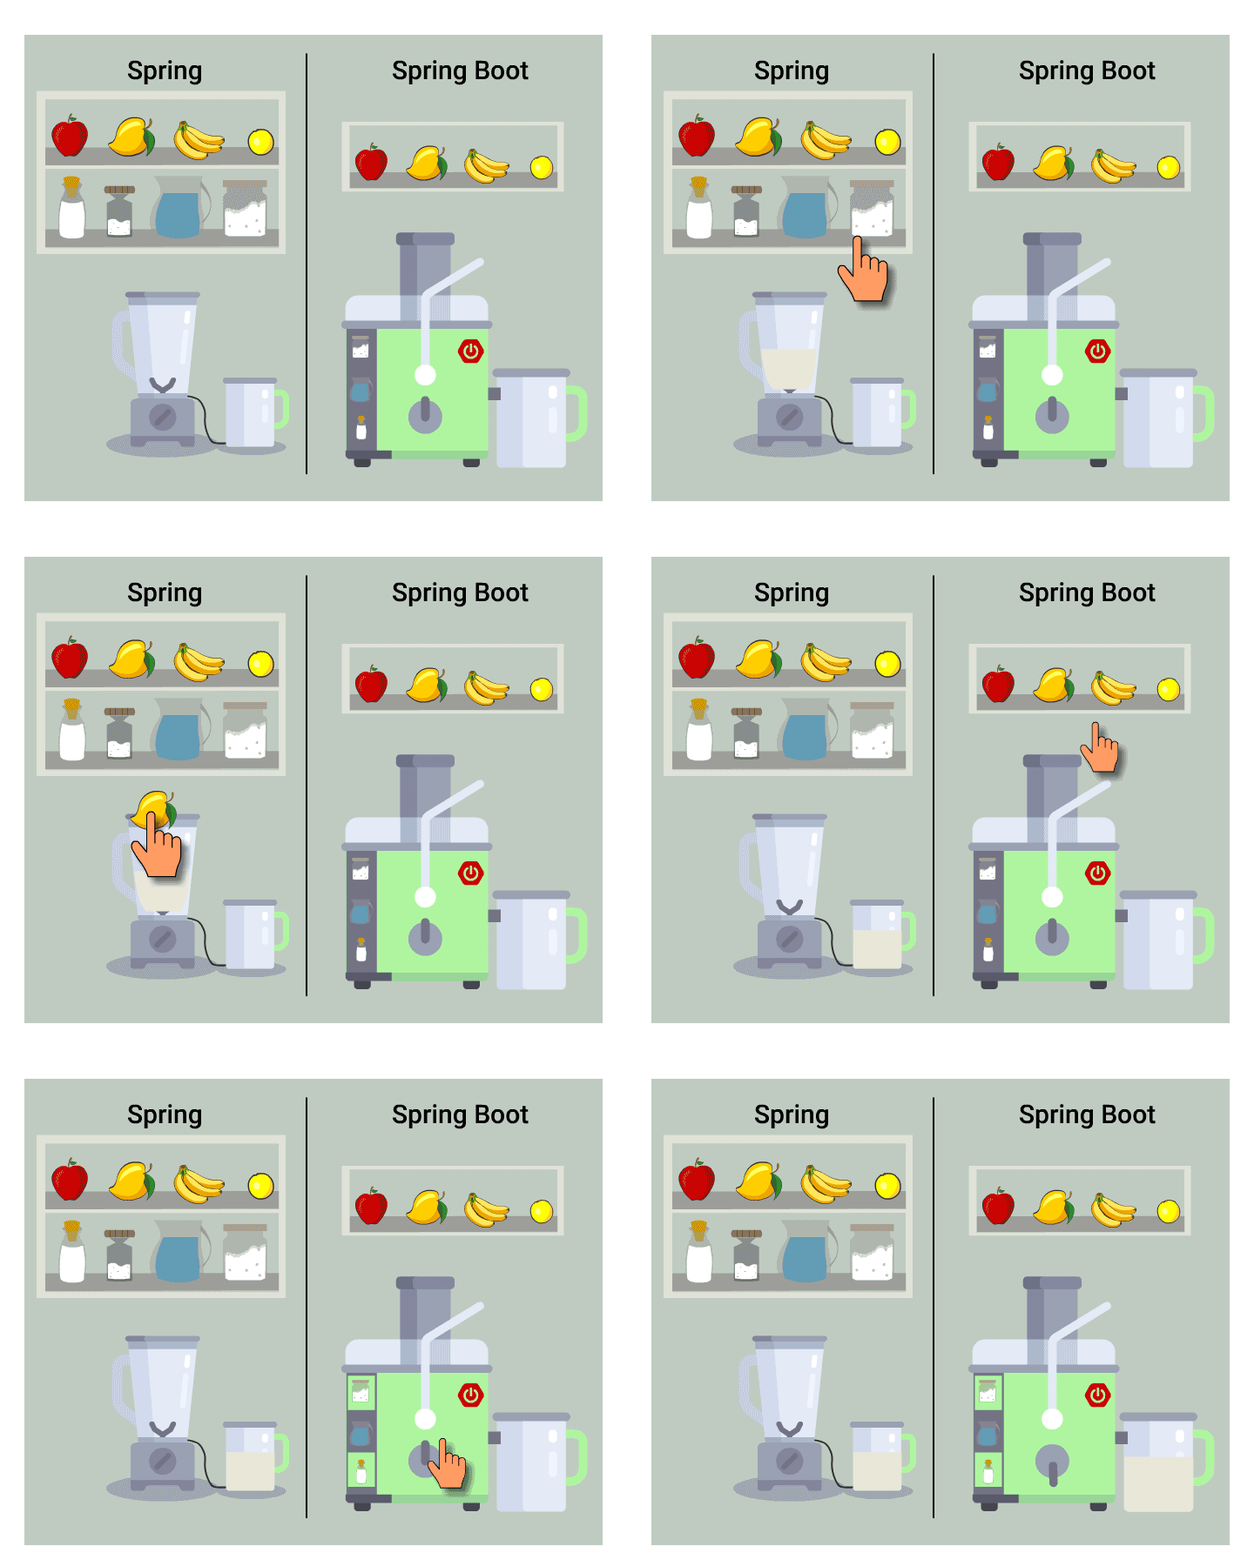
SpringBoot 对上述 Spring 的缺点进行的改善和优化,基于约定优于配置的思想,可以让开发人员不必在配置与逻辑业务之间进行思维的切换,全身心的投入到逻辑业务的代码编写中,从而大大提高了开发的效率,一定程度上缩短了项目周期。
概述
SpringBoot 是由 Pivotal 团队提供的全新框架,其设计目的是用来简化新 Spring应用的初始搭建以及开发过程。该框架使用了特定的方式来进行配置,从而使开发人员不再需要定义样板化的配置。通过这种方式,SpringBoot 致力于在蓬勃发展的快速应用开发领域(rapid application development)成为领导者。
SpringBoot 官方网址:https://spring.io/projects/spring-boot#overview
SpringBoot 开发版本推荐
- Springboot 目前分为两大版本系列,1.x 系列和 2.x 系列
- 如果是使用 Eclipse,推荐安装 Spring Tool Suite (STS) 插件
- 如果使用 IDEA 旗舰版,自带了 SpringBoot 插件,使用很方便
- 必须使用 Maven 3.3+,Maven 目前最新版本为3.8.1(2021-05-03)
- 推荐使用 Java 8,Java11,Java16,SpringBoot 1.x 系列的版本兼容Java 6,SpringBoot 2.x 系列需要至少 Java8
SpringBoot 的特性
- 能够快速创建基于 Spring 的应用程序,避免了大量的配置文件
- 能够直接使用 java main 方法启动内嵌的 Tomcat 服务器运行 SpringBoot 程序,不需要部署 war 包文件
- 提供约定的 starter POM 来简化 Maven 配置,让 Maven 的配置变得简单
- 自动化配置,根据项目的 Maven 依赖配置,Springboot 自动配置 Spring、Spring MVC 等
- 提供了一些大型项目中常见的非功能性特性,如嵌入式服务器、安全、指标,健康检测、外部配置等
- 基本可以完全不使用 XML 配置文件,采用注解配置
- SpringBoot 不是对 Spring 功能上的增强,而是提供了一种快速使用 Spring 的方式,简单理解,就是框架的框架
SpringBoot 四大核心
-
自动配置【重点】
针对很多 Spring 应用程序和常见的应用功能,SpringBoot 能自动提供相关配置。可以根据简单的配置甚至0配置来搭建整个项目。
Spring Boot 的自动配置是一个运行时(更准确地说,是应用程序启动时)的过程,考虑了众多因素,才决定 Spring 配置应该用哪个,不该用哪个。该过程是 Spring 自动完成的。
-
起步依赖【重点】
起步依赖本质上是一个Maven项目对象模型(Project Object Model,POM),定义了对其他库的传递依赖,这些东西加在一起即支持某项功能。
告诉 SpringBoot 需要什么功能,它就能引入需要的依赖库。通过起步依赖机制(Starter),简化 jar 包的引用,解决 jar 版本冲突问题。
-
Actuator【了解】
是 SpringBoot 的程序监控器,可监控 Spring 应用程序上下文中的 Bean、查看自动配置决策、Controller 映射、线程活动、应用程序健康状况等,能够深入运行中的 Spring Boot 应用程序,一探 Spring boot 程序的内部信息。
-
命令行界面【了解】
这是 SpringBoot 的可选特性,主要针对 Groovy 语言使用;
Groovy 是一种基于JVM(Java虚拟机) 的敏捷开发语言,它结合了 Python、Ruby 和 Smalltalk的许多强大的特性,Groovy 代码能够与 Java 代码很好地结合,也能用于扩展现有代码,由于其运行在 JVM 上的特性,Groovy 可以使用其他 Java 语言编写的库。
SpringBoot 重要策略
SpringBoot 框架中还有两个非常重要的策略:开箱即用和约定优于配置。
- 开箱即用,Outofbox,是指在开发过程中,通过在 MAVEN 项目的 pom 文件中添加相关依赖包,然后使用对应注解来代替繁琐的 XML 配置文件以管理对象的生命周期。这个特点使得开发人员摆脱了复杂的配置工作以及依赖的管理工作,更加专注于业务逻辑。
- 约定优于配置,Convention over configuration,是一种由 SpringBoot 本身来配置目标结构,由开发者在结构中添加信息的软件设计范式。这一特点虽降低了部分灵活性,增加了BUG定位的复杂性,但减少了开发人员需要做出决定的数量,同时减少了大量的XML配置,并且可以将代码编译、测试和打包等工作自动化。
SpringBoot 应用系统开发模板的基本架构设计从前端到后台进行说明:前端常使用模板引擎,主要有 FreeMarker 和 Thymeleaf,它们都是用 Java 语言编写的,渲染模板并输出相应文本,使得界面的设计与应用的逻辑分离,同时前端开发还会使用到 Bootstrap、AngularJS、JQuery 等;在浏览器的数据传输格式上采用 Json,非 xml,同时提供 RESTful API;SpringMVC 框架用于数据到达服务器后处理请求;到数据访问层主要有Hibernate、MyBatis、JPA 等持久层框架;数据库常用 MySQL;开发工具推荐 IntelliJIDEA。
SpringBoot 入门
【一般不用】网站创建地址:https://start.spring.io/
项目创建
1、点击创建项目
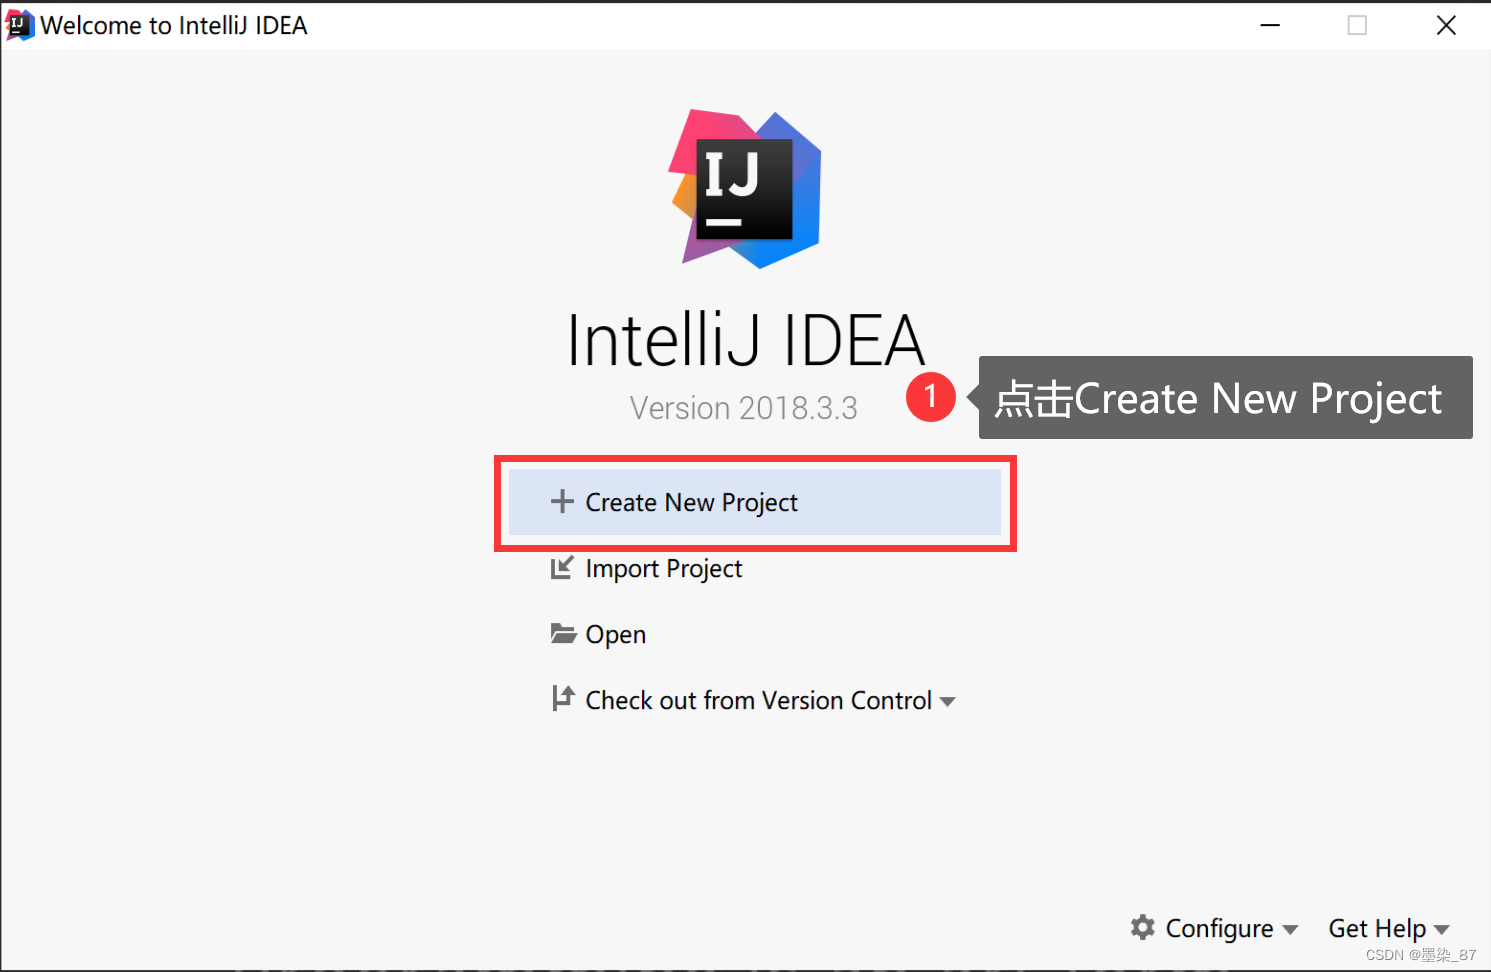
2、选择
Spring Initializr快捷创建 SpringBoot 项目(需要联网),点击下一步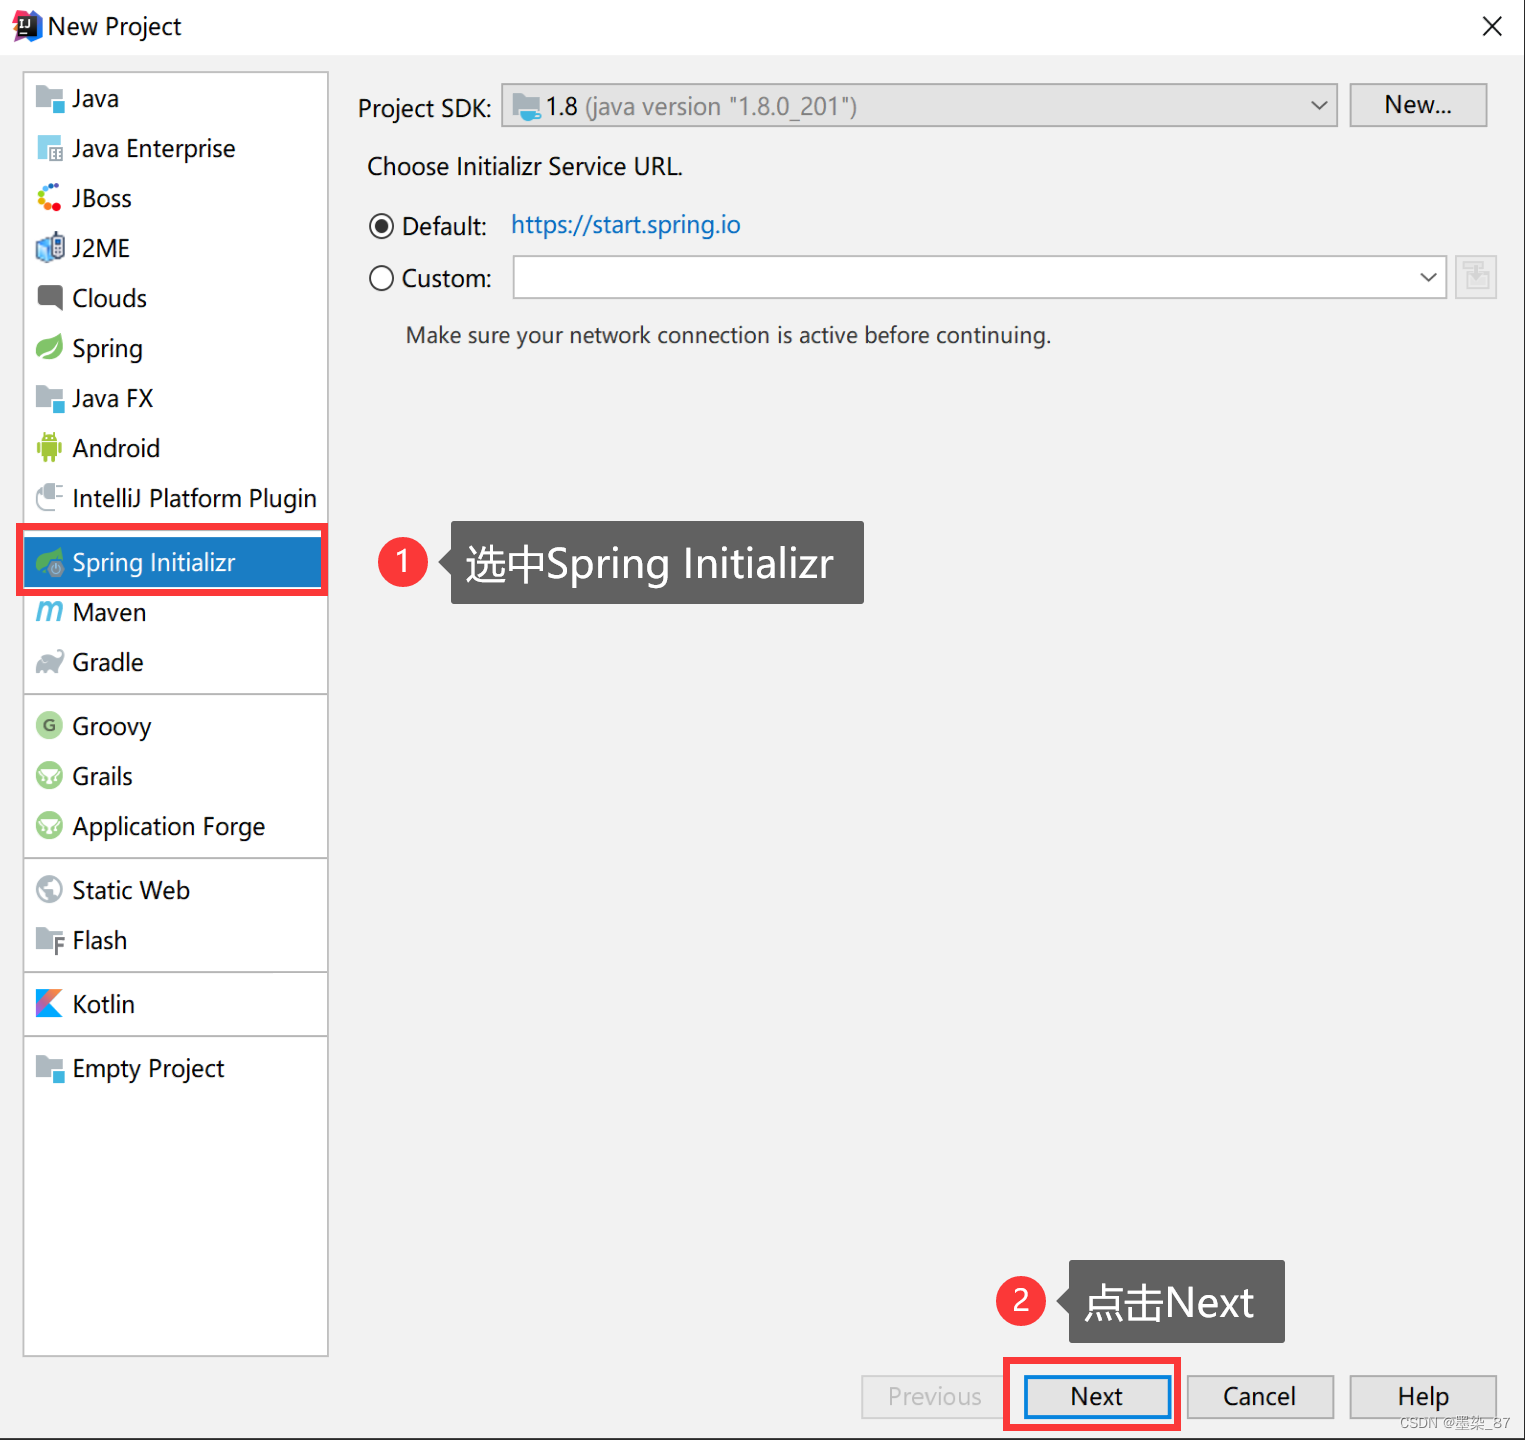
3、输入对应的公司名和骨架名,选择对应的JDK版本以及编辑包名,点击下一步
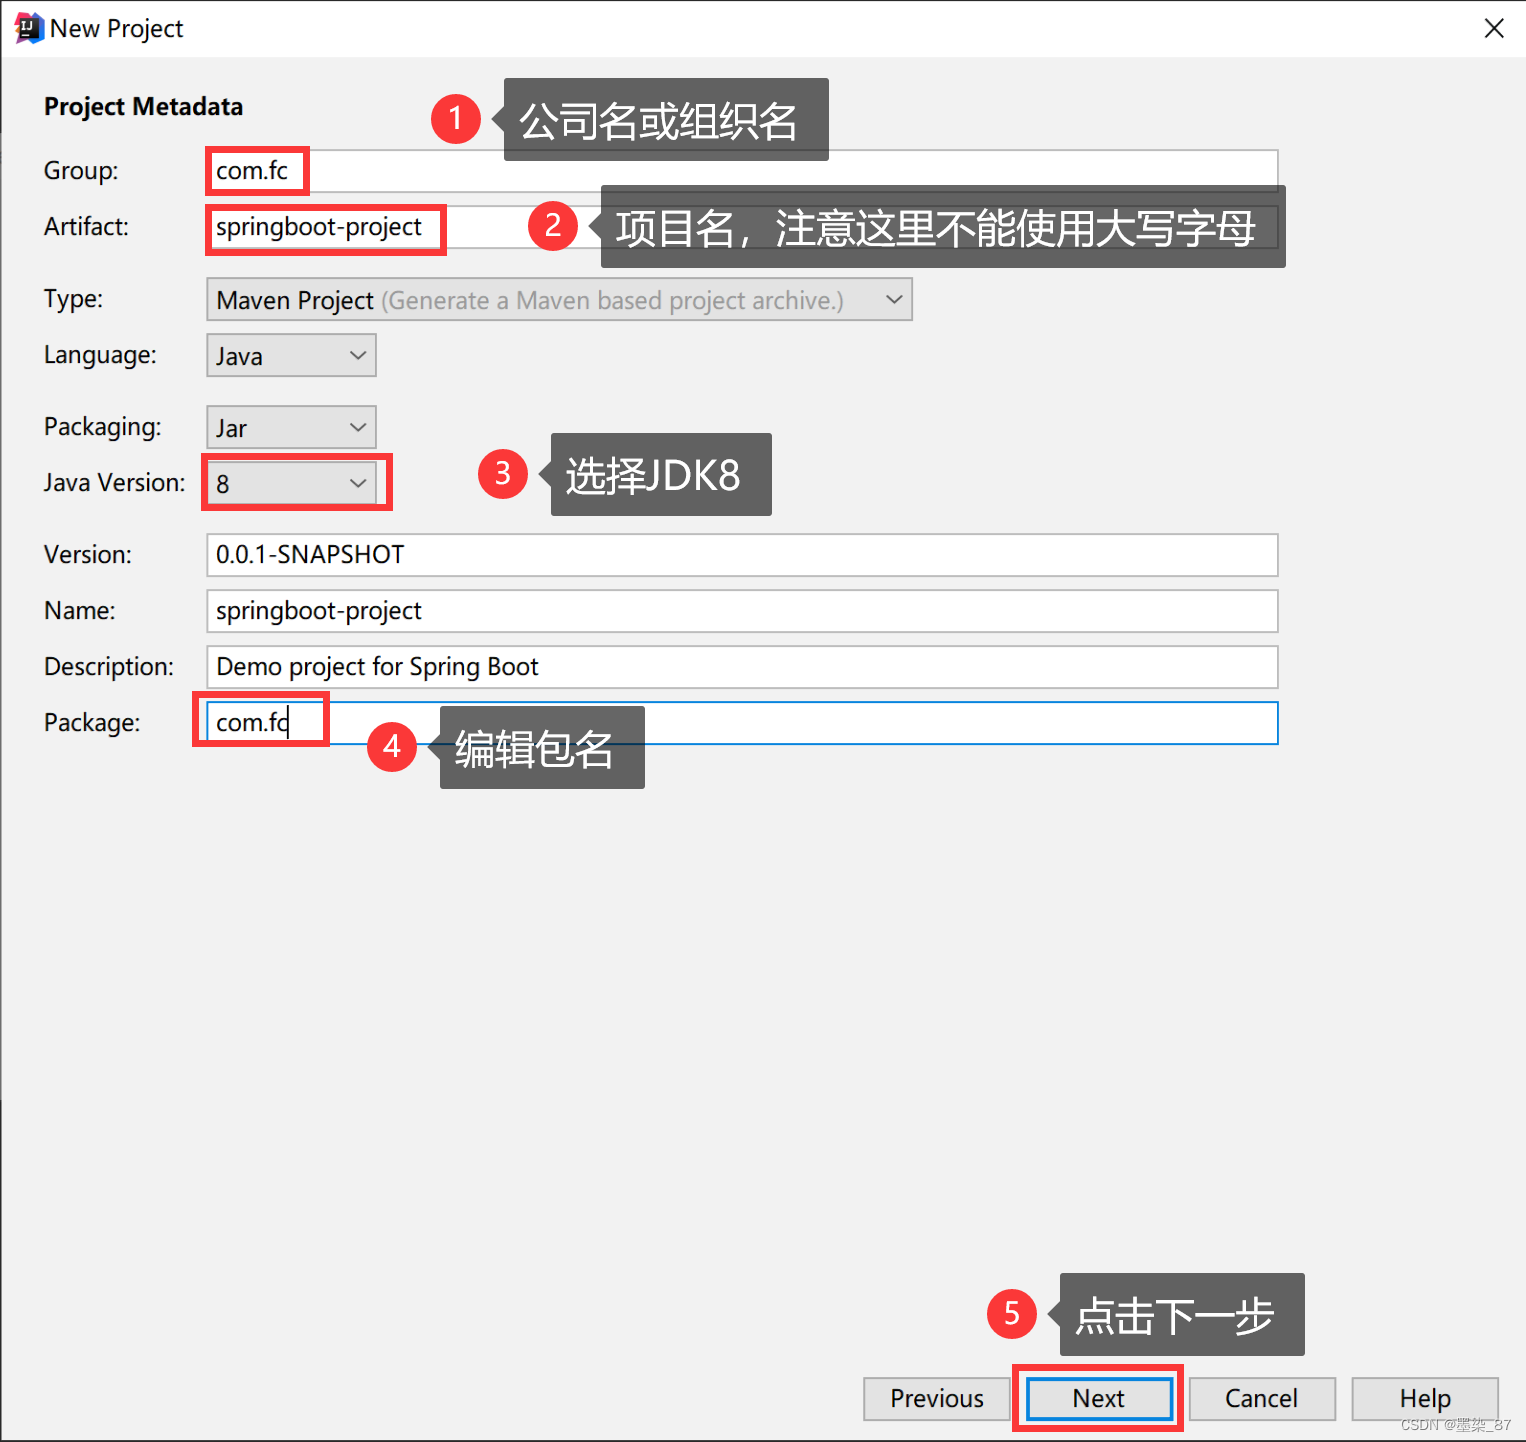
4、添加所需的依赖,这里选择Spring Web,点击下一步
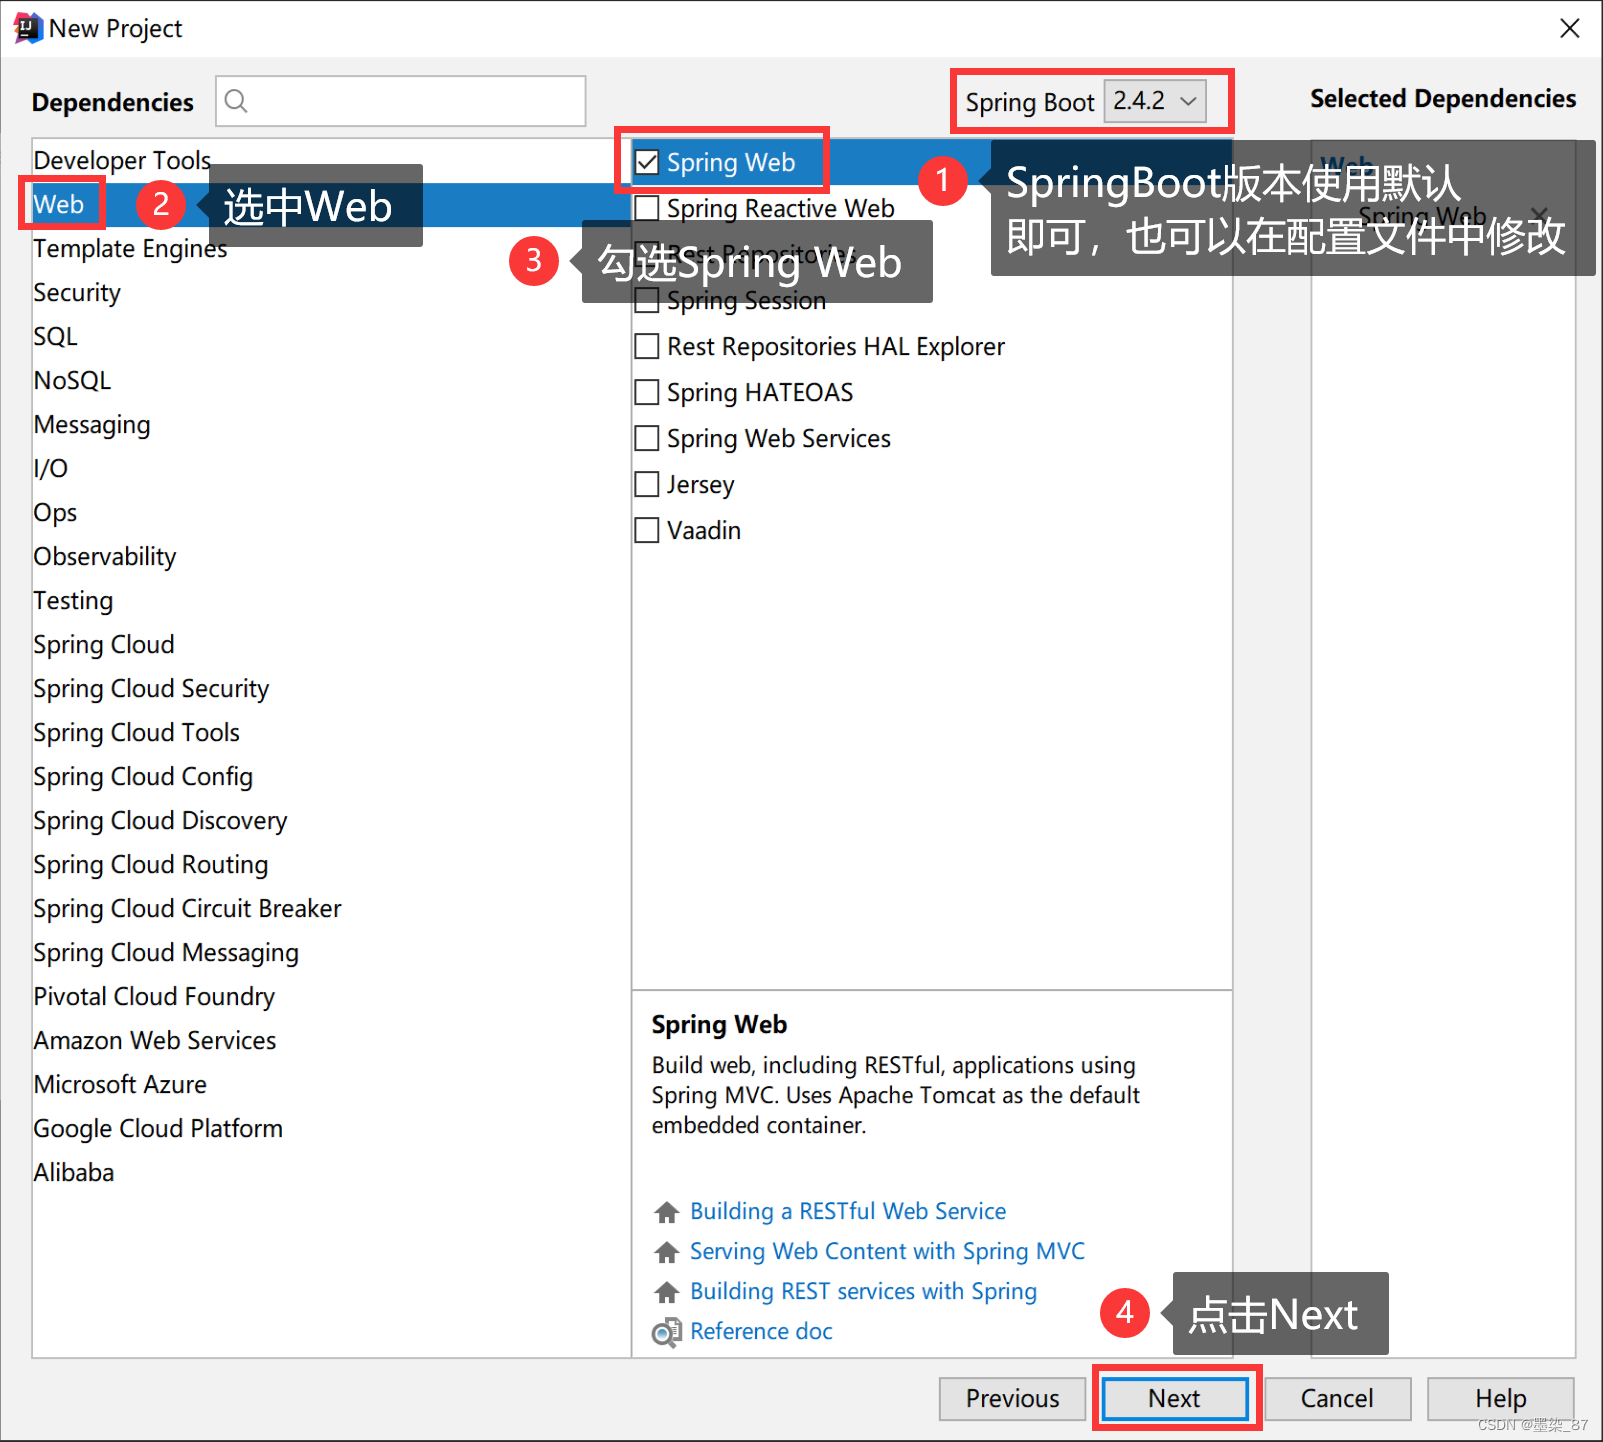
5、选择项目名和项目本地存储的位置
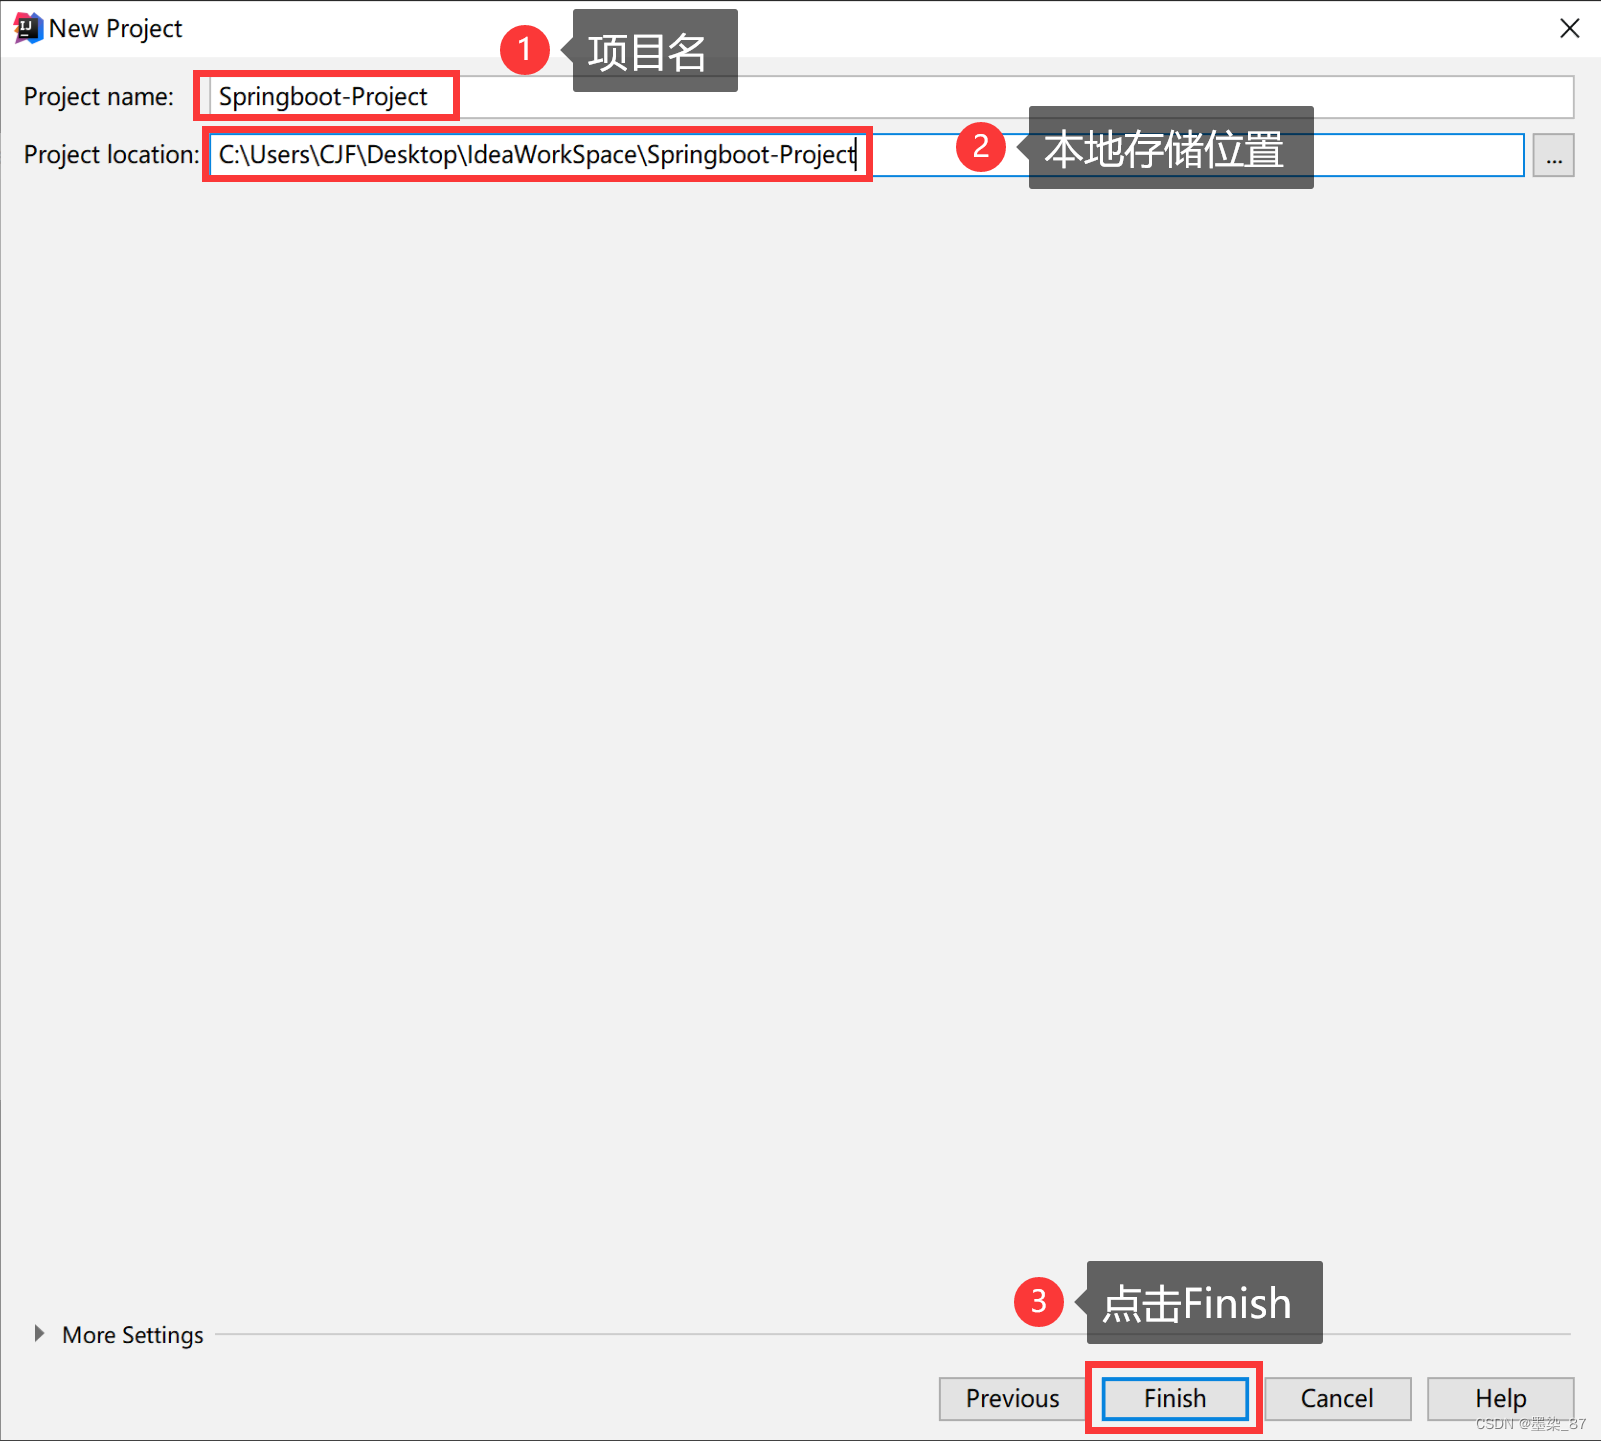
6、项目创建完成
项目结构
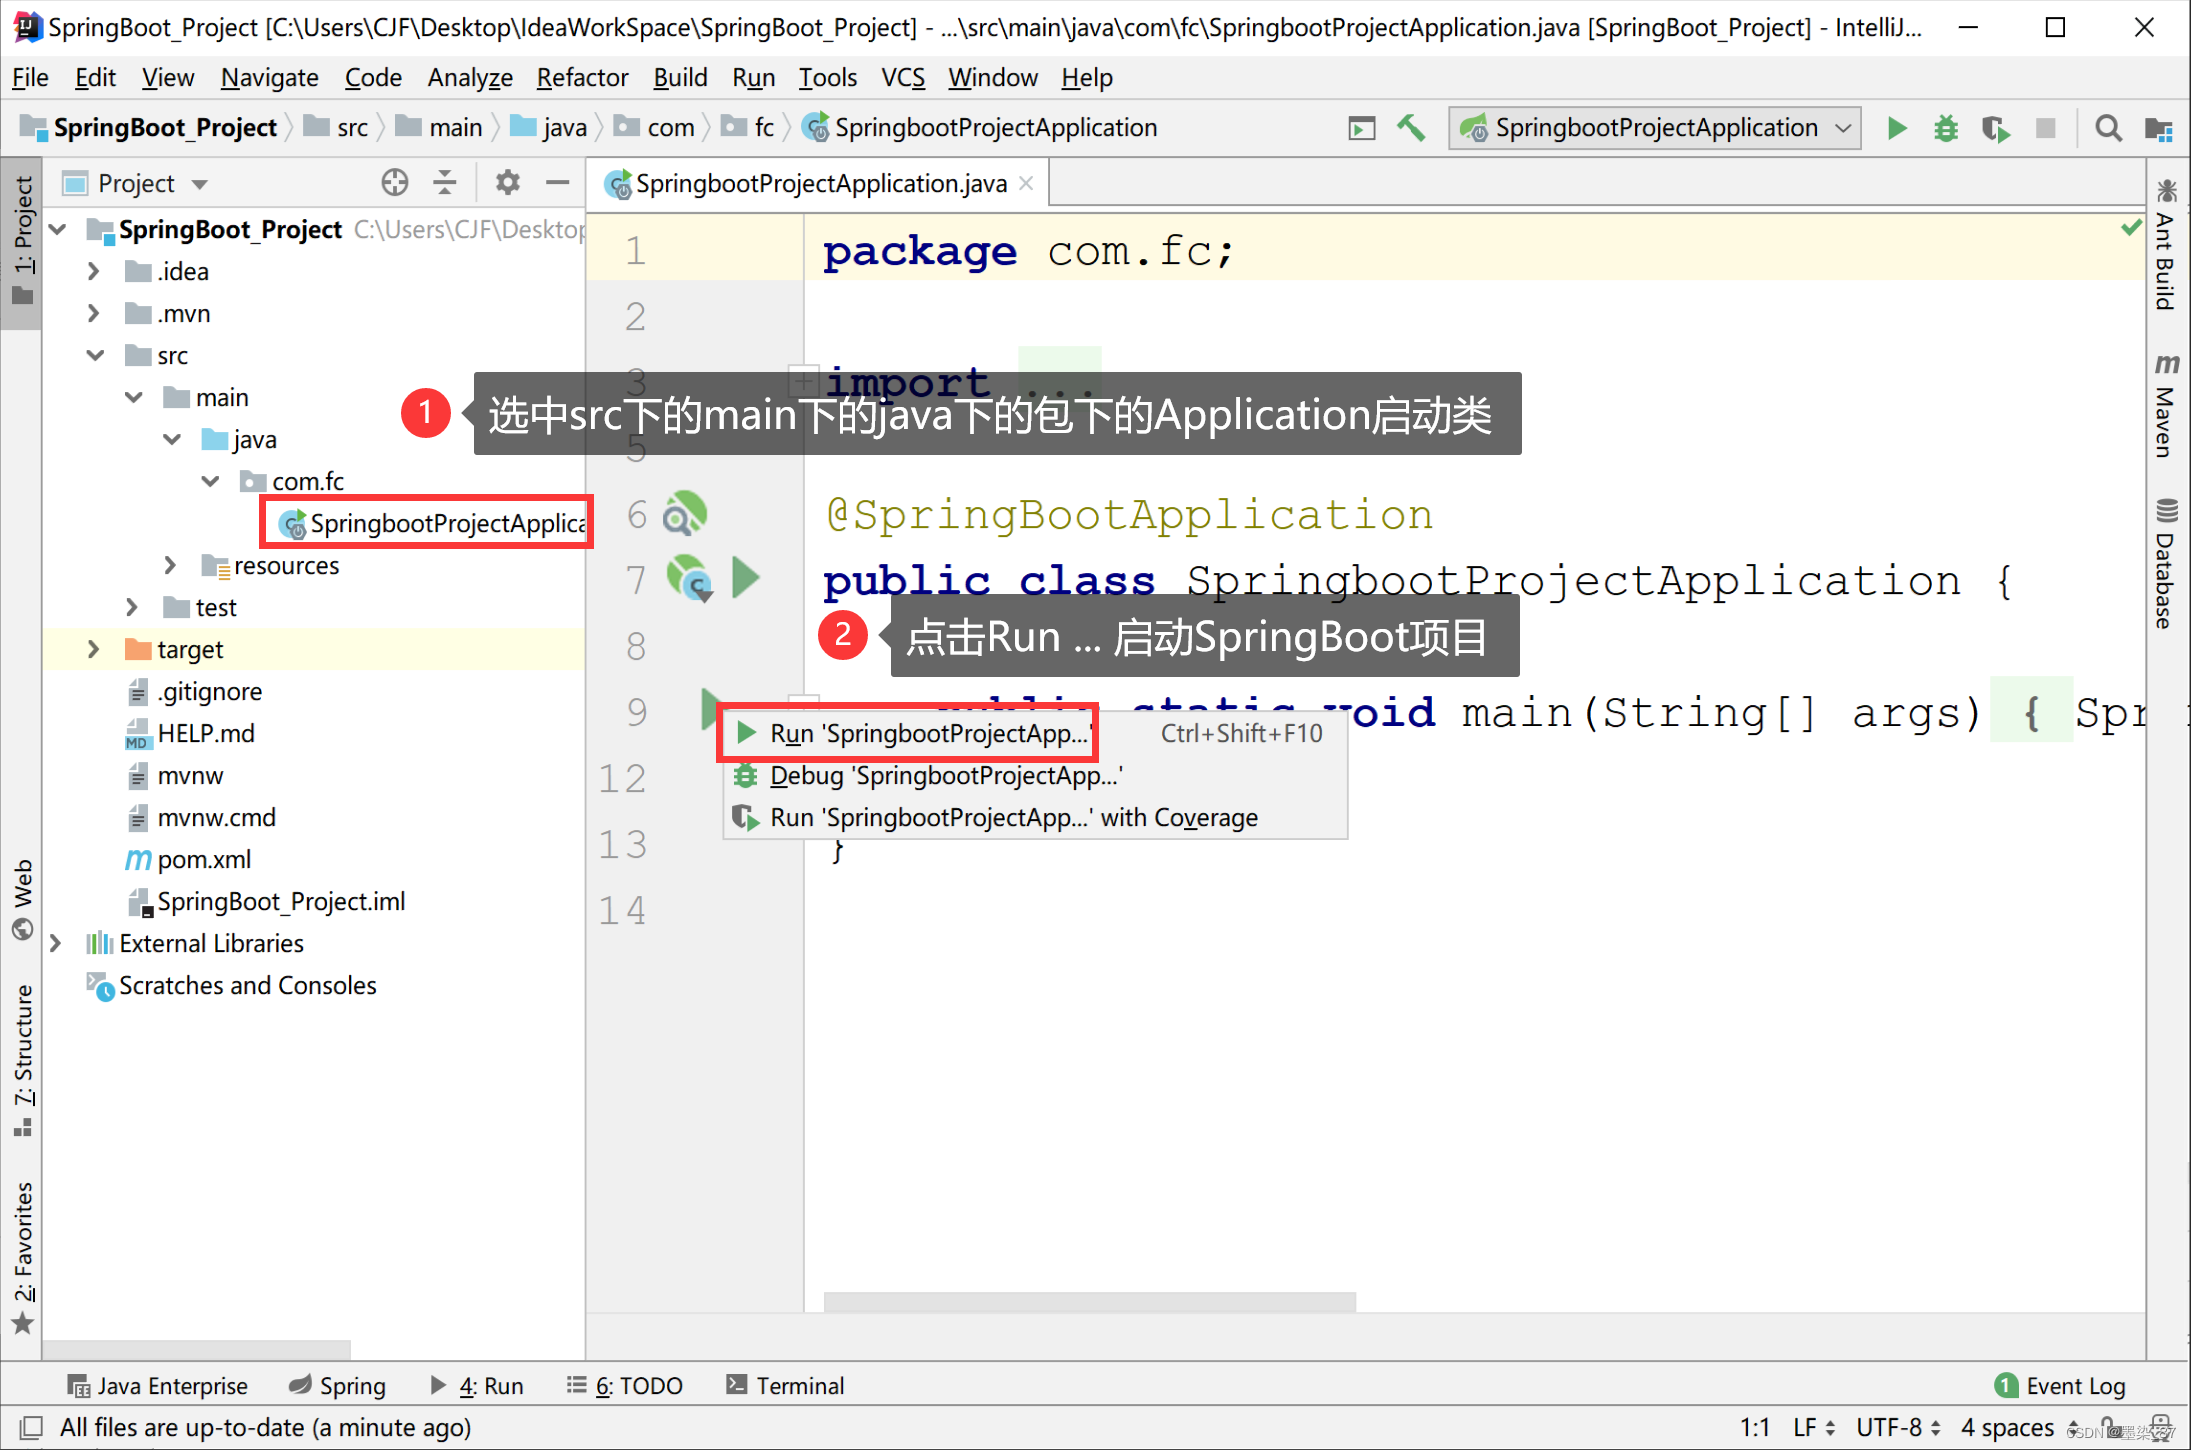
结构说明
名称 描述 java java 代码 com.fc 包名,所有的Java代码都需要放在此包下 SpringbootProjectApplication【重点】 SpringBoot 启动类,程序的入口 resources【重点】 资源 static【重点】 存放静态资源,如图片、 存放静态资源,如图片、 存放静态资源,如图片、 存放静态资源,如图片、 CSS、JavaScript等,可以直接访问 templates【重点】 存放 Web页面的模板文件,只能通过Controller进行访问,类似WEB-INF application.properties【重点】 等同于application.yml文件,用于存放程序的各种依赖模块配置信息,比如服务端口,数据库连接配置等 pom.xml【重点】 maven 配置文件 .mvn|mvnw|mvnw.cmd【了解】 使用脚本操作执行 maven相关命令,国内使用较少可删 除 .gitignore 使用版本控制工具 ,设置一些忽略提交内容 pom.xml
<project xmlns="http://maven.apache.org/POM/4.0.0" xmlns:xsi="http://www.w3.org/2001/XMLSchema-instance" xsi:schemaLocation="http://maven.apache.org/POM/4.0.0 https://maven.apache.org/xsd/maven-4.0.0.xsd"> <modelVersion>4.0.0modelVersion> <parent> <groupId>org.springframework.bootgroupId> <artifactId>spring-boot-starter-parentartifactId> <version>2.4.2version> <relativePath/> parent> <groupId>com.fcgroupId> <artifactId>springboot-01artifactId> <version>0.0.1-SNAPSHOTversion> <name>06_SpringBoot-01name> <description>Demo project for Spring Bootdescription> <properties> <java.version>1.8java.version> properties> <dependencies> <dependency> <groupId>org.springframework.bootgroupId> <artifactId>spring-boot-starter-webartifactId> dependency> <dependency> <groupId>org.springframework.bootgroupId> <artifactId>spring-boot-starter-testartifactId> <scope>testscope> dependency> dependencies> <build> <plugins> <plugin> <groupId>org.springframework.bootgroupId> <artifactId>spring-boot-maven-pluginartifactId> plugin> plugins> build> project>- 1
- 2
- 3
- 4
- 5
- 6
- 7
- 8
- 9
- 10
- 11
- 12
- 13
- 14
- 15
- 16
- 17
- 18
- 19
- 20
- 21
- 22
- 23
- 24
- 25
- 26
- 27
- 28
- 29
- 30
- 31
- 32
- 33
- 34
- 35
- 36
- 37
- 38
- 39
- 40
- 41
- 42
- 43
- 44
项目启动
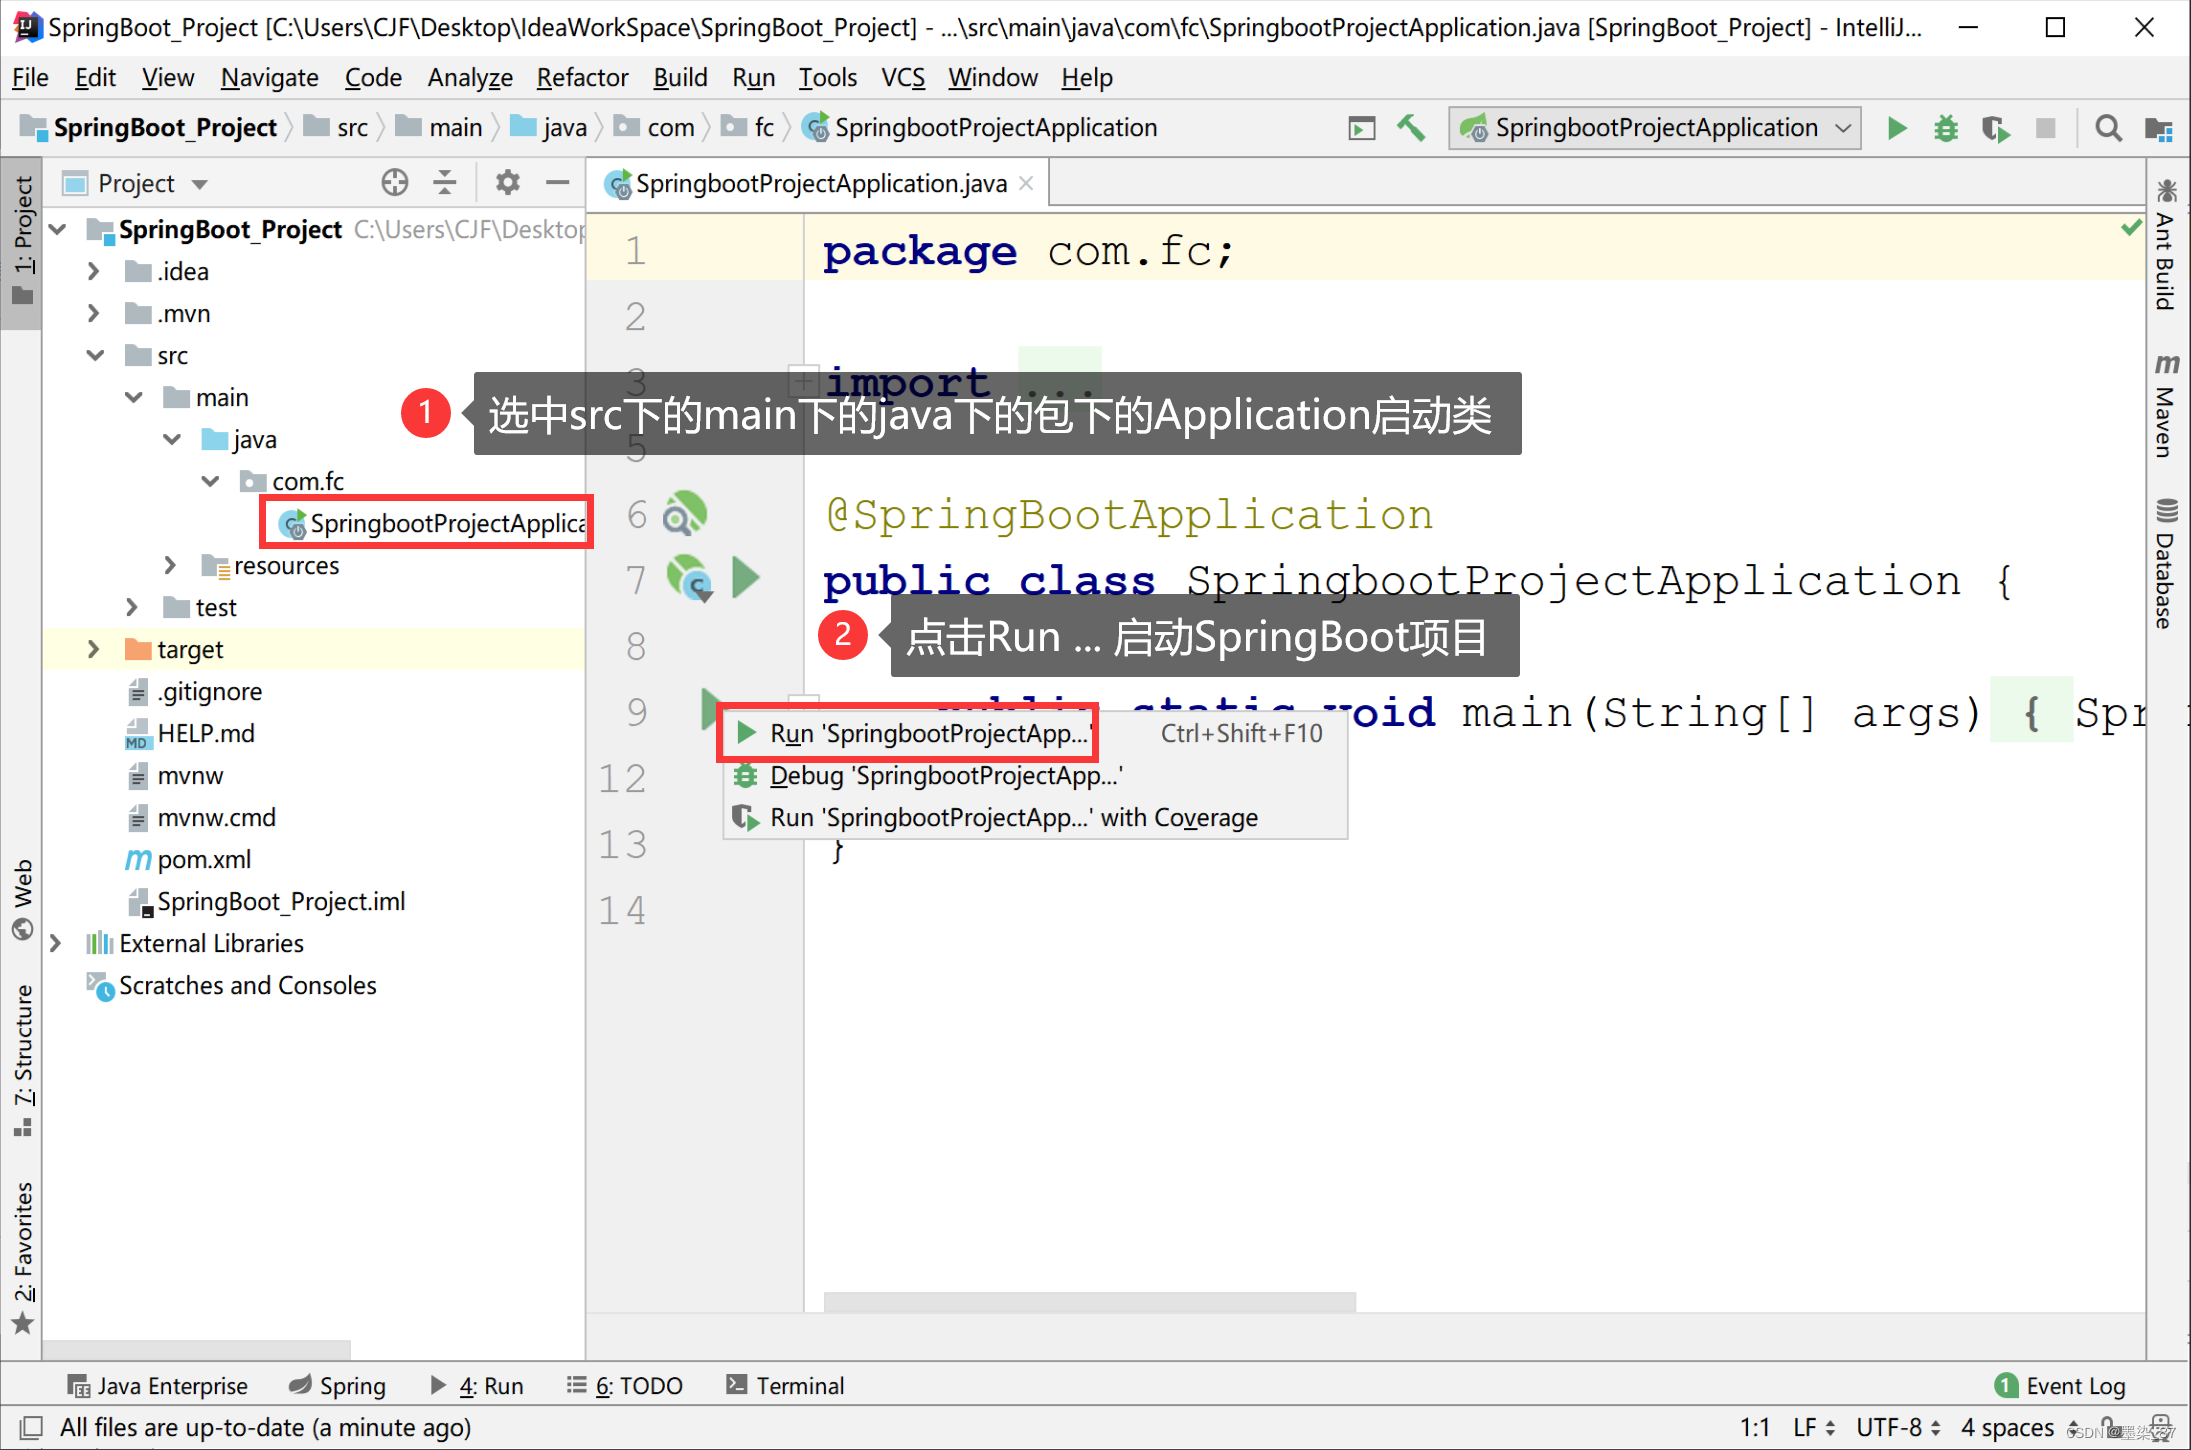
控制台无报错说明启动成功
案例代码
Controller
@RestController @RequestMapping("user") public class UserController { @RequestMapping("findAll") public String findAll() { return "findAll"; } }- 1
- 2
- 3
- 4
- 5
- 6
- 7
- 8
【注意】新创建的类一定要位于 Application 启动类同级目录或者下,否则 SpringBoot 加载不到。
启动类
// 此注解用于声明一个SpringBoot的启动类,该注解具备多种功能 @SpringBootApplication public class Application { public static void main(String[] args) { // 运行启动类,参数为启动类的字节码对象和相关的参数 SpringApplication.run(Application.class, args); } }- 1
- 2
- 3
- 4
- 5
- 6
- 7
- 8
- 9
Spring Boot 核心配置文件
两个核心配置格式【重点】
SpringBoot是基于约定的,所以很多配置都有默认值,但如果想使用自己的配置替换默认配置的话,就可以使用 application.properties 或者application.yml(application.yaml)进行配置,SpringBoot 默认会从Resources 目录下加载 application.properties 或application.yml(application.yaml)文件。
properties 文件格式
application.properties 文件是键值对类型的文件(默认)
application.properties 配置文件
# 配置Tomcat的端口号 server.port=8081 # 配置Web访问的路径前缀 server.servlet.context-path=/properties- 1
- 2
- 3
- 4
yml 文件格式
概述
SpringBoot 还可以使用 yml 文件进行配置,YML 文件格式是 YAML (YAML Ain’t Markup Language)编写的文件格式,YAML 是一种直观的能够被电脑识别的的数据数据序列化格式,并且容易被人类阅读,容易和脚本语言交互的,可以被支持 YAML 库的不同的编程语言程序导入,比如: C/C++, Ruby, Python, Java, Perl, C#, PHP等。YML 文件是以数据为核心的,比传统的xml方式更加简洁,YML文件的扩展名可以使用.yml或者.yaml。
语法要求
- key: value; kv之间有空格
- 大小写敏感
- 使用缩进表示层级关系
- 缩进不允许使用tab,只允许空格
- 缩进的空格数不重要,只要相同层级的元素左对齐即可
- '#'表示注释
- “与”"表示字符串内容会被转义/不转义
案例代码
application.yml 配置文件
server: # 配置Tomcat端口号 port: 8082 servlet: # 配置Web访问路径前缀 context-path: /yml- 1
- 2
- 3
- 4
- 5
- 6
数据类型
配置文件
# 自定义对象进行参数绑定 user: name: "易烊千玺" # 字符串 age: 21 # 数值 gender: true # 布尔值 birthday: 2000/1/1 12:30:20 # 日期 hobby: ["唱", "跳", "rap"] # 数组 food: # 集合 - 烤羊排 - 烤韭菜 - 烤鱿鱼 score: {"Java": 100, "MySQL": 100} # Map car: # 对象 name: 比亚迪- 1
- 2
- 3
- 4
- 5
- 6
- 7
- 8
- 9
- 10
- 11
- 12
- 13
- 14
实体类
@Data public class Car { private String name; } // 注意必须将当前类的对象注册到Spring容器中才能使用ConfigurationProperties @Component @ConfigurationProperties(prefix = "user") @Data public class User { private String name; private Integer age; private Boolean gender; private Date birthday; private String[] hobby; private List<String> food; private Map<String, Object> score; private Car car; }- 1
- 2
- 3
- 4
- 5
- 6
- 7
- 8
- 9
- 10
- 11
- 12
- 13
- 14
- 15
- 16
- 17
- 18
- 19
【注意】如果是字符串类型的数据,单引号下转义字符无效,双引号下转义字符才能生效
【补充】配置处理器
解决 ConfigurationProperties 注解报错以及在配置文件中使用提示
在 ConfigInfo类中使用了 类中使用了 ConfigurationProperties 注解后, IDEA 会出现一个警告, 不影响程序的执行
Spring Boot Configuration Annotation Processor not found in classpath- 1
点击 open documentnation 跳转到网页,在网页中提示需要加一个依赖,将这个依赖拷贝,粘贴到 pom.xml 文件中即可解决,此时 application.yml 配置文件中的黄色警告线也会消失,并且配置文件中也能使用提示了
<dependency> <groupId>org.springframework.bootgroupId> <artifactId>spring-boot-configuration-processorartifactId> <optional>trueoptional> dependency>- 1
- 2
- 3
- 4
- 5
- 6
另外,SpringBoot 建议在打包的时候不声明此配置处理器,因为这是和我们的业务无关的内容,我们可以在插件配置中添加如下代码来实现,并且在 2.4.2 版本添加上了此功能的优化,并不需要我们再去手动配置了。
<plugin> <groupId>org.springframework.bootgroupId> <artifactId>spring-boot-maven-pluginartifactId> <configuration> <excludes> <exclude> <groupId>org.springframework.bootgroupId> <artifactId>spring-boot-configuration-processorartifactId> exclude> excludes> configuration> plugin>- 1
- 2
- 3
- 4
- 5
- 6
- 7
- 8
- 9
- 10
- 11
- 12
- 13
properties 和 yaml 的加载顺序
如果 application.properties 文件与 application.yml 配置文件同时存在,当
application.properties和application.yaml进行优先级加载时,它们都会加载,并不是application.properties加载了application.yaml就不加载了,而是它们的内容根据优先级的高低进行合并(merge)并以application.properties为主。常用配置
官方描述:https://docs.spring.io/spring-boot/docs/2.4.5/reference/htmlsingle/#common-application-properties
配置 默认值 描述 spring.aop.autotrue添加@EnableAspectJAutoProxy。 spring.aop.proxy-target-classtrue与标准的基于Java接口的代理(false)相反,是否要创建基于子类的代理(CGLIB)(true)。 spring.application.name应用名称。 spring.autoconfigure.exclude要排除的自动配置类。 spring.config.import导入其他配置数据。 spring.config.location替换默认设置的配置文件位置。 spring.config.nameapplication配置文件名。 spring.jackson.date-format日期格式字符串或标准日期格式类名称。例如, yyyy-MM-dd HH:mm:ss。spring.jackson.time-zone格式化日期时使用的时区。例如,“ America / Los_Angeles”或“ GMT + 10”。 服务器相关
server.port8080服务器HTTP端口。 server.servlet.context-pathserver.servlet.pathserver.address服务器应绑定到的网络地址。 server.server-header用于服务器响应标头的值(如果为空,则不发送标头)。 server.servlet.application-display-nameapplication显示应用程序的名称。 server.servlet.context-parameters.*Servlet上下文初始化参数。 server.servlet.context-path应用程序的上下文路径。 server.servlet.encoding.charset编码集 SpringMVC 相关
配置 默认值 描述 spring.mvc.view.prefixSpring MVC视图前缀。 spring.mvc.view.suffixSpring MVC视图后缀。 spring.mvc.format.date要使用的日期格式,例如 dd / MM / yyyy。spring.mvc.format.time使用的时间格式,例如“ HH:mm:ss”。 spring.mvc.format.date-time要使用的日期时间格式,例如“ yyyy-MM-dd HH:mm:ss”。 spring.mvc.static-path-pattern /**用于静态资源的访问路径加上前缀,默认无前缀。 spring.mvc.servlet.load-on-startup-1加载调度程序Servlet的启动优先级。 spring.mvc.servlet.path/调度程序Servlet的路径。为此属性设置自定义值与PathPatternParser匹配策略不兼容。 **spring.web.resources.static-locations: ** classpath:/**用于静态资源的本地路径加上前缀,默认无前缀。 Datasource 相关
配置 默认值 描述 spring.datasource.driver-class-name 数据库的连接 spring.datasource.password 数据库的登录密码。 spring.datasource.username 数据库的登录用户名。 spring.datasource.url 数据库的JDBC URL。 spring.datasource.type HikariDataSource 要使用的连接池实现的完全限定名称。默认情况下,它是从类路径中自动检测到的,使用的是HikariCP,可以修改为Druid。 MyBatis 相关
属性配置 默认值 描述 mybatis.config-location mybatis-config.xml 配置文件的本地路径 mybatis.mapper-locations mapper.xml 映射文件的本地路径 mybatis.type-aliases-package 扫描指定包下的类作为别名 mybatis.configuration.cache-enabled true 二级缓存 mybatis.configuration.log-impl 日志输出 mybatis.configuration.map-underscore-to-camel-case false 开启驼峰命名自动映射 mybatis.configuration.lazy-loading-enabled false 开启延迟加载的全局开关 mybatis.configuration.aggressive-lazy-loading false 开启时,任一方法的调用都会加载该对象的所有延迟加载属性。否则,每个延迟加载属性会按需加载 mybatis.configuration.use-generated-keys false 允许 JDBC 支持自动生成主键,需要数据库驱动支持。如果设置为true,将强制使用自动生成主键。 mybatis.configuration.default-statement-timeout 超时时间,它决定数据库驱动等待数据库响应的秒数 Quartz 定时任务相关
Elasticsearch 相关
配置 默认值 描述 spring.elasticsearch.jest.password spring.elasticsearch.jest.proxy.host spring.elasticsearch.jest.proxy.port spring.elasticsearch.jest.read-timeout spring.elasticsearch.jest.username PageHelper 相关
pagehelper.dialect 自动选择对应的数据库方言 pagehelper.reasonable false 分页合理化 pagehelper.support-methods-arguments false 支持通过 Mapper 接口参数来传递分页参数 自定义配置
在 SpringBoot 的核心配置文件中,除了使用内置的配置项之外,我们还可以在自定义配置,然后采用对应的注解去读取配置的属性值
@Value
Value 注解用于获取配置文件中属性键对应的值并赋值给声明的变量
使用格式
@Value("${属性名}")- 1
1、编写 application.yml 配置文件
server: port: 8080 # 自定义配置 user: username: 易烊千玺 password: 123456- 1
- 2
- 3
- 4
- 5
- 6
- 7
2、声明 Controller 并通过 @Value 注解使用自定义配置
@RestController @RequestMapping("user") public class UserController { // 声明成员变量并使用配置文件中的自定义配置 @Value("${user.username}") private String username; @Value("${password}") private String password; @RequestMapping("customConfiguration") public String customConfiguration() { return "用户名:" + username + " 密码:" + password; } }- 1
- 2
- 3
- 4
- 5
- 6
- 7
- 8
- 9
- 10
- 11
- 12
- 13
- 14
- 15
@ConfigurationProperties
ConfigurationProperties 注解用于将整个文件映射成一个对象,用于自定义配置项比较多的情况
格式
@ConfigurationProperties(prefix = "属性名")- 1
1、编写 application.yml 配置文件
server: port: 8080 # 自定义配置类 student: username: 易烊千玺 password: 123456 age: 20 info: 送你一朵小红花- 1
- 2
- 3
- 4
- 5
- 6
- 7
- 8
- 9
2、声明配置类
@Component // 声明配置文件中的属性 @ConfigurationProperties(prefix = "student") public class ConfigInfo { // 注意成员变量与配置文件中的属性要相同 private String username; private String password; private int age; private String info; // Controller、Getters、Setters }- 1
- 2
- 3
- 4
- 5
- 6
- 7
- 8
- 9
- 10
- 11
- 12
【注意】
1、必须将类注册到容器中,否则会报错!可以使用 @Component (类上)或者 @EnableConfigurationProperties (配置类上)
1、@ConfigurationProperties 注解必须声明 prefix 属性
2、成员变量必须要和配置文件中的属性相同
3、一定要在配置的对象中加上 set、get 方法
3、声明 Controller
@RestController @RequestMapping("student") public class StudentController { // 注入自定义配置类 @Autowired private ConfigInfo configInfo; @RequestMapping("getConfigInfo") public String getConfigInfo() { return configInfo.getUsername() + configInfo.getPassword() + configInfo.getAge() + configInfo.getInfo(); } }- 1
- 2
- 3
- 4
- 5
- 6
- 7
- 8
- 9
- 10
- 11
- 12
SpringBoot 常用注解
@Configuration【重点】
被@Configuration 修饰的类作为一个配置类,相当于 xml 配置文件,会在启动时被加载。通常和 @Bean 标签配合使用,相当于 xml 配置文件中的 Bean 标签。
概述
-
指示一个类声明了一个或多个 @Bean 方法,并且可以由 Spring 容器进行处理,以在运行时为这些 bean 生成 bean 定义和服务请求。
-
元注解为 @Component,可以使用 @Autowired 进行依赖注入。
-
@Configuration 类不仅可以使用组件扫描来引导,还可以自己使用 @ComponentScan 注解来配置组件扫描。
-
@Configuration 默认会生成当前类的代理对象,可以通过内部的 proxyBeanMethods 属性设置为 false 来生成真实对象。用来达到跳过 Spring 容器并强制执行 @Bean 注解生成对象的生命周期的目的
案例代码
1、TestConfig
/** * 声明此注解的类相当于xml配置文件,SpringBoot启动时加载 */ @Configuration public class TestConfig { public TestConfig() { System.out.println("相当于Spring中的xml配置文件"); } public void testComponent() { System.out.println("测试@Component"); } }- 1
- 2
- 3
- 4
- 5
- 6
- 7
- 8
- 9
- 10
- 11
- 12
- 13
2、控制层
@Controller @RequestMapping("test") public class ConfigController { @Autowired public TestConfig testConfig; @RequestMapping("component") public void testComponent() { testConfig.testComponent(); } }- 1
- 2
- 3
- 4
- 5
- 6
- 7
- 8
- 9
- 10
- 11
@Bean【重点】
概述
指示方法产生一个由Spring容器管理的bean。该注解的 name 属性的名称和语义有意类似于 Spring XML 配置文件中的 bean 标签,并且默认是单例的,如果想要修改为多例,可以使用 @Scope 注解进行声明。
bean 的 name 属性默认使用对象的首字母小写的形式,也可以自定义,支持一个字符串数组,允许给一个 bean 对象起多个别名。
案例代码
1、User 实体类
public class User { private int id; private String name; private int age; private String info; // Constructor、Setters、Getters、toString }- 1
- 2
- 3
- 4
- 5
- 6
- 7
- 8
2、TestConfig
@Configuration public class TestConfig { // 声明通过此方法获取一个对象放入到Spring容器中进行管理 @Bean public User getUser() { return new User(1, "易烊千玺", 20, "送你一朵小红花"); } }- 1
- 2
- 3
- 4
- 5
- 6
- 7
- 8
3、控制层
@Controller @RequestMapping("test") public class ConfigController { @Autowired public User user; @RequestMapping("bean") public void testBean() { System.out.println(user); } }- 1
- 2
- 3
- 4
- 5
- 6
- 7
- 8
- 9
- 10
- 11
@PostConstruct【重点】
常用此注解来完成一些初始化的操作
概述
被 @PostConstruct 修饰的方法会在服务器加载的时候运行,并且只会被服务器执行一次。PostConstruct 在构造方法以及@Autowired之后执行。
案例代码
@Component public class TestInit { @PostConstruct public void init() { System.out.println("@PostConstruct注解,启动时加载"); } }- 1
- 2
- 3
- 4
- 5
- 6
- 7
@Import【了解】
概述
表明给容器导入一个组件,4.2之前只能是配置类 ,4.2之后也可以是普通的类,相当于交给 Spring 容器中创建一个当前类的对象,对象名为完整的全限定名
案例代码
1、实体类
@Data public class Cat { private String name; }- 1
- 2
- 3
- 4
2、配置类
// 将指定的类注入到Spring的容器中 @Import({Cat.class}) @Configuration() public class TestConfig { }- 1
- 2
- 3
- 4
- 5
3、启动测试类
@SpringBootApplication public class Application { public static void main(String[] args) { // 获取Spring容器 ConfigurableApplicationContext run = SpringApplication.run(Application.class, args); // 使用完整的全限定名获取容器中的对象 Cat cat1 = run.getBean("com.fc.bean.Cat", Cat.class); // 使用指定的类型获取容器中的对象 Cat cat2 = run.getBean(Cat.class); System.out.println(cat1); System.out.println(cat2); } }- 1
- 2
- 3
- 4
- 5
- 6
- 7
- 8
- 9
- 10
- 11
- 12
- 13
- 14
- 15
@Conditional【了解】
概述
条件装配:指示仅当所有指定条件都匹配时,组件才有资格注册。
@Conditional 注解的子注解

案例代码
实体类
@Data public class Son { } @Data public class Wife { } @Data public class GirlFriend { }- 1
- 2
- 3
- 4
- 5
- 6
- 7
- 8
- 9
- 10
- 11
配置类
@Configuration public class BeanConfig { // 注意条件类的位置要在被引用条件之前 // @Bean("wife") public Wife getWife() { return new Wife(); } // 当spring容器中包含Wife类的对象时才创建对象 @ConditionalOnBean(Wife.class) @Bean(name = "son") public Son getSon() { return new Son(); } // 当spring容器中不包含Wife类的对象时才创建对象 @ConditionalOnMissingBean(Wife.class) @Bean("girlFriend") public GirlFriend getGirlFriend() { return new GirlFriend(); } }- 1
- 2
- 3
- 4
- 5
- 6
- 7
- 8
- 9
- 10
- 11
- 12
- 13
- 14
- 15
- 16
- 17
- 18
- 19
- 20
- 21
- 22
【注意】被作为条件的类一定要在被引用之前注册到 Spring 容器中,否则根据条件注册会失败
启动类
@SpringBootApplication public class Application { public static void main(String[] args) { // 获取容器 ConfigurableApplicationContext run = SpringApplication.run(Application.class, args); // 判断是否包含指定组件 boolean hasSon = run.containsBean("son"); // 如果包含指定的组件 if (hasSon) { // 从容器中获取对象 Son son = run.getBean("son", Son.class); System.out.println("有儿子:" + son); } else { System.out.println("没有儿子"); } // 判断容器中是否包含指定组件 boolean hasGirlFriend = run.containsBean("girlFriend"); if (hasGirlFriend) { GirlFriend girlFriend = run.getBean(GirlFriend.class); System.out.println("有女朋友:" + girlFriend); } else { System.out.println("没有女朋友"); } } }- 1
- 2
- 3
- 4
- 5
- 6
- 7
- 8
- 9
- 10
- 11
- 12
- 13
- 14
- 15
- 16
- 17
- 18
- 19
- 20
- 21
- 22
- 23
- 24
- 25
- 26
- 27
- 28
- 29
- 30
- 31
- 32
其他常用注解【了解】
注解 描述 @SpringBootApplication 放置在Springboot启动类上,表明该类是开启Springboot容器的入口。2.0中的注解@SpringBootApplication是注解@SpringBootConfiguration、@EnableAutoConfiguration和@ComponentScan的组合 @SpringBootConfiguration 它表示的是该类会作为Springboot的一个配置类 @EnableAutoConfiguration 它表示开启自动配置功能。包含@AutoConfigurationPackage以及@Import两个注解 @AutoConfigurationPackage 表示自动注入包 @ImportResource 用来加载 xml 配置文件,常用于导入 xml 中装配好的组件(classpath:xxx.xml) @ComponentScan 用来将指定包(如果未指定就是将当前类所在包及其子孙包)加入SpringIOC的包扫描,本质上等于context:component-scan配置 @Inject 等价于默认的@Autowired,只是没有required属性 @Qualifier 当有多个同一类型的Bean时,可以用@Qualifier(“name”)来指定。与@Autowired配合使用。@Qualifier限定描述符除了能根据名字进行注入,但能进行更细粒度的控制如何选择候选者 @Resource(name=”name”,type=”type”) 没有括号内内容的话,默认byName。与@Autowired干类似的事,相当于@Autowired加上@Qualifier。此注解不是Spring的注解,而是Java Web中的注解 SpringBoot 静态资源访问
概述
SpingBoot 会默认访问
/static(or/publicor/resourcesor/META-INF/resources下所有的静态资源,访问方式是当前项目名加资源名即可。访问方式: 当前项目根路径/静态资源名
可以给访问路径以及本地路径添加指定前缀,用来实现 SpringMvc.mxl 配置文件中 resources 标签的映射功能
配置访问路径前缀
# 访问指定img路径下的静态资源 spring.mvc.static-path-pattern=/img/**- 1
- 2
访问路径为:当前项目根路径/img/静态资源名
配置本地路径前缀
# 访问static下的img下的静态资源,除此路径外的静态资源都无法进行访问 spring.web.resources.static-locations=classpath:/static/img/- 1
- 2
访问路径为:当前项目根路径 / + 静态资源名
使用 WebJars 下的静态资源【了解】
pom.xml 文件
<dependency> <groupId>org.webjarsgroupId> <artifactId>jqueryartifactId> <version>3.6.0version> dependency>- 1
- 2
- 3
- 4
- 5
- 6
static 下的 html
DOCTYPE html> <html lang="en"> <head> <meta charset="UTF-8"> <title>Titletitle> head> <script src="webjars/jquery/3.6.0/jquery.min.js">script> <body> body> html>- 1
- 2
- 3
- 4
- 5
- 6
- 7
- 8
- 9
- 10
能够正常访问到静态资源
欢迎页面【了解】
静态资源路径下的 index.html 为欢迎页面,启动项目会默认访问此页面
图标【了解】
将 favicon.ico 文件放在静态资源路径下即可,如果访问不到图标,可以重新编译项目并重启浏览器
SpringBoot 整合 JSP【了解】
1、pom.xml 文件添加依赖并指定JSP文件的编译目录
<project xmlns="http://maven.apache.org/POM/4.0.0" xmlns:xsi="http://www.w3.org/2001/XMLSchema-instance" xsi:schemaLocation="http://maven.apache.org/POM/4.0.0 https://maven.apache.org/xsd/maven-4.0.0.xsd"> <modelVersion>4.0.0modelVersion> <parent> <groupId>org.springframework.bootgroupId> <artifactId>spring-boot-starter-parentartifactId> <version>2.4.2version> <relativePath/> parent> <groupId>com.fcgroupId> <artifactId>springboot-06-jspartifactId> <version>0.0.1-SNAPSHOTversion> <name>springboot-06-jspname> <description>Demo project for Spring Bootdescription> <properties> <java.version>1.8java.version> properties> <dependencies> <dependency> <groupId>org.springframework.bootgroupId> <artifactId>spring-boot-starter-webartifactId> dependency> <dependency> <groupId>org.apache.tomcat.embedgroupId> <artifactId>tomcat-embed-jasperartifactId> dependency> <dependency> <groupId>javax.servletgroupId> <artifactId>javax.servlet-apiartifactId> dependency> <dependency> <groupId>javax.servlet.jspgroupId> <artifactId>javax.servlet.jsp-apiartifactId> <version>2.3.1version> dependency> <dependency> <groupId>javax.servletgroupId> <artifactId>jstlartifactId> dependency> <dependency> <groupId>org.springframework.bootgroupId> <artifactId>spring-boot-starter-testartifactId> <scope>testscope> dependency> dependencies> <build> <plugins> <plugin> <groupId>org.springframework.bootgroupId> <artifactId>spring-boot-maven-pluginartifactId> plugin> plugins> <resources> <resource> <directory>src/main/webappdirectory> <targetPath>META-INF/resourcestargetPath> <includes> <include>**/*.*include> includes> resource> resources> build> project>- 1
- 2
- 3
- 4
- 5
- 6
- 7
- 8
- 9
- 10
- 11
- 12
- 13
- 14
- 15
- 16
- 17
- 18
- 19
- 20
- 21
- 22
- 23
- 24
- 25
- 26
- 27
- 28
- 29
- 30
- 31
- 32
- 33
- 34
- 35
- 36
- 37
- 38
- 39
- 40
- 41
- 42
- 43
- 44
- 45
- 46
- 47
- 48
- 49
- 50
- 51
- 52
- 53
- 54
- 55
- 56
- 57
- 58
- 59
- 60
- 61
- 62
- 63
- 64
- 65
- 66
- 67
- 68
- 69
- 70
- 71
- 72
- 73
- 74
- 75
- 76
- 77
- 78
- 79
- 80
- 81
- 82
2、application.yml 配置文件中配置试图解析
server: port: 8080 # 配置SpringMVC视图解析器 spring: mvc: view: # 配置前缀和后缀 prefix: / suffix: .jsp- 1
- 2
- 3
- 4
- 5
- 6
- 7
- 8
- 9
- 10
3、声明 Controller
@Controller @RequestMapping("test") public class JspController { @RequestMapping("jsp") public String getJsp(Model model) { // 添加model属性值 model.addAttribute("username", "易烊千玺"); // 跳转页面 return "index"; } }- 1
- 2
- 3
- 4
- 5
- 6
- 7
- 8
- 9
- 10
- 11
- 12
4、创建 index.jsp
<%@ page contentType="text/html;charset=UTF-8" language="java" isELIgnored="false" %>测试JSP ${username}- 1
- 2
- 3
- 4
- 5
- 6
- 7
- 8
- 9
SpringBoot 整合 MyBatis【重点】
使用 Druid 连接池访问数据库
1、pom.xml 配置文件引入依赖
<project xmlns="http://maven.apache.org/POM/4.0.0" xmlns:xsi="http://www.w3.org/2001/XMLSchema-instance" xsi:schemaLocation="http://maven.apache.org/POM/4.0.0 https://maven.apache.org/xsd/maven-4.0.0.xsd"> <modelVersion>4.0.0modelVersion> <parent> <groupId>org.springframework.bootgroupId> <artifactId>spring-boot-starter-parentartifactId> <version>2.4.2version> <relativePath/> parent> <groupId>com.fcgroupId> <artifactId>springboot-07-mybatisartifactId> <version>0.0.1-SNAPSHOTversion> <name>springboot-07-mybatisname> <description>Demo project for Spring Bootdescription> <properties> <java.version>1.8java.version> properties> <dependencies> <dependency> <groupId>org.springframework.bootgroupId> <artifactId>spring-boot-starter-webartifactId> dependency> <dependency> <groupId>org.mybatis.spring.bootgroupId> <artifactId>mybatis-spring-boot-starterartifactId> <version>2.1.2version> dependency> <dependency> <groupId>mysqlgroupId> <artifactId>mysql-connector-javaartifactId> <version>5.1.48version> dependency> <dependency> <groupId>com.alibabagroupId> <artifactId>druid-spring-boot-starterartifactId> <version>1.1.21version> dependency> <dependency> <groupId>org.projectlombokgroupId> <artifactId>lombokartifactId> dependency> <dependency> <groupId>org.springframework.bootgroupId> <artifactId>spring-boot-starter-testartifactId> <scope>testscope> dependency> dependencies> <build> <plugins> <plugin> <groupId>org.springframework.bootgroupId> <artifactId>spring-boot-maven-pluginartifactId> plugin> plugins> build> project>- 1
- 2
- 3
- 4
- 5
- 6
- 7
- 8
- 9
- 10
- 11
- 12
- 13
- 14
- 15
- 16
- 17
- 18
- 19
- 20
- 21
- 22
- 23
- 24
- 25
- 26
- 27
- 28
- 29
- 30
- 31
- 32
- 33
- 34
- 35
- 36
- 37
- 38
- 39
- 40
- 41
- 42
- 43
- 44
- 45
- 46
- 47
- 48
- 49
- 50
- 51
- 52
- 53
- 54
- 55
- 56
- 57
- 58
- 59
- 60
- 61
- 62
- 63
- 64
- 65
- 66
- 67
- 68
- 69
2、application.yml 配置文件配置数据源以及 MyBatis 相关配置
server: port: 8080 # 配置数据源 spring: datasource: type: com.alibaba.druid.pool.DruidDataSource driver-class-name: com.mysql.jdbc.Driver url: jdbc:mysql://localhost:3306/FC2021?useSSL=false&characterEncoding=UTF-8&serverTimezone=Asia/Shanghai username: root password: root # mybatis相关配置 mybatis: # 配置别名需要扫描的包 type-aliases-package: com.fc.bean # mapper映射文件 mapper-locations: classpath:mapper/*.xml configuration: # 配置日志在控制台显示sql语句 log-impl: org.apache.ibatis.logging.stdout.StdOutImpl # 开启二级缓存 cache-enabled: true- 1
- 2
- 3
- 4
- 5
- 6
- 7
- 8
- 9
- 10
- 11
- 12
- 13
- 14
- 15
- 16
- 17
- 18
- 19
- 20
- 21
- 22
- 23
3、创建实体类
@Component @Data public class Student implements Serializable { private Integer id; private String name; private Integer age; private String gender; private Date birthday; private String info; }- 1
- 2
- 3
- 4
- 5
- 6
- 7
- 8
- 9
- 10
【注意】因为使用了二级缓存,所以需要实现序列化
3、创建 Dao 层接口
@Repository public interface StudentDao { List<Student> findAll(); }- 1
- 2
- 3
- 4
这里也可以使用 @Mapper 注解,相当于启动类中的 @MapperScan
4、创建 Mapper 映射文件
DOCTYPE mapper PUBLIC "-//mybatis.org//DTD Mapper 3.0//EN" "http://mybatis.org/dtd/mybatis-3-mapper.dtd" > <mapper namespace="com.fc.dao.StudentDao"> <cache/> <select id="findAll" resultType="com.fc.bean.Student"> select * from student select> mapper>- 1
- 2
- 3
- 4
- 5
- 6
- 7
- 8
- 9
- 10
- 11
- 12
【注意】映射文件需要放在 src\main\resources\mapper 路径下
5、创建 Service 层接口
public interface StudentService { List<Student> findAll(); }- 1
- 2
- 3
6、创建 Service 层接口实现类
@Service("studentService") public class StudentServiceImpl implements StudentService { @Autowired private StudentDao studentDao; @Override public List<Student> findAll() { return studentDao.findAll(); } }- 1
- 2
- 3
- 4
- 5
- 6
- 7
- 8
- 9
- 10
7、创建 Controller
@RestController @RequestMapping("student") public class StudentController { @Autowired private StudentService studentService; @RequestMapping("findAll") public List<Student> findAll() { return studentService.findAll(); } }- 1
- 2
- 3
- 4
- 5
- 6
- 7
- 8
- 9
- 10
- 11
8、修改启动类,添加扫描接口的注解
// 此注解用于扫描Mapper接口,指定的包下面的所有接口在编译之后都会生成相应的实现类 @MapperScan("com.fc.dao") @SpringBootApplication public class Springboot07MybatisApplication { public static void main(String[] args) { SpringApplication.run(Springboot07MybatisApplication.class, args); } }- 1
- 2
- 3
- 4
- 5
- 6
- 7
- 8
使用分页插件
1、pom.xml 文件中添加依赖
<dependency> <groupId>com.github.pagehelpergroupId> <artifactId>pagehelper-spring-boot-starterartifactId> <version>1.2.13version> dependency>- 1
- 2
- 3
- 4
- 5
- 6
2、Controller 中添加方法
@RestController @RequestMapping("student") public class StudentController { @Autowired private StudentService studentService; /** * 分页查询 * @param pageNum 当前页 * @param pageSize 每页显示多少条数据 * @return 每页显示的数据 */ @RequestMapping("findAllByPage") public PageInfo<Student> findAllByPage(Integer pageNum, Integer pageSize) { PageHelper.startPage(pageNum, pageSize); List<Student> list = studentService.findAll(); return new PageInfo<>(list); } }- 1
- 2
- 3
- 4
- 5
- 6
- 7
- 8
- 9
- 10
- 11
- 12
- 13
- 14
- 15
- 16
- 17
- 18
- 19
- 20
开启事务支持
service 实现类中添加事务注解
@Service("studentService") public class StudentServiceImpl implements StudentService { @Autowired private StudentDao studentDao; // 开启事务并指定传播行为,隔离级别,是否只读 @Transactional(isolation = Isolation.READ_COMMITTED, readOnly = true, propagation = Propagation.REQUIRED) @Override public List<Student> findAll() { return studentDao.findAll(); } }- 1
- 2
- 3
- 4
- 5
- 6
- 7
- 8
- 9
- 10
- 11
- 12
- 13
- 14
修改启动类,添加开启事务支持的注解,但是没必要,会自动开启
// 开启事务支持 @EnableTransactionManagement @MapperScan("com.fc.dao") @SpringBootApplication public class Springboot07MybatisApplication { public static void main(String[] args) { SpringApplication.run(Springboot07MybatisApplication.class, args); } }- 1
- 2
- 3
- 4
- 5
- 6
- 7
- 8
- 9
SpringBoot 实现 RESTful
概述
REST(英文:Representational State Transfer,简称 REST)
一种互联网软件架构设计的风格,但它并不是标准,它只是提出了一组客户端和服务器 交互时的架构理念和设计原则,基于这种理念和原则设计的接口可以更简洁,更有层次,REST 这个词,是 Roy Thomas Fielding 在他 2000 年的博士论文中提出的。任何的技术都可以实现这种理念,如果一个架构符合 REST 原则,就称它为 RESTFul 架构
比如我们要访问一个 http 接口:http://localhost:8080/boot/order?id=1021&status=1
采用 RESTful 风格则访问的地址为 http://localhost:8080/boot/order/1021/1
我们通常使用 @PathVariable 注解获取 url 中的数据。
案例代码
1、pom.xml 配置文件引入依赖
<project xmlns="http://maven.apache.org/POM/4.0.0" xmlns:xsi="http://www.w3.org/2001/XMLSchema-instance" xsi:schemaLocation="http://maven.apache.org/POM/4.0.0 https://maven.apache.org/xsd/maven-4.0.0.xsd"> <modelVersion>4.0.0modelVersion> <parent> <groupId>org.springframework.bootgroupId> <artifactId>spring-boot-starter-parentartifactId> <version>2.4.2version> <relativePath/> parent> <groupId>com.fcgroupId> <artifactId>springboot-08-restfulartifactId> <version>0.0.1-SNAPSHOTversion> <name>springboot-08-restfulname> <description>Demo project for Spring Bootdescription> <properties> <java.version>1.8java.version> properties> <dependencies> <dependency> <groupId>org.springframework.bootgroupId> <artifactId>spring-boot-starter-webartifactId> dependency> <dependency> <groupId>org.mybatis.spring.bootgroupId> <artifactId>mybatis-spring-boot-starterartifactId> <version>2.1.2version> dependency> <dependency> <groupId>mysqlgroupId> <artifactId>mysql-connector-javaartifactId> <version>5.1.48version> dependency> <dependency> <groupId>com.alibabagroupId> <artifactId>druid-spring-boot-starterartifactId> <version>1.1.21version> dependency> <dependency> <groupId>org.projectlombokgroupId> <artifactId>lombokartifactId> <optional>trueoptional> dependency> <dependency> <groupId>org.springframework.bootgroupId> <artifactId>spring-boot-starter-testartifactId> <scope>testscope> dependency> dependencies> <build> <plugins> <plugin> <groupId>org.springframework.bootgroupId> <artifactId>spring-boot-maven-pluginartifactId> <configuration> <excludes> <exclude> <groupId>org.projectlombokgroupId> <artifactId>lombokartifactId> exclude> excludes> configuration> plugin> plugins> build> project>- 1
- 2
- 3
- 4
- 5
- 6
- 7
- 8
- 9
- 10
- 11
- 12
- 13
- 14
- 15
- 16
- 17
- 18
- 19
- 20
- 21
- 22
- 23
- 24
- 25
- 26
- 27
- 28
- 29
- 30
- 31
- 32
- 33
- 34
- 35
- 36
- 37
- 38
- 39
- 40
- 41
- 42
- 43
- 44
- 45
- 46
- 47
- 48
- 49
- 50
- 51
- 52
- 53
- 54
- 55
- 56
- 57
- 58
- 59
- 60
- 61
- 62
- 63
- 64
- 65
- 66
- 67
- 68
- 69
- 70
- 71
- 72
2、application.yml 配置文件配置数据源以及 MyBatis 相关配置
server: port: 8080 # 数据库源 spring: datasource: driver-class-name: com.mysql.jdbc.Driver url: jdbc:mysql://localhost:3306/FC2021?useSSL=false&characterEncoding=UTF-8&serverTimezone=Asia/Shanghai username: root password: root # Mybatis相关配置 mybatis: type-aliases-package: com.fc.bean configuration: cache-enabled: true log-impl: org.apache.ibatis.logging.stdout.StdOutImpl mapper-locations: classpath:mapper/*.xml- 1
- 2
- 3
- 4
- 5
- 6
- 7
- 8
- 9
- 10
- 11
- 12
- 13
- 14
- 15
- 16
- 17
- 18
- 19
3、创建实体类
@Component @Data public class Student implements Serializable { private Integer id; private String name; private Integer age; private String gender; private Date birthday; private String info; }- 1
- 2
- 3
- 4
- 5
- 6
- 7
- 8
- 9
- 10
3、创建 Dao 层接口
@Repository public interface StudentDao { List<Student> findAll(); int add(Student student); int update(Student student); int delete(Integer id); }- 1
- 2
- 3
- 4
- 5
- 6
- 7
- 8
- 9
- 10
4、创建 Mapper 映射文件
DOCTYPE mapper PUBLIC "-//mybatis.org//DTD Mapper 3.0//EN" "http://mybatis.org/dtd/mybatis-3-mapper.dtd" > <mapper namespace="com.fc.dao.StudentDao"> <cache/> <select id="findAll" resultType="com.fc.bean.Student"> select * from student select> <insert id="add" parameterType="com.fc.bean.Student"> insert into student(name, age, gender, birthday, info) value (#{name}, #{age}, #{gender}, #{birthday}, #{info}) insert> <update id="update" parameterType="com.fc.bean.Student"> update student set name = #{name}, gender = #{gender}, age = #{age}, info = #{info} where id = #{id} update> <delete id="delete" parameterType="Integer"> delete from student where id = #{id} delete> mapper>- 1
- 2
- 3
- 4
- 5
- 6
- 7
- 8
- 9
- 10
- 11
- 12
- 13
- 14
- 15
- 16
- 17
- 18
- 19
- 20
- 21
- 22
- 23
- 24
- 25
- 26
- 27
5、创建 Service 层接口
public interface StudentService { List<Student> findAll(); int add(Student student); int update(Student student); int delete(Integer id); }- 1
- 2
- 3
- 4
- 5
- 6
- 7
- 8
- 9
6、创建 Service 层接口实现类
@Service("studentService") public class StudentServiceImpl implements StudentService { @Autowired private StudentDao studentDao; // 开启事务并指定传播行为,隔离级别,是否只读 @Transactional(isolation = Isolation.READ_COMMITTED, readOnly = true, propagation = Propagation.REQUIRED) @Override public List<Student> findAll() { return studentDao.findAll(); } @Transactional(readOnly = false) @Override public int add(Student student) { return studentDao.add(student); } @Transactional(readOnly = false) @Override public int update(Student student) { return studentDao.update(student); } @Transactional(readOnly = false) @Override public int delete(Integer id) { return studentDao.delete(id); } }- 1
- 2
- 3
- 4
- 5
- 6
- 7
- 8
- 9
- 10
- 11
- 12
- 13
- 14
- 15
- 16
- 17
- 18
- 19
- 20
- 21
- 22
- 23
- 24
- 25
- 26
- 27
- 28
- 29
- 30
- 31
- 32
7、创建 Controller
@RestController @RequestMapping("student") public class StudentController { @Autowired private StudentService studentService; /** * 使用Get请求查询所有 * * 参考URL: * http://localhost:8080/student */ @GetMapping() public List<Student> findAll() { return studentService.findAll(); } /** * 使用POST请求添加学生 * @param name 姓名 * @param age 年龄 * @param gender 性别 * @param birthday 生日 * @param info 信息 * @return 返回结果集 * * 参考URL: * http://localhost:8080/student/易烊千玺/20/男/2021-02-09 10:21:13/真帅 */ @PostMapping("{name}/{age}/{gender}/{birthday}/{info}") public Map<String, Object> add(@PathVariable("name") String name, @PathVariable("age") Integer age, @PathVariable("gender") String gender, @PathVariable("birthday") String birthday, @PathVariable("info") String info) { Map<String, Object> map = new HashMap<>(); SimpleDateFormat simpleDateFormat = new SimpleDateFormat("yyyy-MM-dd HH:mm:ss"); Date date = null; try { date = simpleDateFormat.parse(birthday); Student student = new Student(); student.setName(name); student.setAge(age); student.setGender(gender); student.setBirthday(date); student.setInfo(info); int affectedRows = studentService.add(student); if (affectedRows > 0) { map.put("code", 200); map.put("message", "添加成功"); } else { map.put("code", 500); map.put("message", "添加失败"); } } catch (ParseException e) { e.printStackTrace(); } return map; } /** * 使用PUT请求修改学生 * @param id ID * @param name 姓名 * @param age 年龄 * @param gender 性别 * @param birthday 生日 * @param info 信息 * @return 返回结果集 * * 参考URL: * http://localhost:8080/student/13/迪丽热巴/20/女/2021-02-09 18:49:13/年轻 */ @PutMapping("{id}/{name}/{age}/{gender}/{birthday}/{info}") public Map<String, Object> update(@PathVariable("id") Integer id, @PathVariable("name") String name, @PathVariable("age") Integer age, @PathVariable("gender") String gender, @PathVariable("birthday") String birthday, @PathVariable("info") String info) { Map<String, Object> map = new HashMap<>(); SimpleDateFormat simpleDateFormat = new SimpleDateFormat("yyyy-MM-dd HH:mm:ss"); Date date = null; try { date = simpleDateFormat.parse(birthday); Student student = new Student(); student.setId(id); student.setName(name); student.setAge(age); student.setGender(gender); student.setBirthday(date); student.setInfo(info); int affectedRows = studentService.update(student); if (affectedRows > 0) { map.put("code", 200); map.put("message", "修改成功"); } else { map.put("code", 500); map.put("message", "修改失败"); } } catch (ParseException e) { e.printStackTrace(); } return map; } /** * 使用DELETE请求删除学生 * @param id ID * @return 返回结果集 * * 参考URL: * http://localhost:8080/student/13 */ @DeleteMapping("{id}") public Map<String, Object> delete(@PathVariable("id") Integer id) { Map<String, Object> map = new HashMap<>(); int affectedRows = studentService.delete(id); if (affectedRows > 0) { map.put("code", 200); map.put("message", "删除成功"); } else { map.put("code", 500); map.put("message", "删除失败"); } return map; } }- 1
- 2
- 3
- 4
- 5
- 6
- 7
- 8
- 9
- 10
- 11
- 12
- 13
- 14
- 15
- 16
- 17
- 18
- 19
- 20
- 21
- 22
- 23
- 24
- 25
- 26
- 27
- 28
- 29
- 30
- 31
- 32
- 33
- 34
- 35
- 36
- 37
- 38
- 39
- 40
- 41
- 42
- 43
- 44
- 45
- 46
- 47
- 48
- 49
- 50
- 51
- 52
- 53
- 54
- 55
- 56
- 57
- 58
- 59
- 60
- 61
- 62
- 63
- 64
- 65
- 66
- 67
- 68
- 69
- 70
- 71
- 72
- 73
- 74
- 75
- 76
- 77
- 78
- 79
- 80
- 81
- 82
- 83
- 84
- 85
- 86
- 87
- 88
- 89
- 90
- 91
- 92
- 93
- 94
- 95
- 96
- 97
- 98
- 99
- 100
- 101
- 102
- 103
- 104
- 105
- 106
- 107
- 108
- 109
- 110
- 111
- 112
- 113
- 114
- 115
- 116
- 117
- 118
- 119
- 120
- 121
- 122
- 123
- 124
- 125
- 126
- 127
- 128
- 129
- 130
- 131
- 132
- 133
- 134
- 135
- 136
- 137
- 138
- 139
- 140
- 141
- 142
- 143
- 144
- 145
- 146
8、修改启动类,添加扫描接口的注解
@MapperScan("com.fc.dao") @SpringBootApplication public class Springboot08RestfulApplication { public static void main(String[] args) { SpringApplication.run(Springboot08RestfulApplication.class, args); } }- 1
- 2
- 3
- 4
- 5
- 6
- 7
9、使用 Postman 访问各接口
# POST http://localhost:8080/student/易烊千玺/20/男/2021-02-09 10:21:13/真帅 # DELETE http://localhost:8080/student/13 # PUT http://localhost:8080/student/13/迪丽热巴/20/女/2021-02-09 18:49:13/年轻 # GET http://localhost:8080/student- 1
- 2
- 3
- 4
- 5
- 6
- 7
- 8
- 9
- 10
- 11
RESTful 风格的特点
- 传递参数变简单了 传递参数变简单了
- 服务提供者对外只了一个接口,而不是传统的 服务提供者对外只了一个接口,而不是传统的 服务提供者对外只了一个接口,而不是传统的 服务提供者对外只了一个接口,而不是传统的 服务提供者对外只了一个接口,而不是传统的 服务提供者对外只了一个接口,而不是传统的 服务提供者对外只了一个接口,而不是传统的 CRUD四个接口
- 一定要注意两个请求路径会发生请求路径冲突问题。如果出现了冲突,要么修改请求路径,要么修改请求方式
RESTful 原则【了解】
1、增使用 post 请求、删使用 delete 请求、改使用 put 请求、查使用 get 请求
2、请求路径不要出现动词
例如:查询订单接口
/boot/order/1021/1(推荐) /boot/queryOrder/1021/1(不推荐)- 1
- 2
3、分页、排序等操作,不需要使用斜杠传参数分页、排序等操作,不需要使用 RESTful 风格传参
例如:订单列表接口
/boot/orders?page=1&sort=desc(推荐)- 1
一般传的参数不是数据库表字段,可以不采用 RESTful 风格传参
SpringBoot 异常处理
概述
SpringBoot 默认的已经提供了一套处理异常的机制。 一旦程序中出现了异常 SpringBoot 会向 /error 的 url 发送请求。在 SpringBoot 中提供了一个 叫 BasicExceptionController 来处理 /error 请求,然后跳转到默认显示异常的页面来展示异常信息。
[外链图片转存失败,源站可能有防盗链机制,建议将图片保存下来直接上传(img-5YWzDG4P-1662614879129)(Pictures/异常.png)]
常用注解
注解 描述 核心属性及作用 @ControllerAdvice 对所有异常集中处理,对Controller层进行拦截 value,用于指定异常拦截的包名 @RestControllerAdvice 相当于@ControllerAdvice加上@ResponseBody注解 value,用于指定异常拦截的包名 @ExceptionHandler 对指定异常进行处理 value,异常的Class对象 案例代码
1、创建自定义异常
/** * 自定义异常 */ public class MyException extends Exception { public MyException() { super(); } public MyException(String message) { super(message); } }- 1
- 2
- 3
- 4
- 5
- 6
- 7
- 8
- 9
- 10
- 11
- 12
2、创建异常处理器
// 此注解用于拦截控制层的所有异常 @RestControllerAdvice public class CustomExceptionHandler { // 此注解用于处理对应类型的异常 @ExceptionHandler(value = Exception.class) public Map<String, Object> handlerSystemException(Exception e, HttpServletRequest request) { Map<String, Object> map = new HashMap<>(); map.put("msg", e.getMessage()); map.put("url", request.getRequestURL()); return map; } @ExceptionHandler(value = MyException.class) public Map<String, Object> handlerMyException(MyException e, HttpServletRequest request) { Map<String, Object> map = new HashMap<>(); map.put("msg", e.getMessage()); map.put("url", request.getRequestURL()); return map; } }- 1
- 2
- 3
- 4
- 5
- 6
- 7
- 8
- 9
- 10
- 11
- 12
- 13
- 14
- 15
- 16
- 17
- 18
- 19
- 20
- 21
- 22
- 23
- 24
3、创建 Controller
@RestController @RequestMapping("exception") public class ExceptionController { // 测试系统异常 @RequestMapping("systemException") public void testSystemException() { int i = 1 / 0; } // 测试自定义异常 @RequestMapping("customException") public void testCustomException() throws MyException { throw new MyException("自定义异常"); } }- 1
- 2
- 3
- 4
- 5
- 6
- 7
- 8
- 9
- 10
- 11
- 12
- 13
- 14
- 15
SpringBoot 过滤器
1、创建自定义过滤器
@WebFilter("/*") public class MyFilter implements Filter { @Override public void doFilter(ServletRequest servletRequest, ServletResponse servletResponse, FilterChain filterChain) throws IOException, ServletException { System.out.println("自定义过滤器被执行"); filterChain.doFilter(servletRequest, servletResponse); } }- 1
- 2
- 3
- 4
- 5
- 6
- 7
- 8
2、创建 Controller
@RestController @RequestMapping("filter") public class FilterController { @RequestMapping("test") public String testFilter() { return "filter"; } }- 1
- 2
- 3
- 4
- 5
- 6
- 7
- 8
- 9
3、修改启动类,添加 @ServletComponentScan 注解,此注解用于@WebServlet、@WebFilter、@WebListener注解自动注册
@SpringBootApplication // 声明此注解后,Servlet、Filter、Listener可以直接通过@WebServlet、@WebFilter、@WebListener注解自动注册 @ServletComponentScan public class Springboot10FilterApplication { public static void main(String[] args) { SpringApplication.run(Springboot10FilterApplication.class, args); } }- 1
- 2
- 3
- 4
- 5
- 6
- 7
- 8
SpringBoot 拦截器
1、创建自定义拦截器
public class MyInterceptor implements HandlerInterceptor { /* * 进入controller方法之前调用 * * true表示放行,false表示不放行 */ @Override public boolean preHandle(HttpServletRequest request, HttpServletResponse response, Object handler) throws Exception { System.out.println("preHandle"); return true; } // 调用完controller之后,视图渲染之前 @Override public void postHandle(HttpServletRequest request, HttpServletResponse response, Object handler, ModelAndView modelAndView) throws Exception { System.out.println("postHandle"); } // 页面跳转之后,整个流程执行之后,一般用于资源清理操作 @Override public void afterCompletion(HttpServletRequest request, HttpServletResponse response, Object handler, Exception ex) throws Exception { System.out.println("afterCompletion"); } }- 1
- 2
- 3
- 4
- 5
- 6
- 7
- 8
- 9
- 10
- 11
- 12
- 13
- 14
- 15
- 16
- 17
- 18
- 19
- 20
- 21
- 22
- 23
- 24
2、创建拦截器配置类,这里的操作就相当于 SpringMVC 的注册拦截器 ,@Configuration就相当于一个 springMvc.xml
@Configuration public class InterceptorConfig implements WebMvcConfigurer { @Override public void addInterceptors(InterceptorRegistry registry) { // 设置拦截器并指定拦截路径 registry.addInterceptor(new MyInterceptor()).addPathPatterns("/interceptor/*"); // 拦截所有 // registry.addInterceptor(new MyInterceptor()).addPathPatterns("/**"); // 指定不拦截 // registry.addInterceptor(new MyInterceptor()).addPathPatterns("/**").excludePathPatterns("/test"); //添加自定义拦截器 WebMvcConfigurer.super.addInterceptors(registry); } }- 1
- 2
- 3
- 4
- 5
- 6
- 7
- 8
- 9
- 10
- 11
- 12
- 13
- 14
3、在 static 目录下创建 index.html 页面
DOCTYPE html> <html lang="en"> <head> <meta charset="UTF-8"> <title>测试主页title> head> <body> 主页 body> html>- 1
- 2
- 3
- 4
- 5
- 6
- 7
- 8
- 9
- 10
4、创建 Controller
@Controller @RequestMapping("interceptor") public class InterceptorController { @RequestMapping("test") public String test() { return "/index.html"; } }- 1
- 2
- 3
- 4
- 5
- 6
- 7
- 8
SpringBoot 整合 JUnit4
概述
Spring Test 与 JUnit 等其他测试框架结合起来,提供了便捷高效的测试手段。而 Spring Boot Test 是在 Spring Test 之上的再次封装,增加了切片测试,增强了mock 能力。
SpringBootTest 注解
@SpringBootTest 替代了 Spring-Test 中的 @ContextConfiguration 注解,目的是加载 ApplicationContext,启动 Spring 容器。
使用 @SpringBootTest 时并没有像 @ContextConfiguration 一样显示指定 locations 或 classes 属性,原因在于 @SpringBootTest 注解会自动检索程序的配置文件,检索顺序是从当前包开始,逐级向上查找被@SpringBootApplication 或 @SpringBootConfiguration 注解的类。
案例代码
1、pom.xml 导入对应的依赖
<dependency> <groupId>org.springframework.bootgroupId> <artifactId>spring-boot-starterartifactId> dependency> <dependency> <groupId>org.springframework.bootgroupId> <artifactId>spring-boot-starter-webartifactId> <scope>providedscope> dependency> <dependency> <groupId>junitgroupId> <artifactId>junitartifactId> <scope>providedscope> dependency> <dependency> <groupId>org.springframework.bootgroupId> <artifactId>spring-boot-starter-testartifactId> <scope>testscope> dependency>- 1
- 2
- 3
- 4
- 5
- 6
- 7
- 8
- 9
- 10
- 11
- 12
- 13
- 14
- 15
- 16
- 17
- 18
- 19
- 20
- 21
- 22
- 23
- 24
- 25
- 26
2、声明 Controller
@Controller public class UserController { public void test() { System.out.println("测试"); } }- 1
- 2
- 3
- 4
- 5
- 6
3、编写测试类
// 告知junit加载Spring运行环境,SpringRunner是SpringJUnit4ClassRunner的子类 @RunWith(SpringRunner.class) @SpringBootTest class ApplicationTests { // 依赖注入 @Autowired private UserController userController; @Test void contextLoads() { userController.test(); } }- 1
- 2
- 3
- 4
- 5
- 6
- 7
- 8
- 9
- 10
- 11
- 12
- 13
SpringBoot 整合 JUnit5
概述
Spring Boot 2.2.0 版本开始引入 JUnit 5 作为单元测试默认库
作为最新版本的 JUnit 框架,JUnit5 与之前版本的 Junit 框架有很大的不同。由三个不同子项目的几个不同模块组成。
JUnit 5 = JUnit Platform + JUnit Jupiter + JUnit Vintage
JUnit Platform: Junit Platform 是在 JVM 上启动测试框架的基础,不仅支持 Junit 自制的测试引擎,其他测试引擎也都可以接入。
JUnit Jupiter: JUnit Jupiter 提供了JUnit5的新的编程模型,是JUnit5新特性的核心。内部包含了一个测试引擎,用于在 Junit Platform 上运行。
JUnit Vintage: 由于 JUint 已经发展多年,为了照顾老的项目,JUnit Vintage 提供了兼容 JUnit4.x,Junit3.x 的测试引擎。
注意:
1、SpringBoot 2.4 以上版本移除了默认对 Vintage 的依赖。如果需要兼容 junit4 需要自行引入(不能使用junit4的功能 @Test)
2、Junit 类具有 Spring 的功能,比如 @Autowired 能够自动注入容器中的对象、比如 @Transactional 声明的测试方法,测试完成后能够自动回滚
常用注解
注解 描述 @Test 表示方法是测试方法。但是与JUnit4的@Test不同,他的职责非常单一不能声明任何属性,拓展的测试将会由Jupiter提供额外测试 @ParameterizedTest 表示方法是参数化测试 @RepeatedTest 表示方法是重复测试的测试模板 @DisplayName 声明测试类或测试方法的自定义显示名称 @BeforeEach 表示在每个单元测试之前执行,类似于JUnit 4的@Before @AfterEach 表示在每个单元测试之后执行,类似于 JUnit 4的@After @BeforeAll 表示在所有单元测试之前执行,类似于JUnit 4的@BeforeClass @AfterAll 表示在所有单元测试之后执行,类似于JUnit 4的@AfterClass @Tag 表示单元测试类别,类似于JUnit4中的@Categories @Disabled 表示测试类或测试方法不执行,类似于JUnit4中的@Ignore @Timeout 表示测试方法运行如果超过了指定时间将会返回错误 @RepeatedTest 表示测试方法会被重复测试 @ExtendWith 为测试类或测试方法提供扩展类引用,类似于JUnit4中的@RunWith 案例代码
// 测试Junit5中的注解 // @SpringBootTest内置@ExtendWith注解,相当于@Runwith注解,用来指明Spring的运行环境 @SpringBootTest @DisplayName("测试DisplayName注解加到类上") class ApplicationTests { @Autowired private User user; @Test void testDI() { System.out.println("测试从容器里获取的对象:" + user); } @Test void contextLoads() { System.out.println("测试Junit5中的@Test方法"); } // @DisplayName用来标记显示的名称 @DisplayName("测试DisplayName注解加到方法上") @Test void testDisplayName() { System.out.println("测试DisplayName注解"); } // @Disabled标记当前测试方法不可用 @Disabled @Test @Tag("测试注解") void testDisabled() { System.out.println("测试Disabled注解:被此注解声明的测试方法将不会生效"); } // @Timeout指定测试方法的过期时间,unit为时间单位 @Timeout(value = 3, unit = TimeUnit.SECONDS) @Test void testTimeout() { try { Thread.sleep(5000); System.out.println("测试Timeout注解,超时报错"); } catch (InterruptedException e) { e.printStackTrace(); } } // @RepeatedTest用于指明重复执行的次数 @RepeatedTest(3) void testRepeatedTest() { System.out.println("测试RepeatedTest注解:重复测试,可以手动指定测试的次数"); } // @BeforeEach用来指定每个测试方法前执行的方法 @BeforeEach() void testBeforeEach() { System.out.println("测试BeforeEach注解:任意测试方法执行前执行此方法"); } // @AfterEach用来指定每个测试方法后执行的方法 @AfterEach void testAfterEach() { System.out.println("测试AfterEach注解:任意测试方法执行后执行此方法"); } // @BeforeAll用来指定所有测试方法前执行的方法 @BeforeAll static void testBeforeAll() { System.out.println("测试BeforeAll注解:所有测试方法执行前执行此方法(一次)"); } // @AfterAll用来指定所有测试方法后执行的方法 @AfterAll static void testAfterAll() { System.out.println("测试AfterAll注解:所有测试方法执行后执行此方法(一次)"); } }- 1
- 2
- 3
- 4
- 5
- 6
- 7
- 8
- 9
- 10
- 11
- 12
- 13
- 14
- 15
- 16
- 17
- 18
- 19
- 20
- 21
- 22
- 23
- 24
- 25
- 26
- 27
- 28
- 29
- 30
- 31
- 32
- 33
- 34
- 35
- 36
- 37
- 38
- 39
- 40
- 41
- 42
- 43
- 44
- 45
- 46
- 47
- 48
- 49
- 50
- 51
- 52
- 53
- 54
- 55
- 56
- 57
- 58
- 59
- 60
- 61
- 62
- 63
- 64
- 65
- 66
- 67
- 68
- 69
- 70
- 71
- 72
- 73
- 74
- 75
SpringBoot 多环境配置
application-profile
为每个环境创建一配置文件,命名必须以 application-环境标识 .properties | yml
1、创建 application-dev.yml 配置文件
# 设置开发环境配置 server: # 设置Tomcat内嵌端口号 port: 8080 # 设置上下文根 servlet: context-path: /dev- 1
- 2
- 3
- 4
- 5
- 6
2、创建 application-product.yml 配置文件
# 设置生产环境配置 server: # 设置Tomcat内嵌端口号 port: 8081 # 设置上下文根 servlet: context-path: /product- 1
- 2
- 3
- 4
- 5
- 6
- 7
3、创建 application-test.yml 配置文件
# 设置测试环境配置 server: # 设置Tomcat内嵌端口号 port: 8082 # 设置上下文根 servlet: context-path: /test- 1
- 2
- 3
- 4
- 5
- 6
- 7
通过配置文件指定
在 application.yml 总配置文件中添加对应的使用环境
# 使用测试环境 #spring: # profiles: # active: test # 使用开发环境 #spring: # profiles: # active: dev # 使用开发环境 spring: profiles: active: product- 1
- 2
- 3
- 4
- 5
- 6
- 7
- 8
- 9
- 10
- 11
- 12
- 13
- 14
通过命令行携带参数指定
java -jar xxx.jar --spring.profiles.active=dev- 1
【注意】优先级最高
@Profile 条件装配
@Profile 注解
指示当一个或多个指定的配置文件处于活动状态时,该组件才有资格注册。此注解可用于类或者方法上,配合 @Component 或者 @Bean 创建对象到容器中。
案例代码
声明三个配置文件
person: name: 马尔扎哈 age: 200- 1
- 2
- 3
1、创建 application-dev.yml 配置文件
person: name: 易烊千玺 age: 21- 1
- 2
- 3
2、创建 application-test.yml 配置文件
person: name: 迪丽热巴 age: 22- 1
- 2
- 3
3、创建 application-product.yml 配置文件
person: name: 马尔扎哈 age: 200- 1
- 2
- 3
4、声明一个接口以及三个实现类
public interface Person { } @Profile("product") @ConfigurationProperties("person") @Data @Component public class GrandPa implements Person { private String name; private Integer age; } @Profile("dev") @ConfigurationProperties("person") @Data @Component public class Father implements Person { private String name; private Integer age; } @Profile("test") @ConfigurationProperties("person") @Data @Component public class Son implements Person { private String name; private Integer age; }- 1
- 2
- 3
- 4
- 5
- 6
- 7
- 8
- 9
- 10
- 11
- 12
- 13
- 14
- 15
- 16
- 17
- 18
- 19
- 20
- 21
- 22
- 23
- 24
- 25
- 26
- 27
- 28
- 29
声明控制层中的方法
@RestController @RequestMapping("user") public class UserController { // 注入一个接口 @Autowired private Person person; @RequestMapping("getPerson") public Person getPerson() { return person; } }- 1
- 2
- 3
- 4
- 5
- 6
- 7
- 8
- 9
- 10
- 11
- 12
通过 application.yml 文件指定运行的环境
# 使用开发环境 spring: profiles: active: product- 1
- 2
- 3
- 4
此时我们从 Spring 容器中获取到的 Person 对象响应到浏览器上就是 { “name”: “马尔扎哈”,“age”: 200}
【补充】SpringBoot 字符编码集
如果出现了字符编码集的问题,在 application.yml 文件中添加以下内容即可
server: servlet: encoding: enabled: true force: true charset: UTF-8- 1
- 2
- 3
- 4
- 5
- 6
【补充】SpringBoot 热部署
为了方便开发,可以在创建项目时手动勾选热部署,或导入该依赖,就不需要每次重启配置类
实现原理主要是因为它使用了两种不同的类加载器。基础类加载器用于加载不会改变的类(比如第三方库中的类),重启类加载器用于加载你应用程序中的类。当应用程序启动时,重启类加载器中的类将会被替换掉,这就意味着重启将比冷启动更快!
1、pom.xml 配置文件添加依赖
<dependency> <groupId>org.springframework.bootgroupId> <artifactId>spring-boot-devtoolsartifactId> <optional>trueoptional> dependency>- 1
- 2
- 3
- 4
- 5
- 6
2、点击 Settings
[外链图片转存失败,源站可能有防盗链机制,建议将图片保存下来直接上传(img-opH1D1Ey-1662614879133)(Pictures/SpringBoot热部署01.png)]
3、勾选自动构建项目
[外链图片转存失败,源站可能有防盗链机制,建议将图片保存下来直接上传(img-2UZ7otqw-1662614879133)(Pictures/SpringBoot热部署02.png)]
4、Ctrl + Alt + Shift + / 打开保持页面,并选择 Registry
[外链图片转存失败,源站可能有防盗链机制,建议将图片保存下来直接上传(img-FcwQpvPi-1662614879134)(Pictures/SpringBoot热部署03.png)]
5、在注册页面找到
complier.automake.allow.when.app.running并勾选 Close[外链图片转存失败,源站可能有防盗链机制,建议将图片保存下来直接上传(img-NkZVwoxs-1662614879135)(Pictures/SpringBoot热部署04.png)]
【补充】关闭启动时的 SpringBoot Logo
修改启动类
@SpringBootApplication public class SpringbootApplication { public static void main(String[] args) { SpringApplication springApplication = new SpringApplication(SpringbootApplication.class); // 关闭启动logo springApplication.setBannerMode(Banner.Mode.OFF); springApplication.run(args); } }- 1
- 2
- 3
- 4
- 5
- 6
- 7
- 8
- 9
- 10
- 11
【补充】替换启动时的 SpringBoot Logo
在 src/main/resources 目录下添加 banner.txt 文件,此文件中的内容就是 Logo。可以利用网站生成图标: https://www.bootschool.net/ascii 或者 http://patorjk.com/software/taag/,将生成好的图标文字粘贴到 ,将生成好的图标文字粘贴到 banner.txt 文件中即可。
或者直接使用图片,在配置文件中进行对应的配置也可以
spring.banner.image.location=classpath:- 1
@Profile(“dev”)
@ConfigurationProperties(“person”)
@Data
@Component
public class Father implements Person {
private String name;
private Integer age;
}@Profile(“test”)
@ConfigurationProperties(“person”)
@Data
@Component
public class Son implements Person {
private String name;
private Integer age;
}声明控制层中的方法 ```java @RestController @RequestMapping("user") public class UserController { // 注入一个接口 @Autowired private Person person; @RequestMapping("getPerson") public Person getPerson() { return person; } }- 1
- 2
- 3
- 4
- 5
- 6
- 7
- 8
- 9
- 10
- 11
- 12
- 13
- 14
- 15
- 16
通过 application.yml 文件指定运行的环境
# 使用开发环境 spring: profiles: active: product- 1
- 2
- 3
- 4
此时我们从 Spring 容器中获取到的 Person 对象响应到浏览器上就是 { “name”: “马尔扎哈”,“age”: 200}
【补充】SpringBoot 字符编码集
如果出现了字符编码集的问题,在 application.yml 文件中添加以下内容即可
server: servlet: encoding: enabled: true force: true charset: UTF-8- 1
- 2
- 3
- 4
- 5
- 6
【补充】SpringBoot 热部署
为了方便开发,可以在创建项目时手动勾选热部署,或导入该依赖,就不需要每次重启配置类
实现原理主要是因为它使用了两种不同的类加载器。基础类加载器用于加载不会改变的类(比如第三方库中的类),重启类加载器用于加载你应用程序中的类。当应用程序启动时,重启类加载器中的类将会被替换掉,这就意味着重启将比冷启动更快!
1、pom.xml 配置文件添加依赖
<dependency> <groupId>org.springframework.bootgroupId> <artifactId>spring-boot-devtoolsartifactId> <optional>trueoptional> dependency>- 1
- 2
- 3
- 4
- 5
- 6
2、点击 Settings
[外链图片转存中…(img-opH1D1Ey-1662614879133)]
3、勾选自动构建项目
[外链图片转存中…(img-2UZ7otqw-1662614879133)]
4、Ctrl + Alt + Shift + / 打开保持页面,并选择 Registry
[外链图片转存中…(img-FcwQpvPi-1662614879134)]
5、在注册页面找到
complier.automake.allow.when.app.running并勾选 Close[外链图片转存中…(img-NkZVwoxs-1662614879135)]
【补充】关闭启动时的 SpringBoot Logo
修改启动类
@SpringBootApplication public class SpringbootApplication { public static void main(String[] args) { SpringApplication springApplication = new SpringApplication(SpringbootApplication.class); // 关闭启动logo springApplication.setBannerMode(Banner.Mode.OFF); springApplication.run(args); } }- 1
- 2
- 3
- 4
- 5
- 6
- 7
- 8
- 9
- 10
- 11
【补充】替换启动时的 SpringBoot Logo
在 src/main/resources 目录下添加 banner.txt 文件,此文件中的内容就是 Logo。可以利用网站生成图标: https://www.bootschool.net/ascii 或者 http://patorjk.com/software/taag/,将生成好的图标文字粘贴到 ,将生成好的图标文字粘贴到 banner.txt 文件中即可。
或者直接使用图片,在配置文件中进行对应的配置也可以
spring.banner.image.location=classpath:- 1
-
相关阅读:
Python自动化办公篇 - 104 - python实现邮件自动化 - 邮件发送
数字信号处理FFT快速傅立叶变换MATLAB实现——实例
荐书 |《写作脑科学》:屠龙的胭脂井教你写得又快又好
【MATLAB】语音信号识别与处理:一维信号NLM非局部均值滤波算法去噪及谱相减算法呈现频谱
【SpingBoot拦截器】实现两个接口,配置拦截路径
JavaScript基础学学习总结
【C++】引用之带你“消除”C语言版数据结构教材的一些困惑(虽然是C++的内容,但是强烈建议正在学习数据结构的同学点进来看看)
DevOps自动化测试的原则和实践
第二章 第二十四节:文件操作:写
【FPGA】时序逻辑电路——基于计数器实现一个以1秒频率闪烁的LED灯
- 原文地址:https://blog.csdn.net/Angeliaz/article/details/126762757
