-
极光推送实现
注意:个人无法使用此功能,因为个人申请使用是不会通过的
建议先看一下:
Linux curl命令最全详解
curl使用总结1、创建极光推送流程
极光消息推送文档
查看创建应用和创建消息推送两个文档(写的很详细,如何创建)

API文档

其中需要注意,获取appKey和masterSecret在:

2、调用API
这里是发送post请求调用,且这里客户端请求(需要有认证信息),且需要对appKey和masterSecret进行base64算法加密
HTTP基本认证(https://zh.wikipedia.org/wiki/HTTP%E5%9F%BA%E6%9C%AC%E8%AE%A4%E8%AF%81)

创建推送请求示例: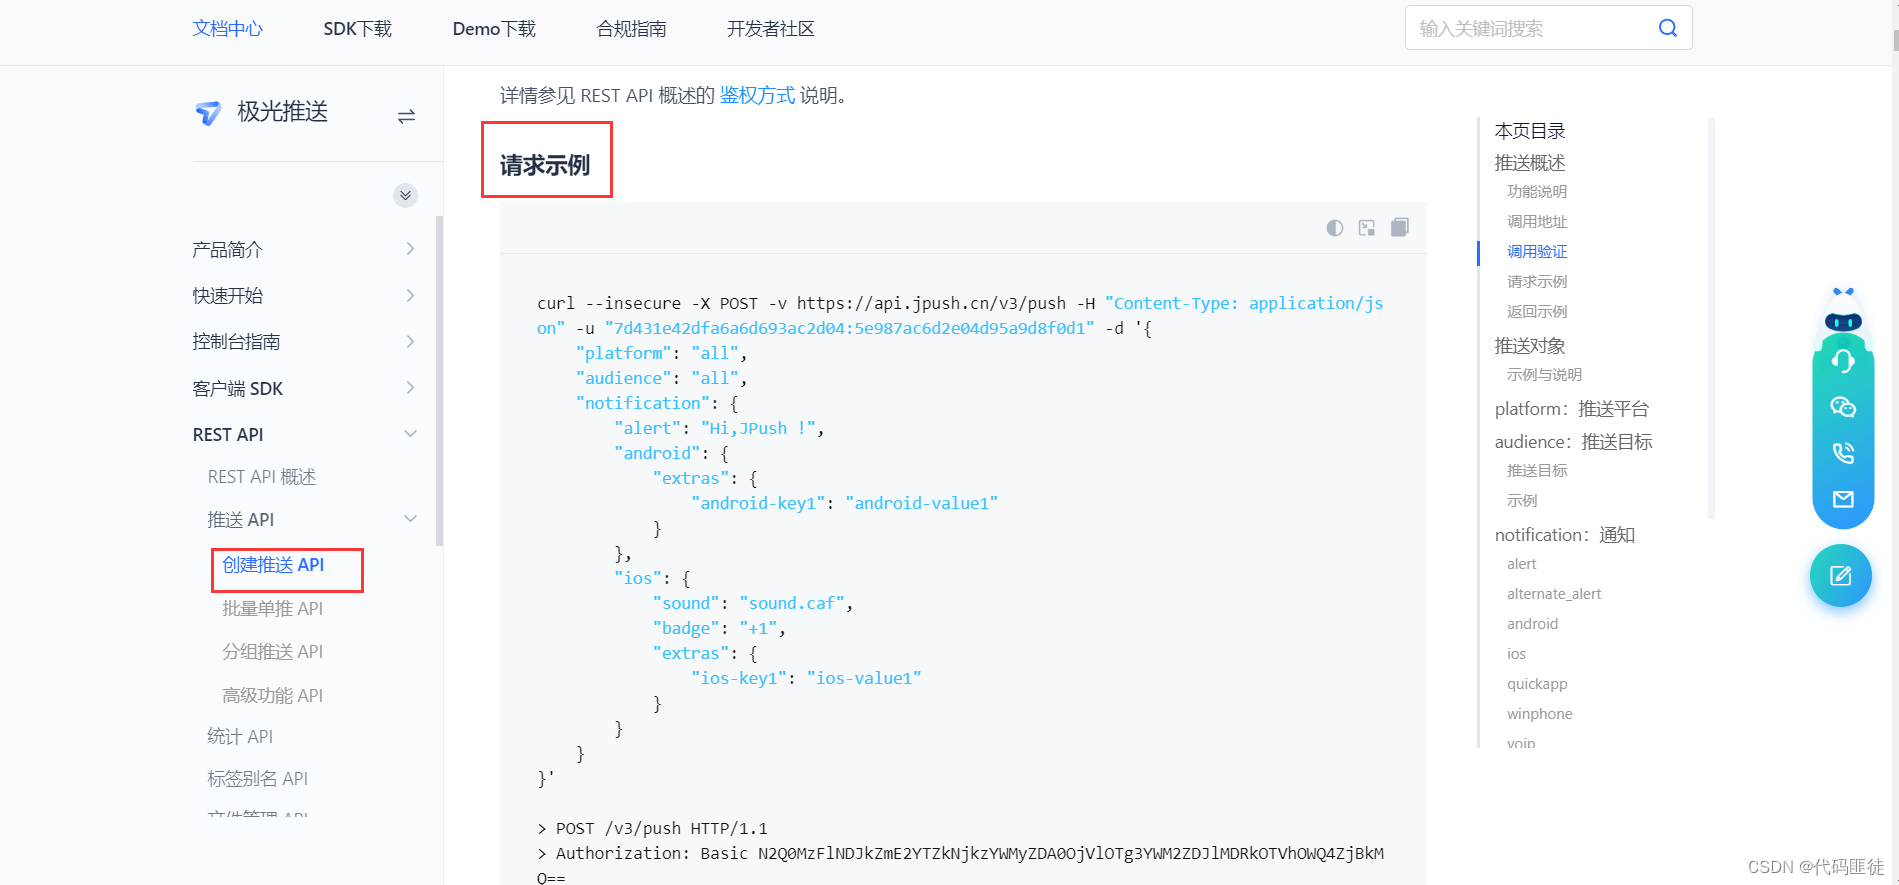
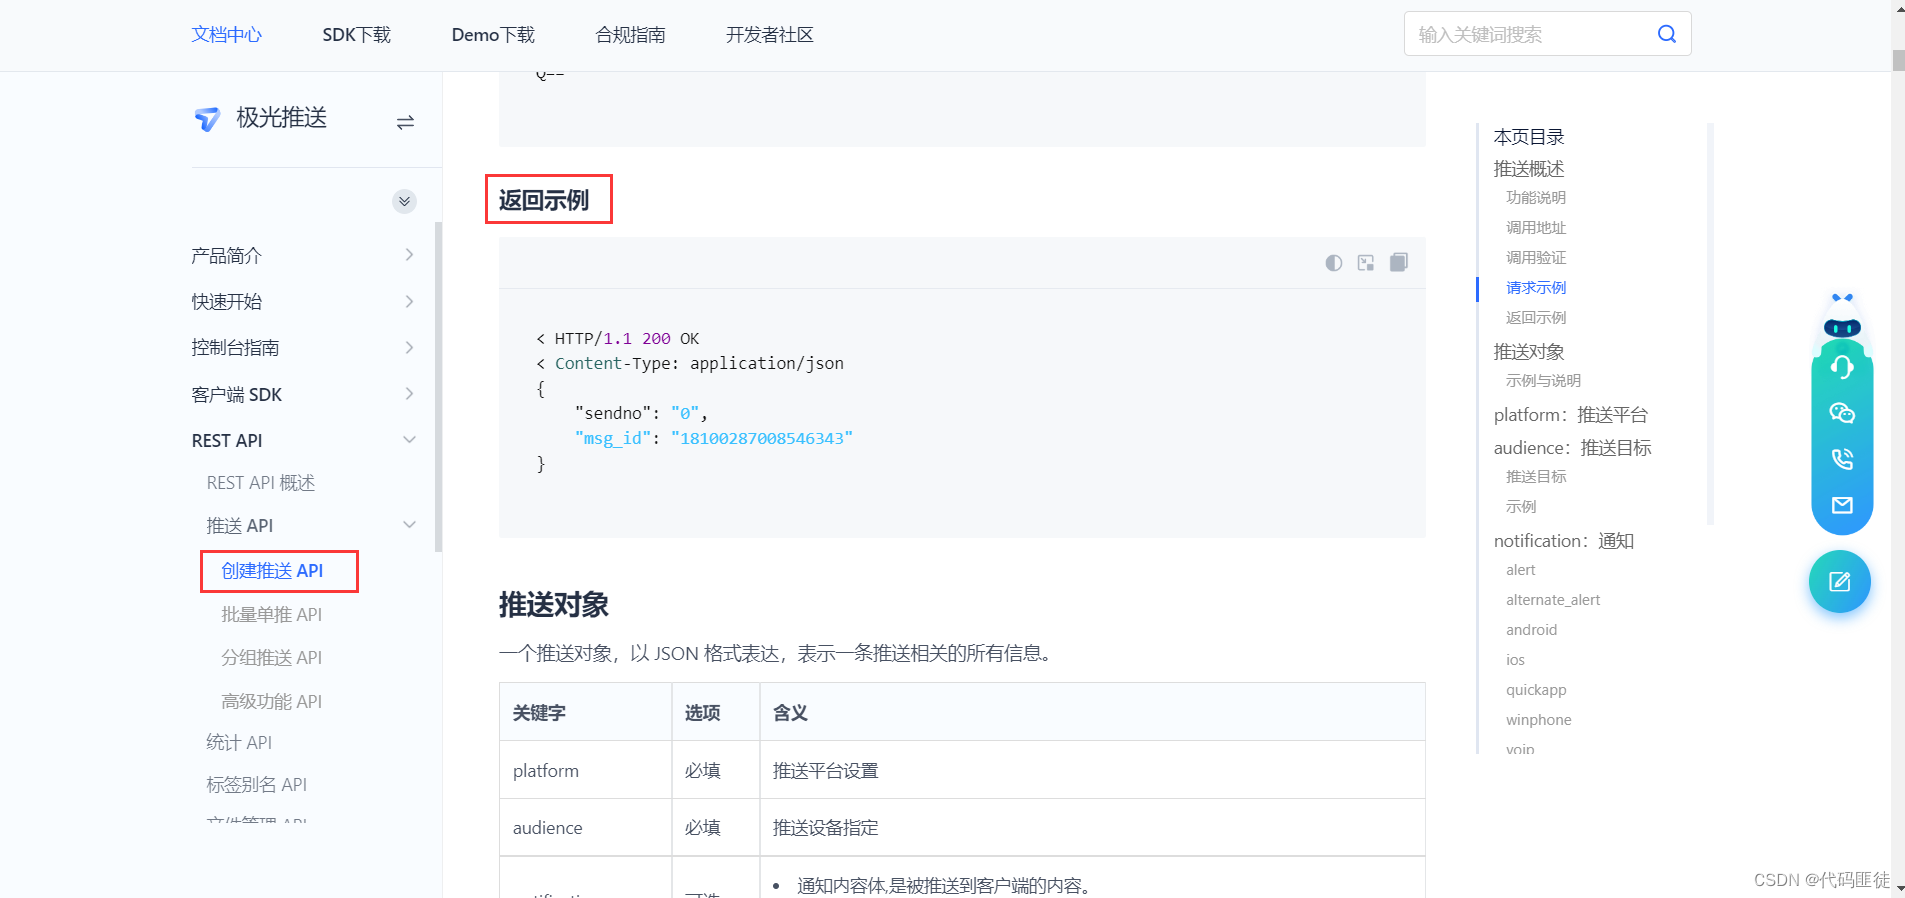
返回示例:
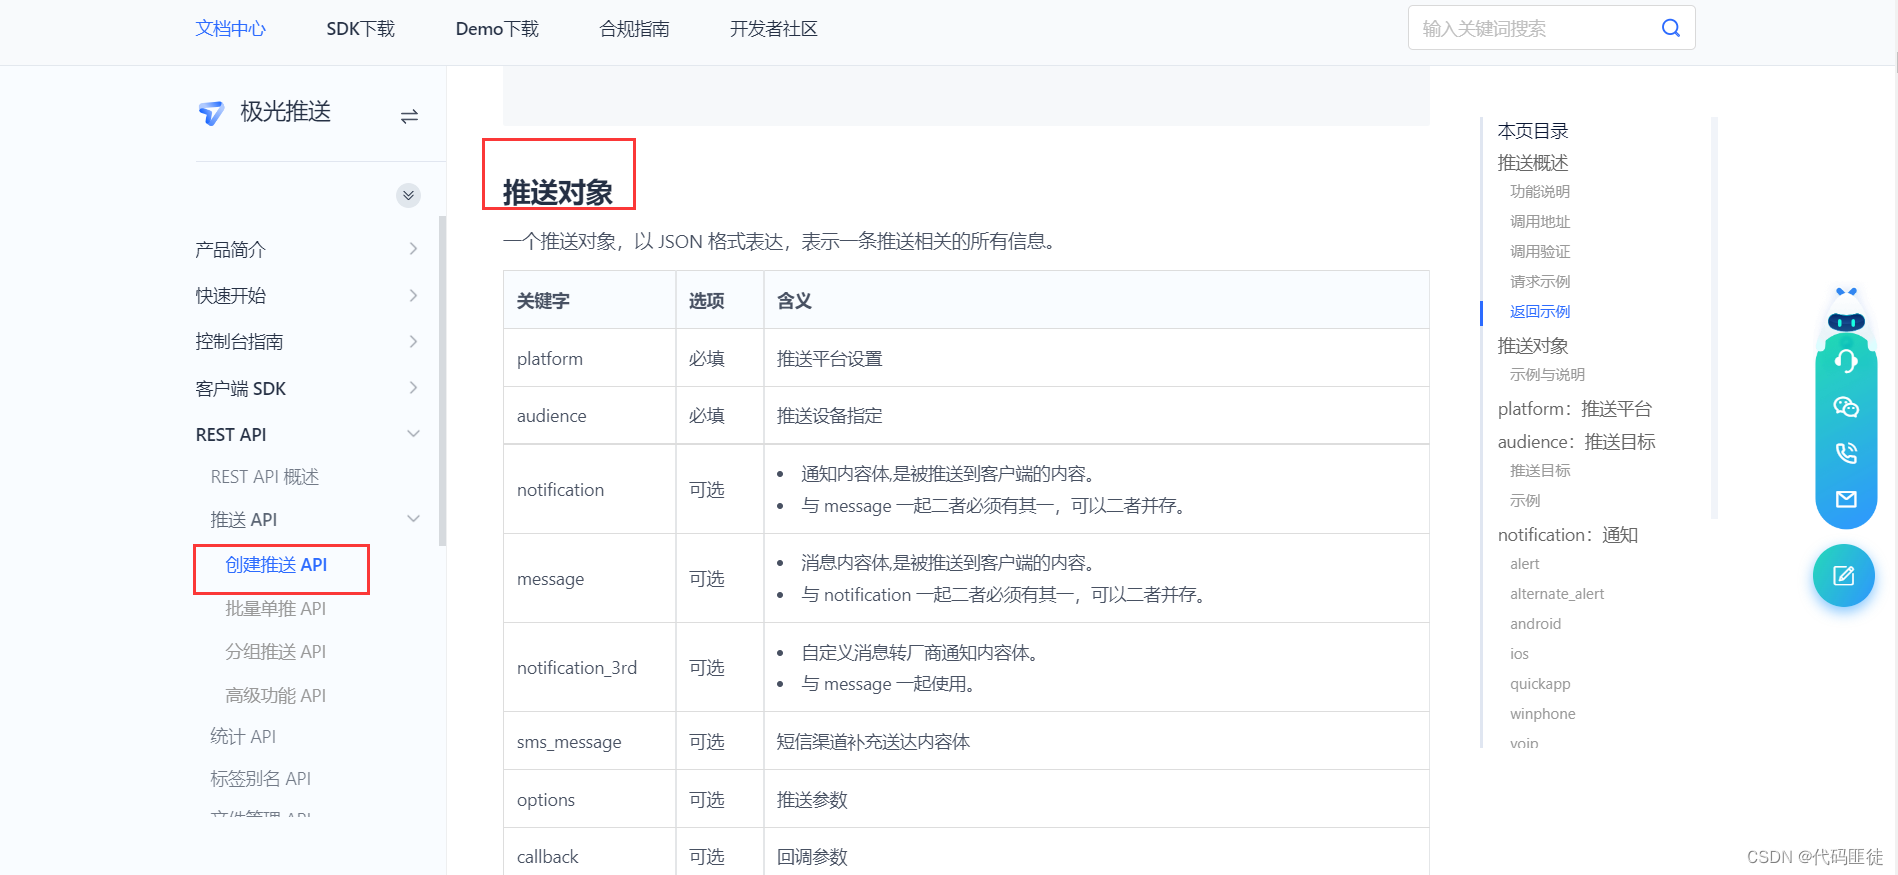
推送对象:
示例说明:

3、代码实现
这里采用了hutool工具包封装的方法发生post请求
hutool发送Http请求-HttpRequest
使用 hutool 工具包发送 HTTP 请求
依赖:<!--Hutool--> <dependency> <groupId>cn.hutool</groupId> <artifactId>hutool-all</artifactId> <version>5.7.16</version> </dependency>- 1
- 2
- 3
- 4
- 5
- 6
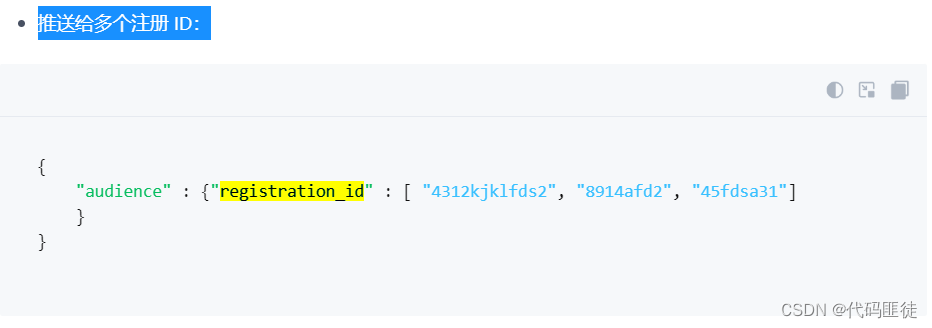
这里实现的是 audience:推送目标的推送给多个注册 ID:
代码:import cn.hutool.http.HttpRequest; import com.alibaba.fastjson.JSONArray; import com.alibaba.fastjson.JSONObject; import java.util.ArrayList; import java.util.List; /** * @author xn */ public class JpushService { /** * 极光推送的APP KEY */ String JPUSH_APP_KEY = "xxx"; /** * 极光推送的MASTER SECRET */ String JPUSH_MASTER_SECRET = "xxx"; /** * 发送通知消息,封装数据 * * @param userUuid 用户的Uuid (这里demo用不到userUuid) * @param title 题目 * @param content 内容 */ public void pushNotification(String userUuid, String title, String content) { //根据用户userUuid从数据库中查找存储的jpushRegistrationId //ListjpushRegistrationId = userDeviceInfoMapper.getUserJpushRegistrationId(userUuid); List<String> jpushRegistrationId = new ArrayList<>(); jpushRegistrationId.add("xxx"); jpushRegistrationId.add("xxx"); if (jpushRegistrationId.size() > 0) { JSONObject requestData = new JSONObject(); requestData.put("platform", "all"); JSONArray registrationIds = new JSONArray(); registrationIds.addAll(jpushRegistrationId); JSONObject audience = new JSONObject(); audience.put("registration_id", registrationIds); requestData.put("audience", audience); JSONObject notification = new JSONObject(); JSONObject android = new JSONObject(); android.put("alert", content); android.put("title", title); notification.put("android", android); JSONObject ios = new JSONObject(); ios.put("alert", content); notification.put("ios", ios); requestData.put("notification", notification); jpushNotificationNetworkHandler(requestData); } } /** * 发送推送 * * @param requestData 请求参数 */ private void jpushNotificationNetworkHandler(JSONObject requestData) { try { //只需要执行就行了,不需要过去结果 HttpRequest.post("https://api.jpush.cn/v3/push") .basicAuth(JPUSH_APP_KEY, JPUSH_MASTER_SECRET) .body(requestData.toString()) .timeout(20000) .execute().body(); } catch (Exception exception) { System.out.println(exception); } } }- 1
- 2
- 3
- 4
- 5
- 6
- 7
- 8
- 9
- 10
- 11
- 12
- 13
- 14
- 15
- 16
- 17
- 18
- 19
- 20
- 21
- 22
- 23
- 24
- 25
- 26
- 27
- 28
- 29
- 30
- 31
- 32
- 33
- 34
- 35
- 36
- 37
- 38
- 39
- 40
- 41
- 42
- 43
- 44
- 45
- 46
- 47
- 48
- 49
- 50
- 51
- 52
- 53
- 54
- 55
- 56
- 57
- 58
- 59
- 60
- 61
- 62
- 63
- 64
- 65
- 66
- 67
- 68
- 69
- 70
- 71
- 72
- 73
- 74
- 75
- 76
- 77
- 78
- 79
- 80
- 81
- 82
- 83
- 84
- 85
其中如何获取registration_id: 查看该API
是在前端调用获取到的
-
相关阅读:
面经第5天
modbusTCP【codesys】
后端一次性返回10w条数据,该如何渲染
获取wifi密码信息(仅供学习使用,勿作他用)
通用考勤后台管理系统
Hammer.js - 旋转 拖拽 移动 缩放
java毕业设计超市商品管理mybatis+源码+调试部署+系统+数据库+lw
常用的机器学习模型算法
java计算机毕业设计装修设计管理系统设计与实现(附源码、数据库)
CSS特效003:太阳、地球、月球的旋转
- 原文地址:https://blog.csdn.net/munangs/article/details/126751574
