-
win10环境下PCL安装和配置回顾(一)
2020年博主有写过几篇关于PCL的博客,这边想先回顾下,再增加点新内容。之前写的博客专栏如下链接。
一.PCL官网资料
之前多篇博客中都提过,要善于利用官方去学习一个新的东西,好的东西,其官网大多必然讲些详细。现在官网的一些资源都会放到github上,比如之前博主讲到的OpenVINO。
OpenVINO使用介绍(一)_竹叶青lvye的博客-CSDN博客_openvino
OpenVINO示例介绍_竹叶青lvye的博客-CSDN博客_openvino 示例
PLC的官网链接如下:

Docs入口是API的介绍文档,PCL里模块分的很清楚,若想直接看对应模块的API,也可以直接从点击大方对应图标进入。
Tutorials是详细的手册介绍,里面还会有一些示例,方便整体知道如何去使用,了解一些算子原理

github网址如下
GitHub - PointCloudLibrary/pcl: Point Cloud Library (PCL)

可看到最新的版本是1.12.1
tags可以下载到常用的平台下源码编译出来的安装文件,如果没有满足自己平台的,那么可以自己去编译下。(源码编译和交叉编译方法可以参考如下两篇博客),这里不再赘叙。
Ubuntu下源码编译OpenCV静态库及使用(勾选WITH_QT)_竹叶青lvye的博客-CSDN博客_opencv静态库使用
Ubuntu下交叉编译OpenCV(WITH_QT)_竹叶青lvye的博客-CSDN博客_opencv编译with_qt

二. PCL安装和配置
这一步主要可参考之前的博客:
vs2017配置PCL1.8.1 QT5.12.1(一)- 配置步骤_竹叶青lvye的博客-CSDN博客_vs2017配置pcl
这里博主选择了新的版本,vs2019 + PCL1.12.1

这篇博客需要补充的地方是,中间在输入目标链接库名字时,可以用python脚本批量去获得lib库的名字。

脚本如下:
- # author:"jiugeshao"
- # data:2022/9/3 2:16
- import os
- def ListFilesToTxt(Currentdir, outfile, nameExtentisons, isIncludeSubDir, isDebug):
- """
- :param Currentdir: 需要统计的目录
- :param outfile: 需要输出到的txt文件
- :param nameExtentisons: 后缀列表
- :param isIncludeSubDir: 是否需要统计子目录
- :return:
- """
- exts = nameExtentisons.split(" ")
- files = os.listdir(Currentdir)
- for name in files:
- fullname = os.path.join(Currentdir, name)
- if (os.path.isdir(fullname) & isIncludeSubDir):
- ListFilesToTxt(fullname, outfile, nameExtentisons, isIncludeSubDir, isDebug)
- else:
- for ext in exts:
- if (name.endswith(ext)):
- if(isDebug == True):
- if("gd" in name or "d.lib" in name):
- outfile.write(name + "\n")
- break
- else:
- if("gd" not in name or "d.lib" in name):
- outfile.write(name + "\n")
- break
- def Read(Currentdir, outfile, isDebug):
- """
- :param Currentdir:需要统计的目录
- :param outfile:需要输出到的txt文本
- :return:
- """
- nameExtensons = ".lib" #若要支持多种后缀统计,可以空格隔开,再加其它后缀名
- file = open(outfile,"w")
- if not file:
- print("cannot open the fule %s" % outfile)
- ListFilesToTxt(Currentdir, file, nameExtensons, 1, isDebug)
- file.close()
- dir = "C:\\Program Files\\PCL 1.12.1\\3rdParty"
- debug_txt = "D:\\PCL\\debug_3rdparty.txt"
- release_txt = "D:\\PCL\\release_3rdparty.txt"
- Read(dir, debug_txt, isDebug=True)
- Read(dir, release_txt, isDebug=False)
如上是去获取3rdParty目录及其子目录下满足条件设置的lib(debug版本和release版本也都做了区分)。生成的debug_3rdparty.txt和release_3rdparty.txt文本如下:


大家可在此脚本基础上做其它演变。
测试工程执行效果如下(工程也上传百度网盘):
链接:https://pan.baidu.com/s/1RFLs3zvOIVR3ao_wR0lVfA
提取码:u4l9
c++代码如下:- // test_vtk63.cpp : 定义控制台应用程序的入口点。
- //
- #include
- #include
- #include "vtkAutoInit.h"
- //VTK_MODULE_INIT(vtkRenderingOpenGL2);
- //VTK_MODULE_INIT(vtkInteractionStyle);
- //#define vtkRenderingCore_AUTOINIT 2(vtkRenderingOpenGL2, vtkInteractionStyle)
- #include
- #include
- #include
- #include
//pcd 读写类相关的头文件。 - #include
- #include
- #include
- #include
- using namespace pcl;
- using namespace pcl::io;
- using namespace std;
- int testpointcloudToPcd()
- {
- vtkObject::GlobalWarningDisplayOff();
- pcl::PointCloud
- char strfilepath[256] = "D:\\PCL\\rabbit.pcd";
- //第一种读入方法较多场合如此
- if (-1 == pcl::io::loadPCDFile(strfilepath, *cloud)) {
- cout << "error input!" << endl;
- return -1;
- }
- boost::shared_ptr
- viewer->addPointCloud(cloud, "model_cloud");
- viewer->addCoordinateSystem(1.0);
- viewer->initCameraParameters();
- while (!viewer->wasStopped())
- {
- viewer->spinOnce(100);
- boost::this_thread::sleep(boost::posix_time::microseconds(100000));
- }
- }
- int _tmain(int argc, _TCHAR* argv[])
- {
- testpointcloudToPcd();
- return 0;
- }
运行效果如下:

此版本对应的VTK版本是9.1

三.在VTK控件中显示PCL点云
1.直接用vtk去显示自定义的一个锥体
- // test_vtk63.cpp : 定义控制台应用程序的入口点。
- //
- #include
- #include
- #include "vtkConeSource.h"
- #include "vtkConeSource.h"
- #include "vtkCommand.h"
- #include "vtkCamera.h"
- #include "vtkRenderWindowInteractor.h"
- #include "vtkTransform.h"
- #include "vtkInteractorStyleTrackballCamera.h"
- #include
- #include
- #include
- #include
- #include
- #include
- #include
- #include
- #include
- #include
- #include
- #include
- #include
- #include
- #include
- #include
- #include
- #include
- #include
- #include
- #include
- #include
- #include
- #include
- #include
- #include
- #include
- #include
- VTK_MODULE_INIT(vtkRenderingOpenGL);
- VTK_MODULE_INIT(vtkRenderingFreeType);
- VTK_MODULE_INIT(vtkInteractionStyle);
- void testvtk2()
- {
- //创建数据源:创建一个圆锥,并设置其参数:高度、底面半径和分辨率
- vtkConeSource* cone = vtkConeSource::New();
- cone->SetHeight(3.0);
- cone->SetRadius(1.0);
- cone->SetResolution(100);
- //映射器:创建一个多边形映射器,用于把多边形数据映射为可以被计算机渲染的图元
- vtkPolyDataMapper* coneMapper = vtkPolyDataMapper::New();
- coneMapper->SetInputConnection(cone->GetOutputPort());
- //创建一个Actor,并关联一个映射器,从而确定Actor的形状
- vtkActor* coneActor = vtkActor::New();
- coneActor->SetMapper(coneMapper);
- //方法1:设置演员颜色
- coneActor->GetProperty()->SetColor(1.0, 0.0, 0.0);//设置对象颜色为红色
- //方法2:设置演员颜色
- //vtkProperty* coneProperty = vtkProperty::New();//设置一个Property对象
- //coneProperty->SetColor(1.0, 0.0, 0.0);
- //coneActor->SetProperty(coneProperty);
- //渲染器:创建一个渲染器,添加要渲染的演员
- vtkRenderer* ren1 = vtkRenderer::New();
- ren1->AddActor(coneActor);
- ren1->SetBackground(0.1, 0.2, 0.4);
- //渲染窗口:添加一个渲染窗口,供渲染器使用
- vtkRenderWindow* renWin = vtkRenderWindow::New();
- renWin->AddRenderer(ren1);
- renWin->SetSize(300, 300);
- //实例化一个交互对象
- vtkRenderWindowInteractor* interactor = vtkRenderWindowInteractor::New();//交互对象加入renWin窗口中
- interactor->SetRenderWindow(renWin);
- renWin->Render();//绘制舞台上的东西
- interactor->Initialize();//交互对象初始化
- interactor->Start();//开始交互事件
- //释放内存
- cone->Delete();
- coneActor->Delete();
- coneMapper->Delete();
- ren1->Delete();
- renWin->Delete();
- interactor->Delete();
- }
- int _tmain(int argc, _TCHAR* argv[])
- {
- testvtk2();
- return 0;
- }
运行出现如下报错:
严重性 代码 说明 项目 文件 行 禁止显示状态
错误 LNK2019 无法解析的外部符号 "void __cdecl vtkRenderingOpenGL_AutoInit_Construct(void)" (?vtkRenderingOpenGL_AutoInit_Construct@@YAXXZ),函数 "public: __cdecl `anonymous namespace'::vtkRenderingOpenGL_ModuleInit::vtkRenderingOpenGL_ModuleInit(void)" (??0vtkRenderingOpenGL_ModuleInit@?A0xfeadf992@@QEAA@XZ) 中引用了该符号 PCL_config_console D:\PCL\code\PCL_config_console\PCL_config_console\PCL_config_console.obj 1
将代码中的VTK_MODULE_INIT(vtkRenderingOpenGL)修改为VTK_MODULE_INIT(vtkRenderingOpenGL2),即可!

2.pcl读入点云,在vtk控件中显示
代码如下:
- // test_vtk63.cpp : 定义控制台应用程序的入口点。
- //
- // test_mfc_showDlg.h: 头文件
- //
- #include
- #include "vtkAutoInit.h"
- VTK_MODULE_INIT(vtkRenderingOpenGL2);
- VTK_MODULE_INIT(vtkInteractionStyle);
- #include
//多线程 - #include
- #include
- #include
//pcd 读写类相关的头文件。 - #include
- #include
- #include
//PCL中支持的点类型头文件。 - #include
- #include
- #include
- #include
- #include
- #include
- #include "vtkCommand.h"
- #include "vtkRenderer.h"
- #include "vtkCellPicker.h"
- #include "vtkProperty.h"
- #include "vtkPlaneSource.h"
- #include "vtkMetaImageReader.h"
- #include "vtkImagePlaneWidget.h"
- #include "vtkPlaneSource.h"
- #include "vtkPlane.h"
- #include "vtkSmartPointer.h"
- #include "vtkResliceCursorActor.h"
- #include "vtkResliceCursorPolyDataAlgorithm.h"
- #include "vtkResliceCursor.h"
- #include "vtkResliceCursorWidget.h"
- #include "vtkResliceCursorLineRepresentation.h"
- #include "vtkResliceCursorThickLineRepresentation.h"
- #include
- #include "vtkImageReader2Factory.h"
- #include "vtkImageReader2.h"
- using namespace pcl;
- using namespace pcl::io;
- using namespace std;
- using pcl::visualization::PointCloudColorHandlerGenericField;
- using pcl::visualization::PointCloudColorHandlerCustom;
- void testvtk2()
- {
- pcl::PointCloud
- char strfilepath[256] = "D:\\PCL\\rabbit.pcd";
- std::cout << "start to read" << std::endl;
- //第一种读入方法j较多场合如此
- if (-1 == pcl::io::loadPCDFile(strfilepath, *cloud)) {
- cout << "error input!" << endl;
- }
- cout << cloud->points.size() << endl;
- vtkSmartPointer
points = vtkSmartPointer ::New();//key code - vtkIdType size = cloud->points.size();
- int n = 0;
- for (vtkIdType rowId = 0; rowId < size; rowId++)
- {
- auto dp = cloud->points.at(rowId);
- if (dp.z == 0) {
- continue;
- }
- points->InsertNextPoint(dp.x, dp.y, dp.z);//key code
- n++;
- }
- vtkSmartPointer
polydata = vtkSmartPointer ::New(); - polydata->SetPoints(points);
- vtkSmartPointer
glyphFilter = vtkSmartPointer ::New(); - glyphFilter->SetInputData(polydata);
- glyphFilter->Update();
- vtkPolyDataMapper* dataMapper = vtkPolyDataMapper::New();
- dataMapper->SetInputConnection(glyphFilter->GetOutputPort());
- vtkActor* coneActor = vtkActor::New();
- coneActor->SetMapper(dataMapper);
- coneActor->GetProperty()->SetColor(1.0, 0.0, 0.0);//设置对象颜色为红色
- //方法2:设置演员颜色
- //vtkProperty* coneProperty = vtkProperty::New();//设置一个Property对象
- //coneProperty->SetColor(1.0, 0.0, 0.0);
- //coneActor->SetProperty(coneProperty);
- //渲染器:创建一个渲染器,添加要渲染的演员
- vtkSmartPointer
m_Renderer; - vtkSmartPointer
m_RenderWindow; - m_Renderer = vtkSmartPointer
::New(); - m_Renderer->AddActor(coneActor);
- m_Renderer->SetBackground(0.1, 0.2, 0.4);
- m_RenderWindow = vtkSmartPointer
::New(); - m_RenderWindow->SetSize(500, 500);
- m_RenderWindow->AddRenderer(m_Renderer);
- vtkRenderWindowInteractor * interactor = vtkRenderWindowInteractor::New();//交互对象加入renWin窗口中
- interactor->SetRenderWindow(m_RenderWindow);
- m_RenderWindow->Render();//绘制舞台上的东西
- interactor->Initialize();//交互对象初始化
- interactor->Start();//开始交互事件
- polydata->Delete();
- glyphFilter->Delete();
- dataMapper->Delete();
- coneActor->Delete();
- m_Renderer->Delete();
- m_RenderWindow->Delete();
- interactor->Delete();
- //if (m_RenderWindow->GetInteractor() == NULL)
- //{
- // vtkSmartPointer
RenderWindowInteractor = - // vtkSmartPointer
::New(); - // RenderWindowInteractor->SetRenderWindow(m_RenderWindow);
- // RenderWindowInteractor->Initialize();
- //}
- }
- int _tmain(int argc, _TCHAR* argv[])
- {
- testvtk2();
- return 0;
- }
vtk中显示的效果如下:

3.VTK保存数据为vtk文件
在上面代码的基础上,增加头文件#include
在增加如下代码(polydata->SetPoints(points)语句下面),即可以保存数据到vtk文件中

4.VTK API读取本地vtk文件,并在自己控件里显示
代码如下:
- // test_vtk63.cpp : 定义控制台应用程序的入口点。
- //
- // test_mfc_showDlg.h: 头文件
- //
- #include
- #include "vtkAutoInit.h"
- VTK_MODULE_INIT(vtkRenderingOpenGL2);
- VTK_MODULE_INIT(vtkInteractionStyle);
- #include
//多线程 - #include
- #include
- #include
//pcd 读写类相关的头文件。 - #include
- #include
- #include
//PCL中支持的点类型头文件。 - #include
- #include
- #include
- #include
- #include
- #include
- #include
- #include "vtkCommand.h"
- #include "vtkRenderer.h"
- #include "vtkCellPicker.h"
- #include "vtkProperty.h"
- #include "vtkPlaneSource.h"
- #include "vtkMetaImageReader.h"
- #include "vtkImagePlaneWidget.h"
- #include "vtkPlaneSource.h"
- #include "vtkPlane.h"
- #include "vtkSimplePointsReader.h"
- #include "vtkSmartPointer.h"
- #include "vtkResliceCursorActor.h"
- #include "vtkResliceCursorPolyDataAlgorithm.h"
- #include "vtkResliceCursor.h"
- #include "vtkResliceCursorWidget.h"
- #include "vtkResliceCursorLineRepresentation.h"
- #include "vtkResliceCursorThickLineRepresentation.h"
- #include
- #include "vtkImageReader2Factory.h"
- #include "vtkImageReader2.h"
- #include
- using namespace pcl;
- using namespace pcl::io;
- using namespace std;
- using pcl::visualization::PointCloudColorHandlerGenericField;
- using pcl::visualization::PointCloudColorHandlerCustom;
- void testvtk2()
- {
- vtkNew
reader; - reader->SetFileName("D:\\PCL\\rabbit.vtk");
- reader->Update();
- vtkSmartPointer
polydata = vtkSmartPointer ::New(); - polydata->SetPoints(reader->GetOutput()->GetPoints());
- vtkSmartPointer
glyphFilter = vtkSmartPointer ::New(); - glyphFilter->SetInputData(polydata);
- glyphFilter->Update();
- vtkPolyDataMapper* dataMapper = vtkPolyDataMapper::New();
- dataMapper->SetInputConnection(glyphFilter->GetOutputPort());
- vtkActor* coneActor = vtkActor::New();
- coneActor->SetMapper(dataMapper);
- coneActor->GetProperty()->SetColor(1.0, 0.0, 0.0);//设置对象颜色为红色
- //方法2:设置演员颜色
- //vtkProperty* coneProperty = vtkProperty::New();//设置一个Property对象
- //coneProperty->SetColor(1.0, 0.0, 0.0);
- //coneActor->SetProperty(coneProperty);
- //渲染器:创建一个渲染器,添加要渲染的演员
- vtkSmartPointer
m_Renderer; - vtkSmartPointer
m_RenderWindow; - m_Renderer = vtkSmartPointer
::New(); - m_Renderer->AddActor(coneActor);
- m_Renderer->SetBackground(0.1, 0.2, 0.4);
- m_RenderWindow = vtkSmartPointer
::New(); - m_RenderWindow->SetSize(500, 500);
- m_RenderWindow->AddRenderer(m_Renderer);
- vtkRenderWindowInteractor* interactor = vtkRenderWindowInteractor::New();//交互对象加入renWin窗口中
- interactor->SetRenderWindow(m_RenderWindow);
- m_RenderWindow->Render();//绘制舞台上的东西
- interactor->Initialize();//交互对象初始化
- interactor->Start();//开始交互事件
- polydata->Delete();
- glyphFilter->Delete();
- dataMapper->Delete();
- coneActor->Delete();
- m_Renderer->Delete();
- m_RenderWindow->Delete();
- interactor->Delete();
- //if (m_RenderWindow->GetInteractor() == NULL)
- //{
- // vtkSmartPointer
RenderWindowInteractor = - // vtkSmartPointer
::New(); - // RenderWindowInteractor->SetRenderWindow(m_RenderWindow);
- // RenderWindowInteractor->Initialize();
- //}
- }
- int _tmain(int argc, _TCHAR* argv[])
- {
- testvtk2();
- return 0;
- }
执行效果如下:

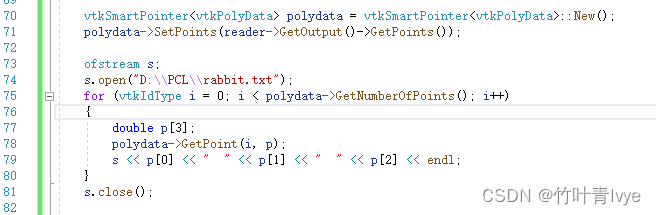
5.VTK保存数据到txt文本中
在上面代码的基础上增加如下代码(polydata->SetPoints(reader->GetOutput()->GetPoints()):
6.VTK读txt数据并转化为vtk数据
代码如下,读入一个txt文本,然后进行数据的转换
- // test_vtk63.cpp : 定义控制台应用程序的入口点。
- //
- // test_mfc_showDlg.h: 头文件
- //
- #include
- #include "vtkAutoInit.h"
- VTK_MODULE_INIT(vtkRenderingOpenGL2);
- VTK_MODULE_INIT(vtkInteractionStyle);
- #include
//多线程 - #include
- #include
- #include
//pcd 读写类相关的头文件。 - #include
- #include
- #include
//PCL中支持的点类型头文件。 - #include
- #include
- #include
- #include
- #include
- #include
- #include "vtkCommand.h"
- #include "vtkRenderer.h"
- #include "vtkCellPicker.h"
- #include "vtkProperty.h"
- #include "vtkPlaneSource.h"
- #include "vtkMetaImageReader.h"
- #include "vtkImagePlaneWidget.h"
- #include "vtkPlaneSource.h"
- #include "vtkPlane.h"
- #include "vtkSmartPointer.h"
- #include "vtkResliceCursorActor.h"
- #include "vtkResliceCursorPolyDataAlgorithm.h"
- #include "vtkResliceCursor.h"
- #include "vtkResliceCursorWidget.h"
- #include "vtkResliceCursorLineRepresentation.h"
- #include "vtkResliceCursorThickLineRepresentation.h"
- #include
- #include "vtkImageReader2Factory.h"
- #include "vtkImageReader2.h"
- using namespace pcl;
- using namespace pcl::io;
- using namespace std;
- using pcl::visualization::PointCloudColorHandlerGenericField;
- using pcl::visualization::PointCloudColorHandlerCustom;
- void testvtk2()
- {
- //istringstream istr;
- //string line, str;
- //while (getline(cin, line))//从终端接收一行字符串,并放入字符串line中
- //{
- // istr.str(line);//把line中的字符串存入字符串流中
- // while (istr >> str)//每次读取一个单词(以空格为界),存入str中
- // {
- // cout << str << endl;
- // }
- //}
- //std::string filename = "Points.txt";
- // std::ifstream filestream(filename.c_str()); //文件流
- // std::string line;
- // vtkSmartPointer
points = vtkSmartPointer ::New(); - // while(std::getline(filestream, line)) //整行读取文件
- //{
- // double x, y, z;
- // std::stringstream linestream;
- // linestream << line;
- // linestream >> x >> y >> z;
- // points->InsertNextPoint(x, y, z); //新读取的数据赋予点的几何结构
- // }
- // filestream.close(); //关闭文件流操作
- vtkSmartPointer
points = vtkSmartPointer ::New();//key code - ifstream inFile;
- inFile.open("D:\\PCL\\rabbit.txt");
- double x, y, z;
- while (inFile >> x >> y >> z)
- {
- points->InsertNextPoint(x, y, z);
- }
- vtkSmartPointer
polydata = vtkSmartPointer ::New(); - polydata->SetPoints(points);
- vtkSmartPointer
glyphFilter = vtkSmartPointer ::New(); - glyphFilter->SetInputData(polydata);
- glyphFilter->Update();
- vtkPolyDataMapper* dataMapper = vtkPolyDataMapper::New();
- dataMapper->SetInputConnection(glyphFilter->GetOutputPort());
- vtkActor* coneActor = vtkActor::New();
- coneActor->SetMapper(dataMapper);
- coneActor->GetProperty()->SetColor(1.0, 0.0, 0.0);//设置对象颜色为红色
- //方法2:设置演员颜色
- //vtkProperty* coneProperty = vtkProperty::New();//设置一个Property对象
- //coneProperty->SetColor(1.0, 0.0, 0.0);
- //coneActor->SetProperty(coneProperty);
- //渲染器:创建一个渲染器,添加要渲染的演员
- vtkSmartPointer
m_Renderer; - vtkSmartPointer
m_RenderWindow; - m_Renderer = vtkSmartPointer
::New(); - m_Renderer->AddActor(coneActor);
- m_Renderer->SetBackground(0.1, 0.2, 0.4);
- m_RenderWindow = vtkSmartPointer
::New(); - m_RenderWindow->SetSize(500, 500);
- m_RenderWindow->AddRenderer(m_Renderer);
- vtkRenderWindowInteractor* interactor = vtkRenderWindowInteractor::New();//交互对象加入renWin窗口中
- interactor->SetRenderWindow(m_RenderWindow);
- m_RenderWindow->Render();//绘制舞台上的东西
- interactor->Initialize();//交互对象初始化
- interactor->Start();//开始交互事件
- polydata->Delete();
- glyphFilter->Delete();
- dataMapper->Delete();
- coneActor->Delete();
- m_Renderer->Delete();
- m_RenderWindow->Delete();
- interactor->Delete();
- //if (m_RenderWindow->GetInteractor() == NULL)
- //{
- // vtkSmartPointer
RenderWindowInteractor = - // vtkSmartPointer
::New(); - // RenderWindowInteractor->SetRenderWindow(m_RenderWindow);
- // RenderWindowInteractor->Initialize();
- //}
- }
- int _tmain(int argc, _TCHAR* argv[])
- {
- testvtk2();
- return 0;
- }
显示效果如下:

7.PCL读入txt数据显示
代码如下:
- // test_vtk63.cpp : 定义控制台应用程序的入口点。
- //
- #include
- #include
- #include "vtkAutoInit.h"
- //VTK_MODULE_INIT(vtkRenderingOpenGL2);
- //VTK_MODULE_INIT(vtkInteractionStyle);
- //#define vtkRenderingCore_AUTOINIT 2(vtkRenderingOpenGL2, vtkInteractionStyle)
- #include
- #include
- #include
- #include
//pcd 读写类相关的头文件。 - #include
- #include
- #include
- #include
- using namespace pcl;
- using namespace pcl::io;
- using namespace std;
- int testpointcloudToPcd()
- {
- pcl::PointCloud
- ifstream in0;
- in0.open("D:\\PCL\\rabbit.txt");
- if (!in0.is_open())
- {
- cout << "error open!" << endl;
- return -1;
- }
- //a,b为符号
- int count = 0;
- double x, y, z;
- while (in0 >> x >> y >> z)
- {
- pcl::PointXYZ cltmp(x, y, z);
- cloud->points.push_back(cltmp);
- count++;
- }
- std::cout << "start to save pointcloud...";
- cloud->width = count; //设置点云宽度
- cloud->height = 1; //设置点云高度
- cloud->is_dense = false;//判断points中的数据是否是有限的(有限为true)或者说是判断点云中的点是否包含 Inf/NaN这种值(包含为false)。
- //为false或者true并不影响结果,是否为密度点云
- //pcl::io::savePCDFileASCII("D:\\mycode\\0-PCL_VTK\\pryamid_yidong10.pcd", *cloud);
- /*pcl::io::savePCDFileBinary("D:\\mycode\\0-PCL_VTK\\pryamid1.pcd", *cloud);
- pcl::io::savePCDFile("D:\\mycode\\0-PCL_VTK\\pryamid2.pcd", *cloud);*/
- std::cout << "save completed!start to show" << std::endl;
- boost::shared_ptr
- viewer->addPointCloud(cloud, "model_cloud");
- viewer->addCoordinateSystem(1.0);
- viewer->initCameraParameters();
- while (!viewer->wasStopped())
- {
- viewer->spinOnce(100);
- boost::this_thread::sleep(boost::posix_time::microseconds(100000));
- }
- }
- int _tmain(int argc, _TCHAR* argv[])
- {
- testpointcloudToPcd();
- return 0;
- }

8.常见点云文件格式介绍
这边列举了一些博客用于参考
(1)PCD
PCL:点云数据(*.pcd)文件格式详解_孙 悟 空的博客-CSDN博客_pcd格式
PCL中PCD(Point Cloud Data)文件格式解析_SOC罗三炮的博客-CSDN博客_pcd文件
(2) PLY
(3) Step
https://www.jianshu.com/p/ccfc77d0ee45
9.PCL读写点云文件
这边列举了一些博客用于参考
PCL:读写pcd点云的两种方式_孙 悟 空的博客-CSDN博客_pcl读取pcd
ply las pcd等一些常见的基本点云文件格式的读写方法_qq_46084757的博客-CSDN博客_ply点云
点云学习----PCL读写点云_刚上路DE小白的博客-CSDN博客_pcl读取点云
10.VTK数据处理
VTK图像处理(二)--vtkPolyData数据处理 - 知乎
11. 八叉树
如下的一些帖子,博主觉得可参考
PCL学习笔记(六)-- k-d tree_看到我请叫我学C++的博客-CSDN博客
PCL学习笔记(七)-- 八叉树OcTree_八叉树写法_看到我请叫我学C++的博客-CSDN博客
https://www.cnblogs.com/z-web-2017/p/14111071.html
-
相关阅读:
Anaconda与Jupyter Notebook入门级详细使用教程
Hyperledger Fabric 2.2 学习笔记:测试网络test-network
基于深度学习的小学语文“输出驱动”教学研究课题方案
用IDEA操作数据库--MySQL
【MySQL】MVCC机制(undo log,read view)
mysql高阶语句
SpringBoot电商项目之实现购物车功能
让开发回归简单模式-组件封装
Linux crontab 命令定时任务设置
毅速丨金属3D打印能替代传统制造吗?
- 原文地址:https://blog.csdn.net/jiugeshao/article/details/126688053
 https://blog.csdn.net/jiugeshao/category_11993239.html?spm=1001.2014.3001.5482
- 最新文章
-
沪漂五周年了:我越来越迷茫了
Agentic Skill Routing 实战:别再把所有 Skill 塞进 AI Agent 上下文
MySQL-Seconds_behind_master的精度误差
[MAF预定义ChatClient中间件-03]CachingChatClient——利用缓存省钱省时间
AI的至暗历史:从万众期待到被政府撤资,AI的两次死亡徘徊
Agent OS :五种驯服不确定性的范式
PortSwigger SQL注入LAB11
数据库即时编译JIT
[Begin]AI Learn Data Day 0
深度学习进阶(二十七)现代 LLM 的核心架构设计其二:SwiGLU