-
redux最佳实战(一)
redux核心知识
简介
redux是一个
JavaScript状态容器,提供可预测化的状态管理。
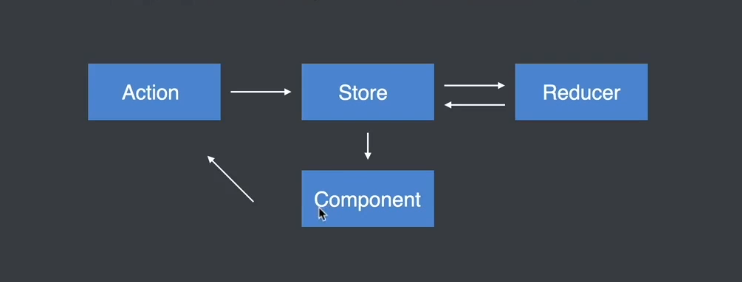
redux主要有四个核心概念
- Store 存储状态的容器,JavaScript对象
- View 视图,html页面
- Action 对象,描述对状态进行怎样的操作
- Reducers 函数,操作并返回新的状态
案例
接下来通过redux实现一个简单的计数器,加深对redux的认识:
0- 1
- 2
- 3
// 3. 存储默认状态 var initialState = {count: 0 } // 2. 创建 reducer 函数 function reducer (state = initialState, action) {switch (action.type) {case 'increment':return {count: state.count + 1};case 'decrement':return {count: state.count - 1}default:return state;} } // 1. 创建 store 对象 var store = Redux.createStore(reducer); // 4. 定义 action var increment = { type: 'increment' }; var decrement = { type: 'decrement' }; // 5. 获取按钮 给按钮添加点击事件 document.getElementById('plus').onclick = function () {// 6. 触发actionstore.dispatch(increment); } document.getElementById('minus').onclick = function () {// 6. 触发actionstore.dispatch(decrement); } // 7. 订阅 store store.subscribe(() => {// 获取store对象中存储的状态// console.log(store.getState());document.getElementById('count').innerHTML = store.getState().count; })- 1
- 2
- 3
- 4
- 5
- 6
- 7
- 8
- 9
- 10
- 11
- 12
- 13
- 14
- 15
- 16
- 17
- 18
- 19
- 20
- 21
- 22
- 23
首先通过
Redux.createStore创建redux实例,参数就是我们的reducer函数,reducer函数有两个参数,一个就是我们state仓库,第二个就是我们的action。通过上图,我们看到要更新视图,首先要dispatch来触发action,于是第五步、第六步就是通过点击函数来触发action,通过action去触发reducer更改我们的state仓库;仓库更改了,就需要更新视图,就需要subscribe函数出场了,在subscribe中对视图进行更新。这个demo还是非常简单的,使用redux来更改数据,有点杀鸡用牛刀的感觉。在一个较大的项目中,数据管理一直都是一个难点,比如在react项目中,react组件间的通信都是单向数据流的,如果涉及层级过多,传参就会很困难,使用context如果数据过多,就会变得很难维护,这个时候redux就排上了用场。由于Store独立于组件,是的数据管理同样独立于组件,这就使得数据管理变得有迹可循,后期容易维护,组件通信也容易了许多。
react+redux
上面为了了解redux,流程图画的较为的简单,接下来再重新介绍下redux工作流程
- 组件通过dispatch方法触发action
- Store接受action并将Action分发给Reducer
- Reducer根据Action类型对状态进行更改并将更改后的状态返回给Store
- 组件订阅了Store中的状态,Store中的状态更新会同步到组件中
接下来使用react来重构上述的计数器
//index.js import React from 'react'; import ReactDOM from 'react-dom/client'; // import App from './App'; import {createStore} from 'redux'; const initialState = {count:0 } function reducer(state = initialState,action){switch (action.type) {case 'increment':return {count: state.count + 1};case 'decrement':return {count: state.count - 1}default:return state;} } const store = createStore(reducer) const increment = {type:'increment'} const decrement = {type:'decrement'} function Counter(){return ({store.getState().count}) } store.subscribe(() => {root.render(); }) const root = ReactDOM.createRoot(document.getElementById('root')); root.render( ); - 1
- 2
- 3
- 4
- 5
- 6
- 7
- 8
- 9
- 10
- 11
- 12
- 13
- 14
- 15
- 16
- 17
- 18
- 19
- 20
- 21
- 22
- 23
- 24
- 25
- 26
- 27
这种写法实际上有个很大的问题,平常我们封装的组件都是在一个文件夹里单独导入的,在单独的组件内如何拿到Store实例,以及触发subscribe函数,这就需要一个插件
react-redux出场了。这个插件中主要暴露了一个组件和一个方法,Provider组件和contect方法。- Provider组件,这个组件将我们的Store实例放到全局作用域上,让所有的组件都能够引用,使用方法如下:
接下来是代码编写:
//index.js import React from 'react'; import ReactDOM from 'react-dom/client'; // import App from './App'; import {createStore} from 'redux'; import { Provider } from 'react-redux'; import Counter from './components/Counter.js' const initialState = {count:0 } function reducer(state = initialState,action){switch (action.type) {case 'increment':return {count: state.count + 1};case 'decrement':return {count: state.count - 1}default:return state;} } const store = createStore(reducer) const root = ReactDOM.createRoot(document.getElementById('root')); root.render(- 1
- 2
- 3
- 4
- 5
- 6
- 7
- 8
- 9
- 10
- 11
- 12
- 13
- 14
- 15
- 16
- 17
- 18
- 19
- 20
- 21
- 22
// /components/Counter.js import React from "react"; import {connect} from 'react-redux' const increment = {type:'increment'} const decrement = {type:'decrement'} function Counter({count,increment,decrement}){return ({count}) } const mapStateToProps = state => ({count:state.count }) const mapDispatchToProps = dispatch => ({increment() {dispatch(increment)},decrement() {dispatch(decrement)} }) // connect第一个参数就是state仓库组件中的属性可以通过props.state拿到state //第二个参数是一个函数 返回一个对象该对象的属性都可以通过props拿到 export default connect(mapStateToProps,mapDispatchToProps)(Counter)- 1
- 2
- 3
- 4
- 5
- 6
- 7
- 8
- 9
- 10
- 11
- 12
- 13
- 14
- 15
- 16
- 17
- 18
- 19
首先通过函数
createStore创建一个store实例,参数就是reducer函数,用以更改state仓库;然后用Provider组件包裹我们的组件,这样我们的业务组件就可以拿到store实例;在组件中定义了一个Counter函数组件,返回时用被传入connect返回函数,connect函数有两个参数,第一个是我们的state仓库,第二个就是action,用以更改state仓库。在react中使用redux流程就如上述,虽然目前有点繁琐,那是因为代码少,一旦项目复杂起来,redux状态共享就会变得非常的有用。稍微复杂一点的项目,都会将store单独拆分成一个模块出来,而不是都写在index.js中,接下来在优化一下代码:
// src/store/actions/counter.actions.js import { INCREMENT, DECREMENT } from "../const/counter.const"; export const increment = () => ({type: INCREMENT}); export const decrement = () => ({type: DECREMENT});- 1
- 2
- 3
- 4
- 5
// src/store/const/counter.const.js export const INCREMENT = 'increment'; export const DECREMENT = 'decrement';- 1
- 2
- 3
// src/store/reducer/counter.reducer.js import { INCREMENT, DECREMENT } from "../const/counter.const"; const initialState = {count: 0 } const reducer = (state = initialState, action) => {switch(action.type) {case INCREMENT:return {count: state.count + 1}case DECREMENT:return {count: state.count - 1}default: return state;} } export default reducer- 1
- 2
- 3
- 4
- 5
- 6
- 7
- 8
- 9
- 10
src/store/index.js import { createStore } from "redux"; import Reducer from './reducers/counter.reducer' export const store = createStore(Reducer)- 1
- 2
- 3
- 4
- 5
这样我们的根目录下的
index.js就会非常的简洁了:import React from 'react'; import ReactDOM from 'react-dom/client'; // import App from './App'; import { Provider } from 'react-redux'; import Counter from './components/Counter.js' import { store } from './store'; const root = ReactDOM.createRoot(document.getElementById('root')); root.render(- 1
- 2
- 3
- 4
- 5
- 6
- 7
- 8
- 9
- 10
- 11
- 12
- 13
实际上action也可以传参的:
在action中传入参数
- 1
定义action时接受参数
const reducer = (state = initialState, action) => {switch(action.type) {case INCREMENT:return {count: state.count + action.payload}case DECREMENT:return {count: state.count - action.payload}default: return state;} }- 1
- 2
中间件开发
概念
中间件本质就是一个函数,允许我们来扩展redux程序,很大的扩展了我们对action的扩展能力。当我们增加了中间件以后,组件触发了action,首先执行中间件函数,当中间件处理完成后,才会执行reducer。
加入了中间件的redux,其工作流程是这样的

案例
现在在点击按钮加减时需要延时1s才会数值才会改变,首先编写一个中间件:
//middleware/thunk.js const thunkMd =({dispatch}) => next => action => {if(action.type === 'increment' || action.type === 'decrement'){setTimeout(() => {next(action)},1000)}// next(action) } export default thunkMd- 1
- 2
- 3
- 4
- 5
然后注册这个中间件
// store/index.js import thunk from './middleware/thunk' export const store = createStore(Reducer,applyMiddleware(thunk))- 1
- 2
- 3
- 4
功能已经出现了,然而这个中间件不够灵活,我们想实现一个延时中间件,不仅仅只有这个计数器案例可以使用,要足够的抽象,可以根据传入的参数来判断,如果传入的那参数是函数,就执行我们的函数,在函数中执行异步操作;不然就正常往后执行:
const thunkMd =({dispatch}) => next => action => {// 1. 当前这个中间件函数不关心你想执行什么样的异步操作 只关心你执行的是不是异步操作// 2. 如果你执行的是异步操作 你在触发action的时候 给我传递一个函数 如果执行的是同步操作 就传递action对象// 3. 异步操作代码要写在你传递进来的函数中// 4. 当前这个中间件函数在调用你传递进来的函数时 要将dispatch方法传递过去if (typeof action === 'function') {return action(dispatch)}next(action) } export default thunkMd- 1
- 2
- 3
- 4
定义异步action
export const increment_async = payload => dispatch => {setTimeout(() => {dispatch(increment(payload))},1000) }- 1
- 2
然后触发action时
function Counter({count,increment,decrement,increment_async}){return ({count}) }- 1
- 2
常用的中间件
- redux-thnk这个中间件和上述编写的中间件完全一样的,用法也很简单,和上述完全类似,首先`npm install redux-thunk````import {applyMiddleware} from 'redux’createStore(rootReducer,applyMiddleware(thunk))
const loadPosts = () => async dispatch => { const posts = await axios,get('api').then(res => res.data) dispatch({type:LOADPOSTS,payload:posts})} ```* redux-sagaredux-saga和redux -thunk一样,都是在redux工作流程中添加异步代码 ,redux-saga更加强大,它允许将异步操作从Action Creator文件中抽离出来,放在一个单独的文件中。首先安装下这个插件npm install redux-saga```// store/index.jsimport createSagaMidddleware from 'redux-saga';import counterSaga from './sagas/counter.saga'// 创建 sagaMiddlewareconst sagaMiddleware = createSagaMidddleware();export const store = createStore(Reducer, applyMiddleware(sagaMiddleware));sagaMiddleware.run(counterSaga)//src/sagas/counter.saga.jsimport { takeEvery, put, delay } from ‘redux-saga/effects’;import { increment } from ‘…/actions/counter.actions’;import { INCREMENT_ASYNC } from ‘…/const/counter.const’;// takeEvery 接收 action// put 触发 actionfunction* increment_async_fn (action) {yield delay(2000);yield put(increment(action.payload))}export default function* counterSaga () {// 接收actionyield takeEvery(INCREMENT_ASYNC, increment_async_fn)} ``````export const INCREMENT_ASYNC = ‘increment_async’; ```触发actions```function Counter({count,increment,decrement,increment_async}){return ()} ```第一篇基础总结,后面写一个购物车的案例,在研究下源码手写一个redux。加油。
-
相关阅读:
图像绘制-线段、矩形、圆形、椭圆等
拓扑排序:acwing 848. 有向图的拓扑序列
Docker部署GItLab
盘点国内主流数字孪生厂商!你了解几家?
一文理解CAS和自旋的区别(荣耀典藏版)
数字化转型接力赛接棒 金融壹账通迎“新帅”
SpringBoot+Vue项目便捷洗衣服务平台
伪原创-伪原创软件-免费伪原创软件
13 个Typescript 实用类型:开发人员的备忘单
《PyTorch深度学习实践》第二讲 线性模型 课后练习
- 原文地址:https://blog.csdn.net/web2022050902/article/details/126373858
