-
Android开发超详细介绍
文章目录
一 Android 简介
Android是一种可视化的技术, 在终端市场有70%占有率, 广泛应用在手机, 车载平板, 智能电视等领域, 其和web前端, ios开发一同属于大前端技术领域
通过本文, 您可以了解
Android技术全貌, 并用kotlin语言逐个实现个模块, 每个部分都有示例代码和效果图1.1 Android四大组件
最核心的就是这4个概念:Activity、Service、BroadcaseReceiver 和 ContentProvider
- Activity是可视化的页面
- Service是后台
- BroadCastReceiver允许你的app读各处的广播消息(如电话/短信), 也可向外发出广播
- ContentProvider用于在app间共享数据
1.2 Android操作系统架构
- Linux内核层: 提供了显示/音频/照相机/蓝牙/wifi/电源的驱动
- 系统运行库层
- C++的一些库如sqlite/opengl/webkit
- art运行环境(类似虚拟机)使得各应用运行在独立的进程中
- 应用框架层: 提供Android的API, 如activity/service/…
- 应用层: 应用程序, 如联系人, 短信等apk

1.3 Android技术栈整体感官
- 开发语言有
kotlin和java, 其中前者更高效简介, 且是更面向未来的技术 - 相比于web前端, 其概念也有共同之处
- 其
activity对应了js, 负责写交互相关的业务逻辑 - 其
layout对应了html+css, 负责页面骨架和样式
- 其
- 学习之路: 首先直接操作页面, 其次用
jetpack做数据视图绑定, 最终用jetpack compose实现更复杂的交互 - 学习资料: 入门可用
Android第一行代码书籍, 更现代的先进概念可在https://developer.android.com学习
二 环境搭建并运行首个APP
IDE都用安卓官网推荐的
Android Studio, 也是Jetbranis系列的我们可在Android官网入门demo下载源代码

选择安卓SDK的版本为Android10, 语言为kotlin后, 项目结构如下
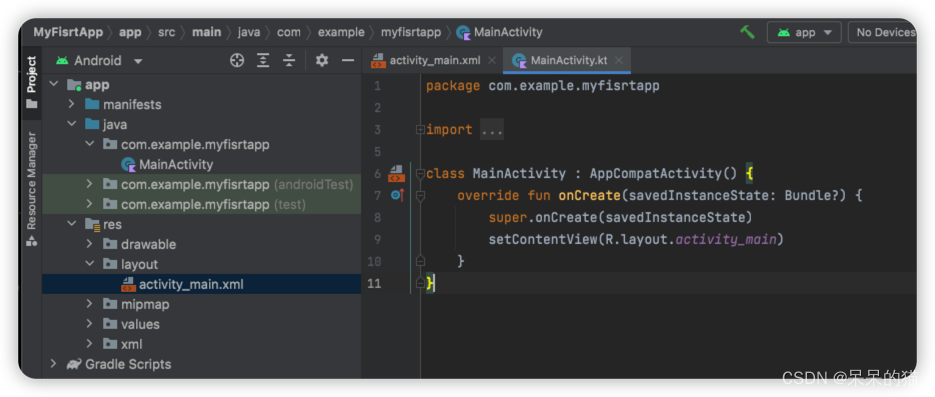
其中各目录含义如下
- app > java > com.example.myfirstapp > MainActivity: 应用的入口点, 启动时通过此加载布局
- app > res > layout > activity_main.xml: 定义了activity界面的UI布局
- app > manifests > AndroidManifest.xml: 描述了应用的基本特性, 定义个应用组件
- Gradle Scripts > build.gradle: 各模块通过各自的build.gradle文件控制gradle插件加载的方式
2.1 运行安卓模拟器
我们可以用USB线连接到电脑上看到APP, 也可以在IDE里用安卓模拟器看到APP可视化的效果
注意, 电脑一定要预留足够空间(例如10GB),The emulator process for AVD has terminated报错, 可在~/Library/Logs/Google/AndroidStudio找到AndroidStudio的日志run起来效果如下, 这就是一个模拟的安卓手机, 和新买的手机一样, 预装了很多APP(如chrome浏览器, 日历, 电话, 短信, 应用商店等)

页面的布局, 比如按钮放在哪里, 间距多少, 颜色字体等样式, 可在
res/layout/activity_main.xml中修改, 有2种方式- 在
design标签页通过拖拽(类似低代码平台) - 也可在
code标签页通过直接编写xml实现 - 下图中的
split则左右分隔了code和design两者

放一个文本和按钮, 位置对齐, 设置文字, 效果如下图, 这样第一个app就run起来

2.2 多页面的APP
每个页面在
Android中称为Activity, 我们希望实现: 当点第一个页面的send按钮时, 跳转到第二个页面. 下图是第二个页面

2.2.1 添加Button处理函数
先在
MainActivity增加sendMessage函数, 并绑定到send按钮class MainActivity : AppCompatActivity() { override fun onCreate(savedInstanceState: Bundle?) { super.onCreate(savedInstanceState) setContentView(R.layout.activity_main) } /** Called when the user taps the Send button */ fun sendMessage(view: View) { // Do something in response to button } }- 1
- 2
- 3
- 4
- 5
- 6
- 7
- 8
- 9
- 10
- 11
2.2.2 利用Intent启动其他页面
Intent是相互独立的组件(如两个activity)之间, 提供运行时绑定的对象, 表示应用执行某操作的意图.在Main中定义一个常量, 并通过
Intent发送给第二个activityconst val EXTRA_MESSAGE = "com.example.myfirstapp.MESSAGE" class MainActivity : AppCompatActivity() { override fun onCreate(savedInstanceState: Bundle?) { super.onCreate(savedInstanceState) setContentView(R.layout.activity_main) } /** Called when the user taps the Send button */ fun sendMessage(view: View) { val editText = findViewById<EditText>(R.id.editTextTextPersonName) val message = editText.text.toString() val intent = Intent(this, DisplayMessageActivity::class.java).apply { putExtra(EXTRA_MESSAGE, message) } startActivity(intent) } }- 1
- 2
- 3
- 4
- 5
- 6
- 7
- 8
- 9
- 10
- 11
- 12
- 13
- 14
- 15
- 16
- 17
- 18
2.2.3 跳转后页面展示ViewText
在 Project 窗口中,右键点击 app 文件夹,然后依次选择
New > Activity > Empty Activity 添加ViewText, 并显示第一个页面带回来的字符串override fun onCreate(savedInstanceState: Bundle?) { super.onCreate(savedInstanceState) setContentView(R.layout.activity_display_message) // Get the Intent that started this activity and extract the string val message = intent.getStringExtra(EXTRA_MESSAGE) // Capture the layout's TextView and set the string as its text val textView = findViewById<TextView>(R.id.textView).apply { text = message } }- 1
- 2
- 3
- 4
- 5
- 6
- 7
- 8
- 9
- 10
- 11
- 12
- 增加返回上级页面的按钮
改
AndroidManifest.xml<activity android:name=".DisplayMessageActivity" android:parentActivityName=".MainActivity"> <!-- The meta-data tag is required if you support API level 15 and lower --> <meta-data android:name="android.support.PARENT_ACTIVITY" android:value=".MainActivity" /> </activity>- 1
- 2
- 3
- 4
- 5
- 6
- 7
2.3 AndroidStudio常用设置
2.3.1 依赖代理
- 自动下载依赖包: 用ShadowSocks为Android设置proxy
- 手动下载依赖包:
1.下载地址:https://repo1.maven.org/maven2/org/jetbrains/kotlin/kotlin-compiler-embeddable/1.4.32/kotlin-compiler-embeddable-1.7.20-Beta.jar 2.下载完成之后找到~/.gradle/caches/modules-2/files-2.1/org.jetbrains.kotlin/kotlin-compiler-embeddable/1.4.32/4e982732a609a692421652cfbee3a5c885c48674。- 1
- 2
2.3.2 kotlin-android-extensions插件
Kotlin - 省略 findViewById()失败 apply plugin: ‘kotlin-android-extensions’
三 Activity 页面
3.1 Activity绘制页面和交互逻辑
3.1.1 添加一个Button, 并通过Toast展示通知

3.1.2 添加Menu菜单
先创建一个menu文件(
res/menu/main.xml)<menu xmlns:android="http://schemas.android.com/apk/res/android"> <item android:id="@+id/add_item" android:title="Add" /> <item android:id="@+id/remove_item" android:title="Remove"/> menu>- 1
- 2
- 3
- 4
- 5
- 6
- 7
- 8
再在Activity中指定点击menu的反应(通知消息)
override fun onCreateOptionsMenu(menu: Menu?): Boolean { menuInflater.inflate(R.menu.main, menu) return true } override fun onOptionsItemSelected(item: MenuItem): Boolean { when (item.itemId) { R.id.add_item -> Toast.makeText(this, "You clicked Add",Toast.LENGTH_SHORT).show() R.id.remove_item->Toast.makeText(this, "You clicked Remove", Toast.LENGTH_SHORT).show() } return true }- 1
- 2
- 3
- 4
- 5
- 6
- 7
- 8
- 9
- 10
- 11
- 12

3.1.3 销毁一个Activity
按Back键, 或通过finish()函数
button1.setOnClickListener { finish() }- 1
- 2
- 3
3.2 Activity的生命周期
android用task管理activity, 一个task就是一组存放在栈里的activity集合
当启动activity则入栈, 当activity销毁(按back键或调用finish()销毁)则出栈

3.2.1 Activity的4种状态
- 运行状态: 当一个activity在栈顶时
- 暂停状态: 当不在栈顶, 但仍可见. 因为不是每个activity都会占满整个屏幕, 例如对话框就只占用了部分屏幕区域
- 停止状态: 当不在栈顶, 且完全不可见时
- 销毁状态: 从栈中移除后
其中系统最不倾向回收运行和暂停状态(因为影响用户体验), 最倾向回收销毁状态, 当内存紧张时则回收停止状态
3.2.2 Activity的生存期
- onCreate: 第一次创建activity时初始化的操作, 如加载布局, 绑定事件
- onStart: 当activity由可见变为不可见时
- onResume: 当activity准备好和用户交互时(此时一定在栈顶且为运行状态)
- onPause: 当os准备启动或恢复
另一个activity时调用, 通常在此释放消耗CPU的操作 - onStop: 当activity完全不可见时调用, 类似onPause
- onDestory: 当activity被销毁之前调用
- onRestart: 当由停止变为运行时调用
其中又可分为一下3种生存期
- 完整生存期: 在onCreate和onDestroy之间
- 可见生存期: 在onStart和onStop之间
- 前台生存期: 在onResume和onPause之间

3.2.3 体验Activity的生命周期
我们建立一个新的项目ActivityTest, 其中有两个按钮, 分别启动NormalActivity和DialogActivity
package com.example.activitylifecycletest import android.annotation.SuppressLint import android.app.Activity import android.content.Intent import androidx.appcompat.app.AppCompatActivity import android.os.Bundle import android.util.Log import android.widget.Button import kotlinx.android.synthetic.main.activity_main.* class MainActivity : AppCompatActivity() { private val tag = "MainActivity" @SuppressLint("WrongViewCast") override fun onCreate(savedInstanceState: Bundle?) { super.onCreate(savedInstanceState) Log.d(tag, "onCreate") setContentView(R.layout.activity_main) startNormalActivity.setOnClickListener { val intent = Intent(this, NormalActivity::class.java) startActivity(intent) } startDialogActivity.setOnClickListener { val intent = Intent(this, DialogActivity::class.java) startActivity(intent) } } override fun onStart() { super.onStart() Log.d(tag, "onStart") } override fun onResume() { super.onResume() Log.d(tag, "onResume") } override fun onPause() { super.onPause() Log.d(tag, "onPause") } override fun onStop() { super.onStop() Log.d(tag, "onStop") } override fun onDestroy() { super.onDestroy() Log.d(tag, "onDestroy") } override fun onRestart() { super.onRestart() Log.d(tag, "onRestart") } }- 1
- 2
- 3
- 4
- 5
- 6
- 7
- 8
- 9
- 10
- 11
- 12
- 13
- 14
- 15
- 16
- 17
- 18
- 19
- 20
- 21
- 22
- 23
- 24
- 25
- 26
- 27
- 28
- 29
- 30
- 31
- 32
- 33
- 34
- 35
- 36
- 37
- 38
- 39
- 40
- 41
- 42
- 43
- 44
- 45
- 46
- 47
- 48
- 49
- 50
- 51
- 52
- 53
3.2.4 Activity被回收了怎么办
如果从Activity A跳转到Activity B, 若Activity A被回收了则临时数据也会被回收, 此时os仍会通过
onCreate创建新的Activity B, 而不是通过onRestart重启Activity B, 虽有界面, 但数据丢了还是会影响用户体验为了解决此问题, 可用
onSaveInstanceState()保存数据, 当onCreate()再加载数据override fun onCreate(savedInstanceState: Bundle?) { super.onCreate(savedInstanceState) Log.d(tag, "onCreate") setContentView(R.layout.activity_main) if (savedInstanceState != null) { val tempData = savedInstanceState.getString("data_key") Log.d(tag, "tempData is $tempData") } } override fun onSaveInstanceState(outState: Bundle, outPersistentState: PersistableBundle) { super.onSaveInstanceState(outState, outPersistentState) outState.putString("data_key", "Something you just typed") }- 1
- 2
- 3
- 4
- 5
- 6
- 7
- 8
- 9
- 10
- 11
- 12
- 13
- 14
3.3 Activity的启动模式
有4种, 可在AndroidManifest.xml中通过给
android:launchMode来选择启动模式3.3.1 Standard
是默认行为: os不在乎栈内是否已存在, 而是每次启动都创建一个该activity的新实例
override fun onCreate(savedInstanceState: Bundle?) { super.onCreate(savedInstanceState) Log.d("FirstActivity", this.toString()) setContentView(R.layout.first_layout) button1.setOnClickListener { val intent = Intent(this, FirstActivity::class.java) startActivityForResult(intent, 1) } }- 1
- 2
- 3
- 4
- 5
- 6
- 7
- 8
- 9
可看到每点击按钮就创建一个实例, 也需要连按3次back键才能退出程序
2022-08-07 19:12:30.231 30429-30429/com.example.activitytest D/FirstActivity: com.example.activitytest.FirstActivity@570edff 2022-08-07 19:12:42.595 30429-30429/com.example.activitytest D/FirstActivity: com.example.activitytest.FirstActivity@78f70b5 2022-08-07 19:12:44.177 30429-30429/com.example.activitytest D/FirstActivity: com.example.activitytest.FirstActivity@cc75a0a- 1
- 2
- 3

3.3.2 SingleTop
启动activity时, 若栈顶已经是该activity了, 则直接使用而不再创建新的activity实例.
在AndroidManifest.xml中设置<activity android:name=".FirstActivity" android:exported="true" android:launchMode="singleTop" android:label="This is FirstActivity"> <intent-filter> <action android:name="android.intent.action.MAIN" /> <category android:name="android.intent.category.LAUNCHER" /> intent-filter> activity>- 1
- 2
- 3
- 4
- 5
- 6
- 7
- 8
- 9
- 10
- 11

3.3.3 SingleTask
启动该activity时, 检查栈中是否存在该activity实例
- 若存在, 则直接使用该实例, 并把该activity之上的所有其他activity实例全部出栈
- 若不存在, 则创建新的activity实例
示例操作如下: 现在重新运行程序,在FirstActivity界面点击按钮进入SecondActivity,然后在
SecondActivity界面点击按钮,又会重新进入FirstActivity。在second中启动first时, 因为发现
栈顶为second且first不是栈顶, 在栈顶之下,则使second出栈并复用栈中已有的first.2022-08-07 19:37:01.576 32502-32502/com.example.activitytest D/FirstActivity: com.example.activitytest.FirstActivity@1af950 2022-08-07 19:37:05.515 32502-32502/com.example.activitytest D/SecondActivity: com.example.activitytest.SecondActivity@afa6507 2022-08-07 19:37:10.241 32502-32502/com.example.activitytest D/FirstActivity: onRestart 2022-08-07 19:37:10.802 32502-32502/com.example.activitytest D/SecondActivity: onDestroy- 1
- 2
- 3
- 4

3.3.4 SingleTaskInstance
为了解决其他各应用程序均可
共用此activity, 单独创建一个新的栈来管理这个activity, 其他各应用程序均共用此栈3.4 Activity最佳实践
3.4.1 一键退出所有Activities
通过
javaClass.simpleName获取当前实例的类名
通过一个专门的集合ActivityCollector可实现对所有Activities的管理添加
BaseActivity的classpackage com.example.activitytest import android.app.Activity import android.os.Bundle import android.service.voice.VoiceInteractionSession import android.util.Log import androidx.appcompat.app.AppCompatActivity object ActivityCollector { private val activities = ArrayList<Activity>() fun addActivity(activity: Activity) { activities.add(activity) } fun removeActivity(activity: Activity) { activities.remove(activity) } fun finishAll() { for (activity in activities) { if (!activity.isFinishing) { activity.finish() } } activities.clear() } } open class BaseActivity : AppCompatActivity() { override fun onCreate(savedInstanceState: Bundle?) { super.onCreate(savedInstanceState) Log.d("BaseActivity", javaClass.simpleName) ActivityCollector.addActivity(this) } override fun onDestroy() { super.onDestroy() ActivityCollector.removeActivity(this) } }- 1
- 2
- 3
- 4
- 5
- 6
- 7
- 8
- 9
- 10
- 11
- 12
- 13
- 14
- 15
- 16
- 17
- 18
- 19
- 20
- 21
- 22
- 23
- 24
- 25
- 26
- 27
- 28
- 29
- 30
- 31
- 32
- 33
- 34
- 35
- 36
- 37
使FirstActivity, SecondActivity, ThirdActivity均继承自BaseActivity
业务逻辑是点FirstActivity会调用SecondActivity, 点SecondActivity会调用ThirdActivity, 当点ThirdActivity时销毁所有activities
class ThirdActivity : BaseActivity() { override fun onCreate(savedInstanceState: Bundle?) { super.onCreate(savedInstanceState) Log.d("ThirdActivity", "Task id is $taskId") setContentView(R.layout.third_activity) button3.setOnClickListener { ActivityCollector.finishAll() android.os.Process.killProcess(android.os.Process.myPid()) } } }- 1
- 2
- 3
- 4
- 5
- 6
- 7
- 8
- 9
- 10
- 11
3.4.2 启动Activity最佳实践
通过
actionStart包装startActivity, 这样可以暴露出自己需要的参数, 方便别人看文档被调用方定义如下
class SecondActivity : BaseActivity() { companion object { fun actionStart(context: Context, data1: String, data2: String) { val intent = Intent(context, SecondActivity::class.java) intent.putExtra("param1", data1) intent.putExtra("param2", data2) context.startActivity(intent) } } }- 1
- 2
- 3
- 4
- 5
- 6
- 7
- 8
- 9
- 10
调用方如下
button1.setOnClickListener { secondActivity.actionStart(this, "data1", "data2") }- 1
- 2
- 3
3.5 Intent在组件间传递数据
Intent是Android程序, 各组件之间, 交互的方式, 不仅可指明当前组件想要执行的动作, 还可在不同组件间传递数据.
一般可用于启动Activity, 启动Service, 发送广播3.5.1 显示Intent
button1.setOnClickListener { val intent = Intent(this, SecondActivity::class.java) // 第二个参数是希望操作的activity startActivity(intent) // 启动 }- 1
- 2
- 3
- 4
3.5.2 隐式Intent
不明确指出要启动哪个Activity, 而是制定一系列更抽象的action和category,然后由系统分析此intent并找到合适的activity区启动.
可在AndroidManifest.xml中添加如下代码, 表示SecondActivity可响应此action和category<activity android:name=".SecondActivity" android:exported="false"> <intent-filter> <action android:name="com.example.activitytest.ACTION_START"/> <category android:name="android.intent.category.DEFAULT"/> intent-filter> activity>- 1
- 2
- 3
- 4
- 5
- 6
- 7
- 8
再在FirstActivity中添加响应事件
其中android.intent.category.DEFAULT是默认的categorybutton1.setOnClickListener { // val intent = Intent(this, SecondActivity::class.java) // 第二个参数是希望操作的activity val intent = Intent("com.example.activitytest.ACTION_START") // 第二个参数是希望操作的activity startActivity(intent) // 启动 }- 1
- 2
- 3
- 4
- 5
如果再加上未定义的category, 即
intent.addCategory("com.example.activitytest.MY_CATEGORY"), 如下图就会报错, 这是因为我们并未在AndroidManifest.xml中声明可响应此category的Activity, 报错如预期是正常的button1.setOnClickListener { // val intent = Intent(this, SecondActivity::class.java) // 第二个参数是希望操作的activity val intent = Intent("com.example.activitytest.ACTION_START") // 第二个参数是希望操作的activity intent.addCategory("com.example.activitytest.MY_CATEGORY") startActivity(intent) // 启动 }- 1
- 2
- 3
- 4
- 5
- 6
android.content.ActivityNotFoundException: No Activity found to handle Intent { act=com.example.activitytest.ACTION_START cat=[com.example.activitytest.MY_CATEGORY] }- 1
3.5.3 Intent应用案例
3.5.3.1 跳转原生浏览器
Intent的目的就是让各应用互相调用, 下例便可调安卓原生的浏览器打开百度跳转, 而不用自己实现一个浏览器, 那岂不是太麻烦了
button1.setOnClickListener { val intent = Intent(Intent.ACTION_VIEW) intent.data = Uri.parse("https://www.baidu.com") startActivity(intent) }- 1
- 2
- 3
- 4
- 5
也可以自己实现一个可跳转的activity, 其中指定可相应
https开头的url<activity android:name=".ThirdActivity" android:exported="true"> <intent-filter tools:ignore="AppLinkUrlError"> <action android:name="android.intent.action.VIEW" /> <category android:name="android.intent.category.DEFAULT" /> <data android:scheme="https" /> intent-filter> activity>- 1
- 2
- 3
- 4
- 5
- 6
- 7
- 8

3.5.3.2 跳转电话拨号页
button1.setOnClickListener { val intent = Intent(Intent.ACTION_DIAL) intent.data = Uri.parse("tel:10086") startActivity(intent) }- 1
- 2
- 3
- 4
- 5
3.5.4 用startActivityForResult返回数据
firstActivity跳转到secondActivity
button1.setOnClickListener { val intent = Intent(this, SecondActivity::class.java) startActivityForResult(intent, 1) }- 1
- 2
- 3
- 4
secondActivity添加如下
class SecondActivity : AppCompatActivity() { override fun onCreate(savedInstanceState: Bundle?) { super.onCreate(savedInstanceState) setContentView(R.layout.activity_second) val button2: Button = findViewById(R.id.button2) button2.setOnClickListener { val intent = Intent() intent.putExtra("data_return", "hello FirstActivity") setResult(RESULT_OK, intent) finish() } } override fun onBackPressed() { val intent = Intent() intent.putExtra("data_return", "Hello FirstActivity 123") setResult(RESULT_OK, intent) finish() } }- 1
- 2
- 3
- 4
- 5
- 6
- 7
- 8
- 9
- 10
- 11
- 12
- 13
- 14
- 15
- 16
- 17
- 18
- 19
- 20
因为在secondActivity被销毁之前会
回调上一个activity的onActivityResult()方法, 所以我们需要重写上一个activity的此方法override fun onActivityResult(requestCode: Int, resultCode: Int, data: Intent?) { super.onActivityReenter(resultCode, data) when (requestCode) { 1 -> if (resultCode == RESULT_OK) { val returnedData = data?.getStringExtra("data_return") Log.d("FirstActivity", "returned data is $returnedData") } } }- 1
- 2
- 3
- 4
- 5
- 6
- 7
- 8
- 9
四 UI 控件
4.1 TextView
<TextView android:id="@+id/textView" android:layout_width="match_parent" android:layout_height="wrap_content" android:gravity="center" android:textColor="#00ff00" android:textSize="24sp" android:text="@string/this_is_textview" tools:ignore="MissingConstraints" />- 1
- 2
- 3
- 4
- 5
- 6
- 7
- 8
- 9

4.2 Button
<Button android:id="@+id/button" android:layout_width="match_parent" android:layout_height="wrap_content" android:text="Button" app:layout_constraintEnd_toEndOf="parent" app:layout_constraintStart_toStartOf="parent" app:layout_constraintTop_toBottomOf="@+id/textView" />- 1
- 2
- 3
- 4
- 5
- 6
- 7
- 8
使
MainActivity实现View.OnClickListener接口(通过实现onClick()函数), 通过button.setOnClickListener(this)来把MainActivity传入, 当点击按钮时即可执行onClick()中的代码class MainActivity : AppCompatActivity(), View.OnClickListener { override fun onCreate(savedInstanceState: Bundle?) { super.onCreate(savedInstanceState) setContentView(R.layout.activity_main) button.setOnClickListener(this) } override fun onClick(v: View?) { when (v?.id) { R.id.button -> { // 在此处添加逻辑 Log.d("MainActivity", "clicked a button") } } } }- 1
- 2
- 3
- 4
- 5
- 6
- 7
- 8
- 9
- 10
- 11
- 12
- 13
- 14
- 15
- 16
点击button时会打印日志
2022-08-08 10:57:43.339 5996-5996/com.example.uiwidgettest D/MainActivity: clicked a button4.3 EditText
<EditText android:id="@+id/editText" android:layout_width="match_parent" android:layout_height="wrap_content" />- 1
- 2
- 3
- 4
- 5
获取editText的内容, 并通知
class MainActivity : AppCompatActivity(), View.OnClickListener { override fun onCreate(savedInstanceState: Bundle?) { super.onCreate(savedInstanceState) setContentView(R.layout.activity_main) button.setOnClickListener(this) } override fun onClick(v: View?) { when (v?.id) { R.id.button -> { val inputText = editText.text.toString() Toast.makeText(this, inputText, Toast.LENGTH_SHORT).show() } } } }- 1
- 2
- 3
- 4
- 5
- 6
- 7
- 8
- 9
- 10
- 11
- 12
- 13
- 14
- 15
- 16

4.4 ImageView
<ImageView android:id="@+id/imageView" android:layout_width="wrap_content" android:layout_height="wrap_content" android:src="@drawable/img_1"/>- 1
- 2
- 3
- 4
- 5
drawable文件夹里放两个图片

点击按钮则替换imageView的图片

4.5 ProgressBar
<ProgressBar android:id="@+id/progressBar" android:layout_width="match_parent" android:layout_height="wrap_content" app:layout_constraintStart_toStartOf="parent" app:layout_constraintTop_toBottomOf="@+id/imageView" />- 1
- 2
- 3
- 4
- 5
- 6
可通过按钮控制进度条的可见性
override fun onClick(v: View?) { when (v?.id) { R.id.button -> { if (progressBar.visibility == View.VISIBLE) { progressBar.visibility = View.GONE } else { progressBar.visibility = View.VISIBLE } } } }- 1
- 2
- 3
- 4
- 5
- 6
- 7
- 8
- 9
- 10
- 11
也可设置成水平进度条
<ProgressBar android:id="@+id/progressBar" android:layout_width="match_parent" android:layout_height="wrap_content" style="?android:attr/progressBarStyleHorizontal" android:max="100" app:layout_constraintStart_toStartOf="parent" app:layout_constraintTop_toBottomOf="@+id/imageView" />- 1
- 2
- 3
- 4
- 5
- 6
- 7
- 8
override fun onClick(v: View?) { when (v?.id) { R.id.button -> { progressBar.progress = progressBar.progress + 10 } } }- 1
- 2
- 3
- 4
- 5
- 6
- 7

4.6 AlertDialog
弹窗, 屏蔽其他空间的交互, 一般显示警告信息或重要内容
override fun onClick(v: View?) { when (v?.id) { R.id.button -> { AlertDialog.Builder(this).apply { setTitle("This is Dialog") setMessage("something important") setPositiveButton("OK") { dialog, which -> } setNegativeButton("Cancel") { dialog, which -> } show() } } } }- 1
- 2
- 3
- 4
- 5
- 6
- 7
- 8
- 9
- 10
- 11
- 12
- 13

4.7 三种基本布局

4.8 LinearLayout线性布局
4.8.1 垂直均分
默认android:orientation属性指定了排列方向是vertical
下例android:orientation=horizontal, 三个按钮的垂直布局分别为上中下<LinearLayout xmlns:android="http://schemas.android.com/apk/res/android" android:orientation="horizontal" android:layout_width="match_parent" android:layout_height="match_parent"> <Button android:id="@+id/button1" android:layout_width="wrap_content" android:layout_height="wrap_content" android:layout_gravity="top" android:text="Button 1" /> <Button android:id="@+id/button2" android:layout_width="wrap_content" android:layout_height="wrap_content" android:layout_gravity="center_vertical" android:text="Button 2" /> <Button android:id="@+id/button3" android:layout_width="wrap_content" android:layout_height="wrap_content" android:layout_gravity="bottom" android:text="Button 3" /> LinearLayout>- 1
- 2
- 3
- 4
- 5
- 6
- 7
- 8
- 9
- 10
- 11
- 12
- 13
- 14
- 15
- 16
- 17
- 18
- 19
- 20
- 21
- 22
- 23
4.8.2 layout_weight控制比例
<EditText android:id="@+id/input_message" android:layout_width="0dp" android:layout_height="wrap_content" android:layout_weight="1" android:hint="Type something" /> <Button android:id="@+id/send" android:layout_width="0dp" android:layout_height="wrap_content" android:layout_weight="1" android:text="Send" />- 1
- 2
- 3
- 4
- 5
- 6
- 7
- 8
- 9
- 10
- 11
- 12
- 13
因为指定了android:layout_weight属性,此时控件的宽度就不应该再由android:layout_width来决定了, layout_weight分别为1表示两者均分

4.8.3 铺满并设置比例
<EditText android:id="@+id/input_message" android:layout_width="0dp" android:layout_height="wrap_content" android:layout_weight="1" android:hint="Type something" /> <Button android:id="@+id/send" android:layout_width="wrap_content" android:layout_height="wrap_content" android:text="Send" />- 1
- 2
- 3
- 4
- 5
- 6
- 7
- 8
- 9
- 10
- 11
- 12
- 13
Button的宽度仍然按照
wrap_content来计算,而EditText则会占满屏幕所有的剩余空间

4.9 RelativeLayout相对布局
4.9.1 相对父布局元素定位
<Button android:id="@+id/button1" android:layout_width="wrap_content" android:layout_height="wrap_content" android:layout_alignParentLeft="true" android:layout_alignParentTop="true" android:text="Button 1" /> <Button android:id="@+id/button2" android:layout_width="wrap_content" android:layout_height="wrap_content" android:layout_alignParentRight="true" android:layout_alignParentTop="true" android:text="Button 2" /> <Button android:id="@+id/button3" android:layout_width="wrap_content" android:layout_height="wrap_content" android:layout_centerInParent="true" android:text="Button 3" /> <Button android:id="@+id/button4" android:layout_width="wrap_content" android:layout_height="wrap_content" android:layout_alignParentBottom="true" android:layout_alignParentLeft="true" android:text="Button 4" /> <Button android:id="@+id/button5" android:layout_width="wrap_content" android:layout_height="wrap_content" android:layout_alignParentBottom="true" android:layout_alignParentRight="true" android:text="Button 5" />- 1
- 2
- 3
- 4
- 5
- 6
- 7
- 8
- 9
- 10
- 11
- 12
- 13
- 14
- 15
- 16
- 17
- 18
- 19
- 20
- 21
- 22
- 23
- 24
- 25
- 26
- 27
- 28
- 29
- 30
- 31
- 32
- 33
- 34

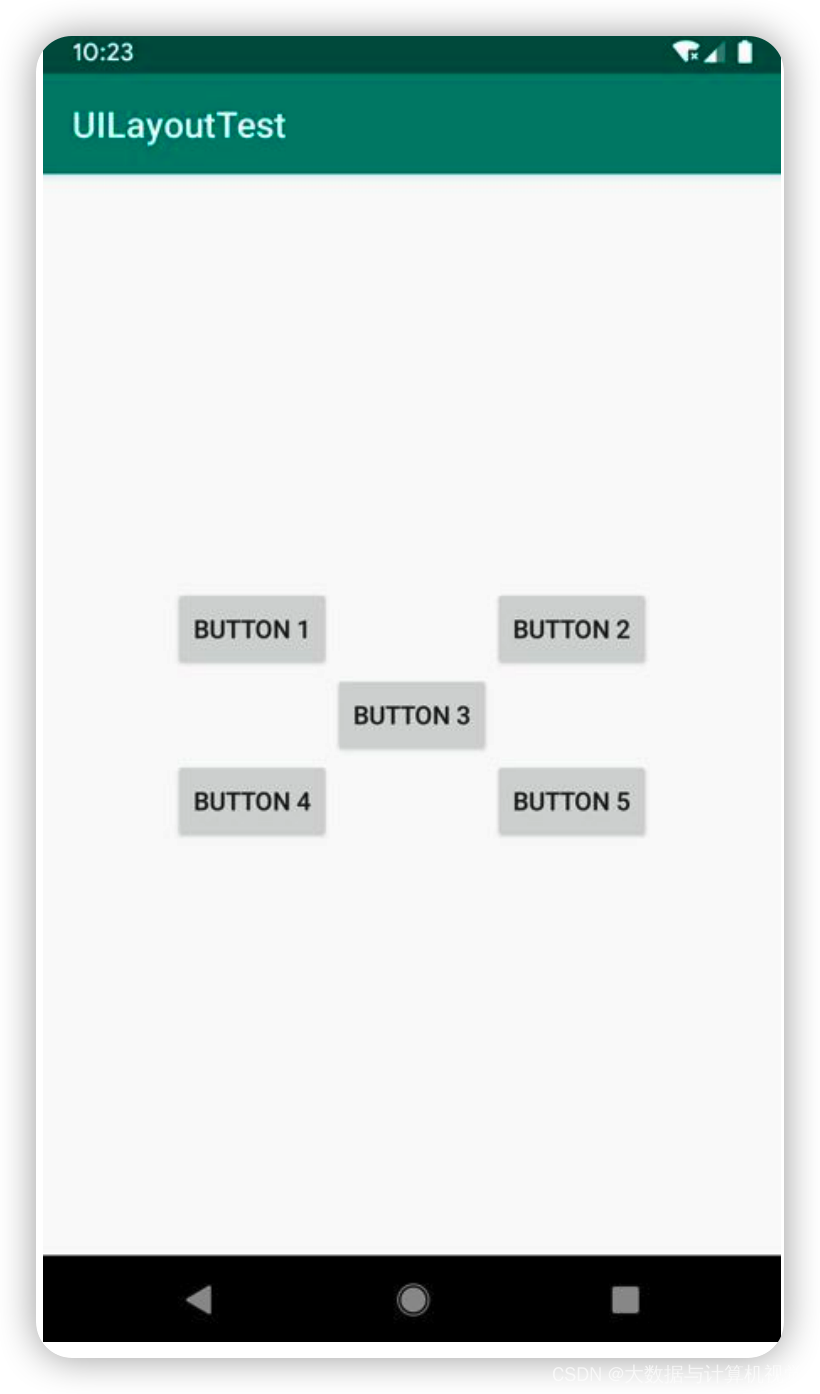
4.9.2 相对空间定位
<Button android:id="@+id/button3" android:layout_width="wrap_content" android:layout_height="wrap_content" android:layout_centerInParent="true" android:text="Button 3" /> <Button android:id="@+id/button1" android:layout_width="wrap_content" android:layout_height="wrap_content" android:layout_above="@id/button3" android:layout_toLeftOf="@id/button3" android:text="Button 1" /> <Button android:id="@+id/button2" android:layout_width="wrap_content" android:layout_height="wrap_content" android:layout_above="@id/button3" android:layout_toRightOf="@id/button3" android:text="Button 2" /> <Button android:id="@+id/button4" android:layout_width="wrap_content" android:layout_height="wrap_content" android:layout_below="@id/button3" android:layout_toLeftOf="@id/button3" android:text="Button 4" /> <Button android:id="@+id/button5" android:layout_width="wrap_content" android:layout_height="wrap_content" android:layout_below="@id/button3" android:layout_toRightOf="@id/button3" android:text="Button 5" />- 1
- 2
- 3
- 4
- 5
- 6
- 7
- 8
- 9
- 10
- 11
- 12
- 13
- 14
- 15
- 16
- 17
- 18
- 19
- 20
- 21
- 22
- 23
- 24
- 25
- 26
- 27
- 28
- 29
- 30
- 31
- 32
- 33
- 34
4.9.3 FrameLayout帧布局
所有控件都默认放在左上角, 设置layout_gravity可布局
<TextView android:id="@+id/textView" android:layout_width="wrap_content" android:layout_height="wrap_content" android:layout_gravity="left" android:text="This is TextView" /> <Button android:id="@+id/button" android:layout_width="wrap_content" android:layout_height="wrap_content" android:layout_gravity="right" android:text="Button" />- 1
- 2
- 3
- 4
- 5
- 6
- 7
- 8
- 9
- 10
- 11
- 12
- 13
- 14
4.10 自定义控件

我们所用的所有控件都是直接或间接继承自View的,所用的所有布局都是直接或间接继承自ViewGroup的。View是Android中最基本的一种UI组件,它可以在屏幕上绘制一块矩形区域,并能响应这块区域的各种事件,因此,我们使用的各种控件其实就是在View的基础上又添加了各自特有的功能。而ViewGroup则是一种特殊的View,它可以包含很多子View和子ViewGroup,是一个用于放置控件和布局的容器例如我们实现一个自定义顶部标题栏, 使可返回上一级, 新建一个layout/title.xml
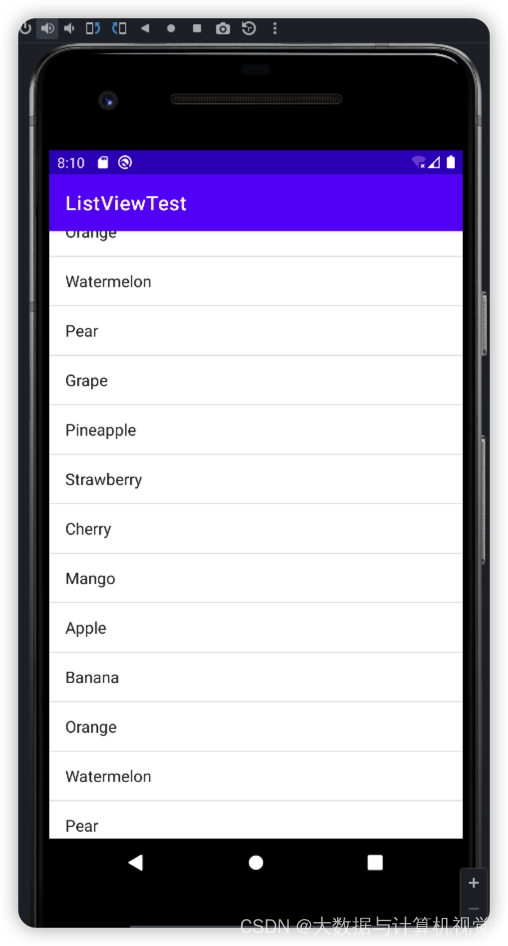
4.11 ListView列表控件
铺满一个ListView, 用ArrayAdapter填充数据
<LinearLayout xmlns:android="http://schemas.android.com/apk/res/android" android:layout_width="match_parent" android:layout_height="match_parent"> <ListView android:id="@+id/listView" android:layout_width="match_parent" android:layout_height="match_parent" /> LinearLayout>- 1
- 2
- 3
- 4
- 5
- 6
- 7
- 8
class MainActivity : AppCompatActivity() { private val data = listOf( "Apple", "Banana", "Orange", "Watermelon", "Pear", "Grape", "Pineapple", "Strawberry", "Cherry", "Mango", "Apple", "Banana", "Orange", "Watermelon", "Pear", "Grape", "Pineapple", "Strawberry", "Cherry", "Mango" ) override fun onCreate(savedInstanceState: Bundle?) { super.onCreate(savedInstanceState) setContentView(R.layout.activity_main) val adapter = ArrayAdapter<String>(this, android.R.layout.simple_list_item_1, data) listView.adapter = adapter } }- 1
- 2
- 3
- 4
- 5
- 6
- 7
- 8
- 9
- 10
- 11
- 12
- 13
- 14
- 15
4.12 图文列表控件
class Fruit(val name: String, val imageId: Int) class FruitAdapter(activity: Activity, val resourceId: Int, data: List<Fruit>) : ArrayAdapter<Fruit>(activity, resourceId, data) { override fun getView(position: Int, convertView: View?, parent: ViewGroup): View { val view = LayoutInflater.from(context).inflate(resourceId, parent, false) val fruit = getItem(position) // 获取当前项的Fruit实例 if (fruit != null) { view.fruitImage.setImageResource(fruit.imageId) view.fruitName.text = fruit.name } return view } } class MainActivity : AppCompatActivity() { private val fruitList = ArrayList<Fruit>() override fun onCreate(savedInstanceState: Bundle?) { super.onCreate(savedInstanceState) setContentView(R.layout.activity_main) initFruits() // 初始化水果数据 val adapter = FruitAdapter(this, R.layout.fruit_item, fruitList) listView.adapter = adapter } private fun initFruits() { repeat(2) { fruitList.add(Fruit("Apple", R.drawable.apple_pic)) fruitList.add(Fruit("Banana", R.drawable.banana_pic)) fruitList.add(Fruit("Orange", R.drawable.orange_pic)) fruitList.add(Fruit("Watermelon", R.drawable.watermelon_pic)) fruitList.add(Fruit("Pear", R.drawable.pear_pic)) fruitList.add(Fruit("Grape", R.drawable.grape_pic)) fruitList.add(Fruit("Pineapple", R.drawable.pineapple_pic)) fruitList.add(Fruit("Strawberry", R.drawable.strawberry_pic)) fruitList.add(Fruit("Cherry", R.drawable.cherry_pic)) fruitList.add(Fruit("Mango", R.drawable.mango_pic)) } } }- 1
- 2
- 3
- 4
- 5
- 6
- 7
- 8
- 9
- 10
- 11
- 12
- 13
- 14
- 15
- 16
- 17
- 18
- 19
- 20
- 21
- 22
- 23
- 24
- 25
- 26
- 27
- 28
- 29
- 30
- 31
- 32
- 33
- 34
- 35
- 36
- 37
- 38
- 39
- 40

这里添加了一个initFruits()方法,用于初始化所有的水果数据。在Fruit类的构造函数中将水果的名字和对应的图片id传入,然后把创建好的对象添加到水果列表中。
另外,我们使用了一个repeat函数将所有的水果数据添加了两遍,这是因为如果只添加一遍的话,数据量还不足以充满整个屏幕。
接着在onCreate()方法中创建了FruitAdapter对象,并将它作为适配器传递给ListView,这样定制ListView界面的任务就完成了
Adapter内部会通过getItem(position)拿到某行数据,并通过setImageResource()和setText()设置图片和文本数据五 BroadCast广播
广播用于在
Android系统内实现通知,概念较为简单

为了实现上述效果, 代码如下
- 基础类如下, 定义了
receiver, 当收到消息时, 触发receiver逻辑(弹窗, 关闭所有activities, 跳转到loginActivity)
其中注册和反注册BroadcastReceiver, 是写在onResume和onPause内, 而不是onCreate和onDestroy, 是因为我们希望只有栈顶的activity才可收到强制下线的广播, 其他非栈顶的activity不应该且没必要收此广播, 即当一个activity失去栈顶位置时自动取消BraodcastReceiver的注册
package com.example.broadcastbestpractice import android.content.BroadcastReceiver import android.content.Context import android.content.Intent import android.content.IntentFilter import androidx.appcompat.app.AppCompatActivity import android.os.Bundle import androidx.appcompat.app.AlertDialog open class BaseActivity : AppCompatActivity() { lateinit var receiver: ForceOfflineReceiver override fun onCreate(savedInstanceState: Bundle?) { super.onCreate(savedInstanceState) ActivityCollector.addActivity(this) } override fun onResume() { super.onResume() val intentFilter = IntentFilter() intentFilter.addAction("com.example.broadcastbestpractice.FORCE_OFFLINE") receiver = ForceOfflineReceiver() registerReceiver(receiver, intentFilter) } override fun onPause() { super.onPause() unregisterReceiver(receiver) } override fun onDestroy() { super.onDestroy() ActivityCollector.removeActivity(this) } inner class ForceOfflineReceiver : BroadcastReceiver() { override fun onReceive(context: Context, intent: Intent) { AlertDialog.Builder(context).apply { setTitle("Warning") setMessage("You are forced to be offline. Please try to login again.") setCancelable(false) setPositiveButton("OK") { _, _ -> ActivityCollector.finishAll() // 销毁所有Activity val i = Intent(context, LoginActivity::class.java) context.startActivity(i) // 重新启动LoginActivity } show() } } } }- 1
- 2
- 3
- 4
- 5
- 6
- 7
- 8
- 9
- 10
- 11
- 12
- 13
- 14
- 15
- 16
- 17
- 18
- 19
- 20
- 21
- 22
- 23
- 24
- 25
- 26
- 27
- 28
- 29
- 30
- 31
- 32
- 33
- 34
- 35
- 36
- 37
- 38
- 39
- 40
- 41
- 42
- 43
- 44
- 45
- 46
- 47
- 48
- 49
- 50
- 51
MainActivity类, 继承BaseActivity类, 当点击button时发出broadcast消息, 触发后续逻辑
package com.example.broadcastbestpractice import android.app.Activity import android.content.Intent import androidx.appcompat.app.AppCompatActivity import android.os.Bundle import kotlinx.android.synthetic.main.activity_main.* object ActivityCollector { private val activities = ArrayList<Activity>() fun addActivity(activity: Activity) { activities.add(activity) } fun removeActivity(activity: Activity) { activities.remove(activity) } fun finishAll() { for (activity in activities) { if (!activity.isFinishing) { activity.finish() } } activities.clear() } } class MainActivity : BaseActivity() { override fun onCreate(savedInstanceState: Bundle?) { super.onCreate(savedInstanceState) setContentView(R.layout.activity_main) forceOffline.setOnClickListener { val intent = Intent("com.example.broadcastbestpractice.FORCE_OFFLINE") sendBroadcast(intent) } } }- 1
- 2
- 3
- 4
- 5
- 6
- 7
- 8
- 9
- 10
- 11
- 12
- 13
- 14
- 15
- 16
- 17
- 18
- 19
- 20
- 21
- 22
- 23
- 24
- 25
- 26
- 27
- 28
- 29
- 30
- 31
- 32
- 33
- 34
- 35
- 36
loginActivity, 当用户名密码输入正确是跳转到MainActivity, 否则弹出Toast
package com.example.broadcastbestpractice import android.content.Intent import android.os.Bundle import android.widget.Toast import kotlinx.android.synthetic.main.activity_login.* class LoginActivity : BaseActivity() { override fun onCreate(savedInstanceState: Bundle?) { super.onCreate(savedInstanceState) setContentView(R.layout.activity_login) login.setOnClickListener { val account = accountEdit.text.toString() val password = passwordEdit.text.toString() // 如果账号是admin且密码是123456,就认为登录成功 if (account == "admin" && password == "123456") { val intent = Intent(this, MainActivity::class.java) startActivity(intent) finish() } else { Toast.makeText( this, "account or password is invalid", Toast.LENGTH_SHORT ).show() } } } }- 1
- 2
- 3
- 4
- 5
- 6
- 7
- 8
- 9
- 10
- 11
- 12
- 13
- 14
- 15
- 16
- 17
- 18
- 19
- 20
- 21
- 22
- 23
- 24
- 25
- 26
- 27
- 28
- 通过在
AndroidManifest.xml中指定主activity, 可以从登录页开始
<manifest xmlns:android="http://schemas.android.com/apk/res/android" xmlns:tools="http://schemas.android.com/tools" package="com.example.broadcastbestpractice"> <application android:allowBackup="true" android:dataExtractionRules="@xml/data_extraction_rules" android:fullBackupContent="@xml/backup_rules" android:icon="@mipmap/ic_launcher" android:label="@string/app_name" android:roundIcon="@mipmap/ic_launcher_round" android:supportsRtl="true" android:theme="@style/Theme.BroadcastBestPractice" tools:targetApi="31"> <activity android:name=".BaseActivity" android:exported="false" /> <activity android:name=".LoginActivity" android:exported="true"> <intent-filter> <action android:name="android.intent.action.MAIN" /> <category android:name="android.intent.category.LAUNCHER" /> intent-filter> activity> <activity android:name=".MainActivity" android:exported="true" /> application> manifest>- 1
- 2
- 3
- 4
- 5
- 6
- 7
- 8
- 9
- 10
- 11
- 12
- 13
- 14
- 15
- 16
- 17
- 18
- 19
- 20
- 21
- 22
- 23
- 24
- 25
- 26
- 27
- 28
- 29
- 30
- 31
- 32
六 数据持久化
Android的数据持久化3种方式: 文件存储, SharedPreferences, 数据库存储
6.1 文件持久化
6.1.1 文件写入
默认写在/data/data/com.example.FilePersistenceTest/files/data中, 当按back键时即写入该文件
class MainActivity : AppCompatActivity() { override fun onCreate(savedInstanceState: Bundle?) { super.onCreate(savedInstanceState) setContentView(R.layout.activity_main) } override fun onDestroy() { super.onDestroy() val inputText = editText.text.toString() save(inputText) } private fun save(inputText: String) { try { val output = openFileOutput("data", Context.MODE_PRIVATE) val writer = BufferedWriter(OutputStreamWriter(output)) writer.use { it.write(inputText) } } catch (e: IOException) { e.printStackTrace() } } }- 1
- 2
- 3
- 4
- 5
- 6
- 7
- 8
- 9
- 10
- 11
- 12
- 13
- 14
- 15
- 16
- 17
- 18
- 19
- 20
- 21
- 22
6.1.2 文件读取
程序加载时, 读取到editText中
class MainActivity : AppCompatActivity() { override fun onCreate(savedInstanceState: Bundle?) { super.onCreate(savedInstanceState) setContentView(R.layout.activity_main) val inputText = load() if (inputText.isNotEmpty()) { editText.setText(inputText) editText.setSelection(inputText.length) Toast.makeText(this, "Restoring succeeded", Toast.LENGTH_SHORT).show() } } private fun load(): String { val content = StringBuilder() try { val input = openFileInput("data") val reader = BufferedReader(InputStreamReader(input)) reader.use { reader.forEachLine { content.append(it) } } } catch (e: IOException) { e.printStackTrace() } return content.toString() } }- 1
- 2
- 3
- 4
- 5
- 6
- 7
- 8
- 9
- 10
- 11
- 12
- 13
- 14
- 15
- 16
- 17
- 18
- 19
- 20
- 21
- 22
- 23
- 24
- 25
- 26
- 27
6.2 SharedPreferences持久化
是键值对的形式, 且保持数据结构(如整型, 如字符串等), 更易用
6.2.1 数据写入
有2种获取SharedPreferences的方式
- 第一种是Context类中的getSharedPreferences()方法, 其有2个参数
- 第1个参数是路径, 在/data/data//shared_prefs/
- 第2个参数是操作模式, 默认是MODE_PRIVATE, 即只有当前应用程序才可对此读写
- 第二种是Activity类的getPreferences()方法
- 只有1个参数
- 自动将当前activity雷鸣作为SharedPreferences的文件名
- 调用方式如下3步骤
- 调用SharedPreferences对象的edit()方法获取一个SharedPreferences.Editor对象
- 向SharedPreferences.Editor对象中添加数据,比如添加一个布尔型数据就使用putBoolean()方法,添加一个字符串则使用putString()方法,以此类推。
- 调用apply()方法将添加的数据提交,从而完成数据存储操作
6.2.2 数据读取
布局如下
<LinearLayout xmlns:android="http://schemas.android.com/apk/res/android" android:layout_width="match_parent" android:layout_height="match_parent" android:orientation="vertical"> <Button android:id="@+id/saveButton" android:layout_width="match_parent" android:layout_height="wrap_content" android:text="Save Data" /> <Button android:id="@+id/restoreButton" android:layout_width="match_parent" android:layout_height="wrap_content" android:text="Restore Data" /> LinearLayout>- 1
- 2
- 3
- 4
- 5
- 6
- 7
- 8
- 9
- 10
- 11
- 12
- 13
- 14
- 15
- 16
- 17
- MainActivity如下
class MainActivity : AppCompatActivity() { override fun onCreate(savedInstanceState: Bundle?) { super.onCreate(savedInstanceState) setContentView(R.layout.activity_main) saveButton.setOnClickListener { val editor = getSharedPreferences("data", Context.MODE_PRIVATE).edit() editor.putString("name", "Tom") editor.putInt("age", 28) editor.putBoolean("married", false) editor.apply() } restoreButton.setOnClickListener { val prefs = getSharedPreferences("data", Context.MODE_PRIVATE) val name = prefs.getString("name", "") val age = prefs.getInt("age", 0) val married = prefs.getBoolean("married", false) Log.d("MainActivity", "name is $name") Log.d("MainActivity", "age is $age") Log.d("MainActivity", "married is $married") } } }- 1
- 2
- 3
- 4
- 5
- 6
- 7
- 8
- 9
- 10
- 11
- 12
- 13
- 14
- 15
- 16
- 17
- 18
- 19
- 20
- 21
- 22
通过点击按钮, 会在/data/data/com.example.sharedpreferencestest/shared_prefs/data.xml中存放如下数据
<map> <string name="name">Tomstring> <boolean name="married" value="false" /> <int name="age" value="28" /> map>- 1
- 2
- 3
- 4
- 5
- 6
点击load按钮, 即可加载数据, 在控制台打印如下
// 刚开始点击load按钮后的打印, 为空值 2022-08-12 09:56:59.452 3376-3376/com.example.sharedpreferencestest D/MainActivity: name is 2022-08-12 09:56:59.452 3376-3376/com.example.sharedpreferencestest D/MainActivity: age is 0 2022-08-12 09:56:59.452 3376-3376/com.example.sharedpreferencestest D/MainActivity: married is false // 点击save按钮后, 再点击load按钮后的打印, 为save的值 2022-08-12 10:04:05.721 5566-5566/com.example.sharedpreferencestest D/MainActivity: name is Tom 2022-08-12 10:04:05.721 5566-5566/com.example.sharedpreferencestest D/MainActivity: age is 28 2022-08-12 10:04:05.721 5566-5566/com.example.sharedpreferencestest D/MainActivity: married is false- 1
- 2
- 3
- 4
- 5
- 6
- 7
- 8

6.2.3 实现记住密码功能
新建一个LoginActivity, 布局如下
<LinearLayout xmlns:android="http://schemas.android.com/apk/res/android" android:layout_width="match_parent" android:layout_height="match_parent" android:orientation="vertical"> <LinearLayout android:layout_width="match_parent" android:layout_height="60dp" android:orientation="horizontal"> <TextView android:layout_width="90dp" android:layout_height="wrap_content" android:layout_gravity="center_vertical" android:text="Account:" android:textSize="18sp" /> <EditText android:id="@+id/accountEdit" android:layout_width="0dp" android:layout_height="wrap_content" android:layout_gravity="center_vertical" android:layout_weight="1" /> LinearLayout> <LinearLayout android:layout_width="match_parent" android:layout_height="60dp" android:orientation="horizontal"> <TextView android:layout_width="90dp" android:layout_height="wrap_content" android:layout_gravity="center_vertical" android:text="Password:" android:textSize="18sp" /> <EditText android:id="@+id/passwordEdit" android:layout_width="0dp" android:layout_height="wrap_content" android:layout_gravity="center_vertical" android:layout_weight="1" android:inputType="textPassword" /> LinearLayout> <LinearLayout android:layout_width="match_parent" android:layout_height="wrap_content" android:orientation="horizontal"> <CheckBox android:id="@+id/rememberPass" android:layout_width="wrap_content" android:layout_height="wrap_content" /> <TextView android:layout_width="wrap_content" android:layout_height="wrap_content" android:text="Remember password" android:textSize="18sp" /> LinearLayout> <Button android:id="@+id/login" android:layout_width="200dp" android:layout_height="60dp" android:layout_gravity="center_horizontal" android:text="Login" /> LinearLayout>- 1
- 2
- 3
- 4
- 5
- 6
- 7
- 8
- 9
- 10
- 11
- 12
- 13
- 14
- 15
- 16
- 17
- 18
- 19
- 20
- 21
- 22
- 23
- 24
- 25
- 26
- 27
- 28
- 29
- 30
- 31
- 32
- 33
- 34
- 35
- 36
- 37
- 38
- 39
- 40
- 41
- 42
- 43
- 44
- 45
- 46
- 47
- 48
- 49
- 50
- 51
- 52
- 53
- 54
- 55
- 56
- 57
- 58
- 59
- 60
- 61
- 62
- 63
- 64
- 65
- 66
- 67
- 68
- 69
- 70
- 71
- LoginActivity如下
class LoginActivity : BaseActivity() { override fun onCreate(savedInstanceState: Bundle?) { super.onCreate(savedInstanceState) setContentView(R.layout.activity_login) val prefs = getPreferences(Context.MODE_PRIVATE) val isRemember = prefs.getBoolean("remember_password", false) if (isRemember) { // 将账号和密码都设置到文本框中 val account = prefs.getString("account", "") val password = prefs.getString("password", "") accountEdit.setText(account) passwordEdit.setText(password) rememberPass.isChecked = true } login.setOnClickListener { val account = accountEdit.text.toString() val password = passwordEdit.text.toString() // 如果账号是admin且密码是123456,就认为登录成功 if (account == "admin" && password == "123456") { val editor = prefs.edit() if (rememberPass.isChecked) { // 检查复选框是否被选中 editor.putBoolean("remember_password", true) editor.putString("account", account) editor.putString("password", password) } else { editor.clear() } editor.apply() val intent = Intent(this, MainActivity::class.java) startActivity(intent) finish() } else { Toast.makeText( this, "account or password is invalid", Toast.LENGTH_SHORT ).show() } } } }- 1
- 2
- 3
- 4
- 5
- 6
- 7
- 8
- 9
- 10
- 11
- 12
- 13
- 14
- 15
- 16
- 17
- 18
- 19
- 20
- 21
- 22
- 23
- 24
- 25
- 26
- 27
- 28
- 29
- 30
- 31
- 32
- 33
- 34
- 35
- 36
- 37
- 38
- 39
- 40

6.3 SQLite数据库持久化
6.3.1 创建数据库
SQLiteOpenHelper类, 有onCreate()和onUpgrade()方法, 实现数据库创建和升级
getReadableDatabase()和getWriteableDatabase()获取数据库实例
点击按钮则创建database, 其中databaseHelper专门负责调用sqliteOpenHelper来调用数据库class MainActivity : AppCompatActivity() { override fun onCreate(savedInstanceState: Bundle?) { super.onCreate(savedInstanceState) setContentView(R.layout.activity_main) val dbHelper = MyDatabaseHelper(this, "BookStore.db", 1) createDatabase.setOnClickListener { dbHelper.writableDatabase } } } class MyDatabaseHelper(val context: Context, name: String, version: Int) : SQLiteOpenHelper(context, name, null, version) { private val createBook = "create table Book (" + " id integer primary key autoincrement," + "author text," + "price real," + "pages integer," + "name text)" override fun onCreate(db: SQLiteDatabase) { db.execSQL(createBook) Toast.makeText(context, "Create succeeded", Toast.LENGTH_SHORT).show() } override fun onUpgrade(db: SQLiteDatabase, oldVersion: Int, newVersion: Int) { } }- 1
- 2
- 3
- 4
- 5
- 6
- 7
- 8
- 9
- 10
- 11
- 12
- 13
- 14
- 15
- 16
- 17
- 18
- 19
- 20
- 21
- 22
- 23
- 24
- 25
- 26
- 27
- 28
在/data/data/com.example.databasetest/databases/BookStore.db有sqlite文件, 可导出并用DBBrowser插件查看
6.3.2 升级数据库
目前有了Book表,若希望增加Category表, 则可添加如下代码, 多次调用onCreate(), 但只有第一次才会生效, 因为只有第一次才会建库BookStore.db, 后续若此库存在则不会再建库BookStore.db, 除非卸载app或手动删除BookStore.db文件
class MyDatabaseHelper(val context: Context, name: String, version: Int) : SQLiteOpenHelper(context, name, null, version) { private val createBook = "create table Book (" + " id integer primary key autoincrement," + "author text," + "price real," + "pages integer," + "name text)" private val createCategory = "create table Category (" + "id integer primary key autoincrement," + "category_name text," + "category_code integer)" override fun onCreate(db: SQLiteDatabase) { db.execSQL(createBook) db.execSQL(createCategory) Toast.makeText(context, "Create succeeded", Toast.LENGTH_SHORT).show() } // 为了保证升级兼容性, 一般会在onUpgrade()方法内根据version判断执行不同版本的升级逻辑 // 从低version开始, 保证任何版本都能成功执行 override fun onUpgrade(db: SQLiteDatabase, oldVersion: Int, newVersion: Int) { if (oldVersion <= 1) { db.execSQL(createCategory) } if (oldVersion <= 2) { db.execSQL("alter table Book add column category_id integer") } } }- 1
- 2
- 3
- 4
- 5
- 6
- 7
- 8
- 9
- 10
- 11
- 12
- 13
- 14
- 15
- 16
- 17
- 18
- 19
- 20
- 21
- 22
- 23
- 24
- 25
- 26
- 27
- 28
- 29
- 30
若传入的version大于旧值则调用onUpgrade, 否则若version相等则调onUpdate
val dbHelper = MyDatabaseHelper(this, "BookStore.db", 2) // 传入的version>1时, 即会调用onUpgrade()- 1
- 2
6.3.3 添加数据
通过如下, 可将数据插入数据库中
class MainActivity : AppCompatActivity() { override fun onCreate(savedInstanceState: Bundle?) { super.onCreate(savedInstanceState) setContentView(R.layout.activity_main) val dbHelper = MyDatabaseHelper(this, "BookStore.db", 2) addData.setOnClickListener { val db = dbHelper.writableDatabase val values1 = ContentValues().apply { // 开始组装第一条数据 put("name", "The Da Vinci Code") put("author", "Dan Brown") put("pages", 454) put("price", 16.96) } db.insert("Book", null, values1) // 插入第一条数据 val values2 = ContentValues().apply { // 开始组装第二条数据 put("name", "The Lost Symbol") put("author", "Dan Brown") put("pages", 510) put("price", 19.95) } db.insert("Book", null, values2) // 插入第二条数据 } } }- 1
- 2
- 3
- 4
- 5
- 6
- 7
- 8
- 9
- 10
- 11
- 12
- 13
- 14
- 15
- 16
- 17
- 18
- 19
- 20
- 21
- 22
- 23
- 24
- 25
- 26
- 27
最终会发现落库成功
sqlite3 BookStore.db SQLite version 3.35.4 2021-04-02 15:20:15 Enter ".help" for usage hints. sqlite> select * from Book; 1|Dan Brown|16.96|454|The Da Vinci Code 2|Dan Brown|19.95|510|The Lost Symbol 3|Dan Brown|16.96|454|The Da Vinci Code 4|Dan Brown|19.95|510|The Lost Symbol- 1
- 2
- 3
- 4
- 5
- 6
- 7
- 8
6.3.4 更新数据
class MainActivity : AppCompatActivity() { override fun onCreate(savedInstanceState: Bundle?) { super.onCreate(savedInstanceState) setContentView(R.layout.activity_main) val dbHelper = MyDatabaseHelper(this, "BookStore.db", 2) updateData.setOnClickListener { val db = dbHelper.writableDatabase val values = ContentValues() values.put("price", 10.99) db.update("Book", values, "name = ?", arrayOf("The Da Vinci Code")) } } }- 1
- 2
- 3
- 4
- 5
- 6
- 7
- 8
- 9
- 10
- 11
- 12
- 13
更新后如下
sqlite3 BookStore.db SQLite version 3.35.4 2021-04-02 15:20:15 Enter ".help" for usage hints. sqlite> select * from Book; 1|Dan Brown|10.99|454|The Da Vinci Code 2|Dan Brown|19.95|510|The Lost Symbol 3|Dan Brown|10.99|454|The Da Vinci Code 4|Dan Brown|19.95|510|The Lost Symbol- 1
- 2
- 3
- 4
- 5
- 6
- 7
- 8
6.3.5 删除数据
deleteData.setOnClickListener { val db = dbHelper.writableDatabase db.delete("Book", "pages > ?", arrayOf("500")) }- 1
- 2
- 3
- 4
6.3.6 查询数据

下例为获取表中所有行queryData.setOnClickListener { val db = dbHelper.writableDatabase // 查询Book表中所有的数据 val cursor = db.query("Book", null, null, null, null, null, null) if (cursor.moveToFirst()) { do { // 遍历Cursor对象,取出数据并打印 val name = cursor.getString(cursor.getColumnIndex("name")) val author = cursor.getString(cursor.getColumnIndex("author")) val pages = cursor.getInt(cursor.getColumnIndex("pages")) val price = cursor.getDouble(cursor.getColumnIndex("price")) Log.d("MainActivity", "book name is $name") Log.d("MainActivity", "book author is $author") Log.d("MainActivity", "book pages is $pages") Log.d("MainActivity", "book price is $price") } while (cursor.moveToNext()) } cursor.close() }- 1
- 2
- 3
- 4
- 5
- 6
- 7
- 8
- 9
- 10
- 11
- 12
- 13
- 14
- 15
- 16
- 17
- 18
- 19
查出后打印日志如下
2022-08-12 15:10:34.264 7666-7666/com.example.databasetest D/MainActivity: book name is The Da Vinci Code 2022-08-12 15:10:34.265 7666-7666/com.example.databasetest D/MainActivity: book author is Dan Brown 2022-08-12 15:10:34.265 7666-7666/com.example.databasetest D/MainActivity: book pages is 454 2022-08-12 15:10:34.265 7666-7666/com.example.databasetest D/MainActivity: book price is 10.99 2022-08-12 15:10:34.265 7666-7666/com.example.databasetest D/MainActivity: book name is The Lost Symbol 2022-08-12 15:10:34.265 7666-7666/com.example.databasetest D/MainActivity: book author is Dan Brown 2022-08-12 15:10:34.265 7666-7666/com.example.databasetest D/MainActivity: book pages is 510 2022-08-12 15:10:34.265 7666-7666/com.example.databasetest D/MainActivity: book price is 19.95 2022-08-12 15:10:34.265 7666-7666/com.example.databasetest D/MainActivity: book name is The Da Vinci Code 2022-08-12 15:10:34.265 7666-7666/com.example.databasetest D/MainActivity: book author is Dan Brown 2022-08-12 15:10:34.265 7666-7666/com.example.databasetest D/MainActivity: book pages is 454 2022-08-12 15:10:34.265 7666-7666/com.example.databasetest D/MainActivity: book price is 10.99 2022-08-12 15:10:34.265 7666-7666/com.example.databasetest D/MainActivity: book name is The Lost Symbol 2022-08-12 15:10:34.265 7666-7666/com.example.databasetest D/MainActivity: book author is Dan Brown 2022-08-12 15:10:34.265 7666-7666/com.example.databasetest D/MainActivity: book pages is 510 2022-08-12 15:10:34.265 7666-7666/com.example.databasetest D/MainActivity: book price is 19.95- 1
- 2
- 3
- 4
- 5
- 6
- 7
- 8
- 9
- 10
- 11
- 12
- 13
- 14
- 15
- 16
6.3.7 直接用SQL操作数据库
db.execSQL("insert into Book (name, author, pages, price) values(?, ?, ?, ?)", arrayOf("The Da Vinci Code", "Dan Brown", "454", "16.96") ) db.execSQL("insert into Book (name, author, pages, price) values(?, ?, ?, ?)", arrayOf("The Lost Symbol", "Dan Brown", "510", "19.95") ) db.execSQL("update Book set price = ? where name = ?", arrayOf("10.99", "The Da Vinci Code")) db.execSQL("delete from Book where pages > ?", arrayOf("500")) val cursor = db.rawQuery("select * from Book", null)- 1
- 2
- 3
- 4
- 5
- 6
- 7
- 8
- 9
6.3.8 使用事务
先开启事务, 然后在try catch 和 finally中捕获exception, 做对应处理
replaceData.setOnClickListener { val db = dbHelper.writableDatabase db.beginTransaction() // 开启事务 try { db.delete("Book", null, null) if (true) { // 手动抛出一个异常,让事务失败 throw NullPointerException() } val values = ContentValues().apply { put("name", "Game of Thrones") put("author", "George Martin") put("pages", 720) put("price", 20.85) } db.insert("Book", null, values) db.setTransactionSuccessful() // 事务已经执行成功 } catch (e: Exception) { e.printStackTrace() } finally { db.endTransaction() // 结束事务 } }- 1
- 2
- 3
- 4
- 5
- 6
- 7
- 8
- 9
- 10
- 11
- 12
- 13
- 14
- 15
- 16
- 17
- 18
- 19
- 20
- 21
- 22
- 23
日志就会打印printStackTrace对应的方法
2022-08-12 15:30:39.075 8005-8005/com.example.databasetest W/System.err: java.lang.NullPointerException 2022-08-12 15:30:39.080 8005-8005/com.example.databasetest W/System.err: at com.example.databasetest.MainActivity.onCreate$lambda-7(MainActivity.kt:71) 2022-08-12 15:30:39.080 8005-8005/com.example.databasetest W/System.err: at com.example.databasetest.MainActivity.$r8$lambda$Ff3cxcjnoRHI0B8DD9nQh8YQ2cY(Unknown Source:0)- 1
- 2
- 3
七 Kotlin语法
7.1 高阶函数
7.1.1 简化SharedPreferences的用法
通常我们若需向SharedPreferences存储数据, 需3个步骤
- 调SharedPreferences.edit()方法获取SharedPreferences.Editor对象
- 向SharedPreferences.Editor对象, 添加数据
- 调apply()方法提交数据, 完成数据存储
代码如下
val editor = getSharedPreferences("data", Context.MODE_PRIVATE).edit() editor.putString("name", "Tom") editor.putInt("age", 28) editor.putBoolean("married", false) editor.apply()- 1
- 2
- 3
- 4
- 5
然而可通过高阶函数简化, 具体方式如下
通过新建一个SharedPreferences.kt文件, 加入如下代码, 其实是为SharedPreferences类添加了open函数, 其中open函数是高阶函数, 其参数为block函数
其中block是我们添加数据的业务逻辑
这个open函数做了一些模板工作, 它会帮我们拿到editor对象, 调我们的block()业务逻辑, 最终通过apply提交数据fun SharedPreferences.open(block: SharedPreferences.Editor.() -> Unit) { val editor = edit() editor.block() editor.apply() }- 1
- 2
- 3
- 4
- 5
定义之后, 我们可按如下使用, 其中向open函数内传的block()函数就是如下3行业务逻辑
getSharedPreferences("data", Context.MODE_PRIVATE).open { putString("name", "Tom") putInt("age", 28) putBoolean("married", false) }- 1
- 2
- 3
- 4
- 5
其实AndroidStudioIDE在初始化项目时即自动引入了ktx库, 此库就会为我们做这些工作, 只不过将open函数名换成了edit函数名, 调用方式如下
getSharedPreferences("data", Context.MODE_PRIVATE).edit { putString("name", "Tom") putInt("age", 28) putBoolean("married", false) }- 1
- 2
- 3
- 4
- 5
7.1.2 简化ContentValues的用法
通常的用法是如下
val values = ContentValues() values.put("name", "Game of Thrones") values.put("author", "George Martin") values.put("pages", 720) values.put("price", 20.85) db.insert("Book", null, values)- 1
- 2
- 3
- 4
- 5
- 6
为了简化, 我们可定义一个ContentValues.kt文件, 在其中定义cvOf()方法
fun cvOf(vararg pairs: Pair<String, Any?>): ContentValues { val cv = ContentValues() for (pair in pairs) { val key = pair.first val value = pair.second when (value) { is Int -> cv.put(key, value) is Long -> cv.put(key, value) is Short -> cv.put(key, value) is Float -> cv.put(key, value) is Double -> cv.put(key, value) is Boolean -> cv.put(key, value) is String -> cv.put(key, value) is Byte -> cv.put(key, value) is ByteArray -> cv.put(key, value) null -> cv.putNull(key) } } return cv }- 1
- 2
- 3
- 4
- 5
- 6
- 7
- 8
- 9
- 10
- 11
- 12
- 13
- 14
- 15
- 16
- 17
- 18
- 19
- 20
调用的时候, 就很简化了, 通过cvOf一次性就可以输入一堆数据
val values = cvOf( "name" to "Game of Thrones", "author" to "George Martin", "pages" to 720, "price" to 20.85 ) db.insert("Book", null, values)- 1
- 2
- 3
- 4
- 5
其实AndroidStudioIDE自动引入的ktx库, 也有contentValuesOf方法, 我们可以直接使用, 它的调用方法如下
val values = contentValuesOf("name" to "Game of Thrones", "author" to "George Martin", "pages" to 720, "price" to 20.85) db.insert("Book", null, values)- 1
- 2
- 3
7.2 泛型和委托
-
相关阅读:
数据挖掘是什么?
我们拆了一款双通道三核便携示波器
疫情之下,我帮你总结了全网最全的Java面试高频考点
Java核心——面向对象编程(上)包-继承-多态
字符串方法+ES6中字符串的方法
Spring Boot项目开发实战:项目属性常用配置和使用方法
Java面向对象/类和对象/封装/private/public关键字
向上(向下)转型的理解与应用
跟着GPT学设计模式之观察者模式
100天精通Golang(基础入门篇)——第19天:深入剖析Go语言中方法(Method)的妙用与实践
- 原文地址:https://blog.csdn.net/jiaoyangwm/article/details/126331532
