-
基于requests框架实现接口自动化测试项目实战
requests库是一个常用的用于http请求的模块,它使用python语言编写,在当下python系列的接口自动化中应用广泛,本文将带领大家深入学习这个库
Python环境的安装就不在这里赘述了,我们直接开干。
01
requests的安装windows下执行如下命令
pipinstallrequests-ihttp://pypi.douban.com/simple/–trust-host pypi.douban.com
mac终端下执行如下命令
python3-mpipinstallrequests-ihttp://pypi.douban.com/simple/–trust-host pypi.douban.com
02
自动化requests模块的常用方法
2.1get请求实战
!/usr/bin python3
encoding: utf-8 -*-
@author: 沙陌 微信:Matongxue_2
@Time:2021/3/25 9:54
@Copyright:北京码同学网络科技有限公司
import requests
host=‘http://10.0.0.18:8080’
def get():
“”"
get接口请求
:return:
“”"
url =host+‘/pinter/com/getSku’ #接口地址
params={
'id':1- 1
}
resp = requests.get(url,params=params)
status_code=resp.status_code #获取响应状态码
print(‘响应状态码:{}’.format(status_code))
text=resp.text #获取响应内容,结果类型是字符串
print(‘响应内容:{}’.format(text))
json=resp.json() #获取响应内容,结果是字典类型
print(‘响应内容:{}’.format(json))
resp_headers=resp.headers #获取响应headers
print(‘响应header:{}’.format(resp_headers))
if__name__==‘main’:
get()
结果如下
D:\Python\Python36\python.exe D:/pycharmprojects/first/requetsstudy/pinter.py
响应状态码:200
响应内容:{“code”:“0”,“message”:“success”,“data”:{“skuId”:1,“skuName”:“ptest-1”,“price”:“645”,“stock”:709,“brand”:“testfan”}}
响应内容:{‘code’:‘0’,‘message’:‘success’,‘data’:{‘skuId’:1,‘skuName’:‘ptest-1’,‘price’:‘645’,‘stock’:709,‘brand’:‘testfan’}}
响应header:{‘Content-Type’:‘application/json;charset=UTF-8’,‘Transfer-Encoding’:‘chunked’,‘Date’:‘Fri,12Mar202122:13:49GMT’,‘Keep-Alive’:
‘timeout=20’,‘Connection’:‘keep-alive’}
Process finished with exit code 0
上述代码中请求发起后得到一个响应对象变量resp,那么resp对象的常用方法如下

2.2post请求实战
post请求的参数格式通常有多种,我们依次学习
第一种表单形式的参数
importrequests host='http://10.0.0.18:8080' defpost():"""post表单:return:"""url=host+'/pinter/com/login'#表单参数data={ 'userName':'沙陌','password':'123456'}resp=requests.post(url=url,data=data)status_code= resp.status_code#获取响应状态码print('响应状态码:{}'.format(status_code))text=resp.text#获取响应内容,结果类型是字符串print('响应内容:{}'.format(text))json=resp.json()#获取响应内容,结果是字典类型print('响应内容:{}'.format(json))resp_headers=resp.headers#获取响应headers print('响应header:{}'.format(resp_headers))``` 第二种json格式参数 import requests host='http://10.0.0.18:8080' def post_json(): """ postjson :return: """ url =host +'/pinter/com/register' #header里定义参数类型 headers={ 'Content-Type':'application/json' } #json参数 json={ "userName":"沙陌", "password":"1234", "gender":1, "phoneNum":"110", "email":"beihe@163.com", "address":"Beijing" } resp=requests.post(url=url,json=json) status_code=resp.status_code #获取响应状态码 print('响应状态码:{}'.format(status_code)) text=resp.text #获取响应内容,结果类型是字符串 print('响应内容:{}'.format(text)) json=resp.json() #获取响应内容,结果是字典类型 print('响应内容:{}'.format(json)) resp_headers=resp.headers #获取响应headers print('响应header:{}'.format(resp_headers)) 2.3put接口实战 import requests host='http://10.0.0.18:8080' def put(): """ put 清酒 :return: """ url = host+'/pinter/com/phone' #接口地址 #参数 json={ "brand":"Huawei", "color":"yellow", "memorySize":"64G", "cpuCore":"8核", "price":"8848", "desc":"全新上市" } resp=requests.put(url=url,json=json) status_code=resp.status_code #获取响应状态码 print('响应状态码:{}'.format(status_code)) text=resp.text #获取响应内容,结果类型是字符串 print('响应内容:{}'.format(text)) json=resp.json() #获取响应内容,结果是字典类型 print('响应内容:{}'.format(json)) resp_headers=resp.headers #获取响应headers print('响应header:{}'.format(resp_headers)) 2.4delete请求 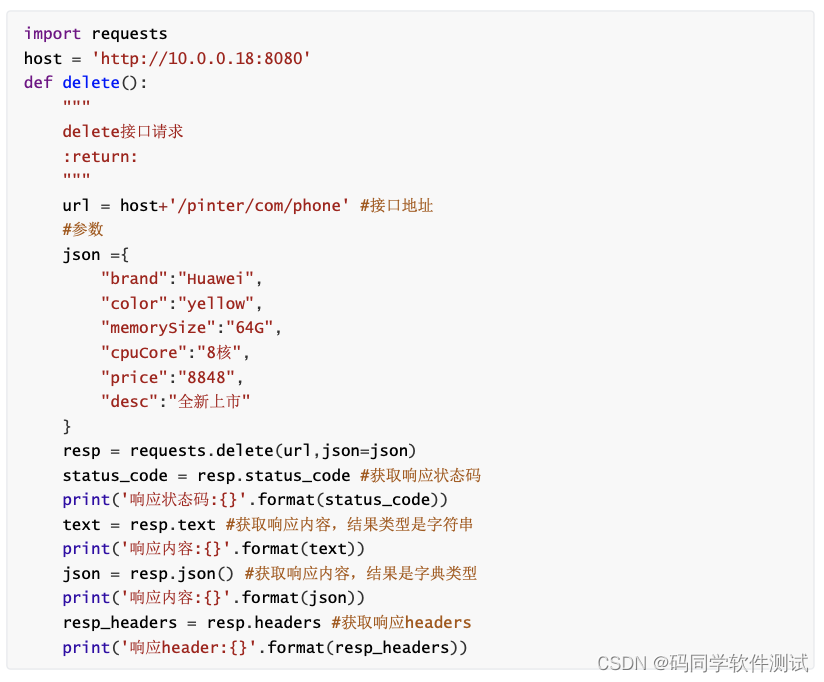 2.5request.session.request用法 可以自动管理cookie,比如如下需要采用cookie认证的接口  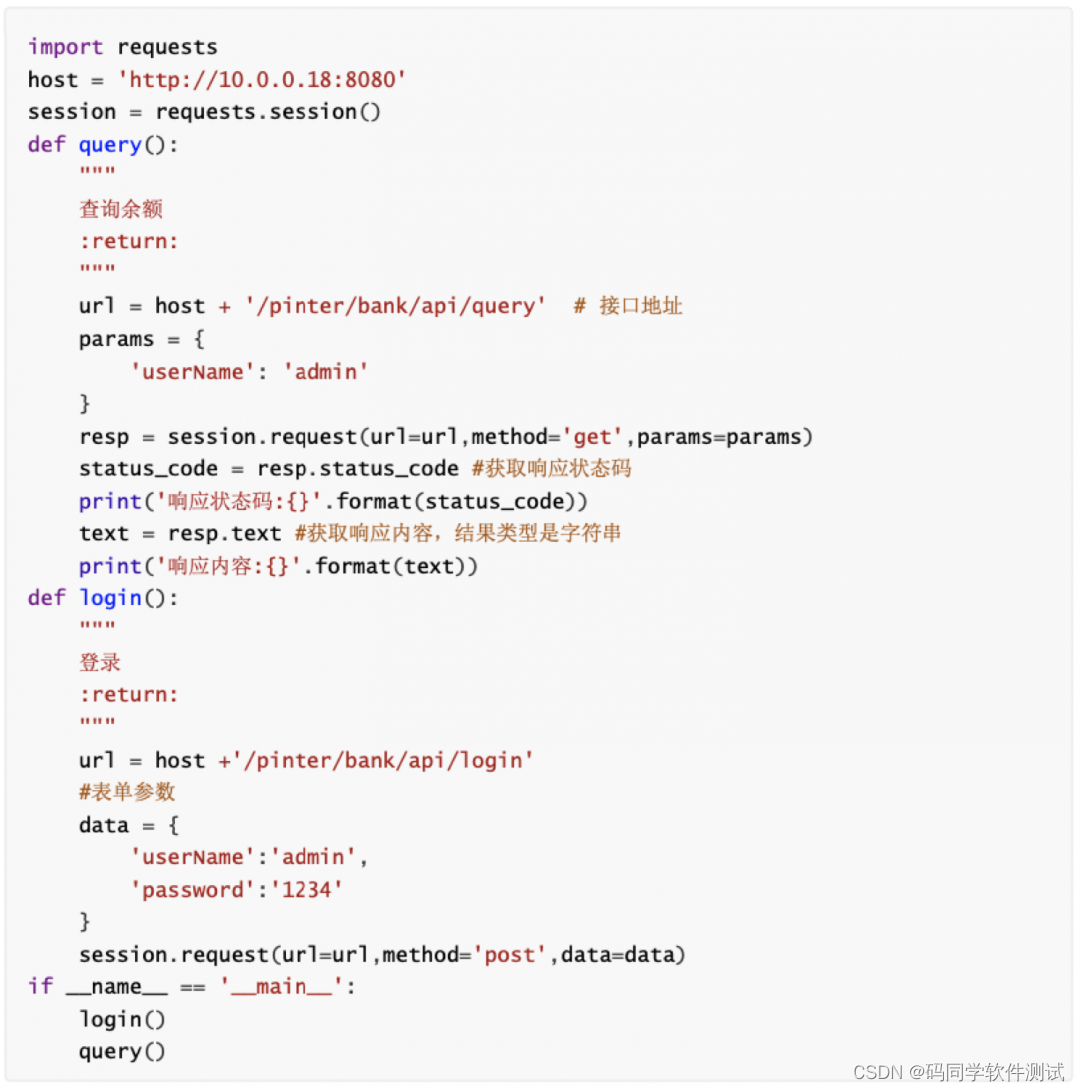 结果如下: D:\Python\Python36\python.exeD:/pycharmprojects/first/requetsstudy/pinter.py 响应状态码:200 响应内容:{"code":"0","message":"success","data":"$22,378,198"} Process finished with exit code 0 2.6token关联的接口如何做呢? 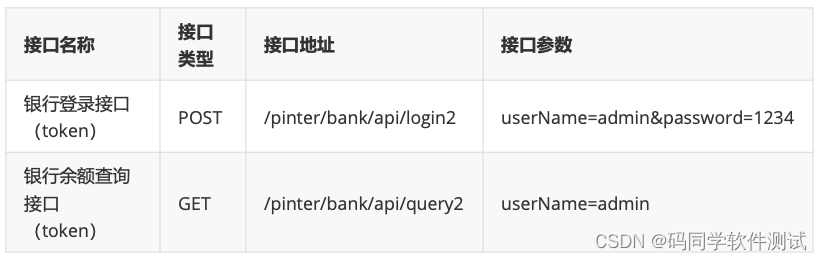 对于需要token关联的接口来说,需要从登录接口的返回值中提取token信息,并传递给需要token的接口  结果如下: D:\Python\Python36\python.exeD:/pycharmprojects/first/requetsstudy/pinter1.py 响应状态码:200 响应内容:{"code":"0","message":"success","data":"$74,780,457"} Process finished with exit code 0 总结一下: requests库的请求方法里参数众多,所以简单划分一下,查询参数就用params=params 表单参数就用data=data json参数就用json=json 请求头信息header就用headers=headers- 1
- 2
- 3
- 4
- 5
- 6
- 7
- 8
- 9
- 10
- 11
- 12
- 13
- 14
- 15
- 16
- 17
- 18
- 19
- 20
- 21
- 22
- 23
- 24
- 25
- 26
- 27
- 28
- 29
- 30
- 31
- 32
- 33
- 34
- 35
- 36
- 37
- 38
- 39
- 40
- 41
- 42
- 43
- 44
- 45
- 46
- 47
- 48
- 49
- 50
- 51
- 52
- 53
- 54
- 55
- 56
- 57
- 58
- 59
- 60
- 61
- 62
- 63
- 64
- 65
- 66
- 67
- 68
- 69
- 70
- 71
- 72
- 73
- 74
- 75
- 76
- 77
- 78
- 79
- 80
- 81
- 82
- 83
- 84
- 85
- 86
- 87
- 88
- 89
- 90
- 91
- 92
- 93
- 94
- 95
- 96
- 97
- 98
- 99
- 100
- 101
- 102
- 103
- 104
- 105
- 106
- 107
- 108
- 109
- 110
- 111
- 112
- 113
- 114
- 115
- 116
- 117
- 118
- 119
- 120
- 121
- 122
- 123
- 124
- 125
- 126
- 127
- 128
- 129
- 130
- 131
- 132
- 133
- 134
- 135
- 136
- 137
- 138
- 139
- 140
- 141
- 142
- 143
- 144
- 145
- 146
- 147
- 148
- 149
- 150
- 151
- 152
- 153
- 154
- 155
- 156
- 157
- 158
- 159
- 160
- 161
- 162
- 163
- 164
- 165
- 166
- 167
- 168
- 169
- 170
- 171
- 172
- 173
- 174
- 175
- 176
- 177
- 178
- 179
- 180
- 181
- 182
- 183
- 184
- 185
- 186
- 187
- 188
- 189
- 190
- 191
- 192
- 193
- 194
-
相关阅读:
【数据结构】算法的时间复杂度和空间复杂度
经典算法——直接插入排序
使用nvm安装nodejs时,npm安装失败,提示 handshake timeout
MySQL—索引—基础语法
Java面试常见问题总结
毛玻璃员工卡片悬停效果
用了CDN就一定比不用更快吗?
Leetcode刷题day1|数组一|704.二分查找,27.移除元素,35.搜索插入位置
关于el-table+el-input+el-propover的封装
AcWing:第56场周赛
- 原文地址:https://blog.csdn.net/Testfan_zhou/article/details/126340347
