-
5、JS-BOM和DOM
一、BOM:Browser object model
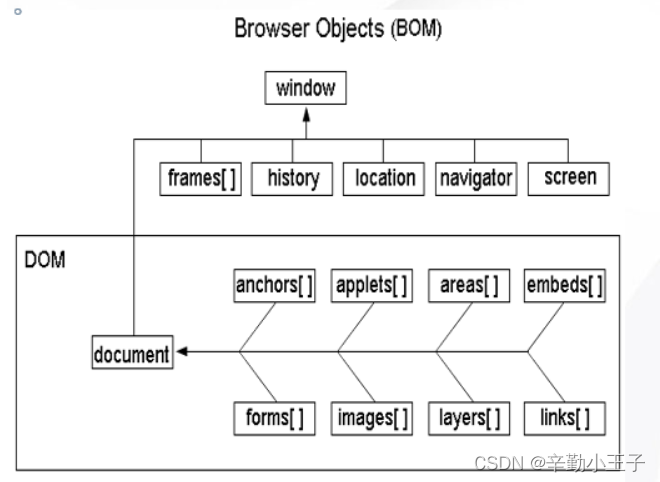
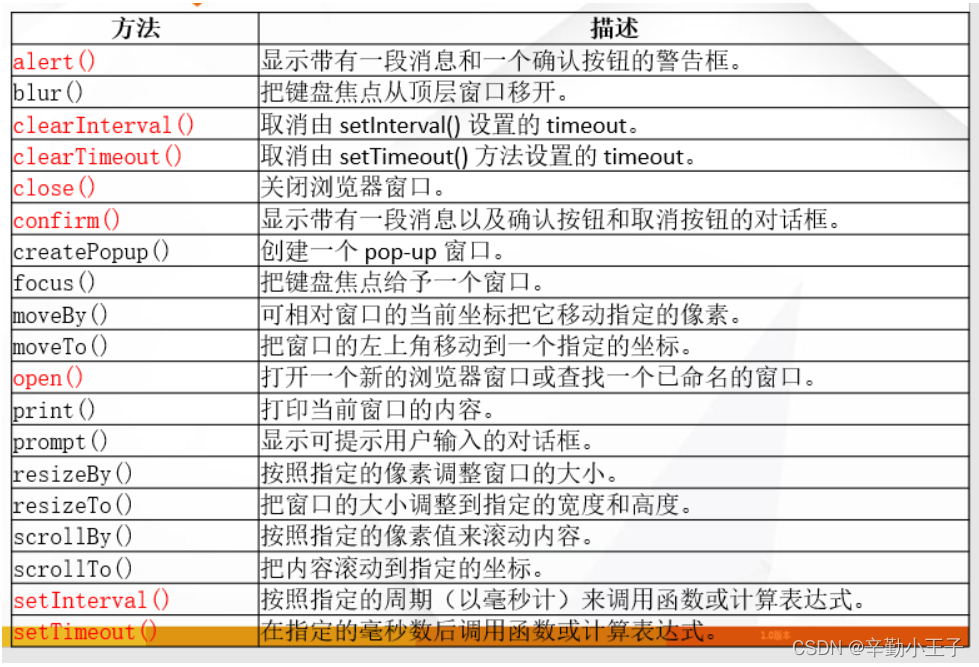
•BOM提供了一些访问窗口对象的一些方法,我们可以用它来移动窗口位置,改变窗口大小,打开新窗口和关闭窗口,弹出对话框alert(),进行导航以及获取客户的一些信息如:浏览器品牌版本,屏幕分辨率。但BOM最强大的功能是它提供了一个访问HTML页面的一入口——document对象,以使得我们可以通过这个入口来使用DOM的强大功能!!!
•window对象是BOM中所有对象的核心。window对象表示整个浏览器窗口,但不必表示其中包含的内容。此外,window还可用于移动或调整它表示的浏览器的大小,或者对它产生其他影响。JavaScript中的任何一个全局函数或变量都是window的属性

1、screen对象(屏幕)
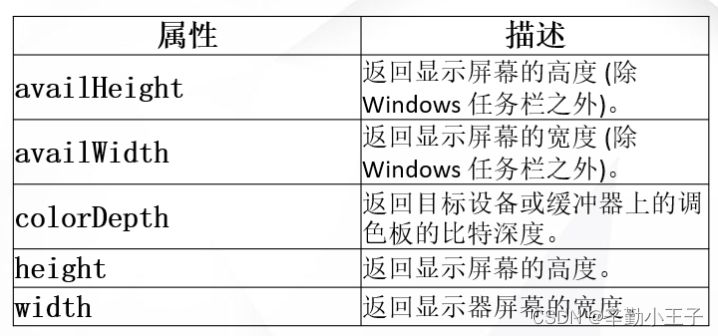
screen对象包含有关用户屏幕的信息
•每个 Window 对象的 screen 属性都引用一个 Screen 对象。Screen 对象中存放着有关显示浏览器屏幕的信息。JavaScript 程序将利用这些信息来优化它们的输出,以达到用户的显示要求。例如,一个程序可以根据显示器的尺寸选择使用大图像还是使用小图像,它还可以根据显示器的颜色深度选择使用 16 位色还是使用 8 位色的图形。另外,JavaScript 程序还能根据有关屏幕尺寸的信息将新的浏览器窗口定位在屏幕中间。

document.write("width:"+window.screen.width+"
"); document.write("height:"+window.screen.height+"
"); document.write("avaiWidth:"+window.screen.availWidth+"
"); document.write("avaiHeight:"+window.screen.availHeight+"
"); document.write("colorDepth:"+window.screen.colorDepth);- 1
- 2
- 3
- 4
- 5
2、navigator对象(浏览器)
•navigator 对象包含有关访问者浏览器的信息
![[外链图片转存失败,源站可能有防盗链机制,建议将图片保存下来直接上传(img-omAdzMdx-1660490503118)(C:\Users\66496\AppData\Roaming\Typora\typora-user-images\image-20210811062724460.png)]](https://1000bd.com/contentImg/2022/08/17/151557190.png)
document.write("appCodeName:"+navigator.appCodeName+"
");
document.write("appName:"+navigator.appName+"
");
document.write("appVersion:"+navigator.appVersion+"
");
document.write("browserLanguage:"+navigator.browserLanguage+"
");
document.write("cookieEnabled:"+navigator.cookieEnabled+"
");
document.write("platform:"+navigator.platform+"
");
document.write("userAgent:"+navigator.userAgent+"
");
document.write("userLanguage:"+navigator.userLanguage+"
");- 1
- 2
- 3
- 4
- 5
- 6
- 7
- 8
“Netscape” 是 IE11、Chrome、Firefox 以及 Safari 的应用程序名称的统称。
可以不带window前缀写
3、window对象
•所有浏览器都支持 window 对象。它表示浏览器窗口。
•所有 JavaScript 全局对象、函数以及变量均自动成为 window 对象的成员。
–全局变量是 window 对象的属性。
–全局函数是 window 对象的方法。
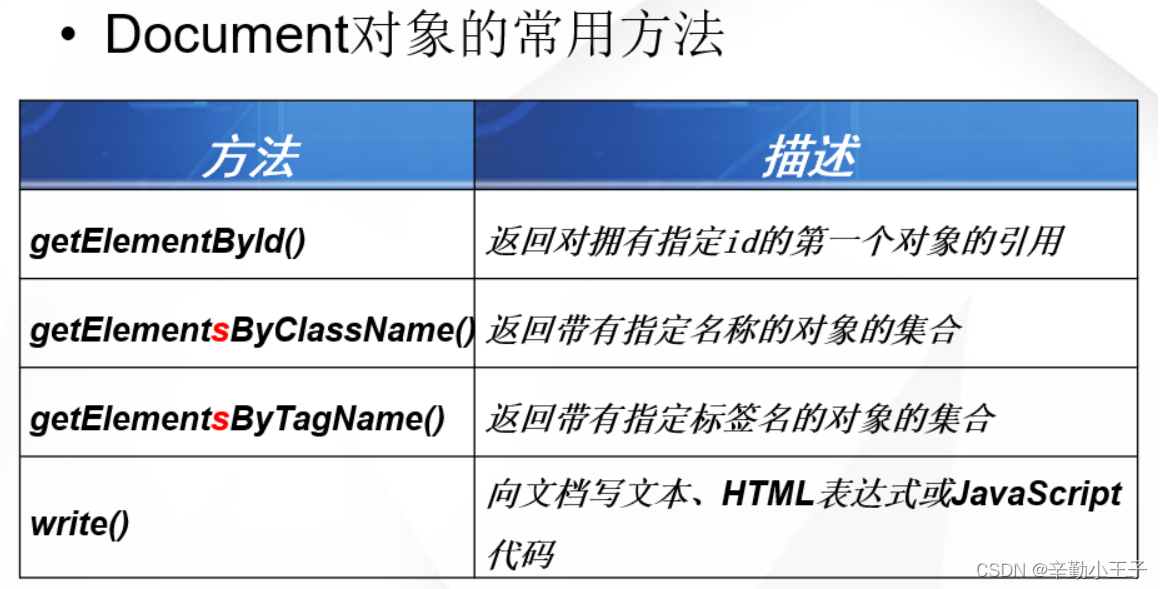
–甚至 HTML DOM 的 document 也是 window 对象的属性之一:
•window.document.getElementById(“header”);
•与此相同:
•document.getElementById(“header”);
![[外链图片转存失败,源站可能有防盗链机制,建议将图片保存下来直接上传(img-3hJh8iZ1-1660490503121)(C:\Users\66496\AppData\Roaming\Typora\typora-user-images\image-20210811062824409.png)]](https://1000bd.com/contentImg/2022/08/17/151557553.png)
window.document.write("screenLeft:"+window.screenLeft);- 1

- 1
- 2
- 3
- 4
- 5
- 6
- 7
- 8
- 9
- 10
- 11
- 12
- 13
- 14
- 15
- 16
- 17
- 18
- 19
- 20
- 21
- 22
- 23
- 24
- 25
- 26
- 27
- 28
- 29
- 30
- 31
- 32
- 33
- 34
- 35
- 36
- 37
- 38
- 39
- 40
- 41
- 42
- 43
- 44
- 45
- 46
- 47
- 48
- 49
- 50
- 51
- 52
- 53
- 54
- 55
- 56
- 57
- 58
- 59
- 60
- 61
- 62
- 63
- 64
- 65
- 66
- 67
- 68
- 69
- 70
- 71
- 72
- 73
- 74
- 75
- 76
- 77
- 78
- 79
- 80
- 81
- 82
- 83
- 84
- 85
- 86
- 87
- 88
4、history对象(历史)
•history 对象包含浏览器的历史
•History 对象最初设计来表示窗口的浏览历史。但出于隐私方面的原因,History 对象不再允许脚本访问已经访问过的实际 URL。唯一保持使用的功能只有 back()、forward() 和 go() 方法。
![[外链图片转存失败,源站可能有防盗链机制,建议将图片保存下来直接上传(img-av3KQRk5-1660490503126)(C:\Users\66496\AppData\Roaming\Typora\typora-user-images\image-20210811063007719.png)]](https://1000bd.com/contentImg/2022/08/17/151557828.png)
- 1
- 2
- 3
5、location对象
location 对象用于获得当前页面的地址•(URL),并把浏览器重定向到新的页面
![[外链图片转存失败,源站可能有防盗链机制,建议将图片保存下来直接上传(img-1sAqycZw-1660490503127)(C:\Users\66496\AppData\Roaming\Typora\typora-user-images\image-20210811063108348.png)]](https://1000bd.com/contentImg/2022/08/17/151557931.png)
![[外链图片转存失败,源站可能有防盗链机制,建议将图片保存下来直接上传(img-LPasNowv-1660490503128)(C:\Users\66496\AppData\Roaming\Typora\typora-user-images\image-20210811063139064.png)]](https://1000bd.com/contentImg/2022/08/17/151558033.png)
var timeInterval = setInterval(myTimer,1000); function openNew(){ location.href="../lesson1/reg.html"; } function openNew2(){ location.assign("http://www.baidu.com"); } function refresh1(){ location.reload(true); } function myTimer(){ var time = new Date().toLocaleTimeString(); document.getElementById("myTime").innerHTML=time; } function replace1(){ location.replace("http://www.baidu.com"); }- 1
- 2
- 3
- 4
- 5
- 6
- 7
- 8
- 9
- 10
- 11
- 12
- 13
- 14
- 15
- 16
- 17
- 18
- 19
- 20
- 21
二、DOM
![[外链图片转存失败,源站可能有防盗链机制,建议将图片保存下来直接上传(img-48BzmIO3-1660490503129)(C:\Users\66496\AppData\Roaming\Typora\typora-user-images\image-20210811063344399.png)]](https://1000bd.com/contentImg/2022/08/17/151558132.png)
1、节点:
![[外链图片转存失败,源站可能有防盗链机制,建议将图片保存下来直接上传(img-KmQprp3l-1660490503130)(C:\Users\66496\AppData\Roaming\Typora\typora-user-images\image-20210811063836244.png)]](https://1000bd.com/contentImg/2022/08/17/151558247.png)
2、dom常用的方法:

getElementsByName()
3、使用dom:
根据 W3C 的 HTML DOM 标准,HTML 文档中的所有内容都是节点:
- 整个文档是一个文档节点
- 每个 HTML 元素是元素节点
- HTML 元素内的文本是文本节点
- 每个 HTML 属性是属性节点
- 注释是注释节点
父、子和同胞节点
我们常用父(parent)、**子(child)和同胞(sibling)**等术语来描述这些关系。父节点拥有子节点。同级的子节点被称为同胞(兄弟或姐妹)。
- 在节点树中,顶端节点被称为根(root)。
- 每个节点都有父节点、除了根(它没有父节点)。
- 一个节点可拥有任意数量的子节点。
- 同胞是拥有相同父节点的节点。
DOM 教程 DOM 课程1
Hello world!
//根节点,父节点 节点没有父节点;它是根节点 和 的父节点是 节点 文本节点 "Hello world!" 的父节点是节点 //子节点,同胞节点 节点拥有两个子节点:
和 节点拥有两个子节点: 与节点 <title> 节点也拥有一个子节点:文本节点 "DOM 教程" <h1> 和 <p> 节点是同胞节点,同时也是 <body> 的子节点 //首个节点和最后一个节点 <head> 元素是 <html> 元素的首个子节点 <body> 元素是 <html> 元素的最后一个子节点 <h1> 元素是 <body> 元素的首个子节点 <p> 元素是 <body> 元素的最后一个子节点 <div class="hljs-button signin" data-title="登录后复制" data-report-click="{"spm":"1001.2101.3001.4334"}"></div></code><div class="hide-preCode-box"><span class="hide-preCode-bt" data-report-view="{"spm":"1001.2101.3001.7365"}"><img class="look-more-preCode contentImg-no-view" src="https://1000bd.com/contentImg/2022/06/27/191644837.png" alt="" title=""></span></div><ul class="pre-numbering" style=""><li style="color: rgb(153, 153, 153);">1</li><li style="color: rgb(153, 153, 153);">2</li><li style="color: rgb(153, 153, 153);">3</li><li style="color: rgb(153, 153, 153);">4</li><li style="color: rgb(153, 153, 153);">5</li><li style="color: rgb(153, 153, 153);">6</li><li style="color: rgb(153, 153, 153);">7</li><li style="color: rgb(153, 153, 153);">8</li><li style="color: rgb(153, 153, 153);">9</li><li style="color: rgb(153, 153, 153);">10</li><li style="color: rgb(153, 153, 153);">11</li><li style="color: rgb(153, 153, 153);">12</li><li style="color: rgb(153, 153, 153);">13</li><li style="color: rgb(153, 153, 153);">14</li><li style="color: rgb(153, 153, 153);">15</li><li style="color: rgb(153, 153, 153);">16</li><li style="color: rgb(153, 153, 153);">17</li><li style="color: rgb(153, 153, 153);">18</li><li style="color: rgb(153, 153, 153);">19</li><li style="color: rgb(153, 153, 153);">20</li><li style="color: rgb(153, 153, 153);">21</li><li style="color: rgb(153, 153, 153);">22</li><li style="color: rgb(153, 153, 153);">23</li><li style="color: rgb(153, 153, 153);">24</li><li style="color: rgb(153, 153, 153);">25</li><li style="color: rgb(153, 153, 153);">26</li><li style="color: rgb(153, 153, 153);">27</li></ul></pre> <pre data-index="7" class="prettyprint"><code class="has-numbering" onclick="mdcp.signin(event)" style="position: unset;">//父亲元素 var div1 = document.getElementById("d1"); var chds = div1.childNodes; chds[1].style.color="red"; chds[1].nextElementSibling.style.backgroundColor="blue"; chds[1].parentNode.style.backgroundColor="green"; <div class="hljs-button signin" data-title="登录后复制" data-report-click="{"spm":"1001.2101.3001.4334"}"></div></code><ul class="pre-numbering" style=""><li style="color: rgb(153, 153, 153);">1</li><li style="color: rgb(153, 153, 153);">2</li><li style="color: rgb(153, 153, 153);">3</li><li style="color: rgb(153, 153, 153);">4</li><li style="color: rgb(153, 153, 153);">5</li><li style="color: rgb(153, 153, 153);">6</li><li style="color: rgb(153, 153, 153);">7</li><li style="color: rgb(153, 153, 153);">8</li></ul></pre> <p><strong>创建节点:createElement</strong></p> <p><strong>添加节点:appendChild</strong></p> <pre data-index="8" class="prettyprint"><code class="has-numbering" onclick="mdcp.signin(event)" style="position: unset;">添加节点 //元素节点 var btn = document.createElement("BUTTON"); //文本节点 var text = document.createTextNode("newBtn"); //属性节点 var attr = document.createAttribute("name"); attr.value="btn1"; //添加文本节点 btn.appendChild(text); //添加属性节点 btn.setAttributeNode(attr); //添加元素(添加到节点末尾) document.getElementById("d1").nextElementSibling.appendChild(btn); <div class="hljs-button signin" data-title="登录后复制" data-report-click="{"spm":"1001.2101.3001.4334"}"></div></code><ul class="pre-numbering" style=""><li style="color: rgb(153, 153, 153);">1</li><li style="color: rgb(153, 153, 153);">2</li><li style="color: rgb(153, 153, 153);">3</li><li style="color: rgb(153, 153, 153);">4</li><li style="color: rgb(153, 153, 153);">5</li><li style="color: rgb(153, 153, 153);">6</li><li style="color: rgb(153, 153, 153);">7</li><li style="color: rgb(153, 153, 153);">8</li><li style="color: rgb(153, 153, 153);">9</li><li style="color: rgb(153, 153, 153);">10</li><li style="color: rgb(153, 153, 153);">11</li><li style="color: rgb(153, 153, 153);">12</li><li style="color: rgb(153, 153, 153);">13</li><li style="color: rgb(153, 153, 153);">14</li><li style="color: rgb(153, 153, 153);">15</li></ul></pre> <pre data-index="9" class="set-code-hide prettyprint"><code class="has-numbering" onclick="mdcp.signin(event)" style="position: unset;"><!DOCTYPE html> <html> <head> <meta charset="utf-8"> <title> - 1
- 2
- 3
- 4
- 5
- 6
- 7
- 8
- 9
- 10
- 11
- 12
- 13
- 14
- 15
- 16
- 17
- 18
- 19
- 20
- 21
- 22
- 23
- 24
- 25
- 26
- 27
- 28
- 29
- 30
- 31
- 32
//插入节点 var btn = document.createElement("BUTTON"); var text = document.createTextNode("Button3"); var attr = document.createAttribute("name"); attr.value="btn3"; btn.appendChild(text); btn.setAttributeNode(attr); var div1 = document.getElementById("d1"); var p1 = document.getElementById("p1"); div1.insertBefore(btn,p1);- 1
- 2
- 3
- 4
- 5
- 6
- 7
- 8
- 9
- 10
- 11
//删除节点 var div1 = document.getElementById("d1"); var p1 = document.getElementById("p1"); div1.removeChild(p1);- 1
- 2
- 3
- 4
//替换节点 var a = document.createElement("a"); var text = document.createTextNode("替换后的a标签"); var attr = document.createAttribute("style"); attr.value="background-color:yellow"; a.appendChild(text); a.setAttributeNode(attr); var div1 = document.getElementById("d1"); var p1 = document.getElementById("p1"); div1.replaceChild(a,p1);- 1
- 2
- 3
- 4
- 5
- 6
- 7
- 8
- 9
- 10
- 11
- 12
4、常见的dom操作:
设置class属性
.className = “style2”;
设置css样式:
.style.color=“red”;
.style.cssText = "background-color:black; display:block;color:White;
.style[‘border’]=“10px solid #fcfe3f”;
修改外连css表
![[外链图片转存失败,源站可能有防盗链机制,建议将图片保存下来直接上传(img-rAPLSqiO-1660490503131)(C:\Users\66496\AppData\Roaming\Typora\typora-user-images\image-20210827072445433.png)]](https://1000bd.com/contentImg/2022/08/17/151558523.png)
获取属性:
getAttribute(“style”);
设置属性:
.setAttribute(“class”, “style2”);
删除属性:
.removeAttribute(“class”);
innerHTML,innerText,outerHTML,outerText
5、dom事件:
1、onmouseover 和 onmouseout 事件
Mouse Over Me- 1
- 2
- 3
- 4
- 5
- 6
- 7
- 8
- 9
- 10
- 11
- 12
- 13
- 14
- 15
- 16
- 17
2、onmousedown、onmouseup 以及 onclick 事件
onmousedown、onmouseup 以及 onclick 事件是鼠标点击的全部过程。首先当某个鼠标按钮被点击时,触发 onmousedown 事件,然后,当鼠标按钮被松开时,会触发 onmouseup 事件,最后,当鼠标点击完成时,触发 onclick 事件。
Click Me- 1
- 2
- 3
- 4
- 5
- 6
- 7
- 8
- 9
- 10
- 11
- 12
- 13
- 14
- 15
- 16
- 17
- 18
- 19
- 20
- 21
- 22
- 23
首页轮播图:
https://www.cnblogs.com/tyblwmbs/p/10909792.html
https://blog.csdn.net/krysliang/article/details/84632780
-
相关阅读:
关键词搜索抖音商品列表API接口-(item_search-根据关键词取商品列表API接口)
关于数组太大导致stack over flow
linux精通 4.1
【Java 基础篇】Java LinkedHashSet 详解:有序唯一元素存储的完美选择
记录我使用poi库,中文却无法显示的问题
android源码宇宙-Retrofit
彻底弄懂C/C++指针数组与数组指针
达梦数据库常用SQL之生成启用自增列表插入功能及insert插入语句
c++练习(10):链表练习
bp神经网络图像特征提取,神经网络提取特征值
- 原文地址:https://blog.csdn.net/qq_37917691/article/details/126338234
