-
【SSM框架】Mybatis详解07(源码自取)之动态代理的实现
- 🧛♂️个人主页:杯咖啡
- 💡进步是今天的活动,明天的保证!
- ✨目前正在学习:SSM框架,算法刷题
- 👉本文收录专栏:SSM框架解析
- 🙌牛客网,刷算法过面试的神级网站,用牛客你也牛。 👉免费注册和我一起学习刷题👈
- 🐳希望大家多多支持🥰一起进步呀!
- 😎The man who fears losing has already lost.
怕输的人已经输了。 - 《权力的游戏》
✨前言
上一篇节我们复习了对象分析,注册别名,设置日志输出
本篇节我们将复习在框架中动态代理的实现
和我一起复习下去你可以获得一个比较完美框架demo,并且深刻体会框架。
坚持到最后的源码解析你会收获更多哦,加油坚持!!!
动态代理存在的意义
在三层架构中,业务逻辑层要通过接口访问数据访问层的功能.我们只能访问什么功能就要手动创建什么功能的实现类。
那么动态代理就可以实现自动创建所需要的类对象.动态代理的实现规范
在框架中实现动态代理需要遵循7个规范,框架才会自动接管。
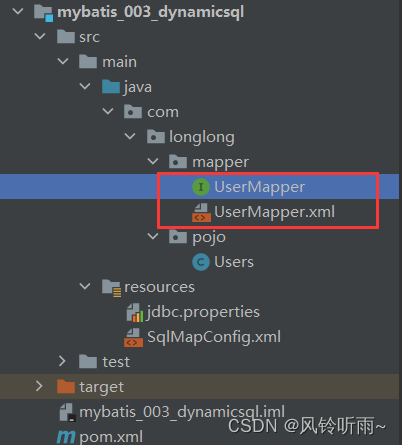
1)UsersMapper.xml文件与UsersMapper.java的接口必须同一个目录下.
2)UsersMapper.xml文件与UsersMapper.java的接口的文件名必须一致,后缀不管.
3)UserMapper.xml文件中标签的id值与与UserMapper.java的接口中方法的名称完全一致.
4)UserMapper.xml文件中标签的parameterType属性值与与UserMapper.java的接口中方法的参数类型完全一致.
5)UserMapper.xml文件中标签的resultType值与与UserMapper.java的接口中方法的返回值类型完全一致.
6)UserMapper.xml文件中namespace属性必须是接口的完全限定名称com.bjpowernode.mapper.UsersMapper
7)在SqlMapConfig.xml文件中注册mapper文件时,使用class=接口的完全限定名称com.bjpowernode.mapper.UsersMapper.动态代理实现的步骤
下面就利用一个例子实现动态代理的具体步骤:
1)建表Users
下面提供sql代码,可以直接导入哦,如果是跟着之前的过程直接导入就好,如果不是需要自己实例化数据库ssm哦
use ssm; -- ---------------------------- -- Table structure for `users` -- ---------------------------- DROP TABLE IF EXISTS `users`; CREATE TABLE `users` ( `id` int(11) NOT NULL AUTO_INCREMENT, `username` varchar(32) COMMENT '用户名称', `birthday` date DEFAULT NULL COMMENT '生日', `sex` char(2) DEFAULT NULL COMMENT '性别', `address` varchar(256) DEFAULT NULL COMMENT '地址', PRIMARY KEY (`id`) ) ENGINE=InnoDB AUTO_INCREMENT=27 DEFAULT CHARSET=utf8; -- ---------------------------- -- Records of user -- ---------------------------- INSERT INTO `users` VALUES (1, '王五', '2000-09-10', '2', '安徽'); INSERT INTO `users` VALUES (2, '张三', '2001-07-12', '1', '北京市'); INSERT INTO `users` VALUES (3, '张小明', '1999-02-22', '1', '河南'); INSERT INTO `users` VALUES (4, '陈小亮', '2002-11-19', '1', '辽宁'); INSERT INTO `users` VALUES (5, '张三丰', '2001-03-10', '1', '上海市'); INSERT INTO `users` VALUES (6, '陈小明', '2002-01-19', '1', '重庆市'); INSERT INTO `users` VALUES (7, '王五四', '2001-05-13', '2', '天津市'); select * from users;- 1
- 2
- 3
- 4
- 5
- 6
- 7
- 8
- 9
- 10
- 11
- 12
- 13
- 14
- 15
- 16
- 17
- 18
- 19
- 20
- 21
- 22
- 23
- 24
- 25
2)新建maven工程,刷新可视化
刷新可视化,显示存在users就表示数据库创建成功
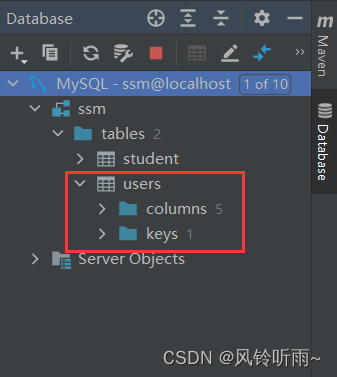
新建maven工程,这里就不在显示创建过程了,如果有需要请查找 mybatis框架详解043)修改目录
这里就不再显示修改目录过程了,如果有需要请查找 mybatis框架详解04
4)修改pom.xml文件,添加依赖
这里并没有添加新的依赖哦,具体解释请查找 mybatis框架详解04
<dependencies> <dependency> <groupId>junitgroupId> <artifactId>junitartifactId> <version>4.11version> <scope>testscope> dependency> <dependency> <groupId>org.mybatisgroupId> <artifactId>mybatisartifactId> <version>3.5.6version> dependency> <dependency> <groupId>mysqlgroupId> <artifactId>mysql-connector-javaartifactId> <version>8.0.15version> dependency> dependencies> <build> <resources> <resource> <directory>src/main/javadirectory> <includes> <include>**/*.xmlinclude> <include>**/*.propertiesinclude> includes> resource> <resource> <directory>src/main/resourcesdirectory> <includes> <include>**/*.xmlinclude> <include>**/*.propertiesinclude> includes> resource> resources> build>- 1
- 2
- 3
- 4
- 5
- 6
- 7
- 8
- 9
- 10
- 11
- 12
- 13
- 14
- 15
- 16
- 17
- 18
- 19
- 20
- 21
- 22
- 23
- 24
- 25
- 26
- 27
- 28
- 29
- 30
- 31
- 32
- 33
- 34
- 35
- 36
- 37
- 38
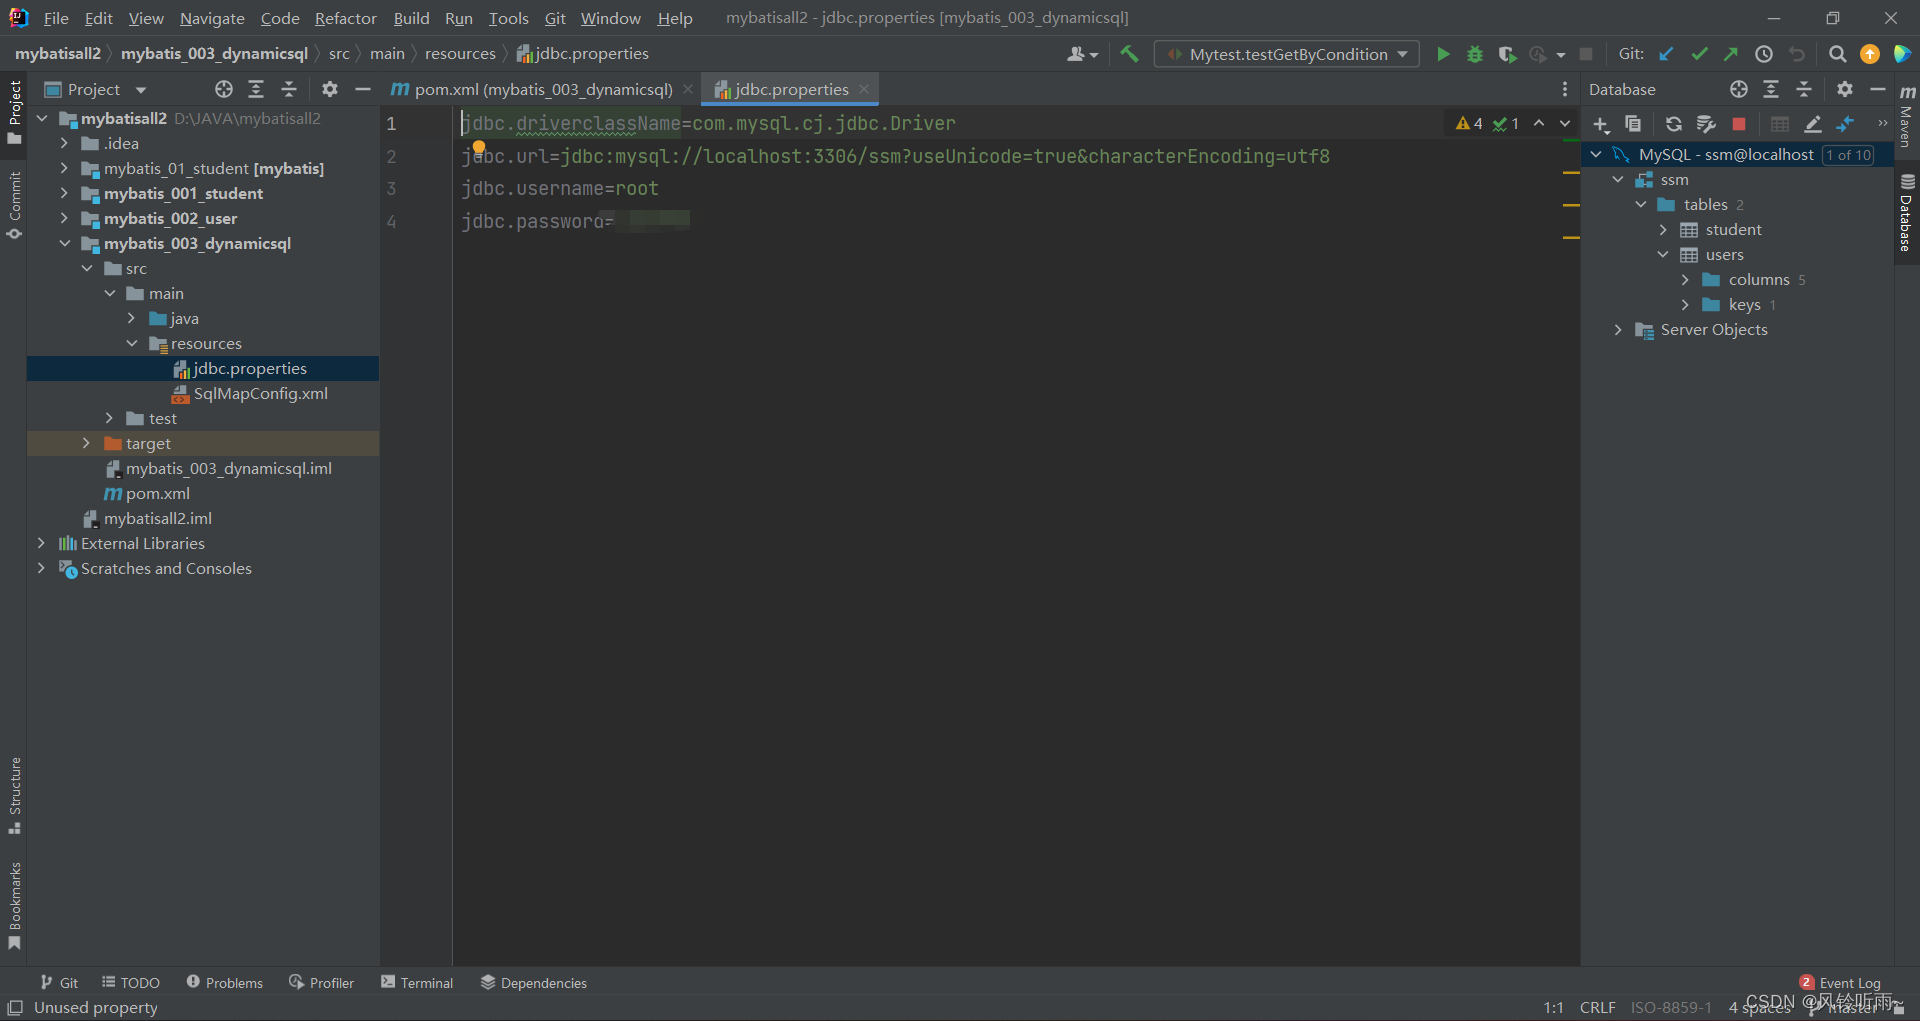
5)添加jdbc.propertis文件到resources目录下
jdbc.driverclassName=com.mysql.cj.jdbc.Driver jdbc.url=jdbc:mysql://localhost:3306/ssm?useUnicode=true&characterEncoding=utf8 jdbc.username=root jdbc.password=********- 1
- 2
- 3
- 4
6)添加SqlMapConfig.xml文件
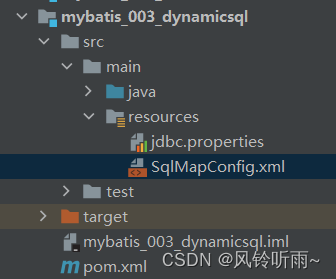
DOCTYPE configuration PUBLIC "-//mybatis.org//DTD Config 3.0//EN" "http://mybatis.org/dtd/mybatis-3-config.dtd"> <configuration> <properties resource="jdbc.properties">properties> <settings> <setting name="logImpl" value="STDOUT_LOGGING"/> settings> <typeAliases> <package name="com.longlong.pojo"/> typeAliases> <environments default="development"> <environment id="development"> <transactionManager type="JDBC">transactionManager> <dataSource type="POOLED"> <property name="driver" value="${jdbc.driverclassName}"/> <property name="url" value="${jdbc.url}"/> <property name="username" value="${jdbc.username}"/> <property name="password" value="${jdbc.password}"/> dataSource> environment> environments> <mappers> <package name="com.longlong.mapper"/> mappers> configuration>- 1
- 2
- 3
- 4
- 5
- 6
- 7
- 8
- 9
- 10
- 11
- 12
- 13
- 14
- 15
- 16
- 17
- 18
- 19
- 20
- 21
- 22
- 23
- 24
- 25
- 26
- 27
- 28
- 29
- 30
- 31
- 32
- 33
- 34
- 35
- 36
- 37
- 38
- 39
- 40
- 41
- 42
- 43
- 44
- 45
- 46
- 47
- 48
- 49
- 50
- 51
- 52
- 53
- 54
- 55
- 56
- 57
- 58
- 59
- 60
- 61
- 62
- 63
- 64
- 65
- 66
- 67
- 68
- 69
- 70
- 71
- 72
- 73
- 74
- 75
- 76
- 77
- 78
- 79
需要注意的是:在注册mapper的时候一定要选择类注册,或者包批量注册,否则无法检测到哦,包批量注册默认名称为首字母小写的驼峰命名法的类名
7)添加实体类
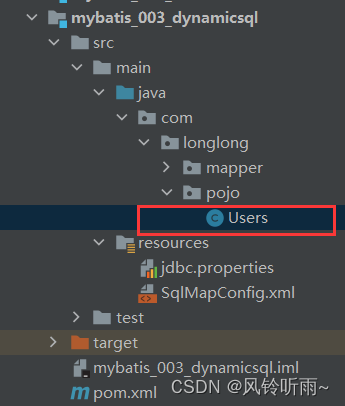
实体类,最好按照数据库的类名写哦,可以自动识别并且装配。当然不一样也是可以的,后续介绍哦package com.longlong.pojo; import java.util.Date; /** * @Author DELL longlong * @Date 2022/7/3 15:59 * @Version 1.0 * @Function users实体类 */ public class Users { private Integer id; private String userName; private Date birthday; private String sex; private String address; public Users(Integer id, String userName, Date birthday, String sex, String address) { this.id = id; this.userName = userName; this.birthday = birthday; this.sex = sex; this.address = address; } public Users(String userName, Date birthday, String sex, String address) { this.userName = userName; this.birthday = birthday; this.sex = sex; this.address = address; } public Users() { } @Override public String toString() { return "User{" + "id=" + id + ", userName='" + userName + '\'' + ", birthday=" + birthday + ", sex='" + sex + '\'' + ", address='" + address + '\'' + '}'; } public Integer getId() { return id; } public void setId(Integer id) { this.id = id; } public String getUserName() { return userName; } public void setUserName(String userName) { this.userName = userName; } public Date getBirthday() { return birthday; } public void setBirthday(Date birthday) { this.birthday = birthday; } public String getSex() { return sex; } public void setSex(String sex) { this.sex = sex; } public String getAddress() { return address; } public void setAddress(String address) { this.address = address; } }- 1
- 2
- 3
- 4
- 5
- 6
- 7
- 8
- 9
- 10
- 11
- 12
- 13
- 14
- 15
- 16
- 17
- 18
- 19
- 20
- 21
- 22
- 23
- 24
- 25
- 26
- 27
- 28
- 29
- 30
- 31
- 32
- 33
- 34
- 35
- 36
- 37
- 38
- 39
- 40
- 41
- 42
- 43
- 44
- 45
- 46
- 47
- 48
- 49
- 50
- 51
- 52
- 53
- 54
- 55
- 56
- 57
- 58
- 59
- 60
- 61
- 62
- 63
- 64
- 65
- 66
- 67
- 68
- 69
- 70
- 71
- 72
- 73
- 74
- 75
- 76
- 77
- 78
- 79
- 80
- 81
- 82
- 83
- 84
- 85
- 86
- 87
8)添加mapper文件夹,新建UserMapper接口
重点来了,Usermapper文件和UserMapper接口一定要放在同级目录下,大家看到名字和文件位置都非常的像,就是为了方便框架可以把他们两个更好的对应起来。
package com.longlong.mapper; import com.longlong.pojo.Users; import org.apache.ibatis.annotations.Param; import java.util.List; /** * @Author DELL longlong * @Date 2022-08-05 16:26 * @Version 1.0 * @Function 数据访问层的接口,规定的数据库中可进行的各种操作 */ public interface UserMapper { //查询全部用户信息 List<Users> getAll(); }- 1
- 2
- 3
- 4
- 5
- 6
- 7
- 8
- 9
- 10
- 11
- 12
- 13
- 14
- 15
- 16
- 17
- 18
9)在mapper文件夹下,新建UsersMapper.xml文件,完成增删改查功能
这里只给了简单的功能,其余功能下节更加详细哦
<?xml version="1.0" encoding="utf-8" ?> <!DOCTYPE mapper PUBLIC "-//mybatis.org//DTD Mapper 3.0//EN" "http://mybatis.org/dtd/mybatis-3-mapper.dtd"> <mapper namespace="com.longlong.mapper.UserMapper"> <!-- //查询全部用户信息--> <!-- List<Users> getAll();--> <select id="getAll" resultType="users"> select <include refid="allColumns"></include> from users </select>- 1
- 2
- 3
- 4
- 5
- 6
- 7
- 8
- 9
- 10
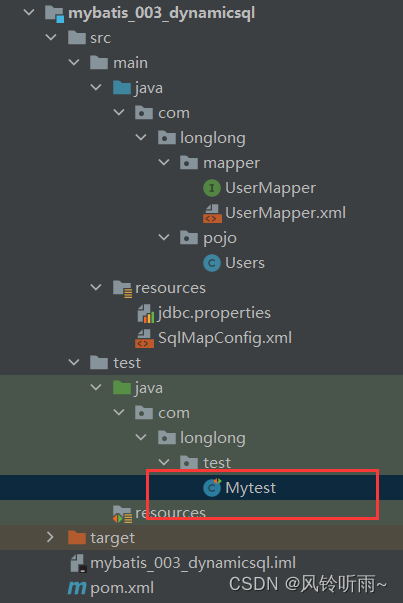
10)添加测试类,测试功能
package com.longlong.test; import com.longlong.mapper.UserMapper; import com.longlong.pojo.Users; import org.apache.ibatis.io.Resources; import org.apache.ibatis.session.SqlSession; import org.apache.ibatis.session.SqlSessionFactory; import org.apache.ibatis.session.SqlSessionFactoryBuilder; import org.junit.After; import org.junit.Before; import org.junit.Test; import java.io.IOException; import java.io.InputStream; import java.text.ParseException; import java.text.SimpleDateFormat; import java.util.List; import java.util.UUID; /** * @Author DELL longlong * @Date 2022/7/3 19:32 * @Version 1.0 * @Function 测试类 */ public class Mytest { SqlSession sqlSession; //动态代理的对象 UserMapper userMapper; //日期格式化刷子 SimpleDateFormat sf = new SimpleDateFormat("yyyy-MM-dd"); @Before public void openSqlSession() throws IOException { //1.读取核心配置文件按 InputStream in = Resources.getResourceAsStream("SqlMapConfig.xml"); //2.创建工厂对象 SqlSessionFactory factory = new SqlSessionFactoryBuilder().build(in); //3.取出sqlsession sqlSession = factory.openSession(); //取出动态代理的对象,完成接口中方法的调用,实则是调用xml文件中相应的标签功能 userMapper = sqlSession.getMapper(UserMapper.class); } @After public void closeSqlSession(){ sqlSession.close(); } @Test public void testGetAll(){ System.out.println(userMapper); List<Users> list = userMapper.getAll(); list.forEach(users -> System.out.println(users)); }- 1
- 2
- 3
- 4
- 5
- 6
- 7
- 8
- 9
- 10
- 11
- 12
- 13
- 14
- 15
- 16
- 17
- 18
- 19
- 20
- 21
- 22
- 23
- 24
- 25
- 26
- 27
- 28
- 29
- 30
- 31
- 32
- 33
- 34
- 35
- 36
- 37
- 38
- 39
- 40
- 41
- 42
- 43
- 44
- 45
- 46
- 47
- 48
- 49
- 50
- 51
- 52
- 53
- 54
- 55
- 56
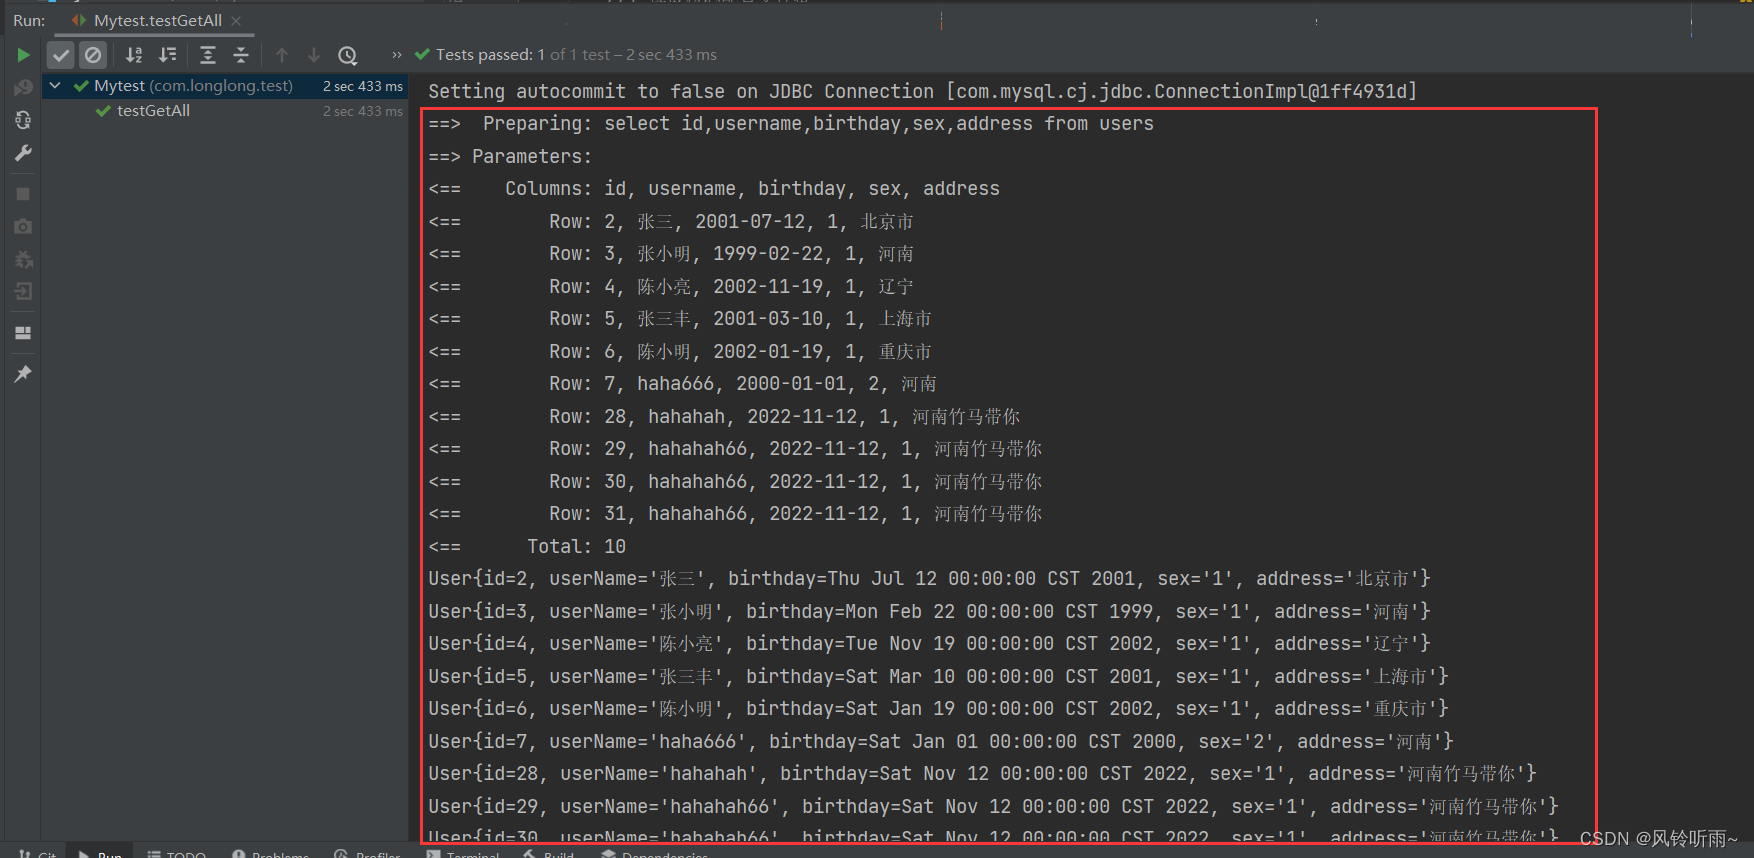
结果演示
✨总结
今天我们加入了动态代理,由于篇幅问题过的代码没有放入到文章里面,有需要请到仓库自取。小编会及时更新仓库。
本次源码放在代码仓库gitee,自取链接原创不易,还希望各位大佬支持一下 \textcolor{blue}{原创不易,还希望各位大佬支持一下} 原创不易,还希望各位大佬支持一下
点赞,你的认可是我创作的动力! \textcolor{green}{点赞,你的认可是我创作的动力!} 点赞,你的认可是我创作的动力!
收藏,你的青睐是我努力的方向! \textcolor{green}{收藏,你的青睐是我努力的方向!} 收藏,你的青睐是我努力的方向!
评论,你的意见是我进步的财富! \textcolor{green}{评论,你的意见是我进步的财富!} 评论,你的意见是我进步的财富! -
相关阅读:
Java 网络编程 —— Socket 详解
新的node节点加入集群
在线客服系统源码 聊天记录实时保存 附带完整的搭建教程
Java项目:SSM在线工艺品销售商城平台网站
安防监控/视频汇聚/云存储/AI智能视频分析平台EasyCVR显示CPU过载,该如何解决?
数仓工具—Hive集成篇之UDF写ES(04)
EasyOCR 常用方法参数说明
[附源码]java毕业设计逸尘房屋销售管理系统
4. client-go 编程式交互
CSS---div盒子模型、相对绝对位置、float浮动、清除浮动
- 原文地址:https://blog.csdn.net/muzi_longren/article/details/126260061
