-
直播课堂系统09--腾讯云点播管理模块(一)
说是点播模块,其实就是继续写后端的curd…点播管理模块
需求
添加点播课程,包含课程基本信息,课程章节,课程小结和最终发布

数据库相关表

环境搭建
以下全都是代码生成器生成,这些我自己写,截图记录一下格式。

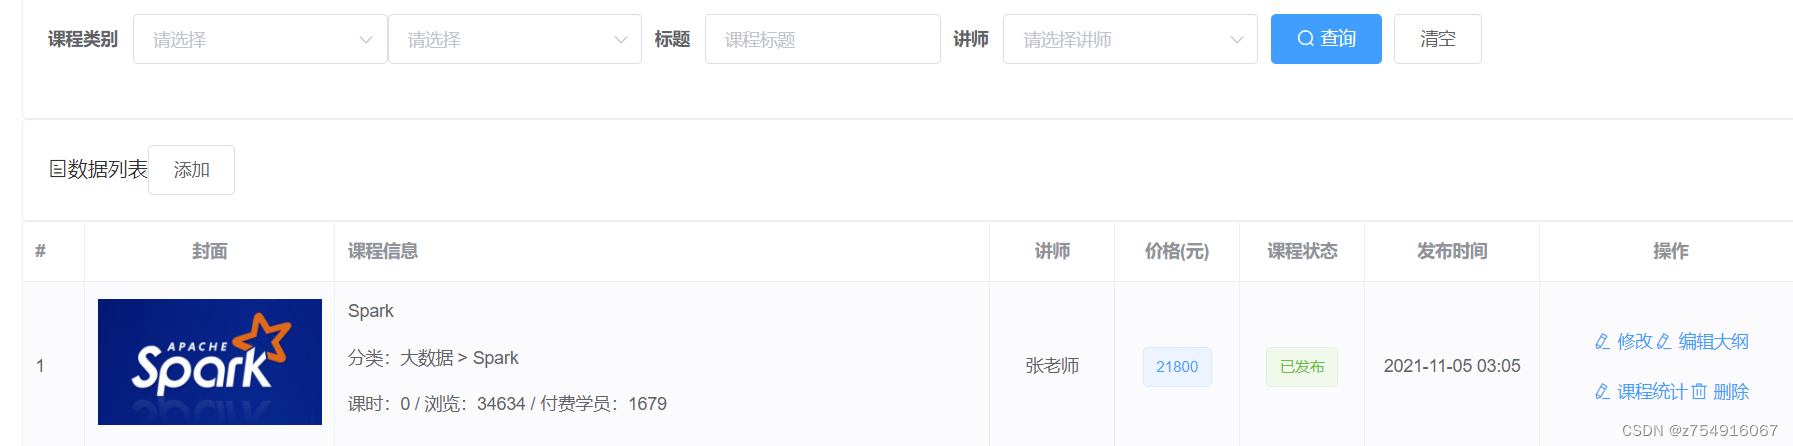
功能实现-课程列表
首先实现分页条件查询点播课程的功能,大体如下

创建mapper
继续创建mapper和一个空的xml
@Mapper public interface CourseMapper extends BaseMapper<Course> { }- 1
- 2
- 3
编写service
首先创建一个CourseService接口,在service接口里面声明分页查询方法
public interface TeacherService extends IService<Teacher> { //分页获取课程列表 CourseQueryVo是因为只取需要的 Map<String,Object> findPage(Page<Course> pageParam, CourseQueryVo courseQueryVo) }- 1
- 2
- 3
- 4
然后编写impl,记住impl首先extends在implements
@Service public class CourseServiceImpl extends ServiceImpl<CourseMapper, Course> implements CourseService { @Autowired private CourseService courseService; @Autowired private TeacherService teacherService; @Autowired private SubjectService subjectService; @Override public Map<String, Object> findPage(Page<Course> pageParam, CourseQueryVo courseQueryVo) { //获取Vo里面的各种属性 String title = courseQueryVo.getTitle();//名称 Long subjectId = courseQueryVo.getSubjectId();//二级分类 Long subjectParentId = courseQueryVo.getSubjectParentId();//一级分类 Long teacherId = courseQueryVo.getTeacherId();//讲师 //封装条件 QueryWrapper<Course> wrapper = new QueryWrapper<>(); //判断字符串是否为空 if(!StringUtils.isEmpty(title)) { wrapper.like("title",title); } if(!StringUtils.isEmpty(subjectId)) { wrapper.eq("subject_id",subjectId); } if(!StringUtils.isEmpty(subjectParentId)) { wrapper.eq("subject_parent_id",subjectParentId); } if(!StringUtils.isEmpty(teacherId)) { wrapper.eq("teacher_id",teacherId); } //调用方法查询 Page<Course> pages = baseMapper.selectPage(pageParam, wrapper); long totalCount = pages.getTotal();//总记录数 long totalPage = pages.getPages();//总页数 long currentPage = pages.getCurrent();//当前页 long size = pages.getSize();//每页记录数 //每页数据集合 List<Course> records = pages.getRecords(); //将集合进行封装 records.stream().forEach(item ->{ //根据集合里的存储获取其讲师和分类的名称 this.getTeacherOrSubjectName(item); }); //封装返回数据 HashMap<String, Object> map = new HashMap<>(); map.put("totalCount",totalCount); map.put("totalPage",totalPage); map.put("records",records); return map; } //获取讲师和分类名称 private Course getTeacherOrSubjectName(Course course){ //因为查询出来的是course 所以肯定也要传入course //从其他的数据库里查询讲师和分类的具体名称 Teacher teacher = teacherService.getById(course.getTeacherId()); if(teacher!=null){ //course继承的是BaseEntity 有一个其他参数为Map- 1
- 2
- 3
- 4
- 5
- 6
- 7
- 8
- 9
- 10
- 11
- 12
- 13
- 14
- 15
- 16
- 17
- 18
- 19
- 20
- 21
- 22
- 23
- 24
- 25
- 26
- 27
- 28
- 29
- 30
- 31
- 32
- 33
- 34
- 35
- 36
- 37
- 38
- 39
- 40
- 41
- 42
- 43
- 44
- 45
- 46
- 47
- 48
- 49
- 50
- 51
- 52
- 53
- 54
- 55
- 56
- 57
- 58
- 59
- 60
- 61
- 62
- 63
- 64
- 65
- 66
- 67
- 68
- 69
- 70
- 71
- 72
- 73
- 74
- 75
编写controller
创建CourseController.java,注意刚加载时这里传入的Vo里面全都是null,所以传到service里面后,会变成查询所有。
Course本身已经与对应的数据库表绑定,所以由它构建QueryWrapper可以直接在对应表中进行查询。无论数据库表里有多少列,都会按定义的model的列返回,其余的列不会被返回。@Api(tags = "课程管理接口") @RestController @CrossOrigin @RequestMapping(value = "/admin/vod/course") public class CourseController { @Autowired private CourseService courseService; @ApiOperation(value = "获取分页列表") @GetMapping("{page}/{limit}") public Result index( @ApiParam(name = "page", value = "当前页码", required = true) @PathVariable Long page, @ApiParam(name = "limit", value = "每页记录数", required = true) @PathVariable Long limit, @ApiParam(name = "courseVo", value = "查询对象", required = false) CourseQueryVo courseQueryVo){ //根据传入的page和limit构建page对象 Page<Course> coursePage = new Page<>(page, limit); //将其传入方法中进行填充 并返回 Map<String, Object> map = courseService.findPage(coursePage, courseQueryVo); return Result.ok(map); } }- 1
- 2
- 3
- 4
- 5
- 6
- 7
- 8
- 9
- 10
- 11
- 12
- 13
- 14
- 15
- 16
- 17
- 18
- 19
- 20
- 21
- 22
- 23
- 24
课程列表前端
首先在router下的index.js添加前端路径,再在api里添加调用后端接口的方法,再在views里面写组件且调用api里的方法。
index.js
在router下的index.js下添加路由
//课程管理 { path: '/vod', component: Layout, redirect: '/vod/course/list', name: 'Vod', meta: { title: '点播管理', icon: 'el-icon-bank-card' }, alwaysShow: true, children: [ { path: 'course/list', name: 'CourseList', component: () => import('@/views/vod/course/list'), meta: { title: '课程列表' } }, ] },- 1
- 2
- 3
- 4
- 5
- 6
- 7
- 8
- 9
- 10
- 11
- 12
- 13
- 14
- 15
- 16
- 17
- 18
- 19
- 20
api
在api目录创建路由文件course.js
import request from '@/utils/request' const api_name = 'admin/vod/course' export default{ //课程列表 getPageList(page,limit,searchObj){ return request({ //写的是后端路径 url:`${api_name}/${page}/${limit}`, method: 'get', params: searchObj }) }, }- 1
- 2
- 3
- 4
- 5
- 6
- 7
- 8
- 9
- 10
- 11
- 12
- 13
- 14
在teacher.js里面定义一个获取所有讲师,以list形式返回的接口,之前在controller里面写过,不要和分页查询搞混。
//获取所有讲师 不分页 list(){ return request({ url:`${api_name}/findAll`, method:`get` }) },- 1
- 2
- 3
- 4
- 5
- 6
- 7
vue的list编写
再编写index.js里的/views/vod/course/list页面,代码也太多了,整整两百多行,复制粘贴后读一下吧…
实在摆不上来了,就这样吧。效果
功能实现-发布课程-填写课程基本信息
发布课程一共有三个流程:填写课程基本信息,创建课程大纲-发布课程,这里实现第一个功能:填写课程基本信息。
每个课程都有自己的描述,并且也会经常更新,故创建一个数据库表course_description
创建mapper
创建mapper并且将其与CourseDescription模型绑定,以后使用这个mapper进行的搜索都会在其model映射的table里。
public interface CourseDescriptionMapper extends BaseMapper<CourseDescription> { }- 1
- 2
不要忘记建对应的xml,虽然是空的。
DOCTYPE mapper PUBLIC "-//mybatis.org//DTD Mapper 3.0//EN" "http://mybatis.org/dtd/mybatis-3-mapper.dtd"> <mapper namespace="com.atguigu.ggkt.vod.mapper.CourseDescriptionMapper"> mapper>- 1
- 2
- 3
- 4
- 5
- 6
创建service
创建service接口,然后创建其实现impl,记住实例化对应的mapper进行查询操作。
写到这里时悟了,之前的model分为model和vo,其中model对应的是数据库表,vo对应的是前端传来的数据,将其用一个model接收。public interface CourseDescriptionService extends IService<CourseDescription> { //返回新建课程的基本ID public Long saveCourseInfo(CourseFormVo vo); }- 1
- 2
- 3
- 4
实现impl
@Service public class CourseDescriptionImpl extends ServiceImpl<CourseDescriptionMapper, CourseDescription> implements CourseDescriptionService { //声明mapper @Autowired private CourseDescriptionMapper courseDescriptionMapper; //声明别家mapper 因为需要插入它的数据库 @Autowired private CourseMapper courseMapper; //将获得的vo信息传入数据库中并存储 需要插入的表用:course表 courseDescription表 @Override public Long saveCourseInfo(CourseFormVo vo) { Course course = new Course(); //把传入的vo复制给course BeanUtils.copyProperties(vo,course); //插入course数据库 courseMapper.insert(course); //插入coursedescription CourseDescription courseDescription = new CourseDescription(); //研究了一下为什么直接转 然后发现命名不太一样...上面的course是一样的 courseDescription.setDescription(vo.getDescription()); courseDescription.setCourseId(course.getId()); //插入数据库 //descriptionService.save(courseDescription); 笔记里用的是这句 我感觉用mapper好一点吧。 courseDescriptionMapper.insert(courseDescription); //返回课程id return course.getId(); } }- 1
- 2
- 3
- 4
- 5
- 6
- 7
- 8
- 9
- 10
- 11
- 12
- 13
- 14
- 15
- 16
- 17
- 18
- 19
- 20
- 21
- 22
- 23
- 24
- 25
- 26
- 27
- 28
- 29
- 30
controller
这部分代码很坑,它service和mapper都是分开建的,但是课程添加,竟然是写在CourseController里,研究了下是因为在CourseService里面要做到对Description表的修改,按编码规范来说,需要注入其service,所以要将Description的类创建到Service层次,故对前面进行大改。
现在更改CourseController.java
@ApiOperation(value = "新增") @PostMapping("save") public Result save(@RequestBody CourseFormVo vo){ Long id = courseService.saveCourseInfo(vo); return Result.ok(id); }- 1
- 2
- 3
- 4
- 5
- 6
前端
在index.js里面修改路由
{ path: 'course/info', name: 'CourseInfo', component: () => import('@/views/vod/course/form'), meta: { title: '发布课程' }, hidden: true },- 1
- 2
- 3
- 4
- 5
- 6
- 7
同时,在课程列表的界面也有添加键触发跳转,所以那里也要加上。

add() { //跳转到的应该是路由 不是界面 this.$router.push({ path: 'course/info' }) },- 1
- 2
- 3
- 4
跳转的应该是index.js里面定义的路由
在api的course.js里定义接口,注意这里不能按笔记一样写在params里,这样后端接收不到,因为后端接收的是RequestBody,必须把它放在data里!saveCourseInfo(courseInfo){ return request({ //写的是后端路径 url:`${api_name}/save`, method: `post`, // params: courseInfo data: courseInfo }) },- 1
- 2
- 3
- 4
- 5
- 6
- 7
- 8
- 9
创建index.js里面指向的course/form.vue

注意这里要获取路由名字,所以要在前面的index.js里面添加,在created()时能跳转到对应界面。{ path: 'course/info', name: 'CourseInfo', component: () => import('@/views/vod/course/form'), meta: { title: '发布课程' }, hidden: true }, { path: 'course/info/:id', name: 'CourseInfoEdit', component: () => import('@/views/vod/course/form'), meta: { title: '编辑课程' }, hidden: true }, { path: 'course/chapter/:id', name: 'CourseChapterEdit', component: () => import('@/views/vod/course/form'), meta: { title: '编辑大纲' }, hidden: true },- 1
- 2
- 3
- 4
- 5
- 6
- 7
- 8
- 9
- 10
- 11
- 12
- 13
- 14
- 15
- 16
- 17
- 18
- 19
- 20
- 21
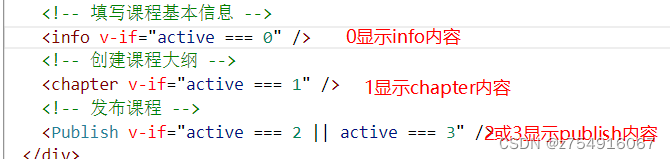
<template> <div class="app-container"> <h2 style="text-align: center;">发布新课程</h2> <el-steps :active="active" finish-status="success" simple style="margin-bottom: 40px"> <el-step title="填写课程基本信息" /> <el-step title="创建课程大纲" /> <el-step title="发布课程" /> </el-steps> <!-- 填写课程基本信息 --> <info v-if="active === 0" /> <!-- 创建课程大纲 --> <chapter v-if="active === 1" /> <!-- 发布课程 --> <Publish v-if="active === 2 || active === 3" /> </div> </template> <script> // 引入子组件 import Info from '@/views/vod/course/components/Info' import Chapter from '@/views/vod/course/components/Chapter' import Publish from '@/views/vod/course/components/Publish' export default { components: { Info, Chapter, Publish }, // 注册子组件 data() { return { active: 0, courseId: null } }, created() { // 获取路由id if (this.$route.params.id) { this.courseId = this.$route.params.id } if (this.$route.name === 'CourseInfoEdit') { this.active = 0 } if (this.$route.name === 'CourseChapterEdit') { this.active = 1 } } } </script>- 1
- 2
- 3
- 4
- 5
- 6
- 7
- 8
- 9
- 10
- 11
- 12
- 13
- 14
- 15
- 16
- 17
- 18
- 19
- 20
- 21
- 22
- 23
- 24
- 25
- 26
- 27
- 28
- 29
- 30
- 31
- 32
- 33
- 34
- 35
- 36
- 37
- 38
- 39
- 40
- 41
- 42
- 43
注意一下上面引入了三个组件Info Chapter Publish
其组件关系如下

代码太长直接解读一下。


效果

功能实现:修改课程基本信息
这个功能实现修改回显,即假如已经填写好基本信息并且点击保存,此时又想回退修改的情景。
修改Service
首先在CourseService接口里面添加对应的方法。
//根据ID获取课程信息 CourseFormVo getCourseFormVoById(long id); //根据ID修改课程信息 void updateCourseById(CourseFormVo courseFormVo);- 1
- 2
- 3
- 4
impl实现
//根据id获取课程信息 @Override public CourseFormVo getCourseFormVoById(long id) { //首先拿着id去数据库查数据 查到对应的课程 Course course = courseMapper.selectById(id); if(course==null) return null; //从course_description表取数据 //需要注意的是在course_description表里,课程id的存储方式是course_id 而非id 所以不能使用getById方法 //需要建一个wapper 用eq // CourseDescription byId = courseDescriptionService.getById(id); QueryWrapper<CourseDescription> QueryWrapper = new QueryWrapper<>(); QueryWrapper.eq("course_id",id); CourseDescription description = courseDescriptionService.getOne(QueryWrapper); //创建Form对象 因为要返回前端 CourseFormVo courseFormVo = new CourseFormVo(); BeanUtils.copyProperties(course,courseFormVo); if(description!=null){ courseFormVo.setDescription(description.getDescription()); } return courseFormVo; } //根据id修改课程信息 @Override public void updateCourseById(CourseFormVo courseFormVo) { //获取课程 Course course = new Course(); BeanUtils.copyProperties(courseFormVo,course); //需要传入一个实体 根据这个实体的id更新 courseMapper.updateById(course); //修改课程详情信息 同理如上 不能直接getid 修改的有详情和课程id QueryWrapper<CourseDescription> QueryWrapper = new QueryWrapper<>(); QueryWrapper.eq("course_id",courseFormVo.getid()); CourseDescription description = courseDescriptionService.getOne(QueryWrapper); description.setDescription(courseFormVo.getDescription()); description.setId(course.getId()); //更新上去 同理不能用updateById QueryWrapper.eq("course_id",description.getid()); courseDescriptionService.update(QueryWrapper); }- 1
- 2
- 3
- 4
- 5
- 6
- 7
- 8
- 9
- 10
- 11
- 12
- 13
- 14
- 15
- 16
- 17
- 18
- 19
- 20
- 21
- 22
- 23
- 24
- 25
- 26
- 27
- 28
- 29
- 30
- 31
- 32
- 33
- 34
- 35
- 36
- 37
- 38
- 39
- 40
- 41
- 42
- 43
controller实现
@ApiOperation(value = "获取") @GetMapping("get/{id}") public Result get(@PathVariable Long id) { CourseFormVo course = courseService.getCourseFormVoById(id); return Result.ok(course); } @ApiOperation(value = "修改") @PutMapping("update") public Result updateById(@RequestBody CourseFormVo courseFormVo) { courseService.updateCourseById(courseFormVo); return Result.ok(null); }- 1
- 2
- 3
- 4
- 5
- 6
- 7
- 8
- 9
- 10
- 11
- 12
前端实现
在api的course.js里定义连接后端的方法
//id获取课程信息 getCourseInfoById(id) { return request({ url: `${api_name}/get/${id}`, method: 'get' }) }, //修改课程信息 updateCourseInfoById(courseInfo) { return request({ url: `${api_name}/update`, method: 'put', data: courseInfo }) },- 1
- 2
- 3
- 4
- 5
- 6
- 7
- 8
- 9
- 10
- 11
- 12
- 13
- 14
- 15
再修改info.vue界面,里面写具体的更新方法
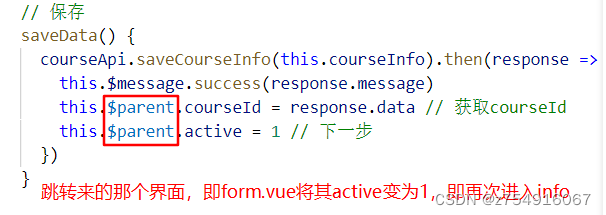
created() { if(this.$parent.courseId){ // 回显 如果带有courseId 说明是从下一个步骤里回来的 只有在上一个步骤里点击保存 才能带有一个保存的courseId 先加载它的信息并修改就完事 this.fetchCourseInfoById(this.$parent.courseId) }else{ //新增 // 初始化分类列表 this.initSubjectList() } // 获取讲师列表 this.initTeacherList() },- 1
- 2
- 3
- 4
- 5
- 6
- 7
- 8
- 9
- 10
- 11
// 获取课程信息 fetchCourseInfoById(id) { courseApi.getCourseInfoById(id).then(response => { this.courseInfo = response.data // 初始化分类列表 subjectApi.getChildList(0).then(response => { this.subjectList = response.data // 填充二级菜单:遍历一级菜单列表, this.subjectList.forEach(subject => { // 找到和courseInfo.subjectParentId一致的父类别记录 if (subject.id === this.courseInfo.subjectParentId) { // 拿到当前类别下的子类别列表,将子类别列表填入二级下拉菜单列表 subjectApi.getChildList(subject.id).then(response => { this.subjectLevelTwoList = response.data }) } }) }) }) }, // 保存并下一步 saveAndNext() { this.saveBtnDisabled = true if (!this.$parent.courseId) { this.saveData() } else { this.updateData() } }, // 修改 updateData() { courseApi.updateCourseInfoById(this.courseInfo).then(response => { this.$message.success(response.message) this.$parent.courseId = response.data // 获取courseId this.$parent.active = 1 // 下一步 }) },- 1
- 2
- 3
- 4
- 5
- 6
- 7
- 8
- 9
- 10
- 11
- 12
- 13
- 14
- 15
- 16
- 17
- 18
- 19
- 20
- 21
- 22
- 23
- 24
- 25
- 26
- 27
- 28
- 29
- 30
- 31
- 32
- 33
- 34
- 35
- 36
- 37
-
相关阅读:
2022-08-08 学习日记(28th day)Stream流
Linux C语言 UDP协议实现的网络聊天室
具有标记和笔记功能的文件管理器TagSpaces
重试机制-spring-retry、guava-retry
子网掩码计算工具:IPSubnetter
虹科分享 | AR眼镜开启工业创新之旅!
振动在线监测系统
申请ISO50430建筑体系认证有哪些注意问题?
学习突围2 - 关于高效学习的方法
【python基础】if语句-语法格式
- 原文地址:https://blog.csdn.net/z754916067/article/details/126231919

- 最新文章
-
沪漂五周年了:我越来越迷茫了
Agentic Skill Routing 实战:别再把所有 Skill 塞进 AI Agent 上下文
MySQL-Seconds_behind_master的精度误差
[MAF预定义ChatClient中间件-03]CachingChatClient——利用缓存省钱省时间
AI的至暗历史:从万众期待到被政府撤资,AI的两次死亡徘徊
Agent OS :五种驯服不确定性的范式
PortSwigger SQL注入LAB11
数据库即时编译JIT
[Begin]AI Learn Data Day 0
深度学习进阶(二十七)现代 LLM 的核心架构设计其二:SwiGLU