-
【selenium4自动化工具的使用以及Junit5单元测试框架】
(点击跳转即可哦)
Web自动化——selenium
了解自动化和selenium4
什么是自动化,为什么要这么做?
答:自动化测试能够代替一部分的手工测试,自动化测试能够提高测试效率。 随着功能的增加,版本越来越多,版本回归的压力也越来越大,所以仅仅通过手工测试 来回归 所有版本 肯定是不现实的,所以我们需要借助自动化来进行回归。
为什么选择selenium作为 我们的web自动化工具?
答:
- 开源免费
- 支持多浏览器,比如Chrome、Firefox、IE、Edge
- 支持多系统,比如Linux、Windows、MacOS
- 支持多语言,比如Java、Python
- selenium包的底层有很多可以使用的API
环境的部署
selenium工具包——Maven中导入
<dependency> <groupId>org.seleniumhq.selenium</groupId> <artifactId>selenium-java</artifactId> <version>4.0.0</version> </dependency>- 1
- 2
- 3
- 4
- 5
Chrome浏览器
Chromedriver谷歌驱动(注意版本号要一致)
Java版本最低要求8
什么是驱动?驱动的工作原理是什么?
人工测试的情况下,可以手动(驱动)打开浏览器
但是对于自动化来说,代码不能直接打开浏览器,需要借助驱动程序来协助打开浏览器。
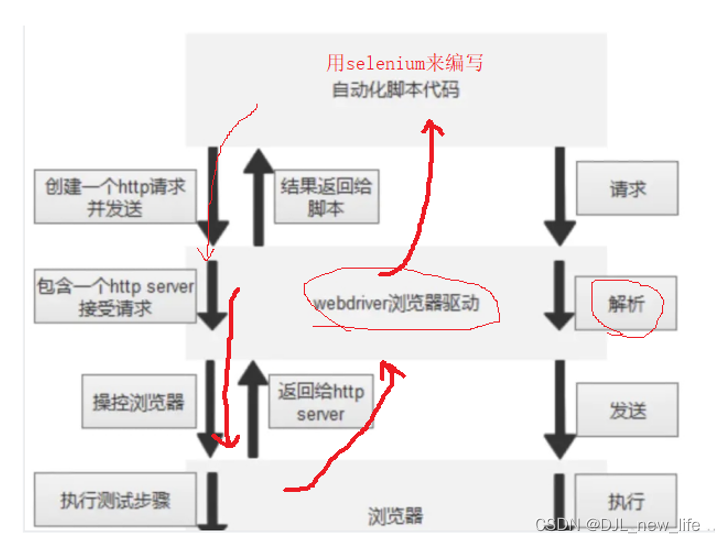
selenium、驱动、浏览器三者的联系?

简单的web自动化演示
package com.autochrom; import org.openqa.selenium.By; import org.openqa.selenium.WebDriver; import org.openqa.selenium.chrome.ChromeDriver; import org.openqa.selenium.support.ui.ExpectedCondition; import org.openqa.selenium.support.ui.ExpectedConditions; import org.openqa.selenium.support.ui.WebDriverWait; import java.time.Duration; public class Auto { public void test() throws InterruptedException { ChromeDriver chromeDriver = new ChromeDriver(); //输入百度网址 chromeDriver.get("https://www.baidu.com"); //找到百度搜索框,并输入关键词 // chromeDriver.findElement(By.xpath("//*[@id=\"kw\"]")).sendKeys("迪丽热巴"); // Thread.sleep(1000); // chromeDriver.findElement(By.cssSelector("#kw")).sendKeys("2222"); // //找到百度一下,并点击 // chromeDriver.findElement(By.cssSelector("#su")).submit(); //获取文本 // String str = chromeDriver.findElement(By.cssSelector("#hotsearch-content-wrapper > li:nth-child(2) > a > span.title-content-title")).getText(); // System.out.println(str); //获取属性 // String str1 = chromeDriver.findElement(By.cssSelector("#su")).getAttribute("value"); // String str2 = chromeDriver.findElement(By.cssSelector("#su")).getAttribute("id"); // System.out.println(str1 + " " + str2); // Thread.sleep(2000); //找到百度搜索框,并输入关键词 chromeDriver.findElement(By.xpath("//*[@id=\"kw\"]")).sendKeys("迪丽热巴"); //找到百度一下,并点击 chromeDriver.findElement(By.cssSelector("#su")).click(); //强制等待 // Thread.sleep(1000); // chromeDriver.findElement(By.cssSelector("#\\31 > div > div.header-left_1BntJ > div.c-color-t.left-title_3lM8p.c-line-clamp1")); //隐式等待 // chromeDriver.manage().timeouts().implicitlyWait(Duration.ofSeconds(2)); // chromeDriver.findElement(By.cssSelector("#\\31 > div > div.header-left_1BntJ > div.c-color-t.left-title_3lM8p.c-line-clamp1")); //显示等待 WebDriverWait foo = new WebDriverWait(chromeDriver,Duration.ofSeconds(1)); //配合显示等待,等待括号里的条件满足为止,如果条件在指定时间内没有满足,就抛出异常 foo.until(ExpectedConditions.presenceOfElementLocated(By.cssSelector("#\\31 > div > div.header-left_1BntJ > div.c-color-t.left-title_3lM8p.c-line-clamp1"))); //释放驱动对象,关闭浏览器 chromeDriver.quit(); } }- 1
- 2
- 3
- 4
- 5
- 6
- 7
- 8
- 9
- 10
- 11
- 12
- 13
- 14
- 15
- 16
- 17
- 18
- 19
- 20
- 21
- 22
- 23
- 24
- 25
- 26
- 27
- 28
- 29
- 30
- 31
- 32
- 33
- 34
- 35
- 36
- 37
- 38
- 39
- 40
- 41
- 42
- 43
- 44
- 45
- 46
- 47
- 48
- 49
- 50
- 51
- 52
- 53
- 54
selenium的基础语法
定位页面的元素
ChromeDriver chromeDriver = new ChromeDriver(); //输入百度网址 chromeDriver.get("https://www.baidu.com"); chromeDriver.findElement()//定位页面- 1
- 2
- 3
- 4
参数:抽象类By里的方法,如cssSelector、xpath、id、name、classname
定位元素的方法
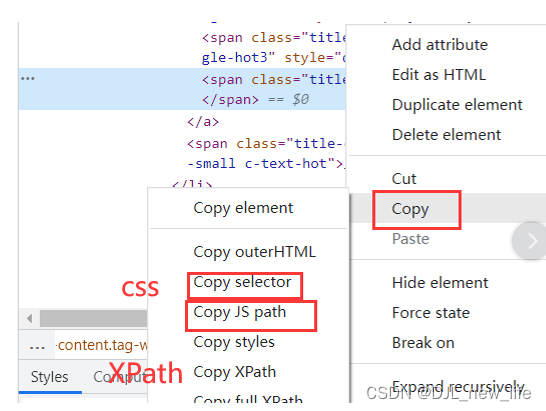
css选择器
String str = chromeDriver.findElement(By.cssSelector("#hotsearch-content-wrapper > li:nth-child(2) > a > span.title-content-title")).getText(); //getTest()返回一个String类型的字符串- 1
- 2
XPath
chromeDriver.findElement(By.xpath("//*[@id=\"kw\"]")).sendKeys("迪丽热巴");- 1

注意: 定位元素必须要唯一
元素的操作
点击:click()
提交:submit()
click() 和 submit() 都可以 操作按钮
click 可以的 submit不一定可以,界面的任何元素都可以click().
不建议使用submit()
//找到百度一下,并点击 chromeDriver.findElement(By.cssSelector("#su")).click();- 1
- 2
模拟按键输入:send_keys()
//找到百度搜索框,并输入关键词 chromeDriver.findElement(By.xpath("//*[@id=\"kw\"]")).sendKeys("迪丽热巴");- 1
- 2
clear(): 清除对象输入的文本内容
//找到百度搜索框,并输入关键词 chromeDriver.findElement(By.xpath("//*[@id=\"kw\"]")).sendKeys("迪丽热巴"); Thread.sleep(2000); chromeDriver.findElement(By.xpath("//*[@id=\"kw\"]")).clear();- 1
- 2
- 3
- 4
getText() 获取文本
String str = chromeDriver.findElement(By.cssSelector("#hotsearch-content-wrapper > li:nth-child(2) > a > span.title-content-title")).getText();- 1
需要注意下: 不是说页面上可以看见的文字都能成为 文本,有的文本是属性对应的属性值,不能够通过getTest()来获取文本。
获取属性值:使用getAttribute()方法来获取属性值
String str = chromeDriver.findElement(By.cssSelector("#\\31 > div > div > div.c-row.c-gap-top-small > div.c-span9.c-span-last.main-info_4Q_kj > div:nth-child(1) > div")).getAttribute("aria-label"); System.out.println(str);- 1
- 2
等待
代码的执行速度比较块,而前端页面的渲染速度相对较慢一点,可能导致的结果就是,代码已经执行到下一步,页面还没有渲染出来,元素找不到
等待分为三种:1、强制等待 2、隐式等待 3、显示等待
强制等待
Thread.sleep(时间 单位是ms);
让程序暂停一会,等待指定的时间之后继续执行下一步。
优点:语法简单,适合调试的时候用
缺点:需要等待固定时间,造成测试时间的大量消耗。大大减少了自动化的测试效率。
隐式等待
在规定的时间范围内,轮询等待元素出现之后就立即结束,如果在规定时间内 元素仍然没有出现,则会抛出
NoSuchElementException的异常chromeDriver.manage().timeouts().implicitlyWait(Duration.ofSeconds(2));- 1
隐式等待 作用在webdeiver的整个生命周期
优点:节省了大量的等待时间,元素展现之后就可以直接执行下一步,执行效率高
缺点:需要等待所有的元素都展现 才会执行下一步,仍然会有额外的时间上的浪费
隐式等待是指设置一个最长等待时间,如果在此时间内页面提前加载完成,则进行下一步操作;如果在规定时间内仍然未加载成功,则不再等待,下一步操作无法进行。
优点是:这个方式的设置是对于整个driver周期的,所以一般在开头设置一次即可。
缺点是:我们有时并不需要页面的全部元素加载成功,所以等待个别非目标元素加载时会浪费一些时间。另外,在打开新的窗口时,需要重新设置隐式等待。
此段参考:https://blog.csdn.net/weixin_29029673/article/details/112530103
显示等待
显示等待可以针对某一个元素来使用。
public WebDriverWait(WebDriver driver, Duration timeout) { this(driver, timeout, Duration.ofMillis(500L), Clock.systemDefaultZone(), Sleeper.SYSTEM_SLEEPER); }- 1
- 2
- 3
river是传入的
WebDriver实例,timeout是最长的等待时间,单位是秒,poll_frequency是循环查询的时间间隔,单位是秒,默认为0.5秒,ignored_exceptions是忽略的异常,如果在调用查询时得到的异常在此之内,则忽略掉,继续进行,如果不在此范围内,则报告错误,默认为NoSuchElementException。WebDriverWait webDriverWait = new WebDriverWait(chromeDriver,Duration.ofSeconds(1)); //一般只填写前两个即可 webDriverWait.until(ExpectedConditions.presenceOfElementLocated(By.cssSelector("#\\32 > div > div > div.opr-toplist1-table_3K7iH > div:nth-child(1) > div:nth-child(1) > div > a")));- 1
- 2
- 3
等待什么时候为止呢,等待到 until() 括号里面的条件满足为止,如果条件在指定时间内没有满足,就抛出异常
优点:针对 某一个元素进行 等待,极大的降低了自动化整体的等待时间
缺点:写法复杂
foo.until(ExpectedConditions.presenceOfElementLocated()); //proseceOfElementLocated:检查页面是否存在对应的元素 foo.until(ExpectedConditions.textToBe()); //textToBe:检查页面元素对应的文本是否正确- 1
- 2
- 3
- 4
信息打印
打印标题:getTitle()
打印当前Url:getCurrentUrl()
public void prinTitle_url() throws InterruptedException { //点击地图 diriver.findElement(By.cssSelector("#s-top-left > a:nth-child(3)")).click(); Thread.sleep(2000); String title = diriver.getTitle(); String url = diriver.getCurrentUrl(); System.out.println(url + " 地址 的页面标题为:" + title); }- 1
- 2
- 3
- 4
- 5
- 6
- 7
- 8
点击超链接之后打开了新的标签页,这对于selenium来说 是不知道应该展示的页面是什么。
selenium对于每一个标签页都给了唯一标识,称之为句柄
窗口
获取当前页面的句柄
//获取当前页面的句柄 返回值:String类型的字符串 String curWin = diriver.getWindowHandle();- 1
- 2
获取所有标签页的句柄
Set<String> curWins = driver.getWindowHandles();- 1
返回值是 集合Set
.
窗口的切换
如何切换到最新的页面?
答:从所有句柄中选择想要跳转的句柄,使用方法进行跳转
driver.switchTo().window(win);//win是String类型- 1
public void changeWindow(){ //获取当前页面的句柄 String curWin = driver.getWindowHandle(); Set<String> curWins = driver.getWindowHandles(); //如何跳转到我想去的页面呢? 从allwindow 挑选出我想去的页面 for(String win : curWins){ if(win != curWin) driver.switchTo().window(win); } String title = driver.getTitle(); String url = driver.getCurrentUrl(); System.out.println(url + " 地址 的页面标题为:" + title); }- 1
- 2
- 3
- 4
- 5
- 6
- 7
- 8
- 9
- 10
- 11
- 12
- 13
窗口大小的设置
最大化:driver.manage().window().maximize();
最小化:driver.manage().window().minimize();
设置指定的尺寸:driver.manage().window().setSize(new Dimension(宽度,高度));
导航
selenium里提供了navigate接口来实现页面的导航
前进 :driver.navigate().forward();
后退: driver.navigate().back();
弹窗
可以在前端代码中定位到普通的弹窗都可以使用driver.findElement() 方法来定位元素
警告弹窗和确认弹窗 不能够在前端代码中定位到元素,需要使用Selenium中提供的Alert接口来处理
Alert alert = driver.switchTo().alert();//切换到弹窗上 alert.accept();//点击弹窗上的确认按钮 alert.dismiss();//点击弹窗上的取消按钮- 1
- 2
- 3
public void yesTanChuan() throws InterruptedException { driver.get("file:///D:/javaStudy/%E6%B5%8B%E8%AF%95%E6%9D%BF%E4%B9%A6/selenium4html/selenium4html/confirm.html"); driver.findElement(By.cssSelector("body > input[type=button]")).click(); Alert alert = driver.switchTo().alert(); Thread.sleep(1000); alert.accept(); Thread.sleep(1000); } public void noTanChuan() throws InterruptedException { driver.get("file:///D:/javaStudy/%E6%B5%8B%E8%AF%95%E6%9D%BF%E4%B9%A6/selenium4html/selenium4html/confirm.html"); driver.findElement(By.cssSelector("body > input[type=button]")).click(); Alert alert = driver.switchTo().alert(); Thread.sleep(1000); alert.dismiss(); Thread.sleep(1000); }- 1
- 2
- 3
- 4
- 5
- 6
- 7
- 8
- 9
- 10
- 11
- 12
- 13
- 14
- 15
- 16
- 17
提示弹窗

public void inputTanChuan() throws InterruptedException { driver.get("file:///D:/javaStudy/%E6%B5%8B%E8%AF%95%E6%9D%BF%E4%B9%A6/selenium4html/selenium4html/Prompt.html"); driver.findElement(By.cssSelector("body > input[type=button]")).click(); Alert alert = driver.switchTo().alert(); alert.sendKeys("djl"); Thread.sleep(1000); alert.accept(); Thread.sleep(1000); }- 1
- 2
- 3
- 4
- 5
- 6
- 7
- 8
- 9
鼠标、键盘的操作
selenium提供了Actions接口
鼠标
鼠标移动到指定的元素上并保持:actions.clickAndHold(web).perform();
鼠标移动到指定的元素上并点击:actions.click().perform();
/** * 鼠标的选定 * @throws InterruptedException */ public void clickKuan() throws InterruptedException { driver.get("file:///D:/javaStudy/%E6%B5%8B%E8%AF%95%E6%9D%BF%E4%B9%A6/selenium4html/selenium4html/level_locate.html#"); driver.findElement(By.cssSelector("body > div:nth-child(2) > div > div > a")).click(); Thread.sleep(1000); WebElement web = driver.findElement(By.cssSelector("#dropdown1 > li:nth-child(3) > a")); Actions actions = new Actions(driver); actions.clickAndHold(web).perform();//鼠标选到这个元素,并显示出来 driver.findElement(By.cssSelector("#dropdown1 > li:nth-child(3) > a")).click(); Thread.sleep(1000); }- 1
- 2
- 3
- 4
- 5
- 6
- 7
- 8
- 9
- 10
- 11
- 12
- 13
- 14
键盘
sendKeys();- 1
选择框
selenium 提供了select接口
select.selectByIndex(3);//通过索引来定位选项,索引从0开始计数
select.selectByValue(“8.34”);//通过value属性来选择/** * 选择框的定位 * @throws InterruptedException */ public void choseKuan() throws InterruptedException { driver.get("file:///D:/javaStudy/%E6%B5%8B%E8%AF%95%E6%9D%BF%E4%B9%A6/selenium4html/selenium4html/select.html"); WebElement webElement = driver.findElement(By.cssSelector("#ShippingMethod")); Thread.sleep(2000); Select select = new Select(webElement); select.selectByIndex(3);//通过索引来定位选项,索引从0开始计数 // select.selectByValue("8.34");//通过value属性来选择 Thread.sleep(2000); }- 1
- 2
- 3
- 4
- 5
- 6
- 7
- 8
- 9
- 10
- 11
- 12
- 13
- 14
文件上传
页面中点击文件会弹出系统窗口,selenium不能够操作系统窗口。
通过senKey()方法输入我们想要上传的文件路径以及文件名,就能够达到文件上传的一个操作
public void updata() throws InterruptedException { driver.get("file:///D:/javaStudy/%E6%B5%8B%E8%AF%95%E6%9D%BF%E4%B9%A6/selenium4html/selenium4html/upload.html"); WebElement webElement = driver.findElement(By.cssSelector("body > div > div > input[type=file]")); webElement.sendKeys("D:\\图片\\Saved Pictures\\wallhaven-z8wz2o.jpg"); Thread.sleep(3000);- 1
- 2
- 3
- 4
- 5
屏幕截图
屏幕截图需要用到的依赖
<dependency> <groupId>commons-io</groupId> <artifactId>commons-io</artifactId> <version>2.6</version> </dependency>- 1
- 2
- 3
- 4
- 5
代码的执行速度比页面渲染的速度要快
通过截图来留证
//屏幕截图 File srcfile = chromeDriver.getScreenshotAs(OutputType.FILE); //x 可以选择File Base64 bytes //将截图文件srcfile保存在指定的路径下 File file = new File("./src/test/java/com/autochrom/pircle/my.png"); FileUtils.copyFile(srcfile,file);- 1
- 2
- 3
- 4
- 5
- 6
自动的存储到设定的目录下
//按照时间来生成文件夹名称 和 文件名称 public List<String> getTime(){ //文件名格式20220801-214130+毫秒 SimpleDateFormat sim1 = new SimpleDateFormat("yyyyMMdd-HHmmssSS"); //文件夹名称格式2022-08-01 SimpleDateFormat sim2 = new SimpleDateFormat("yyyy-MM-dd"); String filename = sim1.format(System.currentTimeMillis()); String dirname = sim2.format(System.currentTimeMillis()); List<String> list = new ArrayList<>(); list.add(dirname); list.add(filename); return list; } /** * 获取屏幕截图 * str:类名下的用例 */ public void getScreenshot(String str) throws IOException { List<String> times = getTime(); //生成的文件夹路径./src/test/autotest-2022-08-01/goodsbroser-20220801-214130.png String filename ="./src/test/autotest-"+times.get(0)+"/"+str+"-"+times.get(1)+".png"; File srcfile = driver.getScreenshotAs(OutputType.FILE); //把屏幕截图放到指定的路径下 FileUtils.copyFile(srcfile,new File(filename)); }- 1
- 2
- 3
- 4
- 5
- 6
- 7
- 8
- 9
- 10
- 11
- 12
- 13
- 14
- 15
- 16
- 17
- 18
- 19
- 20
- 21
- 22
- 23
- 24
- 25
- 26
- 27
Junit单元测试框架
了解Junit5
Java版本最低要求为8
Junit 是一个开源的Java语言的单元测试框架。Java方向使用最广泛的单元测试框架。使用Java开发者都应当学习Junit 并且掌握单元测试的编写。
Junit的依赖
<dependency> <groupId>org.junit.jupiter</groupId> <artifactId>junit-jupiter</artifactId> <version>5.8.2</version> <scope>test</scope> </dependency> <dependency> <groupId>org.junit.platform</groupId> <artifactId>junit-platform-suite</artifactId> <version>1.8.2</version> <scope>test</scope> </dependency> <dependency> <groupId>org.junit.platform</groupId> <artifactId>junit-platform-reporting</artifactId> <version>1.8.2</version> <scope>test</scope> </dependency>- 1
- 2
- 3
- 4
- 5
- 6
- 7
- 8
- 9
- 10
- 11
- 12
- 13
- 14
- 15
- 16
- 17
- 18
基本使用
注解
@Test 表示一个方法/用例
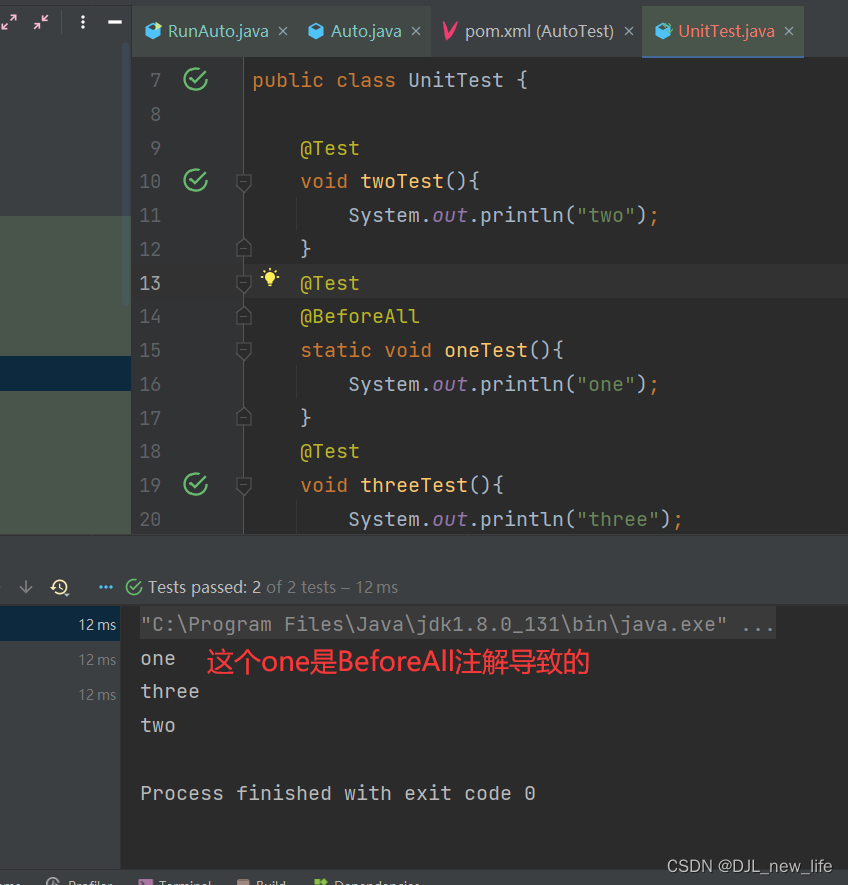
@BeforeEach、@BeforeAll 表示被注解的方法应该在其他方法之前
@BeforeEach : 表示其他方法执行之前都要执行一次

@BeforeAll :表示其他所有方法执行之前只需要执行一遍,使用@BeforeAll注解的方法必须定义为 static

@AfterEach、@AfterAll 表示 被注解节的方法应该在其他方法之后
@AfterEach :其他方法执行之后都要执行一次
@AfterAll : 其他所有方法执行之后只需要执行一次,使用@AfterAll注解的方法必须定义为static
断言
写自动化测试,测试结果分为两种,要么是成功的,要么是失败的
assertEquals(expect,actual)
Assertions.assertEquals(expect,actual);//期望值 比较的值- 1
校验期望值 和 实际值 是否 匹配
assertNotEquals(expect,actual)
Assertions.assertNotEquals(expect,actual);//期望值 比较的值- 1
校验 期望值 和 实际值 是否 匹配
assertTrue() 和 assertFalse()
如果条件的真假与预期相同,程序继续运行,否则抛出异常,不会打印报错信息。参数是boolean类型
assertNull() 和 assertNotNull()
判断一个对象是否为空,如果结果与预期相同,程序继续运行,否则抛出异常。
assertSame() 和 assertNotSame()
判断预期的值和实际的值是否为同一个参数(即判断是否为相同的引用),如果结果与预期相同,程序继续运行,否则抛出异常。
assertSame(expected,actual) 和 assertEquals(expected,actual)的区别;
assertSame(A,B) —> A==B
assertEquals(A,B)—>A.equals(B)
用例的执行顺序
方法的排序
通过@Order()注解 来进行排序
@TestMethodOrder(MethodOrderer.OrderAnnotation.class)//标注当前类使用方法来进行排序 public class Test{ @Test @Order(1) //明确标注具体的执行顺序 void pri(){ ... } }- 1
- 2
- 3
- 4
- 5
- 6
- 7
- 8
为什么需要用到 Junit里的排序方法?
如果用例之间存在关联关系,那么就是需要手动的指定用例的执行顺序
测试套件Suite
指定类,添加到套件中并执行
@Suite @SelectClasses({frontPageTest.class,inboundTest.class,goodsbrowseTest.class,driverQuitTest.class}) //按照类的先后顺序进行执行 public class runSuite { }- 1
- 2
- 3
- 4
- 5
指定包,添加到套件中并执行
注意:执行包下面所有以Test命名的文件中 的所有@Test注解的用例
如果包下没有命名 包含Test\tests 的文件,则会提示找不到对应的用例
@Suite @SelectPackages("com.name.name") //按照类的先后顺序进行执行 public class runSuite { }- 1
- 2
- 3
- 4
- 5
参数化
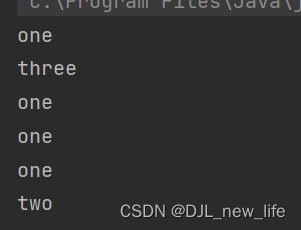
注意:@Parameterizedtest 标注方法类型为参数化 不需要添加@Test注解了,如果添加了,该用例就会 多执行 一次
需要添加参数的来源
单参数
@ValueSource(类型={参数1,参数2})
类型使用原生类型:int double 常见的都可以使用
@ParameterizedTest @ValueSource(String = {"名字","名字","名字"}) void my(String name){ System.out.println("name:" + name); }- 1
- 2
- 3
- 4
- 5
多参数 @CsvSource
@ParameterizedTest @CsvSource(value = {"名字,10","名字,20"}) void prin(String name,int age){ System.out.println("name:" + name + " age:" + age); }- 1
- 2
- 3
- 4
- 5
手动指定分隔符(指定 delimiterString)
@ParameterizedTest @CsvSource(value = {"名字-10","名字-20"},delimiterString = "-") void prin(String name,int age){ System.out.println("name:" + name + " age:" + age); }- 1
- 2
- 3
- 4
- 5
@CsvSource(value = {"'名,字',20"}) //如果参数中包含逗号,就需要 使用单引号('')作为 转义字符- 1
- 2
多参数
如果参数非常的多,在代码中 编写不太好看,就可以 借助 文件 注入的方式来添加。
@CsvSource(指定文件路径)
指定文件路径为 当前项目下 resources 文件 中 csv 文件
@ParameterizedTest @CsvFileSource(resources = "/my.csv") void prin(String name,int age){ System.out.println("name:" + name + " age:" + age); }- 1
- 2
- 3
- 4
- 5
指定文件路径为本地任意文件夹下的csv文件
@ParameterizedTest @CsvFileSource(files = "D:\\file\\my.csv") void prin(String name,int age){ System.out.println("name:" + name + " age:" + age); }- 1
- 2
- 3
- 4
- 5
动态参数
单参数: @MethodSource(“”) 参数为 数据来源的方法名
如果不指定数据来源,则默认找跟用例同名的静态方法
@ParameterizedTest @MethodSource("meth") void dyTest(String x){ System.out.println(x); } static Stream<String> meth(){ return Stream.of("参数1","参数2"); }- 1
- 2
- 3
- 4
- 5
- 6
- 7
- 8
多参数
@ParameterizedTest @MethodSource void dyTest(String x,int age){ System.out.println( x + age); } static Stream<Arguments> dyTest(){ return Stream.of(Arguments.arguments("11",3), Arguments.arguments("22",4); }- 1
- 2
- 3
- 4
- 5
- 6
- 7
- 8
- 9
- 10
要是对大家有所帮助的话,请帮我点个赞吧。
-
相关阅读:
Day60 django ORM 分组查询 查询优化 字段参数
论文理解与代码解析 :VoxelNet pytorch版本
同步请求和异步请求(利用axios)
Spring Boot面试必问:启动流程
二维码智慧门牌管理系统:提升城市管理效率与服务水平
解决error: invalid conversion from ‘unsigned char‘ to ‘unsigned char*‘
软件测试周刊(第78期):你对未来越有信心,你对现在越有耐心。
031-从零搭建微服务-监控中心(一)
fabic.js Quadratic Curve /可控制的曲线
OpenApi-Generator:简化RESTful API开发流程
- 原文地址:https://blog.csdn.net/DJL_new_life/article/details/126169461
