-
原生JS实现《贪吃蛇-snake》项目总结及代码分析展示
项目展示图


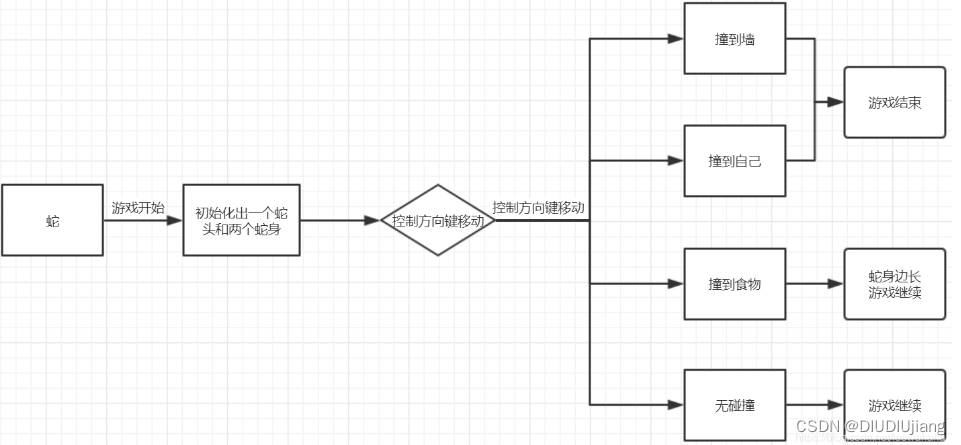
基本功能描述
1.开始游戏功能
当用户进入游戏主界面时,可在界面中下方显眼的位置找到“start”按钮,点击后用户可进行新游戏。
2.运动功能
2.1.默认运动功能
当用户点击”开始游戏“按钮后,蛇的方向默认从左到右方向移动。
2.2.键盘控制方向运动功能
用户可通过使用键盘上的上下左右方位键控制蛇的移动方向,蛇在控制的方向上进行直线前进。
3.吃食物功能
当界面任意位置出现食物,用户使用方位键控制蛇移动到食物周围,当蛇头碰到食物时则表示贪吃蛇吃到此食物,界面上会在任意位置出现下一个食物,用户再次控制蛇去吃这一食物。
4.死亡判定功能
当蛇头在前进方向上撞到墙壁或蛇头吃到蛇身时,给出死亡判定,并弹框给出用户本次游戏得分。
5.暂停/继续游戏功能
当用户使用软件时,由于个人原因需要暂停游戏进程,用户可点击游戏界面时及时“暂停”游戏,此时会出现“游戏暂停”的按钮,当再次点击“暂停”按钮则继续之前的游戏。
准备工作
- 建立新文件夹snake,新建出images CSS JS 三个文件夹,并在根目录下创建出snake.html
- 将素材图片转到images文件中
- 接下来可以开始着手操作了
HTML结构
- 游戏内容区域 (content)
- 游戏开始按钮 (btn startBtn)
- 游戏暂停按钮 (btn pauseBtn)
- 游戏进行区域 (snakeWrap)
可以构造出如下的结构
- <div class="content">
- <div class="btn startBtn"><button>button>div>
- <div class="btn pauseBtn"><button>button>div>
- <div id="snakeWrap">div>
- div>
在head标签内引入CSS文件夹内的style.css
<link rel="stylesheet" href="css/style.css">在body标签的最末尾,添加script,引入JS文件夹内的snake.js
<script src="js/snake.js">script>CSS样式
首先,要让游戏内容区域 居中显示
- .content {
- width: 640px;
- height: 640px;
- margin: 50px auto;
- position: relative;
- }
左右margin为 auto 使其自适应居中显示
给两个按钮以及其蒙层添加属性
- .btn {
- width: 100%;
- height: 100%;
- position: absolute;
- left: 0;
- top: 0;
- background-color: rgba(0, 0, 0, 0);
- z-index: 1;
- }
- .btn button {
- background: none;
- border: none;
- background-size: 100% 100%;
- cursor: pointer;
- outline: none;
- position: absolute;
- left: 50%;
- top: 50%;
- }
btn 是两个按钮的蒙层属性,完全覆盖了游戏内容区域,而btn 中 的 button 给它设置了一些相应的属性,例如水平垂直居中(在下面获取具体宽高的时候,给予负 的 margin)background-size 平铺背景图片 等属性
- .startBtn button {
- background-image: url(../images/btn1.gif);
- width: 200px;
- height: 150px;
- margin-left: -100px;
- margin-top: -75px;
- }
- .pauseBtn {
- display: none;
- }
- .pauseBtn button {
- background-image: url(../images/btn4.png);
- width: 70px;
- height: 70px;
- margin-left: -35px;
- margin-top: -35px;
- }
给予开始按钮 以及 暂停按钮宽高,并设置背景图片,让其居中,并让暂停按钮不显示
给游戏进行区域添加样式
- #snakeWrap {
- position: relative;
- width: 600px;
- height: 600px;
- border: 20px solid deeppink;
- background: pink;
- }
游戏内容区域宽高为640px 游戏进行区域的宽高为600px 加上边框border 刚好就是640px,并且给予其相对定位
预定义蛇的样式
首先,我们的蛇的身体,头部,包括我们的食物苹果,其实都是一个一个的小方块构成(这部分我们会在js里面实现)
我们先预定义蛇头样式
- .snakeHead {
- background-image: url(../images/snake.png);
- background-size: cover;
- }
引入蛇头图片,让其图片平铺方块,再将其初始的蛇头方向圆角修饰,让其蛇头朝右
蛇身体样式
- .snakeBody {
- background-color: #9CCC65;
- border-radius: 50%;
- }
蛇的身体其实是一个小圆点,直接设置背景颜色和 border-radius 即可
预定义食物样式
- .food {
- background: url(../images/food2.png) no-repeat;
- background-size: 100% 100%;
- }
食物将背景图片引入,设置背景尺寸即可
JS逻辑 && 代码
游戏逻辑

蛇逻辑
食物逻辑

在开始代码之前,先在全局定义几个变量
- var sw = 20, // 一个方块的宽度
- sh = 20, // 高度
- tr = 30, // 行数
- td = 30; // 列数
- var snake = null, // 蛇的实例
- food = null, // 食物的实例
- game = null; // 游戏的实例
接下来开始着手主要的核心代码
上面说到 蛇 和 食物 可以看成是小方块,所以我们可以先写小方块的构造函数
小方块
- // 方块构造函数
- function Square(x, y, classname) {
- this.x = x * sw; // x坐标 * 小方块宽度
- this.y = y * sh; // y坐标 * 小方块高度
- this.classname = classname; // 赋值classname
- this.viewContent = document.createElement('div'); // 方块对应的DOM元素
- this.viewContent.className = this.class;
- this.parent = document.getElementById('snakeWrap'); // 方块的父级
- }
接下来,我们在Square的原型链上添加两个方法,创建和移除 ;并且给小方块设置样式
- Square.prototype.create = function() { // 创建方块dom, 并添加到页面里
- this.viewContent.style.position = 'absolute';
- this.viewContent.style.width = sw + 'px';
- this.viewContent.style.height = sh + 'px';
- this.viewContent.style.left = this.x + 'px';
- this.viewContent.style.top = this.y + 'px';
- this.parent.appendChild(this.viewContent); // 把方块添加到snake里
- }
- Square.prototype.remove = function() {
- this.parent.removeChild(this.viewContent); // 从父级里面清除方块元素
- }
蛇
首先,先写出蛇的构造函数
- // 蛇
- function Snake() {
- this.head = null; // 存一下蛇头的信息
- this.tail = null; // 蛇尾
- this.pos = []; // 存储蛇身上的每一个方块的位置
- this.directionNum = { // 存储蛇走的方向,用一个对象来表示
- left: {
- x: -1,
- y: 0,
- rotate: 180 // 蛇头旋转角度 蛇头在不同方向中应该进行旋转,要不始终是向右
- },
- right: {
- x: 1,
- y: 0,
- rotate: 0
- },
- up: {
- x: 0,
- y: -1,
- rotate: -90
- },
- down: {
- x: 0,
- y: 1,
- rotate: 90
- }
- }
- }
其中呢,rotate是为了蛇头转向时候,蛇头的朝向设置的
接下来是 蛇的 初始换函数 (最开始的两个蛇身 以及 蛇头)
- Snake.prototype.init = function() {
- // 创建蛇头
- var snakeHead = new Square(2, 0, 'snakeHead');
- snakeHead.create(); // 在(2,0)处创建蛇头
- this.head = snakeHead; // 存储蛇头信息
- this.pos.push([2, 0]) // 将蛇头所在的位置,用数组pos存储起来
- // 创建蛇身体
- var snakeBody1 = new Square(1, 0, 'snakeBody');
- snakeBody1.create();
- this.pos.push([1, 0]) // 存储蛇身1的位置
- var snakeBody2 = new Square(0, 0, 'snakeBody');
- snakeBody2.create();
- this.tail = snakeBody2; // 存储蛇尾信息
- this.pos.push([0, 0]) // 存储蛇身2的位置
- // 形成链表关系
- snakeHead.last = null;
- snakeHead.next = snakeBody1;
- snakeBody1.last = snakeHead;
- snakeBody1.next = snakeBody2;
- snakeBody2.last = snakeBody1;
- snakeBody2.next = null;
- // 给蛇添加一个属性,用来表示蛇走的方向
- this.direction = this.directionNum.right; // 默认往右走
- };
注释写的挺清楚了 ,也就不做过多的解释,创建链表关系是为了更方便我们写蛇移动的函数
接下来是蛇的下一个点的判断,也就是四块逻辑,撞墙,撞自己,撞食物,未碰撞
- // 这个方法用来获取蛇头的下一个位置对应的元素,要根据元素做不同的事情
- Snake.prototype.getNextPos = function() {
- var nextPos = [ // 蛇头要走的下一个点的坐标
- this.head.x / sw + this.direction.x, // 蛇头的x坐标 + 蛇走向的下一个坐标
- this.head.y / sh + this.direction.y
- ]
- // 下个点是自己,代表撞到了自己,游戏结束
- var selfCollied = false; //是否撞到了自己
- this.pos.forEach(function(value) {
- if (value[0] == nextPos[0] && value[1] == nextPos[1]) {
- // 如果数组中的两个数据都相等,就说明下一个点在蛇身上里面能找到,代表撞到自己了
- selfCollied = true;
- }
- });
- if (selfCollied) {
- console.log('撞到自己了!');
- this.strategies.die.call(this); // 把this.strategies(属性)转换成this实例对象
- return;
- }
- // 下个点是围墙,游戏结束
- if (nextPos[0] < 0 || nextPos[1] < 0 || nextPos[0] > td - 1 || nextPos[1] > tr - 1) {
- console.log('撞到墙了!');
- this.strategies.die.call(this); // 把this.strategies(属性)转换成this实例对象
- return;
- }
- // 下个点是食物,吃
- if (food && food.pos[0] == nextPos[0] && food.pos[1] == nextPos[1]) {
- // 如果食物的点和蛇头走的下一个点一致,就说明蛇吃到了食物
- console.log('吃到食物了!');
- this.strategies.eat.call(this); // 把this.strategies(属性)转换成this实例对象
- return;
- }
- // 下个点什么都不是,继续走
- this.strategies.move.call(this);
- };
书写四种逻辑,每种逻辑内有三种处理情况 游戏结束(die) 蛇吃食物(eat) 蛇移动(move)
接下来就是书写碰撞后三种处理情况的逻辑
- // 处理碰撞后要做的事
- Snake.prototype.strategies = {
- move: function () {
- },
- die: function() {
- },
- eat: function() {
- }
- }
首先是 move 函数
蛇移动的思路是如下
- 蛇朝着对应的方向移动的,首先先在蛇头处创建一个蛇身
- 再在蛇头下一个移动的坐标上创建蛇头
- 最后根据是否有吃食物,来进行最后一个蛇身是否消失
- move: function(format) { // 该参数用于决定是否删除蛇尾,当传了这个参数后就表示要做的事情是吃
- // 创建新身体,在旧蛇头的位置
- var newBody = new Square(this.head.x / sw, this.head.y / sh, 'snakeBody');
- // 更新链表的关系
- newBody.next = this.head.next;
- newBody.next.last = newBody;
- newBody.last = null;
- this.head.remove(); // 把旧蛇头从原来的位置删除
- newBody.create(); // 创建一个新蛇头
- // 新蛇头要走的下一个点
- var newHead = new Square(this.head.x / sw + this.direction.x, this.head.y / sh + this.direction.y, 'snakeHead');
- // 更新链表的关系
- newHead.next = newBody;
- newHead.last = null;
- newBody.last = newHead;
- newHead.viewContent.style.transform = 'rotate(' + this.direction.rotate + 'deg)';
- newHead.create();
- // 更新蛇身上每一个方块的坐标
- this.pos.splice(0, 0, [this.head.x / sw + this.direction.x, this.head.y / sh + this.direction.y]); // 在索引为0的位置,不需要替换,所以有第二个零,然后插入一个新蛇头的坐标值
- this.head = newHead; //还要更新this.head的信息
- if (!format) { // 如果format的值为false: 表示需要删除(处理吃之外的操作)
- this.tail.remove();
- this.tail = this.tail.last;
- this.pos.pop(); // 删除数组中的最后一个
- }
- },
eat 这块逻辑,首先,吃了食物,蛇身体变长,但其实,蛇的身体是变长可以通过给move函数传递参数true来实现。
蛇吃完了食物,就要创建新的食物,这个食物不和蛇的身体重叠,这块逻辑,就交给食物对象来处理。- eat: function() {
- this.strategies.move.call(this, true);
- createFood();
- game.score++;
- },
die 这块逻辑,我们用游戏结束来代替,通过game对象的 over 来结束游戏,并打印分数等
- die: function() {
- game.over();
- }
吃了食物之后,游戏的分数会增加,通过game对象来处理
到此,蛇的逻辑基本完成了这时开始游戏时,就要新建一个蛇,不要忘记新建蛇
snake = new Snake();食物
- // 创建食物
- function createFood() {
- // 食物的随机坐标
- var x = null;
- var y = null;
- var include = true; // 循环跳出的条件,true表示食物的坐标在蛇身上(需要继续循环), false表示食物的坐标不在蛇身上(不循环了)
- while (include) {
- x = Math.round(Math.random() * (td - 1));
- y = Math.round(Math.random() * (tr - 1));
- snake.pos.forEach(function(value) {
- if (x != value[0] && y != value[1]) { // 条件成立时说明现在这个随机出来的食物坐标不在蛇身上
- include = false;
- }
- });
- }
- // 生成食物
- food = new Square(x, y, 'food');
- food.pos = [x, y]; // 存储食物的坐标,用于跟蛇头下一个走的点作对比
- var foodDom = document.querySelector('.food');
- if (foodDom) {
- foodDom.style.left = x * sw + 'px';
- foodDom.style.top = y * sh + 'px';
- } else {
- food.create();
- }
- }
game 对象
首先,是Game 的构造函数
- // 创建游戏逻辑
- function Game() {
- this.timer = null;
- this.score = 0;
- }
然后是game 的初始化函数
- Game.prototype.init = function() {
- snake.init();
- createFood();
- document.onkeydown = function(ev) {
- // 用户按下左键, 蛇不能是正在往右走的
- if (ev.which == 37 && snake.direction != snake.directionNum.right) { // 左键
- snake.direction = snake.directionNum.left;
- } else if (ev.which == 38 && snake.direction != snake.directionNum.down) { // 上键
- snake.direction = snake.directionNum.up;
- } else if (ev.which == 39 && snake.direction != snake.directionNum.left) { // 右键
- snake.direction = snake.directionNum.right;
- } else if (ev.which == 40 && snake.direction != snake.directionNum.up) { // 下键
- snake.direction = snake.directionNum.down;
- }
- }
- this.start();
- }
开始游戏
- Game.prototype.start = function() {
- // 开始游戏
- this.timer = setInterval(function() {
- snake.getNextPos();
- }, 200);
- }
暂停游戏
- Game.prototype.pause = function() {
- clearInterval(this.timer);
- }
游戏结束
- Game.prototype.over = function() {
- clearInterval(this.timer);
- alert('你的得分为:' + this.score);
- // 游戏回到最初始的状态 蛇和食物都清空
- var snakeWrap = document.getElementById('snakeWrap');
- snakeWrap.innerHTML = '';
- snake = new Snake();
- game = new Game();
- // 开始按钮显示出来
- var startBtnWrap = document.querySelector('.startBtn');
- startBtnWrap.style.display = 'block';
- }
game逻辑内的 两个按钮 (开始游戏,暂停游戏,继续游戏)
- // 开启游戏
- game = new Game();
- var startBtn = document.querySelector('.startBtn button');
- startBtn.onclick = function() {
- startBtn.parentNode.style.display = 'none';
- game.init();
- }
- // 暂停游戏
- var snakeWrap = document.getElementById('snakeWrap');
- var pauseBtn = document.querySelector('.pauseBtn button');
- snakeWrap.onclick = function() {
- game.pause();
- pauseBtn.parentNode.style.display = 'block';
- }
- pauseBtn.onclick = function() {
- game.start();
- pauseBtn.parentNode.style.display = 'none';
- }
-
相关阅读:
ARINC825规范简介
ARM 版 Kylin V10 部署 KubeSphere 3.4.0 不完全指南
MMKV(2)
保姆式教程:MAC安装Android studio(包括安装JDK,Android SDK),解决gradle下载慢的问题
基于单片机开发的酒精浓度测试仪方案
免费:实时 AI 编程助手 Amazon CodeWhisperer
数学——图形题
数据结构 -栈和队列
机器学习赋予用户“超人”的能力来打开和控制虚拟现实中的工具
来看看你是不是真的了解 RSA 加密算法,查漏补缺!
- 原文地址:https://blog.csdn.net/DIUDIUjiang/article/details/126140064
