-
《多线程案例》阻塞队列、定时器、线程池、饿汉与懒汉模式
目录
🍑代码
🍑测试代码
🍑代码
🍑 线程池的优点
一、阻塞队列的模拟实现
阻塞队列实现思路
- 通过 "循环队列" 的方式来实现.
- 使用 synchronized 进行加锁控制.
- put 插入元素的时候, 判定如果队列满了, 就进行 wait. (注意, 要在循环中进行 wait. 被唤醒时不一定队列就不满了, 因为同时可能是唤醒了多个线程).
- take 取出元素的时候,
代码
- // 阻塞队列——wait,线程安全——加锁
- // 阻塞队列的模拟实现
- public class MyBlockQueue {
- private int[] array = new int[100];
- private int head;
- private int tile;
- volatile private int size;// 防止内存可见性问题
- public MyBlockQueue() {
- array = new int[100];
- }
- // 入队列
- public void put(int value) throws InterruptedException {
- synchronized (this) {
- if (size == array.length) {
- this.wait();
- }
- array[tile] = value;
- tile++;
- if (tile == array.length) {
- tile = 0;
- }
- size++;
- // 但我们的插入结束后,队列就不空了,就应该唤醒我们的队列为空等待(take中的等待)
- this.notify(); // 即使没人在等待,多写一个也要等待
- }
- }
- // 出队列
- public Integer take() throws InterruptedException {
- int ret;
- synchronized (this) {
- if (size == 0) {
- this.wait(); // 在出队列的时候,如果队列为空,就等待
- }
- ret = array[head];
- head++;
- size--;
- if (head == array.length) {
- head = 0;
- }
- // 当我们出了一个队列后,队列就不满了,唤醒队列为满的等待(put中等待)
- this.notify();
- }
- return ret;
- }
- }
测试代码
- import java.util.concurrent.LinkedBlockingQueue;
- import java.util.concurrent.BlockingDeque;
- // 生产者,消费者模型,用到了我们自己模拟实现的阻塞队列
- public class BlockingQueue {
- public static void main(String[] args) {
- // BlockingQueue blockingQueue = new BlockingQueue();
- // java.util.concurrent.BlockingQueue
queue = new LinkedBlockingQueue<>(); // 阻塞队列 - MyBlockQueue queue = new MyBlockQueue();
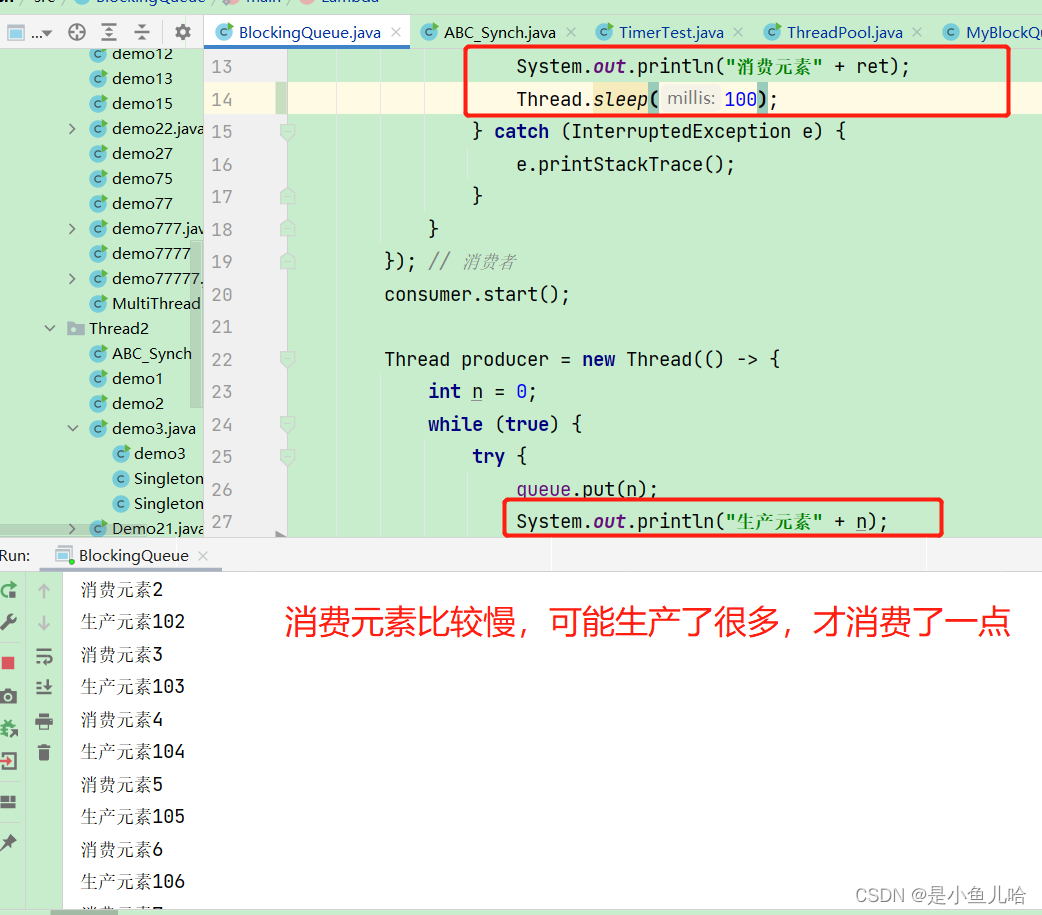
- Thread consumer = new Thread(() -> {
- while (true) {
- try {
- int ret = queue.take();
- System.out.println("消费元素" + ret);
- } catch (InterruptedException e) {
- e.printStackTrace();
- }
- }
- }); // 消费者
- consumer.start();
- Thread producer = new Thread(() -> {
- int n = 0;
- while (true) {
- try {
- queue.put(n);
- System.out.println("生产元素" + n);
- Thread.sleep(300);
- } catch (InterruptedException e) {
- e.printStackTrace();
- }
- n++;
- }
- }); // 生产者
- producer.start();
- }
- }

二、定时器的模拟实现
- // 定时器的模拟实现
- import java.util.concurrent.PriorityBlockingQueue;
- class MyTask implements Comparable
{ - // 任务要干啥
- public Runnable command;
- // 任务在什么时候干,任务推迟的时间
- public long time;
- public MyTask(Runnable command, long after) {
- this.command = command;
- this.time = System.currentTimeMillis() + after; // 记录下任务执行的绝对时间
- }
- // 执行任务的run方法,直接在内部调用command的run方法
- public void run() {
- command.run();
- }
- public long getTime() {
- return time;
- }
- @Override
- public int compareTo(MyTask o) {
- return (int) (this.time - o.time);
- }
- }
- // 自己创建的定时器类
- class MyTimer {
- //
- private Object object = new Object();
- // 使用优先级阻塞队列来保存要执行的若干个队列,按时间来确定优先级(这是标准库中的)
- public static PriorityBlockingQueue
queue = new PriorityBlockingQueue<>(); - // command要执行的顺序是什么,after在什么时间执行该任务
- public void schedule(Runnable command, long after) {
- MyTask myTask = new MyTask(command, after);
- synchronized (object) {
- queue.put(myTask);
- object.notify(); // 唤醒当前线程
- }
- }
- public MyTimer() {
- // 在这里启动一个线程
- Thread t = new Thread(() -> {
- while (true) {
- // 循环过程中, 就不断的尝试从队列中获取到队首元素.
- // 判定队首元素当前的时间是否就绪. 如果就绪了就执行, 不就绪, 就不执行.
- synchronized (object) { // 因为线程调度是随机的,可能在任务塞回队列之后,wait之前。有其他的任务加入(也没有成过唤醒该线程)
- while (queue.isEmpty()) {
- try {
- object.wait(); // 在等待过程中,通过唤醒,也可以执行其他任务
- } catch (InterruptedException e) {
- e.printStackTrace();
- }
- }
- MyTask myTask = null;
- try {
- myTask = queue.take();
- } catch (InterruptedException e) {
- e.printStackTrace();
- }
- // 时间到了
- if (myTask.getTime() <= System.currentTimeMillis()) {
- myTask.run();
- }
- // 时间还没到
- else {
- // 时间还没到, 塞回到队列中
- queue.put(myTask);
- try { // 当wait陷入等待,thread线程暂时停止执行,但main主线程还可以插入新的任务,thread线程会提前唤醒
- object.wait(myTask.getTime() - System.currentTimeMillis()); // 在等的时候,通过唤醒,其他代码也可以执行
- } catch (InterruptedException e) {
- e.printStackTrace();
- }
- }
- }
- }
- });
- t.start();
- }
- }
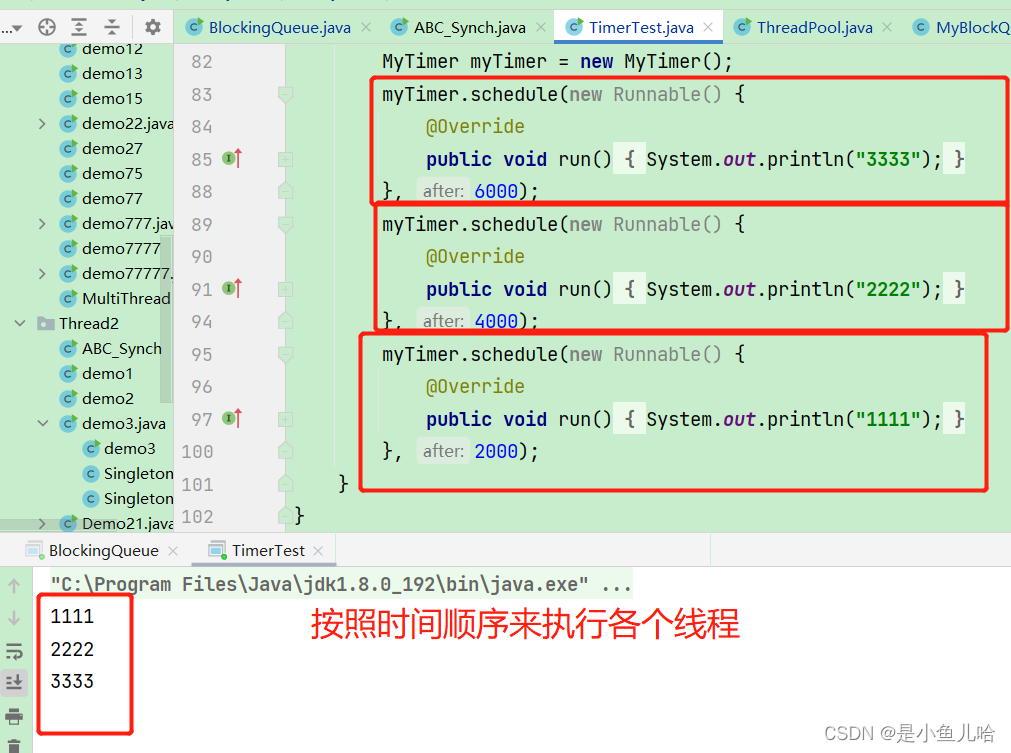
- public class TimerTest {
- public static void main(String[] args) throws InterruptedException {
- MyTimer myTimer = new MyTimer();
- myTimer.schedule(new Runnable() {
- @Override
- public void run() {
- System.out.println("3333");
- }
- }, 6000);
- myTimer.schedule(new Runnable() {
- @Override
- public void run() {
- System.out.println("2222");
- }
- }, 4000);
- myTimer.schedule(new Runnable() {
- @Override
- public void run() {
- System.out.println("1111");
- }
- }, 2000);
- }
- }
三、线程池的模拟实现
标准库中的线程池
使用 Executors.newFixedThreadPool(10) 能创建出固定包含 10 个线程的线程池.
返回值类型为 ExecutorService
通过 ExecutorService.submit 可以注册一个任务到线程池中
代码
- // 线程池的模拟实现
- import java.util.concurrent.BlockingQueue;
- import java.util.concurrent.ExecutorService;
- import java.util.concurrent.Executors;
- import java.util.concurrent.LinkedBlockingQueue;
- class MyThreadPool {
- // BlockingQueue 是一个接口. 真正实现的类是 LinkedBlockingQueue, java标准库中内置的阻塞队列
- private BlockingQueue
queue = new LinkedBlockingQueue<>(); //这个队列就是 "任务队列" 把当前线程池要完成的任务都放到这个队列中. - // 再由线程池内部的工作线程负责完成它们.
- // 核心方法, 往线程池里插入任务.
- public void submit(Runnable runnable) throws InterruptedException {
- queue.put(runnable);
- }
- // 设置线程池中最大的线程数
- // 构造方法中,就需要创建一些工作线程,让这些工作线程负责完成上述执行任务的工作
- public MyThreadPool(int n) {
- for (int i = 0; i < n; i++) {
- Thread t = new Thread(() -> {
- //Thread.currentThread()返回当前线程对象引用
- //.isInterrupted()测试是否当前线程已被中断 中断返回true,否则返回false
- //总的说,这句就是无限判断当前线程状态,如果没有中断,就一直执行while内容
- while (!Thread.currentThread().isInterrupted()) {
- try {
- Runnable runnable = queue.take();
- runnable.run();
- } catch (InterruptedException e) {
- e.printStackTrace();
- }
- }
- });
- t.start();
- }
- }
- }
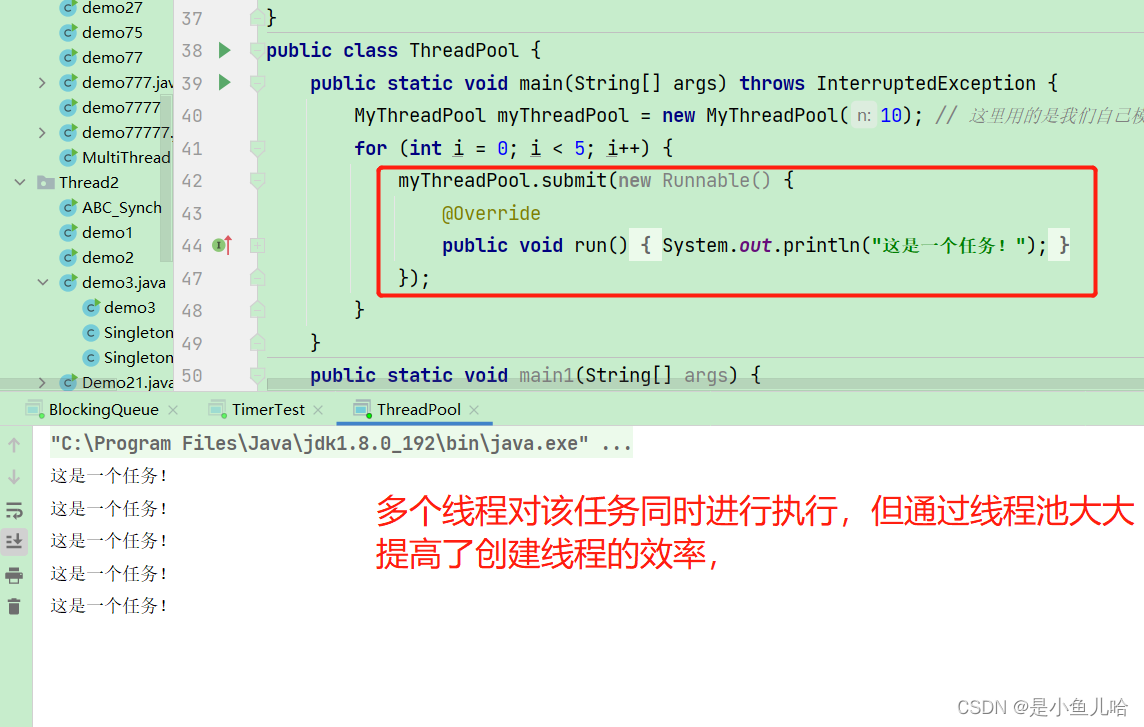
- public class ThreadPool {
- public static void main(String[] args) throws InterruptedException {
- MyThreadPool myThreadPool = new MyThreadPool(10); // 这里用的是我们自己模拟实现的线程池
- for (int i = 0; i < 5; i++) {
- myThreadPool.submit(new Runnable() {
- @Override
- public void run() {
- System.out.println("这是一个任务!");
- }
- });
- }
- }
- public static void main1(String[] args) {
- // 借助静态方法来创建实例,像这样的方法叫做”工厂方法", 所对应的设计模式,就叫做“工厂模式"
- // 当前的线程池中最多有10个线程,线程池存在的目的就是未来让程序员不必创建新的线程,直接使用已有的线程完成想要进行的工作
- // 为什么要有工程模式,通常情况下,创建对象,是借助new,调用构造方法来实现的。但是C++/java里的构造方法,有着诸多限制,很多时候不方便使用
- ExecutorService threadPool = Executors.newFixedThreadPool(10);
- // ThreadPoolExcutor线程池原始的类,其实也是有构造方法的。Executor里面的各自工厂方法,其实都是针对TreadPoolExecutor这个类进行了new并传入了不同风格的参数,来达到构造不同种类的线程池的目标
- threadPool.submit(new Runnable() { // 通过 ExecutorService.submit 可以注册一个任务到线程池中
- @Override
- public void run() {
- System.out.println("这是一个任务!");
- }
- });
- }
- }
线程池的优点
- 降低资源的消耗。线程本身是一种资源,创建和销毁线程会有CPU开销;创建的线程也会占用一定的内存。(而我们的线程池是把线程创建好了后,就放到池子了,需要用到线程,直接从池子里取就行,不用系统在进行创建。但线程不用了,直接还是放到池子了,不用系统来销毁。)从池子里取(用户态操作)比系统创建线程(内核态操作)来的快
- 提高响应速度:当任务来时可以直接使用,不用等待线程创建
- 可管理性: 进行统一的分配,监控,避免大量的线程间因互相抢占系统资源导致的阻塞现象。
四、单例设计模式
饿汉模式与懒汉模式
- package Thread2;
- // 单例设计模式
- // 饿汉模式,程序启动立即创建实例,从始至终都是线程安全的
- class Singleton {
- private static Singleton instance = new Singleton();
- public static Singleton getInstance() {
- return instance;
- }
- // 构造方法设为私有,其他的类想来new就不行了
- public Singleton() {}
- }
- // 懒汉模式,程序有需要时候再创建实例,在一开始是不安全的,之后线程安全
- class SingletonLazy {
- volatile private static SingletonLazy instance = null; // 避免 "内存可见性" 导致读取的 instance 出现偏差, 于是补充上 volatile
- public static SingletonLazy getInstance() {
- if (instance == null) { // 双重循环,减少锁竞争
- synchronized (SingletonLazy.class) {
- if (instance == null) {
- instance = new SingletonLazy();
- }
- }
- }
- return instance;
- }
- }
- public class demo3 {
- public static void main(String[] args) {
- Singleton.getInstance();
- System.out.println(Singleton.getInstance());
- }
- }
-
相关阅读:
MySql入门教程--MySQL数据库基础操作
深入解析React DnD拖拽原理,轻松掌握拖放技巧!
ant-design-vue 实现表格表头纵排列
总结:nginx配置
通过后端数据交互,实现【会议Oa小程序】首页数据渲染
MyBatis学习:实现dao层接口,调用类的方法以执行SQL
【深度学习】 Python 和 NumPy 系列教程(廿二):Matplotlib详解:2、3d绘图类型(8)3D饼图(3D Pie Chart)
19_axios入门到进阶
c#异步编程基础
荧光染料AF488 carboxylic acid,AF488 COOH/ACID/羧酸羧基
- 原文地址:https://blog.csdn.net/weixin_61061381/article/details/126106678
