-
QML包管理
写过C++的都知道,C++是没有包的概念的,用的是#include头文件,通常头文件包含类、函数之类的结构,具体实现在cpp文件。其他语言如JAVA、Go引入其他文件是通过导入包的方式,即导入某个模块Module。C++由于其历史性,为了兼容C,编译链接模式也和C一致,所以采用的是#include头文件的方式,这其中有很多弊端:
-
低效:头文件的本职工作是提供前置声明,而提供前置声明的方式采用了文本拷贝,文本拷贝过程不带有语法分析,会一股脑将需要的、不需要的声明全部拷贝到源文件中。
-
传递性:最底层的头文件中宏、变量等实体的可见性,可以通过中间头文件“透传”给最上层的头文件,这种透传会带来很多麻烦。
-
降低编译速度:加入 a.h 被三个模块包含,则 a 会被展开三次、编译三次。
-
顺序相关:程序的行为受头文件的包含顺影响,也受是否包含某一个头文件影响,在 C++ 中尤为严重(重载)。
-
不确定性:同一个头文件在不同的源文件中可能表现出不同的行为,导致这些不同的原因,可能源自源文件(比如该源文件包含的其他头文件、该源文件中定义的宏等),也可能源自编译选项。
采用包的方式在一定程度上能解决#include出现的一些问题。QML作为今年才发展起来的语言,在引入其他模块方面自然会采取当前主流的方式,即导入包。本篇文章将会介绍QML包管理相关的用法。
语法
QML导入包的方式同其他Go、Python类似,使用import,如导入Qt自带的包
import QtQuick 2.15具体格式为:
import <ModuleIdentifier> <Version.Number> [as <Qualifier>]是一个以点分 URI 表示法指定的标识符,它唯一地标识了模块提供的类型命名空间。 是 MajorVersion.MinorVersion 形式的一个版本,它指定了由于导入而可以使用的各种对象类型和 JavaScript 资源的定义。 是一个可选的本地命名空间标识符,模块提供的对象类型和 JavaScript 资源将被安装到该标识符中(如果给定的话)。 如果省略,模块提供的对象类型和 JavaScript 资源将被安装到全局命名空间中。
as+本地命名空间主要处理有两个同名但位于不同模块中的QML类型的情况
- import QtQuick 2.0 as CoreItems
- import "../textwidgets" as MyModule
- CoreItems.Rectangle {
- width: 100; height: 100
- MyModule.Text { text: "Hello from my custom text item!" }
- CoreItems.Text { text: "Hello from Qt Quick!" }
- }
包含.qml文件
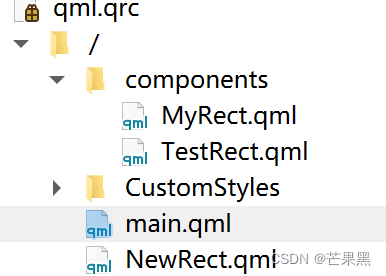
qml引擎会自动检索同级目录下的qml文件,不用显示使用import,.qml的文件名为类型名称

- import QtQuick 2.15
- import QtQuick.Window 2.15
- Window {
- width: 640
- height: 480
- visible: true
- title: qsTr("Hello World")
- NewRect {}
- }
如果不在同级目录,则需使用import指定路径

- import QtQuick 2.15
- import QtQuick.Window 2.15
- import "./components"
- Window {
- width: 640
- height: 480
- visible: true
- title: qsTr("Hello World")
- MyRect {}
- TestRect {}
- }
这种方式一般是一个文件就是一个模块,比较简单,下面介绍多个文件组成一个module的封装及引入方式
qmldir管理包
基本用法
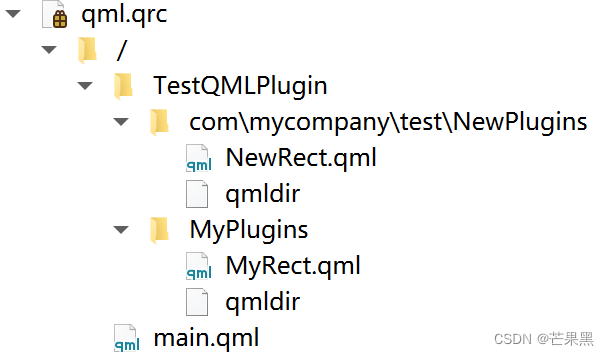
创建并导入如下的目录,其中第一种是带url的

qmldir文件内容
NewPlugins:
- module NewExamplePlugins
- NewRect 1.0 NewRect.qml
MyPlugins
- module MyExamplePlugins
- TestRect 1.0 MyRect.qml
设置导入路径,这步是必须的,告诉QML引擎该模块所在的路径
engine.addImportPath("qrc:/TestQMLPlugin/");引入module
- import QtQuick 2.15
- import QtQuick.Window 2.15
- import MyPlugins 1.0
- import com.mycompany.test.NewPlugins 1.0
- Window {
- width: 640
- height: 480
- visible: true
- title: qsTr("Hello World")
- TestRect {}
- NewRect {}
- }
整个流程还是挺简单清晰的
版本管理
qmldir支持版本管理,如上面例子中MyRect更新了版本为2.0,新建MyRect2.qml文件
MyRect.qml:
- import QtQuick 2.0
- import QtQuick.Controls 2.15
- Item {
- anchors.centerIn: parent
- Rectangle {
- width: 100
- height: 100
- color: "teal"
- Label {
- width: 50
- height: 20
- text: "TestRect"
- }
- }
- }
MyRect2.qml:
- import QtQuick 2.0
- import QtQuick.Controls 2.15
- Item {
- anchors.centerIn: parent
- Rectangle {
- width: 100
- height: 100
- color: "teal"
- Label {
- width: 50
- height: 20
- text: "TestRect222"
- }
- }
- }
在qmldir文件中添加
TestRect 2.0 MyRect2.qml使用时导入2.0的版本,qml会自动使用MyRect2
- import QtQuick 2.15
- import QtQuick.Window 2.15
- import MyPlugins 2.0
- import com.mycompany.test.NewPlugins 1.0
- Window {
- width: 640
- height: 480
- visible: true
- title: qsTr("Hello World")
- TestRect {}
- }

单例类型模块
qmldir还可以声明单例类型,单例类型在封装一些通用配置时很有用,具体用法如下
- pragma Singleton
- import QtQuick 2.0
- QtObject {
- property int textSize: 20
- property color textColor: "green"
- }
- module CustomStyles
- singleton Style 1.0 Style.qml
- import QtQuick 2.15
- import QtQuick.Window 2.15
- import CustomStyles 1.0
- Window {
- width: 640
- height: 480
- visible: true
- title: qsTr("Hello World")
- Text {
- font.pixelSize: Style.textSize
- color: Style.textColor
- text: "Hello World"
- }
- }
internal类型
声明内部的qml类型,即该类型只在模块内部使用,模块调用者无法使用
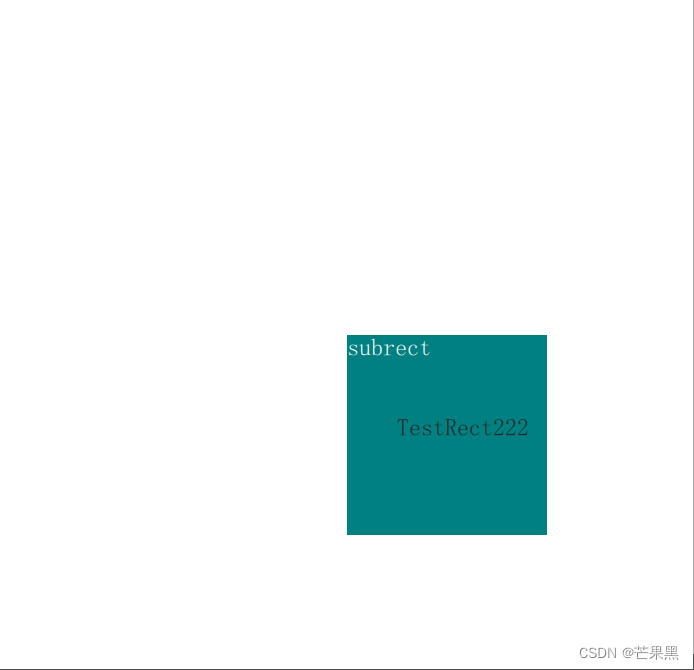
新增一个SubRect,在MyRect2中调用,把SubRect声明为internal类型
SubRect:
- import QtQuick 2.0
- Rectangle {
- width: 50
- height: 50
- color: "transparent"
- Text {
- id: name
- text: "subrect"
- color: "white"
- }
- }
MyRect2:
- import QtQuick 2.0
- import QtQuick.Controls 2.15
- Item {
- anchors.centerIn: parent
- Rectangle {
- width: 100
- height: 100
- color: "teal"
- Label {
- anchors.centerIn: parent
- width: 50
- height: 20
- text: "TestRect222"
- }
- }
- SubRect {}
- }
qmldir
- module MyExamplePlugins
- TestRect 1.0 MyRect.qml
- TestRect 2.0 MyRect2.qml
- internal SubRectPri SubRect.qml

在main.qml中使用SubRect会报错

关于qmldir的更多用法,具体看官方的介绍
关于导入路径
设置的导入路径为模块所在文件夹的上一级,就是说import导入的是模块所在的文件夹名称,那QML引擎只要知道该文件夹名称的上一级目录就能够找到了。如上面例子中TestQMLPlugin包含两个模块,为MyPlugins和com.mycompany.test.NewPlugins,导入路径只需指定到TestQMLPlugin。更为直接的理解是路径加上模块名称能够找到.qml文件,如qrc:/TestQMLPlugin/+com.mycompany.test.NewPlugins就是NewRect.qml和qmldir所在的路径
QML引擎默认的导入路径包含应用程序可执行文件的目录、在 QML2_IMPORT_PATH 环境变量中指定的路径以及来自 QLibraryInfo 的内置 Qml2ImportsPath,可使用以下接口进行查看
QStringList QQmlEngine::importPathList() const打印出来看
main song ("qrc:/", "F:/PROJECT/build-QMLImportDemo-Desktop_Qt_5_15_2_MSVC2019_64bit-Debug/debug", "qrc:/qt-project.org/imports", "D:/Qt/Qt5.15.2/5.15.2/msvc2019_64/qml")导入路径默认包含应用程序可执行文件的目录,则我们的module直接放在该目录也是能够直接访问的,qml程序打包时包含很多qml文件就是如此,但这种方式有个弊端会暴露qml源码。我们上例子中都是添加到qrc资源文件中,防止了源码暴露。除了放在资源文件的方式外,还可以采用Qt插件的方式进行封装,这样也可以不暴露源码。
结语
模块的引入对于一种语言的使用来说是很基础的内容,但简单又很必要,只有了解清楚了,我们才能设计规划更好的代码结构,封装出简单易用、合乎常规的模块。关于QML包的管理就介绍到这里,后续会进行QML插件的内容module封装的介绍。
-
-
相关阅读:
MySQL入门 - 数据分组之 group by
C++ partition()和stable_partition()函数用法详解(深入了解,一文学会)
【前端】使用json-server报错
WFP实现侧边栏导航菜单
最棘手的Java面试题(上)
Leetcode73矩阵置零
神经网络方法研究及应用,神经网络研究主要内容
(附源码)ssm市级疫情防控管理 毕业设计 030957
MySQL事务 MVCC的实现原理
element ui 时间日期选择器 el-date-picker 报错 Prop being mutated: “placement“
- 原文地址:https://blog.csdn.net/a137748099/article/details/126082837
