-
Netty
Netty
一、概述
1、什么是Netty
Netty 是一个异步的、基于事件驱动的网络应用框架,用于快速开发可维护、高性能的网络服务器和客户端
注意:
netty的异步还是基于多路复用的,并没有实现真正意义上的异步IO2、Netty的优势
如果使用传统NIO,其工作量大,bug 多
- 需要自己构建协议
- 解决 TCP 传输问题,如粘包、半包
- 因为bug的存在,epoll 空轮询导致 CPU 100%
Netty 对 API 进行增强,使之更易用,如
- FastThreadLocal => ThreadLocal
- ByteBuf => ByteBuffer
导包
<dependencies> <dependency> <groupId>io.nettygroupId> <artifactId>netty-allartifactId> <version>4.1.75.Finalversion> dependency> dependencies>- 1
- 2
- 3
- 4
- 5
- 6
- 7
二、入门案例
1、服务器端代码
public class HelloServer { public static void main(String[] args) { // 1、启动器,负责装配netty组件,启动服务器 new ServerBootstrap() // 2、创建 NioEventLoopGroup,可以简单理解为 线程池 + Selector .group(new NioEventLoopGroup()) // 3、选择服务器的 ServerSocketChannel 实现 .channel(NioServerSocketChannel.class) // 4、child 负责处理读写,该方法决定了 child 执行哪些操作 // ChannelInitializer 处理器(仅执行一次) // 它的作用是待客户端SocketChannel建立连接后,执行initChannel以便添加更多的处理器 .childHandler(new ChannelInitializer<NioSocketChannel>() { @Override protected void initChannel(NioSocketChannel nioSocketChannel) throws Exception { // 5、SocketChannel的处理器,使用StringDecoder解码,ByteBuf=>String nioSocketChannel.pipeline().addLast(new StringDecoder()); // 6、SocketChannel的业务处理,使用上一个处理器的处理结果 nioSocketChannel.pipeline().addLast(new SimpleChannelInboundHandler<String>() { @Override protected void channelRead0(ChannelHandlerContext channelHandlerContext, String s) throws Exception { System.out.println(s); } }); } // 7、ServerSocketChannel绑定8080端口 }).bind(8080); } }- 1
- 2
- 3
- 4
- 5
- 6
- 7
- 8
- 9
- 10
- 11
- 12
- 13
- 14
- 15
- 16
- 17
- 18
- 19
- 20
- 21
- 22
- 23
- 24
- 25
- 26
- 27
- 28
2、客户端代码
public class HelloClient { public static void main(String[] args) throws InterruptedException { new Bootstrap() .group(new NioEventLoopGroup()) // 选择客户 Socket 实现类,NioSocketChannel 表示基于 NIO 的客户端实现 .channel(NioSocketChannel.class) // ChannelInitializer 处理器(仅执行一次) // 它的作用是待客户端SocketChannel建立连接后,执行initChannel以便添加更多的处理器 .handler(new ChannelInitializer<Channel>() { @Override protected void initChannel(Channel channel) throws Exception { // 消息会经过通道 handler 处理,这里是将 String => ByteBuf 编码发出 channel.pipeline().addLast(new StringEncoder()); } }) // 指定要连接的服务器和端口 .connect(new InetSocketAddress("localhost", 8080)) // Netty 中很多方法都是异步的,如 connect // 这时需要使用 sync 方法等待 connect 建立连接完毕 .sync() // 获取 channel 对象,它即为通道抽象,可以进行数据读写操作 .channel() // 写入消息并清空缓冲区 .writeAndFlush("hello world"); } }- 1
- 2
- 3
- 4
- 5
- 6
- 7
- 8
- 9
- 10
- 11
- 12
- 13
- 14
- 15
- 16
- 17
- 18
- 19
- 20
- 21
- 22
- 23
- 24
- 25
- 26
3、运行流程
左:客户端 右:服务器端

组件解释
-
channel 可以理解为数据的通道
-
msg 理解为流动的数据,最开始输入是 ByteBuf,但经过 pipeline 中的各个 handler 加工,会变成其它类型对象,最后输出又变成 ByteBuf
-
handler 可以理解为数据的处理工序
-
工序有多道,合在一起就是 pipeline(传递途径),pipeline 负责发布事件(读、读取完成…)传播给每个 handler, handler 对自己感兴趣的事件进行处理(重写了相应事件处理方法)
- pipeline 中有多个 handler,处理时会依次调用其中的 handler
-
handler 分 Inbound 和 Outbound 两类
- Inbound 入站
- Outbound 出站
-
-
eventLoop 可以理解为处理数据的工人
- eventLoop 可以管理多个 channel 的 io 操作,并且一旦 eventLoop 负责了某个 channel,就会将其与channel进行绑定,以后该 channel 中的 io 操作都由该 eventLoop 负责
- eventLoop 既可以执行 io 操作,也可以进行任务处理,每个 eventLoop 有自己的任务队列,队列里可以堆放多个 channel 的待处理任务,任务分为普通任务、定时任务
- eventLoop 按照 pipeline 顺序,依次按照 handler 的规划(代码)处理数据,可以为每个 handler 指定不同的 eventLoop
三、组件
1、EventLoop
事件循环对象 EventLoop
EventLoop 本质是一个单线程执行器(同时维护了一个 Selector),里面有 run 方法处理一个或多个 Channel 上源源不断的 io 事件
它的继承关系如下
- 继承自 j.u.c.ScheduledExecutorService 因此包含了线程池中所有的方法
- 继承自 netty 自己的 OrderedEventExecutor
- 提供了 boolean inEventLoop(Thread thread) 方法判断一个线程是否属于此 EventLoop
- 提供了 EventLoopGroup parent() 方法来看看自己属于哪个 EventLoopGroup
事件循环组 EventLoopGroup
EventLoopGroup 是一组 EventLoop,Channel 一般会调用 EventLoopGroup 的 register 方法来绑定其中一个 EventLoop,后续这个 Channel 上的 io 事件都由此 EventLoop 来处理(保证了 io 事件处理时的线程安全)
- 继承自 netty 自己的 EventExecutorGroup
- 实现了 Iterable 接口提供遍历 EventLoop 的能力
- 另有 next 方法获取集合中下一个 EventLoop
处理普通与定时任务
public class TestEventLoop { public static void main(String[] args) { // 创建拥有两个EventLoop的NioEventLoopGroup,对应两个线程 EventLoopGroup group = new NioEventLoopGroup(2); // 通过next方法可以获得下一个 EventLoop System.out.println(group.next()); System.out.println(group.next()); // 通过EventLoop执行普通任务 group.next().execute(()->{ System.out.println(Thread.currentThread().getName() + " hello"); }); // 通过EventLoop执行定时任务 group.next().scheduleAtFixedRate(()->{ System.out.println(Thread.currentThread().getName() + " hello2"); }, 0, 1, TimeUnit.SECONDS); // 优雅地关闭 group.shutdownGracefully(); } }- 1
- 2
- 3
- 4
- 5
- 6
- 7
- 8
- 9
- 10
- 11
- 12
- 13
- 14
- 15
- 16
- 17
- 18
- 19
- 20
- 21
- 22
输出结果如下
io.netty.channel.nio.NioEventLoop@7bb11784 io.netty.channel.nio.NioEventLoop@33a10788 nioEventLoopGroup-2-1 hello nioEventLoopGroup-2-2 hello2 nioEventLoopGroup-2-2 hello2 nioEventLoopGroup-2-2 hello2- 1
- 2
- 3
- 4
- 5
- 6
关闭 EventLoopGroup
优雅关闭
shutdownGracefully方法。该方法会首先切换EventLoopGroup到关闭状态从而拒绝新的任务的加入,然后在任务队列的任务都处理完成后,停止线程的运行。从而确保整体应用是在正常有序的状态下退出的处理IO任务
服务器代码
public class MyServer { public static void main(String[] args) { new ServerBootstrap() .group(new NioEventLoopGroup()) .channel(NioServerSocketChannel.class) .childHandler(new ChannelInitializer<SocketChannel>() { @Override protected void initChannel(SocketChannel socketChannel) throws Exception { socketChannel.pipeline().addLast(new ChannelInboundHandlerAdapter() { @Override public void channelRead(ChannelHandlerContext ctx, Object msg) throws Exception { ByteBuf buf = (ByteBuf) msg; System.out.println(Thread.currentThread().getName() + " " + buf.toString(StandardCharsets.UTF_8)); } }); } }) .bind(8080); } }- 1
- 2
- 3
- 4
- 5
- 6
- 7
- 8
- 9
- 10
- 11
- 12
- 13
- 14
- 15
- 16
- 17
- 18
- 19
- 20
- 21
客户端代码
public class MyClient { public static void main(String[] args) throws IOException, InterruptedException { Channel channel = new Bootstrap() .group(new NioEventLoopGroup()) .channel(NioSocketChannel.class) .handler(new ChannelInitializer<SocketChannel>() { @Override protected void initChannel(SocketChannel socketChannel) throws Exception { socketChannel.pipeline().addLast(new StringEncoder()); } }) .connect(new InetSocketAddress("localhost", 8080)) .sync() .channel(); System.out.println(channel); Scanner scanner = new Scanner(System.in); while (true) { channel.writeAndFlush(scanner.next()); } } }- 1
- 2
- 3
- 4
- 5
- 6
- 7
- 8
- 9
- 10
- 11
- 12
- 13
- 14
- 15
- 16
- 17
- 18
- 19
- 20
- 21
分工
Bootstrap的group()方法可以传入两个EventLoopGroup参数,分别负责处理不同的事件
第一个boos线程默认1个可以不指定线程数量
public class MyServer { public static void main(String[] args) { new ServerBootstrap() // 两个Group,分别为 Boss 负责Accept事件,Worker 负责读写事件 .group(new NioEventLoopGroup(1), new NioEventLoopGroup(2)) ... } }- 1
- 2
- 3
- 4
- 5
- 6
- 7
- 8
- 9
多个客户端分别发送
hello结果nioEventLoopGroup-3-1 hello1 nioEventLoopGroup-3-2 hello2 nioEventLoopGroup-3-1 hello3 nioEventLoopGroup-3-2 hello4 nioEventLoopGroup-3-2 hello4- 1
- 2
- 3
- 4
- 5
可以看出,一个EventLoop可以负责多个Channel,且EventLoop一旦与Channel绑定,则一直负责处理该Channel中的事件

增加自定义EventLoopGroup
当有的任务需要较长的时间处理时,可以使用非NioEventLoopGroup,避免同一个NioEventLoop中的其他Channel在较长的时间内都无法得到处理
在initChannel中,socketChannel.pipeline().addLast(group, name, handler)指定自定义事件管理组group来处理指定耗时的handler
handler中可以通过ctx.fireChannelRead(msg);将消息传递给下一个handler
public class MyServer { public static void main(String[] args) { // 增加自定义的非NioEventLoopGroup EventLoopGroup group = new DefaultEventLoopGroup(); new ServerBootstrap() .group(new NioEventLoopGroup(1), new NioEventLoopGroup(2)) .channel(NioServerSocketChannel.class) .childHandler(new ChannelInitializer<SocketChannel>() { @Override protected void initChannel(SocketChannel socketChannel) throws Exception { // 增加两个handler,第一个使用NioEventLoopGroup处理,第二个使用自定义EventLoopGroup处理 socketChannel.pipeline().addLast("nioHandler",new ChannelInboundHandlerAdapter() { @Override public void channelRead(ChannelHandlerContext ctx, Object msg) throws Exception { ByteBuf buf = (ByteBuf) msg; System.out.println(Thread.currentThread().getName() + " " + buf.toString(StandardCharsets.UTF_8)); // 调用下一个handler ctx.fireChannelRead(msg); } }) // 该handler绑定自定义的Group .addLast(group, "myHandler", new ChannelInboundHandlerAdapter() { @Override public void channelRead(ChannelHandlerContext ctx, Object msg) throws Exception { ByteBuf buf = (ByteBuf) msg; System.out.println(Thread.currentThread().getName() + " " + buf.toString(StandardCharsets.UTF_8)); } }); } }) .bind(8080); } }- 1
- 2
- 3
- 4
- 5
- 6
- 7
- 8
- 9
- 10
- 11
- 12
- 13
- 14
- 15
- 16
- 17
- 18
- 19
- 20
- 21
- 22
- 23
- 24
- 25
- 26
- 27
- 28
- 29
- 30
- 31
- 32
- 33
- 34
启动四个客户端发送数据
nioEventLoopGroup-4-1 hello1 defaultEventLoopGroup-2-1 hello1 nioEventLoopGroup-4-2 hello2 defaultEventLoopGroup-2-2 hello2 nioEventLoopGroup-4-1 hello3 defaultEventLoopGroup-2-3 hello3 nioEventLoopGroup-4-2 hello4 defaultEventLoopGroup-2-4 hello4- 1
- 2
- 3
- 4
- 5
- 6
- 7
- 8
可以看出,客户端与服务器之间的事件,被nioEventLoopGroup和defaultEventLoopGroup分别处理

切换的实现
不同的EventLoopGroup切换的实现原理如下
由上面的图可以看出,当handler中绑定的Group不同时,需要切换Group来执行不同的任务
static void invokeChannelRead(final AbstractChannelHandlerContext next, Object msg) { final Object m = next.pipeline.touch(ObjectUtil.checkNotNull(msg, "msg"), next); // 获得下一个EventLoop, excutor 即为 EventLoopGroup EventExecutor executor = next.executor(); // 如果下一个EventLoop 在当前的 EventLoopGroup中 if (executor.inEventLoop()) { // 使用当前 EventLoopGroup 中的 EventLoop 来处理任务 next.invokeChannelRead(m); } else { // 否则让另一个 EventLoopGroup 中的 EventLoop 来创建任务并执行 executor.execute(new Runnable() { public void run() { next.invokeChannelRead(m); } }); } }- 1
- 2
- 3
- 4
- 5
- 6
- 7
- 8
- 9
- 10
- 11
- 12
- 13
- 14
- 15
- 16
- 17
- 18
- 如果两个 handler 绑定的是同一个EventLoopGroup,那么就直接调用
- 否则,把要调用的代码封装为一个任务对象,由下一个 handler 的 EventLoopGroup 来调用
2、Channel
Channel 的常用方法
- close() 可以用来关闭Channel
- closeFuture() 用来处理 Channel 的关闭
- sync 方法作用是同步等待 Channel 关闭
- 而 addListener 方法是异步等待 Channel 关闭
- pipeline() 方法用于添加处理器
- write() 方法将数据写入
- 因为缓冲机制,数据被写入到 Channel 中以后,不会立即被发送
- 只有当缓冲满了或者调用了flush()方法后,才会将数据通过 Channel 发送出去
- writeAndFlush() 方法将数据写入并立即发送(刷出)
ChannelFuture
连接问题
拆分客户端代码
public class MyClient { public static void main(String[] args) throws IOException, InterruptedException { ChannelFuture channelFuture = new Bootstrap() .group(new NioEventLoopGroup()) .channel(NioSocketChannel.class) .handler(new ChannelInitializer<SocketChannel>() { @Override protected void initChannel(SocketChannel socketChannel) throws Exception { socketChannel.pipeline().addLast(new StringEncoder()); } }) // 该方法为异步非阻塞方法,主线程调用后不会被阻塞,真正去执行连接操作的是NIO线程 // NIO线程:NioEventLoop 中的线程 .connect(new InetSocketAddress("localhost", 8080)); // 该方法用于等待连接真正建立 channelFuture.sync(); // 获取客户端-服务器之间的Channel对象 Channel channel = channelFuture.channel(); channel.writeAndFlush("hello world"); System.in.read(); } }- 1
- 2
- 3
- 4
- 5
- 6
- 7
- 8
- 9
- 10
- 11
- 12
- 13
- 14
- 15
- 16
- 17
- 18
- 19
- 20
- 21
- 22
- 23
- 24
如果我们去掉
channelFuture.sync()方法,会服务器无法收到hello world这是因为建立连接(connect)的过程是异步非阻塞的,若不通过
sync()方法阻塞主线程,等待连接真正建立,这时通过 channelFuture.channel() 拿到的 Channel 对象,并不是真正与服务器建立好连接的 Channel,也就没法将信息正确的传输给服务器端所以需要通过
channelFuture.sync()方法,阻塞主线程,同步处理结果,等待连接真正建立好以后,再去获得 Channel 传递数据。使用该方法,获取 Channel 和发送数据的线程都是主线程下面还有一种方法,用于异步获取建立连接后的 Channel 和发送数据,使得执行这些操作的线程是 NIO 线程(去执行connect操作的线程)
addListener方法
通过这种方法可以在NIO线程中获取 Channel 并发送数据,而不是在主线程中执行这些操作
public class MyClient { public static void main(String[] args) throws IOException, InterruptedException { ChannelFuture channelFuture = new Bootstrap() .group(new NioEventLoopGroup()) .channel(NioSocketChannel.class) .handler(new ChannelInitializer<SocketChannel>() { @Override protected void initChannel(SocketChannel socketChannel) throws Exception { socketChannel.pipeline().addLast(new StringEncoder()); } }) // 该方法为异步非阻塞方法,主线程调用后不会被阻塞,真正去执行连接操作的是NIO线程 // NIO线程:NioEventLoop 中的线程 .connect(new InetSocketAddress("localhost", 8080)); // 当connect方法执行完毕后,也就是连接真正建立后 // 会在NIO线程中调用operationComplete方法 channelFuture.addListener(new ChannelFutureListener() { @Override public void operationComplete(ChannelFuture channelFuture) throws Exception { Channel channel = channelFuture.channel(); channel.writeAndFlush("hello world"); } }); System.in.read(); } }- 1
- 2
- 3
- 4
- 5
- 6
- 7
- 8
- 9
- 10
- 11
- 12
- 13
- 14
- 15
- 16
- 17
- 18
- 19
- 20
- 21
- 22
- 23
- 24
- 25
- 26
- 27
处理关闭
public class ReadClient { public static void main(String[] args) throws InterruptedException { // 创建EventLoopGroup,使用完毕后关闭 NioEventLoopGroup group = new NioEventLoopGroup(); ChannelFuture channelFuture = new Bootstrap() .group(group) .channel(NioSocketChannel.class) .handler(new ChannelInitializer<SocketChannel>() { @Override protected void initChannel(SocketChannel socketChannel) throws Exception { socketChannel.pipeline().addLast(new StringEncoder()); } }) .connect(new InetSocketAddress("localhost", 8080)); channelFuture.sync(); Channel channel = channelFuture.channel(); Scanner scanner = new Scanner(System.in); // 创建一个线程用于输入并向服务器发送 new Thread(()->{ while (true) { String msg = scanner.next(); if ("q".equals(msg)) { // 关闭操作是异步的,在NIO线程中执行 channel.close(); break; } channel.writeAndFlush(msg); } }, "inputThread").start(); // 获得closeFuture对象 ChannelFuture closeFuture = channel.closeFuture(); System.out.println("waiting close..."); // 同步等待NIO线程执行完close操作 closeFuture.sync(); // 关闭之后执行一些操作,可以保证执行的操作一定是在channel关闭以后执行的 System.out.println("关闭之后执行一些额外操作..."); // 关闭EventLoopGroup group.shutdownGracefully(); } }- 1
- 2
- 3
- 4
- 5
- 6
- 7
- 8
- 9
- 10
- 11
- 12
- 13
- 14
- 15
- 16
- 17
- 18
- 19
- 20
- 21
- 22
- 23
- 24
- 25
- 26
- 27
- 28
- 29
- 30
- 31
- 32
- 33
- 34
- 35
- 36
- 37
- 38
- 39
- 40
- 41
- 42
- 43
- 44
- 45
- 46
- 47
关闭channel
当我们要关闭channel时,可以调用channel.close()方法进行关闭。但是该方法也是一个异步方法。真正的关闭操作并不是在调用该方法的线程中执行的,而是在NIO线程中执行真正的关闭操作
如果我们想在channel真正关闭以后,执行一些额外的操作,可以选择以下两种方法来实现
-
通过channel.closeFuture()方法获得对应的ChannelFuture对象,然后调用sync()方法阻塞执行操作的线程,等待channel真正关闭后,再执行其他操作
// 获得closeFuture对象 ChannelFuture closeFuture = channel.closeFuture(); // 同步等待NIO线程执行完close操作 closeFuture.sync();- 1
- 2
- 3
- 4
- 5
-
调用closeFuture.addListener方法,添加close的后续操作
closeFuture.addListener(new ChannelFutureListener() { @Override public void operationComplete(ChannelFuture channelFuture) throws Exception { // 等待channel关闭后才执行的操作 System.out.println("关闭之后执行一些额外操作..."); // 关闭EventLoopGroup group.shutdownGracefully(); } });- 1
- 2
- 3
- 4
- 5
- 6
- 7
- 8
- 9
3、Future与Promise
概念
netty 中的 Future 与 jdk 中的 Future 同名,但是是两个接口
netty 的 Future 继承自 jdk 的 Future,而 Promise 又对 netty Future 进行了扩展
- jdk Future 只能同步等待任务结束(或成功、或失败)才能得到结果
- netty Future 可以同步等待任务结束得到结果,也可以异步方式得到结果,但都是要等任务结束
- netty Promise 不仅有 netty Future 的功能,而且脱离了任务独立存在,只作为两个线程间传递结果的容器
功能/名称 jdk Future netty Future Promise cancel 取消任务 - - isCanceled 任务是否取消 - - isDone 任务是否完成,不能区分成功失败 - - get 获取任务结果,阻塞等待 - - getNow - 获取任务结果,非阻塞,还未产生结果时返回 null - await - 等待任务结束,如果任务失败,不会抛异常,而是通过 isSuccess 判断 - sync - 等待任务结束,如果任务失败,抛出异常 - isSuccess - 判断任务是否成功 - cause - 获取失败信息,非阻塞,如果没有失败,返回null - addLinstener - 添加回调,异步接收结果 - setSuccess - - 设置成功结果 setFailure - - 设置失败结果 JDK Future
public class JdkFuture { public static void main(String[] args) throws ExecutionException, InterruptedException { ThreadFactory factory = new ThreadFactory() { @Override public Thread newThread(Runnable r) { return new Thread(r, "JdkFuture"); } }; // 创建线程池 ThreadPoolExecutor executor = new ThreadPoolExecutor(5, 8,10, TimeUnit.SECONDS, new ArrayBlockingQueue<>(10), factory); // 获得Future对象 Future<Integer> future = executor.submit(new Callable<Integer>() { @Override public Integer call() throws Exception { TimeUnit.SECONDS.sleep(1); return 50; } }); // 通过阻塞的方式,获得运行结果 System.out.println(future.get()); } }- 1
- 2
- 3
- 4
- 5
- 6
- 7
- 8
- 9
- 10
- 11
- 12
- 13
- 14
- 15
- 16
- 17
- 18
- 19
- 20
- 21
- 22
- 23
- 24
- 25
Netty Future
public class NettyFuture { public static void main(String[] args) throws ExecutionException, InterruptedException { NioEventLoopGroup group = new NioEventLoopGroup(); // 获得 EventLoop 对象 EventLoop eventLoop = group.next(); Future<Integer> future = eventLoop.submit(new Callable<Integer>() { @Override public Integer call() throws Exception { return 50; } }); // 主线程中获取结果 System.out.println(Thread.currentThread().getName() + " 获取结果"); System.out.println("getNow " + future.getNow()); System.out.println("get " + future.get()); // NIO线程中异步获取结果 future.addListener(new GenericFutureListener<Future<? super Integer>>() { @Override public void operationComplete(Future<? super Integer> future) throws Exception { System.out.println(Thread.currentThread().getName() + " 获取结果"); System.out.println("getNow " + future.getNow()); } }); } }- 1
- 2
- 3
- 4
- 5
- 6
- 7
- 8
- 9
- 10
- 11
- 12
- 13
- 14
- 15
- 16
- 17
- 18
- 19
- 20
- 21
- 22
- 23
- 24
- 25
- 26
- 27
- 28
运行结果
main 获取结果 getNow null get 50 nioEventLoopGroup-2-1 获取结果 getNow 50- 1
- 2
- 3
- 4
- 5
Netty中的Future对象,可以通过EventLoop的sumbit()方法得到
- 可以通过Future对象的get方法,阻塞地获取返回结果
- 也可以通过getNow方法,获取结果,若还没有结果,则返回null,该方法是非阻塞的
- 还可以通过future.addListener方法,在Callable方法执行的线程中,异步获取返回结果
Netty Promise
Promise相当于一个容器,可以用于存放各个线程中的结果,然后让其他线程去获取该结果
public class NettyPromise { public static void main(String[] args) throws ExecutionException, InterruptedException { // 创建EventLoop NioEventLoopGroup group = new NioEventLoopGroup(); EventLoop eventLoop = group.next(); // 创建Promise对象,用于存放结果 DefaultPromise<Integer> promise = new DefaultPromise<>(eventLoop); new Thread(()->{ try { log.debug("计算中"); int i = 1/0; TimeUnit.SECONDS.sleep(1); // 自定义线程向Promise中存放结果 promise.setSuccess(50); } catch (InterruptedException e) { e.printStackTrace(); promise.setFailure(e); } }).start(); // 主线程从Promise中获取结果 System.out.println(Thread.currentThread().getName() + " " + promise.get()); } }- 1
- 2
- 3
- 4
- 5
- 6
- 7
- 8
- 9
- 10
- 11
- 12
- 13
- 14
- 15
- 16
- 17
- 18
- 19
- 20
- 21
- 22
- 23
- 24
- 25
- 26
- 27
- 28
4、Handler与Pipeline
Pipeline
public class PipeLineServer { public static void main(String[] args) { new ServerBootstrap() .group(new NioEventLoopGroup()) .channel(NioServerSocketChannel.class) .childHandler(new ChannelInitializer<SocketChannel>() { @Override protected void initChannel(SocketChannel socketChannel) throws Exception { // 在socketChannel的pipeline中添加handler // pipeline中handler是带有head与tail节点的双向链表,的实际结构为 // head <-> handler1 <-> ... <-> handler4 <->tail // Inbound主要处理入站操作,一般为读操作,发生入站操作时会触发Inbound方法 // 入站时,handler是从head向后调用的 socketChannel.pipeline().addLast("handler1" ,new ChannelInboundHandlerAdapter() { @Override public void channelRead(ChannelHandlerContext ctx, Object msg) throws Exception { System.out.println(Thread.currentThread().getName() + " Inbound handler 1"); // 父类该方法内部会调用fireChannelRead // 将数据传递给下一个handler super.channelRead(ctx, msg); } }); socketChannel.pipeline().addLast("handler2", new ChannelInboundHandlerAdapter() { @Override public void channelRead(ChannelHandlerContext ctx, Object msg) throws Exception { System.out.println(Thread.currentThread().getName() + " Inbound handler 2"); // 执行write操作,使得Outbound的方法能够得到调用 socketChannel.writeAndFlush(ctx.alloc().buffer().writeBytes("Server...".getBytes(StandardCharsets.UTF_8))); super.channelRead(ctx, msg); } }); // Outbound主要处理出站操作,一般为写操作,发生出站操作时会触发Outbound方法 // 出站时,handler的调用是从tail向前调用的 socketChannel.pipeline().addLast("handler3" ,new ChannelOutboundHandlerAdapter(){ @Override public void write(ChannelHandlerContext ctx, Object msg, ChannelPromise promise) throws Exception { System.out.println(Thread.currentThread().getName() + " Outbound handler 1"); super.write(ctx, msg, promise); } }); socketChannel.pipeline().addLast("handler4" ,new ChannelOutboundHandlerAdapter(){ @Override public void write(ChannelHandlerContext ctx, Object msg, ChannelPromise promise) throws Exception { System.out.println(Thread.currentThread().getName() + " Outbound handler 2"); super.write(ctx, msg, promise); } }); } }) .bind(8080); } }- 1
- 2
- 3
- 4
- 5
- 6
- 7
- 8
- 9
- 10
- 11
- 12
- 13
- 14
- 15
- 16
- 17
- 18
- 19
- 20
- 21
- 22
- 23
- 24
- 25
- 26
- 27
- 28
- 29
- 30
- 31
- 32
- 33
- 34
- 35
- 36
- 37
- 38
- 39
- 40
- 41
- 42
- 43
- 44
- 45
- 46
- 47
- 48
- 49
- 50
- 51
- 52
运行结果如下
nioEventLoopGroup-2-2 Inbound handler 1 nioEventLoopGroup-2-2 Inbound handler 2 nioEventLoopGroup-2-2 Outbound handler 2 nioEventLoopGroup-2-2 Outbound handler 1- 1
- 2
- 3
- 4
通过channel.pipeline().addLast(name, handler)添加handler时,记得给handler取名字。这样可以调用pipeline的addAfter、addBefore等方法更灵活地向pipeline中添加handler
handler需要放入通道的pipeline中,才能根据放入顺序来使用handler
- pipeline是结构是一个带有head与tail指针的双向链表,其中的节点为handler
- 要通过ctx.fireChannelRead(msg)等方法,将当前handler的处理结果传递给下一个handler
- 当有入站(Inbound)操作时,会从head开始向后调用handler,直到handler不是处理Inbound操作为止
- 当有出站(Outbound)操作时,会从tail开始向前调用handler,直到handler不是处理Outbound操作为止
具体结构如下

调用顺序如下

-
入站:从前往后调用(下一个是出站handler则不需要传递)
ctx.fireChannelRead()向后传递一位
socketChannel.read()最后的handler执行read -
出站:从后往前调用(下一个是入站handler则不需要传递)
ctx.write(msg)或ctx.writeAndFlus(msg)向前传递一位socketChannel.write()最后的handler执行write
OutboundHandler
socketChannel.writeAndFlush()
当handler中调用该方法进行写操作时,会触发Outbound操作,此时是从tail向前寻找OutboundHandler

ctx.writeAndFlush()
当handler中调用该方法进行写操作时,会触发Outbound操作,此时是从当前handler向前寻找OutboundHandler

EmbeddedChannel
EmbeddedChannel可以用于测试各个handler,通过其构造函数按顺序传入需要测试handler,然后调用对应的Inbound和Outbound方法即可
public class TestEmbeddedChannel { public static void main(String[] args) { ChannelInboundHandlerAdapter h1 = new ChannelInboundHandlerAdapter() { @Override public void channelRead(ChannelHandlerContext ctx, Object msg) throws Exception { System.out.println("1"); super.channelRead(ctx, msg); } }; ChannelInboundHandlerAdapter h2 = new ChannelInboundHandlerAdapter() { @Override public void channelRead(ChannelHandlerContext ctx, Object msg) throws Exception { System.out.println("2"); super.channelRead(ctx, msg); } }; ChannelOutboundHandlerAdapter h3 = new ChannelOutboundHandlerAdapter() { @Override public void write(ChannelHandlerContext ctx, Object msg, ChannelPromise promise) throws Exception { System.out.println("3"); super.write(ctx, msg, promise); } }; ChannelOutboundHandlerAdapter h4 = new ChannelOutboundHandlerAdapter() { @Override public void write(ChannelHandlerContext ctx, Object msg, ChannelPromise promise) throws Exception { System.out.println("4"); super.write(ctx, msg, promise); } }; // 用于测试Handler的Channel EmbeddedChannel channel = new EmbeddedChannel(h1, h2, h3, h4); // 执行Inbound操作 channel.writeInbound(ByteBufAllocator.DEFAULT.buffer().writeBytes("hello".getBytes(StandardCharsets.UTF_8))); // 执行Outbound操作 channel.writeOutbound(ByteBufAllocator.DEFAULT.buffer().writeBytes("hello".getBytes(StandardCharsets.UTF_8))); } }- 1
- 2
- 3
- 4
- 5
- 6
- 7
- 8
- 9
- 10
- 11
- 12
- 13
- 14
- 15
- 16
- 17
- 18
- 19
- 20
- 21
- 22
- 23
- 24
- 25
- 26
- 27
- 28
- 29
- 30
- 31
- 32
- 33
- 34
- 35
- 36
- 37
- 38
- 39
- 40
- 41
- 42
- 43
SimpleChannel[In/Out]Handler
通过泛型指定处理的消息类型
仅处理该类数据,其他数据不会处理
ChannelDuplexHandler
可以同时作为入站和出站处理器
5、ByteBuf
调试工具方法
private static void log(ByteBuf buffer) { int length = buffer.readableBytes(); int rows = length / 16 + (length % 15 == 0 ? 0 : 1) + 4; StringBuilder buf = new StringBuilder(rows * 80 * 2) .append("read index:").append(buffer.readerIndex()) .append(" write index:").append(buffer.writerIndex()) .append(" capacity:").append(buffer.capacity()) .append(NEWLINE); appendPrettyHexDump(buf, buffer); System.out.println(buf.toString()); }- 1
- 2
- 3
- 4
- 5
- 6
- 7
- 8
- 9
- 10
- 11
该方法可以帮助我们更为详细地查看ByteBuf中的内容
创建
public class ByteBufStudy { public static void main(String[] args) { // 创建ByteBuf ByteBuf buffer = ByteBufAllocator.DEFAULT.buffer(16); log(buffer); // 向buffer中写入数据 StringBuilder sb = new StringBuilder(); for(int i = 0; i < 20; i++) { sb.append("a"); } buffer.writeBytes(sb.toString().getBytes(StandardCharsets.UTF_8)); // 查看写入结果 log(buffer); } }- 1
- 2
- 3
- 4
- 5
- 6
- 7
- 8
- 9
- 10
- 11
- 12
- 13
- 14
- 15
- 16
- 17
运行结果
read index:0 write index:0 capacity:16 read index:0 write index:20 capacity:64 +-------------------------------------------------+ | 0 1 2 3 4 5 6 7 8 9 a b c d e f | +--------+-------------------------------------------------+----------------+ |00000000| 61 61 61 61 61 61 61 61 61 61 61 61 61 61 61 61 |aaaaaaaaaaaaaaaa| |00000010| 61 61 61 61 |aaaa | +--------+-------------------------------------------------+----------------+- 1
- 2
- 3
- 4
- 5
- 6
- 7
- 8
- 9
ByteBuf通过
ByteBufAllocator选择allocator并调用对应的buffer()方法来创建的,默认使用直接内存作为ByteBuf,容量为256个字节,可以指定初始容量的大小当ByteBuf的容量无法容纳所有数据时,ByteBuf会进行扩容操作
如果在handler中创建ByteBuf,建议使用
ChannelHandlerContext ctx.alloc().buffer()来创建直接内存与堆内存
通过该方法创建的ByteBuf,使用的是基于直接内存的ByteBuf
ByteBuf buffer = ByteBufAllocator.DEFAULT.buffer(16);- 1
可以使用下面的代码来创建池化基于堆的 ByteBuf
ByteBuf buffer = ByteBufAllocator.DEFAULT.heapBuffer(16);- 1
也可以使用下面的代码来创建池化基于直接内存的 ByteBuf
ByteBuf buffer = ByteBufAllocator.DEFAULT.directBuffer(16);- 1
- 直接内存创建和销毁的代价昂贵,但读写性能高(少一次内存复制),适合配合池化功能一起用
- 直接内存对 GC 压力小,因为这部分内存不受 JVM 垃圾回收的管理,但也要注意及时主动释放
验证
public class ByteBufStudy { public static void main(String[] args) { // 默认使用的是直接内存 ByteBuf buffer = ByteBufAllocator.DEFAULT.buffer(16); System.out.println(buffer.getClass()); buffer = ByteBufAllocator.DEFAULT.heapBuffer(16); System.out.println(buffer.getClass()); buffer = ByteBufAllocator.DEFAULT.directBuffer(16); System.out.println(buffer.getClass()); } } // 使用池化的直接内存 class io.netty.buffer.PooledUnsafeDirectByteBuf // 使用池化的堆内存 class io.netty.buffer.PooledUnsafeHeapByteBuf // 使用池化的直接内存 class io.netty.buffer.PooledUnsafeDirectByteBufCopy- 1
- 2
- 3
- 4
- 5
- 6
- 7
- 8
- 9
- 10
- 11
- 12
- 13
- 14
- 15
- 16
- 17
- 18
- 19
- 20
- 21
池化与非池化
池化的最大意义在于可以重用 ByteBuf,优点有
- 没有池化,则每次都得创建新的 ByteBuf 实例,这个操作对直接内存代价昂贵,就算是堆内存,也会增加 GC 压力
- 有了池化,则可以重用池中 ByteBuf 实例,并且采用了与 jemalloc 类似的内存分配算法提升分配效率
- 高并发时,池化功能更节约内存,减少内存溢出的可能
池化功能是否开启,可以通过下面的系统环境变量来设置(也可以JVM调参)
-Dio.netty.allocator.type={unpooled|pooled}- 1
- 4.1 以后,非 Android 平台默认启用池化实现,Android 平台启用非池化实现
- 4.1 之前,池化功能还不成熟,默认是非池化实现
组成
ByteBuf主要有以下几个组成部分
-
最大容量与当前容量
- 在构造ByteBuf时,可传入两个参数,分别代表初始容量和最大容量,若未传入第二个参数(最大容量),最大容量默认为Integer.MAX_VALUE
- 当ByteBuf容量无法容纳所有数据时,会进行扩容操作,若超出最大容量,会抛出
java.lang.IndexOutOfBoundsException异常
-
读写操作不同于ByteBuffer只用position进行控制,
ByteBuf分别由读指针和写指针两个指针控制
。进行读写操作时,无需进行模式的切换
- 读指针前的部分被称为废弃部分,是已经读过的内容
- 读指针与写指针之间的空间称为可读部分
- 写指针与当前容量之间的空间称为可写部分

写入
常用方法如下
方法签名 含义 备注 writeBoolean(boolean value) 写入 boolean 值 用一字节 01|00 代表 true|false writeByte(int value) 写入 byte 值 writeShort(int value) 写入 short 值 writeInt(int value) 写入 int 值 Big Endian(大端写入),即 0x250,写入后 00 00 02 50 writeIntLE(int value) 写入 int 值 Little Endian(小端写入),即 0x250,写入后 50 02 00 00 writeLong(long value) 写入 long 值 writeChar(int value) 写入 char 值 writeFloat(float value) 写入 float 值 writeDouble(double value) 写入 double 值 writeBytes(ByteBuf src) 写入 netty 的 ByteBuf writeBytes(byte[] src) 写入 byte[] writeBytes(ByteBuffer src) 写入 nio 的 ByteBuffer int writeCharSequence(CharSequence sequence, Charset charset) 写入字符串 CharSequence为字符串类的父类,第二个参数为对应的字符集 注意
- 这些方法的未指明返回值的,其返回值都是 ByteBuf,意味着可以链式调用来写入不同的数据
- 网络传输中,默认习惯是 Big Endian,使用 writeInt(int value)
使用方法
public class ByteBufStudy { public static void main(String[] args) { // 创建ByteBuf ByteBuf buffer = ByteBufAllocator.DEFAULT.buffer(16, 20); log(buffer); // 向buffer中写入数据 buffer.writeBytes(new byte[]{1, 2, 3, 4}); log(buffer); buffer.writeInt(5); log(buffer); buffer.writeIntLE(6); log(buffer); buffer.writeLong(7); log(buffer); } }- 1
- 2
- 3
- 4
- 5
- 6
- 7
- 8
- 9
- 10
- 11
- 12
- 13
- 14
- 15
- 16
- 17
- 18
- 19
- 20
运行结果
read index:0 write index:0 capacity:16 read index:0 write index:4 capacity:16 +-------------------------------------------------+ | 0 1 2 3 4 5 6 7 8 9 a b c d e f | +--------+-------------------------------------------------+----------------+ |00000000| 01 02 03 04 |.... | +--------+-------------------------------------------------+----------------+ read index:0 write index:8 capacity:16 +-------------------------------------------------+ | 0 1 2 3 4 5 6 7 8 9 a b c d e f | +--------+-------------------------------------------------+----------------+ |00000000| 01 02 03 04 00 00 00 05 |........ | +--------+-------------------------------------------------+----------------+ read index:0 write index:12 capacity:16 +-------------------------------------------------+ | 0 1 2 3 4 5 6 7 8 9 a b c d e f | +--------+-------------------------------------------------+----------------+ |00000000| 01 02 03 04 00 00 00 05 06 00 00 00 |............ | +--------+-------------------------------------------------+----------------+ read index:0 write index:20 capacity:20 +-------------------------------------------------+ | 0 1 2 3 4 5 6 7 8 9 a b c d e f | +--------+-------------------------------------------------+----------------+ |00000000| 01 02 03 04 00 00 00 05 06 00 00 00 00 00 00 00 |................| |00000010| 00 00 00 07 |.... | +--------+-------------------------------------------------+----------------+- 1
- 2
- 3
- 4
- 5
- 6
- 7
- 8
- 9
- 10
- 11
- 12
- 13
- 14
- 15
- 16
- 17
- 18
- 19
- 20
- 21
- 22
- 23
- 24
- 25
- 26
- 27
- 28
- 29
- 30
还有一类方法是 set 开头的一系列方法,也可以写入数据,但不会改变写指针位置
扩容
当ByteBuf中的容量无法容纳写入的数据时,会进行扩容操作
buffer.writeLong(7); log(buffer); // 扩容前 read index:0 write index:12 capacity:16 ... // 扩容后 read index:0 write index:20 capacity:20 +-------------------------------------------------+ | 0 1 2 3 4 5 6 7 8 9 a b c d e f | +--------+-------------------------------------------------+----------------+ |00000000| 01 02 03 04 00 00 00 05 06 00 00 00 00 00 00 00 |................| |00000010| 00 00 00 07 |.... | +--------+-------------------------------------------------+----------------+- 1
- 2
- 3
- 4
- 5
- 6
- 7
- 8
- 9
- 10
- 11
- 12
- 13
- 14
扩容规则
-
如何写入后数据大小未超过 512 字节,则选择下一个 16 的整数倍进行扩容
- 例如写入后大小为 12 字节,则扩容后 capacity 是 16 字节
-
如果写入后数据大小超过 512 字节,则选择下一个 2n
- 例如写入后大小为 513 字节,则扩容后 capacity 是 210=1024 字节(29=512 已经不够了)
-
扩容不能超过 maxCapacity,否则会抛出
java.lang.IndexOutOfBoundsException异常
Exception in thread "main" java.lang.IndexOutOfBoundsException: writerIndex(20) + minWritableBytes(8) exceeds maxCapacity(20): PooledUnsafeDirectByteBuf(ridx: 0, widx: 20, cap: 20/20) ...- 1
- 2
读取
读取主要是通过一系列read方法进行读取,读取时会根据读取数据的字节数移动读指针
如果需要重复读取,需要调用
buffer.markReaderIndex()对读指针进行标记,并通过buffer.resetReaderIndex()将读指针恢复到mark标记的位置public class ByteBufStudy { public static void main(String[] args) { // 创建ByteBuf ByteBuf buffer = ByteBufAllocator.DEFAULT.buffer(16, 20); // 向buffer中写入数据 buffer.writeBytes(new byte[]{1, 2, 3, 4}); buffer.writeInt(5); // 读取4个字节 System.out.println(buffer.readByte()); System.out.println(buffer.readByte()); System.out.println(buffer.readByte()); System.out.println(buffer.readByte()); log(buffer); // 通过mark与reset实现重复读取 buffer.markReaderIndex(); System.out.println(buffer.readInt()); log(buffer); // 恢复到mark标记处 buffer.resetReaderIndex(); log(buffer); } }- 1
- 2
- 3
- 4
- 5
- 6
- 7
- 8
- 9
- 10
- 11
- 12
- 13
- 14
- 15
- 16
- 17
- 18
- 19
- 20
- 21
- 22
- 23
- 24
- 25
- 26
1 2 3 4 read index:4 write index:8 capacity:16 +-------------------------------------------------+ | 0 1 2 3 4 5 6 7 8 9 a b c d e f | +--------+-------------------------------------------------+----------------+ |00000000| 00 00 00 05 |.... | +--------+-------------------------------------------------+----------------+ 5 read index:8 write index:8 capacity:16 read index:4 write index:8 capacity:16 +-------------------------------------------------+ | 0 1 2 3 4 5 6 7 8 9 a b c d e f | +--------+-------------------------------------------------+----------------+ |00000000| 00 00 00 05 |.... | +--------+-------------------------------------------------+----------------+- 1
- 2
- 3
- 4
- 5
- 6
- 7
- 8
- 9
- 10
- 11
- 12
- 13
- 14
- 15
- 16
- 17
- 18
- 19
还有以 get 开头的一系列方法,这些方法不会改变读指针的位置
释放
由于 Netty 中有堆外内存(直接内存)的 ByteBuf 实现,堆外内存最好是手动来释放,而不是等 GC 垃圾回收。
- UnpooledHeapByteBuf 使用的是 JVM 内存,只需等 GC 回收内存即可
- UnpooledDirectByteBuf 使用的就是直接内存了,需要特殊的方法来回收内存
- PooledByteBuf 和它的子类使用了池化机制,需要更复杂的规则来回收内存
Netty 这里采用了引用计数法来控制回收内存,每个 ByteBuf 都实现了 ReferenceCounted 接口
- 每个 ByteBuf 对象的初始计数为 1
- 调用 release 方法计数减 1,如果计数为 0,ByteBuf 内存被回收
- 调用 retain 方法计数加 1,表示调用者没用完之前,其它 handler 即使调用了 release 也不会造成回收
- 当计数为 0 时,底层内存会被回收,这时即使 ByteBuf 对象还在,其各个方法均无法正常使用
释放规则
因为 pipeline 的存在,一般需要将 ByteBuf 传递给下一个 ChannelHandler,如果在每个 ChannelHandler 中都去调用 release ,就失去了传递性(如果在这个 ChannelHandler 内这个 ByteBuf 已完成了它的使命,那么便无须再传递)
基本规则是,谁是最后使用者,谁负责 release
-
起点,对于 NIO 实现来讲,在 io.netty.channel.nio.AbstractNioByteChannel.NioByteUnsafe.read 方法中首次创建 ByteBuf 放入 pipeline(line 163 pipeline.fireChannelRead(byteBuf))
-
入站 ByteBuf 处理原则
- 对原始 ByteBuf 不做处理,调用 ctx.fireChannelRead(msg) 向后传递,这时无须 release
- 将原始 ByteBuf 转换为其它类型的 Java 对象,这时 ByteBuf 就没用了,必须 release
- 如果不调用 ctx.fireChannelRead(msg) 向后传递,那么也必须 release
- 注意各种异常,如果 ByteBuf 没有成功传递到下一个 ChannelHandler,必须 release
- 假设消息一直向后传,那么 TailContext 会负责释放未处理消息(原始的 ByteBuf)
-
出站 ByteBuf 处理原则
- 出站消息最终都会转为 ByteBuf 输出,一直向前传,由 HeadContext flush 后 release
-
异常处理原则
-
有时候不清楚 ByteBuf 被引用了多少次,但又必须彻底释放,可以循环调用 release 直到返回 true
while (!buffer.release()) {}- 1
-
当ByteBuf被传到了pipeline的head与tail时,ByteBuf会被其中的方法彻底释放,但前提是ByteBuf被传递到了head与tail中
TailConext中释放ByteBuf的源码
protected void onUnhandledInboundMessage(Object msg) { try { logger.debug("Discarded inbound message {} that reached at the tail of the pipeline. Please check your pipeline configuration.", msg); } finally { // 具体的释放方法 ReferenceCountUtil.release(msg); } }- 1
- 2
- 3
- 4
- 5
- 6
- 7
- 8
判断传过来的是否为ByteBuf,是的话才需要释放
public static boolean release(Object msg) { return msg instanceof ReferenceCounted ? ((ReferenceCounted)msg).release() : false; }- 1
- 2
- 3
slice 切片
ByteBuf切片是【零拷贝】的体现之一,对原始 ByteBuf 进行切片成多个 ByteBuf,切片后的 ByteBuf 并没有发生内存复制,还是使用原始 ByteBuf 的内存,切片后的 ByteBuf 维护独立的 read,write 指针
得到分片后的buffer后,要调用其retain方法,使其内部的引用计数加一。避免原ByteBuf释放,导致切片buffer无法使用
修改原ByteBuf中的值,也会影响切片后得到的ByteBuf

public class TestSlice { public static void main(String[] args) { // 创建ByteBuf ByteBuf buffer = ByteBufAllocator.DEFAULT.buffer(16, 20); // 向buffer中写入数据 buffer.writeBytes(new byte[]{1, 2, 3, 4, 5, 6, 7, 8, 9, 10}); // 将buffer分成两部分 ByteBuf slice1 = buffer.slice(0, 5); ByteBuf slice2 = buffer.slice(5, 5); // 需要让分片的buffer引用计数加一 // 避免原Buffer释放导致分片buffer无法使用 slice1.retain(); slice2.retain(); log(slice1); log(slice2); // 更改原始buffer中的值 System.out.println("===========修改原buffer中的值==========="); buffer.setByte(0,5); System.out.println("===========打印slice1==========="); log(slice1); } }- 1
- 2
- 3
- 4
- 5
- 6
- 7
- 8
- 9
- 10
- 11
- 12
- 13
- 14
- 15
- 16
- 17
- 18
- 19
- 20
- 21
- 22
- 23
- 24
- 25
- 26
- 27
- 28
运行结果
read index:0 write index:5 capacity:5 +-------------------------------------------------+ | 0 1 2 3 4 5 6 7 8 9 a b c d e f | +--------+-------------------------------------------------+----------------+ |00000000| 01 02 03 04 05 |..... | +--------+-------------------------------------------------+----------------+ read index:0 write index:5 capacity:5 +-------------------------------------------------+ | 0 1 2 3 4 5 6 7 8 9 a b c d e f | +--------+-------------------------------------------------+----------------+ |00000000| 06 07 08 09 0a |..... | +--------+-------------------------------------------------+----------------+ ===========修改原buffer中的值=========== ===========打印slice1=========== read index:0 write index:5 capacity:5 +-------------------------------------------------+ | 0 1 2 3 4 5 6 7 8 9 a b c d e f | +--------+-------------------------------------------------+----------------+ |00000000| 05 02 03 04 05 |..... | +--------+-------------------------------------------------+----------------+- 1
- 2
- 3
- 4
- 5
- 6
- 7
- 8
- 9
- 10
- 11
- 12
- 13
- 14
- 15
- 16
- 17
- 18
- 19
- 20
duplicate
【零拷贝】的体现之一,就好比截取了原始ByteBuf所有内容,并且没有限制max capacity,也是与原始ByteBuf使用同一块底层内存,只是读写指针时独立的
![[外]](https://1000bd.com/contentImg/2022/07/31/065617874.png)
copy
深拷贝ByteBuf,使用新的内存!
CompositeByteBuf
组合ByteBuf,作用是将ByteBuf内存内容直接映射到这里,不创建新的内存。
addComponents(b1, b2, ...)按顺序组合多个ByteBuf内存(读写指针不变!!!)addComponent(true, b1, b2, ...)读写指针会改变~Unpooled
Unpooled 是一个工具类,类如其名,提供了非池化的ByteBuf创建、组合、复制等操作。
此处仅介绍与【零拷贝】相关的wrappedBuffer方法,可以用来包装ByteBuf
public class UnpooledTest { public static void main(String[] args) { ByteBuf b1 = ByteBufAllocator.DEFAULT.buffer(5); b1.writeBytes(new byte[]{1, 2, 3, 4, 5}); ByteBuf b2 = ByteBufAllocator.DEFAULT.buffer(5); b1.writeBytes(new byte[]{6, 7, 8, 9, 10}); // 包装 ByteBuf个数超过一个时,底层将使用ComponentByteBuf进行组合 ByteBuf b3 = Unpooled.wrappedBuffer(b1, b2); System.out.println(ByteBufUtil.prettyHexDump(b3)); } }- 1
- 2
- 3
- 4
- 5
- 6
- 7
- 8
- 9
- 10
- 11
- 12
输出
+-------------------------------------------------+ | 0 1 2 3 4 5 6 7 8 9 a b c d e f | +--------+-------------------------------------------------+----------------+ |00000000| 01 02 03 04 05 06 07 08 09 0a |.......... | +--------+-------------------------------------------------+----------------+- 1
- 2
- 3
- 4
- 5
也可以用来包装普通字节数组,底层也不会有拷贝操作
ByteBuf b4 = Unpooled.wrappedBuffer(new byte[]{1, 2, 3}, new byte[]{4, 5, 6}); System.out.println(ByteBufUtil.prettyHexDump(b4));- 1
- 2
输出
+-------------------------------------------------+ | 0 1 2 3 4 5 6 7 8 9 a b c d e f | +--------+-------------------------------------------------+----------------+ |00000000| 01 02 03 04 05 06 |...... | +--------+-------------------------------------------------+----------------+- 1
- 2
- 3
- 4
- 5
ByteBuf 优势
-
池化思想 - 可以重用池中 ByteBuf 实例,更节约内存,减少内存溢出的可能
-
读写指针分离,不需要像 ByteBuffer 一样切换读写模式
-
可以自动扩容
-
支持链式调用,使用更流畅
-
很多地方体现零拷贝,例如
- slice、duplicate、CompositeByteBuf
四、应用
1、粘包与半包
ChannelInboundHandlerAdapter类中的channelActive方法在连接channel后触发执行!
服务器代码
public class StudyServer { static final Logger log = LoggerFactory.getLogger(StudyServer.class); void start() { NioEventLoopGroup boss = new NioEventLoopGroup(1); NioEventLoopGroup worker = new NioEventLoopGroup(); try { ServerBootstrap serverBootstrap = new ServerBootstrap(); serverBootstrap.channel(NioServerSocketChannel.class); serverBootstrap.group(boss, worker); serverBootstrap.childHandler(new ChannelInitializer<SocketChannel>() { @Override protected void initChannel(SocketChannel ch) { ch.pipeline().addLast(new LoggingHandler(LogLevel.DEBUG)); ch.pipeline().addLast(new ChannelInboundHandlerAdapter() { @Override public void channelActive(ChannelHandlerContext ctx) throws Exception { // 连接建立时会执行该方法 log.debug("connected {}", ctx.channel()); super.channelActive(ctx); } @Override public void channelInactive(ChannelHandlerContext ctx) throws Exception { // 连接断开时会执行该方法 log.debug("disconnect {}", ctx.channel()); super.channelInactive(ctx); } }); } }); ChannelFuture channelFuture = serverBootstrap.bind(8080); log.debug("{} binding...", channelFuture.channel()); channelFuture.sync(); log.debug("{} bound...", channelFuture.channel()); // 关闭channel channelFuture.channel().closeFuture().sync(); } catch (InterruptedException e) { log.error("server error", e); } finally { boss.shutdownGracefully(); worker.shutdownGracefully(); log.debug("stopped"); } } public static void main(String[] args) { new StudyServer().start(); } }- 1
- 2
- 3
- 4
- 5
- 6
- 7
- 8
- 9
- 10
- 11
- 12
- 13
- 14
- 15
- 16
- 17
- 18
- 19
- 20
- 21
- 22
- 23
- 24
- 25
- 26
- 27
- 28
- 29
- 30
- 31
- 32
- 33
- 34
- 35
- 36
- 37
- 38
- 39
- 40
- 41
- 42
- 43
- 44
- 45
- 46
- 47
- 48
- 49
粘包现象
客户端代码
public class StudyClient { static final Logger log = LoggerFactory.getLogger(StudyClient.class); public static void main(String[] args) { NioEventLoopGroup worker = new NioEventLoopGroup(); try { Bootstrap bootstrap = new Bootstrap(); bootstrap.channel(NioSocketChannel.class); bootstrap.group(worker); bootstrap.handler(new ChannelInitializer<SocketChannel>() { @Override protected void initChannel(SocketChannel ch) throws Exception { log.debug("connected..."); ch.pipeline().addLast(new ChannelInboundHandlerAdapter() { @Override public void channelActive(ChannelHandlerContext ctx) throws Exception { log.debug("sending..."); // 每次发送16个字节的数据,共发送10次 for (int i = 0; i < 10; i++) { ByteBuf buffer = ctx.alloc().buffer(); buffer.writeBytes(new byte[]{0, 1, 2, 3, 4, 5, 6, 7, 8, 9, 10, 11, 12, 13, 14, 15}); ctx.writeAndFlush(buffer); } } }); } }); ChannelFuture channelFuture = bootstrap.connect("127.0.0.1", 8080).sync(); channelFuture.channel().closeFuture().sync(); } catch (InterruptedException e) { log.error("client error", e); } finally { worker.shutdownGracefully(); } } }- 1
- 2
- 3
- 4
- 5
- 6
- 7
- 8
- 9
- 10
- 11
- 12
- 13
- 14
- 15
- 16
- 17
- 18
- 19
- 20
- 21
- 22
- 23
- 24
- 25
- 26
- 27
- 28
- 29
- 30
- 31
- 32
- 33
- 34
- 35
- 36
服务器接收结果
7999 [nioEventLoopGroup-3-1] DEBUG io.netty.handler.logging.LoggingHandler - [id: 0x5b43ecb0, L:/127.0.0.1:8080 - R:/127.0.0.1:53797] READ: 160B +-------------------------------------------------+ | 0 1 2 3 4 5 6 7 8 9 a b c d e f | +--------+-------------------------------------------------+----------------+ |00000000| 00 01 02 03 04 05 06 07 08 09 0a 0b 0c 0d 0e 0f |................| |00000010| 00 01 02 03 04 05 06 07 08 09 0a 0b 0c 0d 0e 0f |................| |00000020| 00 01 02 03 04 05 06 07 08 09 0a 0b 0c 0d 0e 0f |................| |00000030| 00 01 02 03 04 05 06 07 08 09 0a 0b 0c 0d 0e 0f |................| |00000040| 00 01 02 03 04 05 06 07 08 09 0a 0b 0c 0d 0e 0f |................| |00000050| 00 01 02 03 04 05 06 07 08 09 0a 0b 0c 0d 0e 0f |................| |00000060| 00 01 02 03 04 05 06 07 08 09 0a 0b 0c 0d 0e 0f |................| |00000070| 00 01 02 03 04 05 06 07 08 09 0a 0b 0c 0d 0e 0f |................| |00000080| 00 01 02 03 04 05 06 07 08 09 0a 0b 0c 0d 0e 0f |................| |00000090| 00 01 02 03 04 05 06 07 08 09 0a 0b 0c 0d 0e 0f |................| +--------+-------------------------------------------------+----------------+- 1
- 2
- 3
- 4
- 5
- 6
- 7
- 8
- 9
- 10
- 11
- 12
- 13
- 14
- 15
可见虽然客户端是分别以16字节为单位,通过channel向服务器发送了10次数据,可是服务器端却只接收了一次,接收数据的大小为160B,即客户端发送的数据总大小,这就是粘包现象
半包现象
将客户端-服务器之间的channel容量进行调整
服务器代码
// 调整channel的容量 serverBootstrap.option(ChannelOption.SO_RCVBUF, 10);- 1
- 2
注意
serverBootstrap.option(ChannelOption.SO_RCVBUF, 10) 影响的底层接收缓冲区(即滑动窗口)大小,仅决定了 netty 读取的最小单位,netty 实际每次读取的一般是它的整数倍
服务器接收结果
5901 [nioEventLoopGroup-3-1] DEBUG io.netty.handler.logging.LoggingHandler - [id: 0xc73284f3, L:/127.0.0.1:8080 - R:/127.0.0.1:49679] READ: 36B +-------------------------------------------------+ | 0 1 2 3 4 5 6 7 8 9 a b c d e f | +--------+-------------------------------------------------+----------------+ |00000000| 00 01 02 03 04 05 06 07 08 09 0a 0b 0c 0d 0e 0f |................| |00000010| 00 01 02 03 04 05 06 07 08 09 0a 0b 0c 0d 0e 0f |................| |00000020| 00 01 02 03 |.... | +--------+-------------------------------------------------+----------------+ 5901 [nioEventLoopGroup-3-1] DEBUG io.netty.handler.logging.LoggingHandler - [id: 0xc73284f3, L:/127.0.0.1:8080 - R:/127.0.0.1:49679] READ: 40B +-------------------------------------------------+ | 0 1 2 3 4 5 6 7 8 9 a b c d e f | +--------+-------------------------------------------------+----------------+ |00000000| 04 05 06 07 08 09 0a 0b 0c 0d 0e 0f 00 01 02 03 |................| |00000010| 04 05 06 07 08 09 0a 0b 0c 0d 0e 0f 00 01 02 03 |................| |00000020| 04 05 06 07 08 09 0a 0b |........ | +--------+-------------------------------------------------+----------------+ 5901 [nioEventLoopGroup-3-1] DEBUG io.netty.handler.logging.LoggingHandler - [id: 0xc73284f3, L:/127.0.0.1:8080 - R:/127.0.0.1:49679] READ: 40B +-------------------------------------------------+ | 0 1 2 3 4 5 6 7 8 9 a b c d e f | +--------+-------------------------------------------------+----------------+ |00000000| 0c 0d 0e 0f 00 01 02 03 04 05 06 07 08 09 0a 0b |................| |00000010| 0c 0d 0e 0f 00 01 02 03 04 05 06 07 08 09 0a 0b |................| |00000020| 0c 0d 0e 0f 00 01 02 03 |........ | +--------+-------------------------------------------------+----------------+ 5901 [nioEventLoopGroup-3-1] DEBUG io.netty.handler.logging.LoggingHandler - [id: 0xc73284f3, L:/127.0.0.1:8080 - R:/127.0.0.1:49679] READ: 40B +-------------------------------------------------+ | 0 1 2 3 4 5 6 7 8 9 a b c d e f | +--------+-------------------------------------------------+----------------+ |00000000| 04 05 06 07 08 09 0a 0b 0c 0d 0e 0f 00 01 02 03 |................| |00000010| 04 05 06 07 08 09 0a 0b 0c 0d 0e 0f 00 01 02 03 |................| |00000020| 04 05 06 07 08 09 0a 0b |........ | +--------+-------------------------------------------------+----------------+ 5901 [nioEventLoopGroup-3-1] DEBUG io.netty.handler.logging.LoggingHandler - [id: 0xc73284f3, L:/127.0.0.1:8080 - R:/127.0.0.1:49679] READ: 4B +-------------------------------------------------+ | 0 1 2 3 4 5 6 7 8 9 a b c d e f | +--------+-------------------------------------------------+----------------+ |00000000| 0c 0d 0e 0f |.... | +--------+-------------------------------------------------+----------------+- 1
- 2
- 3
- 4
- 5
- 6
- 7
- 8
- 9
- 10
- 11
- 12
- 13
- 14
- 15
- 16
- 17
- 18
- 19
- 20
- 21
- 22
- 23
- 24
- 25
- 26
- 27
- 28
- 29
- 30
- 31
- 32
- 33
- 34
- 35
- 36
- 37
- 38
- 39
- 40
- 41
- 42
可见客户端每次发送的数据,因channel容量不足,无法将发送的数据一次性接收,便产生了半包现象
现象分析
粘包
- 现象
- 发送 abc def,接收 abcdef
- 原因
- 应用层
- 接收方 ByteBuf 设置太大(Netty 默认1024)
- 传输层-网络层
- 滑动窗口:假设发送方 256 bytes 表示一个完整报文,但由于接收方处理不及时且**窗口大小足够大(大于256 bytes),这 256 bytes 字节就会缓冲在接收方的滑动窗口中,**当滑动窗口中缓冲了多个报文就会粘包
- Nagle 算法:会造成粘包
- 应用层
半包
- 现象
- 发送 abcdef,接收 abc def
- 原因
- 应用层
- 接收方 ByteBuf 小于实际发送数据量
- 传输层-网络层
- 滑动窗口:假设接收方的窗口只剩了 128 bytes,发送方的报文大小是 256 bytes,这时接收方窗口中无法容纳发送方的全部报文,发送方只能先发送前 128 bytes,等待 ack 后才能发送剩余部分,这就造成了半包
- 数据链路层
- MSS 限制(网卡限制):当发送的数据超过 MSS 限制后,会将数据切分发送,就会造成半包
- 应用层
本质
发生粘包与半包现象的本质是因为 TCP 是流式协议,消息无边界
解决方案
短链接
客户端每次向服务器发送数据以后,就与服务器断开连接,此时的消息边界为连接建立到连接断开。这时便无需使用滑动窗口等技术来缓冲数据,则不会发生粘包现象。但如果一次性数据发送过多,接收方无法一次性容纳所有数据,还是会发生半包现象,所以短链接无法解决半包现象
客户端代码改进
修改channelActive方法
public void channelActive(ChannelHandlerContext ctx) throws Exception { log.debug("sending..."); ByteBuf buffer = ctx.alloc().buffer(16); buffer.writeBytes(new byte[]{0, 1, 2, 3, 4, 5, 6, 7, 8, 9, 10, 11, 12, 13, 14, 15}); ctx.writeAndFlush(buffer); // 使用短链接,每次发送完毕后就断开连接 ctx.channel().close(); }- 1
- 2
- 3
- 4
- 5
- 6
- 7
- 8
将发送步骤整体封装为send()方法,调用10次send()方法,模拟发送10次数据
public static void main(String[] args) { // 发送10次 for (int i = 0; i < 10; i++) { send(); } }- 1
- 2
- 3
- 4
- 5
- 6
运行结果
6452 [nioEventLoopGroup-3-1] DEBUG io.netty.handler.logging.LoggingHandler - [id: 0x3eb6a684, L:/127.0.0.1:8080 - R:/127.0.0.1:65024] ACTIVE 6468 [nioEventLoopGroup-3-1] DEBUG io.netty.handler.logging.LoggingHandler - [id: 0x3eb6a684, L:/127.0.0.1:8080 - R:/127.0.0.1:65024] READ: 16B +-------------------------------------------------+ | 0 1 2 3 4 5 6 7 8 9 a b c d e f | +--------+-------------------------------------------------+----------------+ |00000000| 00 01 02 03 04 05 06 07 08 09 0a 0b 0c 0d 0e 0f |................| +--------+-------------------------------------------------+----------------+ 6468 [nioEventLoopGroup-3-1] DEBUG io.netty.handler.logging.LoggingHandler - [id: 0x3eb6a684, L:/127.0.0.1:8080 ! R:/127.0.0.1:65024] INACTIVE 6483 [nioEventLoopGroup-3-2] DEBUG io.netty.handler.logging.LoggingHandler - [id: 0x7dcc31ff, L:/127.0.0.1:8080 - R:/127.0.0.1:65057] ACTIVE 6483 [nioEventLoopGroup-3-2] DEBUG io.netty.handler.logging.LoggingHandler - [id: 0x7dcc31ff, L:/127.0.0.1:8080 - R:/127.0.0.1:65057] READ: 16B +-------------------------------------------------+ | 0 1 2 3 4 5 6 7 8 9 a b c d e f | +--------+-------------------------------------------------+----------------+ |00000000| 00 01 02 03 04 05 06 07 08 09 0a 0b 0c 0d 0e 0f |................| +--------+-------------------------------------------------+----------------+ 6483 [nioEventLoopGroup-3-2] DEBUG io.netty.handler.logging.LoggingHandler - [id: 0x7dcc31ff, L:/127.0.0.1:8080 ! R:/127.0.0.1:65057] INACTIVE ...- 1
- 2
- 3
- 4
- 5
- 6
- 7
- 8
- 9
- 10
- 11
- 12
- 13
- 14
- 15
- 16
- 17
- 18
- 19
- 20
- 21
- 22
- 23
客户端先于服务器建立连接,此时控制台打印
ACTIVE,之后客户端向服务器发送了16B的数据,发送后断开连接,此时控制台打印INACTIVE,可见未出现粘包现象定长解码器
客户端于服务器约定一个最大长度,保证客户端每次发送的数据长度都不会大于该长度。若发送数据长度不足则需要补齐至该长度
服务器接收数据时,将接收到的数据按照约定的最大长度进行拆分,即使发送过程中产生了粘包,也可以通过定长解码器将数据正确地进行拆分。服务端需要用到
FixedLengthFrameDecoder对数据进行定长解码,具体使用方法如下ch.pipeline().addLast(new FixedLengthFrameDecoder(16));- 1
客户端代码
客户端发送数据的代码如下
// 约定最大长度为16 final int maxLength = 16; // 被发送的数据 char c = 'a'; // 向服务器发送10个报文 for (int i = 0; i < 10; i++) { ByteBuf buffer = ctx.alloc().buffer(maxLength); // 定长byte数组,未使用部分会以0进行填充 byte[] bytes = new byte[maxLength]; // 生成长度为0~15的数据 for (int j = 0; j < (int)(Math.random()*(maxLength-1)); j++) { bytes[j] = (byte) c; } buffer.writeBytes(bytes); c++; // 将数据发送给服务器 ctx.writeAndFlush(buffer); }- 1
- 2
- 3
- 4
- 5
- 6
- 7
- 8
- 9
- 10
- 11
- 12
- 13
- 14
- 15
- 16
- 17
- 18
服务器代码
使用
FixedLengthFrameDecoder对粘包数据进行拆分,该handler需要添加在LoggingHandler之前,保证数据被打印时已被拆分// 通过定长解码器对粘包数据进行拆分 ch.pipeline().addLast(new FixedLengthFrameDecoder(16)); ch.pipeline().addLast(new LoggingHandler(LogLevel.DEBUG));- 1
- 2
- 3
运行结果
8222 [nioEventLoopGroup-3-1] DEBUG io.netty.handler.logging.LoggingHandler - [id: 0xbc122d07, L:/127.0.0.1:8080 - R:/127.0.0.1:52954] READ: 16B +-------------------------------------------------+ | 0 1 2 3 4 5 6 7 8 9 a b c d e f | +--------+-------------------------------------------------+----------------+ |00000000| 61 61 61 61 00 00 00 00 00 00 00 00 00 00 00 00 |aaaa............| +--------+-------------------------------------------------+----------------+ 8222 [nioEventLoopGroup-3-1] DEBUG io.netty.handler.logging.LoggingHandler - [id: 0xbc122d07, L:/127.0.0.1:8080 - R:/127.0.0.1:52954] READ: 16B +-------------------------------------------------+ | 0 1 2 3 4 5 6 7 8 9 a b c d e f | +--------+-------------------------------------------------+----------------+ |00000000| 62 62 62 00 00 00 00 00 00 00 00 00 00 00 00 00 |bbb.............| +--------+-------------------------------------------------+----------------+ 8222 [nioEventLoopGroup-3-1] DEBUG io.netty.handler.logging.LoggingHandler - [id: 0xbc122d07, L:/127.0.0.1:8080 - R:/127.0.0.1:52954] READ: 16B +-------------------------------------------------+ | 0 1 2 3 4 5 6 7 8 9 a b c d e f | +--------+-------------------------------------------------+----------------+ |00000000| 63 63 00 00 00 00 00 00 00 00 00 00 00 00 00 00 |cc..............| +--------+-------------------------------------------------+----------------+ ...- 1
- 2
- 3
- 4
- 5
- 6
- 7
- 8
- 9
- 10
- 11
- 12
- 13
- 14
- 15
- 16
- 17
- 18
- 19
- 20
- 21
- 22
- 23
行解码器
行解码器的是通过分隔符对数据进行拆分来解决粘包半包问题的
可以通过
LineBasedFrameDecoder(int maxLength)来拆分以换行符(\n)为分隔符的数据,也可以通过DelimiterBasedFrameDecoder(int maxFrameLength, ByteBuf... delimiters)来指定通过什么分隔符来拆分数据(可以传入多个分隔符)两种解码器都需要传入数据的最大长度,若超出最大长度,会抛出
TooLongFrameException异常以换行符 \n 为分隔符
客户端代码
// 约定最大长度为 64 final int maxLength = 64; // 被发送的数据 char c = 'a'; for (int i = 0; i < 10; i++) { ByteBuf buffer = ctx.alloc().buffer(maxLength); // 生成长度为0~62的数据 Random random = new Random(); StringBuilder sb = new StringBuilder(); for (int j = 0; j < (int)(random.nextInt(maxLength-2)); j++) { sb.append(c); } // 数据以 \n 结尾 sb.append("\n"); buffer.writeBytes(sb.toString().getBytes(StandardCharsets.UTF_8)); c++; // 将数据发送给服务器 ctx.writeAndFlush(buffer); }- 1
- 2
- 3
- 4
- 5
- 6
- 7
- 8
- 9
- 10
- 11
- 12
- 13
- 14
- 15
- 16
- 17
- 18
- 19
服务器代码
// 通过行解码器对粘包数据进行拆分,以 \n 为分隔符 // 需要指定最大长度 ch.pipeline().addLast(new DelimiterBasedFrameDecoder(64)); ch.pipeline().addLast(new LoggingHandler(LogLevel.DEBUG));- 1
- 2
- 3
- 4
运行结果
4184 [nioEventLoopGroup-3-1] DEBUG io.netty.handler.logging.LoggingHandler - [id: 0x9d6ac701, L:/127.0.0.1:8080 - R:/127.0.0.1:58282] READ: 10B +-------------------------------------------------+ | 0 1 2 3 4 5 6 7 8 9 a b c d e f | +--------+-------------------------------------------------+----------------+ |00000000| 61 61 61 61 61 61 61 61 61 61 |aaaaaaaaaa | +--------+-------------------------------------------------+----------------+ 4184 [nioEventLoopGroup-3-1] DEBUG io.netty.handler.logging.LoggingHandler - [id: 0x9d6ac701, L:/127.0.0.1:8080 - R:/127.0.0.1:58282] READ: 11B +-------------------------------------------------+ | 0 1 2 3 4 5 6 7 8 9 a b c d e f | +--------+-------------------------------------------------+----------------+ |00000000| 62 62 62 62 62 62 62 62 62 62 62 |bbbbbbbbbbb | +--------+-------------------------------------------------+----------------+ 4184 [nioEventLoopGroup-3-1] DEBUG io.netty.handler.logging.LoggingHandler - [id: 0x9d6ac701, L:/127.0.0.1:8080 - R:/127.0.0.1:58282] READ: 2B +-------------------------------------------------+ | 0 1 2 3 4 5 6 7 8 9 a b c d e f | +--------+-------------------------------------------------+----------------+ |00000000| 63 63 |cc | +--------+-------------------------------------------------+----------------+ ...- 1
- 2
- 3
- 4
- 5
- 6
- 7
- 8
- 9
- 10
- 11
- 12
- 13
- 14
- 15
- 16
- 17
- 18
- 19
- 20
- 21
- 22
以自定义分隔符 \c 为分隔符
客户端代码
... // 数据以 \c 结尾 sb.append("\\c"); buffer.writeBytes(sb.toString().getBytes(StandardCharsets.UTF_8)); ...- 1
- 2
- 3
- 4
- 5
- 6
- 7
服务器代码
// 将分隔符放入ByteBuf中 ByteBuf bufSet = ch.alloc().buffer().writeBytes("\\c".getBytes(StandardCharsets.UTF_8)); // 通过行解码器对粘包数据进行拆分,以 \c 为分隔符 ch.pipeline().addLast(new DelimiterBasedFrameDecoder(64, ch.alloc().buffer().writeBytes(bufSet))); ch.pipeline().addLast(new LoggingHandler(LogLevel.DEBUG));- 1
- 2
- 3
- 4
- 5
运行结果
8246 [nioEventLoopGroup-3-1] DEBUG io.netty.handler.logging.LoggingHandler - [id: 0x86215ccd, L:/127.0.0.1:8080 - R:/127.0.0.1:65159] READ: 14B +-------------------------------------------------+ | 0 1 2 3 4 5 6 7 8 9 a b c d e f | +--------+-------------------------------------------------+----------------+ |00000000| 61 61 61 61 61 61 61 61 61 61 61 61 61 61 |aaaaaaaaaaaaaa | +--------+-------------------------------------------------+----------------+ 8247 [nioEventLoopGroup-3-1] DEBUG io.netty.handler.logging.LoggingHandler - [id: 0x86215ccd, L:/127.0.0.1:8080 - R:/127.0.0.1:65159] READ: 3B +-------------------------------------------------+ | 0 1 2 3 4 5 6 7 8 9 a b c d e f | +--------+-------------------------------------------------+----------------+ |00000000| 62 62 62 |bbb | +--------+-------------------------------------------------+----------------+ ...- 1
- 2
- 3
- 4
- 5
- 6
- 7
- 8
- 9
- 10
- 11
- 12
- 13
- 14
- 15
- 16
长度字段解码器
在传送数据时可以在数据中添加一个用于表示有用数据长度的字段,在解码时读取出这个用于表明长度的字段,同时读取其他相关参数,即可知道最终需要的数据是什么样子的
LengthFieldBasedFrameDecoder解码器可以提供更为丰富的拆分方法,其构造方法有五个参数public LengthFieldBasedFrameDecoder( int maxFrameLength, int lengthFieldOffset, int lengthFieldLength, int lengthAdjustment, int initialBytesToStrip)- 1
- 2
- 3
- 4
参数解析
- maxFrameLength 数据最大长度
- 表示数据的最大长度(包括附加信息、长度标识等内容)
- lengthFieldOffset 数据长度标识的起始偏移量
- 用于指明数据第几个字节开始是用于标识有用字节长度的,因为前面可能还有其他附加信息
- lengthFieldLength 数据长度标识所占字节数(用于指明有用数据的长度)
- 数据中用于表示有用数据长度的标识所占的字节数
- lengthAdjustment 长度表示与有用数据的偏移量
- 用于指明数据长度标识和有用数据之间的距离,因为两者之间还可能有附加信息
- initialBytesToStrip 数据读取起点
- 读取起点,不读取 0 ~ initialBytesToStrip 之间的数据
参数图解

lengthFieldOffset = 0 lengthFieldLength = 2 lengthAdjustment = 0 initialBytesToStrip = 0 (= do not strip header) BEFORE DECODE (14 bytes) AFTER DECODE (14 bytes) +--------+----------------+ +--------+----------------+ | Length | Actual Content |----->| Length | Actual Content | | 0x000C | "HELLO, WORLD" | | 0x000C | "HELLO, WORLD" | +--------+----------------+ +--------+----------------+- 1
- 2
- 3
- 4
- 5
- 6
- 7
- 8
- 9
- 10
从0开始即为长度标识,长度标识长度为2个字节
0x000C 即为后面
HELLO, WORLD的长度
lengthFieldOffset = 0 lengthFieldLength = 2 lengthAdjustment = 0 initialBytesToStrip = 2 (= the length of the Length field) BEFORE DECODE (14 bytes) AFTER DECODE (12 bytes) +--------+----------------+ +----------------+ | Length | Actual Content |----->| Actual Content | | 0x000C | "HELLO, WORLD" | | "HELLO, WORLD" | +--------+----------------+ +----------------+- 1
- 2
- 3
- 4
- 5
- 6
- 7
- 8
- 9
- 10
从0开始即为长度标识,长度标识长度为2个字节,读取时从第二个字节开始读取(此处即跳过长度标识)
因为跳过了用于表示长度的2个字节,所以此处直接读取
HELLO, WORLD
lengthFieldOffset = 2 (= the length of Header 1) lengthFieldLength = 3 lengthAdjustment = 0 initialBytesToStrip = 0 BEFORE DECODE (17 bytes) AFTER DECODE (17 bytes) +----------+----------+----------------+ +----------+----------+----------------+ | Header 1 | Length | Actual Content |----->| Header 1 | Length | Actual Content | | 0xCAFE | 0x00000C | "HELLO, WORLD" | | 0xCAFE | 0x00000C | "HELLO, WORLD" | +----------+----------+----------------+ +----------+----------+----------------+- 1
- 2
- 3
- 4
- 5
- 6
- 7
- 8
- 9
- 10
长度标识前面还有2个字节的其他内容(0xCAFE),第三个字节开始才是长度标识,长度表示长度为3个字节(0x00000C)
Header1中有附加信息,读取长度标识时需要跳过这些附加信息来获取长度
lengthFieldOffset = 0 lengthFieldLength = 3 lengthAdjustment = 2 (= the length of Header 1) initialBytesToStrip = 0 BEFORE DECODE (17 bytes) AFTER DECODE (17 bytes) +----------+----------+----------------+ +----------+----------+----------------+ | Length | Header 1 | Actual Content |----->| Length | Header 1 | Actual Content | | 0x00000C | 0xCAFE | "HELLO, WORLD" | | 0x00000C | 0xCAFE | "HELLO, WORLD" | +----------+----------+----------------+ +----------+----------+----------------+- 1
- 2
- 3
- 4
- 5
- 6
- 7
- 8
- 9
- 10
从0开始即为长度标识,长度标识长度为3个字节,长度标识之后还有2个字节的其他内容(0xCAFE)
长度标识(0x00000C)表示的是从其后lengthAdjustment(2个字节)开始的数据的长度,即
HELLO, WORLD,不包括0xCAFE
lengthFieldOffset = 1 (= the length of HDR1) lengthFieldLength = 2 lengthAdjustment = 1 (= the length of HDR2) initialBytesToStrip = 3 (= the length of HDR1 + LEN) BEFORE DECODE (16 bytes) AFTER DECODE (13 bytes) +------+--------+------+----------------+ +------+----------------+ | HDR1 | Length | HDR2 | Actual Content |----->| HDR2 | Actual Content | | 0xCA | 0x000C | 0xFE | "HELLO, WORLD" | | 0xFE | "HELLO, WORLD" | +------+--------+------+----------------+ +------+----------------+- 1
- 2
- 3
- 4
- 5
- 6
- 7
- 8
- 9
- 10
长度标识前面有1个字节的其他内容,后面也有1个字节的其他内容,读取时从长度标识之后3个字节处开始读取,即读取
0xFE HELLO, WORLD
使用
通过 EmbeddedChannel 对 handler 进行测试
public class EncoderStudy { public static void main(String[] args) { // 模拟服务器 // 使用EmbeddedChannel测试handler EmbeddedChannel channel = new EmbeddedChannel( // 数据最大长度为1KB,长度标识前后各有1个字节的附加信息,长度标识长度为4个字节(int) new LengthFieldBasedFrameDecoder(1024, 1, 4, 1, 0), new LoggingHandler(LogLevel.DEBUG) ); // 模拟客户端,写入数据 ByteBuf buffer = ByteBufAllocator.DEFAULT.buffer(); send(buffer, "Hello"); channel.writeInbound(buffer); send(buffer, "World"); channel.writeInbound(buffer); } private static void send(ByteBuf buf, String msg) { // 得到数据的长度 int length = msg.length(); byte[] bytes = msg.getBytes(StandardCharsets.UTF_8); // 将数据信息写入buf // 写入长度标识前的其他信息 buf.writeByte(0xCA); // 写入数据长度标识 buf.writeInt(length); // 写入长度标识后的其他信息 buf.writeByte(0xFE); // 写入具体的数据 buf.writeBytes(bytes); } }- 1
- 2
- 3
- 4
- 5
- 6
- 7
- 8
- 9
- 10
- 11
- 12
- 13
- 14
- 15
- 16
- 17
- 18
- 19
- 20
- 21
- 22
- 23
- 24
- 25
- 26
- 27
- 28
- 29
- 30
- 31
- 32
- 33
运行结果
146 [main] DEBUG io.netty.handler.logging.LoggingHandler - [id: 0xembedded, L:embedded - R:embedded] READ: 11B +-------------------------------------------------+ | 0 1 2 3 4 5 6 7 8 9 a b c d e f | +--------+-------------------------------------------------+----------------+ |00000000| ca 00 00 00 05 fe 48 65 6c 6c 6f |......Hello | +--------+-------------------------------------------------+----------------+ 146 [main] DEBUG io.netty.handler.logging.LoggingHandler - [id: 0xembedded, L:embedded - R:embedded] READ: 11B +-------------------------------------------------+ | 0 1 2 3 4 5 6 7 8 9 a b c d e f | +--------+-------------------------------------------------+----------------+ |00000000| ca 00 00 00 05 fe 57 6f 72 6c 64 |......World | +--------+-------------------------------------------------+----------------+- 1
- 2
- 3
- 4
- 5
- 6
- 7
- 8
- 9
- 10
- 11
- 12
- 13
2、协议设计与解析
协议的作用
TCP/IP 中消息传输基于流的方式,没有边界
协议的目的就是划定消息的边界,制定通信双方要共同遵守的通信规则
Redis协议
如果我们要向Redis服务器发送一条
set name GuoKun的指令,需要遵守如下协议// 该指令一共有3部分,每条指令之后都要添加回车与换行符 *3\r\n // 第一个指令的长度是3 $3\r\n // 第一个指令是set指令 set\r\n // 下面的指令以此类推 $4\r\n name\r\n $5\r\n GuoKun\r\n- 1
- 2
- 3
- 4
- 5
- 6
- 7
- 8
- 9
- 10
- 11
客户端代码如下
public class RedisNetProtocol { // 回车与换行符 static final byte[] LINE = {'\r','\n'}; public static void main(String[] args) { NioEventLoopGroup group; group = new NioEventLoopGroup(); try { ChannelFuture channelFuture = new Bootstrap() .group(group) .channel(NioSocketChannel.class) .handler(new ChannelInitializer<SocketChannel>() { @Override protected void initChannel(SocketChannel ch) { // 打印日志 ch.pipeline().addLast(new LoggingHandler(LogLevel.DEBUG)); ch.pipeline().addLast(new ChannelInboundHandlerAdapter() { @Override public void channelActive(ChannelHandlerContext ctx) throws Exception { // 获得ByteBuf ByteBuf buffer = ctx.alloc().buffer(); // 连接建立后,向Redis中发送一条指令,注意添加回车与换行 // set name GuoKun set(buffer, "name", "GuoKun"); ctx.writeAndFlush(buffer); } }); } @Override public void channelRead(ChannelHandlerContext ctx, Object msg) throws Exception { ByteBuf buf = (ByteBuf) msg; System.out.println(buf.toString(Charset.defaultCharset())); } }) .connect(new InetSocketAddress("localhost", 6379)); channelFuture.sync(); System.in.read(); // 关闭channel channelFuture.channel().close().sync(); } catch (InterruptedException | IOException e) { e.printStackTrace(); } finally { // 关闭group group.shutdownGracefully(); } } private static void set(ByteBuf buffer, String key, String value) { buffer.writeBytes("*3".getBytes()); buffer.writeBytes(LINE); buffer.writeBytes("$3".getBytes()); buffer.writeBytes(LINE); buffer.writeBytes("set".getBytes()); buffer.writeBytes(LINE); buffer.writeBytes(("$" + key.length()).getBytes()); buffer.writeBytes(LINE); buffer.writeBytes(key.getBytes()); buffer.writeBytes(LINE); buffer.writeBytes(("$" + value.length()).getBytes()); buffer.writeBytes(LINE); buffer.writeBytes(value.getBytes()); buffer.writeBytes(LINE); } }- 1
- 2
- 3
- 4
- 5
- 6
- 7
- 8
- 9
- 10
- 11
- 12
- 13
- 14
- 15
- 16
- 17
- 18
- 19
- 20
- 21
- 22
- 23
- 24
- 25
- 26
- 27
- 28
- 29
- 30
- 31
- 32
- 33
- 34
- 35
- 36
- 37
- 38
- 39
- 40
- 41
- 42
- 43
- 44
- 45
- 46
- 47
- 48
- 49
- 50
- 51
- 52
- 53
- 54
- 55
- 56
- 57
- 58
- 59
- 60
- 61
- 62
- 63
- 64
- 65
控制台打印结果
... 10:56:36.348 [nioEventLoopGroup-2-1] DEBUG i.n.util.ResourceLeakDetectorFactory - Loaded default ResourceLeakDetector: io.netty.util.ResourceLeakDetector@2dd68471 10:56:36.355 [nioEventLoopGroup-2-1] DEBUG i.n.handler.logging.LoggingHandler - [id: 0xe04f87a8, L:/127.0.0.1:9848 - R:localhost/127.0.0.1:6379] WRITE: 35B +-------------------------------------------------+ | 0 1 2 3 4 5 6 7 8 9 a b c d e f | +--------+-------------------------------------------------+----------------+ |00000000| 2a 33 0d 0a 24 33 0d 0a 73 65 74 0d 0a 24 34 0d |*3..$3..set..$4.| |00000010| 0a 6e 61 6d 65 0d 0a 24 36 0d 0a 47 75 6f 4b 75 |.name..$6..GuoKu| |00000020| 6e 0d 0a |n.. | +--------+-------------------------------------------------+----------------+ 10:56:36.355 [nioEventLoopGroup-2-1] DEBUG i.n.handler.logging.LoggingHandler - [id: 0xe04f87a8, L:/127.0.0.1:9848 - R:localhost/127.0.0.1:6379] FLUSH 10:56:36.357 [nioEventLoopGroup-2-1] DEBUG i.n.handler.logging.LoggingHandler - [id: 0xe04f87a8, L:/127.0.0.1:9848 - R:localhost/127.0.0.1:6379] READ: 5B +-------------------------------------------------+ | 0 1 2 3 4 5 6 7 8 9 a b c d e f | +--------+-------------------------------------------------+----------------+ |00000000| 2b 4f 4b 0d 0a |+OK.. | +--------+-------------------------------------------------+----------------+ 10:56:36.358 [nioEventLoopGroup-2-1] DEBUG i.n.channel.DefaultChannelPipeline - Discarded inbound message PooledUnsafeDirectByteBuf(ridx: 0, widx: 5, cap: 2048) that reached at the tail of the pipeline. Please check your pipeline configuration. 10:56:36.358 [nioEventLoopGroup-2-1] DEBUG i.n.channel.DefaultChannelPipeline - Discarded message pipeline : [LoggingHandler#0, RedisNetProtocol$1$1#0, DefaultChannelPipeline$TailContext#0]. Channel : [id: 0xe04f87a8, L:/127.0.0.1:9848 - R:localhost/127.0.0.1:6379]. 10:56:36.358 [nioEventLoopGroup-2-1] DEBUG i.n.handler.logging.LoggingHandler - [id: 0xe04f87a8, L:/127.0.0.1:9848 - R:localhost/127.0.0.1:6379] READ COMPLETE- 1
- 2
- 3
- 4
- 5
- 6
- 7
- 8
- 9
- 10
- 11
- 12
- 13
- 14
- 15
- 16
- 17
- 18
- 19
- 20
- 21
Redis中查询执行结果
>get name GuoKun- 1
- 2
HTTP协议
HTTP协议在请求行请求头中都有很多的内容,自己实现较为困难,可以使用
HttpServerCodec作为服务器端的解码器与编码器,来处理HTTP请求// HttpServerCodec 中既有请求的解码器 HttpRequestDecoder 又有响应的编码器 HttpResponseEncoder // Codec(CodeCombine) 一般代表该类既作为 编码器 又作为 解码器 public final class HttpServerCodec extends CombinedChannelDuplexHandler<HttpRequestDecoder, HttpResponseEncoder> implements HttpServerUpgradeHandler.SourceCodec- 1
- 2
- 3
- 4
服务器代码
@Sl4j public class HttpServer { public static void main(String[] args) { NioEventLoopGroup group = new NioEventLoopGroup(); new ServerBootstrap() .group(group) .channel(NioServerSocketChannel.class) .childHandler(new ChannelInitializer<SocketChannel>() { @Override protected void initChannel(SocketChannel ch) { ch.pipeline().addLast(new LoggingHandler(LogLevel.DEBUG)); // 作为服务器,使用 HttpServerCodec 作为编码器与解码器 ch.pipeline().addLast(new HttpServerCodec()); // 服务器只处理HTTPRequest ch.pipeline().addLast(new SimpleChannelInboundHandler<HttpRequest>() { @Override protected void channelRead0(ChannelHandlerContext ctx, HttpRequest msg) { // 获得请求uri log.debug(msg.uri()); // 获得完整响应,设置版本号与状态码 DefaultFullHttpResponse response = new DefaultFullHttpResponse(msg.protocolVersion(), HttpResponseStatus.OK); // 设置响应内容 byte[] bytes = "Hello, World!
".getBytes(StandardCharsets.UTF_8); // 设置响应体长度,避免浏览器一直接收响应内容 response.headers().setInt(CONTENT_LENGTH, bytes.length); // 设置响应体 response.content().writeBytes(bytes); // 写回响应 ctx.writeAndFlush(response); } }); } }) .bind(8080); } }- 1
- 2
- 3
- 4
- 5
- 6
- 7
- 8
- 9
- 10
- 11
- 12
- 13
- 14
- 15
- 16
- 17
- 18
- 19
- 20
- 21
- 22
- 23
- 24
- 25
- 26
- 27
- 28
- 29
- 30
- 31
- 32
- 33
- 34
- 35
- 36
- 37
- 38
- 39
服务器负责处理请求并响应浏览器。所以只需要处理HTTP请求即可
// 服务器只处理HTTPRequest ch.pipeline().addLast(new SimpleChannelInboundHandler<HttpRequest>()- 1
- 2
获得请求后,需要返回响应给浏览器。需要创建响应对象
DefaultFullHttpResponse,设置HTTP版本号及状态码,为避免浏览器获得响应后,因为获得CONTENT_LENGTH而一直空转,需要添加CONTENT_LENGTH字段,表明响应体中数据的具体长度// 获得完整响应,设置版本号与状态码 DefaultFullHttpResponse response = new DefaultFullHttpResponse(msg.protocolVersion(), HttpResponseStatus.OK); // 设置响应内容 byte[] bytes = "Hello, World!
".getBytes(StandardCharsets.UTF_8); // 设置响应体长度,避免浏览器一直接收响应内容 response.headers().setInt(CONTENT_LENGTH, bytes.length); // 设置响应体 response.content().writeBytes(bytes);- 1
- 2
- 3
- 4
- 5
- 6
- 7
- 8
运行结果
浏览器

控制台
// 请求内容 1714 [nioEventLoopGroup-2-2] DEBUG io.netty.handler.logging.LoggingHandler - [id: 0x72630ef7, L:/0:0:0:0:0:0:0:1:8080 - R:/0:0:0:0:0:0:0:1:55503] READ: 688B +-------------------------------------------------+ | 0 1 2 3 4 5 6 7 8 9 a b c d e f | +--------+-------------------------------------------------+----------------+ |00000000| 47 45 54 20 2f 66 61 76 69 63 6f 6e 2e 69 63 6f |GET /favicon.ico| |00000010| 20 48 54 54 50 2f 31 2e 31 0d 0a 48 6f 73 74 3a | HTTP/1.1..Host:| |00000020| 20 6c 6f 63 61 6c 68 6f 73 74 3a 38 30 38 30 0d | localhost:8080.| |00000030| 0a 43 6f 6e 6e 65 63 74 69 6f 6e 3a 20 6b 65 65 |.Connection: kee| |00000040| 70 2d 61 6c 69 76 65 0d 0a 50 72 61 67 6d 61 3a |p-alive..Pragma:| .... // 响应内容 1716 [nioEventLoopGroup-2-2] DEBUG io.netty.handler.logging.LoggingHandler - [id: 0x72630ef7, L:/0:0:0:0:0:0:0:1:8080 - R:/0:0:0:0:0:0:0:1:55503] WRITE: 61B +-------------------------------------------------+ | 0 1 2 3 4 5 6 7 8 9 a b c d e f | +--------+-------------------------------------------------+----------------+ |00000000| 48 54 54 50 2f 31 2e 31 20 32 30 30 20 4f 4b 0d |HTTP/1.1 200 OK.| |00000010| 0a 43 6f 6e 74 65 6e 74 2d 4c 65 6e 67 74 68 3a |.Content-Length:| |00000020| 20 32 32 0d 0a 0d 0a 3c 68 31 3e 48 65 6c 6c 6f | 22....<h1>Hello| |00000030| 2c 20 57 6f 72 6c 64 21 3c 2f 68 31 3e |, World!</h1> | +--------+-------------------------------------------------+----------------+- 1
- 2
- 3
- 4
- 5
- 6
- 7
- 8
- 9
- 10
- 11
- 12
- 13
- 14
- 15
- 16
- 17
- 18
- 19
- 20
- 21
- 22
自定义协议
组成要素
-
魔数:用来在第一时间判定接收的数据是否为无效数据包
-
版本号:可以支持协议的升级
-
序列化算法
:消息正文到底采用哪种序列化反序列化方式
- 如:json、protobuf、hessian、jdk
-
指令类型:是登录、注册、单聊、群聊… 跟业务相关
-
请求序号:为了双工通信,提供异步能力
-
正文长度
-
消息正文
编码器与解码器
public class MessageCodec extends ByteToMessageCodec<Message> { @Override protected void encode(ChannelHandlerContext ctx, Message msg, ByteBuf out) throws Exception { // 设置魔数 4个字节 out.writeBytes(new byte[]{'i', 'K', 'U', 'N'}); // 设置版本号 1个字节 out.writeByte(1); // 设置序列化方式 1个字节 out.writeByte(1); // 设置指令类型 1个字节 out.writeByte(msg.getMessageType()); // 设置请求序号 4个字节 out.writeInt(msg.getSequenceId()); // 为了补齐为16个字节,填充1个字节的数据 out.writeByte(0xff); // 获得序列化后的msg ByteArrayOutputStream bos = new ByteArrayOutputStream(); ObjectOutputStream oos = new ObjectOutputStream(bos); oos.writeObject(msg); byte[] bytes = bos.toByteArray(); // 获得并设置正文长度 长度用4个字节标识 out.writeInt(bytes.length); // 设置消息正文 out.writeBytes(bytes); } @Override protected void decode(ChannelHandlerContext ctx, ByteBuf in, List<Object> out) throws Exception { // 获取魔数 int magic = in.readInt(); // 获取版本号 byte version = in.readByte(); // 获得序列化方式 byte seqType = in.readByte(); // 获得指令类型 byte messageType = in.readByte(); // 获得请求序号 int sequenceId = in.readInt(); // 移除补齐字节 in.readByte(); // 获得正文长度 int length = in.readInt(); // 获得正文 byte[] bytes = new byte[length]; in.readBytes(bytes, 0, length); ObjectInputStream ois = new ObjectInputStream(new ByteArrayInputStream(bytes)); Message message = (Message) ois.readObject(); // 将信息放入List中,传递给下一个handler out.add(message); // 打印获得的信息正文 System.out.println("===========魔数==========="); System.out.println(magic); System.out.println("===========版本号==========="); System.out.println(version); System.out.println("===========序列化方法==========="); System.out.println(seqType); System.out.println("===========指令类型==========="); System.out.println(messageType); System.out.println("===========请求序号==========="); System.out.println(sequenceId); System.out.println("===========正文长度==========="); System.out.println(length); System.out.println("===========正文==========="); System.out.println(message); } }- 1
- 2
- 3
- 4
- 5
- 6
- 7
- 8
- 9
- 10
- 11
- 12
- 13
- 14
- 15
- 16
- 17
- 18
- 19
- 20
- 21
- 22
- 23
- 24
- 25
- 26
- 27
- 28
- 29
- 30
- 31
- 32
- 33
- 34
- 35
- 36
- 37
- 38
- 39
- 40
- 41
- 42
- 43
- 44
- 45
- 46
- 47
- 48
- 49
- 50
- 51
- 52
- 53
- 54
- 55
- 56
- 57
- 58
- 59
- 60
- 61
- 62
- 63
- 64
- 65
- 66
- 67
- 68
- 69
- 70
-
编码器与解码器方法源于父类ByteToMessageCodec,通过该类可以自定义编码器与解码器,泛型类型为被编码与被解码的类。此处使用了自定义类Message,代表消息
public class MessageCodec extends ByteToMessageCodec<Message>- 1
-
编码器负责将附加信息与正文信息写入到ByteBuf中,其中附加信息总字节数最好为2n,不足需要补齐。正文内容如果为对象,需要通过序列化将其放入到ByteBuf中
-
解码器负责将ByteBuf中的信息取出,并放入List中,该List用于将信息传递给下一个handler
编写测试类
public class TestCodec { static final org.slf4j.Logger log = LoggerFactory.getLogger(StudyServer.class); public static void main(String[] args) throws Exception { EmbeddedChannel channel = new EmbeddedChannel(); // 添加解码器,避免粘包半包问题 channel.pipeline().addLast(new LengthFieldBasedFrameDecoder(1024, 12, 4, 0, 0)); channel.pipeline().addLast(new LoggingHandler(LogLevel.DEBUG)); channel.pipeline().addLast(new MessageCodec()); LoginRequestMessage user = new LoginRequestMessage("Nyima", "123"); // 测试编码与解码 ByteBuf byteBuf = ByteBufAllocator.DEFAULT.buffer(); new MessageCodec().encode(null, user, byteBuf); channel.writeInbound(byteBuf); } }- 1
- 2
- 3
- 4
- 5
- 6
- 7
- 8
- 9
- 10
- 11
- 12
- 13
- 14
- 15
- 16
- 测试类中用到了LengthFieldBasedFrameDecoder,避免粘包半包问题
- 通过MessageCodec的encode方法将附加信息与正文写入到ByteBuf中,通过channel执行入站操作。入站时会调用decode方法进行解码
运行结果


@Sharable注解
要确保该handler类没有共享变量和状态信息!
为了提高handler的复用率,可以将handler创建为handler对象,然后在不同的channel中使用该handler对象进行处理操作
LoggingHandler loggingHandler = new LoggingHandler(LogLevel.DEBUG); // 不同的channel中使用同一个handler对象,提高复用率 channel1.pipeline().addLast(loggingHandler); channel2.pipeline().addLast(loggingHandler);- 1
- 2
- 3
- 4
但是并不是所有的handler都能通过这种方法来提高复用率的,例如
LengthFieldBasedFrameDecoder。如果多个channel中使用同一个LengthFieldBasedFrameDecoder对象,则可能发生如下问题- channel1中收到了一个半包,LengthFieldBasedFrameDecoder发现不是一条完整的数据,则没有继续向下传播
- 此时channel2中也收到了一个半包,因为两个channel使用了同一个LengthFieldBasedFrameDecoder,存入其中的数据刚好拼凑成了一个完整的数据包。LengthFieldBasedFrameDecoder让该数据包继续向下传播,最终引发错误
为了提高handler的复用率,同时又避免出现一些并发问题,Netty中原生的handler中用
@Sharable注解来标明,该handler能否在多个channel中共享。只有带有该注解,才能通过对象的方式被共享,否则无法被共享
自定义编解码器能否使用@Sharable注解
这需要根据自定义的handler的处理逻辑进行分析
我们的MessageCodec本身接收的是LengthFieldBasedFrameDecoder处理之后的数据,那么数据肯定是完整的,按分析来说是可以添加@Sharable注解的
但是实际情况我们并不能添加该注解,会抛出异常信息
ChannelHandler cn.nyimac.study.day8.protocol.MessageCodec is not allowed to be shared-
因为MessageCodec继承自ByteToMessageCodec,ByteToMessageCodec类的注解如下

这就意味着ByteToMessageCodec不能被多个channel所共享的
- 原因:因为该类的目标是:将ByteBuf转化为Message,意味着传进该handler的数据还未被处理过。所以传过来的ByteBuf可能并不是完整的数据,如果共享则会出现问题
如果想要共享,需要怎么办呢?
继承MessageToMessageDecoder即可。该类的目标是:将已经被处理的完整数据再次被处理。传过来的Message如果是被处理过的完整数据,那么被共享也就不会出现问题了,也就可以使用@Sharable注解了。实现方式与ByteToMessageCodec类似
@ChannelHandler.Sharable public class MessageSharableCodec extends MessageToMessageCodec<ByteBuf, Message> { @Override protected void encode(ChannelHandlerContext ctx, Message msg, List<Object> out) throws Exception { ... } @Override protected void decode(ChannelHandlerContext ctx, ByteBuf msg, List<Object> out) throws Exception { ... } }- 1
- 2
- 3
- 4
- 5
- 6
- 7
- 8
- 9
- 10
- 11
- 12
3、在线聊天室
聊天室业务
用户登录接口
public interface UserService { /** * 登录 * @param username 用户名 * @param password 密码 * @return 登录成功返回 true, 否则返回 false */ boolean login(String username, String password); }- 1
- 2
- 3
- 4
- 5
- 6
- 7
- 8
- 9
- 10
用户会话接口
public interface Session { /** * 绑定会话 * @param channel 哪个 channel 要绑定会话 * @param username 会话绑定用户 */ void bind(Channel channel, String username); /** * 解绑会话 * @param channel 哪个 channel 要解绑会话 */ void unbind(Channel channel); /** * 获取属性 * @param channel 哪个 channel * @param name 属性名 * @return 属性值 */ Object getAttribute(Channel channel, String name); /** * 设置属性 * @param channel 哪个 channel * @param name 属性名 * @param value 属性值 */ void setAttribute(Channel channel, String name, Object value); /** * 根据用户名获取 channel * @param username 用户名 * @return channel */ Channel getChannel(String username); }- 1
- 2
- 3
- 4
- 5
- 6
- 7
- 8
- 9
- 10
- 11
- 12
- 13
- 14
- 15
- 16
- 17
- 18
- 19
- 20
- 21
- 22
- 23
- 24
- 25
- 26
- 27
- 28
- 29
- 30
- 31
- 32
- 33
- 34
- 35
- 36
- 37
- 38
群聊会话接口
public interface GroupSession { /** * 创建一个聊天组, 如果不存在才能创建成功, 否则返回 null * @param name 组名 * @param members 成员 * @return 成功时返回组对象, 失败返回 null */ Group createGroup(String name, Set<String> members); /** * 加入聊天组 * @param name 组名 * @param member 成员名 * @return 如果组不存在返回 null, 否则返回组对象 */ Group joinMember(String name, String member); /** * 移除组成员 * @param name 组名 * @param member 成员名 * @return 如果组不存在返回 null, 否则返回组对象 */ Group removeMember(String name, String member); /** * 移除聊天组 * @param name 组名 * @return 如果组不存在返回 null, 否则返回组对象 */ Group removeGroup(String name); /** * 获取组成员 * @param name 组名 * @return 成员集合, 如果群不存在或没有成员会返回 empty set */ Set<String> getMembers(String name); /** * 获取组成员的 channel 集合, 只有在线的 channel 才会返回 * @param name 组名 * @return 成员 channel 集合 */ List<Channel> getMembersChannel(String name); /** * 判断群聊是否一被创建 * @param name 群聊名称 * @return 是否存在 */ boolean isCreated(String name); }- 1
- 2
- 3
- 4
- 5
- 6
- 7
- 8
- 9
- 10
- 11
- 12
- 13
- 14
- 15
- 16
- 17
- 18
- 19
- 20
- 21
- 22
- 23
- 24
- 25
- 26
- 27
- 28
- 29
- 30
- 31
- 32
- 33
- 34
- 35
- 36
- 37
- 38
- 39
- 40
- 41
- 42
- 43
- 44
- 45
- 46
- 47
- 48
- 49
- 50
- 51
- 52
- 53
- 54
整体结构


- client包:存放客户端相关类
- message包:存放各种类型的消息
- protocol包:存放自定义协议
- server包:存放服务器相关类
- service包:存放用户相关类
- session包:单聊及群聊相关会话类
客户端代码结构
public class ChatClient { static final Logger log = LoggerFactory.getLogger(ChatClient.class); public static void main(String[] args) { NioEventLoopGroup group = new NioEventLoopGroup(); LoggingHandler loggingHandler = new LoggingHandler(LogLevel.DEBUG); MessageSharableCodec messageSharableCodec = new MessageSharableCodec(); try { Bootstrap bootstrap = new Bootstrap(); bootstrap.group(group); bootstrap.channel(NioSocketChannel.class); bootstrap.handler(new ChannelInitializer<SocketChannel>() { @Override protected void initChannel(SocketChannel ch) throws Exception { ch.pipeline().addLast(new ProtocolFrameDecoder()); ch.pipeline().addLast(loggingHandler); ch.pipeline().addLast(messageSharableCodec); } }); Channel channel = bootstrap.connect().sync().channel(); channel.closeFuture().sync(); } catch (InterruptedException e) { e.printStackTrace(); } finally { group.shutdownGracefully(); } } }- 1
- 2
- 3
- 4
- 5
- 6
- 7
- 8
- 9
- 10
- 11
- 12
- 13
- 14
- 15
- 16
- 17
- 18
- 19
- 20
- 21
- 22
- 23
- 24
- 25
- 26
- 27
服务器代码结构
public class ChatServer { static final Logger log = LoggerFactory.getLogger(ChatServer.class); public static void main(String[] args) { NioEventLoopGroup boss = new NioEventLoopGroup(); NioEventLoopGroup worker = new NioEventLoopGroup(); LoggingHandler loggingHandler = new LoggingHandler(LogLevel.DEBUG); MessageSharableCodec messageSharableCodec = new MessageSharableCodec(); try { ServerBootstrap bootstrap = new ServerBootstrap(); bootstrap.group(boss, worker); bootstrap.channel(NioServerSocketChannel.class); bootstrap.childHandler(new ChannelInitializer() { @Override protected void initChannel(SocketChannel ch) throws Exception { ch.pipeline().addLast(new ProtocolFrameDecoder()); ch.pipeline().addLast(loggingHandler); ch.pipeline().addLast(messageSharableCodec); } }); Channel channel = bootstrap.bind(8080).sync().channel(); channel.closeFuture().sync(); } catch (InterruptedException e) { e.printStackTrace(); } finally { boss.shutdownGracefully(); worker.shutdownGracefully(); } } } - 1
- 2
- 3
- 4
- 5
- 6
- 7
- 8
- 9
- 10
- 11
- 12
- 13
- 14
- 15
- 16
- 17
- 18
- 19
- 20
- 21
- 22
- 23
- 24
- 25
- 26
- 27
- 28
- 29
登录
客户端代码
客户端添加如下handler,分别处理登录、聊天等操作
ch.pipeline().addLast(new ChannelInboundHandlerAdapter() { /** * 创建连接时执行的处理器,用于执行登陆操作 */ @Override public void channelActive(ChannelHandlerContext ctx) throws Exception { // 开辟额外线程,用于用户登陆及后续操作 new Thread(()->{ Scanner scanner = new Scanner(System.in); System.out.println("请输入用户名"); String username = scanner.next(); System.out.println("请输入密码"); String password = scanner.next(); // 创建包含登录信息的请求体 LoginRequestMessage message = new LoginRequestMessage(username, password); // 发送到channel中 ctx.writeAndFlush(message); System.out.println("等待后续操作..."); // 阻塞,直到登陆成功后CountDownLatch被设置为0 try { waitLogin.await(); } catch (InterruptedException e) { e.printStackTrace(); } // 执行后续操作 if (!loginStatus.get()) { // 登陆失败,关闭channel并返回 ctx.channel().close(); return; } // 登录成功后,执行其他操作 while (true) { System.out.println("=================================="); System.out.println("send [username] [content]"); System.out.println("gsend [group name] [content]"); System.out.println("gcreate [group name] [m1,m2,m3...]"); System.out.println("gmembers [group name]"); System.out.println("gjoin [group name]"); System.out.println("gquit [group name]"); System.out.println("quit"); System.out.println("=================================="); String command = scanner.nextLine(); // 获得指令及其参数,并发送对应类型消息 String[] commands = command.split(" "); switch (commands[0]){ case "send": ctx.writeAndFlush(new ChatRequestMessage(username, commands[1], commands[2])); break; case "gsend": ctx.writeAndFlush(new GroupChatRequestMessage(username,commands[1], commands[2])); break; case "gcreate": // 分割,获得群员名 String[] members = commands[2].split(","); Set<String> set = new HashSet<>(Arrays.asList(members)); // 把自己加入到群聊中 set.add(username); ctx.writeAndFlush(new GroupCreateRequestMessage(commands[1],set)); break; case "gmembers": ctx.writeAndFlush(new GroupMembersRequestMessage(commands[1])); break; case "gjoin": ctx.writeAndFlush(new GroupJoinRequestMessage(username, commands[1])); break; case "gquit": ctx.writeAndFlush(new GroupQuitRequestMessage(username, commands[1])); break; case "quit": ctx.channel().close(); return; default: System.out.println("指令有误,请重新输入"); continue; } } }, "login channel").start(); } @Override public void channelRead(ChannelHandlerContext ctx, Object msg) throws Exception { log.debug("{}", msg); if (msg instanceof LoginResponseMessage) { // 如果是登录响应信息 LoginResponseMessage message = (LoginResponseMessage) msg; boolean isSuccess = message.isSuccess(); // 登录成功,设置登陆标记 if (isSuccess) { loginStatus.set(true); } // 登陆后,唤醒登陆线程 waitLogin.countDown(); } } });- 1
- 2
- 3
- 4
- 5
- 6
- 7
- 8
- 9
- 10
- 11
- 12
- 13
- 14
- 15
- 16
- 17
- 18
- 19
- 20
- 21
- 22
- 23
- 24
- 25
- 26
- 27
- 28
- 29
- 30
- 31
- 32
- 33
- 34
- 35
- 36
- 37
- 38
- 39
- 40
- 41
- 42
- 43
- 44
- 45
- 46
- 47
- 48
- 49
- 50
- 51
- 52
- 53
- 54
- 55
- 56
- 57
- 58
- 59
- 60
- 61
- 62
- 63
- 64
- 65
- 66
- 67
- 68
- 69
- 70
- 71
- 72
- 73
- 74
- 75
- 76
- 77
- 78
- 79
- 80
- 81
- 82
- 83
- 84
- 85
- 86
- 87
- 88
- 89
- 90
- 91
- 92
- 93
- 94
- 95
服务器代码
服务器添加如下handler,并添加到对应的channel中,负责处理登录请求信息,并作出响应
@ChannelHandler.Sharable // 必须添加该注解 public class LoginRequestMessageHandler extends SimpleChannelInboundHandler<LoginRequestMessage> { @Override protected void channelRead0(ChannelHandlerContext ctx, LoginRequestMessage msg) throws Exception { // 获得登录信息 String username = msg.getUsername(); String password = msg.getPassword(); // 校验登录信息 boolean login = UserServiceFactory.getUserService().login(username, password); LoginResponseMessage message; if (login) { message = new LoginResponseMessage(true, "登陆成功"); // 绑定channel与user SessionFactory.getSession().bind(ctx.channel(), username); } else { message = new LoginResponseMessage(false, "登陆失败"); } ctx.writeAndFlush(message); } } // 该handler处理登录请求 LoginRequestMessageHandler loginRequestMessageHandler = new LoginRequestMessageHandler(); ch.pipeline().addLast(new LoginRequestMessageHandler());- 1
- 2
- 3
- 4
- 5
- 6
- 7
- 8
- 9
- 10
- 11
- 12
- 13
- 14
- 15
- 16
- 17
- 18
- 19
- 20
- 21
- 22
- 23
运行结果
客户端
5665 [nioEventLoopGroup-2-1] DEBUG cn.nyimac.study.day8.protocol.MessageSharableCodec - 1314474317, 1, 1, 1, 0, 279 5667 [nioEventLoopGroup-2-1] DEBUG cn.nyimac.study.day8.protocol.MessageSharableCodec - message:AbstractResponseMessage{success=true, reason='登陆成功'} 5667 [nioEventLoopGroup-2-1] DEBUG cn.nyimac.study.day8.client.ChatClient - AbstractResponseMessage{success=true, reason='登陆成功'} success- 1
- 2
- 3
- 4
服务器
11919 [nioEventLoopGroup-3-1] DEBUG cn.nyimac.study.day8.protocol.MessageSharableCodec - 1314474317, 1, 1, 0, 0, 217 11919 [nioEventLoopGroup-3-1] DEBUG cn.nyimac.study.day8.protocol.MessageSharableCodec - message:LoginRequestMessage{username='Nyima', password='123'} 7946 [nioEventLoopGroup-3-1] DEBUG io.netty.handler.logging.LoggingHandler - [id: 0x8e7c07f6, L:/127.0.0.1:8080 - R:/127.0.0.1:60572] WRITE: 295B +-------------------------------------------------+ | 0 1 2 3 4 5 6 7 8 9 a b c d e f | +--------+-------------------------------------------------+----------------+ |00000000| 4e 59 49 4d 01 01 01 00 00 00 00 ff 00 00 01 17 |NYIM............| |00000010| ac ed 00 05 73 72 00 31 63 6e 2e 6e 79 69 6d 61 |....sr.1cn.nyima| |00000020| 63 2e 73 74 75 64 79 2e 64 61 79 38 2e 6d 65 73 |c.study.day8.mes| |00000030| 73 61 67 65 2e 4c 6f 67 69 6e 52 65 73 70 6f 6e |sage.LoginRespon| |00000040| 73 65 4d 65 73 73 61 67 65 e2 34 49 24 72 52 f3 |seMessage.4I$rR.| |00000050| 07 02 00 00 78 72 00 34 63 6e 2e 6e 79 69 6d 61 |....xr.4cn.nyima| |00000060| 63 2e 73 74 75 64 79 2e 64 61 79 38 2e 6d 65 73 |c.study.day8.mes| |00000070| 73 61 67 65 2e 41 62 73 74 72 61 63 74 52 65 73 |sage.AbstractRes| |00000080| 70 6f 6e 73 65 4d 65 73 73 61 67 65 b3 7e 19 32 |ponseMessage.~.2| |00000090| 9b 88 4d 7b 02 00 02 5a 00 07 73 75 63 63 65 73 |..M{...Z..succes| |000000a0| 73 4c 00 06 72 65 61 73 6f 6e 74 00 12 4c 6a 61 |sL..reasont..Lja| |000000b0| 76 61 2f 6c 61 6e 67 2f 53 74 72 69 6e 67 3b 78 |va/lang/String;x| |000000c0| 72 00 24 63 6e 2e 6e 79 69 6d 61 63 2e 73 74 75 |r.$cn.nyimac.stu| |000000d0| 64 79 2e 64 61 79 38 2e 6d 65 73 73 61 67 65 2e |dy.day8.message.| |000000e0| 4d 65 73 73 61 67 65 dd e9 84 b7 21 db 18 52 02 |Message....!..R.| |000000f0| 00 02 49 00 0b 6d 65 73 73 61 67 65 54 79 70 65 |..I..messageType| |00000100| 49 00 0a 73 65 71 75 65 6e 63 65 49 64 78 70 00 |I..sequenceIdxp.| |00000110| 00 00 00 00 00 00 00 01 74 00 0c e7 99 bb e9 99 |........t.......| |00000120| 86 e6 88 90 e5 8a 9f |....... | +--------+-------------------------------------------------+----------------+- 1
- 2
- 3
- 4
- 5
- 6
- 7
- 8
- 9
- 10
- 11
- 12
- 13
- 14
- 15
- 16
- 17
- 18
- 19
- 20
- 21
- 22
- 23
- 24
- 25
- 26
- 27
单聊
客户端输入
send username content即可发送单聊消息,需要服务器端添加处理ChatRequestMessage的handler@ChannelHandler.Sharable // 必须添加该注解 public class ChatRequestMessageHandler extends SimpleChannelInboundHandler<ChatRequestMessage> { @Override protected void channelRead0(ChannelHandlerContext ctx, ChatRequestMessage msg) throws Exception { // 获得user所在的channel Channel channel = SessionFactory.getSession().getChannel(msg.getTo()); // 如果双方都在线 if (channel != null) { // 通过接收方与服务器之间的channel发送信息 channel.writeAndFlush(new ChatResponseMessage(msg.getFrom(), msg.getContent())); } else { // 通过发送方与服务器之间的channel发送消息 ctx.writeAndFlush(new ChatResponseMessage(false, "对方用户不存在或离线,发送失败")); } } } // 该handler处理单聊请求 ChatRequestMessageHandler chatRequestMessageHandler = new ChatRequestMessageHandler(); ch.pipeline().addLast(chatRequestMessageHandler);- 1
- 2
- 3
- 4
- 5
- 6
- 7
- 8
- 9
- 10
- 11
- 12
- 13
- 14
- 15
- 16
- 17
- 18
- 19
运行结果
发送方(zhangsan)
send Nyima hello- 1
接收方(Nyima)
// 收到zhangsan发来的消息 20230 [nioEventLoopGroup-2-1] DEBUG cn.nyimac.study.day8.client.ChatClient - ChatResponseMessage{from='zhangsan', content='hello'}- 1
- 2
群聊
创建
添加处理
GroupCreateRequestMessage的handler@ChannelHandler.Sharable public class GroupCreateMessageHandler extends SimpleChannelInboundHandler<GroupCreateRequestMessage> { @Override protected void channelRead0(ChannelHandlerContext ctx, GroupCreateRequestMessage msg) throws Exception { // 获得要创建的群聊名 String groupName = msg.getGroupName(); // 获得要创建的群聊的成员组 Set<String> members = msg.getMembers(); // 判断该群聊是否创建过,未创建返回null并创建群聊 Group group = GroupSessionFactory.getGroupSession().createGroup(groupName, members); if (group == null) { // 发送创建成功消息 GroupCreateResponseMessage groupCreateResponseMessage = new GroupCreateResponseMessage(true, groupName + "创建成功"); ctx.writeAndFlush(groupCreateResponseMessage); // 获得在线群员的channel,给群员发送入群聊消息 List<Channel> membersChannel = GroupSessionFactory.getGroupSession().getMembersChannel(groupName); groupCreateResponseMessage = new GroupCreateResponseMessage(true, "您已被拉入"+groupName); // 给每个在线群员发送消息 for(Channel channel : membersChannel) { channel.writeAndFlush(groupCreateResponseMessage); } } else { // 发送失败消息 GroupCreateResponseMessage groupCreateResponseMessage = new GroupCreateResponseMessage(false, groupName + "已存在"); ctx.writeAndFlush(groupCreateResponseMessage); } } } // 该handler处理创建群聊请求 GroupCreateMessageHandler groupCreateMessageHandler = new GroupCreateMessageHandler(); ch.pipeline().addLast(groupCreateMessageHandler);- 1
- 2
- 3
- 4
- 5
- 6
- 7
- 8
- 9
- 10
- 11
- 12
- 13
- 14
- 15
- 16
- 17
- 18
- 19
- 20
- 21
- 22
- 23
- 24
- 25
- 26
- 27
- 28
- 29
- 30
- 31
运行结果
创建者客户端
// 首次创建 gcreate Netty学习 zhangsan,lisi 31649 [nioEventLoopGroup-2-1] DEBUG cn.nyimac.study.day8.client.ChatClient - AbstractResponseMessage{success=true, reason='Netty学习创建成功'} 15244 [nioEventLoopGroup-2-1] DEBUG cn.nyimac.study.day8.client.ChatClient - AbstractResponseMessage{success=true, reason='您已被拉入Netty学习'} // 再次创建 gcreate Netty学习 zhangsan,lisi 40771 [nioEventLoopGroup-2-1] DEBUG cn.nyimac.study.day8.client.ChatClient - AbstractResponseMessage{success=false, reason='Netty学习已存在'}- 1
- 2
- 3
- 4
- 5
- 6
- 7
- 8
- 9
- 10
群员客户端
28788 [nioEventLoopGroup-2-1] DEBUG cn.nyimac.study.day8.client.ChatClient - AbstractResponseMessage{success=true, reason='您已被拉入Netty学习'}- 1
聊天
@ChannelHandler.Sharable public class GroupChatMessageHandler extends SimpleChannelInboundHandler<GroupChatRequestMessage> { @Override protected void channelRead0(ChannelHandlerContext ctx, GroupChatRequestMessage msg) throws Exception { String groupName = msg.getGroupName(); GroupSession groupSession = GroupSessionFactory.getGroupSession(); // 判断群聊是否存在 boolean isCreated = groupSession.isCreated(groupName); if (isCreated) { // 给群员发送信息 List<Channel> membersChannel = groupSession.getMembersChannel(groupName); for(Channel channel : membersChannel) { channel.writeAndFlush(new GroupChatResponseMessage(msg.getFrom(), msg.getContent())); } } else { ctx.writeAndFlush(new GroupChatResponseMessage(false, "群聊不存在")); } } } // 该handler处理群聊聊天 GroupChatMessageHandler groupChatMessageHandler = new GroupChatMessageHandler(); ch.pipeline().addLast(groupChatMessageHandler);- 1
- 2
- 3
- 4
- 5
- 6
- 7
- 8
- 9
- 10
- 11
- 12
- 13
- 14
- 15
- 16
- 17
- 18
- 19
- 20
- 21
- 22
运行结果
发送方(群聊存在)
gsend Netty学习 你们好 45408 [nioEventLoopGroup-2-1] DEBUG cn.nyimac.study.day8.client.ChatClient - GroupChatResponseMessage{from='zhangsan', content='你们好'}- 1
- 2
- 3
接收方
48082 [nioEventLoopGroup-2-1] DEBUG cn.nyimac.study.day8.client.ChatClient - GroupChatResponseMessage{from='zhangsan', content='你们好'}- 1
发送方(群聊不存在)
gsend Spring学习 你们好 25140 [nioEventLoopGroup-2-1] DEBUG cn.nyimac.study.day8.client.ChatClient - AbstractResponseMessage{success=false, reason='群聊不存在'}- 1
- 2
- 3
加入
@ChannelHandler.Sharable public class GroupJoinMessageHandler extends SimpleChannelInboundHandler<GroupJoinRequestMessage> { @Override protected void channelRead0(ChannelHandlerContext ctx, GroupJoinRequestMessage msg) throws Exception { GroupSession groupSession = GroupSessionFactory.getGroupSession(); // 判断该用户是否在群聊中 Set<String> members = groupSession.getMembers(msg.getGroupName()); boolean joinFlag = false; // 群聊存在且用户未加入,才能加入 if (!members.contains(msg.getUsername()) && groupSession.isCreated(msg.getGroupName())) { joinFlag = true; } if (joinFlag) { // 加入群聊 groupSession.joinMember(msg.getGroupName(), msg.getUsername()); ctx.writeAndFlush(new GroupJoinResponseMessage(true,"加入"+msg.getGroupName()+"成功")); } else { ctx.writeAndFlush(new GroupJoinResponseMessage(false, "加入失败,群聊未存在或您已加入该群聊")); } } } // 该handler处理加入群聊 GroupJoinMessageHandler groupJoinMessageHandler = new GroupJoinMessageHandler(); ch.pipeline().addLast(groupJoinMessageHandler);- 1
- 2
- 3
- 4
- 5
- 6
- 7
- 8
- 9
- 10
- 11
- 12
- 13
- 14
- 15
- 16
- 17
- 18
- 19
- 20
- 21
- 22
- 23
- 24
- 25
运行结果
正常加入群聊
94921 [nioEventLoopGroup-2-1] DEBUG cn.nyimac.study.day8.client.ChatClient - AbstractResponseMessage{success=true, reason='加入Netty学习成功'}- 1
加入不能存在或已加入的群聊
44025 [nioEventLoopGroup-2-1] DEBUG cn.nyimac.study.day8.client.ChatClient - AbstractResponseMessage{success=false, reason='加入失败,群聊未存在或您已加入该群聊'}- 1
退出
@ChannelHandler.Sharable public class GroupQuitMessageHandler extends SimpleChannelInboundHandler<GroupQuitRequestMessage> { @Override protected void channelRead0(ChannelHandlerContext ctx, GroupQuitRequestMessage msg) throws Exception { GroupSession groupSession = GroupSessionFactory.getGroupSession(); String groupName = msg.getGroupName(); Set<String> members = groupSession.getMembers(groupName); String username = msg.getUsername(); // 判断用户是否在群聊中以及群聊是否存在 boolean joinFlag = false; if (groupSession.isCreated(groupName) && members.contains(username)) { // 可以退出 joinFlag = true; } if (joinFlag) { // 退出成功 groupSession.removeMember(groupName, username); ctx.writeAndFlush(new GroupQuitResponseMessage(true, "退出"+groupName+"成功")); } else { // 退出失败 ctx.writeAndFlush(new GroupQuitResponseMessage(false, "群聊不存在或您未加入该群,退出"+groupName+"失败")); } } } // 该handler处理退出群聊 GroupQuitMessageHandler groupQuitMessageHandler = new GroupQuitMessageHandler(); ch.pipeline().addLast(groupQuitMessageHandler);- 1
- 2
- 3
- 4
- 5
- 6
- 7
- 8
- 9
- 10
- 11
- 12
- 13
- 14
- 15
- 16
- 17
- 18
- 19
- 20
- 21
- 22
- 23
- 24
- 25
- 26
- 27
- 28
运行结果
正常退出
32282 [nioEventLoopGroup-2-1] DEBUG cn.nyimac.study.day8.client.ChatClient - AbstractResponseMessage{success=true, reason='退出Netty学习成功'}- 1
退出不存在或未加入的群聊
67404 [nioEventLoopGroup-2-1] DEBUG cn.nyimac.study.day8.client.ChatClient - AbstractResponseMessage{success=false, reason='群聊不存在或您未加入该群,退出Netty失败'}- 1
查看成员
@ChannelHandler.Sharable public class GroupMembersMessageHandler extends SimpleChannelInboundHandler<GroupMembersRequestMessage> { @Override protected void channelRead0(ChannelHandlerContext ctx, GroupMembersRequestMessage msg) throws Exception { ctx.writeAndFlush(new GroupMembersResponseMessage(GroupSessionFactory.getGroupSession().getMembers(msg.getGroupName()))); } } // 该handler处理查看成员 GroupMembersMessageHandler groupMembersMessageHandler = new GroupMembersMessageHandler(); ch.pipeline().addLast(groupMembersMessageHandler);- 1
- 2
- 3
- 4
- 5
- 6
- 7
- 8
- 9
- 10
运行结果
46557 [nioEventLoopGroup-2-1] DEBUG cn.nyimac.study.day8.client.ChatClient - GroupMembersResponseMessage{members=[zhangsan, Nyima]}- 1
退出聊天室
@ChannelHandler.Sharable public class QuitHandler extends ChannelInboundHandlerAdapter { /** * 断开连接时触发 Inactive事件 */ @Override public void channelInactive(ChannelHandlerContext ctx) throws Exception { // 解绑 SessionFactory.getSession().unbind(ctx.channel()); } /** * 异常退出,需要解绑 */ @Override public void exceptionCaught(ChannelHandlerContext ctx, Throwable cause) throws Exception { // 解绑 SessionFactory.getSession().unbind(ctx.channel()); } } // 该handler处理退出聊天室 ch.pipeline().addLast(quitHandler); GroupMembersMessageHandler groupMembersMessageHandler = new GroupMembersMessageHandler();- 1
- 2
- 3
- 4
- 5
- 6
- 7
- 8
- 9
- 10
- 11
- 12
- 13
- 14
- 15
- 16
- 17
- 18
- 19
- 20
- 21
- 22
- 23
退出时,客户端会关闭channel并返回
case "quit": // 关闭channel并返回 ctx.channel().close(); return;- 1
- 2
- 3
- 4
空闲检测
连接假死
原因
- 网络设备出现故障,例如网卡,机房等,底层的 TCP 连接已经断开了,但应用程序没有感知到,仍然占用着资源
- 公网网络不稳定,出现丢包。如果连续出现丢包,这时现象就是客户端数据发不出去,服务端也一直收不到数据,会白白地消耗资源
- 应用程序线程阻塞,无法进行数据读写
问题
- 假死的连接占用的资源不能自动释放
- 向假死的连接发送数据,得到的反馈是发送超时
解决方法
可以添加
IdleStateHandler对空闲时间进行检测,通过构造函数可以传入三个参数- readerIdleTimeSeconds 读空闲经过的秒数
- writerIdleTimeSeconds 写空闲经过的秒数
- allIdleTimeSeconds 读和写空闲经过的秒数
当指定时间内未发生读或写事件时,会触发特定事件

- 读空闲会触发
READER_IDLE - 写空闲会触发
WRITE_IDLE - 读和写空闲会触发
ALL_IDEL
想要处理这些事件,需要自定义事件处理函数
服务器端代码
// 用于空闲连接的检测,5s内未读到数据,会触发READ_IDLE事件 ch.pipeline().addLast(new IdleStateHandler(5, 0, 0)); // 添加双向处理器,负责处理READER_IDLE事件 ch.pipeline().addLast(new ChannelDuplexHandler() { @Override public void userEventTriggered(ChannelHandlerContext ctx, Object evt) throws Exception { // 获得事件 IdleStateEvent event = (IdleStateEvent) evt; if (event.state() == IdleState.READER_IDLE) { // 断开连接 ctx.channel().close(); } } });- 1
- 2
- 3
- 4
- 5
- 6
- 7
- 8
- 9
- 10
- 11
- 12
- 13
- 14
-
使用
IdleStateHandler进行空闲检测 -
使用双向处理器
ChannelDuplexHandler- 1
对入站与出站事件进行处理
IdleStateHandler中的事件为特殊事件,需要实现ChannelDuplexHandler的userEventTriggered方法,判断事件类型并自定义处理方式,来对事件进行处理
为避免因非网络等原因引发的READ_IDLE事件,比如网络情况良好,只是用户本身没有输入数据,这时发生READ_IDLE事件,直接让服务器断开连接是不可取的
为避免此类情况,需要在客户端向服务器发送心跳包,发送频率要小于服务器设置的
IdleTimeSeconds,一般设置为其值的一半客户端代码
// 发送心跳包,让服务器知道客户端在线 // 3s未发生WRITER_IDLE,就像服务器发送心跳包 // 该值为服务器端设置的READER_IDLE触发时间的一半左右 ch.pipeline().addLast(new IdleStateHandler(0, 3, 0)); ch.pipeline().addLast(new ChannelDuplexHandler() { @Override public void userEventTriggered(ChannelHandlerContext ctx, Object evt) throws Exception { IdleStateEvent event = (IdleStateEvent) evt; if (event.state() == IdleState.WRITER_IDLE) { // 发送心跳包 ctx.writeAndFlush(new PingMessage()); } } });- 1
- 2
- 3
- 4
- 5
- 6
- 7
- 8
- 9
- 10
- 11
- 12
- 13
- 14
五、优化
1、拓展序列化算法
序列化接口
jdk自带的序列化方式只需要拿到字节数组即可反序列化,但是不安全且效率低下。
其他的序列化方式通常需要传递具体的类来实现反序列化。
public interface Serializer { /** * 序列化 * @param object 被序列化的对象 * @param被序列化对象类型 * @return 序列化后的字节数组 */ <T> byte[] serialize(T object); /** * 反序列化 * @param clazz 反序列化的目标类的Class对象 * @param bytes 被反序列化的字节数组 * @param反序列化目标类 * @return 反序列化后的对象 */ <T> T deserialize(Class<T> clazz, byte[] bytes); }- 1
- 2
- 3
- 4
- 5
- 6
- 7
- 8
- 9
- 10
- 11
- 12
- 13
- 14
- 15
- 16
- 17
- 18
枚举实现类
public enum SerializerAlgorithm implements Serializer { // Java的序列化和反序列化 Java { @Override public <T> byte[] serialize(T object) { // 序列化后的字节数组 byte[] bytes = null; try (ByteArrayOutputStream bos = new ByteArrayOutputStream(); ObjectOutputStream oos = new ObjectOutputStream(bos)) { oos.writeObject(object); bytes = bos.toByteArray(); } catch (IOException e) { e.printStackTrace(); } return bytes; } @Override public <T> T deserialize(Class<T> clazz, byte[] bytes) { T target = null; System.out.println(Arrays.toString(bytes)); try (ByteArrayInputStream bis = new ByteArrayInputStream(bytes); ObjectInputStream ois = new ObjectInputStream(bis)) { target = (T) ois.readObject(); } catch (IOException | ClassNotFoundException e) { e.printStackTrace(); } // 返回反序列化后的对象 return target; } } // Json的序列化和反序列化 Json { @Override public <T> byte[] serialize(T object) { String s = new Gson().toJson(object); // System.out.println(s); // 指定字符集,获得字节数组 return s.getBytes(StandardCharsets.UTF_8); } @Override public <T> T deserialize(Class<T> clazz, byte[] bytes) { String s = new String(bytes, StandardCharsets.UTF_8); // System.out.println(s); // 此处的clazz为具体类型的Class对象,而不是父类Message的 return new Gson().fromJson(s, clazz); } } }- 1
- 2
- 3
- 4
- 5
- 6
- 7
- 8
- 9
- 10
- 11
- 12
- 13
- 14
- 15
- 16
- 17
- 18
- 19
- 20
- 21
- 22
- 23
- 24
- 25
- 26
- 27
- 28
- 29
- 30
- 31
- 32
- 33
- 34
- 35
- 36
- 37
- 38
- 39
- 40
- 41
- 42
- 43
- 44
- 45
- 46
- 47
- 48
- 49
- 50
- 51
修改原编解码器
编码
// 获得序列化后的msg // 使用指定的序列化方式 SerializerAlgorithm[] values = SerializerAlgorithm.values(); // 获得序列化后的对象 byte[] bytes = values[out.getByte(5)-1].serialize(msg);- 1
- 2
- 3
- 4
- 5
解码
// 获得反序列化方式 SerializerAlgorithm[] values = SerializerAlgorithm.values(); // 通过指定方式进行反序列化 // 需要通过Message的方法获得具体的消息类型 Message message = values[seqType-1].deserialize(Message.getMessageClass(messageType), bytes);- 1
- 2
- 3
- 4
- 5
2、参数调优
CONNECT_TIMEOUT_MILLIS
- 属于 SocketChannal 的参数
- 用在客户端建立连接时,如果在指定毫秒内无法连接,会抛出 timeout 异常
- 注意:Netty 中不要用成了SO_TIMEOUT 主要用在阻塞 IO(设置BIO的阻塞时间),而 Netty 是非阻塞 IO
使用
public class TestParam { public static void main(String[] args) { // SocketChannel 5s内未建立连接就抛出异常 new Bootstrap().option(ChannelOption.CONNECT_TIMEOUT_MILLIS, 5000); // ServerSocketChannel 5s内未建立连接就抛出异常 new ServerBootstrap().option(ChannelOption.CONNECT_TIMEOUT_MILLIS,5000); // SocketChannel 5s内未建立连接就抛出异常 new ServerBootstrap().childOption(ChannelOption.CONNECT_TIMEOUT_MILLIS, 5000); } }- 1
- 2
- 3
- 4
- 5
- 6
- 7
- 8
- 9
- 10
- 11
-
客户端通过
Bootstrap.option函数来配置参数,配置参数作用于 SocketChannel -
服务器通过
ServerBootstrap- 1
来配置参数,但是对于不同的 Channel 需要选择不同的方法
- 通过
option来配置 ServerSocketChannel 上的参数 - 通过
childOption来配置 SocketChannel 上的参数
设置时间过长,系统如果发现无法连接会提前抛出
Connection refused异常。源码分析
客户端中连接服务器的线程是 NIO 线程,抛出异常的是主线程。这是如何做到超时判断以及线程通信的呢?
AbstractNioChannel.AbstractNioUnsafe.connect方法中public final void connect( final SocketAddress remoteAddress, final SocketAddress localAddress, final ChannelPromise promise) { ... // Schedule connect timeout. // 设置超时时间,通过option方法传入的CONNECT_TIMEOUT_MILLIS参数进行设置 int connectTimeoutMillis = config().getConnectTimeoutMillis(); // 如果超时时间大于0 if (connectTimeoutMillis > 0) { // 创建一个定时任务,延时connectTimeoutMillis(设置的超时时间时间)后执行 // schedule(Runnable command, long delay, TimeUnit unit) connectTimeoutFuture = eventLoop().schedule(new Runnable() { @Override public void run() { // 判断是否建立连接,Promise进行NIO线程与主线程之间的通信 // 如果超时,则通过tryFailure方法将异常放入Promise中 // 在主线程中抛出 ChannelPromise connectPromise = AbstractNioChannel.this.connectPromise; ConnectTimeoutException cause = new ConnectTimeoutException("connection timed out: " + remoteAddress); if (connectPromise != null && connectPromise.tryFailure(cause)) { close(voidPromise()); } } }, connectTimeoutMillis, TimeUnit.MILLISECONDS); } ... }- 1
- 2
- 3
- 4
- 5
- 6
- 7
- 8
- 9
- 10
- 11
- 12
- 13
- 14
- 15
- 16
- 17
- 18
- 19
- 20
- 21
- 22
- 23
- 24
- 25
- 26
- 27
- 28
- 29
- 30
超时的判断主要是通过 Eventloop 的 schedule 方法和 Promise 共同实现的
- schedule 设置了一个定时任务,延迟
connectTimeoutMillis秒后执行该方法 - 如果指定时间内没有建立连接,则会执行其中的任务
- 任务负责创建
ConnectTimeoutException异常,并将异常通过 Pormise 传给主线程并抛出
- 任务负责创建
SO_BACKLOG
该参数是 ServerSocketChannel 的参数
三次握手与连接队列
第一次握手时,因为客户端与服务器之间的连接还未完全建立,连接会被放入半连接队列中

当完成三次握手以后,连接会被放入全连接队列中

服务器处理Accept事件是在TCP三次握手,也就是建立连接之后。服务器会从全连接队列中获取连接并进行处理

在 linux 2.2 之前,backlog 大小包括了两个队列的大小,在 linux 2.2 之后,分别用下面两个参数来控制
- 半连接队列 - sync queue
- 大小通过 /proc/sys/net/ipv4/tcp_max_syn_backlog 指定,在
syncookies启用的情况下,逻辑上没有最大值限制,这个设置便被忽略
- 大小通过 /proc/sys/net/ipv4/tcp_max_syn_backlog 指定,在
- 全连接队列 - accept queue
- 其大小通过 /proc/sys/net/core/somaxconn 指定,在使用 listen 函数时,内核会根据传入的 backlog 参数与系统参数,取二者的较小值
- 如果 accpet queue 队列满了,server 将发送一个拒绝连接的错误信息到 client
作用
在Netty中,
SO_BACKLOG主要用于设置全连接队列的大小。当处理Accept的速率小于连接建立的速率时,全连接队列中堆积的连接数大于SO_BACKLOG设置的值是,便会抛出异常设置方式如下(在NioEventLoop中执行的Accept处理。可以给他加断点阻止处理实现满队列)
// 设置全连接队列,大小为2 new ServerBootstrap().option(ChannelOption.SO_BACKLOG, 2);- 1
- 2
默认值
backlog参数在
NioSocketChannel.doBind方法被使用@Override protected void doBind(SocketAddress localAddress) throws Exception { if (PlatformDependent.javaVersion() >= 7) { javaChannel().bind(localAddress, config.getBacklog()); } else { javaChannel().socket().bind(localAddress, config.getBacklog()); } }- 1
- 2
- 3
- 4
- 5
- 6
- 7
- 8
其中backlog被保存在了
DefaultServerSocketChannelConfig配置类中private volatile int backlog = NetUtil.SOMAXCONN;- 1
具体的赋值操作如下
SOMAXCONN = AccessController.doPrivileged(new PrivilegedAction<Integer>() { @Override public Integer run() { // Determine the default somaxconn (server socket backlog) value of the platform. // The known defaults: // - Windows NT Server 4.0+: 200 // - Linux and Mac OS X: 128 int somaxconn = PlatformDependent.isWindows() ? 200 : 128; File file = new File("/proc/sys/net/core/somaxconn"); BufferedReader in = null; try { // file.exists() may throw a SecurityException if a SecurityManager is used, so execute it in the // try / catch block. // See https://github.com/netty/netty/issues/4936 if (file.exists()) { in = new BufferedReader(new FileReader(file)); // 将somaxconn设置为Linux配置文件中设置的值 somaxconn = Integer.parseInt(in.readLine()); if (logger.isDebugEnabled()) { logger.debug("{}: {}", file, somaxconn); } } else { ... } ... } // 返回backlog的值 return somaxconn; } }- 1
- 2
- 3
- 4
- 5
- 6
- 7
- 8
- 9
- 10
- 11
- 12
- 13
- 14
- 15
- 16
- 17
- 18
- 19
- 20
- 21
- 22
- 23
- 24
- 25
- 26
- 27
- 28
- 29
- 30
-
backlog的值会根据操作系统的不同,来
选择不同的默认值
- Windows 200
- Linux/Mac OS 128
-
如果配置文件
/proc/sys/net/core/somaxconn存在,会读取配置文件中的值,并将backlog的值设置为配置文件中指定的
ulimit-n
- 操作系统参数(临时)
限制打开的文件数
TCP_NODELAY
- 属于 SocketChannal 参数
- 因为 Nagle 算法,数据包会堆积到一定的数量后一起发送,这就可能导致数据的发送存在一定的延时
- 该参数默认为false,如果不希望的发送被延时,则需要将该值设置为true
SO_SNDBUF & SO_RCVBUF
- SO_SNDBUF 属于 SocketChannal 参数
- SO_RCVBUF 既可用于 SocketChannal 参数,也可以用于 ServerSocketChannal 参数(建议设置到 ServerSocketChannal 上)
- 该参数用于指定接收方与发送方的滑动窗口大小
现代的操作系统会自动调整,一般无需我们设置
ALLOCATOR
- 属于 SocketChannal 参数
- 用来配置 ByteBuf 是池化还是非池化,是直接内存还是堆内存
使用
// 选择ALLOCATOR参数,设置SocketChannel中分配的ByteBuf类型 // 第二个参数需要传入一个ByteBufAllocator,用于指定生成的 ByteBuf 的类型 new ServerBootstrap().childOption(ChannelOption.ALLOCATOR, new PooledByteBufAllocator());- 1
- 2
- 3
ByteBufAllocator类型
-
池化并使用直接内存
// true表示使用直接内存 new PooledByteBufAllocator(true);- 1
- 2
-
池化并使用堆内存
// false表示使用堆内存 new PooledByteBufAllocator(false);- 1
- 2
-
非池化并使用直接内存
// ture表示使用直接内存 new UnpooledByteBufAllocator(true);- 1
- 2
-
非池化并使用堆内存
// false表示使用堆内存 new UnpooledByteBufAllocator(false);- 1
- 2
RCVBUF_ALLOCATOR
- 属于 SocketChannal 参数
- 控制 Netty 接收缓冲区大小
- 负责入站数据的分配,决定入站缓冲区的大小(并可动态调整),统一采用 direct 直接内存,具体池化还是非池化由 allocator 决定
3、RPC框架
准备工作
在聊天室代码的基础上进行一定的改进
Message中添加如下代码
public abstract class Message implements Serializable { ... // 添加RPC消息类型 public static final int RPC_MESSAGE_TYPE_REQUEST = 101; public static final int RPC_MESSAGE_TYPE_RESPONSE = 102; static { // 将消息类型放入消息类对象Map中 messageClasses.put(RPC_MESSAGE_TYPE_REQUEST, RpcRequestMessage.class); messageClasses.put(RPC_MESSAGE_TYPE_RESPONSE, RpcResponseMessage.class); } }- 1
- 2
- 3
- 4
- 5
- 6
- 7
- 8
- 9
- 10
- 11
- 12
- 13
- 14
- 15
RPC请求消息
public class RpcRequestMessage extends Message { /** * 调用的接口全限定名,服务端根据它找到实现 */ private String interfaceName; /** * 调用接口中的方法名 */ private String methodName; /** * 方法返回类型 */ private Class<?> returnType; /** * 方法参数类型数组 */ private Class[] parameterTypes; /** * 方法参数值数组 */ private Object[] parameterValue; public RpcRequestMessage(int sequenceId, String interfaceName, String methodName, Class<?> returnType, Class[] parameterTypes, Object[] parameterValue) { super.setSequenceId(sequenceId); this.interfaceName = interfaceName; this.methodName = methodName; this.returnType = returnType; this.parameterTypes = parameterTypes; this.parameterValue = parameterValue; } @Override public int getMessageType() { return RPC_MESSAGE_TYPE_REQUEST; } public String getInterfaceName() { return interfaceName; } public String getMethodName() { return methodName; } public Class<?> getReturnType() { return returnType; } public Class[] getParameterTypes() { return parameterTypes; } public Object[] getParameterValue() { return parameterValue; } @Override public String toString() { return "RpcRequestMessage{" + "interfaceName='" + interfaceName + '\'' + ", methodName='" + methodName + '\'' + ", returnType=" + returnType + ", parameterTypes=" + Arrays.toString(parameterTypes) + ", parameterValue=" + Arrays.toString(parameterValue) + '}'; } }- 1
- 2
- 3
- 4
- 5
- 6
- 7
- 8
- 9
- 10
- 11
- 12
- 13
- 14
- 15
- 16
- 17
- 18
- 19
- 20
- 21
- 22
- 23
- 24
- 25
- 26
- 27
- 28
- 29
- 30
- 31
- 32
- 33
- 34
- 35
- 36
- 37
- 38
- 39
- 40
- 41
- 42
- 43
- 44
- 45
- 46
- 47
- 48
- 49
- 50
- 51
- 52
- 53
- 54
- 55
- 56
- 57
- 58
- 59
- 60
- 61
- 62
- 63
- 64
- 65
- 66
- 67
- 68
- 69
- 70
- 71
想要远程调用一个方法,必须知道以下五个信息
- 方法所在的全限定类名
- 方法名
- 方法返回值类型
- 方法参数类型
- 方法参数值
RPC响应消息
public class RpcResponseMessage extends Message { /** * 返回值 */ private Object returnValue; /** * 异常值 */ private Exception exceptionValue; @Override public int getMessageType() { return RPC_MESSAGE_TYPE_RESPONSE; } public void setReturnValue(Object returnValue) { this.returnValue = returnValue; } public void setExceptionValue(Exception exceptionValue) { this.exceptionValue = exceptionValue; } public Object getReturnValue() { return returnValue; } public Exception getExceptionValue() { return exceptionValue; } @Override public String toString() { return "RpcResponseMessage{" + "returnValue=" + returnValue + ", exceptionValue=" + exceptionValue + '}'; } }- 1
- 2
- 3
- 4
- 5
- 6
- 7
- 8
- 9
- 10
- 11
- 12
- 13
- 14
- 15
- 16
- 17
- 18
- 19
- 20
- 21
- 22
- 23
- 24
- 25
- 26
- 27
- 28
- 29
- 30
- 31
- 32
- 33
- 34
- 35
- 36
- 37
- 38
- 39
- 40
响应消息中只需要获取返回结果和异常值
服务器
public class RPCServer { public static void main(String[] args) { NioEventLoopGroup boss = new NioEventLoopGroup(); NioEventLoopGroup worker = new NioEventLoopGroup(); LoggingHandler loggingHandler = new LoggingHandler(LogLevel.DEBUG); MessageSharableCodec messageSharableCodec = new MessageSharableCodec(); // PRC 请求消息处理器 RpcRequestMessageHandler rpcRequestMessageHandler = new RpcRequestMessageHandler(); try { ServerBootstrap serverBootstrap = new ServerBootstrap(); serverBootstrap.channel(NioServerSocketChannel.class); serverBootstrap.group(boss, worker); serverBootstrap.childHandler(new ChannelInitializer<SocketChannel>() { @Override protected void initChannel(SocketChannel ch) throws Exception { ch.pipeline().addLast(new ProtocolFrameDecoder()); ch.pipeline().addLast(loggingHandler); ch.pipeline().addLast(messageSharableCodec); ch.pipeline().addLast(rpcRequestMessageHandler); } }); Channel channel = serverBootstrap.bind(8080).sync().channel(); channel.closeFuture().sync(); } catch (InterruptedException e) { e.printStackTrace(); } finally { boss.shutdownGracefully(); worker.shutdownGracefully(); } } }- 1
- 2
- 3
- 4
- 5
- 6
- 7
- 8
- 9
- 10
- 11
- 12
- 13
- 14
- 15
- 16
- 17
- 18
- 19
- 20
- 21
- 22
- 23
- 24
- 25
- 26
- 27
- 28
- 29
- 30
- 31
- 32
服务器中添加了处理RPCRequest消息的handler
客户端
public class RPCClient { public static void main(String[] args) { NioEventLoopGroup group = new NioEventLoopGroup(); LoggingHandler loggingHandler = new LoggingHandler(LogLevel.DEBUG); MessageSharableCodec messageSharableCodec = new MessageSharableCodec(); // PRC 请求消息处理器 RpcResponseMessageHandler rpcResponseMessageHandler = new RpcResponseMessageHandler(); try { Bootstrap bootstrap = new Bootstrap(); bootstrap.channel(NioSocketChannel.class); bootstrap.group(group); bootstrap.handler(new ChannelInitializer<SocketChannel>() { @Override protected void initChannel(SocketChannel ch) throws Exception { ch.pipeline().addLast(new ProtocolFrameDecoder()); ch.pipeline().addLast(loggingHandler); ch.pipeline().addLast(messageSharableCodec); ch.pipeline().addLast(rpcResponseMessageHandler); } }); Channel channel = bootstrap.connect(new InetSocketAddress("localhost", 8080)).sync().channel(); channel.closeFuture().sync(); } catch (InterruptedException e) { e.printStackTrace(); } finally { group.shutdownGracefully(); } } }- 1
- 2
- 3
- 4
- 5
- 6
- 7
- 8
- 9
- 10
- 11
- 12
- 13
- 14
- 15
- 16
- 17
- 18
- 19
- 20
- 21
- 22
- 23
- 24
- 25
- 26
- 27
- 28
- 29
- 30
通过接口Class获取实例对象的Factory
public class ServicesFactory { static HashMap<Class<?>, Object> map = new HashMap<>(16); public static Object getInstance(Class<?> interfaceClass) throws ClassNotFoundException, IllegalAccessException, InstantiationException { // 根据Class创建实例 try { Class<?> clazz = Class.forName("cn.nyimac.study.day8.server.service.HelloService"); Object instance = Class.forName("cn.nyimac.study.day8.server.service.HelloServiceImpl").newInstance(); // 放入 InterfaceClass -> InstanceObject 的映射 map.put(clazz, instance); } catch (ClassNotFoundException | InstantiationException | IllegalAccessException e) { e.printStackTrace(); } return map.get(interfaceClass); } }- 1
- 2
- 3
- 4
- 5
- 6
- 7
- 8
- 9
- 10
- 11
- 12
- 13
- 14
- 15
- 16
- 17
RpcRequestMessageHandler
@ChannelHandler.Sharable public class RpcRequestMessageHandler extends SimpleChannelInboundHandler<RpcRequestMessage> { @Override protected void channelRead0(ChannelHandlerContext ctx, RpcRequestMessage rpcMessage) { RpcResponseMessage rpcResponseMessage = new RpcResponseMessage(); try { // 设置返回值的属性 rpcResponseMessage.setSequenceId(rpcMessage.getSequenceId()); // 返回一个实例 HelloService service = (HelloService) ServicesFactory.getInstance(Class.forName(rpcMessage.getInterfaceName())); // 通过反射调用方法,并获取返回值 Method method = service.getClass().getMethod(rpcMessage.getMethodName(), rpcMessage.getParameterTypes()); // 获得返回值 Object invoke = method.invoke(service, rpcMessage.getParameterValue()); // 设置返回值 rpcResponseMessage.setReturnValue(invoke); } catch (Exception e) { e.printStackTrace(); // 设置异常 rpcResponseMessage.setExceptionValue(e); } } // 向channel中写入Message ctx.writeAndFlush(rpcResponseMessage); }- 1
- 2
- 3
- 4
- 5
- 6
- 7
- 8
- 9
- 10
- 11
- 12
- 13
- 14
- 15
- 16
- 17
- 18
- 19
- 20
- 21
- 22
- 23
- 24
- 25
- 26
远程调用方法主要是通过反射实现的,大致步骤如下
- 通过请求消息传入被调入方法的各个参数
- 通过全限定接口名,在map中查询到对应的类并实例化对象
- 通过反射获取Method,并调用其invoke方法的返回值,并放入响应消息中
- 若有异常需要捕获,并放入响应消息中
RpcResponseMessageHandler
@ChannelHandler.Sharable public class RpcResponseMessageHandler extends SimpleChannelInboundHandler{ static final Logger log = LoggerFactory.getLogger(ChatServer.class); @Override protected void channelRead0(ChannelHandlerContext ctx, RpcResponseMessage msg) throws Exception { log.debug("{}", msg); System.out.println((String)msg.getReturnValue()); } } - 1
- 2
- 3
- 4
- 5
- 6
- 7
- 8
- 9
- 10
客户端发送消息
public class RPCClient { public static void main(String[] args) { ... // 创建请求并发送 RpcRequestMessage message = new RpcRequestMessage(1, "cn.nyimac.study.day8.server.service.HelloService", "sayHello", String.class, new Class[]{String.class}, new Object[]{"Nyima"}); channel.writeAndFlush(message); ... } }- 1
- 2
- 3
- 4
- 5
- 6
- 7
- 8
- 9
- 10
- 11
- 12
- 13
- 14
- 15
- 16
- 17
运行结果
客户端
1606 [nioEventLoopGroup-2-1] DEBUG cn.nyimac.study.day8.server.ChatServer - RpcResponseMessage{returnValue=你好,Nyima, exceptionValue=null}- 1
改进客户端
public class RPCClientManager { /** * 产生SequenceId */ private static AtomicInteger sequenceId = new AtomicInteger(0); private static volatile Channel channel = null; private static final Object lock = new Object(); public static void main(String[] args) { // 创建代理对象 HelloService service = (HelloService) getProxy(HelloService.class); // 通过代理对象执行方法 System.out.println(service.sayHello("Nyima")); System.out.println(service.sayHello("Hulu")); } /** * 单例模式创建Channel */ public static Channel getChannel() { if (channel == null) { synchronized (lock) { if (channel == null) { init(); } } } return channel; } /** * 使用代理模式,帮助我们创建请求消息并发送 */ public static Object getProxy(Class serviceClass) { Class[] classes = new Class[]{serviceClass}; // 使用JDK代理,创建代理对象 Object o = Proxy.newProxyInstance(serviceClass.getClassLoader(), classes, new InvocationHandler() { @Override public Object invoke(Object proxy, Method method, Object[] args) throws Throwable { // 创建请求消息 int id = sequenceId.getAndIncrement(); RpcRequestMessage message = new RpcRequestMessage(id, serviceClass.getName(), method.getName(), method.getReturnType(), method.getParameterTypes(), args); // 发送消息 getChannel().writeAndFlush(message); // 创建Promise,用于获取NIO线程中的返回结果,获取的过程是异步的 DefaultPromise- 1
- 2
- 3
- 4
- 5
- 6
- 7
- 8
- 9
- 10
- 11
- 12
- 13
- 14
- 15
- 16
- 17
- 18
- 19
- 20
- 21
- 22
- 23
- 24
- 25
- 26
- 27
- 28
- 29
- 30
- 31
- 32
- 33
- 34
- 35
- 36
- 37
- 38
- 39
- 40
- 41
- 42
- 43
- 44
- 45
- 46
- 47
- 48
- 49
- 50
- 51
- 52
- 53
- 54
- 55
- 56
- 57
- 58
- 59
- 60
- 61
- 62
- 63
- 64
- 65
- 66
- 67
- 68
- 69
- 70
- 71
- 72
- 73
- 74
- 75
- 76
- 77
- 78
- 79
- 80
- 81
- 82
- 83
- 84
- 85
- 86
- 87
- 88
- 89
- 90
- 91
- 92
- 93
- 94
- 95
- 96
获得Channel
- 建立连接,获取Channel的操作被封装到了
init方法中,当连接断开时,通过addListener方法异步关闭group - 通过单例模式创建与获取Channel
远程调用方法
- 为了让方法的调用变得简洁明了,将
RpcRequestMessage的创建与发送过程通过JDK的动态代理来完成 - 通过返回的代理对象调用方法即可,方法参数为被调用方法接口的Class类
远程调用方法返回值获取
-
调用方法的是主线程,处理返回结果的是NIO线程(RpcResponseMessageHandler)。要在不同线程中进行返回值的传递,需要用到Promise
-
在
RpcResponseMessageHandler中创建一个Map- Key为SequenceId
- Value为对应的Promise
-
主线程的代理类将RpcResponseMessage发送给服务器后,需要创建Promise对象,并将其放入到RpcResponseMessageHandler的Map中。需要使用await等待结果被放入Promise中。获取结果后,根据结果类型(判断是否成功)来返回结果或抛出异常
// 创建Promise,用于获取NIO线程中的返回结果,获取的过程是异步的 DefaultPromise- 1
- 2
- 3
- 4
- 5
- 6
- 7
- 8
- 9
- 10
- 11
- 12
- 13
-
NIO线程负责通过SequenceId**获取并移除(remove)**对应的Promise,然后根据RpcResponseMessage中的结果,向Promise中放入不同的值
- 如果没有异常信息(ExceptionValue),就调用
promise.setSuccess(returnValue)放入方法返回值 - 如果有异常信息,就调用
promise.setFailure(exception)放入异常信息
// 将返回结果放入对应的Promise中,并移除Map中的Promise Promise<Object> promise = promiseMap.remove(msg.getSequenceId()); Object returnValue = msg.getReturnValue(); Exception exception = msg.getExceptionValue(); if (promise != null) { if (exception != null) { // 返回结果中有异常信息 promise.setFailure(exception); } else { // 方法正常执行,没有异常 promise.setSuccess(returnValue); } }- 1
- 2
- 3
- 4
- 5
- 6
- 7
- 8
- 9
- 10
- 11
- 12
- 13
- 如果没有异常信息(ExceptionValue),就调用
改进RpcResponseMessageHandler
@ChannelHandler.Sharable public class RpcResponseMessageHandler extends SimpleChannelInboundHandler{ static final Logger log = LoggerFactory.getLogger(ChatServer.class); /** * 用于存放Promise的集合,Promise用于主线程与NIO线程之间传递返回值 */ public static Map - 1
- 2
- 3
- 4
- 5
- 6
- 7
- 8
- 9
- 10
- 11
- 12
- 13
- 14
- 15
- 16
- 17
- 18
- 19
- 20
- 21
- 22
- 23
- 24
- 25
- 26
- 27
- 28
六、源码
1、启动流程
Netty启动流程可以简化成如下代码
// netty 中使用 NioEventLoopGroup (简称 nio boss 线程)来封装线程和 selector Selector selector = Selector.open(); // 创建 NioServerSocketChannel,同时会初始化它关联的 handler,以及为原生 ssc 存储 config NioServerSocketChannel attachment = new NioServerSocketChannel(); // 创建 NioServerSocketChannel 时,创建了 java 原生的 ServerSocketChannel ServerSocketChannel serverSocketChannel = ServerSocketChannel.open(); serverSocketChannel.configureBlocking(false); // 启动 nio boss 线程执行接下来的操作 //注册(仅关联 selector 和 NioServerSocketChannel),未关注事件 SelectionKey selectionKey = serverSocketChannel.register(selector, 0, attachment); // head -> 初始化器 -> ServerBootstrapAcceptor -> tail,初始化器是一次性的,只为添加 acceptor // 绑定端口 serverSocketChannel.bind(new InetSocketAddress(8080)); // 触发 channel active 事件,在 head 中关注 op_accept 事件 selectionKey.interestOps(SelectionKey.OP_ACCEPT);- 1
- 2
- 3
- 4
- 5
- 6
- 7
- 8
- 9
- 10
- 11
- 12
- 13
- 14
- 15
- 16
- 17
- 18
- 19
- 20
- 21
- 22
- 获得选择器Selector,Netty中使用NioEventloopGroup中的NioEventloop封装了线程和选择器
- 创建
NioServerSocketChannel,该Channel作为附件添加到ServerSocketChannel中 - 创建
ServerSocketChannel,将其设置为非阻塞模式,并注册到Selector中,此时未关注事件,但是添加了附件NioServerSocketChannel - 绑定端口
- 通过
interestOps设置感兴趣的事件
bind
选择器Selector的创建是在NioEventloopGroup中完成的。NioServerSocketChannel与ServerSocketChannel的创建,ServerSocketChannel注册到Selector中以及绑定操作都是由
bind方法完成的所以服务器启动的入口便是
io.netty.bootstrap.ServerBootstrap.bindpublic ChannelFuture bind(SocketAddress localAddress) { validate(); return doBind(ObjectUtil.checkNotNull(localAddress, "localAddress")); }- 1
- 2
- 3
- 4
doBind
真正完成初始化、注册以及绑定的方法是
io.netty.bootstrap.AbstractBootstrap.doBinddobind方法在主线程中执行
private ChannelFuture doBind(final SocketAddress localAddress) { // 负责NioServerSocketChannel和ServerSocketChannel的创建 // ServerSocketChannel的注册工作 // init由main线程完成,regisetr由NIO线程完成 final ChannelFuture regFuture = initAndRegister(); final Channel channel = regFuture.channel(); if (regFuture.cause() != null) { return regFuture; } // 因为register操作是异步的 // 所以要判断主线程执行到这里时,register操作是否已经执行完毕 if (regFuture.isDone()) { // At this point we know that the registration was complete and successful. ChannelPromise promise = channel.newPromise(); // 执行doBind0绑定操作 doBind0(regFuture, channel, localAddress, promise); return promise; } else { // Registration future is almost always fulfilled already, but just in case it's not. // 如果register操作还没执行完,就会到这个分支中来 final PendingRegistrationPromise promise = new PendingRegistrationPromise(channel); // 添加监听器,NIO线程异步进行doBind0操作 regFuture.addListener(new ChannelFutureListener() { @Override public void operationComplete(ChannelFuture future) throws Exception { Throwable cause = future.cause(); if (cause != null) { // Registration on the EventLoop failed so fail the ChannelPromise directly to not cause an // IllegalStateException once we try to access the EventLoop of the Channel. promise.setFailure(cause); } else { // Registration was successful, so set the correct executor to use. // See https://github.com/netty/netty/issues/2586 promise.registered(); doBind0(regFuture, channel, localAddress, promise); } } }); return promise; } }- 1
- 2
- 3
- 4
- 5
- 6
- 7
- 8
- 9
- 10
- 11
- 12
- 13
- 14
- 15
- 16
- 17
- 18
- 19
- 20
- 21
- 22
- 23
- 24
- 25
- 26
- 27
- 28
- 29
- 30
- 31
- 32
- 33
- 34
- 35
- 36
- 37
- 38
- 39
- 40
- 41
- 42
- 43
- 44
- 45
- doBind()中有两个重要方法
initAndRegister()和doBind0(regFuture, channel, localAddress, promise) - initAndRegister主要负责NioServerSocketChannel和ServerSocketChannel的创建(主线程中完成)与ServerSocketChannel注册(NIO线程中完成)工作
- doBind0则负责连接的创建工作
initAndRegisterd
代码
final ChannelFuture initAndRegister() { Channel channel = null; try { channel = channelFactory.newChannel(); init(channel); } catch (Throwable t) { if (channel != null) { // channel can be null if newChannel crashed (eg SocketException("too many open files")) channel.unsafe().closeForcibly(); // as the Channel is not registered yet we need to force the usage of the GlobalEventExecutor return new DefaultChannelPromise(channel, GlobalEventExecutor.INSTANCE).setFailure(t); } // as the Channel is not registered yet we need to force the usage of the GlobalEventExecutor return new DefaultChannelPromise(new FailedChannel(), GlobalEventExecutor.INSTANCE).setFailure(t); } ChannelFuture regFuture = config().group().register(channel); if (regFuture.cause() != null) { if (channel.isRegistered()) { channel.close(); } else { channel.unsafe().closeForcibly(); } } // If we are here and the promise is not failed, it's one of the following cases: // 1) If we attempted registration from the event loop, the registration has been completed at this point. // i.e. It's safe to attempt bind() or connect() now because the channel has been registered. // 2) If we attempted registration from the other thread, the registration request has been successfully // added to the event loop's task queue for later execution. // i.e. It's safe to attempt bind() or connect() now: // because bind() or connect() will be executed *after* the scheduled registration task is executed // because register(), bind(), and connect() are all bound to the same thread. return regFuture; }- 1
- 2
- 3
- 4
- 5
- 6
- 7
- 8
- 9
- 10
- 11
- 12
- 13
- 14
- 15
- 16
- 17
- 18
- 19
- 20
- 21
- 22
- 23
- 24
- 25
- 26
- 27
- 28
- 29
- 30
- 31
- 32
- 33
- 34
- 35
- 36
init
Channel channel = null; try { // 通过反射初始化NioServerSocketChannel channel = channelFactory.newChannel(); init(channel); }- 1
- 2
- 3
- 4
- 5
- 6
newChannel方法
@Override public T newChannel() { try { // 通过反射调用NioServerSocketChannel的构造方法 // 创建NioServerSocketChannel对象 return constructor.newInstance(); } catch (Throwable t) { throw new ChannelException("Unable to create Channel from class " + constructor.getDeclaringClass(), t); } }- 1
- 2
- 3
- 4
- 5
- 6
- 7
- 8
- 9
- 10
NioServerSocketChannel构造方法
public NioServerSocketChannel() { // 创建了ServerSocketChannel实例 this(newSocket(DEFAULT_SELECTOR_PROVIDER)); }- 1
- 2
- 3
- 4
newSocket方法
private static ServerSocketChannel newSocket(SelectorProvider provider) { try { // ServerSocketChannel.open方法: // SelectorProvider.provider().openServerSocketChannel() // 所以此处相当于ServerSocketChannel.open() // 创建了ServerSocketChannel实例 return provider.openServerSocketChannel(); } catch (IOException e) { throw new ChannelException("Failed to open a server socket.", e); } }- 1
- 2
- 3
- 4
- 5
- 6
- 7
- 8
- 9
- 10
- 11
init方法
@Override void init(Channel channel) { ... // NioSocketChannl的Pipeline ChannelPipeline p = channel.pipeline(); ... // 向Pipeline中添加了一个handler,该handler等待被调用 p.addLast(new ChannelInitializer() { @Override // register之后才调用该方法 public void initChannel(final Channel ch) { final ChannelPipeline pipeline = ch.pipeline(); // 创建handler并加入到pipeline中 ChannelHandler handler = config.handler(); if (handler != null) { pipeline.addLast(handler); } ch.eventLoop().execute(new Runnable() { @Override public void run() { // 添加新的handler,在发生Accept事件后建立连接 pipeline.addLast(new ServerBootstrapAcceptor( ch, currentChildGroup, currentChildHandler, currentChildOptions, currentChildAttrs)); } }); } }); } - 1
- 2
- 3
- 4
- 5
- 6
- 7
- 8
- 9
- 10
- 11
- 12
- 13
- 14
- 15
- 16
- 17
- 18
- 19
- 20
- 21
- 22
- 23
- 24
- 25
- 26
- 27
- 28
- 29
- 30
- 31
- 32
- 33
init主要完成了以下三个操作
-
创建NioServerSocketChannel
-
通过NioServerSocketChannel的构造器,创建了ServerSocketChannel
-
由
initChannel- 1
方法向NioServerSocketChannel中添加了两个handler,
添加操作在register之后被执行
- 一个handler负责设置配置
- 一个handler负责发生Accepet事件后建立连接
Register
init执行完毕后,便执行
ChannelFuture regFuture = config().group().register(channel)操作该方法最终调用的是
promise.channel().unsafe().register(this, promise)方法promise.channel().unsafe().register(this, promise)
@Override public final void register(EventLoop eventLoop, final ChannelPromise promise) { ... // 获取EventLoop AbstractChannel.this.eventLoop = eventLoop; // 此处完成了由 主线程 到 NIO线程 的切换 // eventLoop.inEventLoop()用于判断当前线程是否为NIO线程 if (eventLoop.inEventLoop()) { register0(promise); } else { try { // 向NIO线程中添加任务 eventLoop.execute(new Runnable() { @Override public void run() { // 该方法中会执行doRegister // 执行真正的注册操作 register0(promise); } }); } catch (Throwable t) { ... } } }- 1
- 2
- 3
- 4
- 5
- 6
- 7
- 8
- 9
- 10
- 11
- 12
- 13
- 14
- 15
- 16
- 17
- 18
- 19
- 20
- 21
- 22
- 23
- 24
- 25
- 26
- 27
register0方法
private void register0(ChannelPromise promise) { try { ... // 执行真正的注册操作 doRegister(); neverRegistered = false; registered = true; // Ensure we call handlerAdded(...) before we actually notify the promise. This is needed as the // user may already fire events through the pipeline in the ChannelFutureListener. // 调用init中的initChannel方法 pipeline.invokeHandlerAddedIfNeeded(); ... } catch (Throwable t) { ... } }- 1
- 2
- 3
- 4
- 5
- 6
- 7
- 8
- 9
- 10
- 11
- 12
- 13
- 14
- 15
- 16
- 17
- 18
- 19
- 20
doRegister方法
@Override protected void doRegister() throws Exception { boolean selected = false; for (;;) { try { // javaChannel()即为ServerSocketChannel // eventLoop().unwrappedSelector()获取eventLoop中的Selector // this为NIOServerSocketChannel,作为附件 selectionKey = javaChannel().register(eventLoop().unwrappedSelector(), 0, this); return; } catch (CancelledKeyException e) { ... } } }- 1
- 2
- 3
- 4
- 5
- 6
- 7
- 8
- 9
- 10
- 11
- 12
- 13
- 14
- 15
- 16
回调initChannel
@Override public void initChannel(final Channel ch) { final ChannelPipeline pipeline = ch.pipeline(); ChannelHandler handler = config.handler(); if (handler != null) { pipeline.addLast(handler); } // 添加新任务,任务负责添加handler // 该handler负责发生Accepet事件后建立连接 ch.eventLoop().execute(new Runnable() { @Override public void run() { pipeline.addLast(new ServerBootstrapAcceptor( ch, currentChildGroup, currentChildHandler, currentChildOptions, currentChildAttrs)); } }); }- 1
- 2
- 3
- 4
- 5
- 6
- 7
- 8
- 9
- 10
- 11
- 12
- 13
- 14
- 15
- 16
- 17
- 18
Register主要完成了以下三个操作
-
完成了主线程到NIO的线程切换
- 通过
eventLoop.inEventLoop()进行线程判断,判断当前线程是否为NIO线程 - 切换的方式为让eventLoop执行register的操作
- register的操作在NIO线程中完成
- 通过
-
调用doRegister方法
// javaChannel()即为ServerSocketChannel // eventLoop().unwrappedSelector()获取eventLoop中的Selector // this为NIOServerSocketChannel,作为附件 selectionKey = javaChannel().register(eventLoop().unwrappedSelector(), 0, this);Copy- 1
- 2
- 3
- 4
- 将ServerSocketChannel注册到EventLoop的Selector中
- 此时还未关注事件
- 添加NioServerSocketChannel附件
-
通过
invokeHandlerAddedIfNeeded调用init中的initChannel方法-
initChannel方法主要创建了
两个handler
- 一个handler负责设置配置
- 一个handler负责发生Accept事件后建立连接
-
doBind0
绑定端口
在
doRegister和invokeHandlerAddedIfNeeded操作中的完成后,会调用safeSetSuccess(promise)方法,向Promise中设置执行成功的结果。此时doBind方法中由initAndRegister返回的ChannelFuture对象regFuture便会由NIO线程异步执行doBind0绑定操作// initAndRegister为异步方法,会返回ChannelFuture对象 final ChannelFuture regFuture = initAndRegister(); regFuture.addListener(new ChannelFutureListener() { @Override public void operationComplete(ChannelFuture future) throws Exception { Throwable cause = future.cause(); if (cause != null) { // Registration on the EventLoop failed so fail the ChannelPromise directly to not cause an // IllegalStateException once we try to access the EventLoop of the Channel. promise.setFailure(cause); } else { // Registration was successful, so set the correct executor to use. // See https://github.com/netty/netty/issues/2586 promise.registered(); // 如果没有异常,则执行绑定操作 doBind0(regFuture, channel, localAddress, promise); } } });Copy- 1
- 2
- 3
- 4
- 5
- 6
- 7
- 8
- 9
- 10
- 11
- 12
- 13
- 14
- 15
- 16
- 17
- 18
- 19
doBind0最底层调用的是ServerSocketChannel的bind方法
NioServerSocketChannel.doBind方法
通过该方法,绑定了对应的端口
@SuppressJava6Requirement(reason = "Usage guarded by java version check") @Override protected void doBind(SocketAddress localAddress) throws Exception { if (PlatformDependent.javaVersion() >= 7) { // 调用ServerSocketChannel的bind方法,绑定端口 javaChannel().bind(localAddress, config.getBacklog()); } else { javaChannel().socket().bind(localAddress, config.getBacklog()); } }- 1
- 2
- 3
- 4
- 5
- 6
- 7
- 8
- 9
- 10
关注事件
在绑定端口操作完成后,会判断各种所有初始化操作是否已经完成,若完成,则会添加ServerSocketChannel感兴趣的事件
if (!wasActive && isActive()) { invokeLater(new Runnable() { @Override public void run() { pipeline.fireChannelActive(); } }); }- 1
- 2
- 3
- 4
- 5
- 6
- 7
- 8
最终在
AbstractNioChannel.doBeginRead方法中,会添加ServerSocketChannel添加Accept事件@Override protected void doBeginRead() throws Exception { // Channel.read() or ChannelHandlerContext.read() was called final SelectionKey selectionKey = this.selectionKey; if (!selectionKey.isValid()) { return; } readPending = true; final int interestOps = selectionKey.interestOps(); // 如果ServerSocketChannel没有关注Accept事件 if ((interestOps & readInterestOp) == 0) { // 则让其关注Accepet事件 // readInterestOp 取值是 16 // 在 NioServerSocketChannel 创建时初始化 selectionKey.interestOps(interestOps | readInterestOp); } }- 1
- 2
- 3
- 4
- 5
- 6
- 7
- 8
- 9
- 10
- 11
- 12
- 13
- 14
- 15
- 16
- 17
注意:此处设置interestOps时使用的方法,避免覆盖关注的其他事件
-
首先获取Channel所有感兴趣的事件
final int interestOps = selectionKey.interestOps();Copy- 1
-
然后再设置其感兴趣的事件
selectionKey.interestOps(interestOps | readInterestOp);Copy- 1
各个事件对应的值

总结
通过上述步骤,完成了
- NioServerSocketChannel与ServerSocketChannel的创建
- ServerSocketChannel绑定到EventLoop的Selecot中,并添加NioServerSocketChannel附件
- 绑定了对应的端口
- 关注了Accept事件
2、NioEventLoop剖析
组成
NioEventLoop的重要组成部分有三个
-
Selector
public final class NioEventLoop extends SingleThreadEventLoop { ... // selector中的selectedKeys是基于数组的 // unwrappedSelector中的selectedKeys是基于HashSet的 private Selector selector; private Selector unwrappedSelector; private SelectedSelectionKeySet selectedKeys; ... }- 1
- 2
- 3
- 4
- 5
- 6
- 7
- 8
- 9
- 10
- 11
- 12
-
Thread与TaskQueue
public abstract class SingleThreadEventExecutor extends AbstractScheduledEventExecutor implements OrderedEventExecutor { // 任务队列 private final QueuetaskQueue; // 线程 private volatile Thread thread; } - 1
- 2
- 3
- 4
- 5
- 6
- 7
Selector的创建
Selector是在NioEventLoop的构造方法中被创建的
NioEventLoop(NioEventLoopGroup parent, Executor executor, SelectorProvider selectorProvider, SelectStrategy strategy, RejectedExecutionHandler rejectedExecutionHandler, EventLoopTaskQueueFactory queueFactory) { ... // 初始化selector,初始化过程在openSelector中 final SelectorTuple selectorTuple = openSelector(); this.selector = selectorTuple.selector; this.unwrappedSelector = selectorTuple.unwrappedSelector; } private SelectorTuple openSelector() { final Selector unwrappedSelector; try { // 此处等同于 Selector.open()方法 // 创建了unwrappedSelector对象 unwrappedSelector = provider.openSelector(); } catch (IOException e) { throw new ChannelException("failed to open a new selector", e); } }- 1
- 2
- 3
- 4
- 5
- 6
- 7
- 8
- 9
- 10
- 11
- 12
- 13
- 14
- 15
- 16
- 17
- 18
- 19
- 20
- 21
NioEventLoop的构造方法中,调用了
openSelector()方法, 该方法会返回一个SelectorTuple对象,该方法是创建Selector的核心方法。
openSelector()方法内部调用了unwrappedSelector = provider.openSelector();Copy- 1
获得了Selector对象
unwrappedSelector后面会通过反射,修改
unwrappedSelector中SelectedKeys的实现,然后通过SelectedSelectionKeySetSelector方法获得selector。最后通过SelectorTuple的构造方法,将该Selector的值赋给SelectorTuple类中的selector与unwrappedSelectorprivate static final class SelectorTuple { final Selector unwrappedSelector; final Selector selector; SelectorTuple(Selector unwrappedSelector) { this.unwrappedSelector = unwrappedSelector; this.selector = unwrappedSelector; } /** * 一般调用的是这个构造方法 */ SelectorTuple(Selector unwrappedSelector, Selector selector) { this.unwrappedSelector = unwrappedSelector; this.selector = selector; } }- 1
- 2
- 3
- 4
- 5
- 6
- 7
- 8
- 9
- 10
- 11
- 12
- 13
- 14
- 15
- 16
- 17
再通过NioEventLoop的构造方法,将SelectorTuple中的Selector赋值给NioEventLoop中的Selector
两个Selector
NioEventLoop中有selector和unwrappedSelector两个Selector,它们的区别主要在于SelectedKeys的数据结构
- selector中的SelectedKeys是基于数组的
- unwrappedSelector中的是基于HashSet的
这样做的主要目的是,数组的遍历效率要高于HashSet
private SelectorTuple openSelector() { final Selector unwrappedSelector; try { unwrappedSelector = provider.openSelector(); } catch (IOException e) { throw new ChannelException("failed to open a new selector", e); } ... // 获得基于数组的selectedKeySet实现 final SelectedSelectionKeySet selectedKeySet = new SelectedSelectionKeySet(); Object maybeException = AccessController.doPrivileged(new PrivilegedAction- 1
- 2
- 3
- 4
- 5
- 6
- 7
- 8
- 9
- 10
- 11
- 12
- 13
- 14
- 15
- 16
- 17
- 18
- 19
- 20
- 21
- 22
- 23
- 24
- 25
- 26
- 27
- 28
- 29
- 30
- 31
- 32
- 33
- 34
- 35
- 36
- 37
- 38
- 39
- 40
- 41
- 42
- 43
- 44
- 45
- 46
- 47
- 48
- 49
- 50
- 51
- 52
获得数组实现SelectedKeys的Selector的原理是反射,主要步骤如下
-
获得基于数组的selectedKeySet实现
// 获得基于数组的selectedKeySet实现 final SelectedSelectionKeySet selectedKeySet = new SelectedSelectionKeySet(); SelectedSelectionKeySet() { keys = new SelectionKey[1024]; }- 1
- 2
- 3
- 4
- 5
- 6
-
通过反射拿到unwrappedSelector中的SelectedKeySet并将其替换为selectedKeySet
-
通过Selector的构造方法获得selector
new SelectedSelectionKeySetSelector(unwrappedSelector, selectedKeySet)- 1
-
通过SelectorTuple的构造方法获得拥有两种Selector的SelectorTuple对象,并返回给NioEventLoop
// 调用构造函数,创建unwrappedSelector与selector return new SelectorTuple(unwrappedSelector, new SelectedSelectionKeySetSelector(unwrappedSelector, selectedKeySet));Copy- 1
- 2
NIO线程启动时机
启动
NioEventLoop中的线程,在首次执行任务时,才会被创建,且只会被创建一次
测试代码
public class TestNioEventLoop { public static void main(String[] args) { EventLoop eventLoop = new NioEventLoopGroup().next(); // 使用NioEventLoop执行任务 eventLoop.execute(()->{ System.out.println("hello"); }); } }- 1
- 2
- 3
- 4
- 5
- 6
- 7
- 8
- 9
进入
execute执行任务@Override public void execute(Runnable task) { // 检测传入的任务是否为空,为空会抛出NullPointerException ObjectUtil.checkNotNull(task, "task"); // 执行任务 // 此处判断了任务是否为懒加载任务,wakesUpForTask的返回值只会为true execute(task, !(task instanceof LazyRunnable) && wakesUpForTask(task)); }- 1
- 2
- 3
- 4
- 5
- 6
- 7
- 8
进入上述代码的
execute方法private void execute(Runnable task, boolean immediate) { // 判断当前线程是否为NIO线程 // 判断方法为 return thread == this.thread; // this.thread即为NIO线程,首次执行任务时,其为null boolean inEventLoop = inEventLoop(); // 向任务队列taskQueue中添加任务 addTask(task); // 当前线程不是NIO线程,则进入if语句 if (!inEventLoop) { // 启动NIO线程的核心方法 startThread(); ... } // 有任务需要被执行时,唤醒阻塞的NIO线程 if (!addTaskWakesUp && immediate) { wakeup(inEventLoop); } }- 1
- 2
- 3
- 4
- 5
- 6
- 7
- 8
- 9
- 10
- 11
- 12
- 13
- 14
- 15
- 16
- 17
- 18
- 19
- 20
- 21
- 22
- 23
进入
startThread方法private void startThread() { // 查看NIO线程状态是否为未启动 // 该if代码块只会执行一次 // state一开始的值就是ST_NOT_STARTED // private volatile int state = ST_NOT_STARTED; if (state == ST_NOT_STARTED) { // 通过原子属性更新器将状态更新为启动(ST_STARTED) if (STATE_UPDATER.compareAndSet(this, ST_NOT_STARTED, ST_STARTED)) { boolean success = false; try { // 执行启动线程 doStartThread(); success = true; } finally { if (!success) { STATE_UPDATER.compareAndSet(this, ST_STARTED, ST_NOT_STARTED); } } } } }- 1
- 2
- 3
- 4
- 5
- 6
- 7
- 8
- 9
- 10
- 11
- 12
- 13
- 14
- 15
- 16
- 17
- 18
- 19
- 20
- 21
进入
doStartThread,真正创建NIO线程并执行任务private void doStartThread() { assert thread == null; // 创建NIO线程并执行任务 executor.execute(new Runnable() { @Override public void run() { // thread即为NIO线程 thread = Thread.currentThread(); if (interrupted) { thread.interrupt(); } boolean success = false; updateLastExecutionTime(); try { // 执行内部run方法 SingleThreadEventExecutor.this.run(); success = true; } ... }); }- 1
- 2
- 3
- 4
- 5
- 6
- 7
- 8
- 9
- 10
- 11
- 12
- 13
- 14
- 15
- 16
- 17
- 18
- 19
- 20
- 21
- 22
- 23
通过
SingleThreadEventExecutor.this.run()执行传入的任务(task)该run方法是NioEvnetLoop的run方法
@Override protected void run() { int selectCnt = 0; // 死循环,不断地从任务队列中获取各种任务来执行 for (;;) { // 执行各种任务 try { int strategy; try { strategy = selectStrategy.calculateStrategy(selectNowSupplier, hasTasks()); switch (strategy) { case SelectStrategy.CONTINUE: continue; case SelectStrategy.BUSY_WAIT: // fall-through to SELECT since the busy-wait is not supported with NIO case SelectStrategy.SELECT: long curDeadlineNanos = nextScheduledTaskDeadlineNanos(); if (curDeadlineNanos == -1L) { curDeadlineNanos = NONE; // nothing on the calendar } nextWakeupNanos.set(curDeadlineNanos); try { if (!hasTasks()) { strategy = select(curDeadlineNanos); } } finally { // This update is just to help block unnecessary selector wakeups // so use of lazySet is ok (no race condition) nextWakeupNanos.lazySet(AWAKE); } // fall through default: } } } }- 1
- 2
- 3
- 4
- 5
- 6
- 7
- 8
- 9
- 10
- 11
- 12
- 13
- 14
- 15
- 16
- 17
- 18
- 19
- 20
- 21
- 22
- 23
- 24
- 25
- 26
- 27
- 28
- 29
- 30
- 31
- 32
- 33
- 34
- 35
- 36
- 37
- 38
唤醒
NioEvnetLoop需要IO事件、普通任务以及定时任务,任务在run方法的for循环中
@Override protected void run() { int selectCnt = 0; // 死循环,不断地从任务队列中获取各种任务来执行 for (;;) { // 执行各种任务 ... } }- 1
- 2
- 3
- 4
- 5
- 6
- 7
- 8
- 9
中被执行,但该循环不会空转,执行到某些代码时,会被阻塞
run方法中有SELECT分支
case SelectStrategy.SELECT: long curDeadlineNanos = nextScheduledTaskDeadlineNanos(); if (curDeadlineNanos == -1L) { curDeadlineNanos = NONE; // nothing on the calendar } nextWakeupNanos.set(curDeadlineNanos); try { if (!hasTasks()) { // 执行select方法 strategy = select(curDeadlineNanos); } } ...- 1
- 2
- 3
- 4
- 5
- 6
- 7
- 8
- 9
- 10
- 11
- 12
- 13
会执行NioEvnetLoop的
select方法,该方法内部会根据情况,执行selector的有参和无参的select方法private int select(long deadlineNanos) throws IOException { // 如果没有指定阻塞事件,就调用select() if (deadlineNanos == NONE) { return selector.select(); } // 否则调用select(timeoutMillis),指定时间内未发生事件就停止阻塞 // Timeout will only be 0 if deadline is within 5 microsecs long timeoutMillis = deadlineToDelayNanos(deadlineNanos + 995000L) / 1000000L; return timeoutMillis <= 0 ? selector.selectNow() : selector.select(timeoutMillis); }- 1
- 2
- 3
- 4
- 5
- 6
- 7
- 8
- 9
- 10
但需要注意的是,
select方法是会阻塞线程的,当没有IO事件,但有其他任务需要执行时,需要唤醒线程唤醒是通过execute最后的if代码块来完成的
// 有任务需要被执行时,唤醒阻塞的NIO线程 if (!addTaskWakesUp && immediate) { wakeup(inEventLoop); }- 1
- 2
- 3
- 4
NioEventLoop.wakeup唤醒被selector.select方法阻塞的NIO线程@Override protected void wakeup(boolean inEventLoop) { // 只有当其他线程给当前NIO线程提交任务时(如执行execute),才会被唤醒 // 通过AtomicLong进行更新,保证每次只能有一个线程唤醒成功 if (!inEventLoop && nextWakeupNanos.getAndSet(AWAKE) != AWAKE) { // 唤醒被selector.select方法阻塞的NIO线程 selector.wakeup(); } }- 1
- 2
- 3
- 4
- 5
- 6
- 7
- 8
- 9
唤醒时需要进行两个判断
-
判断提交任务的
是否为NIO线程
- 若是其他线程,才能唤醒NIO线程
- 若是NIO线程自己,则不能唤醒
-
通过AtomicLong保证有多个线程同时提交任务时,只有一个线程能够唤醒NIO线程
SELECT分支
run方法的switch语句有多条分支,具体执行分支的代码由strategy变量控制
int strategy = selectStrategy.calculateStrategy(selectNowSupplier, hasTasks()); switch (strategy) { ... }- 1
- 2
- 3
- 4
strategy的值由
calculateStrategy方法确定@Override public int calculateStrategy(IntSupplier selectSupplier, boolean hasTasks) throws Exception { // selectSupplier.get() 底层是 selector.selectNow(); return hasTasks ? selectSupplier.get() : SelectStrategy.SELECT; }- 1
- 2
- 3
- 4
- 5
该方法会根据hasTaks变量判断任务队列中是否有任务
-
若有任务,则通过selectSupplier获得strategy的值
-
get方法会selectNow方法,顺便拿到IO事件
private final IntSupplier selectNowSupplier = new IntSupplier() { public int get() throws Exception { return NioEventLoop.this.selectNow(); } }; int selectNow() throws IOException { return this.selector.selectNow(); }- 1
- 2
- 3
- 4
- 5
- 6
- 7
- 8
- 9
-
-
若没有任务,就会进入SELECT分支
也就说,当任务队列中没有任务时,才会进入SELECT分支,让NIO线程阻塞,而不是空转。若有任务,则会通过
get方法调用selector.selectNow方法,顺便拿到IO事件Java NIO空轮询BUG
Java NIO空轮询BUG也就是JavaNIO在Linux系统下的epoll空轮询问题
在NioEventLoop中,因为run方法中存在一个死循环,需要通过selector.select方法来阻塞线程。但是select方法因为BUG,可能无法阻塞线程,导致循环一直执行,使得CPU负载升高
@Override protected void run() { ... for(;;){ ... // 可能发生空轮询,无法阻塞NIO线程 strategy = select(curDeadlineNanos); ... if(...) { ... } else if (unexpectedSelectorWakeup(selectCnt) ){ // 通过unexpectedSelectorWakeup方法中的rebuildSelector重建selector // 并将selectCnt重置为0 selectCnt = 0; } } }- 1
- 2
- 3
- 4
- 5
- 6
- 7
- 8
- 9
- 10
- 11
- 12
- 13
- 14
- 15
- 16
- 17
- 18
Netty中通过
selectCnt变量来检测select方法是否发生空轮询BUG若发生空轮询BUG,那么selectCnt的值会增长是十分迅速。当
selectCnt的值大于等于SELECTOR_AUTO_REBUILD_THRESHOLD(默认512)时,Netty则判断其出现了空轮询BUG,进行如下处理if (SELECTOR_AUTO_REBUILD_THRESHOLD > 0 && selectCnt >= SELECTOR_AUTO_REBUILD_THRESHOLD) { // The selector returned prematurely many times in a row. // Rebuild the selector to work around the problem. logger.warn("Selector.select() returned prematurely {} times in a row; rebuilding Selector {}.",selectCnt, selector); // 重建selector,将原selector的配置信息传给新selector // 再用新selector覆盖旧selector rebuildSelector(); return true; }- 1
- 2
- 3
- 4
- 5
- 6
- 7
- 8
- 9
通过
rebuildSelector方法重建selector,将原selector的配置信息传给新selector,再用新selector覆盖旧selector。同时将selectCnt的值设置为0ioRatio
NioEventLoop可以处理IO事件和其他任务。不同的操作所耗费的时间是不同的,想要控制NioEventLoop处理IO事件花费时间占执行所有操作的总时间的比例,需要通过ioRatio来控制
NioEventLoop.run方法
// 处理IO事件时间比例,默认为50% final int ioRatio = this.ioRatio; // 如果IO事件时间比例设置为100% if (ioRatio == 100) { try { // 如果需要去处理IO事件 if (strategy > 0) { // 先处理IO事件 processSelectedKeys(); } } finally { // Ensure we always run tasks. // 剩下的时间都去处理普通任务和定时任务 ranTasks = runAllTasks(); } } else if (strategy > 0) { // 如果需要去处理IO事件 // 记录处理IO事件前的时间 final long ioStartTime = System.nanoTime(); try { // 去处理IO事件 processSelectedKeys(); } finally { // Ensure we always run tasks. // ioTime为处理IO事件耗费的事件 final long ioTime = System.nanoTime() - ioStartTime; // 计算出处理其他任务的事件 // 超过设定的时间后,将会停止任务的执行,会在下一次循环中再继续执行 ranTasks = runAllTasks(ioTime * (100 - ioRatio) / ioRatio); } } else { // 没有IO事件需要处理 // This will run the minimum number of tasks // 直接处理普通和定时任务 ranTasks = runAllTasks(0); }- 1
- 2
- 3
- 4
- 5
- 6
- 7
- 8
- 9
- 10
- 11
- 12
- 13
- 14
- 15
- 16
- 17
- 18
- 19
- 20
- 21
- 22
- 23
- 24
- 25
- 26
- 27
- 28
- 29
- 30
- 31
- 32
- 33
- 34
- 35
通过ioRatio控制各个任务执行的过程如下
-
判断ioRatio是否为100
-
若是,判断是否需要处理IO事件(strategy>0)
- 若需要处理IO事件,则先处理IO事件
-
若否(或IO事件已经处理完毕),接下来去执行所有的普通任务和定时任务,直到所有任务都被处理完
// 没有指定执行任务的时间 ranTasks = runAllTasks();Copy- 1
- 2
-
-
若ioRatio不为100
-
先去处理IO事件,记录处理IO事件所花费的事件保存在ioTime中
-
接下来去处理其他任务,根据ioTime与ioRatio计算执行其他任务可用的时间
// 比如ioTime为10s,ioRatio为50 // 那么通过 10*(100-50)/50=10 计算出其他任务可用的时间为 10s // 处理IO事件占用的事件总比例为50% ranTasks = runAllTasks(ioTime * (100 - ioRatio) / ioRatio);Copy- 1
- 2
- 3
- 4
-
执行其他任务一旦超过可用时间,则会停止执行,在下一次循环中再继续执行
-
-
若没有IO事件需要处理,则去执行最少数量的普通任务和定时任务
// 运行最少数量的任务 ranTasks = runAllTasks(0);Copy- 1
- 2
处理事件
IO事件是通过
NioEventLoop.processSelectedKeys()方法处理的private void processSelectedKeys() { // 如果selectedKeys是基于数组的 // 一般情况下都走这个分支 if (selectedKeys != null) { // 处理各种IO事件 processSelectedKeysOptimized(); } else { processSelectedKeysPlain(selector.selectedKeys()); } }- 1
- 2
- 3
- 4
- 5
- 6
- 7
- 8
- 9
- 10
processSelectedKeysOptimized方法
private void processSelectedKeysOptimized() { for (int i = 0; i < selectedKeys.size; ++i) { // 拿到SelectionKeyec final SelectionKey k = selectedKeys.keys[i]; // null out entry in the array to allow to have it GC'ed once the Channel close // See https://github.com/netty/netty/issues/2363 selectedKeys.keys[i] = null; // 获取SelectionKey上的附件,即NioServerSocketChannel final Object a = k.attachment(); if (a instanceof AbstractNioChannel) { // 处理事件,传入附件NioServerSocketChannel processSelectedKey(k, (AbstractNioChannel) a); } else { @SuppressWarnings("unchecked") NioTasktask = (NioTask ) a; processSelectedKey(k, task); } if (needsToSelectAgain) { // null out entries in the array to allow to have it GC'ed once the Channel close // See https://github.com/netty/netty/issues/2363 selectedKeys.reset(i + 1); selectAgain(); i = -1; } } } - 1
- 2
- 3
- 4
- 5
- 6
- 7
- 8
- 9
- 10
- 11
- 12
- 13
- 14
- 15
- 16
- 17
- 18
- 19
- 20
- 21
- 22
- 23
- 24
- 25
- 26
- 27
- 28
- 29
- 30
该方法中通过fori的方法,遍历基于数组的SelectedKey,通过
final SelectionKey k = selectedKeys.keys[i];Copy- 1
获取到SelectionKey,然后获取其再Register时添加的附件
NioServerSocketChannel// 获取SelectionKey上的附件,即NioServerSocketChannel final Object a = k.attachment();Copy- 1
- 2
如果附件继承自AbstractNioChannel,则会调用
// 处理事件,传入附件NioServerSocketChannel processSelectedKey(k, (AbstractNioChannel) a);Copy- 1
- 2
去处理各个事件
真正处理各种事件的方法
processSelectedKey获取SelectionKey的事件,然后进行相应处理
private void processSelectedKey(SelectionKey k, AbstractNioChannel ch) { final AbstractNioChannel.NioUnsafe unsafe = ch.unsafe(); if (!k.isValid()) { final EventLoop eventLoop; try { eventLoop = ch.eventLoop(); } catch (Throwable ignored) { // If the channel implementation throws an exception because there is no event loop, we ignore this // because we are only trying to determine if ch is registered to this event loop and thus has authority // to close ch. return; } // Only close ch if ch is still registered to this EventLoop. ch could have deregistered from the event loop // and thus the SelectionKey could be cancelled as part of the deregistration process, but the channel is // still healthy and should not be closed. // See https://github.com/netty/netty/issues/5125 if (eventLoop == this) { // close the channel if the key is not valid anymore unsafe.close(unsafe.voidPromise()); } return; } try { int readyOps = k.readyOps(); // We first need to call finishConnect() before try to trigger a read(...) or write(...) as otherwise // the NIO JDK channel implementation may throw a NotYetConnectedException. if ((readyOps & SelectionKey.OP_CONNECT) != 0) { // remove OP_CONNECT as otherwise Selector.select(..) will always return without blocking // See https://github.com/netty/netty/issues/924 int ops = k.interestOps(); ops &= ~SelectionKey.OP_CONNECT; k.interestOps(ops); unsafe.finishConnect(); } // Process OP_WRITE first as we may be able to write some queued buffers and so free memory. if ((readyOps & SelectionKey.OP_WRITE) != 0) { // Call forceFlush which will also take care of clear the OP_WRITE once there is nothing left to write ch.unsafe().forceFlush(); } // Also check for readOps of 0 to workaround possible JDK bug which may otherwise lead // to a spin loop if ((readyOps & (SelectionKey.OP_READ | SelectionKey.OP_ACCEPT)) != 0 || readyOps == 0) { unsafe.read(); } } catch (CancelledKeyException ignored) { unsafe.close(unsafe.voidPromise()); } }- 1
- 2
- 3
- 4
- 5
- 6
- 7
- 8
- 9
- 10
- 11
- 12
- 13
- 14
- 15
- 16
- 17
- 18
- 19
- 20
- 21
- 22
- 23
- 24
- 25
- 26
- 27
- 28
- 29
- 30
- 31
- 32
- 33
- 34
- 35
- 36
- 37
- 38
- 39
- 40
- 41
- 42
- 43
- 44
- 45
- 46
- 47
- 48
- 49
- 50
- 51
- 52
3、Accept剖析
NIO中处理Accept事件流程
NIO中处理Accept事件主要有以下六步
- selector.select()阻塞线程,直到事件发生
- 遍历selectionKeys
- 获取一个key,判断事件类型是否为Accept
- 创建SocketChannel,设置为非阻塞
- 将SocketChannel注册到selector中
- 关注selectionKeys的read事件
代码如下
// 阻塞直到事件发生 selector.select(); Iteratoriter = selector.selectionKeys().iterator(); while (iter.hasNext()) { // 拿到一个事件 SelectionKey key = iter.next(); // 如果是 accept 事件 if (key.isAcceptable()) { // 执行accept,获得SocketChannel SocketChannel channel = serverSocketChannel.accept(); channel.configureBlocking(false); // 将SocketChannel注册到selector中,并关注read事件 channel.register(selector, SelectionKey.OP_READ); } // ... } - 1
- 2
- 3
- 4
- 5
- 6
- 7
- 8
- 9
- 10
- 11
- 12
- 13
- 14
- 15
- 16
- 17
- 18
- 19
- 20
其中前三步,在NioEventLoop剖析中已经分析过了,所以接下来主要分析后三步
SocketChannel的创建与注册
发生Accept事件后,会执行
NioEventLoop.run方法的如下if分支if ((readyOps & (SelectionKey.OP_READ | SelectionKey.OP_ACCEPT)) != 0 || readyOps == 0) { unsafe.read(); }- 1
- 2
- 3
NioMessageUnsafe.read方法public void read() { ... try { try { do { // doReadMessages中执行了accept获得了SocketChannel // 并创建NioSocketChannel作为消息放入readBuf // readBuf是一个ArrayList用来缓存消息 // private final List- 1
- 2
- 3
- 4
- 5
- 6
- 7
- 8
- 9
- 10
- 11
- 12
- 13
- 14
- 15
- 16
- 17
- 18
- 19
- 20
- 21
- 22
- 23
- 24
- 25
- 26
- 27
- 28
- 29
- 30
- 31
- 32
- 33
- 34
- 35
- 36
- 37
- 38
NioSocketChannel.doReadMessages方法该方法中处理accpet事件,获得SocketChannel,同时创建了NioSocketChannel,作为消息放在了readBuf中
@Override protected int doReadMessages(List- 1
- 2
- 3
- 4
- 5
- 6
- 7
- 8
- 9
- 10
- 11
- 12
- 13
- 14
- 15
- 16
- 17
- 18
- 19
- 20
- 21
- 22
- 23
- 24
- 25
- 26
- 27
- 28
- 29
- 30
- 31
- 32
- 33
- 34
- 35
- 36
- 37
- 38
- 39
- 40
- 41
- 42
- 43
- 44
- 45
- 46
通过
AbstractUnsafe.register方法,将SocketChannel注册到了Selector中,过程与启动流程中的Register过程类似public final void register(EventLoop eventLoop, final ChannelPromise promise) { ... AbstractChannel.this.eventLoop = eventLoop; if (eventLoop.inEventLoop()) { register0(promise); } else { try { // 这行代码完成的是nio boss -> nio worker线程的切换 eventLoop.execute(new Runnable() { @Override public void run() { // 真正的注册操作 register0(promise); } }); } catch (Throwable t) { ... } } } AbstractChannel.AbstractUnsafe.register0 private void register0(ChannelPromise promise) { try { ... // 该方法将SocketChannel注册到Selector中 doRegister(); // 执行初始化器,执行前 pipeline 中只有 head -> 初始化器 -> tail pipeline.invokeHandlerAddedIfNeeded(); // 执行后就是 head -> logging handler -> my handler -> tail safeSetSuccess(promise); pipeline.fireChannelRegistered(); if (isActive()) { if (firstRegistration) { // 触发pipeline上active事件 pipeline.fireChannelActive(); } else if (config().isAutoRead()) { beginRead(); } } } catch (Throwable t) { closeForcibly(); closeFuture.setClosed(); safeSetFailure(promise, t); } }- 1
- 2
- 3
- 4
- 5
- 6
- 7
- 8
- 9
- 10
- 11
- 12
- 13
- 14
- 15
- 16
- 17
- 18
- 19
- 20
- 21
- 22
- 23
- 24
- 25
- 26
- 27
- 28
- 29
- 30
- 31
- 32
- 33
- 34
- 35
- 36
- 37
- 38
- 39
- 40
- 41
- 42
- 43
- 44
- 45
- 46
- 47
- 48
- 49
- 50
- 51
- 52
- 53
AbstractNioChannel.doRegister将SocketChannel注册到Selector中@Override protected void doRegister() throws Exception { boolean selected = false; for (;;) { try { // 将Selector注册到Selector中 selectionKey = javaChannel().register(eventLoop().unwrappedSelector(), 0, this); return; } catch (CancelledKeyException e) { ... } } } HeadContext.channelActive public void channelActive(ChannelHandlerContext ctx) { ctx.fireChannelActive(); // 触发read(NioSocketChannel这里read只是为了触发channel的事件注册,还未涉及数据读取) readIfIsAutoRead(); }- 1
- 2
- 3
- 4
- 5
- 6
- 7
- 8
- 9
- 10
- 11
- 12
- 13
- 14
- 15
- 16
- 17
- 18
- 19
AbstractNioChannel.doBeginRead,通过该方法,SocketChannel关注了read事件protected void doBeginRead() throws Exception { // Channel.read() or ChannelHandlerContext.read() was called final SelectionKey selectionKey = this.selectionKey; if (!selectionKey.isValid()) { return; } readPending = true; // 这时候 interestOps是0 final int interestOps = selectionKey.interestOps(); if ((interestOps & readInterestOp) == 0) { // 关注read事件 selectionKey.interestOps(interestOps | readInterestOp); } }- 1
- 2
- 3
- 4
- 5
- 6
- 7
- 8
- 9
- 10
- 11
- 12
- 13
- 14
- 15
4、Read剖析
read事件的处理也是在
if ((readyOps & (SelectionKey.OP_READ | SelectionKey.OP_ACCEPT)) != 0 || readyOps == 0) { unsafe.read(); }- 1
- 2
- 3
分支中,通过
unsafe.read()方法处理的,不过此处调用的方法在AbstractNioByteChannel.NioByteUnsafe类中| readyOps == 0) {
unsafe.read();
}`NioMessageUnsafe.read`方法- 1
- 2
- 3
public void read() {
... try { try { do { // doReadMessages中执行了accept获得了SocketChannel // 并创建NioSocketChannel作为消息放入readBuf // readBuf是一个ArrayList用来缓存消息 // private final List- 1
- 2
- 3
- 4
- 5
- 6
- 7
- 8
- 9
- 10
- 11
- 12
- 13
- 14
- 15
- 16
- 17
- 18
- 19
- 20
- 21
- 22
- 23
- 24
- 25
- 26
- 27
- 28
- 29
- 30
- 31
- 32
- 33
- 34
- 35
}
`NioSocketChannel.doReadMessages`方法 该方法中处理accpet事件,**获得SocketChannel**,同时**创建了NioSocketChannel**,作为消息放在了readBuf中- 1
- 2
- 3
- 4
- 5
@Override
protected int doReadMessages(List buf) throws Exception {
// 处理accpet事件,获得SocketChannel
SocketChannel ch = SocketUtils.accept(javaChannel());try { if (ch != null) { // 创建了NioSocketChannel,作为消息放在了readBuf中 buf.add(new NioSocketChannel(this, ch)); return 1; } } catch (Throwable t) { ... } return 0;- 1
- 2
- 3
- 4
- 5
- 6
- 7
- 8
- 9
- 10
- 11
}
ServerBootstrapAcceptor.channelRead
public void channelRead(ChannelHandlerContext ctx, Object msg) {
// 这时的msg是NioSocketChannel
final Channel child = (Channel) msg;// NioSocketChannel添加childHandler,即初始化器 child.pipeline().addLast(childHandler); // 设置选项 setChannelOptions(child, childOptions, logger); for (Entry- 1
- 2
- 3
- 4
- 5
- 6
- 7
- 8
- 9
- 10
- 11
- 12
- 13
- 14
- 15
- 16
- 17
- 18
- 19
- 20
- 21
- 22
- 23
}
通过`AbstractUnsafe.register` 方法,将SocketChannel注册到了Selector中,**过程与启动流程中的Register过程类似**- 1
- 2
- 3
public final void register(EventLoop eventLoop, final ChannelPromise promise) {
... AbstractChannel.this.eventLoop = eventLoop; if (eventLoop.inEventLoop()) { register0(promise); } else { try { // 这行代码完成的是nio boss -> nio worker线程的切换 eventLoop.execute(new Runnable() { @Override public void run() { // 真正的注册操作 register0(promise); } }); } catch (Throwable t) { ... } }- 1
- 2
- 3
- 4
- 5
- 6
- 7
- 8
- 9
- 10
- 11
- 12
- 13
- 14
- 15
- 16
- 17
- 18
- 19
- 20
}
AbstractChannel.AbstractUnsafe.register0
private void register0(ChannelPromise promise) {
try {... // 该方法将SocketChannel注册到Selector中 doRegister(); // 执行初始化器,执行前 pipeline 中只有 head -> 初始化器 -> tail pipeline.invokeHandlerAddedIfNeeded(); // 执行后就是 head -> logging handler -> my handler -> tail safeSetSuccess(promise); pipeline.fireChannelRegistered(); if (isActive()) { if (firstRegistration) { // 触发pipeline上active事件 pipeline.fireChannelActive(); } else if (config().isAutoRead()) { beginRead(); } } } catch (Throwable t) { closeForcibly(); closeFuture.setClosed(); safeSetFailure(promise, t); }- 1
- 2
- 3
- 4
- 5
- 6
- 7
- 8
- 9
- 10
- 11
- 12
- 13
- 14
- 15
- 16
- 17
- 18
- 19
- 20
- 21
- 22
- 23
- 24
- 25
}
`AbstractNioChannel.doRegister`将SocketChannel注册到Selector中- 1
- 2
- 3
@Override
protected void doRegister() throws Exception {
boolean selected = false;
for (;😉 {
try {
// 将Selector注册到Selector中
selectionKey = javaChannel().register(eventLoop().unwrappedSelector(), 0, this);
return;
} catch (CancelledKeyException e) {
…
}
}
}
HeadContext.channelActive
public void channelActive(ChannelHandlerContext ctx) {
ctx.fireChannelActive();
// 触发read(NioSocketChannel这里read只是为了触发channel的事件注册,还未涉及数据读取)
readIfIsAutoRead();
}`AbstractNioChannel.doBeginRead`,通过该方法,SocketChannel关注了read事件 ```java protected void doBeginRead() throws Exception { // Channel.read() or ChannelHandlerContext.read() was called final SelectionKey selectionKey = this.selectionKey; if (!selectionKey.isValid()) { return; } readPending = true; // 这时候 interestOps是0 final int interestOps = selectionKey.interestOps(); if ((interestOps & readInterestOp) == 0) { // 关注read事件 selectionKey.interestOps(interestOps | readInterestOp); } }- 1
- 2
- 3
- 4
- 5
- 6
- 7
- 8
- 9
- 10
- 11
- 12
- 13
- 14
- 15
- 16
- 17
- 18
- 19
4、Read剖析
read事件的处理也是在
if ((readyOps & (SelectionKey.OP_READ | SelectionKey.OP_ACCEPT)) != 0 || readyOps == 0) { unsafe.read(); }- 1
- 2
- 3
分支中,通过
unsafe.read()方法处理的,不过此处调用的方法在AbstractNioByteChannel.NioByteUnsafe类中 -
相关阅读:
学习笔记-TLS
“安全即服务”为网络安全推开一道门
OpenSea爬取Nft详情全部数据实战
【ArcGIS Pro微课1000例】0033:ArcGIS Pro处理cad数据(格式转换、投影变换)
二、Hadoop分布式系统基础架构
讲解IaaS,PaaS,SaaS技术
知识点滴 - 中国有多少省,简称是什么
GitHub 昙花一现:《Spring Boot 趣味实战》神作开源几分钟被下架
Python自动操作电脑|pywin32
6 MySQL常用的数据类型
- 原文地址:https://blog.csdn.net/Ctrl_kun/article/details/126019375


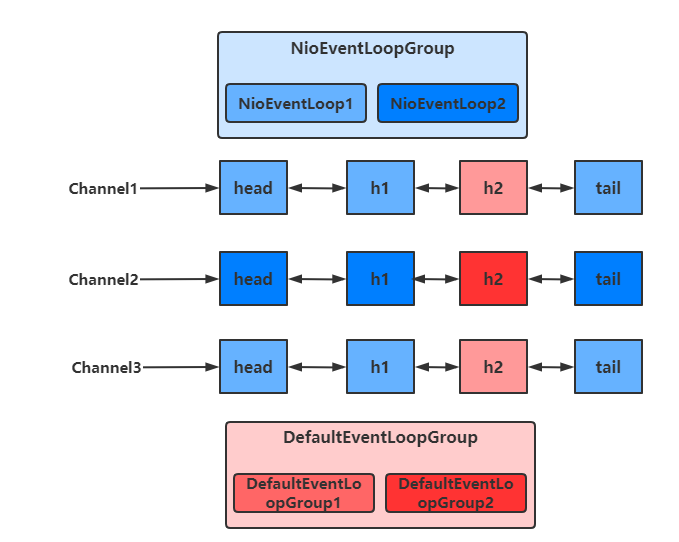
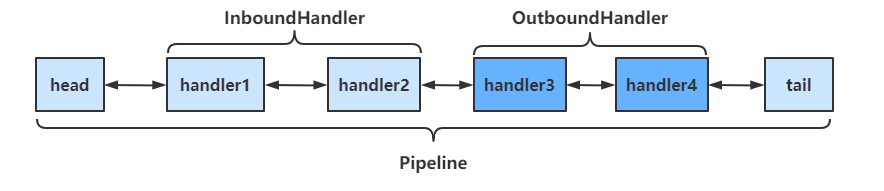
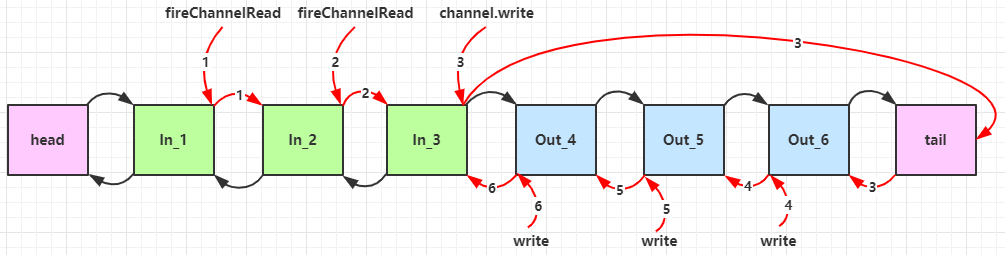
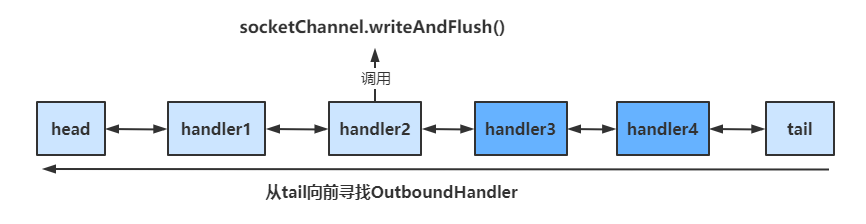
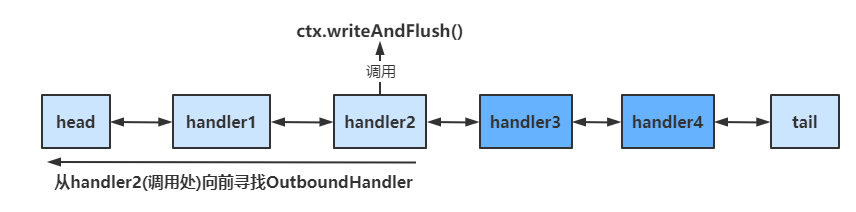
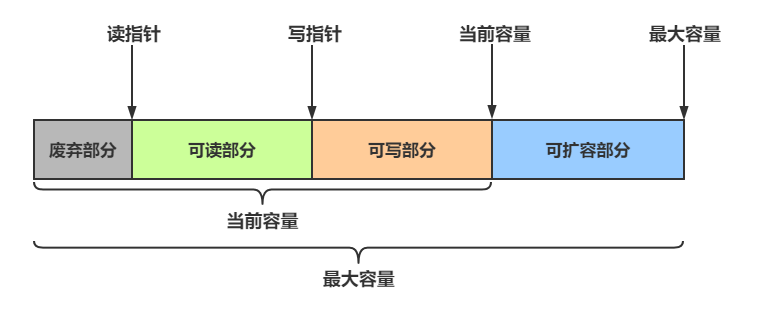
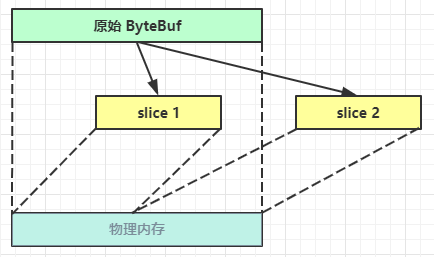

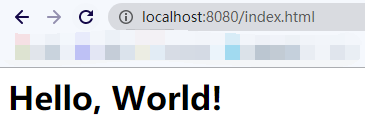
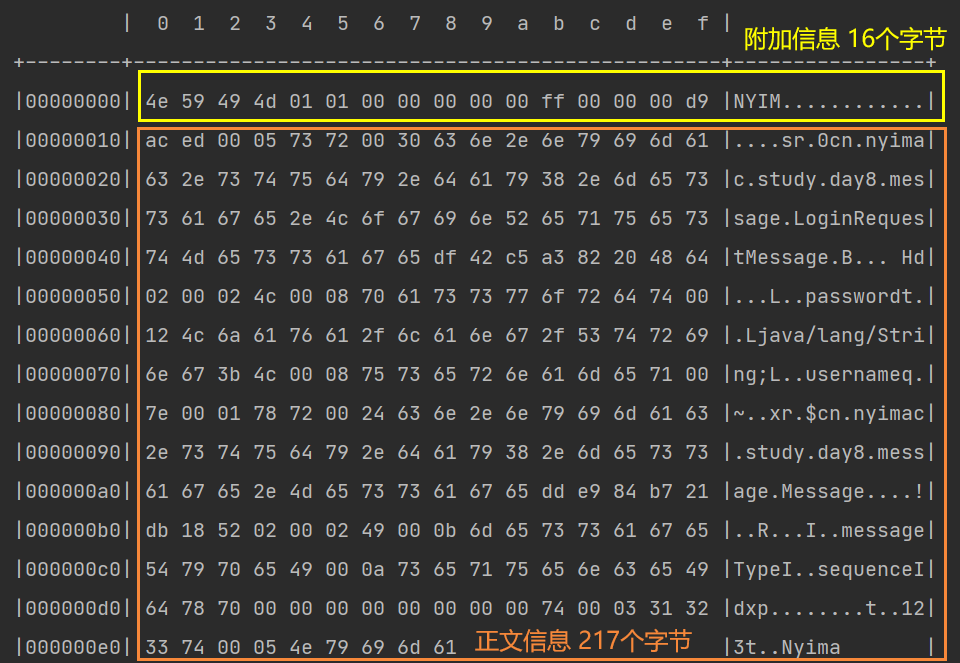
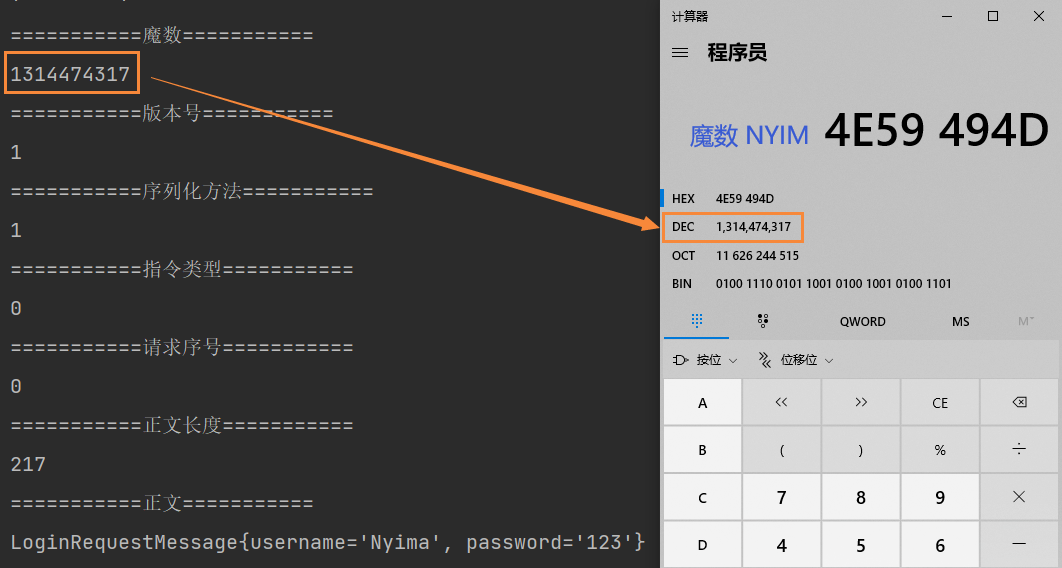

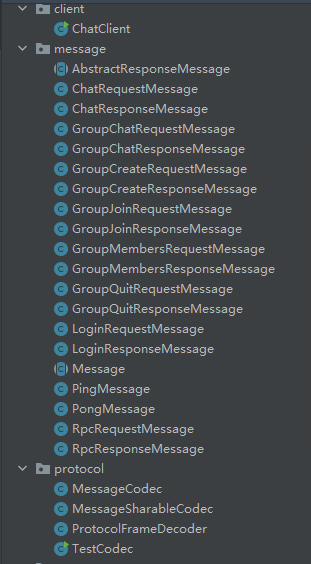

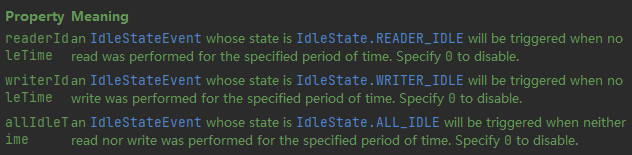

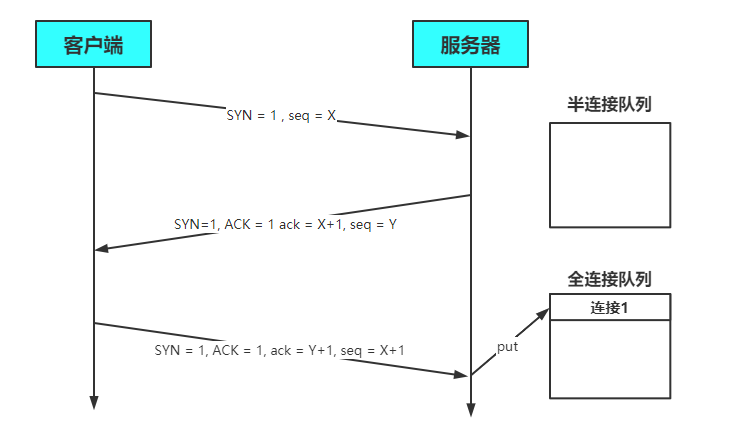

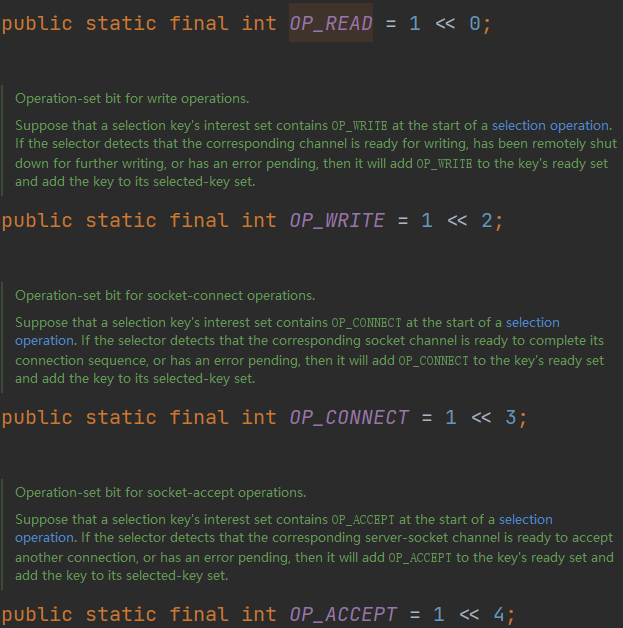
- 最新文章
-
沪漂五周年了:我越来越迷茫了
Agentic Skill Routing 实战:别再把所有 Skill 塞进 AI Agent 上下文
MySQL-Seconds_behind_master的精度误差
[MAF预定义ChatClient中间件-03]CachingChatClient——利用缓存省钱省时间
AI的至暗历史:从万众期待到被政府撤资,AI的两次死亡徘徊
Agent OS :五种驯服不确定性的范式
PortSwigger SQL注入LAB11
数据库即时编译JIT
[Begin]AI Learn Data Day 0
深度学习进阶(二十七)现代 LLM 的核心架构设计其二:SwiGLU