-
nacos配置中心源码分析
这个源码入口怎么去找
1.以接口,核心方法作为切入点
2.既然是配置的话,那么我们可以从配置入手
复习下springboot的只是
- bootstrap的优先级高于application,优先被加载
- yml>yaml>properties
这里直接看nacos配置的优先级覆盖
PropertySource这个就是spring提供的,键值对
到了springboot里面就是这个org.springframework.boot.env.PropertySourceLoader类的load方法
PropertiesPropertySourceLoader实现了PropertySourceLoader接口:
- @Override
- public List<PropertySource> load(String name, Resource resource)
- throws IOException {
- Map<String, ?> properties = loadProperties(resource);
- if (properties.isEmpty()) {
- return Collections.emptyList();
- }
- return Collections
- .singletonList(new OriginTrackedMapPropertySource(name, properties));
- }
ApplicationContextInitializer这个类是spring的扩展点,在
ConfigurableApplicationContext的refresh方法之前调用,用于需要对应用上下文做初始化web应用,例如根据上下文环境注册属性源活激活配置文件等。因为是prepareContext(context, environment, listeners, applicationArguments, printedBanner);然后再
refreshContext(context);的
加载完配置就看
SpringApplication的run方法,其中prepareContext方法里面的applyInitializers(context)方法,会遍历实现ApplicationContextInitializer接口的类,
其中PropertySourceBootstrapConfiguration实现了这个接口,在spring-cloud-context中,使用spring的spi机制注入其中。
PropertySourceBootstrapConfiguration的initialize方法,其中
Collection
最后点到spring的类PropertySource locate(Environment environment);
NacosPropertySourceLocator实现了PropertySourceLocator
我们来看NacosPropertySourceLocator的locate方法
- @Override
- public PropertySource locate(Environment env) {
- nacosConfigProperties.setEnvironment(env);
- ConfigService configService = nacosConfigManager.getConfigService();
- if (null == configService) {
- log.warn("no instance of config service found, can't load config from nacos");
- return null;
- }
- long timeout = nacosConfigProperties.getTimeout();
- nacosPropertySourceBuilder = new NacosPropertySourceBuilder(configService,
- timeout);
- String name = nacosConfigProperties.getName();
- String dataIdPrefix = nacosConfigProperties.getPrefix();
- if (StringUtils.isEmpty(dataIdPrefix)) {
- dataIdPrefix = name;
- }
- if (StringUtils.isEmpty(dataIdPrefix)) {
- dataIdPrefix = env.getProperty("spring.application.name");
- }
- CompositePropertySource composite = new CompositePropertySource(
- NACOS_PROPERTY_SOURCE_NAME);
- loadSharedConfiguration(composite);
- loadExtConfiguration(composite);
- loadApplicationConfiguration(composite, dataIdPrefix, nacosConfigProperties, env);
- return composite;
- }
其中的下面三行代码已经体现了一定的加载顺序性
- loadSharedConfiguration(composite);
- loadExtConfiguration(composite);
- loadApplicationConfiguration(composite, dataIdPrefix, nacosConfigProperties, env);
这里明显可以看出shard的优先级最低,其次是ext的,因为这边是下面的覆盖上面的配置
接下来继续看loadApplicationConfiguration方法
- private void loadApplicationConfiguration(
- CompositePropertySource compositePropertySource, String dataIdPrefix,
- NacosConfigProperties properties, Environment environment) {
- String fileExtension = properties.getFileExtension();
- String nacosGroup = properties.getGroup();
- // load directly once by default
- loadNacosDataIfPresent(compositePropertySource, dataIdPrefix, nacosGroup,
- fileExtension, true);
- // load with suffix, which have a higher priority than the default
- loadNacosDataIfPresent(compositePropertySource,
- dataIdPrefix + DOT + fileExtension, nacosGroup, fileExtension, true);
- // Loaded with profile, which have a higher priority than the suffix
- for (String profile : environment.getActiveProfiles()) {
- String dataId = dataIdPrefix + SEP1 + profile + DOT + fileExtension;
- loadNacosDataIfPresent(compositePropertySource, dataId, nacosGroup,
- fileExtension, true);
- }
- }
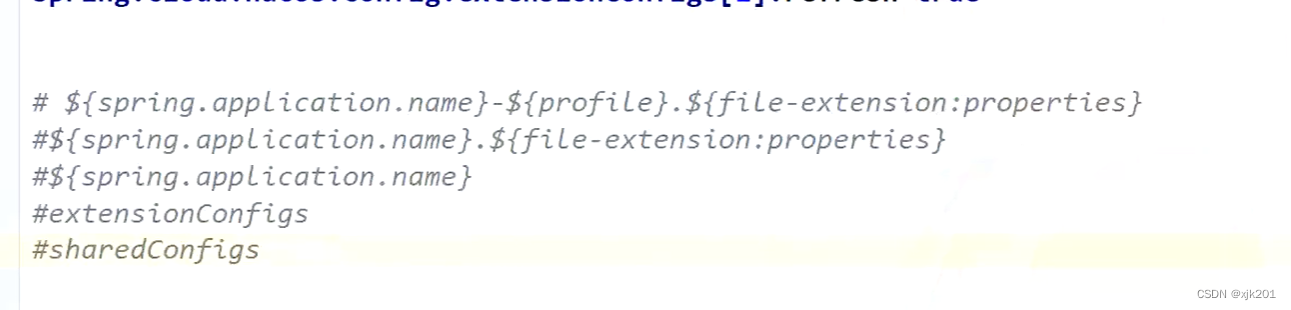
这里的几个loadNacosDataIfPresent就体现了顺序性

优先级从高到低如下所示:
----------------------
配置中心核心 是configservice
注册中心核心是namingservice
先看

这个方法。
会定位到NacosConfigService的getConfigInner方法
- private String getConfigInner(String tenant, String dataId, String group, long timeoutMs) throws NacosException {
- group = null2defaultGroup(group);
- ParamUtils.checkKeyParam(dataId, group);
- ConfigResponse cr = new ConfigResponse();
- cr.setDataId(dataId);
- cr.setTenant(tenant);
- cr.setGroup(group);
- // 优先使用本地配置
- String content = LocalConfigInfoProcessor.getFailover(agent.getName(), dataId, group, tenant);
- if (content != null) {
- log.warn(agent.getName(), "[get-config] get failover ok, dataId={}, group={}, tenant={}, config={}", dataId,
- group, tenant, ContentUtils.truncateContent(content));
- cr.setContent(content);
- configFilterChainManager.doFilter(null, cr);
- content = cr.getContent();
- return content;
- }
- try {
- content = worker.getServerConfig(dataId, group, tenant, timeoutMs);
- cr.setContent(content);
- configFilterChainManager.doFilter(null, cr);
- content = cr.getContent();
- return content;
- } catch (NacosException ioe) {
- if (NacosException.NO_RIGHT == ioe.getErrCode()) {
- throw ioe;
- }
- log.warn("NACOS-0003",
- LoggerHelper.getErrorCodeStr("NACOS", "NACOS-0003", "环境问题", "get from server error"));
- log.warn(agent.getName(), "[get-config] get from server error, dataId={}, group={}, tenant={}, msg={}",
- dataId, group, tenant, ioe.toString());
- }
- log.warn(agent.getName(), "[get-config] get snapshot ok, dataId={}, group={}, tenant={}, config={}", dataId,
- group, tenant, ContentUtils.truncateContent(content));
- content = LocalConfigInfoProcessor.getSnapshot(agent.getName(), dataId, group, tenant);
- cr.setContent(content);
- configFilterChainManager.doFilter(null, cr);
- content = cr.getContent();
- return content;
- }
这里很明显
- // 优先使用本地配置
- String content = LocalConfigInfoProcessor.getFailover(agent.getName(), dataId, group, tenant);
优先使用本地配置,点进去
- static public String getFailover(String serverName, String dataId, String group, String tenant) {
- File localPath = getFailoverFile(serverName, dataId, group, tenant);
- if (!localPath.exists() || !localPath.isFile()) {
- return null;
- }
- try {
- return readFile(localPath);
- } catch (IOException ioe) {
- log.error(serverName, "NACOS-XXXX","get failover error, " + localPath + ioe.toString());
- return null;
- }
- }
- -----------
- static File getFailoverFile(String serverName, String dataId, String group, String tenant) {
- File tmp = new File(LOCAL_SNAPSHOT_PATH, serverName + "_nacos");
- tmp = new File(tmp, "data");
- if (StringUtils.isBlank(tenant)) {
- tmp = new File(tmp, "config-data");
- } else
- {
- tmp = new File(tmp, "config-data-tenant");
- tmp = new File(tmp, tenant);
- }
- return new File(new File(tmp, group), dataId);
- }
红色的圈是namespace ,优先读取本地配置,服务关闭这个配置会清掉

这样就可以容错的,保证断网,配置中心挂掉了还可以用的。比如调用别的服务这样的。
没有的话再去调用服务端拉取配置,这里是http的get请求获取。
content = worker.getServerConfig(dataId, group, tenant, timeoutMs);点进httpGet方法里面有一行
- HttpResult result = HttpSimpleClient.httpGet(
- getUrl(serverListMgr.getCurrentServerAddr(), path, isSSL), newHeaders, paramValues, encoding,
- readTimeoutMs, isSSL);
其中这就是轮询服务端
- public String getCurrentServerAddr() {
- if (StringUtils.isBlank(currentServerAddr)) {
- currentServerAddr = iterator().next();
- }
- return currentServerAddr;
- }
接下来看配置中心的 自动刷新配置的原理:
在spring-cloud-starter-alibaba-nacos-config的spi机制里有这个类NacosConfigAutoConfiguration,会注入nacosContextRefresher这个类实现了ApplicationListener接口,我们直接看它的
- @Override
- public void onApplicationEvent(ApplicationReadyEvent event) {
- // many Spring context
- if (this.ready.compareAndSet(false, true)) {
- this.registerNacosListenersForApplications();
- }
- }
为每个NacosPropertySource依次注册监听器,然后就可以动态感知服务端配置的变化
- private void registerNacosListenersForApplications() {
- if (isRefreshEnabled()) {
- for (NacosPropertySource propertySource : NacosPropertySourceRepository
- .getAll()) {
- if (!propertySource.isRefreshable()) {
- continue;
- }
- String dataId = propertySource.getDataId();
- registerNacosListener(propertySource.getGroup(), dataId);
- }
- }
- }
上面的NacosPropertySource就是我们的六个nacos配置文件,打断点如下

接着看
- private void registerNacosListener(final String groupKey, final String dataKey) {
- String key = NacosPropertySourceRepository.getMapKey(dataKey, groupKey);
- Listener listener = listenerMap.computeIfAbsent(key,
- lst -> new AbstractSharedListener() {
- @Override
- public void innerReceive(String dataId, String group,
- String configInfo) {
- refreshCountIncrement();
- nacosRefreshHistory.addRefreshRecord(dataId, group, configInfo);
- // todo feature: support single refresh for listening
- applicationContext.publishEvent(
- new RefreshEvent(this, null, "Refresh Nacos config"));
- if (log.isDebugEnabled()) {
- log.debug(String.format(
- "Refresh Nacos config group=%s,dataId=%s,configInfo=%s",
- group, dataId, configInfo));
- }
- }
- });
- try {
- configService.addListener(dataKey, groupKey, listener);
- }
- catch (NacosException e) {
- log.warn(String.format(
- "register fail for nacos listener ,dataId=[%s],group=[%s]", dataKey,
- groupKey), e);
- }
- }
看这一行:
- applicationContext.publishEvent(
- new RefreshEvent(this, null, "Refresh Nacos config"));
发布一个RefreshEvent事件,这个时间会在RefreshEventListener(最终实现ApplicationListener)
来看
- @Override
- public void onApplicationEvent(ApplicationEvent event) {
- if (event instanceof ApplicationReadyEvent) {
- handle((ApplicationReadyEvent) event);
- }
- else if (event instanceof RefreshEvent) {
- handle((RefreshEvent) event);
- }
- }
重点看这个else if的方法
- public void handle(RefreshEvent event) {
- if (this.ready.get()) { // don't handle events before app is ready
- log.debug("Event received " + event.getEventDesc());
- Set
keys = this.refresh.refresh(); - log.info("Refresh keys changed: " + keys);
- }
- }
重点看Set
keys = this.refresh.refresh(); - public synchronized Set<String> refresh() {
- Set<String> keys = refreshEnvironment();
- this.scope.refreshAll();
- return keys;
- }
先看环境相关的refreshEnvironment:
- public synchronized Set<String> refreshEnvironment() {
- //抽取出除了system,jndi,servlet之外的所有参数变量
- Map<String, Object> before = extract(
- this.context.getEnvironment().getPropertySources());
- //把原来的environment里面的参数放到一个新建的 spring context容器下重新加载,完事之后关闭新容器,这里就是获取新的参数值了,这里面有个run方法ConfigurableApplicationContext就是SpringApplication的run方法调用
- addConfigFilesToEnvironment();
- //获取新的参数值,并和之前的参数值进行比较找出改变的参数值
- Set<String> keys = changes(before,
- extract(this.context.getEnvironment().getPropertySources())).keySet();
- //发布环境变更事件,并带上改变的参数值
- this.context.publishEvent(new EnvironmentChangeEvent(this.context, keys));
- return keys;
- }
然后看刷新bean的
- this.scope.refreshAll();
- ----------
- public void refreshAll() {
- super.destroy();
- this.context.publishEvent(new RefreshScopeRefreshedEvent());
- }
其中RefreshScopeRefreshedEvent是一个留给我们的扩展点,我们可以自己去监听这个变更的事件,这里没有实现这个类的监听。
这类的scope是RefreshScope,会调用父类GenericScope的销毁方法(清除scope的缓存,下次会从beanfactory里面获取一个新的实例,这个实例使用新的配置):
- @Override
- public void destroy() {
- List
errors = new ArrayList (); - Collection
wrappers = this.cache.clear(); - for (BeanLifecycleWrapper wrapper : wrappers) {
- try {
- Lock lock = this.locks.get(wrapper.getName()).writeLock();
- lock.lock();
- try {
- wrapper.destroy();
- }
- finally {
- lock.unlock();
- }
- }
- catch (RuntimeException e) {
- errors.add(e);
- }
- }
- if (!errors.isEmpty()) {
- throw wrapIfNecessary(errors.get(0));
- }
- this.errors.clear();
- }
- -----
- @Override
- public Object get(String name, ObjectFactory objectFactory) {
- BeanLifecycleWrapper value = this.cache.put(name,
- new BeanLifecycleWrapper(name, objectFactory));
- this.locks.putIfAbsent(name, new ReentrantReadWriteLock());
- try {
- return value.getBean();
- }
- catch (RuntimeException e) {
- this.errors.put(name, e);
- throw e;
- }
- }
这里清除了缓存,重点看下BeanLifecycleWrapper
- private static class BeanLifecycleWrapper {
- private final String name;
- private final ObjectFactory objectFactory;
- private Object bean;
- private Runnable callback;
- BeanLifecycleWrapper(String name, ObjectFactory objectFactory) {
- this.name = name;
- this.objectFactory = objectFactory;
- }
- public String getName() {
- return this.name;
- }
- public void setDestroyCallback(Runnable callback) {
- this.callback = callback;
- }
- public Object getBean() {
- if (this.bean == null) {
- synchronized (this.name) {
- if (this.bean == null) {
- this.bean = this.objectFactory.getObject();
- }
- }
- }
- return this.bean;
- }
- public void destroy() {
- if (this.callback == null) {
- return;
- }
- synchronized (this.name) {
- Runnable callback = this.callback;
- if (callback != null) {
- callback.run();
- }
- this.callback = null;
- this.bean = null;
- }
- }
- 。。。。。。省略
那就很明显了,缓存清除的话,然后每次获取就从GenericScope的get方法获取bean这里会调用到
BeanLifecycleWrapper的getBean方法,缓存清除就木有bean就会调用ObjectFactory的getobject方法(这就和spring的factorybean类似)
------------------
然后看服务端的配置的逻辑:
入口: com.alibaba.nacos.config.server.controller.ConfigController##getConfig
-->inner.doGetConfig(request, response, dataId, group, tenant, tag, clientIp);
其中DiskUtil.targetBetaFile(dataId, group, tenant);
- /**
- * Returns the path of cache file in server.
- */
- public static File targetBetaFile(String dataId, String group, String tenant) {
- File file = null;
- if (StringUtils.isBlank(tenant)) {
- file = new File(EnvUtil.getNacosHome(), BETA_DIR);
- } else {
- file = new File(EnvUtil.getNacosHome(), TENANT_BETA_DIR);
- file = new File(file, tenant);
- }
- file = new File(file, group);
- file = new File(file, dataId);
- return file;
- }
服务端没有查数据库,直接从本地磁盘缓存文件读取,所以直接修改mysql表里面配置是不行的,一定要发布ConfigDataChangeEvent事件。触发本地文件和内存的更新

其中
- md5 = cacheItem.getMd5();
- lastModified = cacheItem.getLastModifiedTs();
服务端判断文件发生编码,对数据进行MD5,然后比较MD5(同样也可以hash之类的去比较)
接下来看写入磁盘的过程:
从DumpService开始

两个实现类一个是内置一个是嵌入式的。
我们看ExternalDumpService
- @PostConstruct
- @Override
- protected void init() throws Throwable {
- dumpOperate(processor, dumpAllProcessor, dumpAllBetaProcessor, dumpAllTagProcessor);
- }
然后dumpConfigInfo(dumpAllProcessor);全量的dump配置信息,dumpAllProcessor.process(new DumpAllTask());这个里面先查出mysql最大的主键量,然后分页每次1000条写入磁盘和内存 ConfigCacheService .dump(cf.getDataId(), cf.getGroup(), cf.getTenant(), cf.getContent(), cf.getLastModified(), cf.getType());接着调用DiskUtil.saveToDisk(dataId, group, tenant, content);写入磁盘。
其中这个是核心方法,判断MD5,然后发布LocalDataChangeEvent事件
- updateMd5(groupKey, md5, lastModifiedTs);
- ---------
- public static void updateMd5(String groupKey, String md5, long lastModifiedTs) {
- CacheItem cache = makeSure(groupKey);
- if (cache.md5 == null || !cache.md5.equals(md5)) {
- cache.md5 = md5;
- cache.lastModifiedTs = lastModifiedTs;
- NotifyCenter.publishEvent(new LocalDataChangeEvent(groupKey));
- }
- }
这个事件在ConfigExecutor.executeLongPolling(new DataChangeTask(evt.groupKey, evt.isBeta, evt.betaIps));调用,LongPollingService这个类的构造方法
- public LongPollingService() {
- allSubs = new ConcurrentLinkedQueue
(); - ConfigExecutor.scheduleLongPolling(new StatTask(), 0L, 10L, TimeUnit.SECONDS);
- // Register LocalDataChangeEvent to NotifyCenter.
- NotifyCenter.registerToPublisher(LocalDataChangeEvent.class, NotifyCenter.ringBufferSize);
- // Register A Subscriber to subscribe LocalDataChangeEvent.
- NotifyCenter.registerSubscriber(new Subscriber() {
- @Override
- public void onEvent(Event event) {
- if (isFixedPolling()) {
- // Ignore.
- } else {
- if (event instanceof LocalDataChangeEvent) {
- LocalDataChangeEvent evt = (LocalDataChangeEvent) event;
- ConfigExecutor.executeLongPolling(new DataChangeTask(evt.groupKey, evt.isBeta, evt.betaIps));
- }
- }
- }
- @Override
- public Class subscribeType() {
- return LocalDataChangeEvent.class;
- }
- });
- }
然后是DataChangeTask的run方法,迭代所有的sub队列(发布订阅模式)
Iterator
iter = allSubs.iterator(); 然后响应变化发生的key
clientSub.sendResponse(Arrays.asList(groupKey));
其中 run方法的
for (Iterator
iter = allSubs.iterator(); iter.hasNext(); ) 这一行就说明有任务的话不需要等待29.5秒时间,直接拉取到变更的配置。
这里就是客户端和服务端存在长轮询,一个可以推,一个可以拉,这里是服务端push模式(服务端会根据心跳文件中保存的最后一次心跳时间,来判断到底是从数据库 dump 全量配置数据还是部分增量配置数据(如果机器上次心跳间隔是 6h 以内的话)。有变更的话)
DataChangeTask任务持有一个 AsyncContext 响应对象,通过定时线程池延后 29.5s 执行。比客户端 30s 的超时时间提前 500ms 返回是为了最大程度上保证客户端不会因为网络延时造成超时。

回到上面的核心方法
- public static boolean publishEvent(final Event event) {
- try {
- return publishEvent(event.getClass(), event);
- } catch (Throwable ex) {
- LOGGER.error("There was an exception to the message publishing : {}", ex);
- return false;
- }
- }
最终定位到DefaultPublisher的publish方法
- @Override
- public boolean publish(Event event) {
- checkIsStart();
- boolean success = this.queue.offer(event);
- if (!success) {
- LOGGER.warn("Unable to plug in due to interruption, synchronize sending time, event : {}", event);
- receiveEvent(event);
- return true;
- }
- return true;
- }
这里就是典型的生产者消费者模式,使用阻塞队列接受任务
其中
- void receiveEvent(Event event) {
- final long currentEventSequence = event.sequence();
- // Notification single event listener
- for (Subscriber subscriber : subscribers) {
- // Whether to ignore expiration events
- if (subscriber.ignoreExpireEvent() && lastEventSequence > currentEventSequence) {
- LOGGER.debug("[NotifyCenter] the {} is unacceptable to this subscriber, because had expire",
- event.getClass());
- continue;
- }
- // Because unifying smartSubscriber and subscriber, so here need to think of compatibility.
- // Remove original judge part of codes.
- notifySubscriber(subscriber, event);
- }
- }
其中抽象类Subscriber的两个子类,一个是通知集群其他节点AsyncNotifyService,一个LongPollingService客户端服务端长轮询用的。这里看下AsyncNotifyService
- @Autowired
- public AsyncNotifyService(ServerMemberManager memberManager) {
- this.memberManager = memberManager;
- // Register ConfigDataChangeEvent to NotifyCenter.
- NotifyCenter.registerToPublisher(ConfigDataChangeEvent.class, NotifyCenter.ringBufferSize);
- // Register A Subscriber to subscribe ConfigDataChangeEvent.
- NotifyCenter.registerSubscriber(new Subscriber() {
- @Override
- public void onEvent(Event event) {
- // Generate ConfigDataChangeEvent concurrently
- if (event instanceof ConfigDataChangeEvent) {
- ConfigDataChangeEvent evt = (ConfigDataChangeEvent) event;
- long dumpTs = evt.lastModifiedTs;
- String dataId = evt.dataId;
- String group = evt.group;
- String tenant = evt.tenant;
- String tag = evt.tag;
- Collection<Member> ipList = memberManager.allMembers();
- // In fact, any type of queue here can be
- Queue<NotifySingleTask> queue = new LinkedList<NotifySingleTask>();
- for (Member member : ipList) {
- queue.add(new NotifySingleTask(dataId, group, tenant, tag, dumpTs, member.getAddress(),
- evt.isBeta));
- }
- ConfigExecutor.executeAsyncNotify(new AsyncTask(nacosAsyncRestTemplate, queue));
- }
- }
- @Override
- public Classextends Event> subscribeType() {
- return ConfigDataChangeEvent.class;
- }
- });
- }
获取Collection
ipList = memberManager.allMembers();集群所有节点目标 然后异步发送ConfigExecutor.executeAsyncNotify(new AsyncTask(nacosAsyncRestTemplate, queue));
再补充一点客户端的ClientWorker
- @SuppressWarnings("PMD.ThreadPoolCreationRule")
- public ClientWorker(final HttpAgent agent, final ConfigFilterChainManager configFilterChainManager,
- final Properties properties) {
- this.agent = agent;
- this.configFilterChainManager = configFilterChainManager;
- // Initialize the timeout parameter
- init(properties);
- this.executor = Executors.newScheduledThreadPool(1, new ThreadFactory() {
- @Override
- public Thread newThread(Runnable r) {
- Thread t = new Thread(r);
- t.setName("com.alibaba.nacos.client.Worker." + agent.getName());
- t.setDaemon(true);
- return t;
- }
- });
- this.executorService = Executors
- .newScheduledThreadPool(Runtime.getRuntime().availableProcessors(), new ThreadFactory() {
- @Override
- public Thread newThread(Runnable r) {
- Thread t = new Thread(r);
- t.setName("com.alibaba.nacos.client.Worker.longPolling." + agent.getName());
- t.setDaemon(true);
- return t;
- }
- });
- this.executor.scheduleWithFixedDelay(new Runnable() {
- @Override
- public void run() {
- try {
- checkConfigInfo();
- } catch (Throwable e) {
- LOGGER.error("[" + agent.getName() + "] [sub-check] rotate check error", e);
- }
- }
- }, 1L, 10L, TimeUnit.MILLISECONDS);
- }
其中
- public void checkConfigInfo() {
- // Dispatch taskes.
- int listenerSize = cacheMap.size();
- // Round up the longingTaskCount.
- int longingTaskCount = (int) Math.ceil(listenerSize / ParamUtil.getPerTaskConfigSize());
- if (longingTaskCount > currentLongingTaskCount) {
- for (int i = (int) currentLongingTaskCount; i < longingTaskCount; i++) {
- // The task list is no order.So it maybe has issues when changing.
- executorService.execute(new LongPollingRunnable(i));
- }
- currentLongingTaskCount = longingTaskCount;
- }
- }
这里可以看到长轮询是定时任务线程池,客户端主动拉取配置的
-
相关阅读:
v-for 中 key的作用和原理
Javascript知识【BootStrap】
【三】kubernetes kuboard部署分布式系统
Maven学习
Unity入门04——Unity重要组件和API(1)
rust 多线程
数学建模2019B “同心协力”策略研究
JAVACPU占用过高、内存泄漏问题排查
一个越南程序员的阿里巴巴之旅
力扣2860 补9.20
- 原文地址:https://blog.csdn.net/xjk201/article/details/125891788

- 最新文章
-
沪漂五周年了:我越来越迷茫了
Agentic Skill Routing 实战:别再把所有 Skill 塞进 AI Agent 上下文
MySQL-Seconds_behind_master的精度误差
[MAF预定义ChatClient中间件-03]CachingChatClient——利用缓存省钱省时间
AI的至暗历史:从万众期待到被政府撤资,AI的两次死亡徘徊
Agent OS :五种驯服不确定性的范式
PortSwigger SQL注入LAB11
数据库即时编译JIT
[Begin]AI Learn Data Day 0
深度学习进阶(二十七)现代 LLM 的核心架构设计其二:SwiGLU