-
spring 注解练习
创建spring项目:
使用idea,maven创建spring项目:

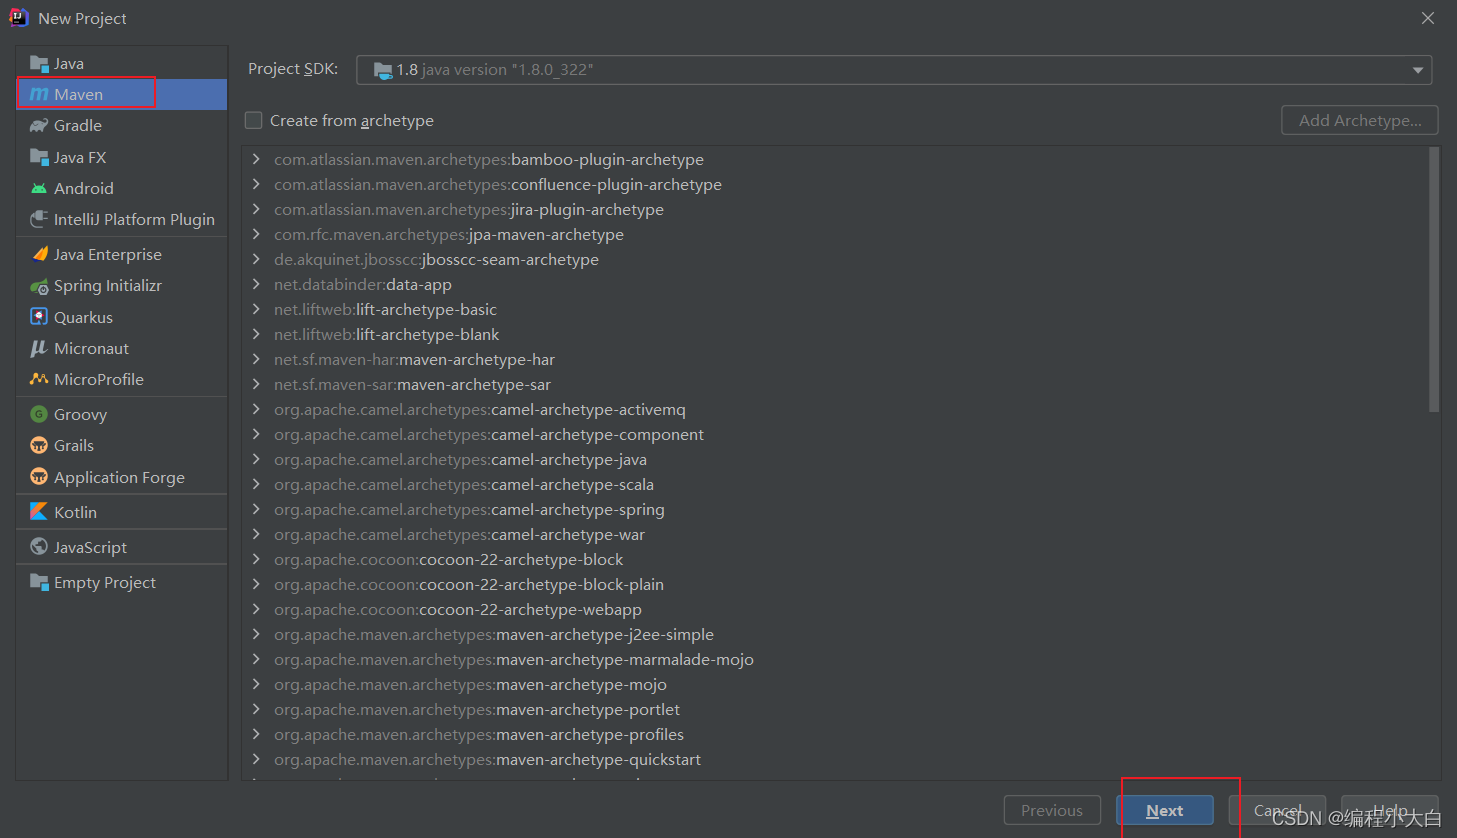

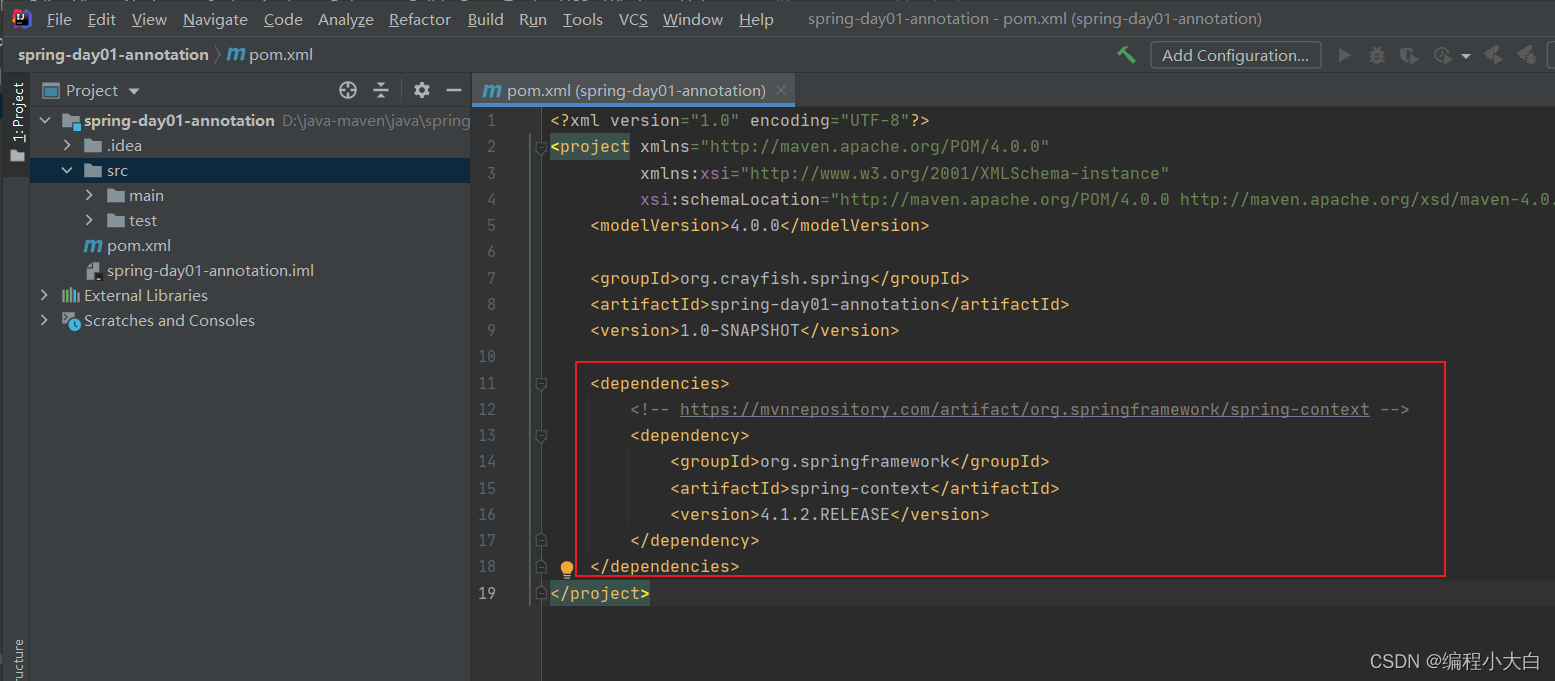
以上就可以创建好项目,然后导入spring-context的jar包,让项目成为spring项目:https://mvnrepository.com- 1
以上链接搜索spring-context,找到您想要的版本,把以下复制到pom.xml配置文件中:
<dependency> <groupId>org.springframework</groupId> <artifactId>spring-context</artifactId> <version>4.1.2.RELEASE</version> </dependency>- 1
- 2
- 3
- 4
- 5
如下图:
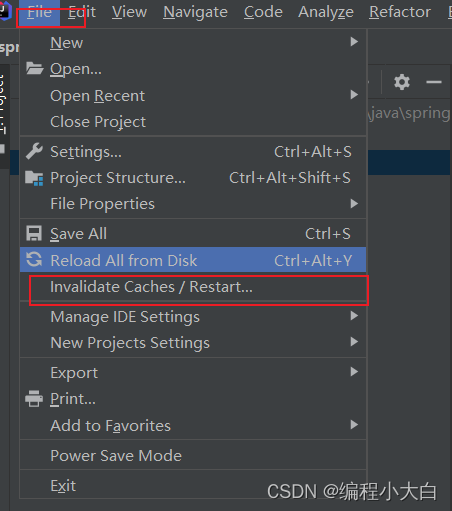
如果上面复制后报错,可以清除idea缓存,然后刷新maven缓存,具体操作如下:

以上步骤完成,一个spring项目就真正地创建好了!!!spring配置bean和注解配置bean练习:
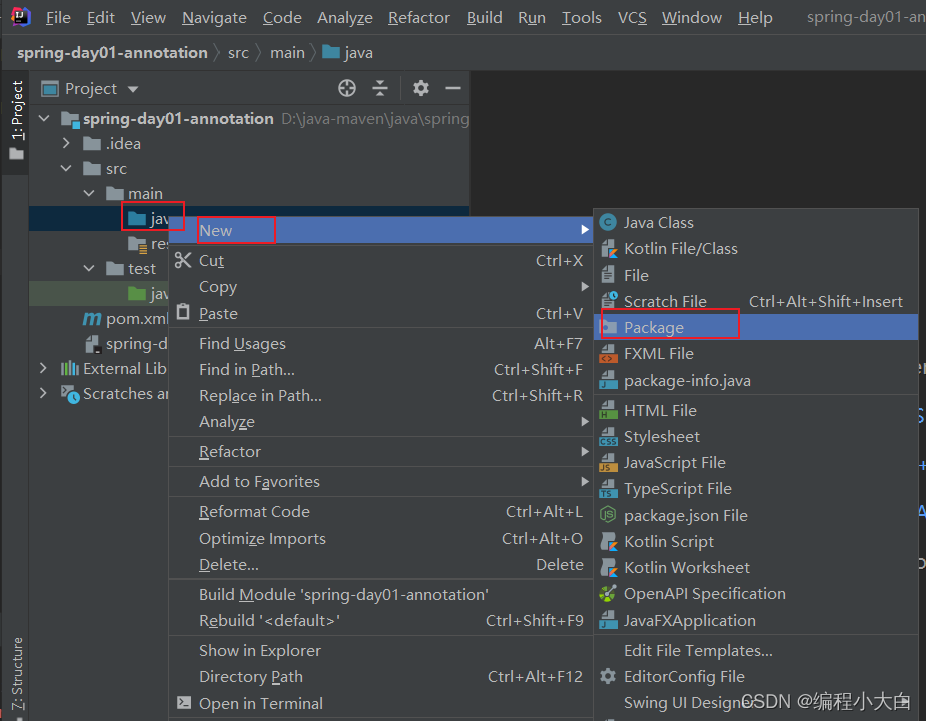
创建一个包,存放实体类Person:


创建person类如下:package org.crayfish.spring; public class Person { private String name; private Integer age; public String getName(){ return name; } public Integer getAge(){ return age; } public void setName(String name){ this.name = name; } public void setAge(Integer age){ this.age = age; } @Override public String toString(){ return "Person [name=" + name + ",age=" + age + "]"; } public Person(String name,Integer age){ super(); this.name = name; this.age = age; } public Person(){ super(); } }- 1
- 2
- 3
- 4
- 5
- 6
- 7
- 8
- 9
- 10
- 11
- 12
- 13
- 14
- 15
- 16
- 17
- 18
- 19
- 20
- 21
- 22
- 23
- 24
- 25
- 26
- 27
- 28
- 29
- 30
- 31
- 32
- 33
- 34
- 35
- 36
- 37
- 38
创建spring的配置类bean.xml:

一定要选择spring config,没有看到spring config时可以清除idea缓存。
bean.xml配置文件如下:<?xml version="1.0" encoding="UTF-8"?> <beans xmlns="http://www.springframework.org/schema/beans" xmlns:xsi="http://www.w3.org/2001/XMLSchema-instance" xsi:schemaLocation="http://www.springframework.org/schema/beans http://www.springframework.org/schema/beans/spring-beans.xsd"> <!-- 注入Person的bean--> <bean id="person" class="org.crayfish.spring.bean.Person"> <property name="age" value="18"></property> <property name="name" value="张三"></property> </bean> </beans>- 1
- 2
- 3
- 4
- 5
- 6
- 7
- 8
- 9
- 10
- 11
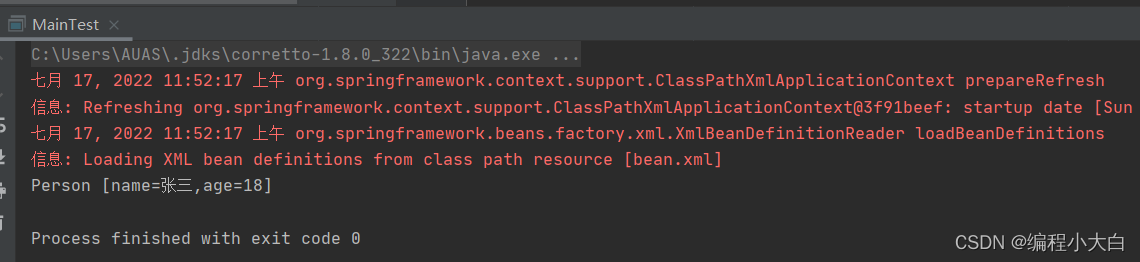
在org.crayfish.spring包下创建一个主测试类,用于测试bean是否导入成功:
package org.crayfish.spring; import org.crayfish.spring.bean.Person; import org.springframework.context.ApplicationContext; import org.springframework.context.support.ClassPathXmlApplicationContext; public class MainTest { public static void main(String[] args) { //获取类路径的配置文件,返回ioc容器ApplicationContext ApplicationContext applicationContext = new ClassPathXmlApplicationContext("bean.xml"); //获取ioc容器的id为person的类型bean Person bean = (Person)applicationContext.getBean("person"); System.out.println(bean); } }- 1
- 2
- 3
- 4
- 5
- 6
- 7
- 8
- 9
- 10
- 11
- 12
- 13
- 14
- 15
- 16
- 17
- 18
- 19
- 20
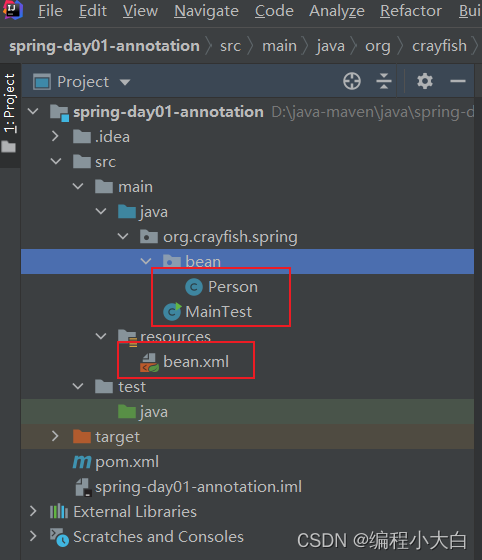
以上就完成了spring配置文件配置bean的练习,具体文件目录与结果如下:
注解练习:
创建注解类MainCOnfig,目录与代码如下:

package org.crayfish.spring.config; import org.crayfish.spring.bean.Person; import org.springframework.context.annotation.Bean; import org.springframework.context.annotation.Configuration; //配置类==配置文件 //@Configuration 表示是一个配置类 @Configuration public class MainConfig { //给容器注册一个bean,类型为返回值类型Person,id默认为方法名 @Bean public Person person(){ return new Person("lili",20); } }- 1
- 2
- 3
- 4
- 5
- 6
- 7
- 8
- 9
- 10
- 11
- 12
- 13
- 14
- 15
- 16
- 17
- 18
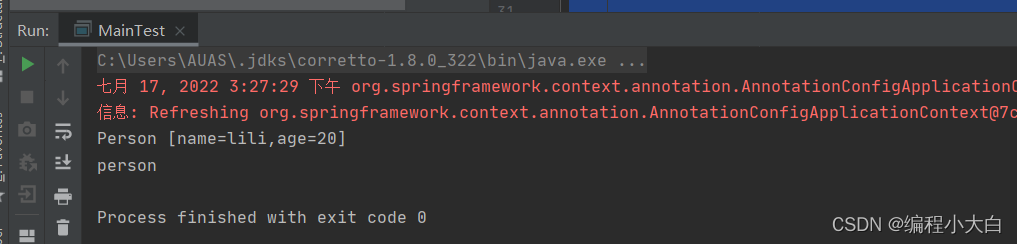
测试类:
package org.crayfish.spring; import org.crayfish.spring.bean.Person; import org.crayfish.spring.config.MainConfig; import org.springframework.context.ApplicationContext; import org.springframework.context.annotation.AnnotationConfigApplicationContext; import org.springframework.context.support.ClassPathXmlApplicationContext; public class MainTest { public static void main(String[] args) { //在配置文件配置时获取的方法 // //获取类路径的配置文件,返回ioc容器ApplicationContext // ApplicationContext applicationContext = new ClassPathXmlApplicationContext("bean.xml"); // //获取ioc容器的id为person的类型bean // Person bean = (Person)applicationContext.getBean("person"); // System.out.println(bean); //注解配置时获取的方法 ApplicationContext applicationContext = new AnnotationConfigApplicationContext(MainConfig.class); Person bean = (Person)applicationContext.getBean(Person.class); System.out.println(bean); //获取Person bean的名字 String[] nameForType = applicationContext.getBeanNamesForType(Person.class); for (String name:nameForType ) { System.out.println(name); } } }- 1
- 2
- 3
- 4
- 5
- 6
- 7
- 8
- 9
- 10
- 11
- 12
- 13
- 14
- 15
- 16
- 17
- 18
- 19
- 20
- 21
- 22
- 23
- 24
- 25
- 26
- 27
- 28
- 29
- 30
- 31
- 32
- 33
- 34
spring注解用法:
package org.crayfish.spring.config; import org.crayfish.spring.bean.Color; import org.crayfish.spring.bean.ColorFactoryBean; import org.crayfish.spring.bean.Person; import org.crayfish.spring.condition.LinuxCondition; import org.crayfish.spring.condition.MyImportBeanDefinitionRegistrar; import org.crayfish.spring.condition.MyImportSelector; import org.crayfish.spring.condition.WindowCondition; import org.springframework.context.annotation.*; /** * 给容器注册组件 * 1.包扫描+组件标注注解(@Controller,@Service,@Repository,@Component * 2.@Bean(导入第三方包里面的组件) * 3.@Import快速给容器导入组件 * @Import(要导入到容器中的组件):容器中就会自动注册这个组件,id默认是全类名 * @ImportSelector:返回需要导入的组件的全类名的数组 * @ImportBeanDefinitionRegistrar 手动注册bean到容器中 * 4.使用spring提供的 FactoryBean(工厂Bean) * 默认获取到的是工厂bean调用getObject创建的对象 Object bean = applicationContext.getBean("colorFactoryBean"); * 要获取工厂bean本身,需要给id前面加& &colorFactoryBean Object bean1 = applicationContext.getBean("&colorFactoryBean"); */ //@Import(要导入到容器中的组件):容器中就会自动注册这个组件,id默认是全类名 //@Import(Color.class) // 普通类Color.class 容器中就会自动注册这个组件,id默认是全类名 // 实现ImportSelector接口的MyImportSelector.class 回需要导入的组件的全类名的数组 // 实现ImportBeanDefinitionRegistrar接口MyImportBeanDefinitionRegistrar.class 手动注册bean到容器中 @Import({Color.class, MyImportSelector.class, MyImportBeanDefinitionRegistrar.class}) //配置类==配置文件 //@Configuration 表示是一个配置类 @Configuration //@ComponentScan("org.crayfish") 自动扫描org.crayfish包 @ComponentScan("org.crayfish") //@ComponentScan value:指定要扫描那个包下的文件 //excludeFilters = Filter[] 指定扫描的时候按照什么规则排除那些组件 //@ComponentScan(value = "org.crayfish",excludeFilters = { // @ComponentScan.Filter(type = FilterType.ANNOTATION,value = {Controller.class //})}) //includeFilters = Filter[] 指定扫描的时候按照什么规则只要那些组件 //useDefaultFilters = false 禁用默认的扫描规则 //@ComponentScan(value = "org.crayfish",includeFilters = { // @ComponentScan.Filter(type = FilterType.ANNOTATION,value = {Controller.class}) //},useDefaultFilters = false) //FilterType.ANNOTATION 按照注解 //FilterType.ASSIGNABLE_TYPE 按照给定类型 //FilterType.ASPECTJ 使用ASPECTJ表达式 //FilterType.REGEX 使用正则表达式 //@ComponentScan(value = "org.crayfish",includeFilters = { // @ComponentScan.Filter(type = FilterType.ANNOTATION,value = {Controller.class}), // @ComponentScan.Filter(type = FilterType.ASSIGNABLE_TYPE,value = {BookService.class}) //},useDefaultFilters = false) //FilterType.CUSTOM 使用自定义规则(TypeFilter实现类) //@ComponentScan(value = "org.crayfish",includeFilters = { // @ComponentScan.Filter(type = FilterType.CUSTOM,value = {MyTypeFilter.class}) // //MyTypeFilter.class 自定义的规则类 写在org.crayfish.spring.config.MyTypeFilter类中,如果返回true才加载到ioc容器中; //},useDefaultFilters = false) public class MainConfig { /** * 使用spring提供的 FactoryBean(工厂Bean) * ColorFactoryBean实现了FactoryBean类的工厂Bean * @return */ @Bean public ColorFactoryBean colorFactoryBean(){ return new ColorFactoryBean(); } //@Bean 给容器注册一个bean,类型为返回值类型Person,id默认为方法名 // @Bean @Bean("Person") //@Scope 默认单实例 作用域 //prototype 多实例(多次获取bean值不一样)ioc容器启动不会调用方法创建对象放在容器中,每次获取时才会调用方法创建对象 //singleton 单实例(默认)(多次获取bean值一样)ioc容器启动会调用方法创建对象放到ioc容器中,以后每次获取直接从容器(map.get())中获取 //request 同一次请求创建一个实例(外网下使用) //session 同一个session创建一个实例(外网下使用) @Scope("prototype") //@Lazy 懒加载:主要针对单实例bean,单实例bean默认容器启动时就创建对象,懒加载是容器启动时不创建对象,第一次使用(获取)bean时才创建对象,并初始化 @Lazy public Person person(){ System.out.println("给ioc容器加载Person bean"); return new Person("lili",20); } /** * @Conditional() 按照一定条件进行判断,满足条件给容器中注册bean * 如果系统是windows,给容器注册WindowPerson * 如果系统是Linux,给容器注册LinuxPerson * 可放在方法 类上 */ @Conditional({WindowCondition.class}) //自己创建的Condition实现类,WindowCondition.class,是window系统才返回true,这里才加载到ioc容器中 @Bean public Person WindowPerson(){ return new Person("window",1); } @Conditional({LinuxCondition.class}) @Bean public Person LinuxPerson(){//自己创建的Condition实现类,LinuxPerson.class,是Linux系统才返回true,这里才加载到ioc容器中 return new Person("Linux",2); } }- 1
- 2
- 3
- 4
- 5
- 6
- 7
- 8
- 9
- 10
- 11
- 12
- 13
- 14
- 15
- 16
- 17
- 18
- 19
- 20
- 21
- 22
- 23
- 24
- 25
- 26
- 27
- 28
- 29
- 30
- 31
- 32
- 33
- 34
- 35
- 36
- 37
- 38
- 39
- 40
- 41
- 42
- 43
- 44
- 45
- 46
- 47
- 48
- 49
- 50
- 51
- 52
- 53
- 54
- 55
- 56
- 57
- 58
- 59
- 60
- 61
- 62
- 63
- 64
- 65
- 66
- 67
- 68
- 69
- 70
- 71
- 72
- 73
- 74
- 75
- 76
- 77
- 78
- 79
- 80
- 81
- 82
- 83
- 84
- 85
- 86
- 87
- 88
- 89
- 90
- 91
- 92
- 93
- 94
- 95
- 96
- 97
- 98
- 99
- 100
- 101
- 102
- 103
- 104
- 105
- 106
- 107
- 108
- 109
- 110
- 111
- 112
- 113
1.包扫描+组件标注注解(@Controller,@Service,@Repository,@Component
@ComponentScan(“org.crayfish”) 自动扫描org.crayfish包@ComponentScan value:指定要扫描那个包下的文件
excludeFilters = Filter[] 指定扫描的时候按照什么规则排除那些组件
@ComponentScan(value = “org.crayfish”,excludeFilters = {
@ComponentScan.Filter(type = FilterType.ANNOTATION,value = {Controller.class
})})includeFilters = Filter[] 指定扫描的时候按照什么规则只要那些组件
useDefaultFilters = false 禁用默认的扫描规则
@ComponentScan(value = “org.crayfish”,includeFilters = {
@ComponentScan.Filter(type = FilterType.ANNOTATION,value = {Controller.class})
},useDefaultFilters = false)FilterType.ANNOTATION 按照注解
FilterType.ASSIGNABLE_TYPE 按照给定类型
FilterType.ASPECTJ 使用ASPECTJ表达式
FilterType.REGEX 使用正则表达式
@ComponentScan(value = “org.crayfish”,includeFilters = {
@ComponentScan.Filter(type = FilterType.ANNOTATION,value = {Controller.class}),
@ComponentScan.Filter(type = FilterType.ASSIGNABLE_TYPE,value = {BookService.class})
},useDefaultFilters = false)FilterType.CUSTOM 使用自定义规则(TypeFilter实现类)
@ComponentScan(value = “org.crayfish”,includeFilters = {
@ComponentScan.Filter(type = FilterType.CUSTOM,value = {MyTypeFilter.class})
//MyTypeFilter.class 自定义的规则类 写在org.crayfish.spring.config.MyTypeFilter类中,如果返回true才加载到ioc容器中;
},useDefaultFilters = false)1.1普通扫描:
@ComponentScan(“org.crayfish”) 自动扫描org.crayfish包package org.crayfish.spring.service; import org.springframework.stereotype.Service; @Service public class BookService { }- 1
- 2
- 3
- 4
- 5
- 6
- 7
- 8
package org.crayfish.spring.dao; import org.springframework.stereotype.Repository; @Repository public class BookDao { }- 1
- 2
- 3
- 4
- 5
- 6
- 7
package org.crayfish.spring.controller; import org.springframework.stereotype.Controller; @Controller public class BookController { }- 1
- 2
- 3
- 4
- 5
- 6
- 7
- 8
1.2,@ComponentScan value:指定要扫描那个包下的文件
excludeFilters = Filter[] 指定扫描的时候按照什么规则排除那些组件@ComponentScan(value = "org.crayfish",excludeFilters = { @ComponentScan.Filter(type = FilterType.ANNOTATION,value = {Controller.class })})- 1
- 2
- 3
- 4
1.3,includeFilters = Filter[] 指定扫描的时候按照什么规则只要那些组件
useDefaultFilters = false 禁用默认的扫描规则@ComponentScan(value = "org.crayfish",includeFilters = { @ComponentScan.Filter(type = FilterType.ANNOTATION,value = {Controller.class}) },useDefaultFilters = false)- 1
- 2
- 3
1.4,FilterType.ANNOTATION 按照注解
FilterType.ASSIGNABLE_TYPE 按照给定类型
FilterType.ASPECTJ 使用ASPECTJ表达式
FilterType.REGEX 使用正则表达式@ComponentScan(value = "org.crayfish",includeFilters = { @ComponentScan.Filter(type = FilterType.ANNOTATION,value = {Controller.class}), @ComponentScan.Filter(type = FilterType.ASSIGNABLE_TYPE,value = {BookService.class}) },useDefaultFilters = false)- 1
- 2
- 3
- 4
package org.crayfish.spring.controller; import org.springframework.stereotype.Controller; @Controller public class BookController { }- 1
- 2
- 3
- 4
- 5
- 6
- 7
- 8
//@ComponentScan(value = "org.crayfish",includeFilters = { // @ComponentScan.Filter(type = FilterType.CUSTOM,value = {MyTypeFilter.class}) // //MyTypeFilter.class 自定义的规则类 写在org.crayfish.spring.config.MyTypeFilter类中,如果返回true才加载到ioc容器中; //},useDefaultFilters = false)- 1
- 2
- 3
- 4
package org.crayfish.spring.config; import org.springframework.core.io.Resource; import org.springframework.core.type.AnnotationMetadata; import org.springframework.core.type.ClassMetadata; import org.springframework.core.type.classreading.MetadataReader; import org.springframework.core.type.classreading.MetadataReaderFactory; import org.springframework.core.type.filter.TypeFilter; import java.io.IOException; public class MyTypeFilter implements TypeFilter { /** * * @param metadataReader 读取到当前正在扫描的类的所有信息 * @param metadataReaderFactory 可以获取到其它任何类信息 * @return * @throws IOException */ public boolean match(MetadataReader metadataReader, MetadataReaderFactory metadataReaderFactory) throws IOException { //获取当前正在扫描的类的注解信息 AnnotationMetadata annotationMetadata = metadataReader.getAnnotationMetadata(); //获取当前正在扫描的类的类信息 ClassMetadata classMetadata = metadataReader.getClassMetadata(); //获取当前正在扫描的类的类资源(类路径) Resource resource = metadataReader.getResource(); //获取当前正在扫描的类名 String className = classMetadata.getClassName(); System.out.println("====>"+className); if(className.contains("er")){ //获取当前正在扫描的类名 包含 er 就符合规则,返回true return true; } return false; } }- 1
- 2
- 3
- 4
- 5
- 6
- 7
- 8
- 9
- 10
- 11
- 12
- 13
- 14
- 15
- 16
- 17
- 18
- 19
- 20
- 21
- 22
- 23
- 24
- 25
- 26
- 27
- 28
- 29
- 30
- 31
- 32
- 33
- 34
- 35
- 36
- 37
- 38
2.@Import(要导入到容器中的组件):容器中就会自动注册这个组件,id默认是全类名
普通类Color.class 容器中就会自动注册这个组件,id默认是全类名
实现ImportSelector接口的MyImportSelector.class 回需要导入的组件的全类名的数组
实现ImportBeanDefinitionRegistrar接口MyImportBeanDefinitionRegistrar.class 手动注册bean到容器中
@Import({Color.class, MyImportSelector.class, MyImportBeanDefinitionRegistrar.class})package org.crayfish.spring.bean; public class Color { }- 1
- 2
- 3
- 4
package org.crayfish.spring.condition; import org.springframework.context.annotation.ImportSelector; import org.springframework.core.type.AnnotationMetadata; /** * 自定义逻辑返回需要导入的组件 */ public class MyImportSelector implements ImportSelector { /** * 返回值,就是要导入到容器中的组件全类名 * @param importingClassMetadata 当前标注@Import注解的类的所有注解信息 * @return 方法不要返回null,可返回空数组new String[0] */ @Override public String[] selectImports(AnnotationMetadata importingClassMetadata) { //返回要导入到容器中的组件org.crayfish.spring.bean.Blue 全类名 return new String[]{"org.crayfish.spring.bean.Blue"}; } }- 1
- 2
- 3
- 4
- 5
- 6
- 7
- 8
- 9
- 10
- 11
- 12
- 13
- 14
- 15
- 16
- 17
- 18
- 19
- 20
- 21
- 22
package org.crayfish.spring.condition; import org.crayfish.spring.bean.Yellow; import org.springframework.beans.factory.support.BeanDefinitionRegistry; import org.springframework.beans.factory.support.RootBeanDefinition; import org.springframework.context.annotation.ImportBeanDefinitionRegistrar; import org.springframework.core.type.AnnotationMetadata; public class MyImportBeanDefinitionRegistrar implements ImportBeanDefinitionRegistrar { /** * * @param importingClassMetadata 当前类的注解信息 * @param registry BeanDefinition注册类ioc容器 * 把所有需要添加到容器的bean,调用BeanDefinitionRegistry.registerBeanDefinition手工注册进来 */ @Override public void registerBeanDefinitions(AnnotationMetadata importingClassMetadata, BeanDefinitionRegistry registry) { //获取ioc容器中的Blue bean Boolean definition = registry.containsBeanDefinition("Blue"); if(definition){ //指定bean的定义信息,bean的类型Yellow.class RootBeanDefinition beanDefinition = new RootBeanDefinition(Yellow.class); //指定yellow bean名,并注册到ioc容器 registry.registerBeanDefinition("yellow",beanDefinition); } } }- 1
- 2
- 3
- 4
- 5
- 6
- 7
- 8
- 9
- 10
- 11
- 12
- 13
- 14
- 15
- 16
- 17
- 18
- 19
- 20
- 21
- 22
- 23
- 24
- 25
- 26
- 27
- 28
3.配置类==配置文件
@Configuration 表示是一个配置类
相当于bean.xml<?xml version="1.0" encoding="UTF-8"?> <beans xmlns="http://www.springframework.org/schema/beans" xmlns:xsi="http://www.w3.org/2001/XMLSchema-instance" xmlns:context="http://www.springframework.org/schema/context" xsi:schemaLocation="http://www.springframework.org/schema/beans http://www.springframework.org/schema/beans/spring-beans.xsd http://www.springframework.org/schema/context http://www.springframework.org/schema/context/spring-context.xsd"> <!-- 包扫描,只要标注了@Controller,@Service,@Repository,@Component,都会自动扫描装配到ioc容器中--> <!-- use-default-filters="false" 禁用默认的扫描规则--> <context:component-scan base-package="org.crayfish" use-default-filters="false"></context:component-scan> <!-- 注入Person的bean; scop作用域;init-method=""初始化方法; destroy-method=""销毁方法 --> <bean id="person" class="org.crayfish.spring.bean.Person" scope="prototype"> <property name="age" value="18"></property> <property name="name" value="张三"></property> </bean> </beans>- 1
- 2
- 3
- 4
- 5
- 6
- 7
- 8
- 9
- 10
- 11
- 12
- 13
- 14
- 15
//@Scope 默认单实例 作用域
//prototype 多实例(多次获取bean值不一样)ioc容器启动不会调用方法创建对象放在容器中,每次获取时才会调用方法创建对象
//singleton 单实例(默认)(多次获取bean值一样)ioc容器启动会调用方法创建对象放到ioc容器中,以后每次获取直接从容器(map.get())中获取
//request 同一次请求创建一个实例(外网下使用)
//session 同一个session创建一个实例(外网下使用)
@Scope(“prototype”)//@Lazy 懒加载:主要针对单实例bean,单实例bean默认容器启动时就创建对象,懒加载是容器启动时不创建对象,第一次使用(获取)bean时才创建对象,并初始化
@Lazy- @Conditional() 按照一定条件进行判断,满足条件给容器中注册bean
/** * @Conditional() 按照一定条件进行判断,满足条件给容器中注册bean * 如果系统是windows,给容器注册WindowPerson * 如果系统是Linux,给容器注册LinuxPerson * 可放在方法 类上 */ @Conditional({WindowCondition.class}) //自己创建的Condition实现类,WindowCondition.class,是window系统才返回true,这里才加载到ioc容器中 @Bean public Person WindowPerson(){ return new Person("window",1); } @Conditional({LinuxCondition.class}) @Bean public Person LinuxPerson(){//自己创建的Condition实现类,LinuxPerson.class,是Linux系统才返回true,这里才加载到ioc容器中 return new Person("Linux",2); }- 1
- 2
- 3
- 4
- 5
- 6
- 7
- 8
- 9
- 10
- 11
- 12
- 13
- 14
- 15
- 16
package org.crayfish.spring.condition; import org.springframework.beans.factory.config.ConfigurableBeanFactory; import org.springframework.beans.factory.support.BeanDefinitionRegistry; import org.springframework.context.annotation.Condition; import org.springframework.context.annotation.ConditionContext; import org.springframework.core.env.Environment; import org.springframework.core.type.AnnotatedTypeMetadata; //判断是否是window系统 public class WindowCondition implements Condition { /** * * @param conditionContext 判断条件能使用的上下文(环境) * @param annotatedTypeMetadata 注释信息 * @return */ public boolean matches(ConditionContext conditionContext, AnnotatedTypeMetadata annotatedTypeMetadata) { //能获取到ioc使用的beanfactory ConfigurableBeanFactory configurableBeanFactory = conditionContext.getBeanFactory(); //获取类加载器 ClassLoader classLoader = conditionContext.getClassLoader(); //获取当前环境信息 Environment environment = conditionContext.getEnvironment(); //获取到bean定义的注册类 BeanDefinitionRegistry beanDefinitionRegistry = conditionContext.getRegistry(); String property = environment.getProperty("os.name"); if(property.contains("Windows")){ return true; } return false; } }- 1
- 2
- 3
- 4
- 5
- 6
- 7
- 8
- 9
- 10
- 11
- 12
- 13
- 14
- 15
- 16
- 17
- 18
- 19
- 20
- 21
- 22
- 23
- 24
- 25
- 26
- 27
- 28
- 29
- 30
- 31
- 32
- 33
- 34
- 35
package org.crayfish.spring.condition; import org.springframework.beans.factory.config.ConfigurableBeanFactory; import org.springframework.beans.factory.support.BeanDefinitionRegistry; import org.springframework.context.annotation.Condition; import org.springframework.context.annotation.ConditionContext; import org.springframework.core.env.Environment; import org.springframework.core.type.AnnotatedTypeMetadata; //判断是否是linux系统 public class LinuxCondition implements Condition { /** * * @param conditionContext 判断条件能使用的上下文(环境) * @param annotatedTypeMetadata 注释信息 * @return */ public boolean matches(ConditionContext conditionContext, AnnotatedTypeMetadata annotatedTypeMetadata) { //能获取到ioc使用的beanfactory ConfigurableBeanFactory configurableBeanFactory = conditionContext.getBeanFactory(); //获取类加载器 ClassLoader classLoader = conditionContext.getClassLoader(); //获取当前环境信息 Environment environment = conditionContext.getEnvironment(); //获取到bean定义的注册类 BeanDefinitionRegistry beanDefinitionRegistry = conditionContext.getRegistry(); String property = environment.getProperty("os.name"); if(property.contains("Linux")){ return true; } return false; } }- 1
- 2
- 3
- 4
- 5
- 6
- 7
- 8
- 9
- 10
- 11
- 12
- 13
- 14
- 15
- 16
- 17
- 18
- 19
- 20
- 21
- 22
- 23
- 24
- 25
- 26
- 27
- 28
- 29
- 30
- 31
- 32
- 33
- 34
- 35
- 36
- 37
测试类:
package org.crayfish.spring; import org.crayfish.spring.bean.Person; import org.crayfish.spring.config.MainConfig; import org.crayfish.spring.config.MainConfigOfLifeCycle; import org.junit.Test; import org.springframework.context.ApplicationContext; import org.springframework.context.annotation.AnnotationConfigApplicationContext; import org.springframework.core.env.ConfigurableEnvironment; import org.springframework.core.env.Environment; import java.util.Map; public class IOCTest { //指定主配置类MainConfig.class的地址,获取ioc容器 AnnotationConfigApplicationContext applicationContext = new AnnotationConfigApplicationContext(MainConfig.class); @Test public void test01(){ //查看容器中所有bean的名字 String[] names = applicationContext.getBeanDefinitionNames(); for (String name: names){ System.out.println(name); } } @Test public void test02(){ //查看容器中所有bean的名字 String[] nameForType = applicationContext.getBeanNamesForType(Person.class); for (String name: nameForType ) { System.out.println(name); } //获取ioc运行环境(操作系统) Environment configurableEnvironment = applicationContext.getEnvironment(); //获取操作系统名字 String property = configurableEnvironment.getProperty("os.name"); System.out.println(property); 查看容器中所有bean的Map对象,值 Map<String,Person> ofType = applicationContext.getBeansOfType(Person.class); System.out.println(ofType); } @Test public void testImport(){ printBean(applicationContext); //使用spring提供的 FactoryBean(工厂Bean) //获取的是工厂Bean 调用getObject创建的对象 Object bean = applicationContext.getBean("colorFactoryBean"); System.out.println(bean.getClass()); //& 获取工厂Bean本身 Object bean1 = applicationContext.getBean("&colorFactoryBean"); System.out.println(bean1.getClass()); } private void printBean(AnnotationConfigApplicationContext applicationContext){ String[] definitionNames = applicationContext.getBeanDefinitionNames(); for (String name:definitionNames ) { System.out.println(name); } } //在配置文件配置时获取的方法 // //获取类路径的配置文件,返回ioc容器ApplicationContext // ApplicationContext applicationContext = new ClassPathXmlApplicationContext("bean.xml"); // //获取ioc容器的id为person的类型bean // Person bean = (Person)applicationContext.getBean("person"); // System.out.println(bean); //注解配置时获取的方法 AnnotationConfigApplicationContext applicationContext = new AnnotationConfigApplicationContext(MainConfig.class); Object bean = applicationContext.getBean("Person"); System.out.println(bean); //测试是单实例还是多实例 System.out.println("ioc容器创建完成。。。"); Object bean1 = applicationContext.getBean("Person"); Object bean2 = applicationContext.getBean("Person"); System.out.println("bean1 == bean2"); System.out.println(bean1 == bean2); //获取Person bean的名字 // String[] nameForType = applicationContext.getBeanNamesForType(Person.class); // for (String name:nameForType // ) { // System.out.println(name); // // } }- 1
- 2
- 3
- 4
- 5
- 6
- 7
- 8
- 9
- 10
- 11
- 12
- 13
- 14
- 15
- 16
- 17
- 18
- 19
- 20
- 21
- 22
- 23
- 24
- 25
- 26
- 27
- 28
- 29
- 30
- 31
- 32
- 33
- 34
- 35
- 36
- 37
- 38
- 39
- 40
- 41
- 42
- 43
- 44
- 45
- 46
- 47
- 48
- 49
- 50
- 51
- 52
- 53
- 54
- 55
- 56
- 57
- 58
- 59
- 60
- 61
- 62
- 63
- 64
- 65
- 66
- 67
- 68
- 69
- 70
- 71
- 72
- 73
- 74
- 75
- 76
- 77
- 78
- 79
- 80
- 81
- 82
- 83
- 84
- 85
- 86
- 87
- 88
- 89
- 90
- 91
- 92
- 93
- 94
- 95
- 96
- 97
- 98
- 99
- 100
- 101
-
相关阅读:
多线程案例
NVIDIA TX2 与 维特 IMU CAN通信
【React一】React基础+组件化编程【ref+props+state】
A的闭包+B的闭包包含于A+B的闭包
区块链中的函数(solidity0.8.13)
那些利用假期学习的职场人,后来都怎么样了?
PHP 5 SimpleXML 函数
Nacos 配置中心底层原理(1.X版本)
Android 线程同步(一)
Python_面向对象
- 原文地址:https://blog.csdn.net/weixin_45703155/article/details/125829902
