-
FFmpeg抓取RTSP图像进行图像分析

前言
需求: 使用FFmpeg获取RTSP流,抓取其中的一帧图片进行图像分析。
闲聊:本来,我这个工具是要在ARM机器上进行使用的,最后因为库的原因,并没有使用FFmepg去抓取图片。而是采用了 去抓取图片,但这个工具有个较为致命的问题,就是每次要停止抓取图片,必须把抓图的对象删除(也许是我自己没找到好的方法,希望有知道的人可以在评论区指引一下噢!),每次要开启,再重新new,这是一种很不好的方法。
但在本篇文章,并不会使用上面说的那种不好的方法,以后有空也可以讲解一下这种方法,没准自己能想到方法进行改进。正文
一、环境
Win11+Qt5.15+MSVC2019+FFmpeg+OpenCV
FFmpeg的版本忘记了,应该是从网上下载的,这个网上下载个最新的版本,应该问题也不是很大。下载链接:https://ffmpeg.org/releases/?C=N;O=D
OpenCV的版本是我自己从网上下载的源码,可以参考这个链接进行下载:Ubuntu 16.04 + Qt 5.11 +opencv 3.4完美配置(亲测,最简单完美的方法)然后使用VS2019进行编译得到的库。如果你使用的不是MSVC2019而是MinGW,则要自己从新进行编译,网上找下教程,应该是挺容易的。然后,你再将编译好的include,bin,lib文件放在我当前的位置上,就可以了,或者,你自己放个位置,然后,pro文件中进行修改也是可以的。程序链接:
文件结构:

上图中的ffmpeg与opencv就是我放的所需要的库文件了,基本你只要环境跟我一样,应该是不用再下载,就可以直接打开Qt编译,编译后,会提示一些dll库没有,这个时候,你就把里面的ffmpeg和opencv里面的/bin文件夹中的dll文件拷贝放到你编译出来的exe文件中(一般是在build目录下),这样,应该编译就可以通过了。二、程序效果
三、FFmpeg抓取RTSP图片
- ffmpeg抓取图片的停止和开始是通过一个启动或终止一个线程来实现的。
/*线程*/ void VideoPlayer::startPlay() { //调用 QThread 的start函数 将会自动执行下面的run函数 run函数是一个新的线程 this->start(); } void VideoPlayer::stopPlay() { //调用 QThread 的start函数 将会自动执行下面的run函数 run函数是一个新的线程 // thread()->terminate(); // thread()->wait(); this->terminate(); this->wait(); }- 1
- 2
- 3
- 4
- 5
- 6
- 7
- 8
- 9
- 10
- 11
- 12
- 13
- 14
- 15
- 核心抓取图片的线程
/*线程*/ void VideoPlayer::run() { /*定义结构体 调用其成员函数*/ //输入数据缓存,视音频流个数 视音频流 文件名 时长 比特率 解封装等 AVFormatContext *pFormatCtx; AVCodecContext *pCodecCtx; AVCodec *pCodec;/*存储解码器信息*/ AVFrame *pFrame, *pFrameRGB;/*存储解码器信息*/ AVPacket *packet;/*数据包*/ static uint8_t *out_buffer; /*处理图片像素数据 图片像素格式转换 图片拉伸等 */ static struct SwsContext *img_convert_ctx; /*视频流*/ /*图像*/ int videoStream, i, numBytes; /*解码*/ /*解码成功*/ int ret, got_picture; avformat_network_init();//初始化FFmpeg网络模块 av_register_all();//初始化FFMPEG 调用了这个才能正常适用编码器和解码器(弃用函数) pFormatCtx = avformat_alloc_context();//初始化内存 //AVDictionary是FFmpeg的键值对存储工具,FFmpeg经常使用AVDictionary设置/读取内部参数 AVDictionary *avdic=NULL; char option_key[]="rtsp_transport"; char m_bTcp; av_dict_set(&avdic,option_key,m_bTcp ? "udp" : "tcp",0); char option_key2[]="stimeout"; char option_value2[]="3000000"; av_dict_set(&avdic, "buffer_size", "1024000", 0); //画质优化 av_dict_set(&avdic,option_key2,option_value2,0); //char url[]="rtsp://admin:123456@192.168.1.217/stream0";/*网络摄像头的数据*/ QByteArray ba=m_sUrlAddress.toLocal8Bit(); char* url = ba.data(); /*avformat_open_input函数*/ //参数一:指向用户提供的AVFormatContext(由avformat_alloc_context分配)的指针。 //参数二:要打开的流的url //参数三:fmt如果非空,则此参数强制使用特定的输入格式。否则6将自动检测格式。 //参数四:包含AVFormatContext和demuxer私有选项的字典。返回时,此参数将被销毁并替换为包含找不到的选项 if (avformat_open_input(&pFormatCtx, url, NULL, &avdic) != 0) //打开多媒体并获取信息 { printf("can't open the file. \n"); return; } if(avdic != NULL) { av_dict_free(&avdic); } qDebug()<<"--->z pFormatCtx->streams[videoStream]->codec"<<pFormatCtx->streams[0]->codec->codec_id; //获取视频流信息 /*avformat_find_stream_info函数*/ //参数一:媒体文件上下文。 //参数二:字典,一些配置选项。 /*媒体句柄*/ if (avformat_find_stream_info(pFormatCtx, NULL) < 0) { printf("Could't find stream infomation.\n"); return; } videoStream = -1;/*无视频流*/ //循环查找视频中包含的流信息,直到找到视频类型的流 /* pFormatCtx函数*/ //unsigned int nb_streams 当前的流数量 //AVStream **streams; 指针数组 视频流和语音流*/ for (i = 0; i < pFormatCtx->nb_streams; i++) { qDebug()<<"--->z run1"<<pFormatCtx->streams[i]->codec->codec_type; if (pFormatCtx->streams[i]->codec->codec_type == AVMEDIA_TYPE_VIDEO)//codec弃用函数 { videoStream = i; } } //如果videoStream为-1 说明没有找到视频流 if (videoStream == -1) { printf("Didn't find a video stream.\n"); return; } //打印流信息 //注意:最后一个参数填0,打印输入流;最后一个参数填1,打印输出流 av_dump_format(pFormatCtx, 0, url,0); //查找解码器,获取指向视频流的编解码器上下文的指针 pCodecCtx = pFormatCtx->streams[videoStream]->codec; //通过解封装之后从avstream结构体里获取CodecID(指定格式流) pCodec = avcodec_find_decoder(pCodecCtx->codec_id); qDebug()<<"--->z CVlcCameraCapture::run()2"<<pCodec<<pCodecCtx->codec_id<<pCodec<<videoStream; //设置编码器参数(不同参数对视频编质量或大小的影响) pCodecCtx->bit_rate =0; //初始化为0 比特率 pCodecCtx->time_base.num=1; //下面两行:一秒钟25帧 pCodecCtx->time_base.den=25; pCodecCtx->frame_number=1; //每包一个视频帧 /*编码器如果等于NULL 编码器没有找到*/ if (pCodec == NULL) { printf("Codec not found.\n"); return; } //打开解码器 if (avcodec_open2(pCodecCtx, pCodec, NULL) < 0) { printf("Could not open codec.\n"); return; } pFrame = av_frame_alloc(); //创建 存储解码器信息*/ pFrameRGB = av_frame_alloc(); //创建 存储解码器信息*/ //解码后的h264数据转换成RGB32 img_convert_ctx = sws_getContext(pCodecCtx->width, pCodecCtx->height, pCodecCtx->pix_fmt, pCodecCtx->width, pCodecCtx->height, AV_PIX_FMT_RGB32, SWS_BICUBIC, NULL, NULL, NULL); //图像的像素格式 图像的像素宽度 图像的像素高度(计算这个格式的图片,需要多少字节来存储) numBytes = avpicture_get_size(AV_PIX_FMT_RGB32, pCodecCtx->width,pCodecCtx->height);//(弃用函数) qDebug() << numBytes; //需要多少字节来存储 out_buffer = (uint8_t *) av_malloc(numBytes * sizeof(uint8_t)); /*瓜分分配的空间*/ //瓜分上一步分配到的buffer. av_image_fill_arrays(pFrameRGB->data, pFrameRGB->linesize, out_buffer, AV_PIX_FMT_RGB32, pCodecCtx->width, pCodecCtx->height, 1); int y_size = pCodecCtx->width * pCodecCtx->height; packet = (AVPacket *) malloc(sizeof(AVPacket)); //申请一个视频帧包的大小 av_new_packet(packet, y_size); //分配packet的数据,为packet分配一个指定大小的内存 int as = 0; while (1) { //av_read_frame //返回流的下一帧。此函数返回存储在文件中的内容,不对有效的帧进行验证。获取存储在文件中的帧中, //并为每个调用返回一个。不会的省略有效帧之间的无效数据,以便给解码器最大可用于解码的信息。 //返回0是成功,小于0则是错误,大于0则是文件末尾,所以大于等于0是返回成功 //每解码一个视频帧,需要先调用 av_read_frame()获得一帧视频的压缩数据,然后才能对该数据进行解码 if (av_read_frame(pFormatCtx, packet) < 0) { qDebug("a == %d\n",++as); if(as == 4) { qDebug(" 连接异常结束\n"); thread()->terminate(); thread()->wait(); this->terminate(); this->wait(); } continue; } if(as != 0) { as = 0; } if (packet->stream_index == videoStream) { ret = avcodec_send_packet(pCodecCtx, packet); //发送数据到ffmepg,放到解码队列中 got_picture = avcodec_receive_frame(pCodecCtx, pFrame); //将成功的解码队列中取出1个frame if (ret < 0) { usleep(1000); printf("decode error.\n"); continue; } if (!got_picture) { //颜色空间转换,最后输出到out_buffer sws_scale(img_convert_ctx,(uint8_t const * const *) pFrame->data, pFrame->linesize, 0, pCodecCtx->height, pFrameRGB->data, pFrameRGB->linesize);//sws_scale库可以在一个函数里面同时实现:1.图像色彩空间转换;2.分辨率缩放;3.前后图像滤波处理。 //把这个RGB数据 用QImage加载 QImage tmpImg((uchar *)out_buffer,pCodecCtx->width,pCodecCtx->height,QImage::Format_RGB32); QImage image = tmpImg.copy(); //把图像复制一份 传递给界面显示 emit sig_GetOneFrame(image); //发送信号 } } //释放一个包。 av_free_packet(packet); //释放资源,否则内存会一直上升(弃用函数) av_packet_unref(packet); memset(out_buffer,0,sizeof(out_buffer)); } av_free(out_buffer); av_free(pFrameRGB); avcodec_close(pCodecCtx);//关闭给定的avcodeContext并释放与之关联的所有数据 if(NULL != pCodecCtx){ avcodec_free_context(&pCodecCtx); avdic = NULL; } if(NULL != pFormatCtx){ avformat_close_input(&pFormatCtx);//关闭打开的输入pFormatCtx。释放它和它的所有内容并设置为空。 pFormatCtx = NULL; } }- 1
- 2
- 3
- 4
- 5
- 6
- 7
- 8
- 9
- 10
- 11
- 12
- 13
- 14
- 15
- 16
- 17
- 18
- 19
- 20
- 21
- 22
- 23
- 24
- 25
- 26
- 27
- 28
- 29
- 30
- 31
- 32
- 33
- 34
- 35
- 36
- 37
- 38
- 39
- 40
- 41
- 42
- 43
- 44
- 45
- 46
- 47
- 48
- 49
- 50
- 51
- 52
- 53
- 54
- 55
- 56
- 57
- 58
- 59
- 60
- 61
- 62
- 63
- 64
- 65
- 66
- 67
- 68
- 69
- 70
- 71
- 72
- 73
- 74
- 75
- 76
- 77
- 78
- 79
- 80
- 81
- 82
- 83
- 84
- 85
- 86
- 87
- 88
- 89
- 90
- 91
- 92
- 93
- 94
- 95
- 96
- 97
- 98
- 99
- 100
- 101
- 102
- 103
- 104
- 105
- 106
- 107
- 108
- 109
- 110
- 111
- 112
- 113
- 114
- 115
- 116
- 117
- 118
- 119
- 120
- 121
- 122
- 123
- 124
- 125
- 126
- 127
- 128
- 129
- 130
- 131
- 132
- 133
- 134
- 135
- 136
- 137
- 138
- 139
- 140
- 141
- 142
- 143
- 144
- 145
- 146
- 147
- 148
- 149
- 150
- 151
- 152
- 153
- 154
- 155
- 156
- 157
- 158
- 159
- 160
- 161
- 162
- 163
- 164
- 165
- 166
- 167
- 168
- 169
- 170
- 171
- 172
- 173
- 174
- 175
- 176
- 177
- 178
- 179
- 180
- 181
- 182
- 183
- 184
- 185
- 186
- 187
- 188
- 189
- 190
- 191
- 192
- 193
- 194
- 195
- 196
- 197
- 198
- 199
- 200
- 201
- 202
- 203
- 204
- 205
上面的注释应该是写的很清楚了,如果还不清楚,可以看下以下的这张图。
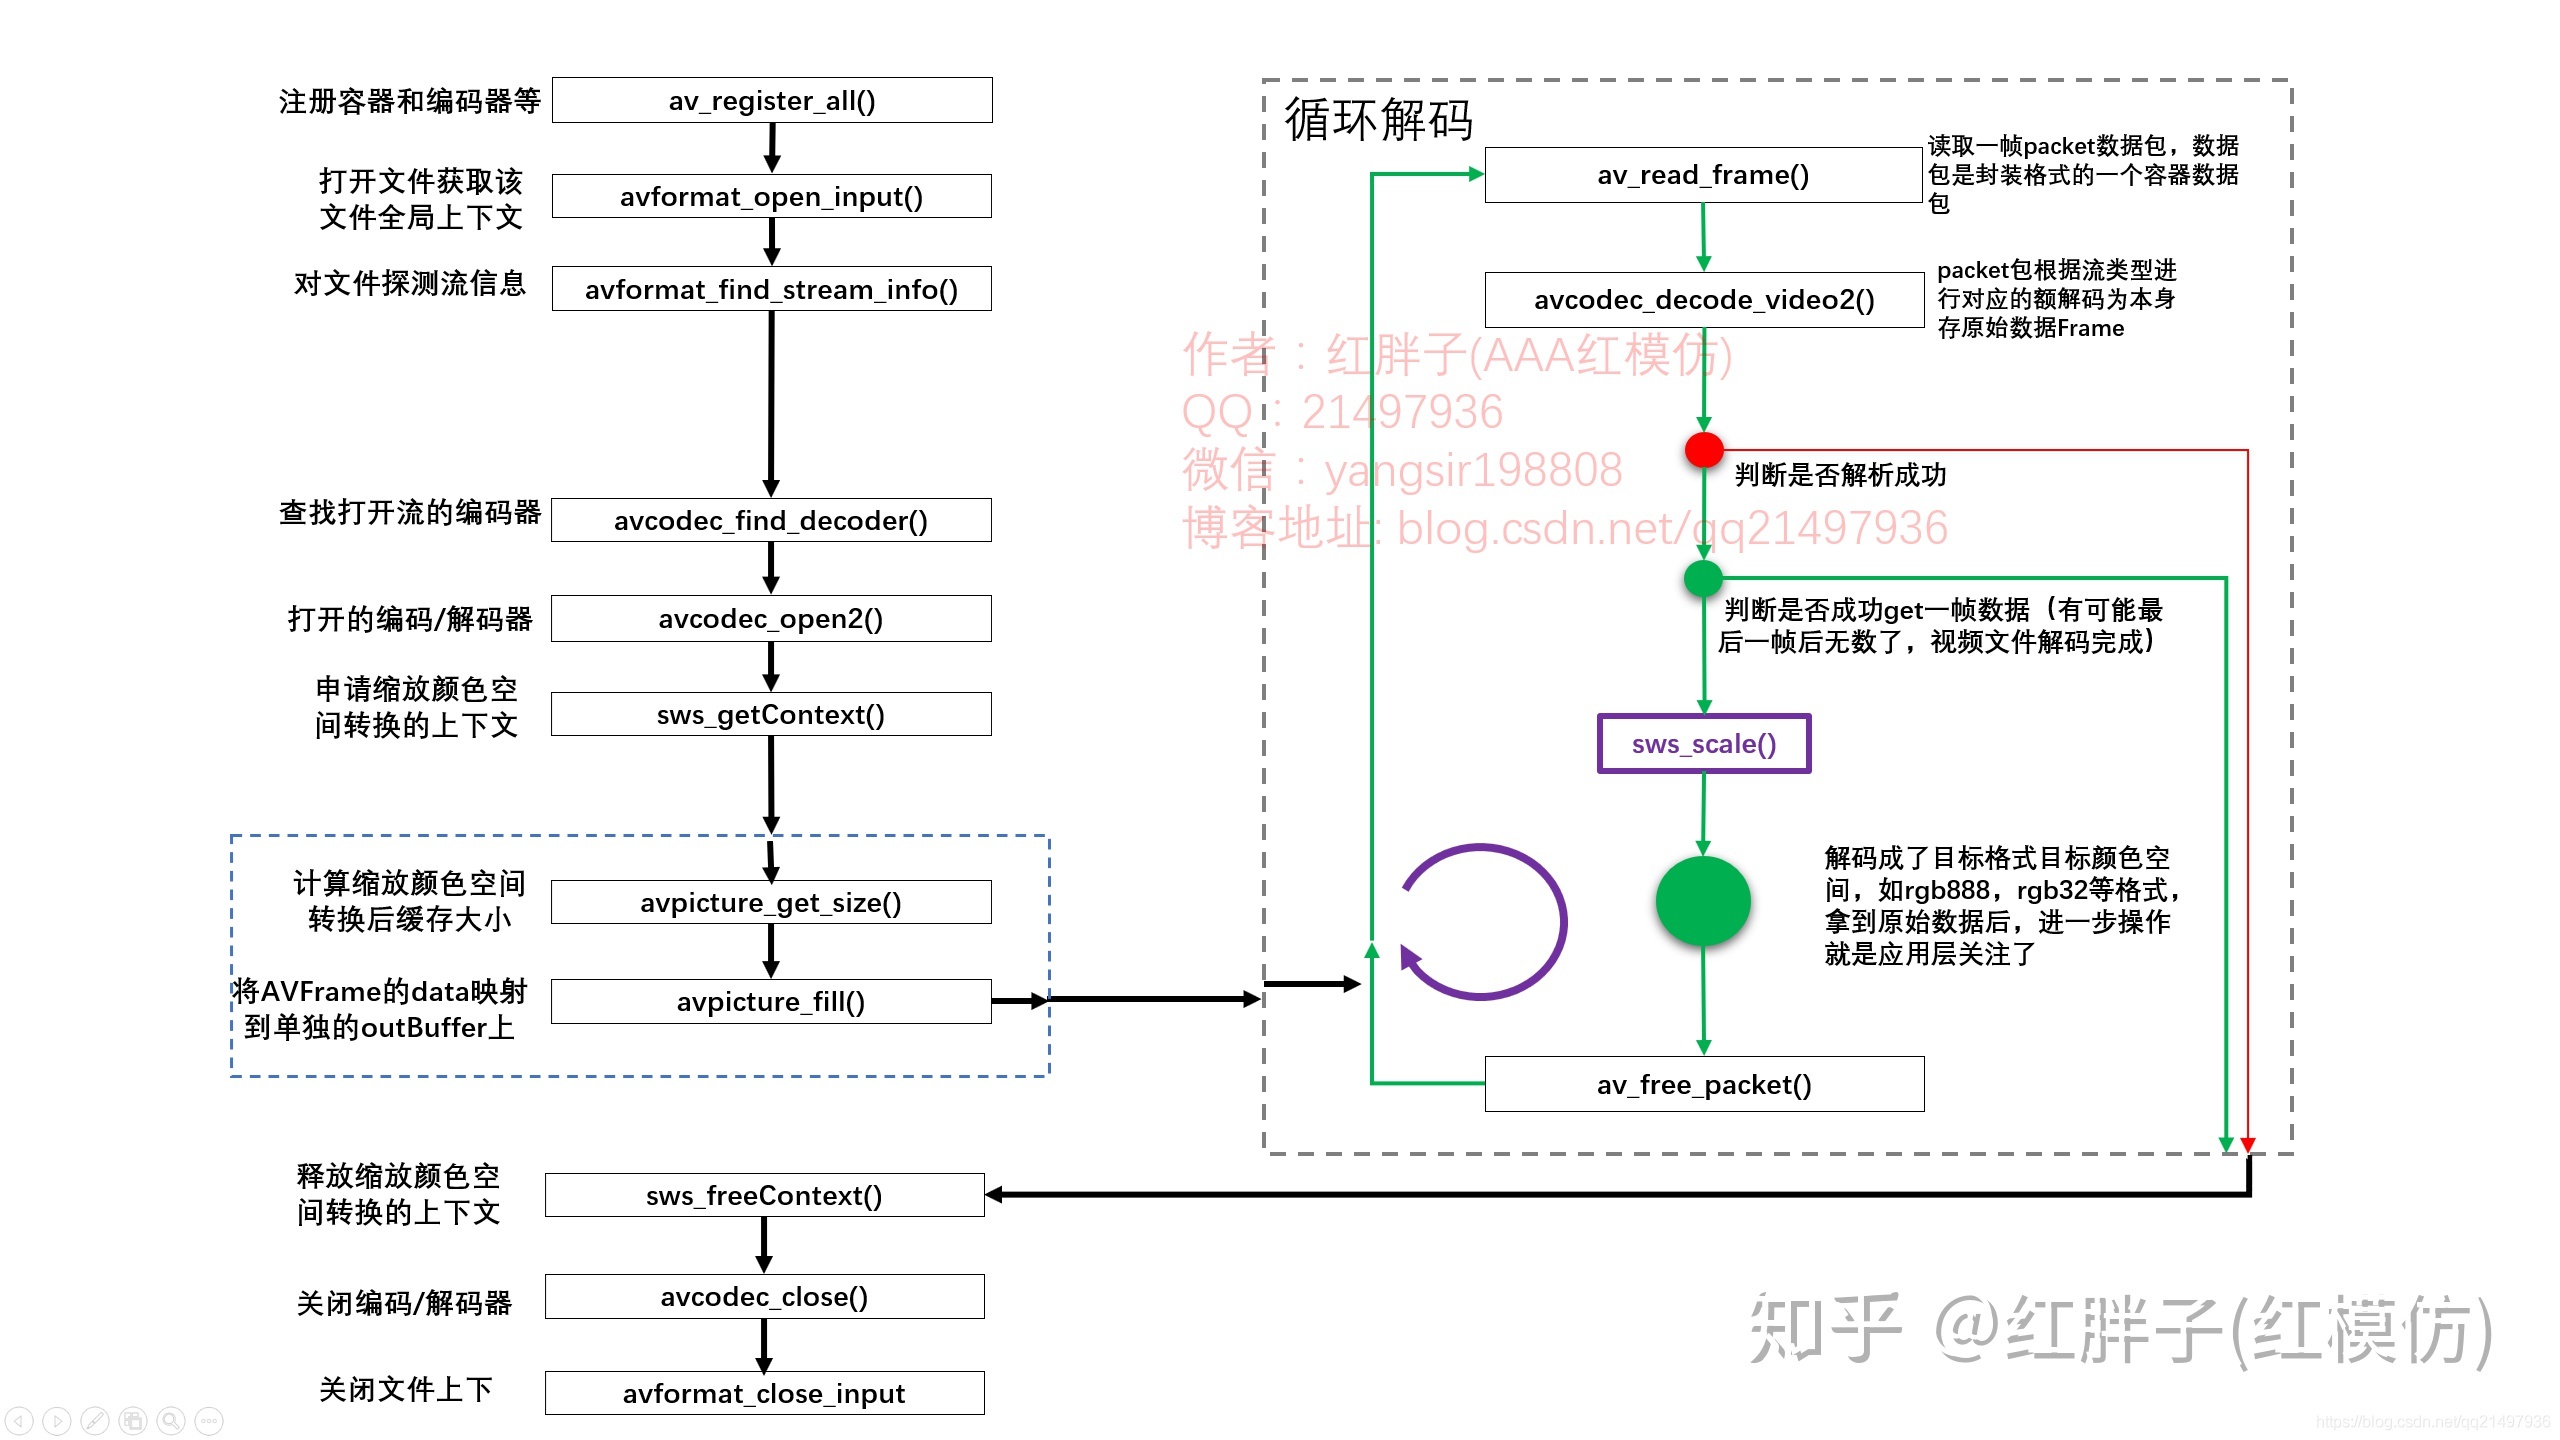
基本上这个流程还是比较入门的,值得记忆以下。四、图像抓取到后,进行图像分析
参考
FFmpeg
- FFmpeg 解码音视频实例及碰到的问题记录(二)
- 海康、大华网络摄像机RTSP URL格式组成及参数配置
- ffmpeg解码器使用
- ffmpeg 下载链接
- Linux下交叉编译FFMPEG与X264库:目标板友善之臂Tiny4412开发板_EXYNOS4412(ARMV7_32位)
- ubuntu下交叉编译X264和FFMPEG到RK3399平台(编译器:aarch64-linux-gcc)
OpenCV
-
相关阅读:
ElasticSearch 文档数据导入导出及两个ElasticSearch互相导入操作
gcc解决Linux多个动态库间的符号冲突问题
华为ensp模拟器 配置ACL访问控制列表
2022前端面试—js+vue篇(持续更新)
大数据基础之-深入理解java的注解与反射
MySQL中USER()和CURRENT_USER()的区别
差分详解(附加模板和例题)
运维 之 一键部署Tomcat
批量检测url是否存在cdn—高准确率
下载调试器 JTAG和SWD
- 原文地址:https://blog.csdn.net/qq_43211060/article/details/125564772