-
26-SpringBoot 缓存
1.相关概念
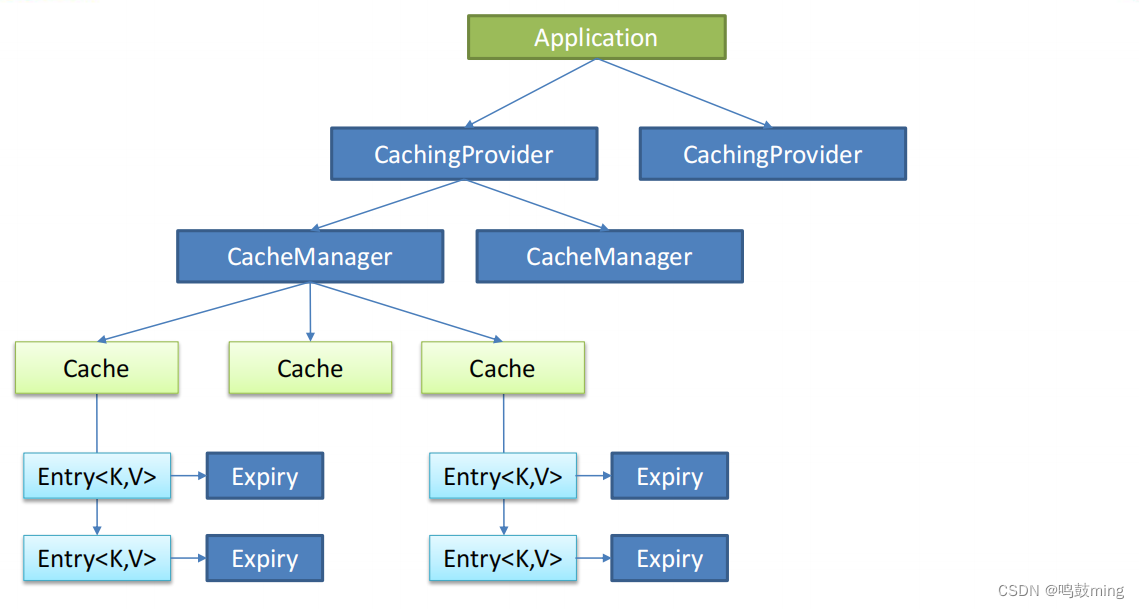
Java Caching定义了5个核心接口,分别是CachingProvider, CacheManager, Cache, Entry和 Expiry。
• CachingProvider定义了创建、配置、获取、管理和控制多个CacheManager。一个应用可以在运行期访问多个CachingProvider。
• CacheManager定义了创建、配置、获取、管理和控制多个唯一命名的Cache,这些Cache存在于CacheManager的上下文中。一个CacheManager仅被一个CachingProvider所拥有。
• Cache是一个类似Map的数据结构并临时存储以Key为索引的值。一个Cache仅被一个CacheManager所拥有。
• Entry是一个存储在Cache中的key-value对。
• Expiry 每一个存储在Cache中的条目有一个定义的有效期。一旦超过这个时间,条目为过期的状态。一旦过期,条目将不可访问、更新和删除。缓存有效期可以通过ExpiryPolicy设置。
Spring从3.1开始定义了org.springframework.cache.Cache和org.springframework.cache.CacheManager接口来统一不同的缓存技术;并支持使用JCache(JSR-107)注解简化我们开发;
• Cache接口为缓存的组件规范定义,包含缓存的各种操作集合;
• Cache接口下Spring提供了各种xxxCache的实现;如RedisCache,EhCacheCache , ConcurrentMapCache等;
• 每次调用需要缓存功能的方法时,Spring会检查检查指定参数的指定的目标方法是否已经被调用过;如果有就直接从缓存中获取方法调用后的结果,如果没有就调用方法并缓存结果后返回给用户。下次调用直接从缓存中获取。
• 使用Spring缓存抽象时我们需要关注以下两点:
1、确定方法需要被缓存以及他们的缓存策略
2、从缓存中读取之前缓存存储的数据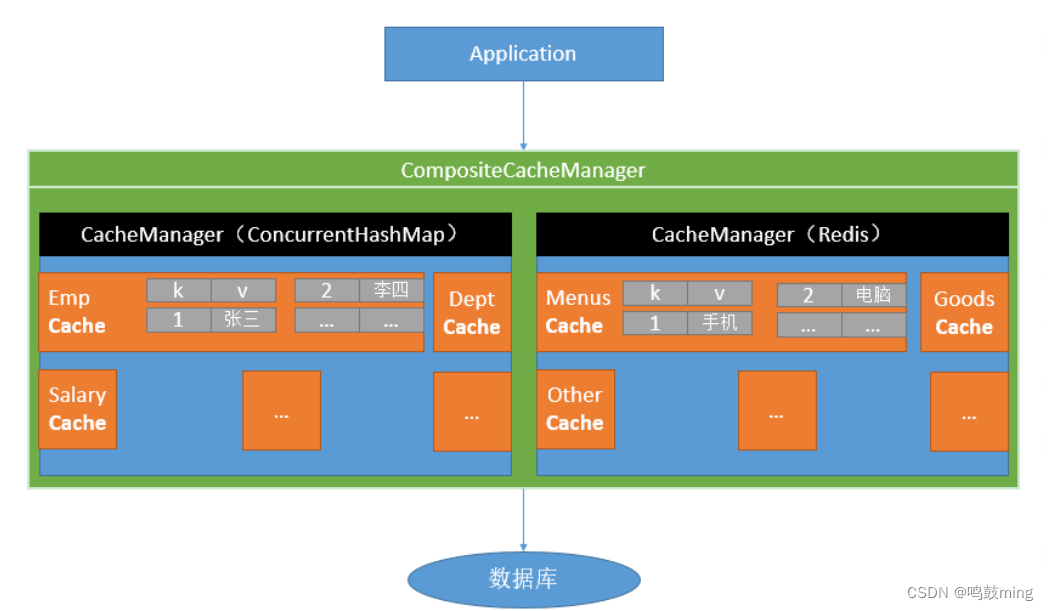
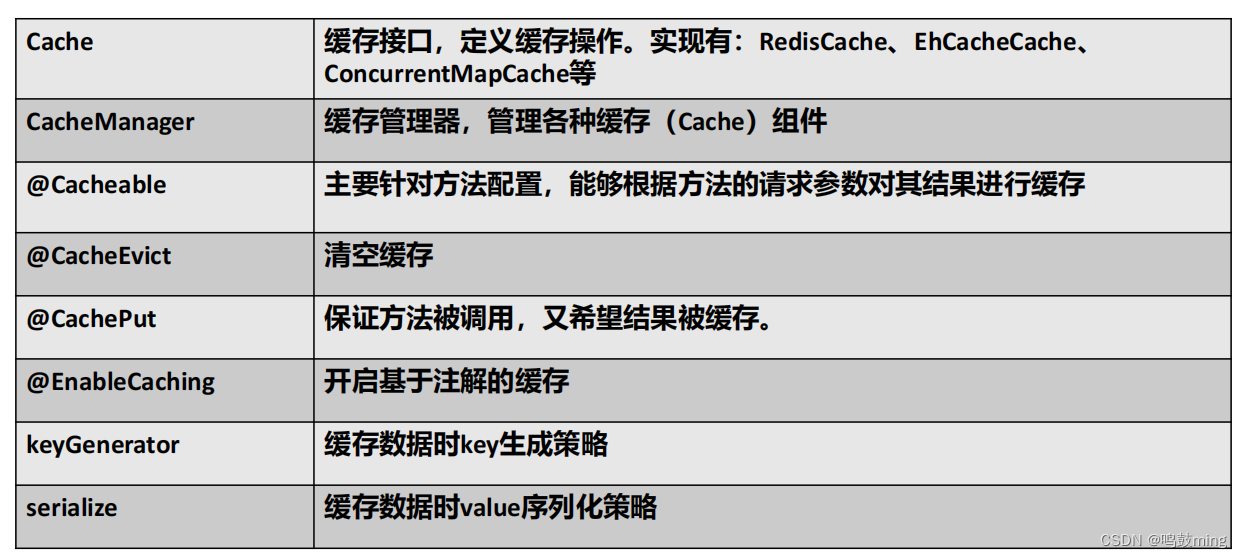
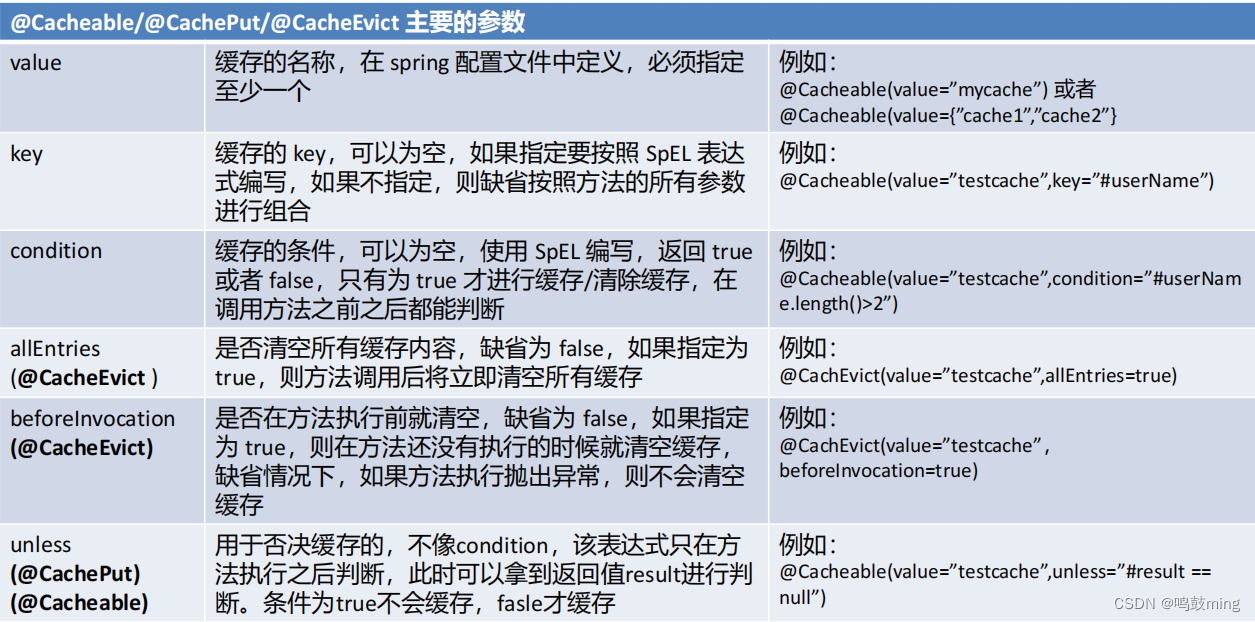
2.缓存注解
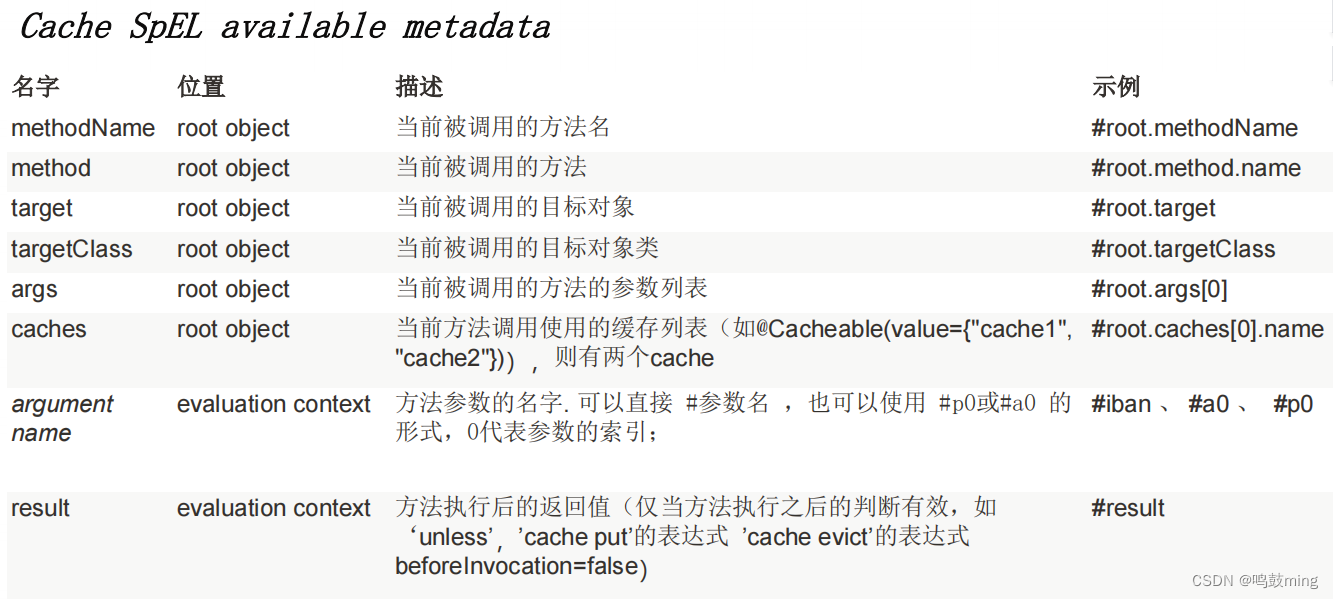
3.使用缓存
数据库表
CREATE TABLE `t_user` ( `id` bigint(20) NOT NULL AUTO_INCREMENT, `user_name` varchar(50) DEFAULT NULL, `pass_word` varchar(50) DEFAULT NULL, PRIMARY KEY (`id`) ) ENGINE=InnoDB AUTO_INCREMENT=11 DEFAULT CHARSET=utf8mb4- 1
- 2
- 3
- 4
- 5
- 6
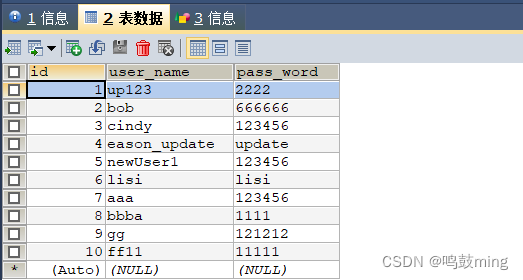
1.引入第三方缓存redis
提示:因为SpringBoot自带有缓存, 也可以不引入redis
添加依赖
<dependency> <groupId>com.baomidou</groupId> <artifactId>mybatis-plus-boot-starter</artifactId> <version>3.4.1</version> </dependency> <dependency> <groupId>mysql</groupId> <artifactId>mysql-connector-java</artifactId> <version>5.1.6</version> </dependency> <dependency> <groupId>org.springframework.boot</groupId> <artifactId>spring-boot-starter-data-redis</artifactId> </dependency>- 1
- 2
- 3
- 4
- 5
- 6
- 7
- 8
- 9
- 10
- 11
- 12
- 13
- 14
application.properties
server.port=8080 #----------------------------配置数据库--------------------------- spring.datasource.url=jdbc:mysql://localhost:3306/db_springtest?useUnicode=true&characterEncoding=utf8 spring.datasource.username=root spring.datasource.password=123456 spring.datasource.driver-class-name=com.mysql.jdbc.Driver #----------------------------配置mybatis-plus--------------------------- #配置sql文件路径 mybatis-plus.mapper-locations=classpath:/mapper/*.xml #开启驼峰命名映射 mybatis-plus.configuration.map-underscore-to-camel-case=true ## 自定义sql中表名带前缀, 默认是实体名的小写, 如user, 但是数据库中是t_user, 所以设置加上前缀 mybatis-plus.global-config.db-config.table-prefix=t_ #-----redis配置---------- spring.redis.host=127.0.0.1 spring.redis.port=6379 # Redis数据库索引(默认为0) spring.redis.database=0 #没有设用户名和密码 #spring.redis.username=root #spring.redis.password=123456 #连接超时时间(毫秒) spring.redis.timeout=1800000 #连接池最大连接数(使用负值表示没有限制) spring.redis.lettuce.pool.max-active=20 #最大阻塞等待时间(负数表示没限制) spring.redis.lettuce.pool.max-wait=-1 #连接池中的最大空闲连接 spring.redis.lettuce.pool.max-idle=5 #连接池中的最小空闲连接 spring.redis.lettuce.pool.min-idle=0- 1
- 2
- 3
- 4
- 5
- 6
- 7
- 8
- 9
- 10
- 11
- 12
- 13
- 14
- 15
- 16
- 17
- 18
- 19
- 20
- 21
- 22
- 23
- 24
- 25
- 26
- 27
- 28
- 29
- 30
- 31
- 32
- 33
- 34
- 35
- 36
- 37
2.编写代码
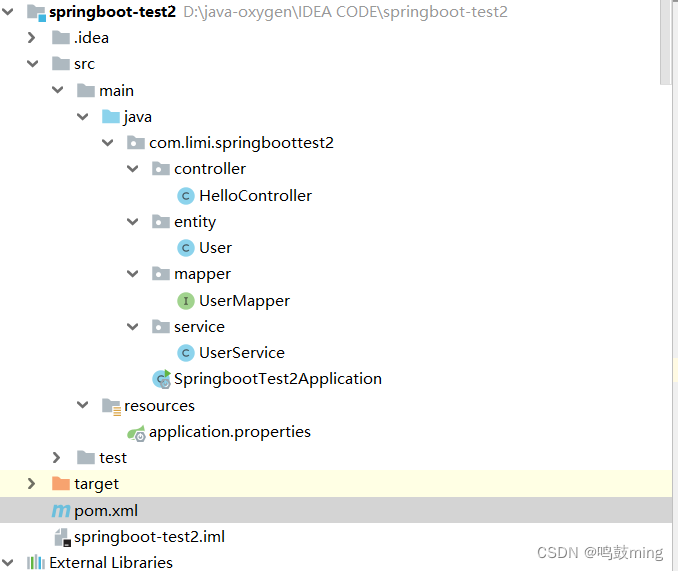
SpringbootTest2Application
package com.limi.springboottest2; import org.mybatis.spring.annotation.MapperScan; import org.springframework.boot.SpringApplication; import org.springframework.boot.autoconfigure.SpringBootApplication; import org.springframework.cache.annotation.EnableCaching; import org.springframework.context.ConfigurableApplicationContext; @EnableCaching //开启缓存, 可以标注在配置类上,或者启动类上 @SpringBootApplication @MapperScan(basePackages = "com.limi.springboottest2.mapper") public class SpringbootTest2Application { ; public static void main(String[] args) { //1、返回我们IOC容器 ConfigurableApplicationContext run = SpringApplication.run(SpringbootTest2Application.class, args); } }- 1
- 2
- 3
- 4
- 5
- 6
- 7
- 8
- 9
- 10
- 11
- 12
- 13
- 14
- 15
- 16
- 17
- 18
- 19
- 20
- 21
User
package com.limi.springboottest2.entity; import lombok.AllArgsConstructor; import lombok.Data; import lombok.NoArgsConstructor; import java.io.Serializable; @Data @AllArgsConstructor @NoArgsConstructor public class User implements Serializable { private Integer id; private String userName; private String passWord; }- 1
- 2
- 3
- 4
- 5
- 6
- 7
- 8
- 9
- 10
- 11
- 12
- 13
- 14
- 15
- 16
- 17
- 18
- 19
- 20
UserMapper
package com.limi.springboottest2.mapper; import com.baomidou.mybatisplus.core.mapper.BaseMapper; import com.limi.springboottest2.entity.User; import org.springframework.stereotype.Repository; @Repository public interface UserMapper extends BaseMapper<User> { }- 1
- 2
- 3
- 4
- 5
- 6
- 7
- 8
- 9
- 10
UserService
package com.limi.springboottest2.service; import com.limi.springboottest2.entity.User; import com.limi.springboottest2.mapper.UserMapper; import org.springframework.beans.factory.annotation.Autowired; import org.springframework.cache.annotation.CacheConfig; import org.springframework.cache.annotation.CacheEvict; import org.springframework.cache.annotation.CachePut; import org.springframework.cache.annotation.Cacheable; import org.springframework.stereotype.Service; @Service @CacheConfig(cacheNames = "user") //指定缓存组件的名字, 类似于存储分区 public class UserService { @Autowired private UserMapper userMapper; //默认执行方法前先查缓存, 缓存中没有对应数据才执行方法去查数据库, 然后数据存入数据库中key = "user["+"#id"+"]", @Cacheable(key = "#id",value = "user") //key = "user[i]" public User getUserById(Integer id){ System.out.println("执行getUserById......"); User user = userMapper.selectById(id); return user; } //默认方法执行后更新缓存 @CachePut(key="#user.id",value = "user") public int updateUserById(User user){ int res = userMapper.updateById(user); return res; } //默认方法执行后清楚缓存 @CacheEvict(key="#id") public int deleteUserById(Integer id){ int res = userMapper.deleteById(id); return res; } }- 1
- 2
- 3
- 4
- 5
- 6
- 7
- 8
- 9
- 10
- 11
- 12
- 13
- 14
- 15
- 16
- 17
- 18
- 19
- 20
- 21
- 22
- 23
- 24
- 25
- 26
- 27
- 28
- 29
- 30
- 31
- 32
- 33
- 34
- 35
- 36
- 37
- 38
- 39
- 40
- 41
- 42
- 43
- 44
- 45
- 46
HelloController
package com.limi.springboottest2.controller; import com.limi.springboottest2.entity.User; import com.limi.springboottest2.service.UserService; import org.springframework.beans.factory.annotation.Autowired; import org.springframework.stereotype.Controller; import org.springframework.web.bind.annotation.GetMapping; import org.springframework.web.bind.annotation.PathVariable; import org.springframework.web.bind.annotation.PostMapping; import org.springframework.web.bind.annotation.ResponseBody; @Controller public class HelloController { @Autowired private UserService userService; @ResponseBody @GetMapping("/get/{id}") public User get(@PathVariable("id") Integer id){ User user = userService.getUserById(id); return user; } @ResponseBody @PostMapping("/update") public int update(User user){ int res = userService.updateUserById(user); return res; } @ResponseBody @PostMapping("/delete/{id}") public int delete(@PathVariable("id") Integer id){ int res = userService.deleteUserById(id); return res; } }- 1
- 2
- 3
- 4
- 5
- 6
- 7
- 8
- 9
- 10
- 11
- 12
- 13
- 14
- 15
- 16
- 17
- 18
- 19
- 20
- 21
- 22
- 23
- 24
- 25
- 26
- 27
- 28
- 29
- 30
- 31
- 32
- 33
- 34
- 35
- 36
- 37
- 38
- 39
3.测试
初始redis中没有数据

多次点击请求
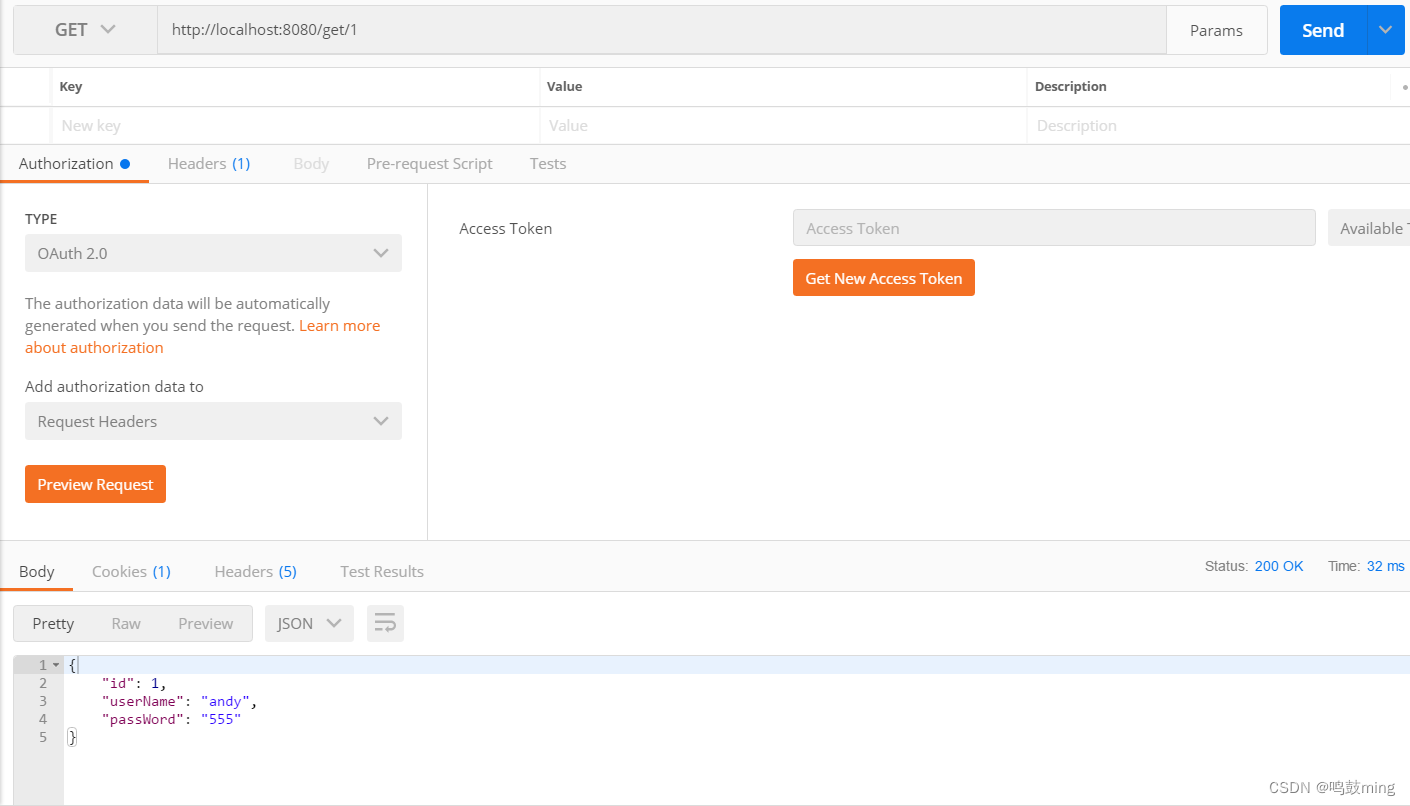
数据库查询只执行一次
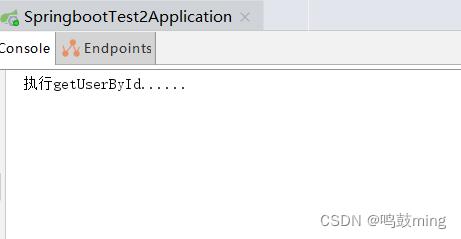
因为redis缓存中有数据
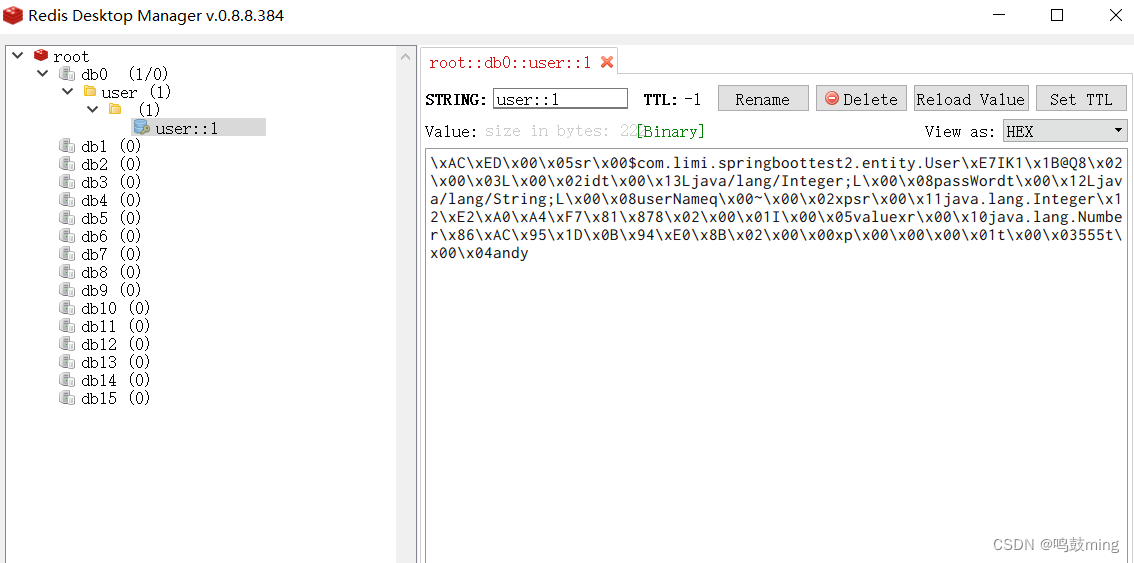
-
相关阅读:
MES管理系统的应用和好处有哪些
Ubuntu - 安装 MySQL 8
K8S集群master节点打污点:可让master节点参与pod调度
编译一日一练(DIY系列之汇编输出)
解决“您点击的链接已过期”;The Link You Followed Has Expired的问题
pr为什么要remove assign?
每日刷题记录 (十)
如何将图片进行竖直拼接(全景拼接)
Visual Studio 2019光标变成灰色方块问题
Vue----单文件组件
- 原文地址:https://blog.csdn.net/qq_41865229/article/details/125544298
