-
Vue3 + TypeSciprt+Vant 项目框架构建
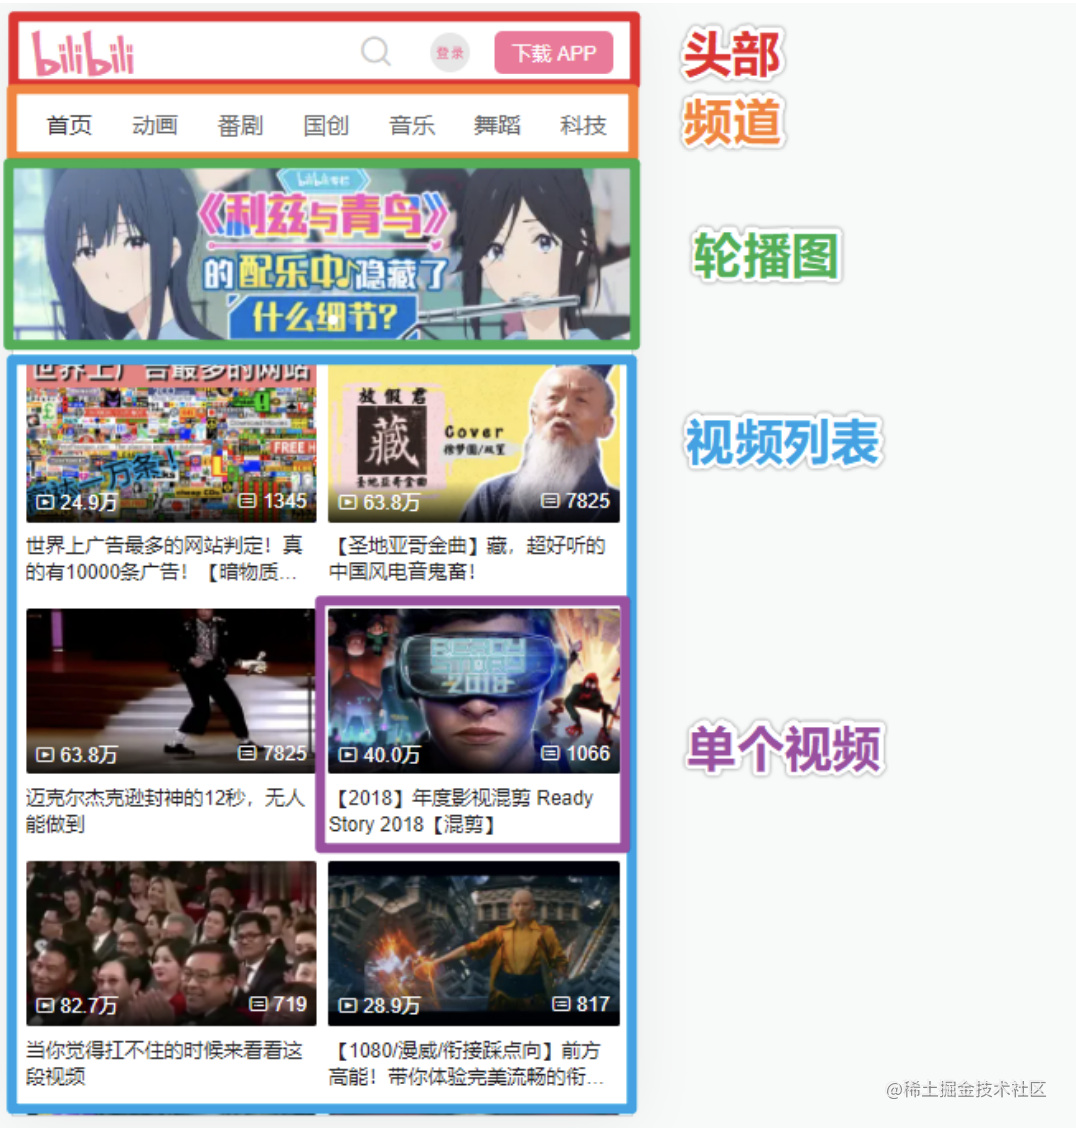
哔哩哔哩移动端 - 项目实战
前言
- 今年8月,Vue3.2 终于定稿了
项目实现效果图:
[外链图片转存失败,源站可能有防盗链机制,建议将图片保存下来直接上传(img-ApjGDxQM-1655734119007)(https://p1-juejin.byteimg.com/tos-cn-i-k3u1fbpfcp/4bcd5ea8327c4b2d855e1acb1f9d9975~tplv-k3u1fbpfcp-zoom-in-crop-mark:1956:0:0:0.image?)]
用到的技术
- Vue Cli cli.vuejs.org/zh/guide/in…
- Vue3.2 v3.cn.vuejs.org/
- VueRouter4 next.router.vuejs.org/zh/guide/
- Vant 3 组件库 vant-contrib.gitee.io/vant/v3/#/z…
- TypeScript www.typescriptlang.org/zh/play
- Axios 请求库
- Volar 插件
- VueDevtools 调试工具
Vue3 + TypeSciprt 开发环境准备^
VScode 安装 Volar

Chrome 安装 vue3_devtools^
-
浏览器地址栏输入 chrome://extensions/
-
右上角开发者模式 - 打开开关。
-
把 vue3_devtools.crx 拖放进去安装。(vue3_devtools.crx评论区的文件里包含有)
创建 Vue3+TypeScript 项目
使用 @vue/cli 创建项目
打开终端工具,输入 vue create 项目名称 创建 Vue3 + TS项目
vue create vue3-ts- 1
温馨提醒:如果创建失败,需要提前安装 @vue/cli 脚手架工具,才能通过以上命令创建项目。 如何安装 @vue/cli 官方教程: cli.vuejs.org/zh/guide/in…
Vue3 + TypeScript 配置如下图:

清理项目多余文件
操作步骤
- 删除 assets 文件夹下所有文件
- 删除 components 文件夹下所有文件
- 删除 views 文件夹下所有文件
新建两个页面
- 新建首页 src\views\Home\index.vue
<template> <h1>Bilibili 主页</h1> <router-link to="/video/1">点我去视频详情页</router-link> </template>- 1
- 2
- 3
- 4
- 新建视频详情页 src\views\Video\index.vue
<template> <h2>视频详情页</h2> <router-link to="/">点我回首页</router-link> </template>- 1
- 2
- 3
- 4
修改路由文件:src/router/index.ts 文件内容
import { createRouter, createWebHashHistory, RouteRecordRaw } from 'vue-router' const routes: Array<RouteRecordRaw> = [ { path: '/', component: () => import('@/views/Home/index.vue') }, { path: '/video/:id', component: () => import('@/views/Video/index.vue') } ] const router = createRouter({ history: createWebHashHistory(), routes }) export default router- 1
- 2
- 3
- 4
- 5
- 6
- 7
- 8
- 9
- 10
- 11
- 12
- 13
- 14
- 15
- 16
修改 src/App.vue 文件内容
<template> <router-view/> </template>- 1
- 2
- 3
这样就可以看见我们新建的首页页面了。
运行 Vue3 + TS 项目
打开终端工具,输入 npm run serve 即可运行项目。
npm run serve- 1
项目素材准备
前言
评论区里提供了项目 图片素材 和 样式文件,下载直接使用就可。
操作步骤
把素材文件夹中的 assets 文件夹移动到项目中,覆盖项目的 src\assets 文件夹。
项目入口素材样式
项目入口文件 src\main.ts 里导入base.less、iconfont.less文件:
import { createApp } from 'vue' import App from './App.vue' import router from './router' //新导入文件: import '@/assets/styles/base.less' import '@/assets/styles/iconfont.less' const app = createApp(App) app.use(router) app.mount('#app')- 1
- 2
- 3
- 4
- 5
- 6
- 7
- 8
- 9
- 10
项目首页
前言
- 首页按组件划分功能模块。
页面组件分析
根据页面分析新建首页三个组件备用
- 频道组件:src\views\Home\components\home-channel.vue
- 轮播组件:src\views\Home\components\home-swipe.vue
- 视频列表组件:src\views\Home\components\home-video-list.vue
温馨提醒:新建三个文件备用即可,组件里面暂时不需要写入内容。

首页 - 头部组件
组件素材准备
- 头部组件为公共组件,主要是静态结构。
- 此项目提供了头部组件和单个视频组件的静态结构素材。
- 把素材文件夹中的 components 文件夹移动到项目中,覆盖项目的 src\components 组件文夹。
修改项目首页
- 组件素材复制到项目后,在项目首页中即可使用头部组件。
- 文件路径:src\views\Home\index.vue
<template> <!-- <h1>Bilibili 主页</h1> --> <!-- <router-link to="/video/1">点我去视频详情页</router-link> --> <!-- 新增头部组件 --> <AppHeader /> </template> <script setup lang="ts"> // script setup 只需要导入组件,无需注册 import AppHeader from '@/components/app-header.vue' </script>- 1
- 2
- 3
- 4
- 5
- 6
- 7
- 8
- 9
- 10
- 11
恭喜你已经学会在 Vue3 项目中如何导入组件和使用组件啦,为自己鼓掌。👏
此时的项目截图如下:
首页 - 频道组件
前言
前端领域有很多成熟的组件库可以提高我们的开发效率,频道模块我们使用组件库快速实现。⚡
Vant 是 有赞前端团队 开源的移动端组件库,Vant 官方提供了 Vue3 版本,感谢有赞前端团队的贡献。🎉
安装组件库
打开终端工具,输入 npm i vant@next 即可安装,vant@next 表示安装最新版 Vant 3。
npm i vant@next- 1
配置按需引入组件 - 重点难点 💥
- 移动端项目用不上所有的 Vant 组件,全部引入会让项目变大,会导致用户浏览速度收到严重影响。
- 🔔我们的项目是按需引入 Vant 组件,但是需要额外的配置才可以。
- 打开终端工具,安装 babel-plugin-import 插件。
npm i babel-plugin-import -D- 1
- 在项目babel.config.js 中添加配置
module.exports = { presets: [ '@vue/cli-plugin-babel/preset' ], plugins: [ [ 'import', { libraryName: 'vant', libraryDirectory: 'es', style: true } ] ] }- 1
- 2
- 3
- 4
- 5
- 6
- 7
- 8
- 9
- 10
- 11
- 12
- 13
- 14
- 15
频道组件使用 Tab 组件
- 组件库使用前需要在 src\main.ts 中全局按需导入和注册 。
import { createApp } from 'vue' import App from './App.vue' import router from './router' import '@/assets/styles/base.less' import '@/assets/styles/iconfont.less' // 导入Vant组件 import { Tab, Tabs } from 'vant' const app = createApp(App) // 注册Vant组件 app.use(Tab) app.use(Tabs) app.use(router) app.mount('#app')- 1
- 2
- 3
- 4
- 5
- 6
- 7
- 8
- 9
- 10
- 11
- 12
- 13
- 14
- 15
- 16
- 新建频道组件:src\views\Home\components\home-channel.vue,添加以下代码。
<template> <van-tabs v-model:active="active"> <van-tab title="标签 1">内容 1</van-tab> <van-tab title="标签 2">内容 2</van-tab> <van-tab title="标签 3">内容 3</van-tab> <van-tab title="标签 4">内容 4</van-tab> </van-tabs> </template> <script setup lang="ts"> // ref 函数用于定义模板中使用的响应式数据,相当于 Vue2 的 data import { ref } from 'vue' // active 表示当前选中标签的下标为 0 const active = ref(0) </script>- 1
- 2
- 3
- 4
- 5
- 6
- 7
- 8
- 9
- 10
- 11
- 12
- 在首页中使用频道组件:src\views\Home\index.vue
<template> <!-- 头部组件 --> <AppHeader /> <!-- 新增频道组件 --> <HomeChannel /> </template> <script setup lang="ts"> // script setup 只需要导入组件,无需注册\ import AppHeader from '@/components/app-header.vue' //新增如下代码: import HomeChannel from './components/home-channel.vue' </script>- 1
- 2
- 3
- 4
- 5
- 6
- 7
- 8
- 9
- 10
- 11
这时,效果图如下: [外链图片转存失败,源站可能有防盗链机制,建议将图片保存下来直接上传(img-2TTFQ8EB-1655734119009)(https://p9-juejin.byteimg.com/tos-cn-i-k3u1fbpfcp/755638e1678e4c97996a41e29d1809e0~tplv-k3u1fbpfcp-zoom-in-crop-mark:1956:0:0:0.image?)]
恭喜你已经学会在 Vue3 项目中如何使用 Vant3 组件库的组件啦,为自己鼓掌。👏
首页 - Axios 数据请求
前言
- 项目通过 mockjs 通过数据服务。
- 项目通过 axios 请求数据。
安装 mockjs
- 打开终端工具,安装 mockjs 插件 和 @types/mockjsTS语法支持包。
npm i mockjs @types/mockjs -D- 1
- 把素材文件夹中的 mock 文件夹移动到项目中,用于提供数据服务,切勿遗漏该步骤。💥
- 在项目入口文件中 src\main.ts 添加导入,提供 mock 数据服务。
import { createApp } from 'vue' import App from './App.vue' import router from './router' import '@/assets/styles/base.less' import '@/assets/styles/iconfont.less' import { Tab, Tabs } from 'vant' //添加mock导入 import '@/mock/index' const app = createApp(App) app.use(Tab) app.use(Tabs) app.use(router) app.mount('#app')- 1
- 2
- 3
- 4
- 5
- 6
- 7
- 8
- 9
- 10
- 11
- 12
- 13
- 14
安装 axios
- 打开终端工具,安装 axios 用于请求数据。
npm i axios- 1
- 发送请求获取数据
<template> <van-tabs v-model:active="active"> <van-tab title="标签 1">内容 1</van-tab> <van-tab title="标签 2">内容 2</van-tab> <van-tab title="标签 3">内容 3</van-tab> <van-tab title="标签 4">内容 4</van-tab> </van-tabs> </template> <script setup lang="ts"> import { ref } from 'vue' //导入axios import axios from 'axios' const active = ref(0) //使用axios发起网络请求 axios({ url: '/navList', method: 'get' }).then(res => { console.log('获取频道数据', res.data) + }) </script>- 1
- 2
- 3
- 4
- 5
- 6
- 7
- 8
- 9
- 10
- 11
- 12
- 13
- 14
- 15
- 16
- 17
- 18
- 19
- 20
控制台输出如下:

恭喜你已经学会在 Vue3 项目中如何使用 Axios 发送请求获取数据啦,再为自己鼓掌。👏
首页 - 频道组件数据渲染
前言
- TypeScript 的 interface 接口定义用于标记数据格式
- 接口定义好处:模板中使用 变量 的时候, 鼠标悬停变量有类型提示 , 书写代码也有提示
- 通过TypeScript 设置数据的类型,再大型的项目会更好维护。🎉
渲染频道组件数据
修改 src\views\Home\components\home-channel.vue 文件
<template> <van-tabs v-model:active="active"> <van-tab v-for="item in list" :key="item.id" :title="item.text"></van-tab> <!-- <van-tab title="标签 1">内容 1</van-tab> --> <!-- <van-tab title="标签 2">内容 2</van-tab> --> <!-- <van-tab title="标签 3">内容 3</van-tab> --> <!-- <van-tab title="标签 4">内容 4</van-tab> --> </van-tabs> </template> <script setup lang="ts"> // ref 函数用于定义模板中使用的响应式数据,相当于 Vue2 的 data import { ref } from 'vue' import axios from 'axios' // TypeScript 的接口用于标记数据格式 interface INavItem { id: string text: string } const active = ref(0) // 频道数据, <INavItem[]> 表示 list 数据为数组,数组的每一项需要复合 INavItem 接口的格式 // TypeScript 好处:模板中使用 list 和 item 的时候,鼠标移入有类型提醒 const list = ref<INavItem[]>([]) axios({ url: '/navList', method: 'get' }).then(res => { list.value = res.data.result console.log('获取频道数据', res.data) }) </script>- 1
- 2
- 3
- 4
- 5
- 6
- 7
- 8
- 9
- 10
- 11
- 12
- 13
- 14
- 15
- 16
- 17
- 18
- 19
- 20
- 21
- 22
- 23
- 24
- 25
- 26
- 27
- 28
- 29
- 30
- 31
- 32
此时项目截图如下:
 恭喜你已经学会在 Vue3 项目中如何使用 TypeScript 的接口定义数据格式了,再为自己鼓掌。👏
首页 - 轮播图组件
前言
- 首页轮播图需要使用到 Vant3 组件库的 Swipe 和 SwipeItem 组件。
- 轮播图请求接口为 { url: ‘/swiperList’, method: ‘get’ }。
- 可参考频道组件实现,建议各位小伙伴自己实操完成哦。
落地代码
- 项目入口导入和注册组件 src\main.ts
import { createApp } from 'vue' import App from './App.vue' import router from './router' import '@/assets/styles/base.less' import '@/assets/styles/iconfont.less' import '@/mock/index' //新增Swipe, SwipeItem组件: import { Tab, Tabs, Swipe, SwipeItem } from 'vant' const app = createApp(App) app.use(Tab) app.use(Tabs) //新增使用: app.use(Swipe) app.use(SwipeItem) app.use(store) app.use(router) app.mount('#app')- 1
- 2
- 3
- 4
- 5
- 6
- 7
- 8
- 9
- 10
- 11
- 12
- 13
- 14
- 15
- 16
- 17
- 18
- 19
- 20
- 21
- 轮播组件代码参考:src\views\Home\components\home-swipe.vue
<template> <van-swipe class="my-swipe" :autoplay="3000" indicator-color="white"> <van-swipe-item v-for="item in list" :key="item.imgSrc"> <img :src="item.imgSrc" alt="图片加载失败" /> </van-swipe-item> </van-swipe> </template> <script setup lang="ts"> // ref 函数用于定义模板中使用的响应式数据,相当于 Vue2 的 data import { ref } from 'vue' import axios from 'axios' interface ISwiper{ link: string imgSrc: string } const list = ref<ISwiper[]>([]) axios({ url: '/swiperList', method: 'get' }).then(res => { list.value = res.data.result console.log('轮播图数据', res.data) }) </script> <style lang="less" scoped> .my-swipe { img { width: 100%; } } </style>- 1
- 2
- 3
- 4
- 5
- 6
- 7
- 8
- 9
- 10
- 11
- 12
- 13
- 14
- 15
- 16
- 17
- 18
- 19
- 20
- 21
- 22
- 23
- 24
- 25
- 26
- 27
- 轮播组件在首页导入:src\views\Home\index.vue
<template> <!-- 头部组件 --> <AppHeader /> <!-- 频道组件 --> <HomeChannel /> <!-- 新增轮播图组件 --> <HomeSwipe /> </template> <script setup lang="ts"> import AppHeader from '@/components/app-header.vue' import HomeChannel from '@/views/Home/components/home-channel.vue' //导入轮播图组件: import HomeSwipe from '@/views/Home/components/home-swipe.vue' </script>- 1
- 2
- 3
- 4
- 5
- 6
- 7
- 8
- 9
- 10
- 11
- 12
此时项目截图如下: [外链图片转存失败,源站可能有防盗链机制,建议将图片保存下来直接上传(img-6Z0ceCcF-1655734119009)(https://p3-juejin.byteimg.com/tos-cn-i-k3u1fbpfcp/a01625a5879e414cb843e22b27e5b7a6~tplv-k3u1fbpfcp-zoom-in-crop-mark:1956:0:0:0.image?)]
恭喜你已经学会在 Vue3 项目中如何使用 Vant3 + Axios + TypeScirpt组合使用啦 ,你的格局已经打开,为自己努力学习鼓掌三次。👏👏👏
B站防盗链问题
前言
-
可能有些小伙伴的轮播图看不到图片,主要是 B 站的图片做了防盗链处理(我们能理解)。
-
我们可以添加代码避免出现这种情况(我们能通过技术破解访问限制)😎
操作步骤
打开项目文件:public\index.html,添加以下代码即可修复问题。
<head> <meta charset="utf-8"> <meta http-equiv="X-UA-Compatible" content="IE=edge"> <meta name="viewport" content="width=device-width,initial-scale=1.0"> //添加此如下代码: <meta name="referrer" content="no-referrer"> <link rel="icon" href="<%= BASE_URL %>favicon.ico"> <title> <%= htmlWebpackPlugin.options.title %> </title> </head>- 1
- 2
- 3
- 4
- 5
- 6
- 7
- 8
- 9
- 10
- 11
- 12
首页 - 视频列表组件
前言
- 视频列表组件设计到数据 父传子
- Vue3 中子组件可通过 defineProps 定义 props ,用于接受父组件传递过来的数据。
- Vue3 中子组件可通过 PropType 规定 props 数据的接口类型 。
落地代码
- 视频列表组件代码参考:src\views\Home\components\home-video-list.vue
- 模板中的 :video="item"表示把数据传递给子组件。
<template> <div class="list"> <AppVideoItem v-for="item in list" :key="item.id" :video="item" /> </div> </template> <script setup lang="ts"> import { ref } from 'vue' import axios from 'axios' import AppVideoItem from '@/components/app-video-item.vue' interface IVideoItem { id: number; imgSrc: string; desc: string; playCount: string; commentCount: string; videoSrc: string; } const list = ref<IVideoItem[]>([]) axios({ method: 'get', url: '/videosList' }).then(res => { console.log('视频列表的数据', res.data.result) list.value = res.data.result }) </script> <style lang="less"> .list { display: flex; flex-wrap: wrap; padding: 0 1vw; } </style>- 1
- 2
- 3
- 4
- 5
- 6
- 7
- 8
- 9
- 10
- 11
- 12
- 13
- 14
- 15
- 16
- 17
- 18
- 19
- 20
- 21
- 22
- 23
- 24
- 25
- 26
- 27
- 28
- 29
- 30
- 视频子组件 src\components\app-video-item.vue 接受父组件传过来的数据
- Vue3 中通过 defineProps 接收数据,可通过 PropType 定义数据的接口类型。
- 温馨提醒:通过 TypeScript 定义了接口,在模板中调用数据的时候会有代码提示哦。🧐
<template> <router-link class="v-card" :to="`/video/${video.id}`"> <div class="card"> <div class="card-img"> <img class="pic" :src="video.imgSrc" :alt="video.desc" /> </div> <div class="count"> <span> <i class="iconfont icon_shipin_bofangshu"></i> {{ video.playCount }} </span> <span> <i class="iconfont icon_shipin_danmushu"></i> {{ video.commentCount }} </span> </div> </div> <p class="title">{{ video.desc }}</p> </router-link> </template> <script setup lang="ts"> import { defineProps, PropType } from 'vue' interface IVideoItem { id: number; imgSrc: string; desc: string; playCount: string; commentCount: string; videoSrc: string; } // 🔔 父传子需要通过 defineProps 接收 // 🔔 PropType 用于指定数据格式 defineProps({ video: { // Object 对象为 IVideoItem 接口格式 type: Object as PropType<IVideoItem>, required: true } }) </script> <style lang="less" scoped> .v-card { width: 50%; padding: 2vw 1vw; .card { position: relative; background: #f3f3f3 url(~@/assets/images/default.png) center no-repeat; background-size: 36%; border-radius: 0.53333vw; overflow: hidden; .card-img { .pic { height: 100px; width: 100%; object-fit: cover; } } .count { background-image: linear-gradient(0deg, #000000d9, #0000); color: #fff; position: absolute; bottom: 0; left: 0; right: 0; font-size: 3vw; display: flex; align-items: center; justify-content: space-between; padding: 1.2vw 1.5vw; span { .iconfont { font-size: 3vw; } } } } .title { margin-top: 1.5vw; font-size: 3.2vw; color: #212121; overflow: hidden; text-overflow: ellipsis; display: -webkit-box; -webkit-line-clamp: 2; -webkit-box-orient: vertical; } } </style>- 1
- 2
- 3
- 4
- 5
- 6
- 7
- 8
- 9
- 10
- 11
- 12
- 13
- 14
- 15
- 16
- 17
- 18
- 19
- 20
- 21
- 22
- 23
- 24
- 25
- 26
- 27
- 28
- 29
- 30
- 31
- 32
- 33
- 34
- 35
- 36
- 37
- 38
- 39
- 40
- 41
- 42
- 43
- 44
- 45
- 46
- 47
- 48
- 49
- 50
- 51
- 52
- 53
- 54
- 55
- 56
- 57
- 58
- 59
- 60
- 61
- 62
- 63
- 64
- 65
- 66
- 67
- 68
- 69
- 70
- 71
- 72
- 73
- 74
- 75
- 76
- 77
- 78
- 79
- 80
- 81
- 82
- 83
- 84
视频列表组件在首页导入:src\views\Home\index.vue
<template> <!-- 头部组件 --> <AppHeader /> <!-- 频道组件 --> <HomeChannel /> <!-- 轮播图组件 --> <HomeSwipe /> <!-- 新增视频列表组件 --> <HomeVideoList /> </template> <script setup lang="ts"> import AppHeader from '@/components/app-header.vue' import HomeChannel from '@/views/Home/components/home-channel.vue' import HomeSwipe from '@/views/Home/components/home-swipe.vue' //导入视频列表组件 import HomeVideoList from '@/views/Home/components/home-video-list.vue' </script>- 1
- 2
- 3
- 4
- 5
- 6
- 7
- 8
- 9
- 10
- 11
- 12
- 13
- 14
- 15
- 16
🌈 目标验证
- 恭喜你已经学会在 Vue3 项目中如何使用defineProps + PropType 处理父子组件通讯业务了。
- 到此为止,你通过努力把整个首页完成,是不是感觉自己越来越棒棒哒。给你点赞。👍
视频播放页 - 自我实战
前言
- 有了前面首页的实战经验,视频播放页建议大家自己书写哦。💪
- 我也提供了视频播放页的素材文件 ,练习过程中遇到困难的小伙伴,可以去参考哦。🧐
- 自我实战的时候慢一点没关系哈,关键是坚持到最后,偷偷地努力,最后惊艳身边所有人。🐮🍺
好了项目到此就结束了,文件的如下,有需要的小伙伴可以自己领取哦。 链接: pan.baidu.com/s/1VL0a4Zva… 提取码: wu3o
-
相关阅读:
下载和安装vscode教程和配置中文插件(超详细)
golang获取postgres或clickhouse连接
Restormer: Efficient Transformer for High-Resolution Image Restoration
基于日特征气象因素的支持向量机预测电力负荷(Matlab代码实现)
数据库基础知识(面试)
Tomcat内存马分析
odoo13笔记点
JavaScript之window对象最常用相关知识总结
扬帆际海—跨境电商代运营靠谱吗?
内核定时器
- 原文地址:https://blog.csdn.net/web2022050901/article/details/125381609
