-
【C++ STL】模拟实现 map 和 set(对一颗红黑树进行封装)
一、STL - map 和 set
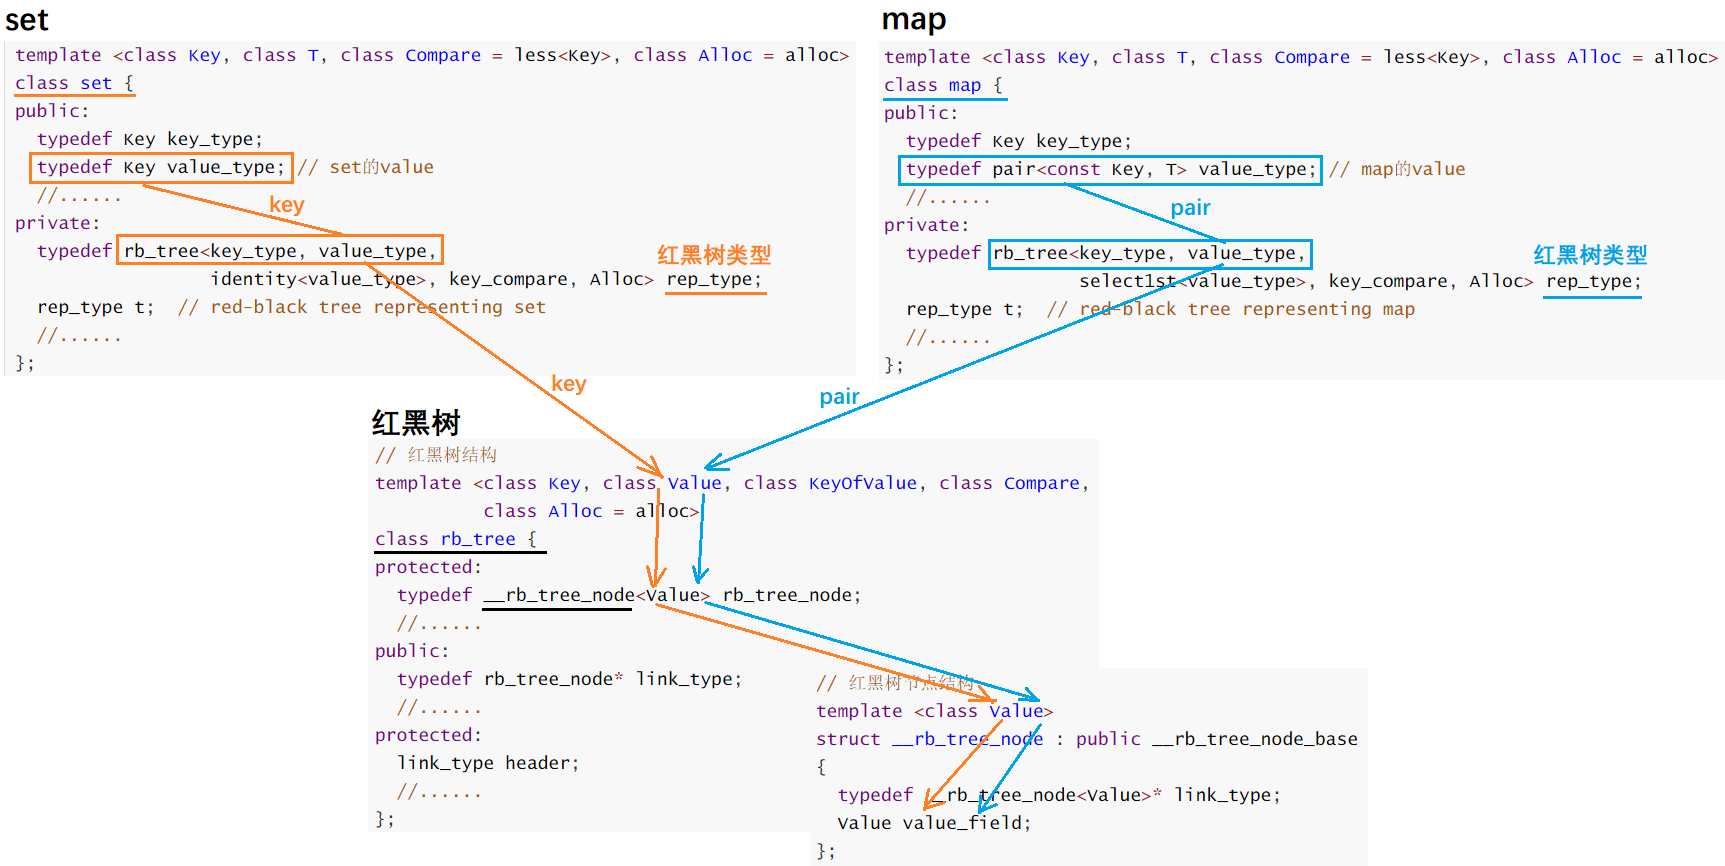
阅读STL源码就可以发现,其实 set 和 map 自己没有实现啥东西,整体就是对红黑树进行了一个封装,set 和 map 的 insert / erase 接口底层就是调用红黑树的 insert / erase 接口,并且 set 和 map 的迭代器也都是取的红黑树里面的迭代器
那 set 和 map 的核心区别在哪里呢?
set 底层封装了一颗红黑树,是 KV 结构,值得注意的是 key_type 和 value_type 都是 key,说明传了两个 key 给红黑树。
// stl_set.h template <class Key, class T, class Compare = less<Key>, class Alloc = alloc> class set { public: typedef Key key_type; typedef Key value_type; // set的value //...... private: typedef rb_tree<key_type, value_type, identity<value_type>, key_compare, Alloc> rep_type; // 红黑树类型 rep_type t; // red-black tree representing set //...... };- 1
- 2
- 3
- 4
- 5
- 6
- 7
- 8
- 9
- 10
- 11
- 12
- 13
map 底层封装了一颗红黑树,是 KV 结构,但 key_type 是 key,value_type 是 pair<const Key, T>,说明传了一个 key 和一个键值对(pair)给红黑树。
但这里和我自己理解的有些不一样,不应该只传一个 pair 就行了吗?为啥还要多传一个 key 呢?因为实现查找接口(find)时需要 key 作为形参。
// stl_map.h template <class Key, class T, class Compare = less<Key>, class Alloc = alloc> class map { public: typedef Key key_type; typedef pair<const Key, T> value_type; // map的value //...... private: typedef rb_tree<key_type, value_type, select1st<value_type>, key_compare, Alloc> rep_type; // 红黑树类型 rep_type t; // red-black tree representing map //...... };- 1
- 2
- 3
- 4
- 5
- 6
- 7
- 8
- 9
- 10
- 11
- 12
- 13
我们发现 stl_map.h 和 stl_set.h 中并没有包含红黑树,那怎么用红黑树的呢?
在库文件
// map #include <stl_tree.h> #include <stl_map.h> #include <stl_multimap.h> // set #include <stl_tree.h> #include <stl_set.h> #include <stl_multiset.h>- 1
- 2
- 3
- 4
- 5
- 6
- 7
- 8
- 9
STL源码中红黑树的实现,只截取了关键部分:
红黑树节点结构是一个泛型设计,根据传进来 value 的类型决定是 set 还是 map
// 红黑树节点结构 // value: 节点数据的类型,key或者pair template <class Value> struct __rb_tree_node : public __rb_tree_node_base { typedef __rb_tree_node<Value>* link_type; Value value_field; }; // 红黑树结构 template <class Key, class Value, class KeyOfValue, class Compare, class Alloc = alloc> class rb_tree { protected: typedef __rb_tree_node<Value> rb_tree_node; // 红黑树节点 //...... public: typedef rb_tree_node* link_type; //...... protected: link_type header; //...... };- 1
- 2
- 3
- 4
- 5
- 6
- 7
- 8
- 9
- 10
- 11
- 12
- 13
- 14
- 15
- 16
- 17
- 18
- 19
- 20
- 21
- 22
- 23
图解:
二、模拟实现 map 和 set
2.1 改造红黑树的结构
这里直接拿我们自己写的红黑树代码(原先是KV模型的)改造下,使其既可兼容K模型,也可兼容KV模型:
我的红黑树里面具体存的是什么类型的元素,是由模板参数 T 来决定:
- 如果 T 是 Key 那么就是 set
- 如果 T 是 pair<const Key, V> 那么就是 map
1、定义红黑树的节点结构
// 定义红黑颜色 enum Colour { BLACK = 0, RED }; // 定义红黑树节点结构 // T: 数据的类型,如果是map,则为pair<const K, V>; 如果是set,则为K template<class T> struct RBTreeNode { T _data; // 数据域 Colour _col; // 用来标记节点颜色 RBTreeNode<T>* _left; RBTreeNode<T>* _right; RBTreeNode<T>* _parent; RBTreeNode(const T& data) // 构造函数 : _data(data), _col(RED) , _left(nullptr), _right(nullptr), _parent(nullptr) {} };- 1
- 2
- 3
- 4
- 5
- 6
- 7
- 8
- 9
- 10
- 11
- 12
- 13
- 14
- 15
- 16
- 17
- 18
- 19
- 20
- 21
- 22
- 23
- 24
2、定义红黑树结构
改造前:
// 定义红黑树结构(KV) // K: 键值key的类型 // T: 数据的类型,如果是map,则为pair<const K, V>; 如果是set,则为K template<class K, class T> class RBTree { typedef RBTreeNode<T> Node; // 红黑树节点 private: Node* _root; public: RBTree() :_root(nullptr) {} // 构造函数 // ...... bool Insert(const T& data); // 插入节点 // ...... };- 1
- 2
- 3
- 4
- 5
- 6
- 7
- 8
- 9
- 10
- 11
- 12
- 13
- 14
- 15
- 16
- 17
【思考】:
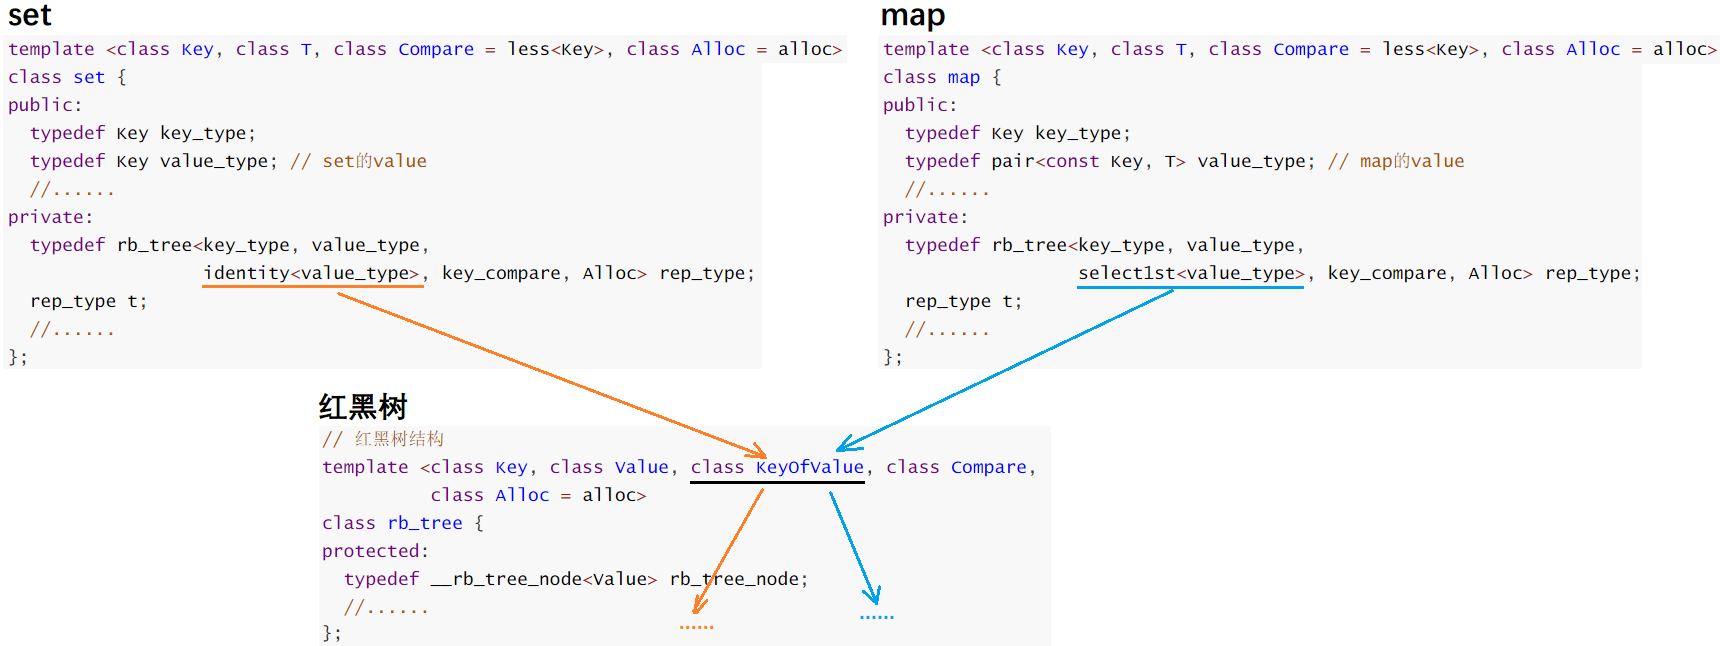
现在有一个问题出现了,红黑树的插入节点接口中要先通过比较节点中数据大小来查找适合插入的位置,但是红黑树不知道数据 data 到底是 key 还是 pair 呀,如果是 key,直接取 key 比较,如果是 pair,需要取 first 比较,这该如何去实现对传进来的不同类型的数据都能进行比较呢?
STL源码是这样实现的,通过传给模板参数 KeyOfValue 的是 set 的仿函数还是 map 的仿函数来应对不同类型数据的比较:
改造后的红黑树结构(增加了仿函数类):(还没完善好,还差迭代器,insert 和 operator[] 接口还没实现)
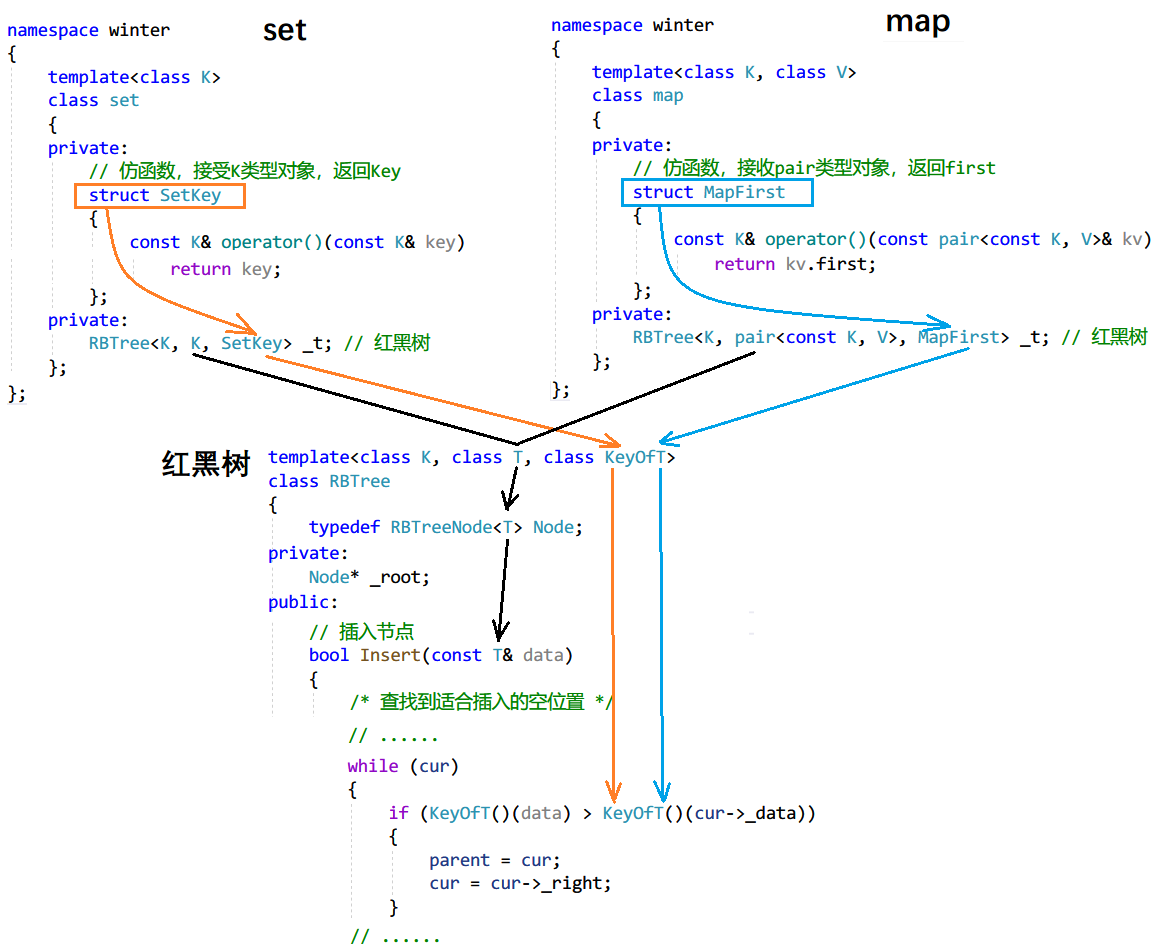
我们自己写的代码,通过给红黑树增加一个模板参数 KeyOfT,KeyOfT 是一个仿函数类,把 map 和 set 中实现的仿函数传给 KeyOfT,根据传的不同数据类型 T ( key / pair ) 和该类型对应的仿函数 ( SetKey / MapFirst ),调用仿函数取出要比较的值( key / first ),来进行比较。
// 红黑树的定义 // K: 键值key的类型 // T: 数据的类型,如果是map,则为pair<const K, V>; 如果是set,则为K // KeyOfT: 通过T的类型来获取key值的一个仿函数类 template<class K, class T, class KeyOfT> class RBTree { typedef RBTreeNode<T> Node; // 红黑树节点 private: Node* _root; public: RBTree() :_root(nullptr) {} // 构造函数 // ...... bool Insert(const T& data); // 插入节点(接口返回值目前是bool,后续要改为pair) // ...... };- 1
- 2
- 3
- 4
- 5
- 6
- 7
- 8
- 9
- 10
- 11
- 12
- 13
- 14
- 15
- 16
- 17
- 18
画图说明:
通过 T 的类型和对应的取 T 类型对象的值的仿函数,就可以进行不同类型数据的比较了:
修改后的 insert 接口如下(只修改了查找部分,可以进行不同类型数据的比较了):
(还没完善好,返回值目前是bool,后续要改为返回pair,目的是为了方便实现opearator[])
// T: 数据的类型,如果是map,则为pair<const K, V>; 如果是set,则为K bool Insert(const T& data) { /* 查找到适合插入的空位置 */ // 树为空 if (_root == nullptr) { _root = new Node(data); // 插入新节点 _root->_col = BLACK; // 根节点为黑色 return true; } // 树不为空 Node* cur = _root; // 记录当前节点和它的父节点 Node* parent = nullptr; // KeyOfT kot; // 实例化仿函数对象 while (cur) // cur为空时,说明找到插入位置了 { /* 通过该数据类型对应的仿函数取值来比较 */ if (KeyOfT()(data) > KeyOfT()(cur->_data)) // 键值大于当前节点 { parent = cur; cur = cur->_right; } else if (KeyOfT()(data) < KeyOfT()(cur->_data)) // 键值小于当前节点 { parent = cur; cur = cur->_left; } else if (KeyOfT()(data) == KeyOfT()(cur->_data)) // 键值等于当前节点 { return false; // 不允许数据冗余,返回false } } // 插入新节点,颜色为红色(可能会破坏性质3,产生两个连续红色节点) cur = new Node(data); cur->_col = RED; // 判断新节点是其父亲的左孩子还是右孩子 if (KeyOfT()(cur->_data) > KeyOfT()(parent->_data)) { // 建立parent和cur之间的联系 parent->_right = cur; cur->_parent = parent; // 更新cur的双亲指针 } else { // 建立parent和cur之间的联系 parent->_left = cur; cur->_parent = parent; // 更新cur的双亲指针 } /* 检测红黑树性质有没有被破坏,并控制树的平衡 */ // ...... 这里的代码无需改动 }- 1
- 2
- 3
- 4
- 5
- 6
- 7
- 8
- 9
- 10
- 11
- 12
- 13
- 14
- 15
- 16
- 17
- 18
- 19
- 20
- 21
- 22
- 23
- 24
- 25
- 26
- 27
- 28
- 29
- 30
- 31
- 32
- 33
- 34
- 35
- 36
- 37
- 38
- 39
- 40
- 41
- 42
- 43
- 44
- 45
- 46
- 47
- 48
- 49
- 50
- 51
- 52
- 53
- 54
- 55
- 56
- 57
- 58
- 59
- 60
2.2 map 和 set 的迭代器
迭代器的好处是以方便遍历,map 和 set 的迭代器是封装的红黑树的迭代器。
2.2.1 红黑树的迭代器
我们先要模拟实现红黑树的迭代器,需要考虑以下问题:
1、begin() 和 end()
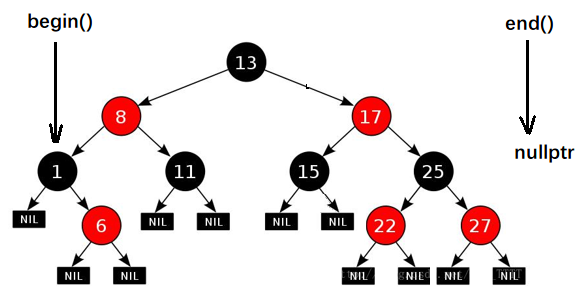
STL明确规定,begin() 与 end() 代表的是一段前闭后开的区间,而对红黑树进行中序遍历后,可以得到一个有序的序列。
SGI-STL源码中,红黑树有一个哨兵位的头节点,begin() 是放在红黑树中最小节点(即最左侧节点)的位置,end() 是放在 end() 放在头结点的位置
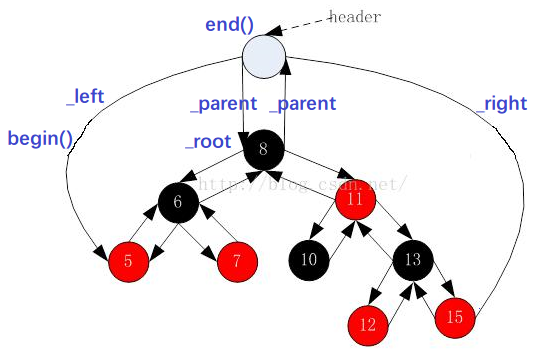
我们学习红黑树,主要是了解它的大体结构,并不需要面面俱到,重复造轮子。
所以在自己模拟实现红黑树时,没有弄这么复杂,begin() 是放在红黑树中最小节点(即最左侧节点)的位置,end()放在最大节点(最右侧节点)的下一个位置,关键是最大节点的下一个位置在哪块?这里我们给成 nullptr
2、迭代器中的 operator++ 和 operator-- 怎么实现呢?
按照 中序遍历(左 - 根 - 右) 来走,分为以下几种情况:
-
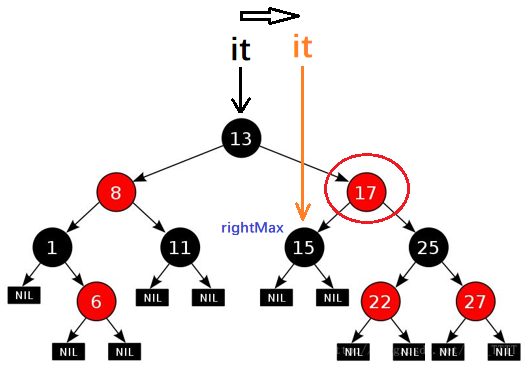
如果 it 指向节点的右子树不为空:
-
则 it++ 要访问的节点是,右子树中序 ( 左 - 根 - 右 ) 的第一个节点,也即是右子树中的最左节点(即最大节点)
-
-
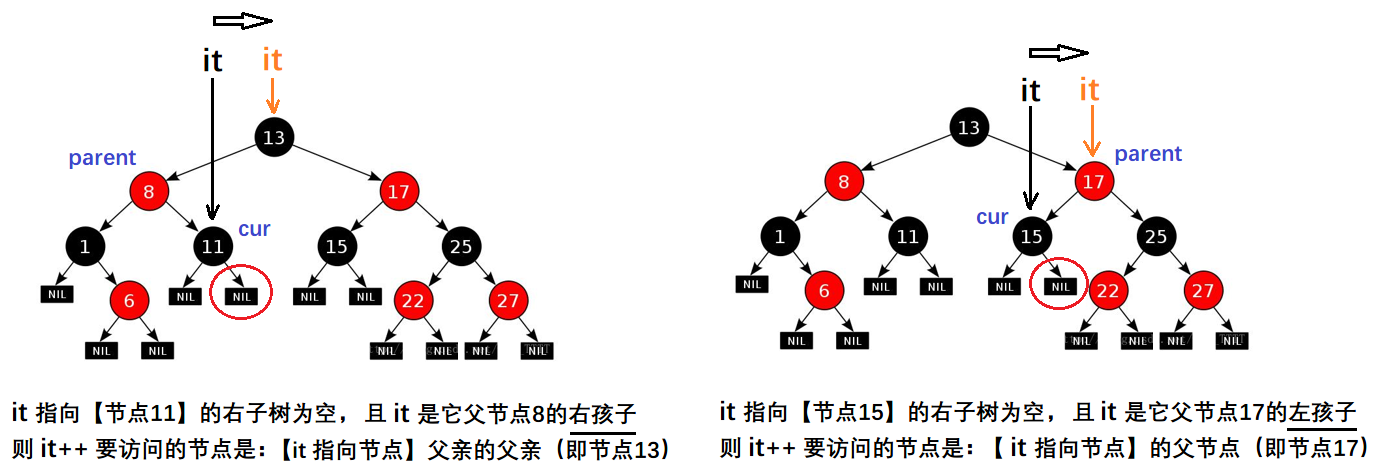
如果 it 指向节点的右子树为空(说明以 it 为根的子树已经访问完了),且 it 父亲存在,且 it 是它父亲的右孩子(说明 it 被访问之后,以 it 父亲为根的子树也就访问完了,此时该访问 it 父亲的父亲了):
- 则 it++ 要访问的节点是,【it 指向节点】的父亲的父亲(即节点13)
-
如果 it 指向节点的右子树为空,且 it 父亲存在,且 it 是它父亲的左孩子:
- 则 it++ 要访问的节点是,【it 指向节点】的父节点(即节点17)
注意:
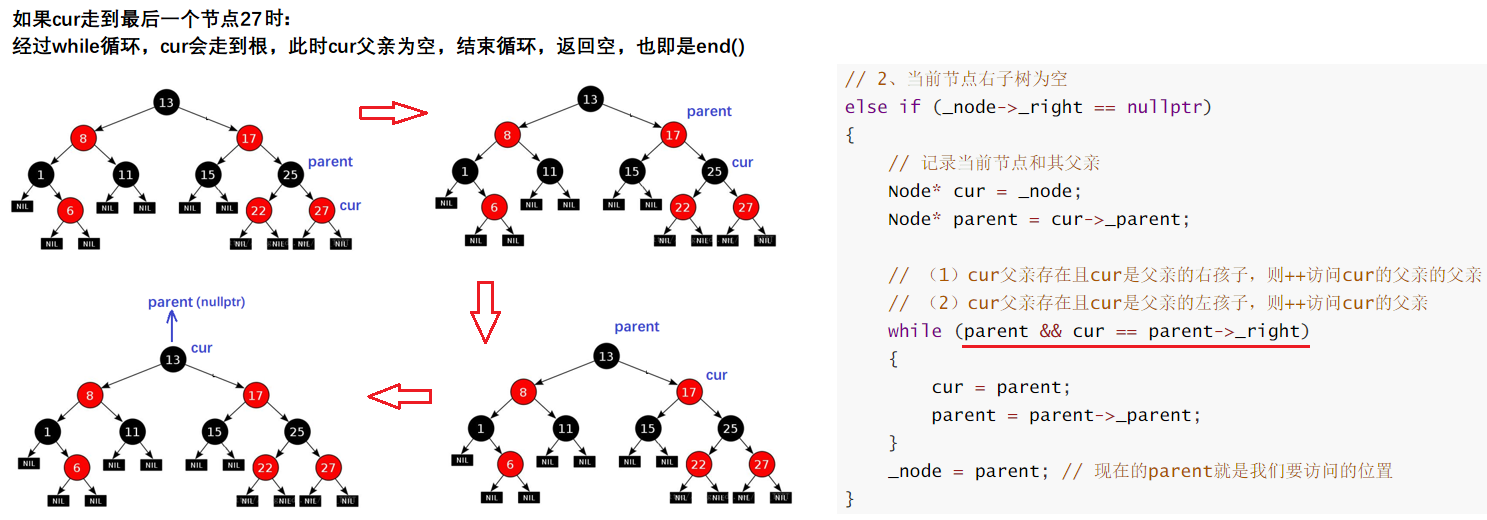
当 it 访问完最后一个节点后,最后一个节点右子树为空,此时整棵树已经访问完了,cur 和 parent 会一直迭代走到根节点,然后返回 _node = parent,parent为空,我们在红黑树中 end() 的值给的也是空,这样当 it 访问完最后一个节点后,就等于 end() 了。
迭代器完整代码如下:
/* 红黑树的迭代器( * T: 数据的类型,如果是map,则为pair<const K, V>; 如果是set,则为K * Ref: 数据的引用 * Ptr: 数据的指针 */ template<class T, class Ref, class Ptr> struct RBTreeIterator { /* ------------------------------------------------------ */ typedef RBTreeNode<T> Node; // 红黑树节点 typedef RBTreeIterator<T, Ref, Ptr> Iter; // 迭代器 Node* _node; // 节点指针 RBTreeIterator(Node* node = nullptr) // 构造函数 : _node(node) {} /* ------------------------------------------------------ */ // 运算符重载 Ref operator*(); Ptr operator&(); Iter& operator++(); Iter& operator--(); // ... }; /* ----------------------------------------------------------------- */ /* 红黑树的定义 * K: 键值key的类型 * T: 数据的类型,如果是map,则为pair<const K, V>; 如果是set,则为K * KeyOfT: 通过T的类型来获取key值的一个仿函数类 */ template<class K, class T, class KeyOfT> class RBTree { typedef RBTreeNode<T> Node; // 红黑树节点 private: Node* _root; public: /* ------------------------------------------------------ */ // 迭代器 // iterator是内嵌类型,在BRTree类内部定义的类型(类种类) typedef RBTreeIterator<T, T&, T*> iterator; // 迭代器 typedef RBTreeIterator<T, const T&, const T*> const_iterator; // const迭代器 iterator begin() // begin(): 指向红黑树的最左节点的迭代器 { Node* cur = _root; while (cur && cur->_left) { cur = cur->_left; } return iterator(cur); // 注意:单参数的构造函数支持隐式类型转换,节点会被构造成迭代器 // 所以也可以这样写:return cur; } iterator end() // end(): 指向nullptr的迭代器 { return iterator(nullptr); } /* ------------------------------------------------------ */ // 构造、拷贝构造、赋值重载、析构... RBTree() :_root(nullptr) {} // 构造函数 /* ------------------------------------------------------ */ // 相关接口 iterator Find(const K& key); // 查找元素 pair<iterator, bool> Insert(const T& data); // 插入元素 // ... };- 1
- 2
- 3
- 4
- 5
- 6
- 7
- 8
- 9
- 10
- 11
- 12
- 13
- 14
- 15
- 16
- 17
- 18
- 19
- 20
- 21
- 22
- 23
- 24
- 25
- 26
- 27
- 28
- 29
- 30
- 31
- 32
- 33
- 34
- 35
- 36
- 37
- 38
- 39
- 40
- 41
- 42
- 43
- 44
- 45
- 46
- 47
- 48
- 49
- 50
- 51
- 52
- 53
- 54
- 55
- 56
- 57
- 58
- 59
- 60
- 61
- 62
- 63
- 64
- 65
- 66
- 67
- 68
- 69
- 70
- 71
- 72
- 73
- 74
- 75
- 76
迭代器中的运算符重载函数:
让迭代器具有类似指针的行为,* 和 -> 运算符重载:
Ref operator*() { return _node->_data; // 返回当前迭代器指向节点中数据的引用 } Ptr operator->() { return &_node->_data; // 返回当前迭代器指向节点中数据的地址 }- 1
- 2
- 3
- 4
- 5
- 6
- 7
- 8
让迭代器可以移动,前置++运算符重载:
Iter& operator++() // 前置++ { /* 按照中序来走,分为两种情况 */ // 1、当前节点右子树不为空,则++访问右子树的最大节点 if (_node->_right != nullptr) { // 找到右子树的最左节点 Node* rightMax = _node->_right; while (rightMax->_left) { rightMax = rightMax->_left; } _node = rightMax; // 现在的rightMax就是我们要访问的位置 } // 2、当前节点右子树为空 else if (_node->_right == nullptr) { // 记录当前节点和其父亲 Node* cur = _node; Node* parent = cur->_parent; // (1)cur父亲存在且cur是父亲的右孩子,则++访问cur的父亲的父亲 // (2)cur父亲存在且cur是父亲的左孩子,则++访问cur的父亲 while (parent && cur == parent->_right) { cur = parent; parent = parent->_parent; } _node = parent; // 现在的parent就是我们要访问的位置 } return *this; // 返回下一个节点的迭代器的引用 } Iter& operator--() // 前置-- { //...... return *this; // 返回上一个节点的迭代器的引用 }- 1
- 2
- 3
- 4
- 5
- 6
- 7
- 8
- 9
- 10
- 11
- 12
- 13
- 14
- 15
- 16
- 17
- 18
- 19
- 20
- 21
- 22
- 23
- 24
- 25
- 26
- 27
- 28
- 29
- 30
- 31
- 32
- 33
- 34
- 35
- 36
- 37
- 38
- 39
- 40
让迭代器可以比较,== 和 != 运算符重载:
bool operator!=(const Iter& it) const { return _node != it._node; // 比较两个迭代器,即比较它们的节点指针,看是否指向同一节点 } bool operator==(const Iter& it) const { return _node == it._node; // 比较两个迭代器,即比较它们的节点指针,看是否指向同一节点 }- 1
- 2
- 3
- 4
- 5
- 6
- 7
- 8
2.3 map 和 set 的插入
map 和 set 的 insert 是封装的红黑树的插入节点接口。所以我们先要模拟实现红黑树的插入。
功能:插入元素时,先通过该元素的 key 查找并判断该元素是否已在树中:
- 如果在,返回:pair<指向该元素的迭代器, false>
- 如果不在,先插入节点,再返回:pair<指向该元素的迭代器, true>
/* 插入节点 * T: 数据的类型,如果是map,则为pair<const K, V>; 如果是set,则为K */ pair<iterator, bool> Insert(const T& data) { /* 查找到适合插入的空位置 */ // 树为空 if (_root == nullptr) { _root = new Node(data); // 插入新节点 _root->_col = BLACK; // 根节点为黑色 return make_pair(iterator(_root), true); // 返回<指向插入节点的迭代器, true> } // 树不为空 Node* cur = _root; // 记录当前节点和它的父节点 Node* parent = nullptr; //KeyOfT kot; // 实例化仿函数对象 while (cur) // cur为空时,说明找到插入位置了 { if (KeyOfT()(data) > KeyOfT()(cur->_data)) // 键值大于当前节点 { parent = cur; cur = cur->_right; } else if (KeyOfT()(data) < KeyOfT()(cur->_data)) // 键值小于当前节点 { parent = cur; cur = cur->_left; } else if (KeyOfT()(data) == KeyOfT()(cur->_data)) // 键值等于当前节点 { // 不允许数据冗余 return make_pair(iterator(cur), false); // 返回<指向已有节点的迭代器, false> } } // 插入新节点,颜色为红色(可能会破坏性质3,产生两个连续红色节点) cur = new Node(data); cur->_col = RED; Node* newnode = cur; // 保存下插入的新节点的位置 // 判断新节点是其父亲的左孩子还是右孩子 if (KeyOfT()(cur->_data) > KeyOfT()(parent->_data)) { // 建立parent和cur之间的联系 parent->_right = cur; cur->_parent = parent; // 更新cur的双亲指针 } else { // 建立parent和cur之间的联系 parent->_left = cur; cur->_parent = parent; // 更新cur的双亲指针 } /* 检测红黑树性质有没有被破坏,并控制树的平衡 */ // ...... 这里的代码无需改动 return make_pair(iterator(newnode), true); // 返回<指向插入节点的迭代器, true> }- 1
- 2
- 3
- 4
- 5
- 6
- 7
- 8
- 9
- 10
- 11
- 12
- 13
- 14
- 15
- 16
- 17
- 18
- 19
- 20
- 21
- 22
- 23
- 24
- 25
- 26
- 27
- 28
- 29
- 30
- 31
- 32
- 33
- 34
- 35
- 36
- 37
- 38
- 39
- 40
- 41
- 42
- 43
- 44
- 45
- 46
- 47
- 48
- 49
- 50
- 51
- 52
- 53
- 54
- 55
- 56
- 57
- 58
- 59
- 60
- 61
- 62
- 63
- 64
- 65
2.4 map 的模拟实现
map的底层结构就是红黑树,因此在map中直接封装一棵红黑树,然后将其接口包装下即可。
namespace winter { template<class K, class V> class map { private: /* ----------------------------------------------------------------- */ // 仿函数,返回pair对象中的key struct MapFirst { const K& operator()(const pair<const K, V>& kv) { return kv.first; } }; public: /* ----------------------------------------------------------------- */ /* map迭代器(底层用的红黑树的迭代器) * 这里是要取RBTree类里面定义的内嵌类型iterator,要注意: * 编译到这里的时候,类模板RBTree<K, pair<const K, V>, MapFirst>可能还没有实例化 * 那么编译器就不认识这个类模板,更别说去它里面找iterator了 * 所以要加typename,告诉编译器这是个类型,等它实例化了再去找它 */ typedef typename RBTree<K, pair<const K, V>, MapFirst>::iterator iterator; iterator begin() { return _t.begin(); } iterator end() { return _t.end(); } /* ----------------------------------------------------------------- */ // 插入元素(pair) pair<iterator, bool> insert(const pair<K, V>& kv) { return _t.Insert(kv); // 底层调用红黑树的接口 } /* ----------------------------------------------------------------- */ /* []运算符重载(底层用的insert接口) * 功能:传入键值key,通过该元素的key查找并判断是否在map中: * 在map中,返回key对应的映射值的引用 * 不在map中,插入pair<ckey, value()>,再返回key对应映射值的引用 */ V& operator[](const K& key) { // 注意:这里的V()是缺省值,调用V类型的默认构造函数去构造一个匿名对象 pair<iterator, bool> ret = _t.Insert(make_pair(key, V())); return (ret.first)->second; // 返回key对应映射值的引用 } private: RBTree<K, pair<const K, V>, MapFirst> _t; // 红黑树 }; }- 1
- 2
- 3
- 4
- 5
- 6
- 7
- 8
- 9
- 10
- 11
- 12
- 13
- 14
- 15
- 16
- 17
- 18
- 19
- 20
- 21
- 22
- 23
- 24
- 25
- 26
- 27
- 28
- 29
- 30
- 31
- 32
- 33
- 34
- 35
- 36
- 37
- 38
- 39
- 40
- 41
- 42
- 43
- 44
- 45
- 46
- 47
- 48
- 49
- 50
- 51
- 52
- 53
- 54
- 55
- 56
- 57
- 58
- 59
- 60
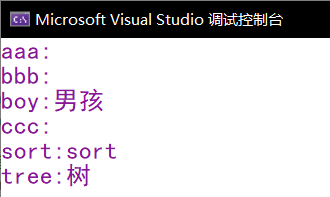
测试:
void test_map() { winter::map<string, string> dict; dict.insert(make_pair("sort", "排序")); dict.insert(make_pair("tree", "树")); dict.insert(make_pair("boy", "男孩")); dict["aaa"]; // 插入元素 dict["bbb"]; dict["ccc"]; dict["sort"] = "sort"; // 修改元素 winter::map<string, string>::iterator it = dict.begin(); while (it != dict.end()) { cout << it->first << ":" << it->second << endl; ++it; } }- 1
- 2
- 3
- 4
- 5
- 6
- 7
- 8
- 9
- 10
- 11
- 12
- 13
- 14
- 15
- 16
- 17
- 18
- 19
- 20
运行结果:
2.5 set 的模拟实现
set的底层结构就是红黑树,因此在set中直接封装一棵红黑树,然后将其接口包装下即可。
namespace winter { template<class K> class set { private: /* ----------------------------------------------------------------- */ // 仿函数,返回key对象中的Key struct SetKey { const K& operator()(const K& key) { return key; } }; public: /* ----------------------------------------------------------------- */ /* set迭代器(底层用的红黑树的迭代器) * 这里是要取RBTree类里面定义的内嵌类型iterator,要注意: * 编译到这里的时候,类模板RBTree<K, K, SetKey>可能还没有实例化 * 那么编译器就不认识这个类模板,更别说去它里面找iterator了 * 所以要加typename,告诉编译器这是个类型,等它实例化了再去找它 */ typedef typename RBTree<K, K, SetKey>::iterator iterator; iterator begin() { return _t.begin(); } iterator end() { return _t.end(); } /* ----------------------------------------------------------------- */ // 插入元素(key) pair<iterator, bool> insert(const K& key) { return _t.Insert(key); // 底层调用红黑树的接口 } /* ----------------------------------------------------------------- */ // 中序遍历 void inorder() { _t.InOrder(); } private: RBTree<K, K, SetKey> _t; // 红黑树 }; }- 1
- 2
- 3
- 4
- 5
- 6
- 7
- 8
- 9
- 10
- 11
- 12
- 13
- 14
- 15
- 16
- 17
- 18
- 19
- 20
- 21
- 22
- 23
- 24
- 25
- 26
- 27
- 28
- 29
- 30
- 31
- 32
- 33
- 34
- 35
- 36
- 37
- 38
- 39
- 40
- 41
- 42
- 43
- 44
- 45
- 46
- 47
- 48
- 49
- 50
- 51
- 52
- 53
测试:
void test_set() { winter::set<int> s; s.insert(2); s.insert(3); s.insert(4); s.insert(-1); s.insert(9); s.insert(6); s.insert(1); s.inorder(); winter::set<int>::iterator it = s.begin(); while (it != s.end()) { cout << *it << " "; ++it; } cout << endl; }- 1
- 2
- 3
- 4
- 5
- 6
- 7
- 8
- 9
- 10
- 11
- 12
- 13
- 14
- 15
- 16
- 17
- 18
- 19
- 20
- 21
运行结果:

-
相关阅读:
使用@check方法获取id集合
【快应用】实现自定义导航栏组件
通信原理第八章复习笔记
nodejs+vue+elementui宾馆酒店入住管理系统java-python
基于Python的接口自动化-JSON模块的操作
如何跳出forEach循环
好好回答下 TCP 和 UDP 的区别
【漏洞复现】fastjson_1.2.24_unserializer_rce
(附源码)计算机毕业设计SSM基于课程群的实验管理平台
Python进阶:上下文管理器
- 原文地址:https://blog.csdn.net/weixin_48025315/article/details/125464941