-
【云原生Docker系列第三篇】Docker网络模式(在失去的所有人里,我最怀念自己 )
系列文章目录
😜即日起,更新云原生相关知识,喜欢的小伙伴可以给我点个三连喔
😜收录至专栏 云原生
😜【云原生Docker系列第一篇】Docker镜像管理
😜【云原生Docker系列第二篇】Docker容器管理
Docker网络
1.1 Docker网络实现原理
docker 使用linux 桥接,在宿主机虚拟一个docker 容器网桥(docker0) ,docker 启动一个容器时会根据docker 网桥的网段分配给容器一个IP地址,称为Container-IP,同时Docker 网桥是每个容器的默认网关。因为在同一宿主机内的容器都接入同一个网桥,这样容器之间就能够通过容器的Container-IP 直接通信.
docker 网桥是宿主机虚拟出来的,并不是真实存在的网络设备,外部网络是无法寻址到的,这也意味着外部网络无法直接通过Container-IP 访问到容器。如果容器希望外部访问能够访问到,可以通过映射容器端口到宿主机(端口映射),即docker run 创建容器时候,通过 -p 或者 -P 参数来启用。访问容器的时候,就通过 [宿主机IP]:[容器端口]访问容器
1.1.1 为容器创建端口映射
方法一:
随机映射端口(从32768开始)docker run -d --name 为容器指定名称 -P 镜像
方法二:
指定映射端口docker run -d --name 为容器指定名称 -p 宿主机端口:容器内端口 镜像
#使用nginx镜像创建容器,名称为web1 ,随机映射端口 [root@localhost ~]# docker run -d --name web1 -P stevelugyq/nginx f4e83d54c76efac3ae28674dc748841fd1c6410e70b337cc5695ac010ac6053d #使用nginx镜像创建容器,名称为web2,将容器内的80端口映射到宿主机的42399端口 [root@localhost ~]# docker run -d --name web2 -p 42399:80 stevelugyq/nginx 42dfd334e7973ea2eb39a24a5b0eca22f24c83b19d135789ba14b38a7a182912 [root@localhost ~]# docker ps -a CONTAINER ID IMAGE COMMAND CREATED STATUS PORTS NAMES 42dfd334e797 stevelugyq/nginx "/docker-entrypoint.…" 5 seconds ago Up 4 seconds 0.0.0.0:42399->80/tcp, :::42399->80/tcp web2 f4e83d54c76e stevelugyq/nginx "/docker-entrypoint.…" About a minute ago Up About a minute 0.0.0.0:49154->80/tcp, :::49154->80/tcp web1 [root@localhost ~]# #访问 [root@localhost ~]# curl http://192.168.109.133:49154 [root@localhost ~]# curl http://192.168.109.133:42399 <!DOCTYPE html> <html> <head> <title>Welcome to nginx!</title> <style> html { color-scheme: light dark; } body { width: 35em; margin: 0 auto; font-family: Tahoma, Verdana, Arial, sans-serif; } </style> </head> <body> <h1>Welcome to nginx!</h1> <p>If you see this page, the nginx web server is successfully installed and working. Further configuration is required.</p> <p>For online documentation and support please refer to <a href="http://nginx.org/">nginx.org</a>.<br/> Commercial support is available at <a href="http://nginx.com/">nginx.com</a>.</p> <p><em>Thank you for using nginx.</em></p> </body> </html> #主机查看端口号 [root@localhost ~]# netstat -natp|grep docker tcp 0 0 0.0.0.0:42399 0.0.0.0:* LISTEN 87691/docker-proxy tcp 0 0 0.0.0.0:49154 0.0.0.0:* LISTEN 87577/docker-proxy tcp6 0 0 :::42399 :::* LISTEN 87695/docker-proxy tcp6 0 0 :::49154 :::* LISTEN 87581/docker-proxy #实际上是通过nat表进行转发的 [root@localhost ~]# iptables -nL -t nat ...... target prot opt source destination RETURN all -- 0.0.0.0/0 0.0.0.0/0 DNAT tcp -- 0.0.0.0/0 0.0.0.0/0 tcp dpt:49154 to:172.17.0.2:80 DNAT tcp -- 0.0.0.0/0 0.0.0.0/0 tcp dpt:42399 to:172.17.0.3:80- 1
- 2
- 3
- 4
- 5
- 6
- 7
- 8
- 9
- 10
- 11
- 12
- 13
- 14
- 15
- 16
- 17
- 18
- 19
- 20
- 21
- 22
- 23
- 24
- 25
- 26
- 27
- 28
- 29
- 30
- 31
- 32
- 33
- 34
- 35
- 36
- 37
- 38
- 39
- 40
- 41
- 42
- 43
- 44
- 45
- 46
- 47
- 48
- 49
- 50
- 51
- 52
- 53
- 54
- 55


1.2 Docker 的网络模式
Host:容器不会虚拟出自己的网卡,配置主机的IP等,而是使用宿主机的IP和端口
Container: 创建的容器不会创建自己的网卡,配置自己的IP,而是和一个指定的容器共享IP,端口范围
None: 该模式关闭了容器的网络功能。
Bridge:默认为该模式,此模式会为每一个容器分配,设置IP等,并将容器连接到一个docker0 的虚拟网桥,通过docker 0 网桥以及iptables nat 表配置与宿主机通信。
自定义网络
1.2.1 查看docker 的网络列表
在安装Docker 时,它会自动创建三个网络,bridge(创建容器默认连接到此网络),none,host
方法一:
docker network ls
方法二:
docker network list
[root@localhost ~]# docker network ls NETWORK ID NAME DRIVER SCOPE 18eb681e0bcf bridge bridge local f97b03a5a9c6 host host local 31c5c12df613 none null local [root@localhost ~]# docker network list NETWORK ID NAME DRIVER SCOPE 18eb681e0bcf bridge bridge local f97b03a5a9c6 host host local 31c5c12df613 none null local- 1
- 2
- 3
- 4
- 5
- 6
- 7
- 8
- 9
- 10
- 11
- 12
- 13
- 14

1.2.2 指定容器网络模式
使用docker run 创建Docker 容器时,可以使用 --net或者–network 选项指定容器的网络模式
- host 模式 : 使用 --net=host 指定
- none模式:使用 --net=none指定
- container模式: 使用–net=contatiner:NAME_or_ID 指定
- bridge模式: 使用 --net=bridge指定,默认设置,可以省略
1.3 docker 网络模式详解
1.3.1 host模式
- host 模式 : 使用 --net=host 指定
- 相当于VMware 中的桥接模式,与宿主机在同一个网络中,但是没有独立IP地址
- Docker 使用了Linux 的Namespace 技术来进行资源隔离,如PID Namespace隔离进程,Mount Namespace隔离文件系统,Network Namespace 隔离网络等。
- 一个Network Namespace 提供了一份独立的网络环境,包括网卡,路由,iptable 规则等都与其他Network Namespace 隔离。
- 一个Docker 容器一般会分配一个独立的Network Namespace
- 但是如果启动容器的时候使用host 模式,那么这个容器将不会获得一个独立的Network Namespace ,而是和宿主机共用一个Network Namespace 。容器将不会虚拟出自己的网卡,配置自己的IP等,而是使用宿主机的IP和端口.此时容器不再拥有隔离的、独立的网络栈。不拥有所有端口资源

#创建容器web 3,指定网络模式为 host #因为是host模式,所有宿主机和容器共享ip和端口 docker run -d --name web3 --net=host nginx #访问宿主机的ip和80端口,则可以访问到web3的nginx服务 firefox http://192.168.109.133:80- 1
- 2
- 3
- 4
- 5
- 6
- 7
- 8
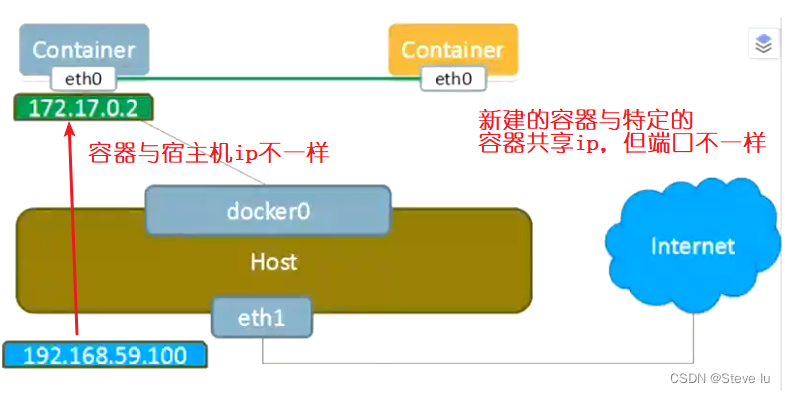
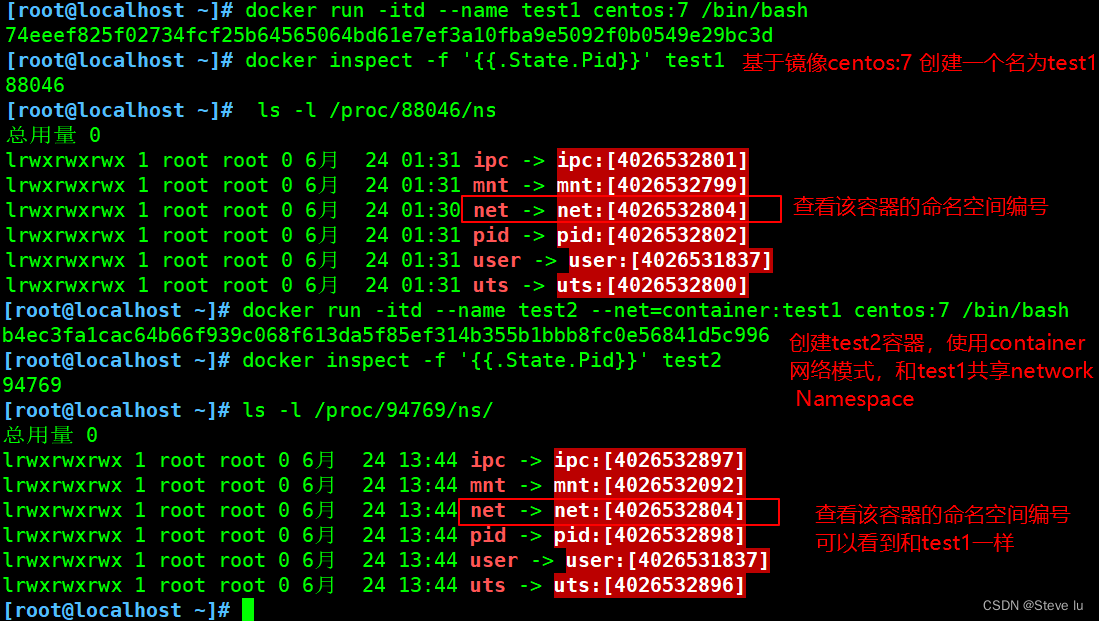
1.3.2 container模式
- container模式: 使用–net=contatiner:NAME_or_ID 指定
- 这个模式指定新创建的容器和已经存在的一个容器共享一个Network Namespace,而不是和宿主机共享。**新创建的容器不会创建自己的网卡,配置自己的IP,而是和一个指定的容器共享IP,端口范围等。**可以在一定程度上节省网络资源,容器内部依然不会拥有所有端口。
- 同样,两个容器除了网络方面,其他的如文件系统,进程列表等还是隔离的。
- 两个容器的进程可以通过lo网卡设备通信
#基于镜像centos:7 创建一个名为test1的容器 [root@localhost ~]# docker run -itd --name test1 centos:7 /bin/bash 74eeef825f02734fcf25b64565064bd61e7ef3a10fba9e5092f0b0549e29bc3d #查看容器的pid号 [root@localhost ~]# docker inspect -f '{{.State.Pid}}' test1 88046 #查看该容器的命名空间编号 [root@localhost ~]# ls -l /proc/88046/ns 总用量 0 lrwxrwxrwx 1 root root 0 6月 24 01:31 ipc -> ipc:[4026532801] lrwxrwxrwx 1 root root 0 6月 24 01:31 mnt -> mnt:[4026532799] lrwxrwxrwx 1 root root 0 6月 24 01:30 net -> net:[4026532804] lrwxrwxrwx 1 root root 0 6月 24 01:31 pid -> pid:[4026532802] lrwxrwxrwx 1 root root 0 6月 24 01:31 user -> user:[4026531837] lrwxrwxrwx 1 root root 0 6月 24 01:31 uts -> uts:[4026532800] #创建test2容器,使用container网络模式,和test1共享network Namespace [root@localhost ~]# docker run -itd --name test2 --net=container:test1 centos:7 /bin/bash b4ec3fa1cac64b66f939c068f613da5f85ef314b355b1bbb8fc0e56841d5c996 #查看test2容器的pid [root@localhost ~]# docker inspect -f '{{.State.Pid}}' test2 94769 #查看该容器的命名空间编号 [root@localhost ~]# ls -l /proc/94769/ns/ 总用量 0 lrwxrwxrwx 1 root root 0 6月 24 13:44 ipc -> ipc:[4026532897] lrwxrwxrwx 1 root root 0 6月 24 13:44 mnt -> mnt:[4026532092] lrwxrwxrwx 1 root root 0 6月 24 13:44 net -> net:[4026532804] lrwxrwxrwx 1 root root 0 6月 24 13:44 pid -> pid:[4026532898] lrwxrwxrwx 1 root root 0 6月 24 13:44 user -> user:[4026531837] lrwxrwxrwx 1 root root 0 6月 24 13:44 uts -> uts:[4026532896]- 1
- 2
- 3
- 4
- 5
- 6
- 7
- 8
- 9
- 10
- 11
- 12
- 13
- 14
- 15
- 16
- 17
- 18
- 19
- 20
- 21
- 22
- 23
- 24
- 25
- 26
- 27
- 28
- 29
- 30
- 31
- 32
1.3.3 none 模式
- none模式:使用 --net=none指定
- 使用none 模式,docker 容器有自己的network Namespace ,但是并不为Docker 容器进行任何网络配置。也就是说,这个Docker 容器没有网卡,ip, 路由等信息。
- 这种网络模式下,容器只有lo 回环网络,没有其他网卡。
- 这种类型没有办法联网,但是封闭的网络能很好的保证容器的安全性
- 该容器将完全独立于网络,用户可以根据需要为容器添加网卡。此模式拥有所有端口。(none网络模式配置网络)
- 特殊情况下才会用到,一般不用

1.3.4 bridge 模式
bridge模式是docker的默认网络模式,不写 – net参数,就是bridge模式。
相当于Vmware中的 nat 模式,容器使用独立network Namespace,并连接到docker0虚拟网卡。通过docker0网桥以及iptables nat表配置与宿主机通信,此模式会为每一个容器分配Network Namespace、设置IP等,并将一个主机上的 Docker 容器连接到一个虚拟网桥上。
- 当Docker进程启动时,会在主机上创建一个名为docker0的虚拟网桥,此主机上启动的Docker容器会连接到这个虚拟网桥上。虚拟网桥的工作方式和物理交换机类似,这样主机上的所有容器就通过交换机连在了一个二层网络中。
- 从docker0子网中分配一个IP给容器使用,并设置docker0的IP地址为容器的默认网关。在主机上创建一对虚拟网卡veth pair设备。veth设备总是成对出现的,它们组成了一个数据的通道,数据从一个设备进入,就会从另一个设备出来。因此,veth设备常用来连接两个网络设备。
- Docker将veth pair 设备的一端放在新创建的容器中,并命名为eth0(容器的网卡),另一端放在主机中, 以veth*这样类似的名字命名,并将这个网络设备加入到docker0网桥中。可以通过 brctl show 命令查看。
- 容器之间通过veth pair进行访问
- 使用 docker run -p 时,docker实际是在iptables做了DNAT规则,实现端口转发功能。可以使用iptables -t nat -vnL 查看。

[root@localhost ~]# docker run -itd --name test4 centos:7 /bin/bash c9d19872effbab980926319b55c6e37a997bac9ad739789a45f85a7bc4618da5 [root@localhost ~]# docker inspect test4 | grep -i 'networkmode' "NetworkMode": "default",- 1
- 2
- 3
- 4

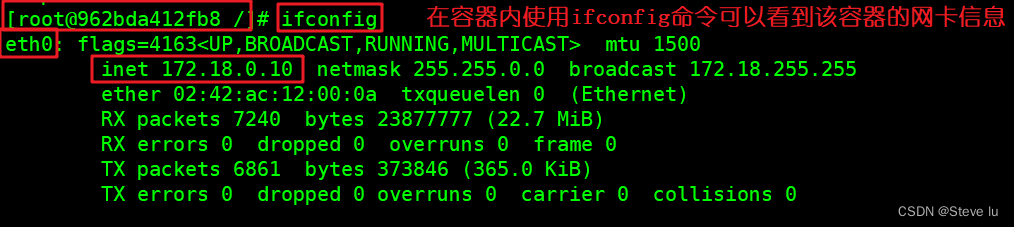
3.5 自定义网络模式
直接使用bridge 模式,还是无法指定IP运行docker 的,可以先自定义网络,在指定IP运行docker
如:
docker network create --subnet=172.18.0.0/16 --opt
“com.docker.network.bridge.name”=“docker1” mynetwork
------ docker 1 为 执行ifconfig -a 命令时显示的网卡名,如果不适用 --opt 参数指定此名称,使用 ifconfig -a 查看网卡的网络信息时,看到的将会是类似 br-110… 这样的名字
----- mynetwork 为执行 docker network list 命令时 显示的 bridge 网络模式名称
#直接执行此命令,则报错 [root@localhost ~]# docker run -itd --name test5 --network bridge --ip 172.17.0.10 centos:7 /bin/bash 1b885f7950b7874ec98176dce8d850c54d9fe642a5896317de28745ba926056b docker: Error response from daemon: user specified IP address is supported on user defined networks only. #先自定义网络,设置网卡地址池,网卡名,网络模式名 [root@localhost ~]# docker network create --subnet=172.18.0.0/16 --opt "com.docker.network.bridge.name"="docker1" mynetwork 9c210d8fa83493211ed3abdae304e8e144db88ba8e50086f2588fd465f5ffb9d #再使用网络创建自定义网络的容器 [root@localhost ~]# docker run -itd --name test6 --net mynetwork --ip 172.18.0.10 centos:7 /bin/bash 962bda412fb89c98ee0a70788a5e09d48a760034d756373f18ef6b45cc4ec429 #查看网络 [root@localhost ~]# docker network ls NETWORK ID NAME DRIVER SCOPE 18eb681e0bcf bridge bridge local f97b03a5a9c6 host host local 9c210d8fa834 mynetwork bridge local 31c5c12df613 none null local [root@localhost ~]# #进入容器 root@localhost ~]# docker exec -it test6 bash #下载网络管理工具 [root@962bda412fb8 /]# yum install -y net-tools #查看容器的网卡信息 [root@962bda412fb8 /]# ifconfig eth0: flags=4163<UP,BROADCAST,RUNNING,MULTICAST> mtu 1500 inet 172.18.0.10 netmask 255.255.0.0 broadcast 172.18.255.255 ether 02:42:ac:12:00:0a txqueuelen 0 (Ethernet) RX packets 7240 bytes 23877777 (22.7 MiB) RX errors 0 dropped 0 overruns 0 frame 0 TX packets 6861 bytes 373846 (365.0 KiB) TX errors 0 dropped 0 overruns 0 carrier 0 collisions 0- 1
- 2
- 3
- 4
- 5
- 6
- 7
- 8
- 9
- 10
- 11
- 12
- 13
- 14
- 15
- 16
- 17
- 18
- 19
- 20
- 21
- 22
- 23
- 24
- 25
- 26
- 27
- 28
- 29
- 30
- 31
- 32
- 33


总结
- Docker容器有几种网络模式?
Host、ContainerNone、Bridge(默认)、自定义网络(还是四种网络模式,只是可以自定义网段)
-
相关阅读:
Windows用VM虚拟机安装MacOS Ventura 13.6系统全流程教程(附资源)
Unity il2cpp API 调用实践
攻击角度多样化,放置类游戏安全风险分析
C++数学运算、随机数
C语言字符串比较详解:strcmp和strncmp函数的使用方法和规则
智能驾驶汽车虚拟仿真视频数据理解(一)
基于装饰器对通用表格的封装
手机怎么把几个PDF文件合并到一起?教你一分钟搞定
MasaFramework -- 领域驱动设计
switchhosts怎么配置host?
- 原文地址:https://blog.csdn.net/qq_42327944/article/details/125451189