-
Android开发笔记——快速入门(从入门ACT到Fragment放肆)
Android开发笔记——快速入门(从入门ACT到Fragment放肆)
往期文章
软件环境:
- Jetbrains Toolbox
- Android Sudio 2021.1.1 Bumblebee
- JDK 17.0.2
请先参考前一篇文章复习一下Kotlin的一些语法。
配套代码获取地址:
Gitee直接下载,全部开源
从入门ACT到Fragment放肆
学习了那么多的ACT,你有没有考虑过一个问题?
ACT的布局是如何和ACT的显示内容关联起来的?
在理解这个问题之前需要先理解几个个问题:
什么是view?view的本质是什么?如何把布局转化为view?
接下来你可以参考文章:
过度到Fragment
我们都知道,Android上的界面展示都是通过Activity实现的,Activity实在是太常用了,他的缺点也很明显,同样的Activity界面在手机上显示可能很好看,在平板上就未必了,因为平板的屏幕非常大,手机的界面放在平板上可能会有过分被拉长、控件间距过大等情况。这个时候更好的体验效果是在Activity中嵌入"小Activity",然后每个"小Activity"又可以拥有自己的布局。
这个"小Activity"就被称为Fragment。
这里使用郭神的图片来做个演示:
如果现在程序运行竖屏模式的平板或手机上,Fragment 1可能嵌入在一个Activity中,而Fragment 2可能嵌入在另一个Activity中,如下图所示:
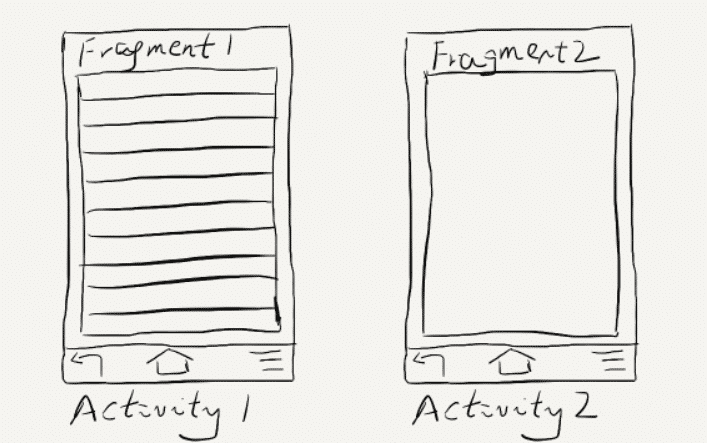
而如果现在程序运行在横屏模式的平板上,两个Fragment就可以嵌入在同一个Activity中了,如下图所示:
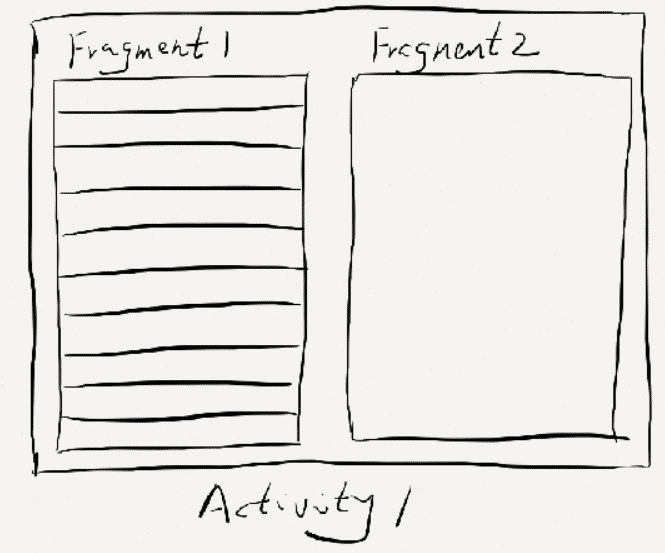
由此可以看出,使用Fragment可以让我们更加充分地利用平板的屏幕空间,下面我们一起来探究下如何使用Fragment。
使用Fragment很简单,类似于创建Activity一样,具体操作可以参考《Anodroid第一行代码》的内容,我们这里就从View的角度去考虑Act是如何将Fragment导入到其中的。
对于一个ACT来说想要让其显示到手机上,只需要一个布局文件和一个ACT类来将布局文件加载进来就可以了,对于一个Fragment来说同样也是这样。首先我们创建两个Fragment的布局文件,让他等下填充一个ACT,简单来说就是把一个ACT用两个Fragment布局来填充。
创建的布局文件如下:
left_fragment.xml<?xml version="1.0" encoding="utf-8"?> <androidx.constraintlayout.widget.ConstraintLayout xmlns:android="http://schemas.android.com/apk/res/android" xmlns:app="http://schemas.android.com/apk/res-auto" xmlns:tools="http://schemas.android.com/tools" android:layout_width="match_parent" android:layout_height="match_parent" android:orientation="vertical" tools:context=".Left_fragment"> <Button android:id="@+id/button" android:layout_width="wrap_content" android:layout_height="wrap_content" android:layout_gravity="center_horizontal" android:layout_marginBottom="683dp" android:text="Button" app:layout_constraintBottom_toBottomOf="parent" app:layout_constraintEnd_toEndOf="parent" app:layout_constraintStart_toStartOf="parent" app:layout_constraintTop_toTopOf="parent" /> </androidx.constraintlayout.widget.ConstraintLayout>- 1
- 2
- 3
- 4
- 5
- 6
- 7
- 8
- 9
- 10
- 11
- 12
- 13
- 14
- 15
- 16
- 17
- 18
- 19
- 20
- 21
右布局如下:
right_fragment.xml<?xml version="1.0" encoding="utf-8"?> <LinearLayout xmlns:android="http://schemas.android.com/apk/res/android" xmlns:tools="http://schemas.android.com/tools" android:layout_width="match_parent" android:layout_height="match_parent" android:orientation="vertical" android:background="#00ff00" tools:context=".Right_fragment"> <!-- TODO: Update blank fragment layout --> <TextView android:layout_width="wrap_content" android:layout_height="wrap_content" android:layout_gravity="center_horizontal" android:textSize="24sp" android:text="This is right Fragment" /> </LinearLayout>- 1
- 2
- 3
- 4
- 5
- 6
- 7
- 8
- 9
- 10
- 11
- 12
- 13
- 14
- 15
- 16
- 17
- 18
为了直观一点我把左右布局的放上来看一看:
左布局情况:
实际上左布局就是通过约束布局在上边放置了一个水平中间对齐的按钮。
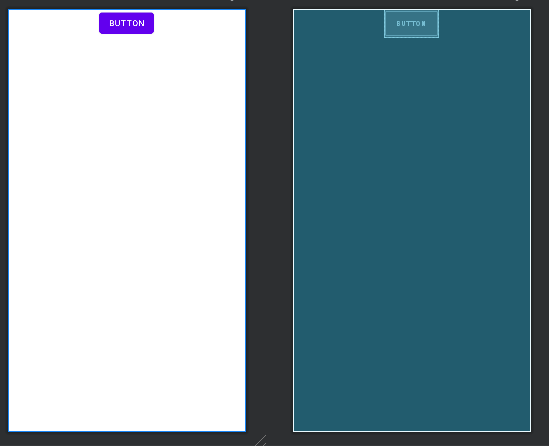
右部局情况:
右边的布局更简单,使用线性布局并将背景颜色设置为绿色,在中间设置了一个对齐的Textview,来显示一段文字。
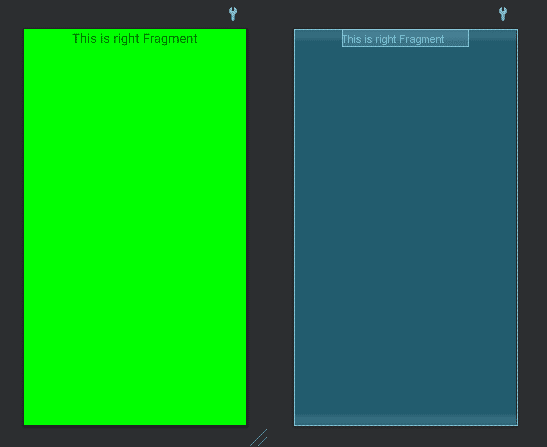
布局文件有了就是具体的类了,AS创建新的Fragment很简单,可以通过直接UI引导工具创建也可以自己新建一个Kotlin类作为Fragmen类只要继承 Fragment()就好了。
通过UI创建:
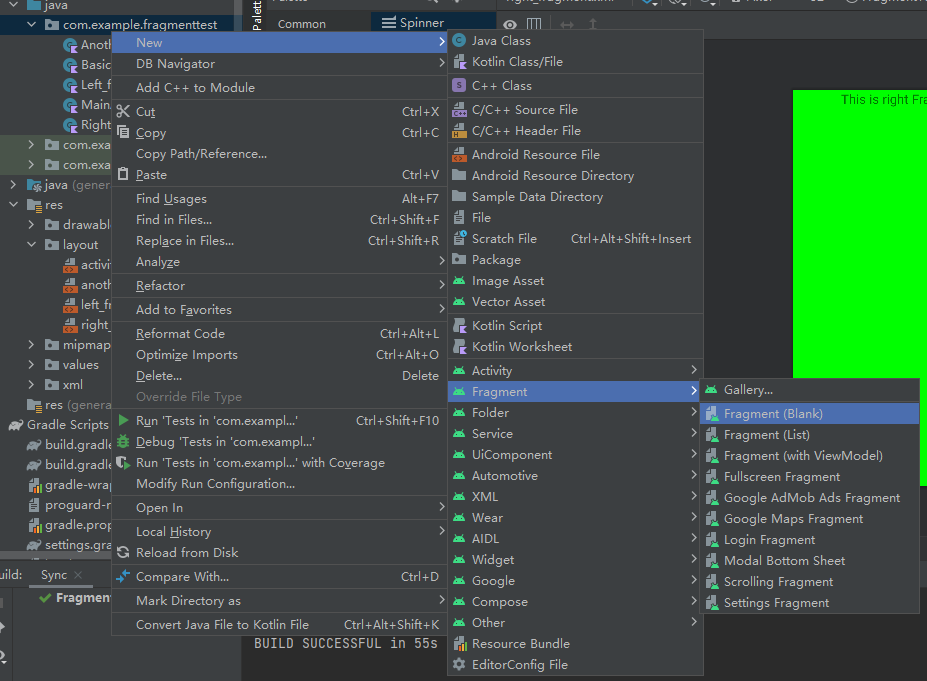
左LeftFragment代码如下,如果你是通过UI创建的会帮写好很多重写的方法,目前还用不到,可以直接删除重写,具体代码如下:
class Left_fragment : Fragment() { override fun onCreate(savedInstanceState: Bundle?) { super.onCreate(savedInstanceState) } override fun onCreateView( inflater: LayoutInflater, container: ViewGroup?, savedInstanceState: Bundle? ): View? { return layoutInflater.inflate(R.layout.left_fragment,container,false) } }- 1
- 2
- 3
- 4
- 5
- 6
- 7
- 8
- 9
- 10
- 11
- 12
- 13
- 14
- 15
- 16
通过上边针对layoutInflater的学习,我相信你能很快的理解这里onCreateView是如何工作的,在调用这个方法之前肯定是通过context对象来获取了一个LayoutInflater,我们只要正常使用这个LayoutInflater的inflate方法就可以将对应的布局加载进来,这里有个小细节是这里inflate()方法的最后一个参数一定要传入false。
在Fragment的相关源码,你会发现它会自动将我们在onCreateView()方法中返回的View添加到一个Container当中:
void addViewToContainer() { // Ensure that our new Fragment is placed in the right index // based on its relative position to Fragments already in the // same container int index = mFragmentStore.findFragmentIndexInContainer(mFragment); mFragment.mContainer.addView(mFragment.mView, index); } //版权声明:本文为CSDN博主「guolin」的原创文章,遵循CC 4.0 BY-SA版权协议,转载请附上原文出处链接及本声明。原文链接:https://blog.csdn.net/guolin_blog/article/details/121889703- 1
- 2
- 3
- 4
- 5
- 6
- 7
- 8
也就是说,后续Fragment自己会有一个addView的操作,如果我们将inflate()方法的第三个参数传入true,那么就会直接将inflate出来的布局添加到父布局当中。这样后面再次addView的时候就会发现它已经有一个父布局了,从而抛出崩溃信息。
总的来说就是使用 layoutInflater来向Fragment加载了布局。
同样的右Fragment的代码如下:
class Right_fragment : Fragment() { override fun onCreate(savedInstanceState: Bundle?) { super.onCreate(savedInstanceState) } override fun onCreateView( inflater: LayoutInflater, container: ViewGroup?, savedInstanceState: Bundle? ): View? { return layoutInflater.inflate(R.layout.right_fragment,container,false) } }- 1
- 2
- 3
- 4
- 5
- 6
- 7
- 8
- 9
- 10
- 11
- 12
- 13
- 14
代码基本一摸一样没什么好说的。
接下来就是在ACT的布局中引入两个Fragment,这个更简单:
我们直接在ACT的布局中引入两个Fragment即可然后通过ID指定是布局文件中哪个Fragment,
android:id="@+id/rightFragment"。<?xml version="1.0" encoding="utf-8"?> <androidx.constraintlayout.widget.ConstraintLayout xmlns:android="http://schemas.android.com/apk/res/android" xmlns:app="http://schemas.android.com/apk/res-auto" xmlns:tools="http://schemas.android.com/tools" android:layout_width="match_parent" android:layout_height="match_parent" tools:context=".MainActivity" > <fragment android:id="@+id/rightFragment" android:name="com.example.fragmenttest.Right_fragment" android:layout_width="0dp" android:layout_height="match_parent" android:layout_weight="1" app:layout_constraintBottom_toBottomOf="parent" app:layout_constraintEnd_toStartOf="@+id/leftFragment" app:layout_constraintHorizontal_weight="1" app:layout_constraintStart_toStartOf="parent" app:layout_constraintTop_toTopOf="parent" app:layout_constraintVertical_bias="0.0" /> <fragment android:id="@+id/leftFragment" android:name="com.example.fragmenttest.Left_fragment" android:layout_width="0dp" android:layout_height="match_parent" android:layout_weight="1" app:layout_constraintBottom_toBottomOf="parent" app:layout_constraintEnd_toEndOf="parent" app:layout_constraintHorizontal_weight="1" app:layout_constraintStart_toEndOf="@+id/rightFragment" app:layout_constraintTop_toTopOf="parent" /> </androidx.constraintlayout.widget.ConstraintLayout>- 1
- 2
- 3
- 4
- 5
- 6
- 7
- 8
- 9
- 10
- 11
- 12
- 13
- 14
- 15
- 16
- 17
- 18
- 19
- 20
- 21
- 22
- 23
- 24
- 25
- 26
- 27
- 28
- 29
- 30
- 31
- 32
- 33
- 34
我们通过
app:layout_constraintHorizontal_weight="1"属性来将约束布局的占比调整成1:1,最终实现效果如下: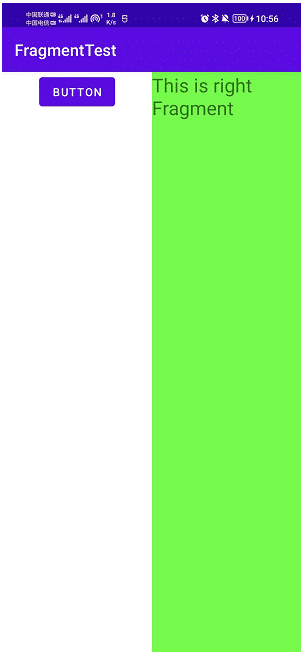
当然只是使用Fragment不能算是放肆,我们来结合一点新的东西:
优雅的使用Viewbinding配合Activity的Fragment
viewbinding已经出来很久了,他和LayoutInflater的最大区别在于,当我使用LayoutInflater获取加载的View对象的时候,我们只是获取了一个view对象,我们无法直接获得view中的组件,打个比方你如果其中包含了一个button的话你是无法直接获得一个button的,你需要这样:
view.findViewById()我并不推荐这样,因为对于一个项目来说如果其中包含了大量的控件的话,
findViewById()是通过遍历他的组件树来查找某个组件的,这会造成性能问题,虽然现在性能很强了,但是小细节还是要注意。我们如果使用Viewbinding的话,这些问题都可以迎刃而解了,首先你如果还不太懂如何使用viewbinding的话请参考我的前一篇文章,先学习一下如何在Activity中使用viewbinding。
我们首先在Activity中创建两个绑定类,首先是Activity的绑定类,其次是左Fragment的绑定类,我们在这里先把左Fragemnt加载进来,右边的就先不要考虑。
class MainActivity : AppCompatActivity() { private lateinit var binding :ActivityMainBinding private lateinit var leftbinding : LeftFragmentBinding override fun onCreate(savedInstanceState: Bundle?) { super.onCreate(savedInstanceState) //使用viewbinding填充Activity视图 binding = ActivityMainBinding.inflate(layoutInflater) val left_fragment: View = binding.???????? setContentView(binding.root) } }- 1
- 2
- 3
- 4
- 5
- 6
- 7
- 8
- 9
- 10
- 11
- 12
- 13
在绑定类创建完成的时候,我们不能直接对他初始化,如果你仔细看了Viewbinding的关于Context类的介绍就知道,这时候Activity的Context还没完成,直接调用的话就会造成空指针问题。
接下来和Act中一样使用layoutInflater来将布局加载进来,加载的时候同时也将布局中的Fragment一并加载进来,这时候你就会有疑问了,那么我的Fragment在哪里呢?为什么绑定类无法获取到我的Fragment?
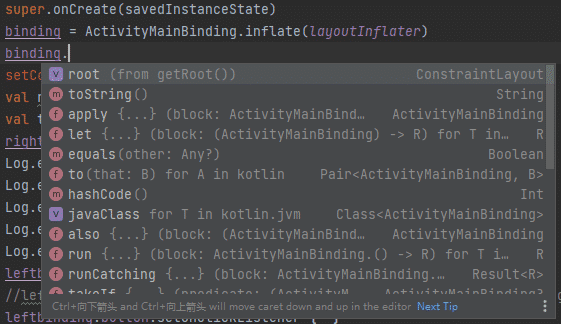
实际上Fragment是一个container而不是一个Viewgroup,所以在layoutInflater中无法获取到对应的Fragment。关于Fragment并不是一个view类型,在Stackoverflow上有这样的说:
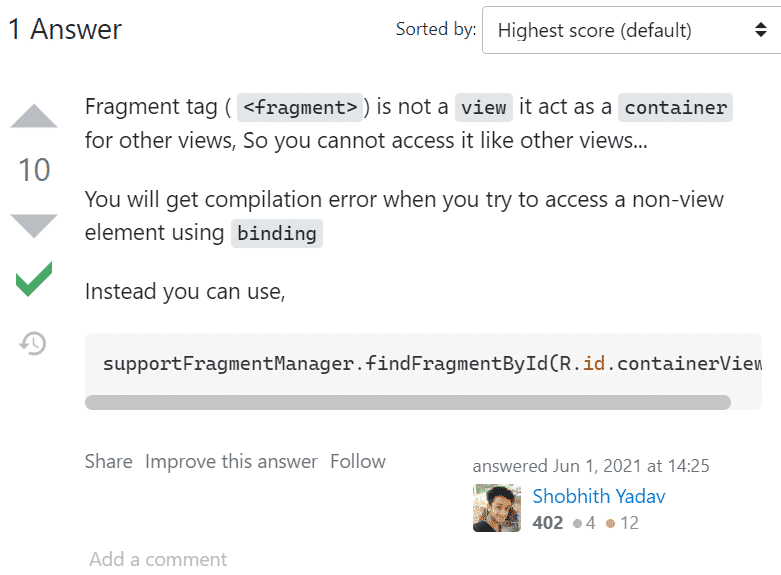
Fragment 标签(
<fragment>) 并不是一个view而是一个container类型,所以Viewbinding是无法直接获取到的,即使我在Fragment布局文件中包含了某个Fragment的id。如下图: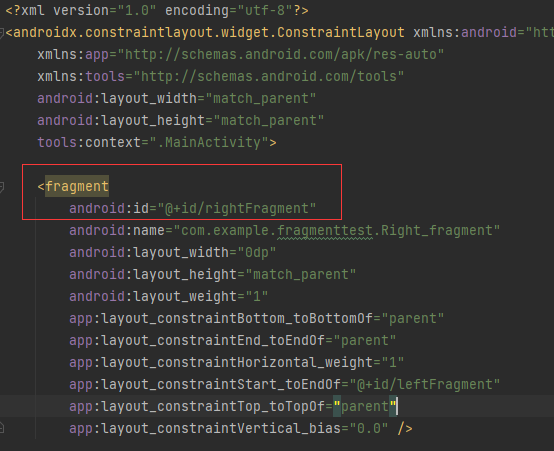
实际上即使有ID的但是还是无法获取,我同时在stackoverflow上看到了这样的介绍,我觉得是最容易理解的:
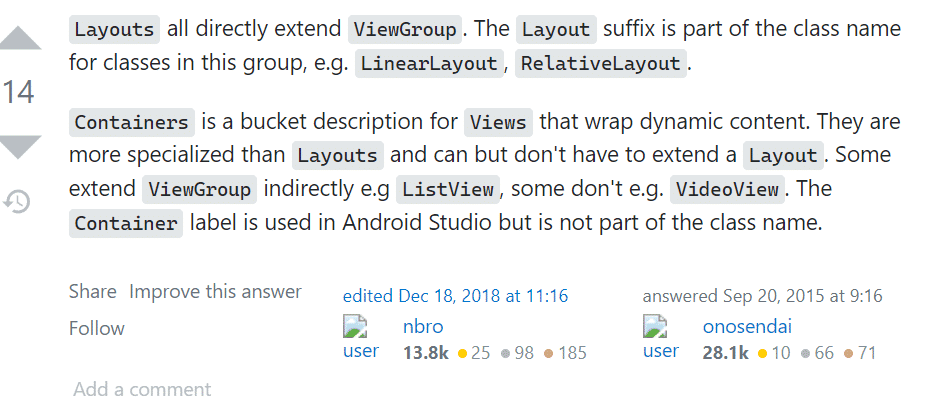
普通的Lauout都是直接继承于ViewGroup,像是
LinearLayout,RelativeLayout这些实际上是继承于ViewGroup的类,这些类的后缀之中都包含着Lauout。而
container类型更像是view的桶,里面放着动态的内容他相对于Views他可以继承一个Layouts类同样也可以不继承,其中很多实际上没有直接继承Viewgroup像Listview,而有些直接就选择不继承,像VideoView就是这样虽然container标签被用于在AS中,但它不是任何一个类的名称。你可能会想这还不简单?我这样写就能创建一个
Fragement的绑定类了:leftbinding =LeftFragmentBinding.inflate(layoutInflater,binding.root,true)- 1
错!仔细看上文中
layoutInflater的介绍,LayoutInflater的inflate方法实际上是唯一加载布局的方法,加载布局就是把布局转化为view对象,我们在这里调用了一个LeftFragmentBinding.inflate()方法实际上是重新加载了一个布局,而不是使用Activity中的Fragement!效果如下:

这当然不是我们想要的,那么到底如何访问到Fragment的button组件呢?
其实很简单,我们只需要将绑定类绑定到Activity的中Fragment中即可
leftbinding = LeftFragmentBinding.bind(binding.root)- 1
这时候这个绑定类实际上就是Activity中的Fragment的绑定类!
我们就可以通过这个绑定类来获取到button组件。
完整代码如下:
class MainActivity : AppCompatActivity() { private lateinit var binding :ActivityMainBinding private lateinit var leftbinding : LeftFragmentBinding override fun onCreate(savedInstanceState: Bundle?) { super.onCreate(savedInstanceState) binding = ActivityMainBinding.inflate(layoutInflater) //绑定对应的Fragment视图上 leftbinding =LeftFragmentBinding.bind(binding.root) leftbinding.button.setOnClickListener { //button的点击操作 } setContentView(binding.root) } }- 1
- 2
- 3
- 4
- 5
- 6
- 7
- 8
- 9
- 10
- 11
- 12
- 13
- 14
- 15
- 16
- 17
你觉得这样就完成了吗!大错特错!能运行就说明你用的对吗?
我们在这里打破砂锅问到底!
这里需要注意的细节是并不是所有布局都可以随意绑定的,在Activity中的Fragment实际上是囊括在一个约束布局之中的,我们回忆一下,Fragment实际上并不是一个view而是一个存放view的容器。
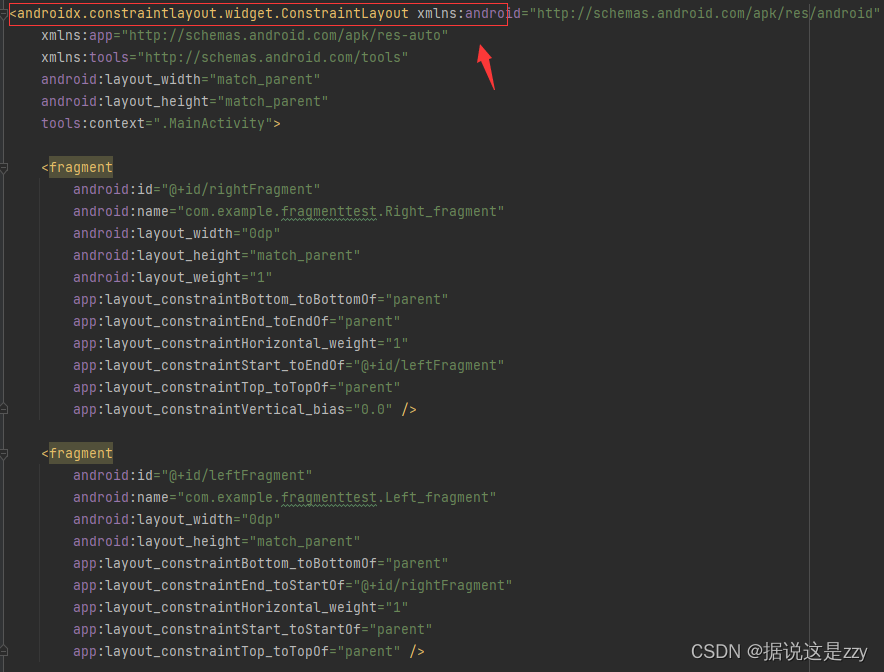
我们再来回看一个例子,说为什么这里将Fragment绑定到binding.root上是不正确的。
我们看一下我刚刚绑定的左边的Fragment,还有一个右边的Fragment我们没有尝试绑定:
他的布局是什么呢?
<?xml version="1.0" encoding="utf-8"?> <LinearLayout xmlns:android="http://schemas.android.com/apk/res/android" xmlns:tools="http://schemas.android.com/tools" android:layout_width="match_parent" android:layout_height="match_parent" android:orientation="vertical" android:background="#00ff00" tools:context=".Right_fragment"> <TextView android:id="@+id/text" android:layout_width="wrap_content" android:layout_height="wrap_content" android:layout_gravity="center_horizontal" android:textSize="24sp" android:text="This is right Fragment" /> </LinearLayout>- 1
- 2
- 3
- 4
- 5
- 6
- 7
- 8
- 9
- 10
- 11
- 12
- 13
- 14
- 15
- 16
- 17
- 18
是一个由
LinearLayout内部包含的TextView组成的布局,按道理来说绑定也很简单对吧:rightbinding=RightFragmentBinding.bind(binding.root)- 1
当我们尝试绑定的结果是什么呢?
竟然报错啦!

E/AndroidRuntime: FATAL EXCEPTION: main Process: com.example.fragmenttest, PID: 27502 java.lang.RuntimeException: Unable to start activity ComponentInfo{com.example.fragmenttest/com.example.fragmenttest.MainActivity}: java.lang.ClassCastException: androidx.constraintlayout.widget.ConstraintLayout cannot be cast to android.widget.LinearLayout- 1
- 2
- 3
怎么会报错呢?
java.lang.ClassCastException: androidx.constraintlayout.widget.ConstraintLayout cannot be cast to android.widget.LinearLayout为什么说是把
ConstraintLayout强转成LinearLayout失败呢?要了解这个问题我们就要去看看bind的代码是什么,可惜的是由于它是以插件辅助的形式存在,实际上你是无法直接访问到对应的绑定类的,这就基本告别了bind方法是如何实现的,不过好在我找到了Google的开发人员书写的Viewbinding的指南
原文链接。
对于bind方法他大致的样子是这样的:
@NonNull public static 某个bidning类 bind(@NonNull View rootView) { /* Edit: Simplified code – the real generated code is an optimized version */ TextView textview = rootView.findViewById(R.id.subtext); if (textview != null) { return new 某个bidning类的构造方法 ((ConstraintLayout) rootView, textview);//注意这里有一个强转操作 } throw new NullPointerException("Missing required view […]"); }- 1
- 2
- 3
- 4
- 5
- 6
- 7
- 8
- 9
- 10
- 11
- 12
他的方法很简单,就是将这个布局里面的所有组件通过
findViewById方法获取到view对象,然后通过构造方法构造一个绑定类进行返回。我们再来看一下绑定类的构造方法:
private 某个bidning类的构造方法 (@NonNull 根布局的类型 rootView, @NonNull TextView textview/*此处应包含所有的子组件,这里只有一个textview所以只需要传入一下textview就可以*/) { … }- 1
- 2
虽然没有详细写,但是我们知道根据视图生成的绑定类实际上的rootview是整个布局的根布局,对于
rightbinding来说我们实际上的rootview应该是一个LinearLayout,我们调用bind方法的时候获取的binding.root实际上是Activity的根部局,是constraintlayout,所以产生了强转错误,也就是说我们绑定的对象根本不对!实际上应该怎么写呢?我们先来确认一下对于Activity加载进来的view对象构成是什么样,rightFragment的父组件是什么?rightFragment是什么布局?我们通过Log来输出以下结果:
class MainActivity : AppCompatActivity() { private lateinit var binding :ActivityMainBinding private lateinit var leftbinding : LeftFragmentBinding private lateinit var rightbinding : RightFragmentBinding override fun onCreate(savedInstanceState: Bundle?) { super.onCreate(savedInstanceState) binding = ActivityMainBinding.inflate(layoutInflater) setContentView(binding.root) val rightfragment: View =findViewById(R.id.rightFragmen) val Textview :View = findViewById(R.id.text) Log.e("tester",Textview.parent.toString()) Log.e("tester",Textview.parent.parent.toString()) Log.e("tester",rightfragment.toString()) Log.e("tester",rightfragment.parent.toString()) Log.e("tester",binding.root.toString()) Log.e("tester",binding.root.rootView.toString()) } }- 1
- 2
- 3
- 4
- 5
- 6
- 7
- 8
- 9
- 10
- 11
- 12
- 13
- 14
- 15
- 16
- 17
- 18
- 19
- 20
- 21
- 22
- 23
- 24
这里通过万能的
findViewById来获取Activity中Fragment的组件,将其中的textview和fragment本身提取出来,输出看一下其对应的类型和父类对应的类型。
2022-05-18 23:29:47.132 12020-12020/com.example.fragmenttest E/tester: android.widget.LinearLayout{aa4256a V.E...... ......ID 0,0-0,0 #7f08012b app:id/rightFragment} 2022-05-18 23:29:47.132 12020-12020/com.example.fragmenttest E/tester: androidx.constraintlayout.widget.ConstraintLayout{5466a5b V.E...... ......I. 0,0-0,0} 2022-05-18 23:29:47.132 12020-12020/com.example.fragmenttest E/tester: android.widget.LinearLayout{aa4256a V.E...... ......ID 0,0-0,0 #7f08012b app:id/rightFragment} 2022-05-18 23:29:47.132 12020-12020/com.example.fragmenttest E/tester: androidx.constraintlayout.widget.ConstraintLayout{5466a5b V.E...... ......I. 0,0-0,0} 2022-05-18 23:29:47.132 12020-12020/com.example.fragmenttest E/tester: androidx.constraintlayout.widget.ConstraintLayout{5466a5b V.E...... ......I. 0,0-0,0}- 1
- 2
- 3
- 4
- 5
- 6
- 7
可以看到textview的父类其实是一个
Linearlayout,而Linearlayout的父类其实是一个ConstraintLayout也就是Activity布局文件的最外层的ConstraintLayout。而bind方法你也能看到,实际上它是将现有view绑定到这个类之中,所以我们应该绑定的是其对应的Fragment,而不是对应的
ConstraintLayout。获取到对应的Fragment的外层布局也很简单,我们只要通过val rightfragment: View =findViewById(R.id.rightFragment)- 1
获取即可,有人说我用viewbinding不就是为了避免用
findViewById吗?这个问题需要得到正视,因为在bind方法中实际上也是使用
findViewById来获取的,view binding的核心在于类型安全和快捷,减少多余的代码量,实际上是一种findViewById的封装。最后在针对上文的错误结果查看一下:
对于绑定的布局我们再次输出他的根部局类型和他本身的布局类型:
Log.e("tester",leftbinding.root.toString()) Log.e("tester",leftbinding.button.parent.toString()) //修正绑定对象 val left_fragment: View =findViewById(R.id.leftFragment) leftbinding =LeftFragmentBinding.bind(left_fragment) Log.e("tester",leftbinding.root.toString()) Log.e("tester",leftbinding.button.parent.toString())- 1
- 2
- 3
- 4
- 5
- 6
- 7
- 8
- 9
结果如下:

2022-05-19 08:18:31.215 10392-10392/com.example.fragmenttest E/tester: androidx.constraintlayout.widget.ConstraintLayout{aa4256a V.E...... ......I. 0,0-0,0} 2022-05-19 08:18:31.215 10392-10392/com.example.fragmenttest E/tester: androidx.constraintlayout.widget.ConstraintLayout{5466a5b V.E...... ......I. 0,0-0,0 #7f0800c9 app:id/leftFragment} 2022-05-19 08:18:31.216 10392-10392/com.example.fragmenttest E/tester: androidx.constraintlayout.widget.ConstraintLayout{5466a5b V.E...... ......I. 0,0-0,0 #7f0800c9 app:id/leftFragment} 2022-05-19 08:18:31.216 10392-10392/com.example.fragmenttest E/tester: androidx.constraintlayout.widget.ConstraintLayout{5466a5b V.E...... ......I. 0,0-0,0 #7f0800c9 app:id/leftFragment}- 1
- 2
- 3
- 4
- 5
可以看到当使用binding.root直接作为绑定对象的时候,leftbinding的根部局是错误的不应该为Act的外层布局,修正以后变为Fragment的根部局。有时候代码能运行完全就是运气!
-
相关阅读:
Linux 入门:基本指令
面试:经典问题解决思路
安防监控视频汇聚平台EasyCVR视频广场搜索异常,报错“通道未开启”的问题排查与解决
MPLS工作过程
帷幄匠心面试题 一面
【电源专题】案例:不导这颗MOS管的原因是在电路上不通用?
【魔店】拼多多店铺一般在哪里找货源?
导数大题练习
电压放大器如何选型号和参数配置
【无标题】
- 原文地址:https://blog.csdn.net/qq_20540901/article/details/125392455