-
【Web书城】书城前端开发
书城首页效果图如下:


组成部分:- search-bar:搜索框
- flap-card:卡片翻转、烟花动画
- guess-you-like
- recommend
- featured
- category-book
- category
当点击flap-card中的Book、guess-you-like、recommend和书架中的book时,都会调用showBookDetail方法跳转到
export function showBookDetail(vue, book) { vue.$router.push({ path: '/book-store/detail', query: { fileName: book.fileName, category: book.categoryText } }) }- 1
- 2
- 3
- 4
- 5
- 6
- 7
- 8
- 9

search-bar的实现
search-bar由标题和搜索框和返回图标三部分组成,title高度0.42rem绝对定位top为0,back高度0.42rem绝对定位top为0;input搜索框绝对定位top0.42rem,并且中间包含一个blank块级元素,一开始宽度初始为0
一开始search-bar的高度设定为0.94rem,当鼠标聚焦到搜索框或发生滚动事件(hide-title样式),search-bar的高度就会变成0.52rem,并且back的高度也会变成0.52rem(视觉上会有下移效果),搜索框中的top会变成0,占据标题监控机,而且其中的blank元素这时会变为{flex: 0 0 .31rem;width: 0.31rem;},视觉上为back腾出空间。titleVisible变量控制hide-title样式,'hide-title': !titleVisible, titleVisible初始为true,watch监听Scroll的top值(newY),当newY大于0滑动则隐藏标题栏时,titleVisible为false,小于或者等于0则为true;当input的点击事件触发titleVisible也会为false,这时候滚动条也要滚到初始位置- 当搜索框按下enter键进行搜索时,会将搜索文本作为参数传递给/store/list页面(view/store/StoreList.vue)
<input v-model="searchText" @keyup.13.exact="search"> search(){ this.$router.push({ path: '/store/list', query: { keyword: this.searchText } }) },- 1
- 2
- 3
- 4
- 5
- 6
- 7
- 8
- 9
到StoreList.vue页面之后,在created钩子函数中会首先请求后端接口
/book/list得到所有按照目录名字为key的图书列表,然后遍历所有的key,过滤掉key中不包含keyword的图书,将得到的list数据传递给featured组件Object.keys(this.list).filter(key => { this.list[key] = this.list[key].filter(book => book.fileName.indexOf(keyword) >= 0) return this.list[key].length > 0 })- 1
- 2
- 3
- 4
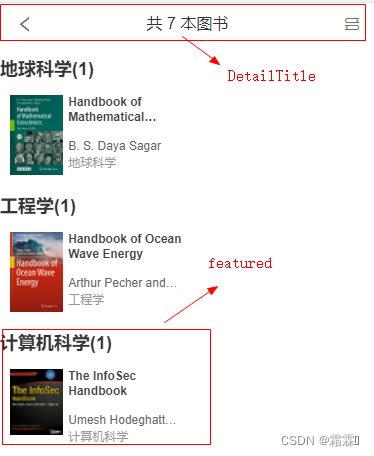
StoreList.vue中封装了detail-title和scroll、featured这三个组件,detail-title组件中传递一个计算属性title,接收list的数量

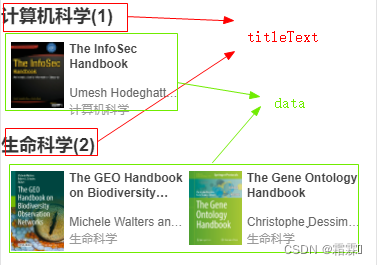
featured组件中接收三个父组件传递过来的变量
- data:过滤后的list的value
- titleText:根据目录Id返回的国际化表示以及list[key]长度

翻转卡片逻辑
首先定义了flapCardList数组,存储小圆信息,如下
{ r: 255, g: 102, _g: 102, b: 159, imgLeft: 'url(' + require('@/assets/images/gift-left.png') + ')', imgRight: 'url(' + require('@/assets/images/gift-right.png') + ')', backgroundSize: '50% 50%', zIndex: 100, rotateDegree: 0 }, //左半圆 .flap-card-semi-circle-left{ border-radius: .24rem 0 0 .24rem; background-position: center right; transform-origin: right; } //右半圆 .flap-card-semi-circle-right{ border-radius: 0 .24rem .24rem 0; background-position: center left; transform-origin: left; }- 1
- 2
- 3
- 4
- 5
- 6
- 7
- 8
- 9
- 10
- 11
- 12
- 13
- 14
- 15
- 16
- 17
- 18
- 19
- 20
- 21
- 22
- 23
烟花的动画
//1.首先定义小球开始和结束坐标,以及小球的宽高和背景颜色 $moves: ( (startX: 0, startY: 0, endX: 0, endY: 55, width: 6, height: 6, background: $color-green), (startX: 0, startY: 0, endX: 15, endY: 60, width: 4, height: 4, background: $color-pink-transparent), (startX: 0, startY: 0, endX: 35, endY: 45, width: 4, height: 4, ); //2.定义动画 @mixin move($index) { $item: nth($moves, $index); $keyframesName: "move" + $index; $animationTime: $pointShowTime; $animationType: linear; $animationIterator: 1; $width: map-get($item, width); $height: map-get($item, height); $backgroud: map-get($item, background); $startX: map-get($item, startX); $startY: map-get($item, startY); $endX: map-get($item, endX); $endY: map-get($item, endY); // width: px2rem($width); // height: px2rem($height); width: $width/100 + rem; height: $height/100 + rem; background: $backgroud; animation: #{$keyframesName} $animationTime $animationType $animationIterator; @keyframes #{$keyframesName} { 0% { // transform: translate3d(px2rem($startX), px2rem($startY), 0) scale(0); transform: translate3d($startX/100 + rem, $startY/100+rem, 0) scale(0); opacity: 0; } 50% { // transform: translate3d(px2rem($endX * 0.5), px2rem($endY * 0.5), 0) scale(.5); transform: translate3d($endX * 0.5/100+rem, $endY * 0.5/100+rem, 0) scale(.5); opacity: 1; } 90% { // transform: translate3d(px2rem($endX), px2rem($endY), 0) scale(1); transform: translate3d($endX/100+rem, $endY/100+rem, 0) scale(1); opacity: 1; } 100% { transform: translate3d($endX * 1.05/100+rem, $endY * 1.05/100+rem, 0) scale(1); opacity: 0; } } } //3.scss语法遍历$moves,给每个小球加上动画 &.animation { @for $i from 1 to length($moves) { &:nth-child(#{$i}) { @include move($i); } } }- 1
- 2
- 3
- 4
- 5
- 6
- 7
- 8
- 9
- 10
- 11
- 12
- 13
- 14
- 15
- 16
- 17
- 18
- 19
- 20
- 21
- 22
- 23
- 24
- 25
- 26
- 27
- 28
- 29
- 30
- 31
- 32
- 33
- 34
- 35
- 36
- 37
- 38
- 39
- 40
- 41
- 42
- 43
- 44
- 45
- 46
- 47
- 48
- 49
- 50
- 51
- 52
- 53
- 54
- 55
- 56
- 57
- runFlapCardAnimation:控制卡片和烟花的显示,当为true时这两部分会显示并且开始flap-card-move动画
- watch侦听器侦听flapCardVisible变量,一旦为true则调用runAnimation方法,定时300毫秒后开启卡片翻转动画和烟花动画,并在2500毫秒结束动画
**卡片翻转动画:**先执行prepare,然后 每50毫秒执行flapCardRotate - prepare:front和back初始化为flapCardList数组下标索引为0和1,front是右半圆,back是左半圆,
prepare() { //让背面的左侧半圆和右侧半圆重叠 const backFlapCard = this.flapCardList[this.back] backFlapCard.rotateDegree = 180 //(不要了)因为后续和正面圆一起转动到90度时转动了9次,并且颜色也不断在变浅所以到90度时无法显示初始颜色 //需要先减去5*9,让它先加深,以便到90°后不断变浅 backFlapCard._g = backFlapCard.g - 5 * 9 this.rotate(this.back, 'back') },- 1
- 2
- 3
- 4
- 5
- 6
- 7
- 8
- 9
- flapCardRotate:卡片翻转,正面圆(右圆,初始角度为0)每次角度加10,颜色变深,背面圆(左圆,初始角度180),每次角度减10,颜色变浅。当正圆和背圆都到90度时,让背圆覆盖正圆,当正圆180背圆0时开始下一组翻转
flapCardRotate(){ const frontFlapCard = this.flapCardList[this.front] const backFlapCard = this.flapCardList[this.back] //加深 frontFlapCard.rotateDegree += 10 frontFlapCard._g -= 5 //变浅 backFlapCard.rotateDegree -= 10 if (backFlapCard.rotateDegree < 90) { //还未转到90°时无法看到,不让它有颜色变化, //到90°时就能显示了,这时候就不断变浅到平面时到初始位置 backFlapCard._g += 5 } //第一个临界点,让背面圆覆盖正面圆,如果是初始状态正面圆转动9次到达90°,但是 //背面圆此时是转动到-90°,无法执行下列逻辑,因此需要先让背面左侧圆和右侧圆重叠,一起翻转, //要先执行prepare让背面圆到180°,此时正面圆转到90°,背面圆也会转到(180-90)° if (frontFlapCard.rotateDegree === 90 && backFlapCard.rotateDegree === 90){ backFlapCard.zIndex += 2 } this.rotate(this.front, 'front') this.rotate(this.back, 'back') //这时正面圆(90+90)和背面圆(90-90)都到了左侧位置 if (frontFlapCard.rotateDegree === 180 && backFlapCard.rotateDegree === 0){ this.next() } },- 1
- 2
- 3
- 4
- 5
- 6
- 7
- 8
- 9
- 10
- 11
- 12
- 13
- 14
- 15
- 16
- 17
- 18
- 19
- 20
- 21
- 22
- 23
- 24
- 25
- 26
- next:开始下一组翻转,首先让上一组归位,然后front++,back++
next(){ //让正面圆和背面圆归位 const frontFlapCard = this.flapCardList[this.front] const backFlapCard = this.flapCardList[this.back] frontFlapCard.rotateDegree = 0 backFlapCard.rotateDegree = 0 frontFlapCard._g = frontFlapCard.g backFlapCard._g = backFlapCard.g this.rotate(this.front, 'front') this.rotate(this.back, 'back') //开始下一组的翻转 this.front++ this.back++ const len = this.flapCardList.length //判断溢出 if (this.front >= len){ this.front = 0 } if (this.back >= len){ this.back = 0 } // 开始下一组的翻转之前要先改变zIndex // 100 -> 96 // 99 -> 100 // 98 -> 99 // 97 -> 98 // 96 -> 97 // 当前这一组的front和back因为已经自加1了,所以现在其各自下标是1和2 //front:100 -> 100 - ((0-1+5)%5=4)=96 //back: 99 -> 100 - (1-2+5)%5=97 this.flapCardList.forEach((item, index) => { item.zIndex = 100 - ((index - this.front + len) % len) }) this.prepare() },- 1
- 2
- 3
- 4
- 5
- 6
- 7
- 8
- 9
- 10
- 11
- 12
- 13
- 14
- 15
- 16
- 17
- 18
- 19
- 20
- 21
- 22
- 23
- 24
- 25
- 26
- 27
- 28
- 29
- 30
- 31
- 32
- 33
- 34
- 35
-
相关阅读:
嵌入式学习笔记(43)S5PV210的SD卡启动详解
目标检测YOLO实战应用案例100讲-SAR图像多尺度舰船目标检测(续)
从 MySQL 到 ClickHouse 实时数据同步 —— Debezium + Kafka 表引擎
Day10配置文件&日志&多线程
新疆旅游8日游费用以及详细线路,新疆八天七晚行程分享,看完就知道了
1110 Complete Binary Tree
cuda系列详细教程-花絮
017 基于Spring Boot的食堂管理系统
SQL注入——预编译CASE注入
angular项目指定端口,实现局域网内ip访问
- 原文地址:https://blog.csdn.net/xueyinglys/article/details/124990716