-
Vue 之 异步/动态组件 && keep-alive && v-model
hello ,因为内容比较多且简单,所以都凑在一起写啦~

目录
类型一 : 工厂函数,该工厂函数返回一个promise对象 ( 常用 )
类型二 : 接受一个对象类型,对异步函数进行配置( 不常用 )
这里涉及两个生命周期 activated || deactivated
一、异步组件
为什么要使用异步组件,首先我们要了解另一个概念
webpack的打包过程
- 默认情况下,因为组件和组件之间是通过模块化直接依赖的,所以webpack打包时会将组件模块打包到一起,比如(app.js文件中)
- 对于一些不需要立即使用的组件,我们可以对它们进行拆分,拆成小的代码块chunk.js
- 这些chunk.js会在需要的时候才会去请求服务器加载,然后运行
webpack是如何进行分包的呢,是使用import(' ')函数

如果我们的项目过大,对于某些组件我们希望通过异步的方式来进行加载( 目的是进行分包处理 ),在vue中提供了一个函数,
defineAsyncComponent异步组件函数
defineAsyncComponent接受两种类型的参数
类型一 : 工厂函数,该工厂函数返回一个promise对象 ( 常用 )
- // 导入vue中的方法
- import { defineAsyncComponent } from 'vue';
- // 普通组件
- import profile from './pages/profile.vue';
- // 异步组件
- const profile = defineAsyncComponent(() => import('./pages/profile.vue'));
类型二 : 接受一个对象类型,对异步函数进行配置( 不常用 )
- const profile = defineAsyncComponent({
- // 工厂函数
- loader: () => import('./pages/profile.vue'),
- // 加载过程中显示的组件Loading,用来占位的,用普通组件的方式导入即可
- loadingComponent: Loading,
- // 加载失败时显示的组件Error
- errorComponent: Error,
- // 在显示loadingComponent组件之前的延迟,等待多长时间 | 默认值200ms
- delay: 2000,
- // 如果提供了timerout,并且加载组件时超过了设定值,将显示错误组件,默认值 infinity == 永不超时 ms
- timeout: 3000,
- // 定义组件是否可挂起 默认true
- suspensible: true,
- /**
- * err : 错误信息
- * retry : 函数,调用retry尝试重新加载
- * fail : 函数,指示加载程序结束退出
- * attempts : 记录尝试的次数
- */
- onError(err, retry, fail, attempts) {
- if (err.message.match(/fetch/) && attempts <= 3) {
- // 请求发生错误时重试,最多尝试3次
- retry();
- } else {
- // 像promise的resove|reject一样,必须调用一个,否则就卡在这里了
- fail();
- }
- }
- });
tip : 异步组件在路由中使用的很多
二、Suspense组件
Suspense是vue3正在新加的组件,正在实验的一个特性,可能以后都会存在,也可能会不存在~,可以和异步组件结合来使用
Suspense是一个内置的全局组件,该组件有两个插槽
- default : 如果default可以显示,那么就显示default的内容
- fallback : 如果default无法显示,那么会显示fallback插槽的内容
- <suspense>
- <template #default>
- <profile />
- </template>
- <template #fallback>
- <loading />
- </template>
- </suspense>
三、动态组件
举个栗子
比如我们现在想要实现一个功能,点击一个tab-bar,切换不同的组件显示
方式一 : 通过v-if || v-show
1.创建 home, about, profile 三个测试组件
2.引用并写如下代码
- <template>
- <div class="hello-world-layout">
- <ul class="nav">
- <li class="item" v-for="item in tabArr" :key="item" @click="itemClick(item)" :class="{ active: currentTab === item }">{{ item }}</li>
- </ul>
- <template v-if="currentTab === 'home'">
- <home />
- </template>
- <template v-if="currentTab === 'about'">
- <about />
- </template>
- <template v-if="currentTab === 'profile'">
- <profile />
- </template>
- </div>
- </template>
- <script>
- // 引用测试组件
- import home from './pages/home.vue';
- import about from './pages/about.vue';
- import profile from './pages/profile.vue';
- export default {
- components: { home, about, profile },
- name: 'HelloWorld',
- data() {
- return {
- tabArr: ['home', 'about', 'profile'],
- // 指定默认组件
- currentTab: 'home'
- };
- },
- methods: {
- // 点击切换
- itemClick(item) {
- this.currentTab = item;
- }
- }
- };
- </script>
- <style lang="scss" scoped>
- .hello-world-layout {
- .nav {
- padding: 0;
- margin: 0;
- width: 100%;
- display: flex;
- align-items: center;
- list-style: none;
- margin-bottom: 100px;
- }
- .item {
- flex: 1;
- height: 30px;
- line-height: 30px;
- background-color: skyblue;
- &.active {
- background-color: red;
- color: #fff;
- }
- }
- }
- </style>
3.效果

方式二 : 使用动态组件
概念 : 动态组件是使用component组件,通过一个特殊的attribute is 来实现
is : 后面可以跟全局注册的组件名,也可以跟局部注册的组件名(不区分大小写)
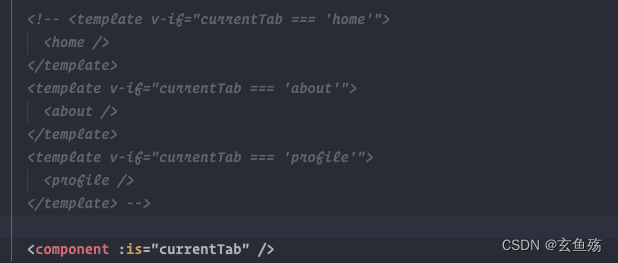
tip : 所以,代码直接可以简化成这个样子!是不是很nice

四、keep-alive
一般会和 路由一起使用,其他地方也可用~
举个栗子
在上面所创建的about.vue文件中我们写如下代码,就是增加一个计数器
- <template>
- <div>about组件</div>
- {{ count }}
- <button class="addClick" @click="count++">+1</button>
- </template>
- <script>
- export default {
- data() {
- return {
- count: 0
- };
- }
- };
- </script>
- <style lang="scss" scoped></style>

但是,不知道你们有没有思考一个问题,如果这个时候我们切换为home组件,然后再跳转回来,那么记得数还回存在吗~答案是否定的,肯定没有了,因为动态组件内部是使用v-if来进行判定的

如果想保留的话,就要使用keep-alive了
keep-alive : 在开发中某些情况我们希望继续保持组件的状态,而不是销毁掉,这个时候可以使用
- <keep-alive>
- <component :is="currentTab" />
- </keep-alive>

keep-alive使用很简单,有几个常用的属性
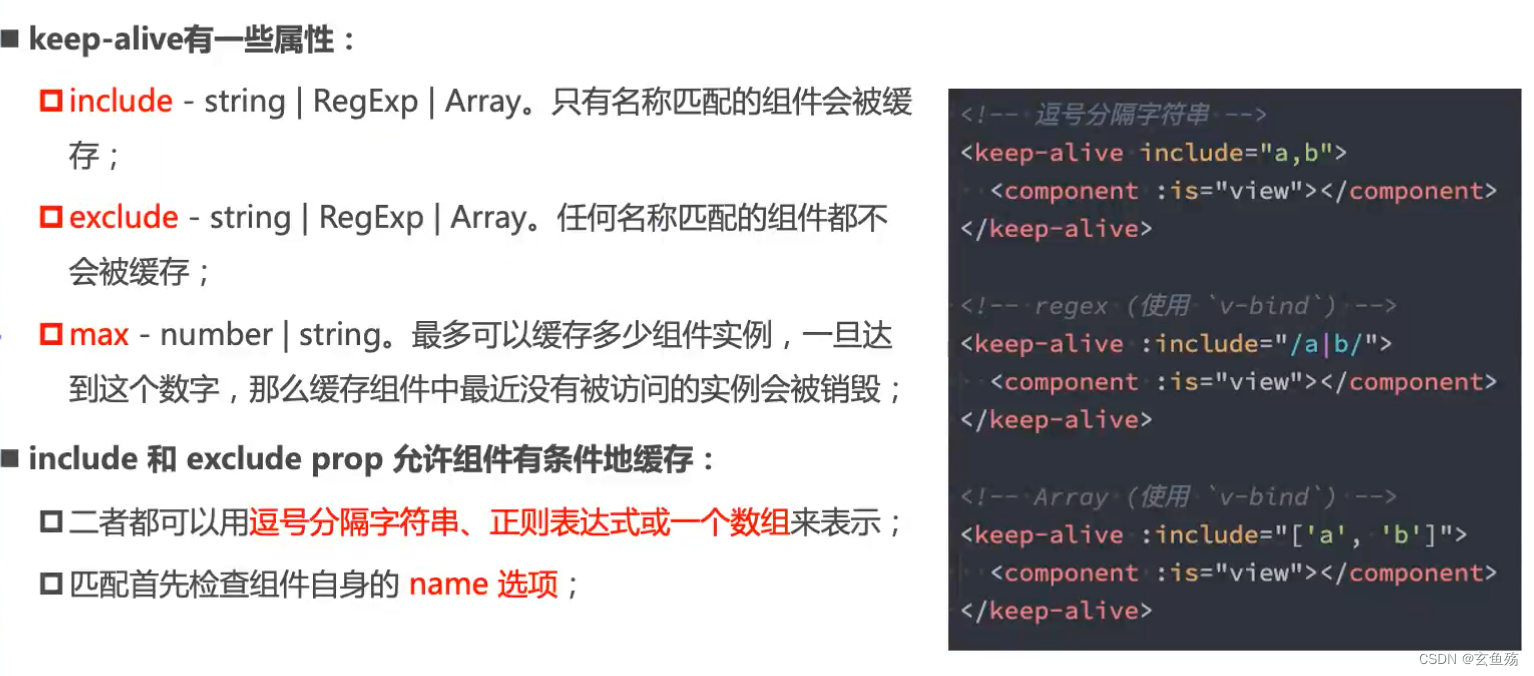
这个根据的是name属性
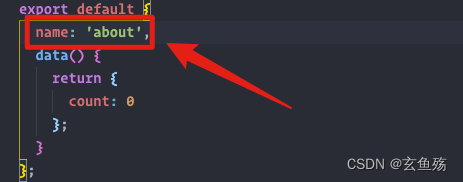
这里涉及两个生命周期 activated || deactivated
对于缓存的组件来说,再次进入该组件,不会执行created或mounted等生命周期的,那么问题来了,如果我们确实希望监听到何时重新进入了该组件,何时离开了该组件
activated : 进入时触发
deactivated : 离开时触发
tip : 第一次进入该组件时,created、mounted、activated会依次执行

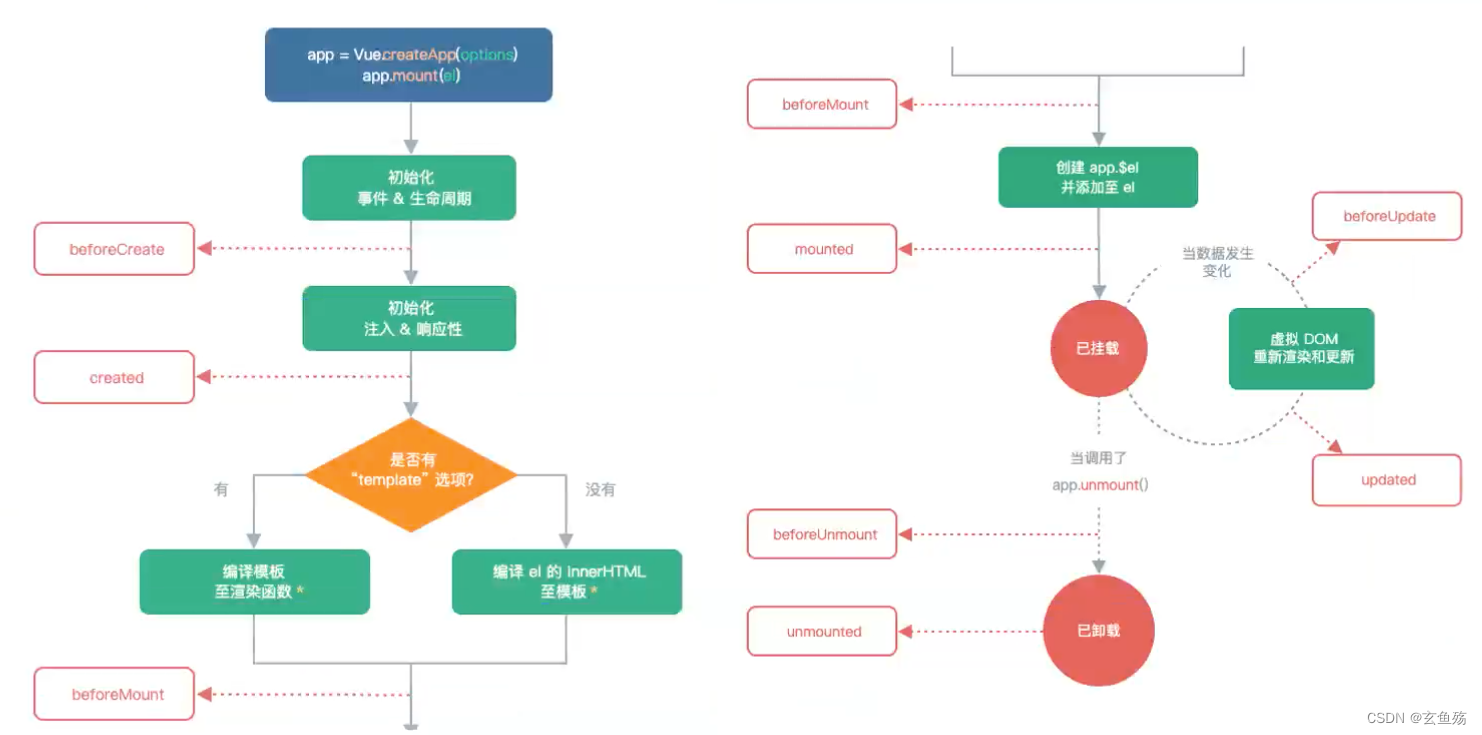
五、生命周期
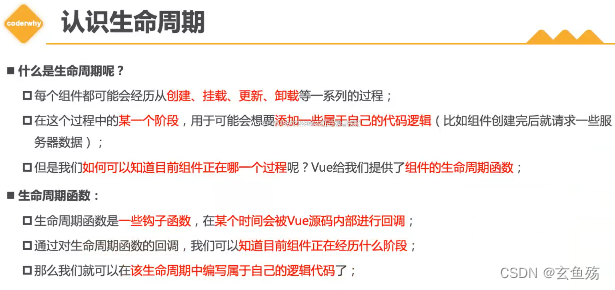
六、v-model
1.元素上使用
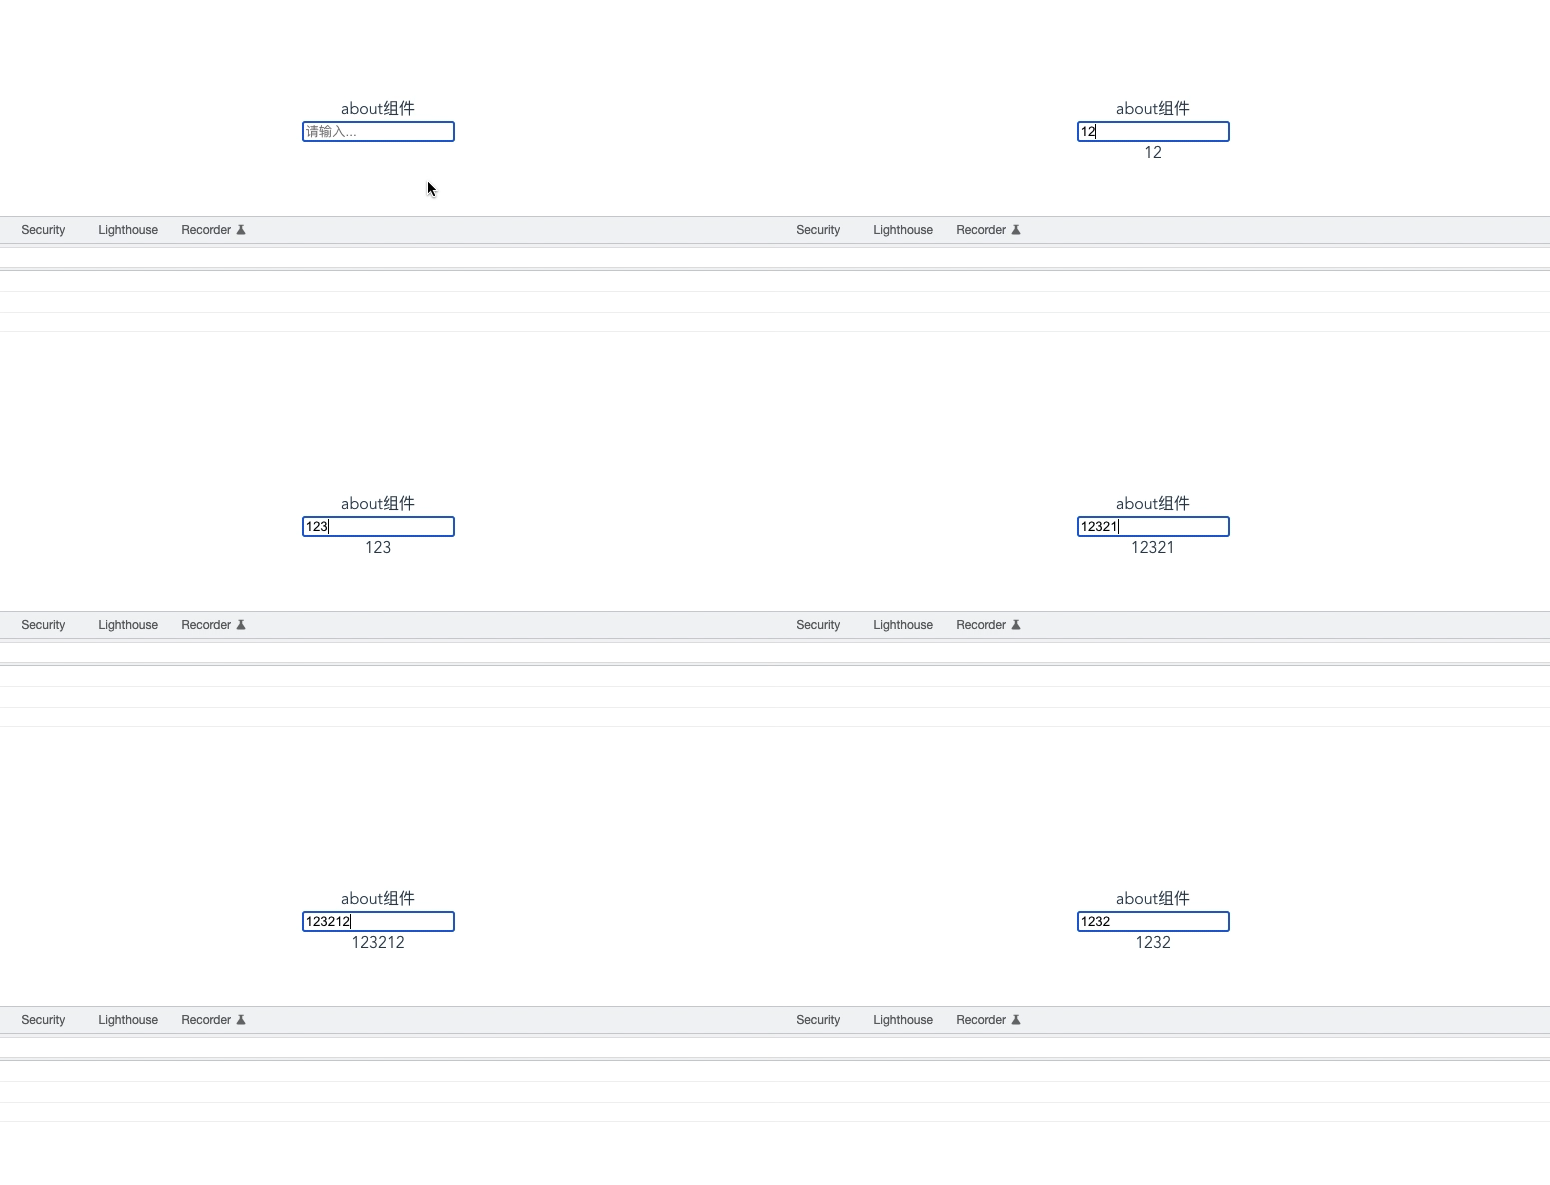
<input type="text" v-model="count" placeholder="请输入..." />相当于
- <!-- 相当于绑定value值,监听input方法改变值 -->
- <input type="text" :value="count" @input="count = $event.target.value" />
整体代码
- <template>
- <div>about组件</div>
- <input type="text" v-model="count" placeholder="请输入..." />
- <div>{{ count }}</div>
- </template>
- <script>
- export default {
- name: 'about',
- data() {
- return {
- count: ''
- };
- }
- };
- </script>
- <style lang="scss" scoped></style>
2.组件上使用
父组件
<home v-model="message" />相当于
- <!-- 相当于传modelValue属性值过去,监听update:modelValue方法更改值 -->
- <home :modelValue="message" @update:modelValue="message = $event" />
整体代码
- <template>
- <div class="hello-world-layout">
- <h1>父组件的message : {{ message }}</h1>
- <!-- 父组件使用v-model传值给子组件 -->
- <home v-model="message" />
- </div>
- </template>
- <script>
- import home from './pages/home.vue';
- export default {
- components: { home },
- name: 'HelloWorld',
- data() {
- return {
- message: '初始化值'
- };
- },
- methods: {}
- };
- </script>
子组件
- <template>
- <div>
- <button @click="btnClick">子组件的按钮</button>
- <h3>子组件的message : {{ modelValue }}</h3>
- <input type="text" :value="modelValue" @input="inputHandle" />
- </div>
- </template>
- <script>
- export default {
- props: {
- // 接受的参数,默认需要这么写
- modelValue: {
- type: String,
- default: ''
- }
- },
- methods: {
- btnClick() {
- // 发射的事件,默认是这样写
- this.$emit('update:modelValue', '我更改了');
- },
- inputHandle(event) {
- this.$emit('update:modelValue', event.target.value);
- }
- }
- };
- </script>
效果

初步优化
如果要实现双向绑定,子组件可以通过computed来实现
- <template>
- <div>
- <h3>子组件的message : {{ sonValue }}</h3>
- <input type="text" v-model="sonValue" />
- </div>
- </template>
- <script>
- export default {
- props: {
- // 接受的参数,默认需要这么写
- modelValue: {
- type: String,
- default: ''
- }
- },
- computed: {
- // 使用计算属性
- sonValue: {
- set(value) {
- // 更改的时候,发射事件让父组件更改
- this.$emit('update:modelValue', value);
- },
- get() {
- // 从父组件获取值
- return this.modelValue;
- }
- }
- }
- };
- </script>
再次优化
- 可以更改名字, v-model:message
- 传递多个属性值
父组件
- <template>
- <div class="hello-world-layout">
- <h1>父组件的message : {{ message }}</h1>
- <!-- 更改默认值,传递多个参数-->
- <home v-model:message="message" v-model:title="title" />
- <h1>父组件的title : {{ title }}</h1>
- </div>
- </template>
- <script>
- import home from './pages/home.vue';
- export default {
- components: { home },
- name: 'HelloWorld',
- data() {
- return {
- message: '初始化值',
- title: '标题一'
- };
- },
- methods: {}
- };
- </script>
子组件
- <template>
- <div>
- <h3>子组件的message : {{ sonMessage }}</h3>
- <input type="text" v-model="sonMessage" />
- </div>
- <hr />
- <div>
- <input type="text" v-model="sonTitle" />
- <h3>子组件的title : {{ sonTitle }}</h3>
- </div>
- </template>
- <script>
- export default {
- props: {
- // 因为更改了默认值,参数得这么写了
- message: {
- type: String,
- default: ''
- },
- title: {
- type: String,
- default: ''
- }
- },
- computed: {
- // 使用计算属性
- sonMessage: {
- set(value) {
- // 更改的时候,发射事件让父组件更改
- this.$emit('update:message', value);
- },
- get() {
- // 从父组件获取值
- return this.message;
- }
- },
- sonTitle: {
- set(value) {
- // 更改的时候,发射事件让父组件更改
- this.$emit('update:title', value);
- },
- get() {
- // 从父组件获取值
- return this.title;
- }
- }
- }
- };
- </script>
效果

七、写在最后
🌟 🌟 谢谢聪明美丽帅气的你看到我的文章,支持一下可否
👍 👍 您的点赞,就是我动力的源泉,让我跨过彼岸
⭐️ ⭐️ 您的收藏,就是我期待的远方,让我目标坚定
✏️ ✏️ 您的评论,就是我心灵的医生,让我完善己身
-
相关阅读:
【OCRA学习】在linux系统安装ORCA,并与xtb联用配置
使用dotnet-monitor sidecar模式 dump docker运行的dotnet程序.
Educational Codeforces Round 124 (Rated for Div. 2) CD题解
机试(2017 cs se)
【Matplotlib绘制图像大全】(八):Matplotlib使用text()添加文字标注
CS224W2.1——传统基于特征的方法(节点层级特征)
普惠联接,让人类诗意地栖居在大地上
基于SpringBoot的在线小说阅读平台系统
MTK平台Metadata的加载(4)—Q版本后
60页政务大数据资源 平台项目可研方案 2022(转发下载)
- 原文地址:https://blog.csdn.net/a15297701931/article/details/120888881