-
学习SpringSecurity这一篇就够了
目录
案例源码地址:https://gitee.com/gzl_com/spring-security.git
一、SpringSecurity 框架简介
1.1、概要
Spring Security 是 Spring 家族中的成员。Spring Security 基于 Spring 框架,提供了一套 Web 应用安全性的完整解决方案。
安全方面的两个主要区域是“
认证”和“授权”。在Web 应用又称之为用户认证和用户授权两个部分,这两点也是 Spring Security 重要核心功能。1.2、Spring Security到底能干什么?
谈论优点的同时,不妨先考虑一下,没有Spring Security我们难道就无法实现认证和授权了吗?
肯定不是的,一般涉及到用户授权,我们都会分为用户表、角色表、用户角色表、菜单表、角色菜单表。
有这五张表,就算没有Spring Security我们依旧可以完成用户菜单等控制。那他究竟在项目中起到了什么作用呢?
-
和 Spring 无缝整合,在SpringBoot下更加简便。在SpringBoot的自动装配下,
可能我们只需要写一行配置,就能实现一个功能。 -
对身份验证和授权的全面且可扩展的支持,到底有多全面?
(1)他提供了登录页和退出页,假如我们着急做项目不想做登录页,只需要引入个依赖添加少量配置就可以快捷的完成一个登录功能
(2)使用SpringSecurity可以轻松完成接口的权限管理,假如不用SpringSecurity,那我们想要指定某个接口只允许拥有某个角色才能访问,这时候我们可能还得用拦截器来做,而且相当麻烦。
(3)这么给你说吧,你做登录和授权,只要是你能想到的,不管是安全方面,还是控制方面,SpringSecurity都能实现,最主要的是通过一个简单配置就能实现。 -
可以防止会话固定、点击劫持、跨站点请求伪造等攻击
1.3、常用术语
- 认证(Identification): 根据声明者持有的特定信息,来确认声明者的身份
- 例如身份证、用户名/密码、手机(包括短信、二维码、手势密码)、电子邮箱、生物特征(虹膜、面部、指纹、语音等)
- 高安全要求的场景下,会使用多种认证方式组合进行身份校验,即多因素认证
- 授权(Authorization): 资源所有者委派执行者,赋予其指定范围的权限,执行对资源的操作
- 授权实体例如银行卡、门禁卡、钥匙、证书等
- 例如web服务的session机制、浏览器的cookie机制、授权令牌token等
- 鉴权(Authentication): 对一个声明者的身份权利的真实性进行鉴别
- 授权和鉴权是一个一一对应的流程,有授权才会去鉴权
- 权限控制(Access/Permission Control): 权限控制就是授权和鉴权的统称
- 主体:谁使用系统谁就是主体。
- 可以是使用系统的用户 或 设备 或 从其他系统远程登录的用户 等等。
1.4、历史
Spring Security的前身并非称呼为Spring Security,而是叫Acegi Security;但这并不意味着它与Spring毫无关系,它仍然是为Spring提供安全支持的。Acegi Security搭上了Spring的便车,摇身一变成为Spring Security,但即便如此其还是继承了AcegiSecurity的臃肿繁琐的配置,学习成本相对还是十分的高。
直到有一天, Spring Boot横空出世,提出约定优于配置等理念,极大的简化了繁琐的配置; SpringSecurity也收益于此,一飞冲天。
1.5、同款产品对比
SpringSecurity 特点:
- SpringSecurity是Spring 技术栈的组成部分,能和Spring 无缝整合。
- 全面的权限控制。
- 重量级。
Shiro 特点:
- Apache 旗下的轻量级权限控制框架。
- Shiro 主张的理念是把复杂的事情变简单。针对对
性能有更高要求的互联网应用有更好表现。
在 SSM 中整合 Spring Security 都是比较麻烦的操作,所以,Spring Security 虽然功能比 Shiro 强大,但是使用者 反而没有 Shiro 多(Shiro 虽然功能没有Spring Security 多,但是对于大部分项目而言,Shiro 也够用了)。
自从有了 Spring Boot 之后,Spring Boot 对于 Spring Security 提供了自动化配置方案,可以使用更少的配置来使用 Spring Security。因此,一般来说,常见的安全管理技术栈的组合是这样的:
- SSM + Shiro
- Spring Boot/Spring Cloud + Spring Security
以上只是一个推荐的组合而已,如果单纯从技术上来说,无论怎么组合,都是可以运行的。
1.6、模块划分

二、SpringSecurity 入门案例
2.1、创建项目
温馨提示:这里只是创建项目,如果会的直接跳过,无视就可以!这里选择springboot项目,然后创建项目的时候默认选择的default,但是我用的是手机热点,是创建不出来的,所以自己添加了地址http://start.springboot.io/然后改为了Custom,说白了默认的是https,我改为了http然后创建成功了,至于为什么创建不成功1、可能是网络原因 2、可能是开热点原因


添加这两个即可。

2.2、创建配置类
任何框架只要是基于spring 来整合的框架,我们想要改框架配置,有以下方式:
- 实现接口,重写方法,然后放到容器里面
- 要么就是继承类,重写方法,然后放到容器里面
- 要么就是直接new一个框架提供好的类,然后通过@Bean注解 放到容器里面
为什么全是放到容器里面?因为任何框架和spring整合都有一点,他都会检测容器里面是否存在配置,如果没有就会创建一个默认配置放到容器里面,如果有则使用容器里面的。
WebSecurityConfigurerAdapter就是Security的核心配置类,一般我们要用Security都会涉及到这个类,一般就是继承这个类,重写方法。
package com.gzl.cn.springsecuritydemo1.config; import org.springframework.context.annotation.Configuration; import org.springframework.security.config.annotation.web.builders.HttpSecurity; import org.springframework.security.config.annotation.web.configuration.WebSecurityConfigurerAdapter; // @Configuration注解的作用就是放到容器里面 @Configuration public class SecurityConfig extends WebSecurityConfigurerAdapter { @Override protected void configure(HttpSecurity http) throws Exception { http.formLogin() // 表单登录 .and() .authorizeRequests() // 认证配置 .anyRequest() // 任何请求 .authenticated(); // 都需要身份验证 } }- 1
- 2
- 3
- 4
- 5
- 6
- 7
- 8
- 9
- 10
- 11
- 12
- 13
- 14
- 15
- 16
- 17
- 18
- 19
- 20
2.3、启动测试

默认的用户名:user
密码在项目启动的时候在控制台会打印,
注意每次启动的时候密码都回发生变化!
输入用户名,密码,这样表示可以访问了,404 表示我们没有这个控制器,但是我们可以访问了。

2.4、添加访问成功后的地址
package com.gzl.cn.springsecuritydemo1.controller; import org.springframework.stereotype.Controller; import org.springframework.web.bind.annotation.GetMapping; import org.springframework.web.bind.annotation.ResponseBody; @Controller public class IndexController { @GetMapping("index") @ResponseBody public String index() { return "success"; } }- 1
- 2
- 3
- 4
- 5
- 6
- 7
- 8
- 9
- 10
- 11
- 12
- 13
- 14
修改配置文件,改为登录成功之后跳到这个请求上:

这时候会发现,不登录是访问不了这个http://localhost:8080/index请求的,访问他就会自动跳到登录页,原因是我们设置了所有请求必须登录认证,我们是入门练习自己并没有设置登录页,所以他就自动跳到了SpringSecurity提供的默认登录页,登录成功后默认跳转到index请求。
2.5、总结
通过入门案例我们不难发现,我们只添加了一个简单的配置,SpringSecurity便已经将登录功能做好了,包括请求拦截、登录跳转等…这就是SpringSecurity真正的作用,在我们做登录的时候,基本上我们能想到的功能SpringSecurity都能帮我们轻松实现。
三、spring Security原理
3.1、spring Security过滤器
spring Security采用责任链的设计模式,它有一条很长的过滤器链。通过不同的过滤器处理相应的业务流程,如登录认证、权限过滤等。
其中15条过滤器是很常用的,业务中经常涉及到的,每一个过滤器都有自己的作用,通过了解过滤器也能更清晰的学习SpringSecurity的功能。
-
org.springframework.security.web.context.SecurityContextPersistenceFilter:SecurityContextPersistenceFilter主要是使用SecurityContextRepository在session中保存或更新一个SecurityContext,并将SecurityContext给以后的过滤器使用,来为后续filter建立所需的上下文。SecurityContext中存储了当前用户的认证以及权限信息。 -
org.springframework.security.web.context.request.async.WebAsyncManagerIntegrationFilter:此过滤器用于集成SecurityContext到Spring异步执行机制中的WebAsyncManager -
org.springframework.security.web.header.HeaderWriterFilter:向请求的Header中添加相应的信息,可在http标签内部使用security:headers来控制 -
org.springframework.security.web.csrf.CsrfFilter:csrf又称跨域请求伪造,SpringSecurity会对所有post请求验证是否包含系统生成的csrf的token信息,如果不包含,则报错。起到防止csrf攻击的效果。 -
org.springframework.security.web.authentication.logout.LogoutFilter:匹配 URL为/logout的请求,实现用户退出,清除认证信息。 -
org.springframework.security.web.authentication.UsernamePasswordAuthenticationFilter:认证操作全靠这个过滤器,默认匹配URL为/login且必须为POST请求。 -
org.springframework.security.web.authentication.ui.DefaultLoginPageGeneratingFilter:如果没有在配置文件中指定认证页面,则由该过滤器生成一个默认认证页面。 -
org.springframework.security.web.authentication.ui.DefaultLogoutPageGeneratingFilter:由此过滤器可以生产一个默认的退出登录页面 -
org.springframework.security.web.authentication.www.BasicAuthenticationFilter:此过滤器会自动解析HTTP请求中头部名字为Authentication,且以Basic开头的头信息。 -
org.springframework.security.web.savedrequest.RequestCacheAwareFilter:通过HttpSessionRequestCache内部维护了一个RequestCache,用于缓存HttpServletRequest -
org.springframework.security.web.servletapi.SecurityContextHolderAwareRequestFilter:针对ServletRequest进行了一次包装,使得request具有更加丰富的API -
org.springframework.security.web.authentication.AnonymousAuthenticationFilter:当SecurityContextHolder中认证信息为空,则会创建一个匿名用户存入到SecurityContextHolder中。
spring security为了兼容未登录的访问,也走了一套认证流程,只不过是一个匿名的身份。 -
org.springframework.security.web.session.SessionManagementFilter:SecurityContextRepository限制同一用户开启多个会话的数量 -
org.springframework.security.web.access.ExceptionTranslationFilter:异常转换过滤器位于整个springSecurityFilterChain的后方,用来转换整个链路中出现的异常 -
org.springframework.security.web.access.intercept.FilterSecurityInterceptor:获取所配置资源访问的授权信息,根据SecurityContextHolder中存储的用户信息来决定其是否有权限。
3.2、ExceptionTranslationFilter
ExceptionTranslationFilter:是个异常过滤器,用来处理在认证授权过程中抛出的异常

通过这里不难发现,框架同样也是try-catch方式来进行处理异常。3.3、UsernamePasswordAuthenticationFilter
UsernamePasswordAuthenticationFilter :对/login 的 POST 请求做拦截,校验表单中用户名,密码。
通过源码不难发现:一旦我们使用SpringSecurity来作为认证框架,我们要写自己的登录的接口的话,
一定要用post请求,并且用户名和密码是固定的,只能用username和password来作为参数名,因为这是SpringSecurity默认的(如果执意要改,可以通过配置文件进行改)。
3.4、默认生成密码的源码探究
1、先追踪日志是从哪打印出来的
和用户相关的自动化配置类在 UserDetailsServiceAutoConfiguration 里边,在该类的 getOrDeducePassword 方法中,我们看到如下一行日志:

2、getOrDeducePassword()是被谁调用的?
是被UserDetailsServiceAutoConfiguration类当中注入InMemoryUserDetailsManager的时候调用的,代码有点长,我就给复制出来了,避免看不见。@Bean @Lazy public InMemoryUserDetailsManager inMemoryUserDetailsManager(SecurityProperties properties, ObjectProvider<PasswordEncoder> passwordEncoder) { User user = properties.getUser(); List<String> roles = user.getRoles(); return new InMemoryUserDetailsManager(new UserDetails[]{org.springframework.security.core.userdetails.User.withUsername(user.getName()) .password(this.getOrDeducePassword(user, (PasswordEncoder)passwordEncoder.getIfAvailable())) .roles(StringUtils.toStringArray(roles)).build()}); }- 1
- 2
- 3
- 4
- 5
- 6
- 7
- 8
- 9
3、isPasswordGenerated 方法返回 true才打印
isPasswordGenerated实际上是user对象passwordGenerated属性,而user类是SecurityProperties一个内部类对象。

打开SecurityProperties对象不难发现,他里面用到了@ConfigurationProperties注解,这个注解主要作用就是读取application配置文件当中的值,注入到java对象属性当中。下面可以看出password默认是使用的uuid,然后账号是user,也就是假如application当中配置password了,那他将不再是自动生成的密码,属性将被覆盖。

@ConfigurationProperties注解是通过调用对象的set方法进行赋值的。也就是我一旦在application当中设置值,那他将不再打印。
4、得出结论可以在配置文件进行配置账号密码,如下是配置方式,大家可以去进行试验,这里我就不再截图说了。
spring.security.user.name=zhangsan spring.security.user.password=123456- 1
- 2
3.5、UserDetailsService 接口讲解
当什么也没有配置的时候,账号和密码是由 Spring Security 定义生成的。而在实际项目中账号和密码都是从数据库中查询出来的。 所以我们要通过自定义认证逻辑。
如果需要自定义逻辑时,只需要实现 UserDetailsService 接口即可。1、为什么要实现UserDetailsService?
回顾刚刚说的UserDetailsServiceAutoConfiguration,首先这个类是springboot给我们默认配置的
主体类,当我们没有自己的登录逻辑的时候,默认他就会走这个地方来获取主体。记住一点这里是获取主体,而并不是直接进行密码比较的地方。正常我们写登录可能就是前端传过来账号密码,然后后端收到账号密码,直接通过账号密码两个条件去数据库查询,查到了就登录成功,查询不到就失败。SpringSecurity他不是这样的,流程如下:
1、前端将账号和密码给后端(这里直接以明文举例)
2、后端通过username获取用户信息(获取不到那证明连这个账号都没有)
3、获取到之后进行密码比对,看看是否正确(这个过程我们称之为身份认证)。
UserDetailsService接口主要的作用就是流程的第二个步骤。一般AutoConfiguration结尾的类都是springboot的自动装配类,springboot之所以用任何一个框架都可以开箱即用,就是这些自动装配类,也就是当我们引用某个框架的时候,springboot内部已经准备好了这个框架的默认配置,我们根本不需要做任何改动,可能就轻松实现了框架整合,当然默认配置有时候会不满足我们的需求,这时候我们就需要进行注入自己的配置。
2、springboot是如何知道你有配置了,不再用他提供的默认配置了的呢?
原因是springboot提供的默认配置类用到了以下注解:
@Configuration(proxyBeanMethods = false):根据注释proxyBeanMethods是为了让使用@Bean注解的方法被代理而实现bean的生命周期的行为。(生命周期就是@scope 属性)
1.设置为true,那么直接调用方法获取bean,不会创建新的bean,而是会走bean的生命周期的行为。
2.设置为false, 那么直接调用方法获取bean,会创建新的bean,且不会走bean的生命周期的行为。@ConditionalOnClass({AuthenticationManager.class}):就是说只有在classpath下能找到AuthenticationManager才会构建这个bean。@ConditionalOnBean({ObjectPostProcessor.class}):;它是一种依赖,表示当存在ObjectPostProcessor这个bean,才注册当前这个bean。@ConditionalOnMissingBean:当你的bean被注册之后,如果注册相同类型的bean,就不会成功,它会保证你的bean只有一个,即你的实例只有一个,当你注册多个相同的bean时,会出现异常。

通过@ConditionalOnMissingBean注解当中会发现他有对UserDetailsService 判断,
UserDetailsService 自然也成为了SpringSecurity最主要的接口。我把UserDetailsService 称之为了主体业务类。容器里面有主体业务类的话,就会走容器存在的,如果没有就会使用SpringSecurity默认的主体业务类(也就是我们刚刚所看到的,没有的话会走SecurityProperties对象当中的内部user类对象)。3、重点了解UserDetailsService接口
UserDetailsService接口只有一个方法,这个方法返回值 UserDetails,
UserDetails这个类是系统默认的用户“主体"。登录的时候是会访问这个方法的,并且会将登录传的username以参数形式传过来。我们需要做的就是实现UserDetailsService接口,然后重写这个方法,并返回一个UserDetails对象。在这个方法我们一般有如下步骤:
1、根据username查询数据库判断该用户是否存在。
2、将从数据库查出来的账号密码封装到UserDetails对象当中,作为方法返回值返回。
4、了解UserDetails接口UserDetails方法:
// 表示获取登录用户所有权限 Collection<? extends GrantedAuthority> getAuthorities(); // 表示获取密码 String getPassword(); // 表示获取用户名 String getUsername(); // 表示判断账户是否过期 boolean isAccountNonExpired(); // 表示判断账户是否被锁定 boolean isAccountNonLocked(); // 表示凭证{密码}是否过期 boolean isCredentialsNonExpired(); // 表示当前用户是否可用 boolean isEnabled();- 1
- 2
- 3
- 4
- 5
- 6
- 7
- 8
- 9
- 10
- 11
- 12
- 13
- 14
5、了解UserDetails实现类
以后我们只需要使用 User 这个实体类即可!当然也可以实现UserDetails接口自定义一个主体类。

注意这个User类可不是刚刚提到的SecurityProperties内部类User了。

6、用法示例loadUserByUsername方法主要作用就是返回主体信息,至于前端传的密码和主题信息的密码对不对的上,不是这块来操心的,那是由专门的身份认证来做的。
import org.springframework.security.core.authority.AuthorityUtils; import org.springframework.security.core.userdetails.User; import org.springframework.security.core.userdetails.UserDetails; import org.springframework.security.core.userdetails.UserDetailsService; import org.springframework.security.core.userdetails.UsernameNotFoundException; import org.springframework.stereotype.Service; @Service public class LoginService implements UserDetailsService { @Override public UserDetails loadUserByUsername(String username) throws UsernameNotFoundException { // 1.根据username查询数据库,判断用户名是否存在 // 2.将数据库当中查出来的username和pwd封装到user对象当中返回 第三个参数表示权限 return new User(username, pwd, AuthorityUtils.commaSeparatedStringToAuthorityList("admin,")); } }- 1
- 2
- 3
- 4
- 5
- 6
- 7
- 8
- 9
- 10
- 11
- 12
- 13
- 14
- 15
- 16
- 17
- 18
- 19
3.6、PasswordEncoder 接口讲解
1、了解PasswordEncoder 接口
PasswordEncoder主要负责的就是密码和 主题信息业务类返回的密码进行比对的时候,所要使用的加密方式。
// 表示把参数按照特定的解析规则进行解析 String encode(CharSequence rawPassword); // 表示验证从存储中获取的编码密码与编码后提交的原始密码是否匹配。如果密码匹配,则返回 true;如果不匹配,则返回 false。第一个参数表示需要被解析的密码。第二个参数表示存储的密码。 boolean matches(CharSequence rawPassword, String encodedPassword); // 表示如果解析的密码能够再次进行解析且达到更安全的结果则返回 true,否则返回false。默认返回 false。 default boolean upgradeEncoding(String encodedPassword) { return false; }- 1
- 2
- 3
- 4
- 5
- 6
- 7
接口实现类:

BCryptPasswordEncoder 是 Spring Security 官方推荐的密码解析器,平时多使用这个解析器。BCryptPasswordEncoder 是对 bcrypt 强散列方法的具体实现。是基于 Hash 算法实现的单向加密。可以通过 strength 控制加密强度,默认 10.
单向加密就是通过密文获取不了明文,bcrypt 加密算法每次加密同样的内容返回的密文是不一样的,但是对比密文的时候是一样的,举例:密码是123加密后成了a存到了数据库,这时候登录前端传的还是123密码,然后进行加密,加密后的密文会发现根本不是a,是b,但是a和b两个密文通过加密算法提供的对比方法,在对比的时候是相等的,这就是这个加密算法的神奇。
2、注册的时候加密
如下代码是在注册账号的时候使用的,然后通过如下方式对密码进行加密存放到数据库当中,这样主体业务类从数据库查询出来的就是加密信息。
import org.springframework.security.crypto.bcrypt.BCryptPasswordEncoder; public class BCryptTest { public static void main(String[] args) { // 创建密码解析器 BCryptPasswordEncoder bCryptPasswordEncoder = new BCryptPasswordEncoder(); // 对密码进行加密 String pwd = bCryptPasswordEncoder.encode("gxs123"); // 打印加密之后的数据 System.out.println("加密之后数据:\t"+pwd); //判断原字符加密后和加密之前是否匹配 boolean result = bCryptPasswordEncoder.matches("gxs123", pwd); // 打印比较结果 System.out.println("比较结果:\t"+result); } }- 1
- 2
- 3
- 4
- 5
- 6
- 7
- 8
- 9
- 10
- 11
- 12
- 13
- 14
- 15
- 16
- 17
运行结果:

3、认证的时候,加密应该如何来用呢?上面说到了使用BCrypt将密码加密存到数据库,下面是讲登录时候 密码如何进行加密 然后和数据库当中的密文进行比较(所谓比较也就是我们所说的真正的认证过程)。
这里最重要的就是
WebSecurityConfigurerAdapter接口下的configure方法,这个方法就是我们要实现的认证逻辑。其实也可以不重写configure方法,他默认就会去容器里面找PasswordEncoder实现类来作为认证的时候 密码加密 和数据库比较,以及userDetailsService实现类。@EnableGlobalMethodSecurity(prePostEnabled = true, securedEnabled = true) public class SecurityConfig extends WebSecurityConfigurerAdapter { /** * 自定义用户认证逻辑 */ @Autowired private UserDetailsService userDetailsService; @Bean public BCryptPasswordEncoder bCryptPasswordEncoder() { return new BCryptPasswordEncoder(); } /** * 身份认证接口 */ @Override protected void configure(AuthenticationManagerBuilder auth) throws Exception { // 告诉SpringSecurity 我们要使用自己定义的userDetailsService来通过username来获取主体,并且使用了BCryptPasswordEncoder加密进行密码比较 auth.userDetailsService(userDetailsService).passwordEncoder(bCryptPasswordEncoder()); } }- 1
- 2
- 3
- 4
- 5
- 6
- 7
- 8
- 9
- 10
- 11
- 12
- 13
- 14
- 15
- 16
- 17
- 18
- 19
- 20
- 21
- 22
- 23
- 24
4、使用BCryptPasswordEncoder加密就彻底安全了吗?
答案不是,BCrypt只是在数据库层面加密了,那请求层呢?前端直接传明文安全吗?所以一般我们会在请求层面使用一个可解密的加密算法,例如对称加密DES,像我目前的项目就是用的DES对称加密。
四、SpringSecurity Web 认证方案
4.1、最基础的认证功能
上面做的入门案例会发现我们账号密码都是通过配置存到内存当中的,在实际开发当中这些肯定是要入库的。本次案例主要是练习真正的web认证方案。案例持久层用到了
mybatis-plus。4.1.1、创建项目
引入依赖,这里需要注意的是mybatis-plus在springboot并没有版本管理,所以我们需要指定mybatis-plus版本,不然就报错。
<dependency> <groupId>org.springframework.boot</groupId> <artifactId>spring-boot-starter-security</artifactId> </dependency> <dependency> <groupId>org.springframework.boot</groupId> <artifactId>spring-boot-starter-web</artifactId> </dependency> <dependency> <groupId>com.baomidou</groupId> <artifactId>mybatis-plus-boot-starter</artifactId> <version>3.4.2</version> </dependency> <dependency> <groupId>mysql</groupId> <artifactId>mysql-connector-java</artifactId> <scope>runtime</scope> </dependency> <!--lombok 用来简化实体类--> <dependency> <groupId>org.projectlombok</groupId> <artifactId>lombok</artifactId> <optional>true</optional> </dependency>- 1
- 2
- 3
- 4
- 5
- 6
- 7
- 8
- 9
- 10
- 11
- 12
- 13
- 14
- 15
- 16
- 17
- 18
- 19
- 20
- 21
- 22
- 23
- 24
4.1.2、初始化sql
create table users( id bigint primary key auto_increment, username varchar(20) unique not null, password varchar(100) ); -- 密码 123456 使用了BCrypt加密 insert into users values(1,'张san','$2a$10$ZglYem2Zs8E4ETbLwaiA4OjXaTZX9w8wJ7x8LZdpGisdtI9VlIfvO'); -- 密码 123456 insert into users values(2,'李si','$2a$10$ZglYem2Zs8E4ETbLwaiA4OjXaTZX9w8wJ7x8LZdpGisdtI9VlIfvO'); create table role( id bigint primary key auto_increment, name varchar(20) ); insert into role values(1,'管理员'); insert into role values(2,'普通用户'); create table role_user( uid bigint, rid bigint ); insert into role_user values(1,1); insert into role_user values(2,2); create table menu( id bigint primary key auto_increment, name varchar(20), url varchar(100), parentid bigint, permission varchar(20) ); insert into menu values(1,'系统管理','',0,'menu:system'); insert into menu values(2,'用户管理','',0,'menu:user'); create table role_menu( mid bigint, rid bigint ); insert into role_menu values(1,1); insert into role_menu values(2,1); insert into role_menu values(2,2);- 1
- 2
- 3
- 4
- 5
- 6
- 7
- 8
- 9
- 10
- 11
- 12
- 13
- 14
- 15
- 16
- 17
- 18
- 19
- 20
- 21
- 22
- 23
- 24
- 25
- 26
- 27
- 28
- 29
- 30
- 31
- 32
- 33
- 34
- 35
- 36
- 37
- 38
- 39
- 40
- 41
4.1.3、添加配置
import org.springframework.context.annotation.Bean; import org.springframework.context.annotation.Configuration; import org.springframework.security.config.annotation.web.builders.HttpSecurity; import org.springframework.security.config.annotation.web.configuration.WebSecurityConfigurerAdapter; import org.springframework.security.crypto.bcrypt.BCryptPasswordEncoder; import org.springframework.security.crypto.password.PasswordEncoder; @Configuration public class SecurityConfig extends WebSecurityConfigurerAdapter { // 注入 PasswordEncoder 类到 spring 容器中 @Bean public PasswordEncoder passwordEncoder() { return new BCryptPasswordEncoder(); } @Override protected void configure(HttpSecurity http) throws Exception { http.formLogin() // 表单登录 .defaultSuccessUrl("/index") // 登录成功之后跳转到哪个 url .failureForwardUrl("/fail") // 登录失败之后跳转到哪个 url .and() .authorizeRequests() // 认证配置 .anyRequest() // 任何请求 .authenticated(); // 都需要身份验证 // 关闭 csrf http.csrf().disable(); } }- 1
- 2
- 3
- 4
- 5
- 6
- 7
- 8
- 9
- 10
- 11
- 12
- 13
- 14
- 15
- 16
- 17
- 18
- 19
- 20
- 21
- 22
- 23
- 24
- 25
- 26
- 27
- 28
- 29
4.1.4、添加控制器
提供了两个接口,一个是登录成功后跳转的,一个是登录失败跳转的。
import org.springframework.stereotype.Controller; import org.springframework.web.bind.annotation.GetMapping; import org.springframework.web.bind.annotation.PostMapping; import org.springframework.web.bind.annotation.ResponseBody; @Controller public class IndexController { @GetMapping("index") @ResponseBody public String index() { return "success"; } @PostMapping("fail") @ResponseBody public String fail() { return "fail"; } }- 1
- 2
- 3
- 4
- 5
- 6
- 7
- 8
- 9
- 10
- 11
- 12
- 13
- 14
- 15
- 16
- 17
- 18
- 19
- 20
4.1.5、添加实体类
import lombok.Data; @Data public class Users { private Long id; private String username; private String password; }- 1
- 2
- 3
- 4
- 5
- 6
- 7
- 8
4.1.6、添加mapper
在添加之前有一点需要注意,mybatis和mybatis-plus一样,mapper都需要添加一个扫描注解。
在启动类添加即可。
@MapperScan("com.gzl.cn.springsecuritywebdemo.mapper")- 1
import com.baomidou.mybatisplus.core.mapper.BaseMapper; import com.gzl.cn.springsecuritywebdemo.entity.Users; import org.springframework.stereotype.Repository; @Repository public interface UsersMapper extends BaseMapper<Users> { }- 1
- 2
- 3
- 4
- 5
- 6
- 7
4.1.7、添加主体业务类
这个类就相当重要了,上面已经都讲过了,我再简单絮叨一嘴。
这个类主要做了两个事:- 根据账号查询用户密码,顺便判断账户是否存在。
- 将从数据库查询出来的账号密码,放到User对象当中并返回。
User对象第三个参数是List,这个list是真正意义上的授权。在下面案例当中我们会用到,并进行讲解,这个案例暂且没用到。
UserDetailsService接口:
主要作用就是返回主体,并且主体当中会携带授权(授权这个权可以是菜单权限,也可以是角色权限)。import com.baomidou.mybatisplus.core.conditions.query.QueryWrapper; import com.gzl.cn.springsecuritywebdemo.entity.Users; import com.gzl.cn.springsecuritywebdemo.mapper.UsersMapper; import org.springframework.beans.factory.annotation.Autowired; import org.springframework.security.core.GrantedAuthority; import org.springframework.security.core.authority.AuthorityUtils; import org.springframework.security.core.userdetails.User; import org.springframework.security.core.userdetails.UserDetails; import org.springframework.security.core.userdetails.UserDetailsService; import org.springframework.security.core.userdetails.UsernameNotFoundException; import org.springframework.stereotype.Service; import java.util.List; @Service public class MyUserDetailsService implements UserDetailsService { @Autowired private UsersMapper usersMapper; @Override public UserDetails loadUserByUsername(String s) throws UsernameNotFoundException { QueryWrapper<Users> wrapper = new QueryWrapper(); wrapper.eq("username", s); Users users = usersMapper.selectOne(wrapper); if (users == null) { throw new UsernameNotFoundException("用户名不存在!"); } System.out.println(users); List<GrantedAuthority> auths = AuthorityUtils.commaSeparatedStringToAuthorityList("role"); return new User(users.getUsername(), users.getPassword(), auths); } }- 1
- 2
- 3
- 4
- 5
- 6
- 7
- 8
- 9
- 10
- 11
- 12
- 13
- 14
- 15
- 16
- 17
- 18
- 19
- 20
- 21
- 22
- 23
- 24
- 25
- 26
- 27
- 28
- 29
- 30
- 31
- 32
- 33
- 34
4.1.8、项目最终结构

4.1.9、测试
http://localhost:8080/login
1、在未登录前是不能访问http://localhost:8080/index的。
2、账号zhangsan 密码123456,登录失败会进入fail请求,成功会进入index请求。在前后端分离项目当中,一般我们使用SpringSecurity当中不会用到配置请求成功页面,以及请求失败页面,这些都是由前端直接在页面上控制的。
4.2、基于角色进行访问控制
通过上面的案例我们发现他只是做了请求认证,并没有对权限进行限制:我们基于上面的案例进行添加权限限制。
权限控制一般系统都会分为
角色控制和菜单控制,菜单控制我们又分为了页面菜单和按钮控制。所谓按钮级别控制,也就是指定Java某个接口必须具备什么角色,或者具备按钮权限,才可以访问。在一些比较早的项目当中没用到SpringSecurity,他们一般是这么做的:
登录的时候前端访问后端,拿到这个用户有哪些权限,这个权限包含了菜单权限,以及按钮权限,当不具备某个按钮权限的时候,前端直接屏蔽掉。然后拦截器只有一层拦截,就是只针对登录成功的人就能访问所有接口,对于普通人来说可能你确实做了这个功能,但是对于程序员来说那只是一个假象。一旦我们登录成功,我们知道接口名称,便可以通过接口直接访问。
SpringSecurity早就已经都想到了,我们只需要通过简单的配置即可避免这样的问题。
4.2.1、添加实体类
import lombok.Data; @Data public class Menu { private Long id; private String name; private String url; private Long parentId; private String permission; }- 1
- 2
- 3
- 4
- 5
- 6
- 7
- 8
- 9
- 10
import lombok.Data; @Data public class Role { private Long id; private String name; }- 1
- 2
- 3
- 4
- 5
- 6
- 7
4.2.2、编写接口与实现类
import com.gzl.cn.springsecuritywebdemo.entity.Menu; import com.gzl.cn.springsecuritywebdemo.entity.Role; import java.util.List; public interface UserInfoMapper { /** * 根据用户 Id 查询用户角色 * * @param userId * @return */ List<Role> selectRoleByUserId(Long userId); /** * 根据用户 Id 查询菜单 * * @param userId * @return */ List<Menu> selectMenuByUserId(Long userId); }- 1
- 2
- 3
- 4
- 5
- 6
- 7
- 8
- 9
- 10
- 11
- 12
- 13
- 14
- 15
- 16
- 17
- 18
- 19
- 20
- 21
- 22
- 23
需要在 resource/mapper 目录下自定义 UserInfoMapper.xml
<?xml version="1.0" encoding="UTF-8"?> <!DOCTYPE mapper PUBLIC "-//mybatis.org//DTD Mapper 3.0//EN" "http://mybatis.org/dtd/mybatis-3-mapper.dtd"> <mapper namespace="com.gzl.cn.springsecuritywebdemo.mapper.UserInfoMapper"> <!--根据用户 Id 查询角色信息--> <select id="selectRoleByUserId" resultType="com.gzl.cn.springsecuritywebdemo.entity.Role"> SELECT r.id, r.NAME FROM role r INNER JOIN role_user ru ON ru.rid = r.id WHERE ru.uid = #{0} </select> <!--根据用户 Id 查询权限信息--> <select id="selectMenuByUserId" resultType="com.gzl.cn.springsecuritywebdemo.entity.Menu"> SELECT m.id, m.NAME, m.url, m.parentid, m.permission FROM menu m INNER JOIN role_menu rm ON m.id = rm.mid INNER JOIN role r ON r.id = rm.rid INNER JOIN role_user ru ON r.id = ru.rid WHERE ru.uid = #{0} </select> </mapper>- 1
- 2
- 3
- 4
- 5
- 6
- 7
- 8
- 9
- 10
- 11
- 12
- 13
- 14
- 15
- 16
- 17
- 18
- 19
- 20
- 21
- 22
- 23
- 24
- 25
- 26
- 27
- 28
- 29
- 30
- 31
- 32
4.2.3、调整MyUserDetailsService
这里最主要的改动是,从数据库查询出来角色和菜单数据存到了
List<GrantedAuthority>集合当中,并且放到了user对象属性当中返回。然后我们在访问某个接口的时候,SpringSecurity会去拿返回的主体信息对比,是否具备该接口的权限,或者是是否具备该角色。
注意:在实际开发当中,我们可能涉及不到某些接口必须用哪个角色才能访问的场景,而只是利用角色来分配菜单,然后给用户再分配角色。
如果要是这样的话,我们只需要根据用户id来关联查询角色表,再根据拥有的角色查询出来所拥有的菜单权限即可。就不需要像下面一样,还查询出来角色,把角色也放到了List当中。import com.baomidou.mybatisplus.core.conditions.query.QueryWrapper; import com.gzl.cn.springsecuritywebdemo.entity.Menu; import com.gzl.cn.springsecuritywebdemo.entity.Role; import com.gzl.cn.springsecuritywebdemo.entity.Users; import com.gzl.cn.springsecuritywebdemo.mapper.UserInfoMapper; import com.gzl.cn.springsecuritywebdemo.mapper.UsersMapper; import org.springframework.beans.factory.annotation.Autowired; import org.springframework.security.core.GrantedAuthority; import org.springframework.security.core.authority.SimpleGrantedAuthority; import org.springframework.security.core.userdetails.User; import org.springframework.security.core.userdetails.UserDetails; import org.springframework.security.core.userdetails.UserDetailsService; import org.springframework.security.core.userdetails.UsernameNotFoundException; import org.springframework.stereotype.Service; import java.util.ArrayList; import java.util.List; @Service public class MyUserDetailsService implements UserDetailsService { @Autowired private UsersMapper usersMapper; @Autowired private UserInfoMapper userInfoMapper; @Override public UserDetails loadUserByUsername(String s) throws UsernameNotFoundException { QueryWrapper<Users> wrapper = new QueryWrapper(); wrapper.eq("username", s); Users users = usersMapper.selectOne(wrapper); if (users == null) { throw new UsernameNotFoundException("用户名不存在!"); } // 获取用户角色、菜单列表 List<Role> roles = userInfoMapper.selectRoleByUserId(users.getId()); List<Menu> menus = userInfoMapper.selectMenuByUserId(users.getId()); // 声明一个集合List<GrantedAuthority> List<GrantedAuthority> grantedAuthorityList = new ArrayList<>(); // 处理角色 for (Role role:roles){ SimpleGrantedAuthority simpleGrantedAuthority = new SimpleGrantedAuthority("ROLE_" + role.getName()); grantedAuthorityList.add(simpleGrantedAuthority); } // 处理权限 for (Menu menu:menus){ grantedAuthorityList.add(new SimpleGrantedAuthority(menu.getPermission())); } return new User(users.getUsername(), users.getPassword(), grantedAuthorityList); } }- 1
- 2
- 3
- 4
- 5
- 6
- 7
- 8
- 9
- 10
- 11
- 12
- 13
- 14
- 15
- 16
- 17
- 18
- 19
- 20
- 21
- 22
- 23
- 24
- 25
- 26
- 27
- 28
- 29
- 30
- 31
- 32
- 33
- 34
- 35
- 36
- 37
- 38
- 39
- 40
- 41
- 42
- 43
- 44
- 45
- 46
- 47
- 48
- 49
- 50
- 51
- 52
- 53
注意:这里拼接的ROLE_不可以去掉,去掉会发现,直接失去了这个角色的权限,原因下面会讲。
SimpleGrantedAuthority simpleGrantedAuthority = new SimpleGrantedAuthority("ROLE_" + role.getName());- 1
4.2.4、添加接口
添加如下两个接口来测试权限控制。
@GetMapping("findAll") @ResponseBody public String findAll() { return "findAll"; } @GetMapping("find") @ResponseBody public String find() { return "find"; }- 1
- 2
- 3
- 4
- 5
- 6
- 7
- 8
- 9
- 10
- 11
4.2.5、修改访问配置类
这块相当于是我制作规定,他必须拥有某个角色,或者某个接口的许可,才可以进行访问这个接口。
这块的许可就是数据库当中menu菜单当中的permission字段,如果是按钮级别控制的话,那每个接口都应该有一个唯一的permission许可。
// 需要用户带有管理员角色才可以访问/findAll接口 .antMatchers("/findAll").hasRole("管理员") // 需要用户具备menu:user这个接口的许可,才可以访问 .antMatchers("/find").hasAuthority("menu:user")- 1
- 2
- 3
- 4
import org.springframework.context.annotation.Bean; import org.springframework.context.annotation.Configuration; import org.springframework.security.config.annotation.web.builders.HttpSecurity; import org.springframework.security.config.annotation.web.configuration.WebSecurityConfigurerAdapter; import org.springframework.security.crypto.bcrypt.BCryptPasswordEncoder; import org.springframework.security.crypto.password.PasswordEncoder; @Configuration public class SecurityConfig extends WebSecurityConfigurerAdapter { // 注入 PasswordEncoder 类到 spring 容器中 @Bean public PasswordEncoder passwordEncoder() { return new BCryptPasswordEncoder(); } @Override protected void configure(HttpSecurity http) throws Exception { // 表单登录 http.formLogin() // 登录成功之后跳转到哪个 url .defaultSuccessUrl("/index").permitAll() // 登录失败之后跳转到哪个 url .failureForwardUrl("/fail").permitAll(); // 身份验证 http.authorizeRequests() // 需要用户带有管理员权限 .antMatchers("/findAll").hasRole("管理员") .antMatchers("/find").hasRole("管理员") // 需要用户具备这个接口的权限 .antMatchers("/find").hasAuthority("menu:user") // 任何请求都需要认证 .anyRequest().authenticated(); // 关闭 csrf http.csrf().disable(); } }- 1
- 2
- 3
- 4
- 5
- 6
- 7
- 8
- 9
- 10
- 11
- 12
- 13
- 14
- 15
- 16
- 17
- 18
- 19
- 20
- 21
- 22
- 23
- 24
- 25
- 26
- 27
- 28
- 29
- 30
- 31
- 32
- 33
- 34
- 35
- 36
- 37
hasRole方法底层源码:会发现他会给我们默认添加一个ROLE_,这也就是我们在上面授权的时候需要加上ROLE_的原因。

4.2.6、测试
http://localhost:8080/login
1、在未登录前是不能访问http://localhost:8080/index的。
2、账号zhangsan 密码123456,登录失败会进入fail请求,成功会进入index请求。
3、使用账号:张san 登录之后findAll接口和find接口是都可以访问的,因为在数据库当中不管是role还是menu,他具备所有权限。
4、使用账号:李si 登录之后findAll接口他是访问不了的,直接报403,原因:因为他没有管理员权限,我限制了findAll只有管理员能访问。
5、使用账号:李si 登录之后find接口可以访问,虽然我限制了find接口必须具备管理员权限才能访问,但是我还设置了只要具有menu:user菜单许可即可访问。也就是两个判断条件我满足了一个就能访问。

4.3、自定义登录页面
接上面案例,我们自定义一个登录页面。
4.3.1、添加登录页面
这个位置是固定的,假如放到别的目录是访问不到的。

<!DOCTYPE html> <html lang="en"> <head> <meta charset="UTF-8"> <title>Title</title> </head> <body> <form action="/user/login" method="post"> 用户名:<input type="text" name="username"> <br> 密码:<input type="text" name="password"> <br> <input type="submit" value="login"/> </form> </body> </html>- 1
- 2
- 3
- 4
- 5
- 6
- 7
- 8
- 9
- 10
- 11
- 12
- 13
- 14
- 15
- 16
4.3.2、修改配置
添加如下配置:

@Override protected void configure(HttpSecurity http) throws Exception { // 表单登录 http.formLogin() // 修改默认的登录页为login.html,他会自动去根路径static文件夹下寻找login.html .loginPage("/login.html") // 设置登录接口地址,这个接口不是真实存在的,还是用的security给我们提供的,之所以要有这个配置,是login.html当中form表单提交的地址我们设置的是这个 .loginProcessingUrl("/user/login") // 登录成功之后跳转到哪个 url .defaultSuccessUrl("/index") // 登录失败之后跳转到哪个 url .failureForwardUrl("/fail") // permitAll中文意思是许可所有的:所有的都遵循上面的配置的意思 .permitAll(); // 都需要身份验证 http.authorizeRequests() // 该路由不需要身份认证 .antMatchers("/user/login", "/login.html").permitAll() // 需要用户带有管理员权限 .antMatchers("/findAll").hasRole("管理员") .antMatchers("/find").hasRole("管理员") // 需要用户具备这个接口的权限 .antMatchers("/find").hasAuthority("menu:user") // 任何请求都需要认证 .anyRequest().authenticated(); // 关闭 csrf http.csrf().disable(); }- 1
- 2
- 3
- 4
- 5
- 6
- 7
- 8
- 9
- 10
- 11
- 12
- 13
- 14
- 15
- 16
- 17
- 18
- 19
- 20
- 21
- 22
- 23
- 24
- 25
- 26
- 27
- 28
4.3.3、测试

4.4、自定义403页面
接上面案例,我们自定义一个403页面。
4.4.1、添加403页面

<!DOCTYPE html> <html lang="en"> <head> <meta charset="UTF-8"> <title>没有权限</title> </head> <body> <h1>没有权限</h1> </body> </html>- 1
- 2
- 3
- 4
- 5
- 6
- 7
- 8
- 9
- 10
4.4.2、添加配置

// 设置没有权限访问跳转自定义页面 http.exceptionHandling().accessDeniedPage("/unauth.html");- 1
- 2
4.4.3、测试
李si 登录之后findAll接口他是访问不了的,直接报403,原因:因为他没有管理员权限,我限制了findAll只有管理员能访问。

4.5、用户注销
4.5.1、添加登录首页

<!DOCTYPE html> <html lang="en"> <head> <meta charset="UTF-8"> <title>Title</title> </head> <body> 登录成功<br> <a href="/logout">退出</a> </body> </html>- 1
- 2
- 3
- 4
- 5
- 6
- 7
- 8
- 9
- 10
- 11
4.5.2、添加配置

// 退出,这里的/logout的请求是和前端的接口约定,是security给我们提供的,退出成功后跳转登录页/login.html http.logout().logoutUrl("/logout").logoutSuccessUrl("/login.html").permitAll();- 1
- 2
4.5.3、测试
登录成功之后,在成功页面点击退出再去访问其他controller不能进行访问的
4.6、基于数据库的自动登录
自动登录也可以叫做记住我,正常情况下我们登录后 关闭所有的网页,这时候就需要重新登录,假如我们没有关闭浏览器,但是服务升级发生了重启,重启过后也是需要重新登录的,为了解决这两个问题,我们需要将这些实例化到db当中。
4.6.1、创建表
CREATE TABLE `persistent_logins` ( `username` VARCHAR ( 64 ) NOT NULL, `series` VARCHAR ( 64 ) NOT NULL, `token` VARCHAR ( 64 ) NOT NULL, `last_used` TIMESTAMP NOT NULL DEFAULT CURRENT_TIMESTAMP ON UPDATE CURRENT_TIMESTAMP, PRIMARY KEY ( `series` ) ) ENGINE = INNODB DEFAULT CHARSET = utf8;- 1
- 2
- 3
- 4
- 5
- 6
- 7
4.6.2、编写配置类

@Autowired private DataSource dataSource; @Autowired private MyUserDetailsService myUserDetailsService; @Bean public PersistentTokenRepository persistentTokenRepository() { JdbcTokenRepositoryImpl jdbcTokenRepository = new JdbcTokenRepositoryImpl(); jdbcTokenRepository.setDataSource(dataSource); return jdbcTokenRepository; } // 注入 PasswordEncoder 类到 spring 容器中 @Bean public PasswordEncoder passwordEncoder() { return new BCryptPasswordEncoder(); }- 1
- 2
- 3
- 4
- 5
- 6
- 7
- 8
- 9
- 10
- 11
- 12
- 13
- 14
- 15
- 16
- 17
- 18
// 设置记住我 http.rememberMe() .tokenRepository(persistentTokenRepository()) // 设置有效时长180秒,默认 2 周时间。 .tokenValiditySeconds(180) .userDetailsService(myUserDetailsService);- 1
- 2
- 3
- 4
- 5
- 6
4.6.3、登录页面添加记住我复选框
此处:name 属性值必须位 remember-me.不能改为其他值
<input type="checkbox" name="remember-me">自动登录- 1
4.6.4、测试
使用张san账号,登录成功之后,关闭浏览器再次访问 http://localhost:8090/findAll,发现依然可以使用!
4.6.5、原理
流程如下:

在用户发送认证请求之后,或调用我们之前说过的usernamePasswordAuthenticationFilter这个过滤器,认证成功之后会调用一个服务负责针对每一用户生成一个Token,然后将token写入Cookie与数据库中。当用户再次请求的时候会经过过滤器链中的RemeberMeAuthenticationFilter,通过名字我们也知道这个了过滤器的作用便是读取Cookie中的Token,然后Service会到数据库里查Token是否有记录,如果有记录会调用UserDetailsService然后根据用户名与密码进行认证。1.登录成功会访问rememberMeServices的loginSuccess方法。

2.rememberMeServices的实现类loginSuccess实际上是调用的AbstractRememberMeServices类的loginSuccess方法。而loginSuccess方法会调用onLoginSuccess方法。

3.onLoginSuccess实际是个抽象方法,也就是得需要继续寻找他的实现方法,如下:这个方法的作用就是生成token然后放到cookie当中。

4. 上面的createNewToken方法不仅仅是创建一个token,他还将token保存到了数据库。看到这里应该就明白了为什么上面要将PersistentTokenRepository注入到容器当中,原因就是这块用到了。JdbcTokenRepositoryImpl是PersistentTokenRepository的实现类。

5. 上面是存储数据的过程,下面讲自动认证的过程。访问请求会经过这个过滤器:当他发现没有登录主体信息的时候会访问autoLogin方法。

6. 自动登录认证过程

五、注解使用
注意:这里的每一个讲解,还是基于上面的案例进行讲解的。
通过上面案例不难发现,我想控制一个接口只有某个角色可以访问 或者是 具备这个接口的访问权限才可以访问,还需要在配置文件配置一下。
// 需要用户带有管理员角色才可以访问/findAll接口 .antMatchers("/findAll").hasRole("管理员")- 1
- 2
假如针对性的接口越来越多,那配置文件会变得越来越臃肿,SpringSecurity也是考虑到了这一点,给我们提供了一些专门控制权限的注解,这样我们就可以在方法或者类上添加个注解就可以完全可以替代掉在配置文件配置。
在测试使用注解之前,我们需要先把在配置文件配置的控制给去掉。

5.1、@Secured
判断是否具有角色,另外需要注意的是这里匹配的字符串需要
添加前缀“ROLE_“。使用该注解 需要先开启该注解!如下:在启动类添加即可。
@EnableGlobalMethodSecurity(securedEnabled=true)- 1
在控制器方法上添加注解:这样就代表管理员和普通用户角色都可以访问这个控制器的接口。
当然也可以在方法上加,只控制某个方法。

5.2、@PreAuthorize
这个注解在开发当中经常会遇到!
使用注解先要开启注解功能!在启动类添加即可。
@EnableGlobalMethodSecurity(prePostEnabled = true)- 1
@PreAuthorize:注解适合进入方法前的权限验证, 可以将登录用户的 roles/permissions 参数传到方法中。
hasAnyAuthority方法实际上就是从当前登录者的User对象当中获取
Set<GrantedAuthority> authorities属性,然后判断set列表当中是否有该权限。这个注解当中的方法是可以自己定义的。@RequestMapping("/find") @ResponseBody //@PreAuthorize("hasRole('ROLE_管理员')") @PreAuthorize("hasAnyAuthority('menu:user')") public String preAuthorize(){ System.out.println("preAuthorize"); return "preAuthorize"; }- 1
- 2
- 3
- 4
- 5
- 6
- 7
- 8
@PreAuthorize功能说白了就是可以替换以下这段代码:
.antMatchers("/find").hasAuthority("menu:user")- 1
5.3、@PostAuthorize
先开启注解功能:
@EnableGlobalMethodSecurity(prePostEnabled = true)- 1
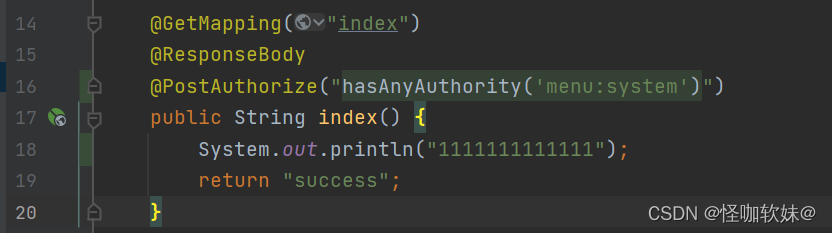
@PostAuthorize 注解使用并不多,在方法执行后再进行权限验证,适合验证带有返回值
的权限。拿李si登录进行验证,李si是没有menu:system这个权限的。登录之后会发现实际是403,但是system却输出值了,代表方法被执行了,但是没有权限导致没return返回。
5.4、@PostFilter
@PostFilter :权限验证之后对数据进行过滤 留下用户名是 admin1 的数据
表达式中的 filterObject 引用的是方法返回值 List 中的某一个元素
@RequestMapping("getAll") @PreAuthorize("hasRole('ROLE_管理员')") @PostFilter("filterObject.username == 'admin1'") @ResponseBody public List<UserInfo> getAllUser(){ ArrayList<UserInfo> list = new ArrayList<>(); list.add(new UserInfo(1l,"admin1","6666")); list.add(new UserInfo(2l,"admin2","888")); return list; }- 1
- 2
- 3
- 4
- 5
- 6
- 7
- 8
- 9
- 10
5.5、@PreFilter
@PreFilter: 进入控制器之前对数据进行过滤
以下示例:过滤掉参数list当中对象id属性除2=0的。
@PreFilter:进入控制器之前对数据进行过滤 @RequestMapping("getTestPreFilter") @PreAuthorize("hasRole('ROLE_管理员')") @PreFilter(value = "filterObject.id%2==0") @ResponseBody public List<UserInfo> getTestPreFilter(@RequestBody List<UserInfo> list) { list.forEach(t -> { System.out.println(t.getId() + "\t" + t.getUsername()); }); return list; }- 1
- 2
- 3
- 4
- 5
- 6
- 7
- 8
- 9
- 10
- 11
- 12
- 13
六、常用配置
@Override protected void configure(HttpSecurity http) throws Exception { // 设置没有权限访问跳转自定义页面 http.exceptionHandling().accessDeniedPage("/unauth.html"); // 退出,这里的/logout的请求是和前端的接口约定,是security给我们提供的,退出成功后跳转登录页/login.html http.logout().logoutUrl("/logout").logoutSuccessUrl("/login.html").permitAll(); // 设置记住我 http.rememberMe() .tokenRepository(persistentTokenRepository()) // 设置有效时长180秒 .tokenValiditySeconds(180) .userDetailsService(myUserDetailsService); // 表单登录相关的配置 http.formLogin() // 前端登录表单用户名别名, 从参数user中获取username参数取值 .usernameParameter("user") // 前端登录表单密码别名, 从参数passwd中获取password参数取值 .passwordParameter("passwd") // 当http请求的url是/login时,进行我们自定义的登录逻辑 .loginProcessingUrl("/login") // 自定义登录的前端控制器 .loginPage("/showLogin") // 登录成功之后跳转到哪个 url .defaultSuccessUrl("/index") // 登录失败之后跳转到哪个 url .failureForwardUrl("/fail") // 所有的都许可,就是遵循上面的配置的意思 .permitAll() // 设置登录成功的跳转链接 // .successForwardUrl("/home"); // 通过successHandler处理器进行登录成功之后的逻辑处理 .successHandler(new AuthenticationSuccessHandler() { @Override public void onAuthenticationSuccess(HttpServletRequest request, HttpServletResponse response, Authentication authentication) throws IOException, ServletException { System.out.println("登录成功,页面即将跳转..."); response.sendRedirect("/home"); } }) // 设置登录失败的跳转链接 // .failureForwardUrl("/errPage"); // 通过failureHandler处理器进行登录失败之后的逻辑处理 .failureHandler(new AuthenticationFailureHandler() { @Override public void onAuthenticationFailure(HttpServletRequest request, HttpServletResponse response, AuthenticationException e) throws IOException, ServletException { e.printStackTrace(); System.out.println("登录失败,页面即将跳转到默认失败页..."); response.sendRedirect("/errPage"); } }); /** * http请求是否要登录认证配置 */ http.authorizeRequests() // 允许登录页面匿名访问 .antMatchers("/showLogin", "/errPage").anonymous() // 所有的静态资源允许匿名访问 .antMatchers( "/css/**", "/js/**", "/images/**", "/fonts/**", "/favicon.ico" ).anonymous() .antMatchers( "/**/*.js", "/profile/**" ).permitAll() // 需要用户带有管理员权限 .antMatchers("/findAll").hasRole("管理员") // 需要用户带有管理员权限或者平台维护管理员任意一个角色即可访问 .antMatchers("/findAll").hasAnyRole("管理员,平台维护管理员") // 需要用户具备这个接口的权限 .antMatchers("/find").hasAuthority("menu:user") // 需要用户具备menu:user或者menu:user1任意一个即可访问 .antMatchers("/find").hasAnyAuthority("menu:user,menu:user1") // 除上面外的所有请求全部需要鉴权认证 .anyRequest().authenticated(); // 关闭 csrf,默认是开启的 http.csrf().disable(); }- 1
- 2
- 3
- 4
- 5
- 6
- 7
- 8
- 9
- 10
- 11
- 12
- 13
- 14
- 15
- 16
- 17
- 18
- 19
- 20
- 21
- 22
- 23
- 24
- 25
- 26
- 27
- 28
- 29
- 30
- 31
- 32
- 33
- 34
- 35
- 36
- 37
- 38
- 39
- 40
- 41
- 42
- 43
- 44
- 45
- 46
- 47
- 48
- 49
- 50
- 51
- 52
- 53
- 54
- 55
- 56
- 57
- 58
- 59
- 60
- 61
- 62
- 63
- 64
- 65
- 66
- 67
- 68
- 69
- 70
- 71
- 72
- 73
- 74
- 75
- 76
- 77
- 78
- 79
- 80
- 81
- 82
- 83
- 84
- 85
- 86
1、authorizeRequests() 配置路径拦截,表明路径访问所对应的权限,角色,认证信息。
2、formLogin()对应表单认证相关的配置这两个之间可以用and进行连接,也可以分开写。
antMatchers().anonymous() 、antMatchers().permitAll() 区别?
-
anonymous():匿名访问,仅允许匿名用户访问,如果登录认证后,带有token信息再去请求,这个anonymous()关联的资源就不能被访问(就相当于登陆之后不允许访问,只允许匿名的用户) -
permitAll()登录能访问,不登录也能访问,一般用于静态资源js等
七、总结
总的来说这一篇只能算是入门篇,SpringSecurity内容太多了,本篇文章已经篇幅很长了,所以计划把剩余部分再整理几篇文章。项目当中使用SpringSecurity的其实还是很多的,最起码自我接手的项目基本都用这个来做认证和授权。
通过这篇文章能掌握以下知识点:
- SpringSecurity配置从哪里找(项目当中继承
WebSecurityConfigurerAdapter的类) - SpringSecurity 认证流程:前端传username和password,然后后端会先去通过 username来查询主体,查询出来主体之后,再根据配置的加密方式,将前端传的密码进行加密,然后和数据库当中的密码进行比较。
- SpringSecurity 加密怎么用
- SpringSecurity 认证配置:
WebSecurityConfigurerAdapter配置类当中,重写configure方法是可以显示的去配置加密方式的,还有返回主体的类,如果不配置的话,默认就会去容器当中找PasswordEncoder的实现类来作为加密方式,还有UserDetailsService的实现类来作为返回主体类 - SpringSecurity 提供的注解
- 当我们接手SpringSecurity项目的时候,首先要确认项目是否是按钮级别控制:如果是的话,看看他是通过注解来控制的,还是在配置文件当中控制的。了解了这些当我们要新增接口的时候就会避免一些尴尬。当要新增接口的时候,如果没配置 然后还想测试的接口的话,可以先在WebSecurityConfigurerAdapter配置类当中过滤掉接口认证,方便来做本地调试。过滤的时候在
antMatchers("接口").permitAll()过滤即可。
当项目使用的是SpringSecurity的时候,我们有了以上这些知识掌握,最起码不用慌了,因为基本的流程我们掌握了。
-
-
相关阅读:
`英语` 2022/8/15
Day44:Pinia和购物车案例准备
Java List
C# 核心8——多态
千亿体培市场进入快车道
Java,异常处理的两种方式与自定义异常类
Yolov8-pose关键点检测:模型轻量化创新 | OREPA结合c2f,节省70%的显存!训练速度提高2倍! | CVPR2022
今天步行数4000
2022-8-21 01点 程序爱生活 纳指可能转向一次大跌中,奇怪的0.618数字出现了,恒指被美股带着可能要走破位,开始做空。
NodeJS原生后台开发教程
- 原文地址:https://blog.csdn.net/weixin_43888891/article/details/124111885
- 最新文章
-
沪漂五周年了:我越来越迷茫了
Agentic Skill Routing 实战:别再把所有 Skill 塞进 AI Agent 上下文
MySQL-Seconds_behind_master的精度误差
[MAF预定义ChatClient中间件-03]CachingChatClient——利用缓存省钱省时间
AI的至暗历史:从万众期待到被政府撤资,AI的两次死亡徘徊
Agent OS :五种驯服不确定性的范式
PortSwigger SQL注入LAB11
数据库即时编译JIT
[Begin]AI Learn Data Day 0
深度学习进阶(二十七)现代 LLM 的核心架构设计其二:SwiGLU