-
11_printf函数移植串口通信
printf函数移植串口通信

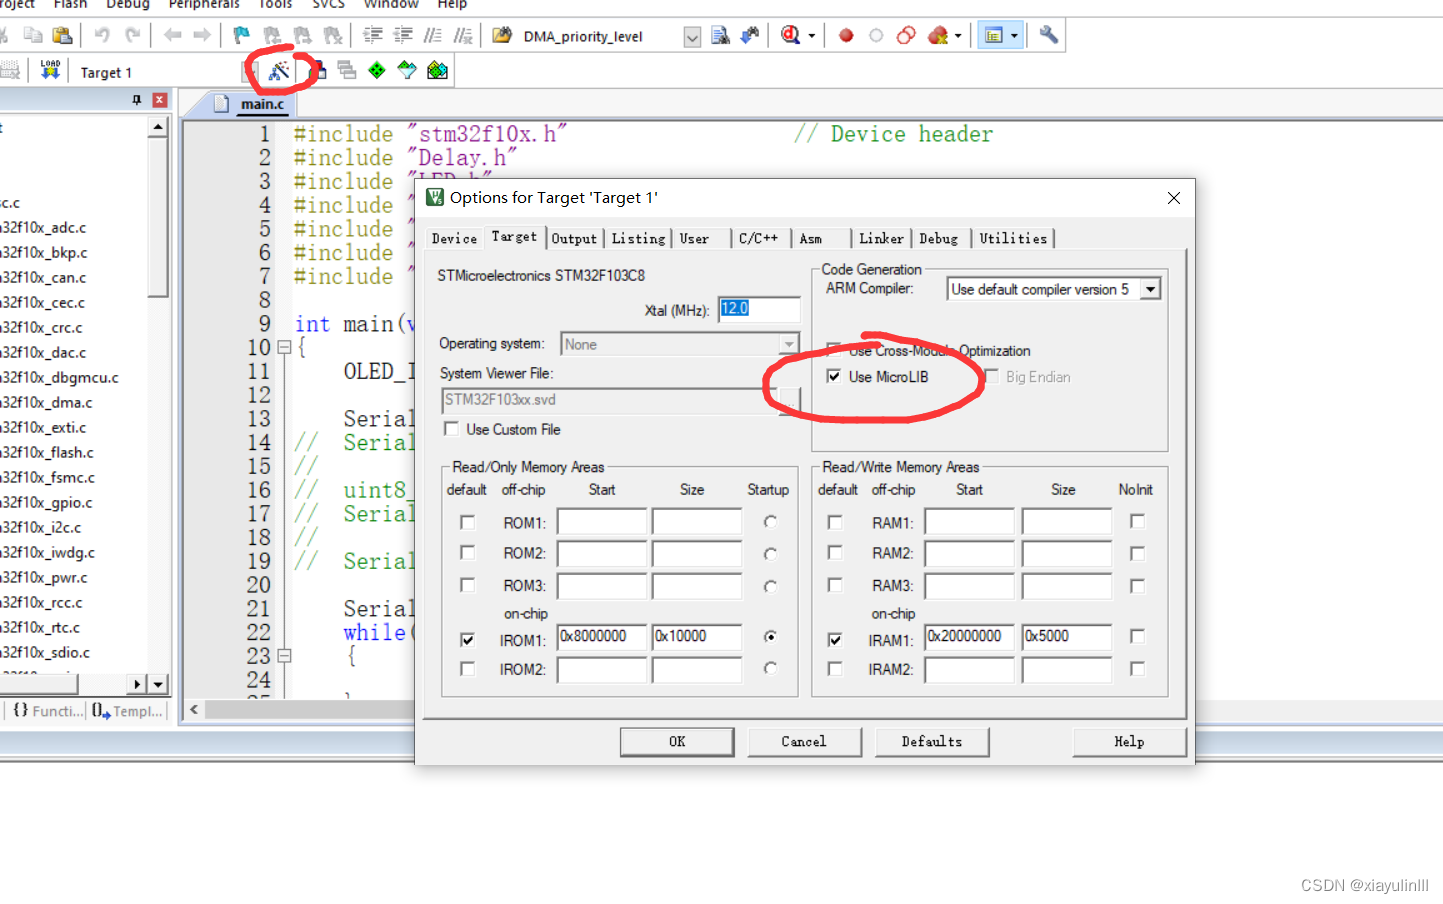
MicroLIB是Keil为嵌入式平台优化的一个精简库

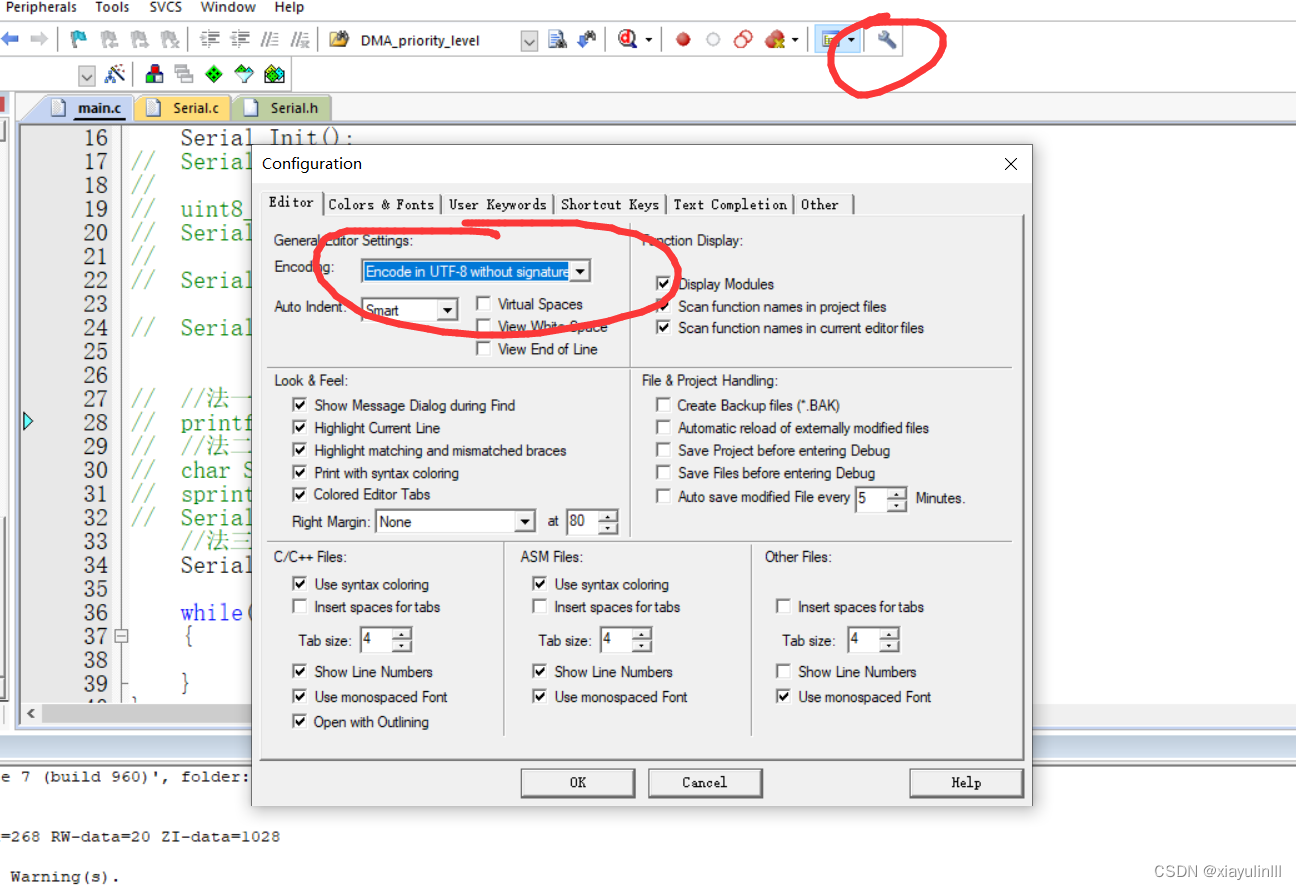
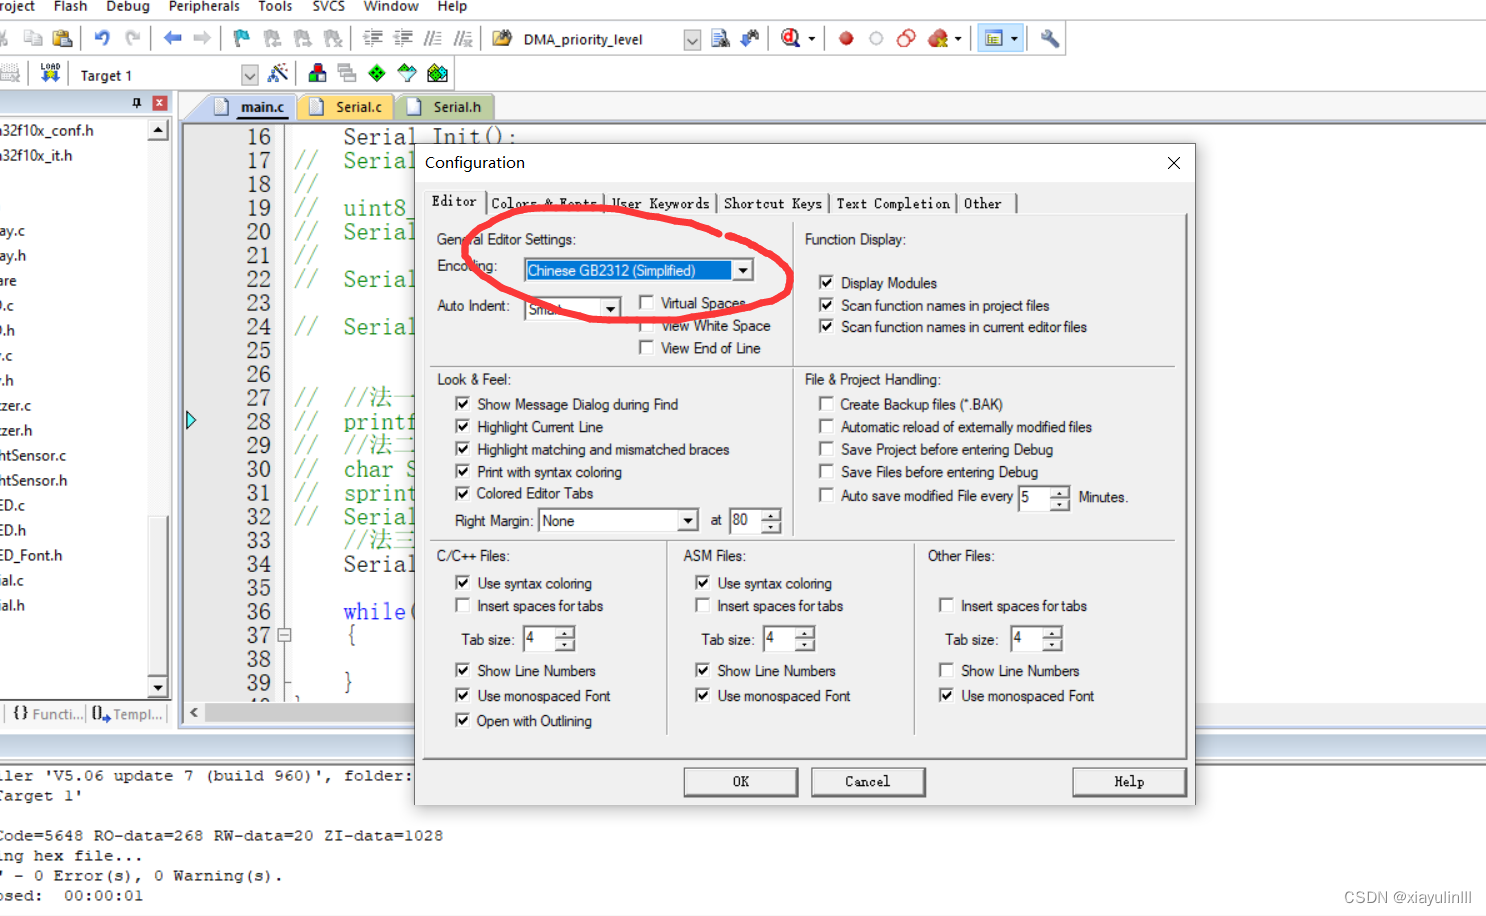
--no-multibyte-chars串口显示汉字乱码问题解决
法一


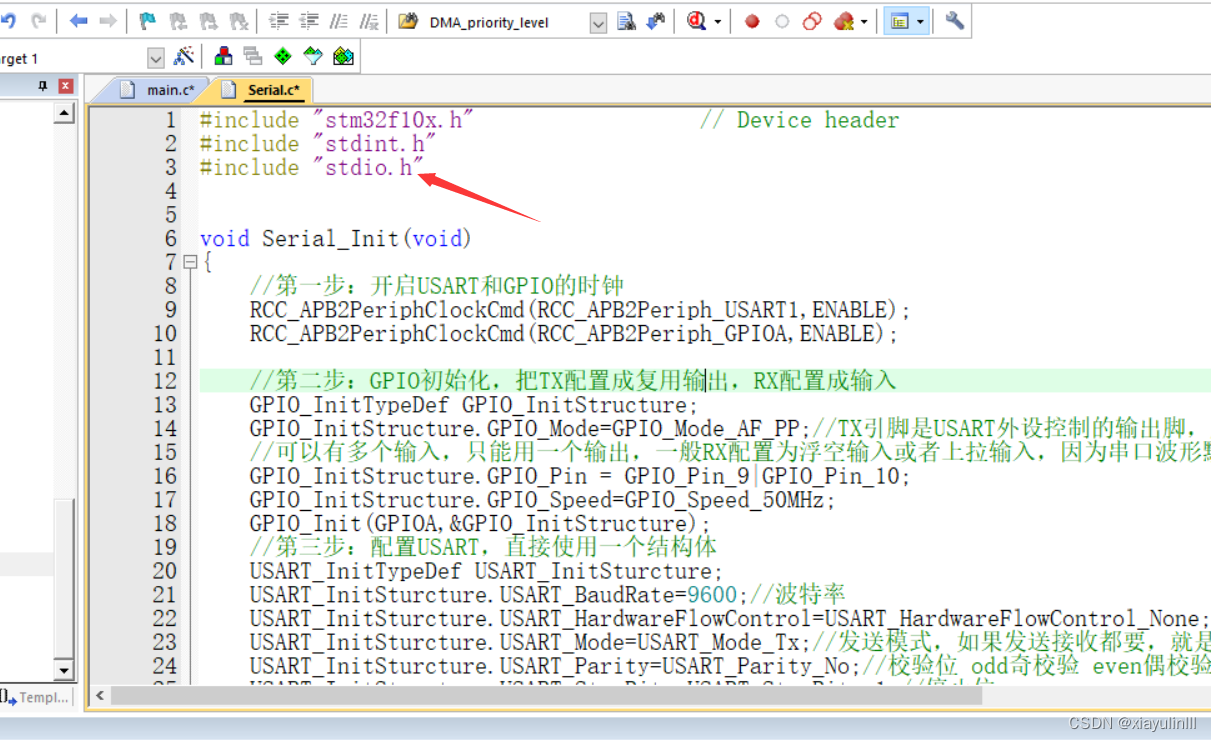
法二

代码
主函数
#include "stm32f10x.h" // Device header #include "Delay.h" #include "LED.h" #include "Key.h" #include "stdint.h" #include "OLED.h" #include "Serial.h" int main(void) { OLED_Init(); Serial_Init(); // Serial_SendByte(0x41); // // uint8_t MyArray[]={0x42,0x43,0x44,0x45}; // Serial_SendArray(MyArray,4); // // Serial_SendString("Hello"); // Serial_SendNumber(12345,5); // //法一 // printf("Num=%d\r\n",666); // //法二 // char String[100]; // sprintf(String,"Num=%d\r\n",666);//指定打印字符串位置 // Serial_SendString(String); //法三,封装sprintf Serial_Sprintf("Num=%d\r\n",666); while(1) { } }- 1
- 2
- 3
- 4
- 5
- 6
- 7
- 8
- 9
- 10
- 11
- 12
- 13
- 14
- 15
- 16
- 17
- 18
- 19
- 20
- 21
- 22
- 23
- 24
- 25
- 26
- 27
- 28
- 29
- 30
- 31
- 32
- 33
- 34
- 35
- 36
- 37
- 38
- 39
- 40
- 41
串口.c Serial.c
#include "stm32f10x.h" // Device header #include "stdint.h" #include "stdio.h" #include "stdarg.h" void Serial_Init(void) { //第一步:开启USART和GPIO的时钟 RCC_APB2PeriphClockCmd(RCC_APB2Periph_USART1,ENABLE); RCC_APB2PeriphClockCmd(RCC_APB2Periph_GPIOA,ENABLE); //第二步:GPIO初始化,把TX配置成复用输出,RX配置成输入 GPIO_InitTypeDef GPIO_InitStructure; GPIO_InitStructure.GPIO_Mode=GPIO_Mode_AF_PP;//TX引脚是USART外设控制的输出脚,所以要选复用推挽输出,RX引脚是外设输入引脚,所以要选择输入模式, //可以有多个输入,只能用一个输出,一般RX配置为浮空输入或者上拉输入,因为串口波形默认空闲状态是高电平,所以不使用下拉输入 GPIO_InitStructure.GPIO_Pin = GPIO_Pin_9|GPIO_Pin_10; GPIO_InitStructure.GPIO_Speed=GPIO_Speed_50MHz; GPIO_Init(GPIOA,&GPIO_InitStructure); //第三步:配置USART,直接使用一个结构体 USART_InitTypeDef USART_InitSturcture; USART_InitSturcture.USART_BaudRate=9600;//波特率 USART_InitSturcture.USART_HardwareFlowControl=USART_HardwareFlowControl_None;//硬件流控制 USART_InitSturcture.USART_Mode=USART_Mode_Tx;//发送模式,如果发送接收都要,就是|起来 USART_InitSturcture.USART_Parity=USART_Parity_No;//校验位 odd奇校验 even偶校验 no无校验 USART_InitSturcture.USART_StopBits=USART_StopBits_1;//停止位 USART_InitSturcture.USART_WordLength=USART_WordLength_8b;//字长 9位是带了一位校验位 USART_Init(USART1,&USART_InitSturcture); //第四步:开启USART,如果需要接收功能,可能还需要配置中断 USART_Cmd(USART1,ENABLE); } void Serial_SendByte(uint8_t Byte) { USART_SendData(USART1,Byte); while(USART_GetFlagStatus(USART1,USART_FLAG_TXE)==RESET);//标志位置1之后,不需要手动清零,当下一次再SendData时,这个标志位会自动清零 } void Serial_SendArray(uint8_t *Array,uint16_t Length) { uint16_t i; for(i=0;i<Length;i++) { Serial_SendByte(Array[i]); } } void Serial_SendString(char *String) { uint8_t i; for(i=0;String[i]!='\0';i++) { Serial_SendByte(String[i]); } } uint32_t Serial_Pow(uint32_t X,uint32_t Y) // X的Y次方 { uint32_t Result = 1; while(Y--) { Result *=X; } return Result; } void Serial_SendNumber(uint32_t Number,uint8_t Length) { uint8_t i; for(i=0;i<Length;i++) { Serial_SendByte(Number / Serial_Pow(10,Length-i-1)%10+0x30);//如果是2位数,2-0-1,10的1次方,发十位,再2-1-1,10的0次方,发个位 //0x30为ASCII表字符偏移,字符0为0x30 ,也可以写 '0' } } //重写fputc函数,重定向到串口,fputc函数是printf函数的底层 int fputc(int ch,FILE *f) { Serial_SendByte(ch); return ch; } //封装sprintf void Serial_Sprintf(char *format,...) { char String[100]; va_list arg; va_start(arg,format); vsprintf(String,format,arg); va_end(arg); Serial_SendString(String); }- 1
- 2
- 3
- 4
- 5
- 6
- 7
- 8
- 9
- 10
- 11
- 12
- 13
- 14
- 15
- 16
- 17
- 18
- 19
- 20
- 21
- 22
- 23
- 24
- 25
- 26
- 27
- 28
- 29
- 30
- 31
- 32
- 33
- 34
- 35
- 36
- 37
- 38
- 39
- 40
- 41
- 42
- 43
- 44
- 45
- 46
- 47
- 48
- 49
- 50
- 51
- 52
- 53
- 54
- 55
- 56
- 57
- 58
- 59
- 60
- 61
- 62
- 63
- 64
- 65
- 66
- 67
- 68
- 69
- 70
- 71
- 72
- 73
- 74
- 75
- 76
- 77
- 78
- 79
- 80
- 81
- 82
- 83
- 84
- 85
- 86
- 87
- 88
- 89
- 90
- 91
- 92
- 93
- 94
串口.h Serial.h
#ifndef __SERIAL_H #define __SERIAL_H #include "stdint.h" #include "stdio.h" void Serial_SendByte(uint8_t Byte); void Serial_Init(void); void Serial_SendArray(uint8_t *Array,uint16_t Length); void Serial_SendString(char *String); void Serial_SendNumber(uint32_t Number,uint8_t Length); int fputc(int ch,FILE *f); void Serial_Sprintf(char *format,...); #endif- 1
- 2
- 3
- 4
- 5
- 6
- 7
- 8
- 9
- 10
- 11
- 12
- 13
-
相关阅读:
Java实现顺序表
线程同步与互斥
软件工程毕业设计课题(46)微信小程序毕业设计JAVA核酸预约小程序系统毕设作品项目
selenium简介及使用
25_ue4进阶末日生存游戏开发[行为树进阶]
iview form组件,当formItem嵌套使用时,formData会是多层结构的json数据,导致async-validator验证插件失效
第二章:ShardingSphere简介
循环神经网络
跟着野火从零开始手搓emWin(2)emWin 在 Windows 上仿真
设想无人值守的自动化测试方案
- 原文地址:https://blog.csdn.net/xiayulinlll/article/details/137345720
